La page est en cours de chargement...

2
1
2
1
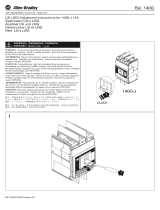
LSIG-MM Getting started for 140G-N, 140G-NS, 140G-R
LSIG-MM Getting started
LSIG-MM Erste Schritte
LSIG-MM Guide de démarrage
LSIG-MM Getting started
Bul. 140G
DIR 1000593R0001 Version 02
WARNING: To prevent electrical shock, disconnect from power source before
installing or servicing. Install in suitable enclosure. Keep free from contaminants.
(Follow NFPA70E requirements).
AVVERTENZA: Per prevenire infortuni, togliere tensione prima dell'installazione o
manutenzione. Installare in custodia idonea. Tenere lontano da contaminanti.
WARNUNG: Vor Installations- oder Servicearbeiten Stromversorgung zur
Vermeidung von elektrischen Unfällen trennen. Die Geräte müssen in einem
passenden Gehäuse eingebaut und gegen Verschmutzung geschützt werden.
AVERTISSEMENT: Avant le montage et la mise en service, couper l'alimentation
secteur pour éviter toute décharge. Prévoir une mise en coffret ou armoire appropriée.
Protéger le produit contre les environnements agressifs.
ADVERTENCIA: Desconéctese de la corriente eléctrica, antes de la instalación o
del servicio, a fin de impedir sacudidas eléctricas. Instálelo en una caja apropiada.
Manténgalo libre de contaminantes.
ATENÇÃO: Para evitar choques, desconectar da corrente elétrica antes de fazer a
instalação ou a manutenção. Instalar em caixa apropriada. Manter livre de
contaminantes.
Installation - Installazione - Instalación
Instalação - -
140G-N
140G-NS
DIR 1000593R0001 Version 02 - 140G-N_ ; 140G-NS_ ; 140G-R
警告:感電事故防止のため、取付けまたは修理の際は電源から取り外してく
ださい。適切なケース内に取付けてください。また、汚染物質がないことを
確認してください。
警告:为了防止触电,在安装或维修之前必须先切断电源。安装在合适的设备
箱内。防止接触污染 。物
140G-R
1
2

1
(2)
Warning - Attenzione - Achtung - Attention - Atención
- Please read all documentation before making changes to the circuit breaker setting. After setting the circuit breaker,
verify the circuit breaker is not providing fault indication.
For addition information see PUB 140G-IN067.
- Prima di ogni operazione sull'interruttore leggere attentamente il presente documento, operare i settaggi del caso
correttamente e verificare che il relè non visualizzi alcuna segnalazione anomala.
Per qualsiasi nota o informazione aggiuntiva consultare il doc. 140G-IN067.
- Vor Eingriffen jeder Art am Leistungsschalter die Dokumentation aufmerksam lesen, die erforderlichen Einstellungen
richtig ausführen und sicherstellen, dass das Relais keine Anomalien signalisiert.
Für alle weiteren Informationen das Dok. 140G-IN067 konsultieren.
- Avant toute opération sur le disjoncteur, lire attentivement la documentation, effectuer correctement les réglages
nécessaires et vérifier que le relais ne signale rien d'anormal.
Pour toute remarque ou information supplémentaire, consulter le document 140G-IN067.
- Antes de realizar cualquier operación sobre el interruptor, leer atentamente la documentación, realizar correctamente
las configuraciones que hicieran falta y controlar que el relé no visualice señalización anómala alguna.
Para cualquier nota o información adicional, consultar el doc. 140G-IN067.
2
- Minimun Power Supply Requirements
- Requisiti minimi di alimentazione
– Mindestanforgerunden Stromversorgung
–Exigences minimales d'alimentation
- Requisitos mínimos de suministro de
alimentación
- three-phase current: >80A
- aux power supply: 24VDC +/- 20%
insulated):
- minimum of 80A for display to illuminate
- corrente trifase: >80A
- tensione ausiliaria: (24VDC +/- 20%
isolata):
- display attivo da 80A
- Dreiphasenspannung: >80A
- Hilfsspannung: 24VDC +/- 20% isoliert
- Display ab 80A aktiv
- courant triphasé: >80A
- tension auxiliaire: 24 VDC +/- 20%
isolée):
- afficheur actif à partir de 80A
- corriente trifásica: >80A
- tensión auxiliar: 24VDC +/- 20% aislada):
- display activo de 80A
Uaux.
K1
K1
K2
K2
24V
+
-
W3
(B)(A)
W2
OUT MM
OUT MM
MM IN
24V
W3 W4
W4
LSIG-MM
95S
95S
98S
98S
K14
K15
Ax5
XR11
64
XR11 13
63
61
2 XR11
INTERNAL
USE
ONLY
+ -
- Future option -
W1
W1 W2
W2
DIR 1000593R0001 Version 02

3
4
10:22:53
400A
(I)
1
U1U2U3I1I2I3In
enter
enter
enter
enter
enter
2/4
January12,2006
Time
Language
Date
System
enter
Time
Enterpassword
12.00.00
enter
3/5
General settings
Measurements
Settings
Protections
Menu
1/4
January 12,2006
Time
Language
Date
System
7/8
System s ettings
Harmonic dist.
System
MeasureStoreTime
Settings
Pass wo rd
Enter password
0***
Date
Enter password
January 12,2006
(3)
- Properly set all operating protections of the electronic release in accordance
with system requirements (refer to PUB 140G-IN067).
- Alle aktivierten Schutzfunktionen des elektronischen Auslösers in Einklang mit
den Erfordernissen der Anlage einstellen (PUB 140G-IN067).
- Régler toutes les protections actives du déclencheur électronique de
manière appropriée, conformément aux exigences de l’installation (PUB 140G-IN067).
- Configurar de forma apropiada todas las protecciones activas del relé
electrónico, de conformidad con las exigencias del sistema (PUB 140G-IN067).
- Settare in modo appropriato tutte le protezioni attive dello sganciatore elettronico
in accordo con le esigenze impiantistiche (PUB 140G-IN067).
Notes-Nota-Anmerkungen-Nota-Notas:
- The default password is 0001
- Das Standard-Passwort ist 0001
- Le mot de passe par défaut est 0001
- La contraseña predeterminada es 0001
- La password di default è 0001
LSIG-MM
- Setting Date and Time
- Einstellung von Datum und Uhrzeit
- Réglage Date et Heure
- Configuración Fecha y Hora
- Settaggio data e ora
- Setting the protections
- Einstellung der Schutzfunktionen
- Réglage protections
- Configuración protecciones
- Settaggio Protezioni
DIR 1000593R0001 Version 02

- Setting Frequencies and Neutral
- Einstellung Frequenzen und Neutralleiter
- Réglages Fréquences et Neutre
- Configuraciones Frecuencias y Neutro
Example-Esempio-Beispiel-Exemple-Ejemplo:
5
Freq=50Hz
InN=OFF
PEN
L1 L2 L3
PE
L1 L2 L3
N
PE
L1 L2 L3
N
PE
L1 L2 L3
N
Freq=50Hz
InN=ON
Freq=60Hz
InN=ON
Freq=60Hz
InN=OFF
50Hz
60Hz
50Hz
60Hz
(4)
LSIG-MM
- Settaggio Frequenza e Neutro
LSIG-MMLSIG-MMLSIG-MM
LSIG-MM
- Three-pole circuit breakers
- Dreipolige Leistungsschalter
- Disjoncteurs tripolaires
- Interruptores automáticos tripolares
- Interruttori tripolari
- Three-pole circuit breakers with external neutral
- Dreipolige Leistungsschalter mit externem Neutralleiter
- Disjoncteurs tripolaires avec neutre extérieur
- Interruptores tripolares con neutro externo
- Interruttori tripolari con neutro esterno
- Four-pole circuit breakers
- Vierpolige Leistungsschalter
- Disjoncteurs tétrapolaires
- Interruptores automáticos tetrapolares
- Interruttori tetrapolari
- Four-pole circuit breakers with no reading of neutral
- Vierpolige Leistungsschalter ohne Abtastung des Neutralleiters
- Disjoncteurs tétrapolaires sans lecture neuter
- Interruptores tetrapolares sin lectura neutron
- Interruttori tetrapolari senza lettura neutro
Notes-Note-Anmerkungen-Nota-Notas
- Settings of neutral value (InN) to be obtained according to the following formula : I1 x InN < Iu
- Die Einstellung des Werts des Neutralleiters (InN) anhand der folgenden Formel ausführen: : I1 x InN < Iu
- Le réglage de la valeur de neutre (InN) doit respecter la formule suivante : I1 x InN < Iu
- El ajuste del valor del neutro (InN) debe cumplir con la seguente formula: I1 x InN < Iu
- La regolazione del valore di neutro (InN) deve rispettare la seguente formula: I1 x InN < Iu
DIR 1000593R0001 Version 02

- Trip test
- Trip test
- Auslöseprüfung
- Test de déclenchement
- Test de disparo
1/6
TripTest
AutoTest
TripTest(disabled)
CBstatus
Test
Pass wo rd
Enterpassword
0***
4/5
Devicetest
Settings
Test
Measures
Menu
6
+
clack! CB OPEN!
10:22:53
400A
(I)
1
U1U2U3I1I2I3In
enter
enter
enter
i TEST
Notes-Nota-Anmerkungen-Nota-Notas:
LSIG-MM
1
LSIG-MM
(5)
- The default password is 0001
- Das Standard-Passwort ist 0001
- Le mot de passe par défaut est 0001
- La contraseña predeterminada es 0001
- La password di default è 0001
Note:
- For LSI, LSIG and LSIG-MM trip units, use the mechanical
adapter. Refer to the codes below.
- Per relè elettronici LSI, LSIG e LSIG-MM, utilizzare
l'adattatore meccanico. Fare riferimento ai codici sottostanti.
LSI PR232/P
LSIG PR331/P
LSIG-MM PR332/P
3
2
DIR 1000593R0001 Version 02

(6)
7
LSIG-MM
1
LSIG-MM
Note:
- For LSI, LSIG and LSIG-MM trip units, use the mechanical
adapter. Refer to the codes below.
- Per relè elettronici LSI, LSIG e LSIG-MM, utilizzare
l'adattatore meccanico. Fare riferimento ai codici sottostanti.
LSI PR232/P
LSIG PR331/P
LSIG-MM PR332/P
3
2
- Autotest
- Autotest
- Selbsttest
- Autotest
- Auto-prueba
10:22:53
400A
(I)
1
U1U2U3I1I2I3In
enter
DIR 1000593R0001 Version 02

8
Prior to putting the circuit breaker into service, check the following:
·It connects the “BATTERY” unit to the test connector;
·Check that the wording on bottom left of the display runs cyclically;
·Should the trip unit show other indications, .refer to user manual PUB 140G-IN067
Prima della messa in servizio con corrente dell'interruttore, effettuare la seguente verifica:
·Connettere l'unità “BATTERY” al connettore di test;
·Verificare che la scritta in basso a sinistra del display scorra ciclicamente;
·Nel caso il relè presenti altre segnalazioni fare riferimento al manuale d'uso .PUB 140G-IN067
Vor der Inbetriebnahme der Leistungsschalters mit Strom, die folgende Kontrolle durchführen:
·Die Stromversorgungseinheit “BATTERY” an den Test-Steckverbinder anschließen;
·Sicherstellen, dass die Anzeige links unten auf dem Display zyklisch durchläuft;
·Wenn das Relais andere Meldungen ausgibt, siehe die Bedienungsanleitung .PUB 140G-IN067
Avant la mise en service du disjoncteur avec du courant, effectuer la vérification suivante:
·Raccorder l'unité “BATTERY” au connecteur de test;
·Vérifier que le message en bas à gauche de l'afficheur défile cycliquement;
·Dans le cas où le relais présenterait d'autres signalisations, se référer au manuel d'utilisation .PUB 140G-IN067
Antes de la puesta en servicio con corriente del interruptor, realizar el siguiente control:
·Conectar la unidad“BATTERY” con el conector de prueba;
·Controlar que el mensaje que aparece en el display, en la parte inferior, a la izquierda, se visualice cíclicamente;
·Si el relé presentara otras señalizaciones, hacer referencia al manual de uso .PUB 140G-IN067
- Final check
- Abschlussprüfung
- Vérification finale
- Verifica finale
DIR 1000593R0001 Version 02 (L8370) - B1478
Copyright © 2017 Rockwell Automation, Inc. All Rights Reserved. Printed in Italy.
Allen-Bradley, Rockwell Software, and Rockwell Automation are trademarks of Rockwell Automation, Inc.
Trademarks not belonging to Rockwell Automation are property of their respective companies.
Publication 140G-IN069C-MU-P - July 2017
Rockwell Automation maintains current product environmental compliance information on its website at http://www.rockwellautomation.com/rockwellautomation/about-us/
sustainability-ethics/product-environmental-compliance.page
/