Toro PowerPlex 40V MAX Axial Blower Manuel utilisateur
- Catégorie
- Outils électroportatifs
- Taper
- Manuel utilisateur

FormNo.3415-830RevC
PowerPlex™40VMAXAxial
Blower
51690,51690T
SopladoraxialPowerPlex™
40VMAX
51690,51690T
SoufeuraxialPowerPlex™
40VMAX
51690,51690T
www.T oro.com.
*3415-830*C


Ifyouhavequestionsor
problems,calltollfree
1-888-367-6631(US)or
1-888-430-1687(Canada)
beforereturningthis
product.
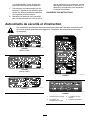
WARNING
CALIFORNIA
Proposition65Warning
Thisproductcontainsachemical
orchemicalsknowntotheStateof
Californiatocausecancer,birthdefects,
orreproductiveharm.
Introduction
Thisblowerisintendedtobeusedbyresidential
homeownerstomoveleaf-likedebrisasneeded
outdoors.Itisdesignedprimarilytousebatterypack
Model88540(providedwithModel51690)or88541.
Readthisinformationcarefullytolearnhowtooperate
andmaintainyourproductproperlyandtoavoid
injuryandproductdamage.Youareresponsiblefor
operatingtheproductproperlyandsafely.
YoumaycontactT orodirectlyatwww.T oro.comfor
productandaccessoryinformation,helpndinga
dealer,ortoregisteryourproduct.
Model51690Tdoesnotincludeabatteryora
charger.
Safety
WARNING:Whenusingelectricgardeningappliances,
alwaysfollowbasicsafetyprecautionstoreduce
theriskofre,electricshock,andpersonalinjury,
includingthefollowing:
WARNING
Failuretofollowallwarningsandinstructions
mayresultinelectricshock,reand/or
seriousinjury.
Readallsafetywarningsandallinstructions.
Saveallwarningsandinstructionsforfuture
reference.
Theterm“powertool”inallofthewarningsrefers
toyourmains-operated(corded)powertoolor
battery-operated(cordless)powertool.
1.Workareasafety
A.Keeptheworkareacleanandwelllit.
Clutteredordarkareasinviteaccidents.
B.Donotoperatepowertoolsinexplosive
atmospheres,suchasinthepresence
ofammableliquids,gasses,ordust.
Powertoolscreatesparkswhichmayignite
thedustorfumes.
C.Keepchildrenandbystandersaway
whileoperatingapowertool.Distractions
cancauseyoutolosecontrol.
2.Personalsafety
A.Stayalert;watchwhatyouaredoing
andusecommonsensewhenoperating
apowertool.Donotuseapowertool
whileyouaretiredorundertheinuence
ofdrugs,alcohol,ormedication.A
momentofinattentionwhileoperatingpower
toolsmayresultinseriouspersonalinjury.
B.Usepersonalprotectiveequipment.
Alwaysweareyeprotection.Protective
equipmentsuchasadustmask,non-skid
safetyshoes,ahardhat,orhearing
protectionusedforappropriateconditions
willreducepersonalinjuries.
C.Preventunintentionalstarting.Ensure
thattheswitchisintheOFFposition
beforeconnectingtoapowersource
and/orbatterypackandpickingupor
carryingthetool.Carryingpowertools
withyourngerontheswitchorenergizing
powertoolsthathavetheswitchoninvites
accidents.
D.Donotoverreach.Keepproper
footingandbalanceatalltimes.This
©2018—TheToro®Company
8111LyndaleAvenueSouth
Bloomington,MN55420
2
Contactusatwww.Toro.com.
PrintedinChina
AllRightsReserved

enablesbettercontrolofthepowertoolin
unexpectedsituations.
E.Dressproperly.Donotwearloose
clothingorjewelry.Keepyourhairtied
backandkeepyourhair,clothing,and
glovesawayfromventingareasLoose
clothes,jewelry,orlonghaircanbecaught
inmovingparts.
F.Keepyourhandsandfeetawayfromthe
cuttingarea.
3.Powertooluseandcare
A.Donotforcethepowertool.Usethe
correctpowertoolforyourapplication.
Thecorrectpowertoolwilldothejob
betterandsaferattherateforwhichitwas
designed.
B.Donotusethepowertooliftheswitch
doesnotturnitonandoff.Anypowertool
thatcannotbecontrolledwiththeswitchis
dangerousandmustberepaired.
C.Removethebatterypackfromthepower
toolbeforemakinganyadjustments,
changingaccessories,orstoringpower
tools.Suchpreventivesafetymeasures
reducetheriskofstartingthepowertool
accidentally.
D.Storeidlepowertoolsoutofthereach
ofchildrenanddonotallowpersons
unfamiliarwiththepowertoolorthese
instructionstooperatethepowertool.
Powertoolsaredangerousinthehandsof
untrainedusers.
E.Storeidleappliancesindoors.Whennot
inuse,appliancesshouldbestoredindoors
inadryandhighorlocked-upplace,outof
thereachofchildren.
F.Maintainpowertools.Checkfor
misalignmentorbindingofmoving
parts,breakageofpartsandanyother
conditionthatmayaffectthepowertools
operation.Ifdamaged,havethepower
toolrepairedbeforeuse.Manyaccidents
arecausedbypoorlymaintainedpower
tools.
G.Keepcuttingtoolssharpandclean.
Properlymaintainedcuttingtoolswithsharp
cuttingedgesarelesslikelytobindandare
easiertocontrol.
H.Usethepowertoolinaccordancewith
theseinstructionsandinthemanner
intendedfortheparticulartypeofpower
tool,takingintoaccounttheworking
conditionsandtheworktobeperformed.
Usingthepowertoolforoperationsdifferent
fromthoseintendedcouldresultina
hazardoussituation.
I.Keepguardsinplaceandinworking
order.
4.Service
Haveyourpowertoolservicedbya
qualiedrepairpersonusingonlyidentical
replacementparts.Thiswillensurethatthe
safetyofthepowertoolismaintained.
5.BatterySafety
A.Donotchargeapplianceinrain,orinwet
locations.
B.Donotusebattery-operatedappliancein
therain.
C.Useonlythefollowingtypeandsize
battery(ies):TorobatteryModel88540or
88541.
D.Removeordisconnectthebatterybefore
servicing,cleaning,orremovingmaterial
fromthegardeningappliance.
E.Donotdisposeofthebattery(ies)ina
re.Thecellmayexplode.Checkwith
localcodesforpossiblespecialdisposal
instructions.
F.Donotopenormutilatethebattery(ies).
Releasedelectrolyteiscorrosiveandmay
causedamagetotheeyesorskin.Itmay
betoxicifswallowed.
G.Exercisecareinhandlingbatteriesinorder
nottoshortthebatterywithconducting
materialssuchasrings,bracelets,andkeys.
Thebatteryorconductormayoverheatand
causeburns.
SAVETHESEINSTRUCTIONS
3

SafetyandInstructionalDecals
Safetydecalsandinstructionsareeasilyvisibletotheoperatorandarelocatednearanyarea
ofpotentialdanger.Replaceanydecalthatisdamagedormissing.
decal136-2467
136-2467
Model51690
decal136-2468
136-2468
Model51690T
decal136-2471
136-2471
decal136-2473
136-2473
decal136-2476
136-2476
1.Thebatterypackis
charging.
3.Thebatterypackistoo
warm.
2.Thebatterypackisfully
charged.
4.Replacethebatterypack.
4

decal136-2533
136-2533
1.Warning—readtheOperator’sManual;keepawayfrom
movingparts;keepallguardsandcoversinplace;wear
eyeprotection;donotoperateinwetconditions.
decal136-2534
136-2534
1.Thebatterydoesnot
comeoutoftheboxfully
charged.
4.Stop—followthese
instructionsbeforerst
use.
2.Placethebatteryinthe
batterycharger.
5.ReadtheOperator’s
Manual.
3.Waituntilthebatteryis
fullychargedbeforethe
rstuse.
decal136-2539
136–2539
1.Chargethebatterywherethetemperatureisbetween0°C
and40°C(32°Fand104°F).
5

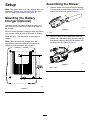
Setup
Note:Thebatterypackisnotfullychargedwhenyou
purchaseit.Beforeusingthetoolforthersttime,
refertoChargingtheBatteryPack(page8).
MountingtheBattery
Charger(Optional)
Ifdesired,mountthebatterychargersecurelyona
wallusingthewall-mountkeyholesonthebackof
thecharger.
Mountitindoors(suchasagarageorotherdryplace),
nearapoweroutlet,andoutofthereachofchildren.
RefertoFigure1forassistanceinmountingthe
charger.
Note:Slideandtwistthechargeroverthe
appropriatelypositionedhardwaretosecurethe
chargerinplace(hardwarenotincluded).
g194202
Figure1
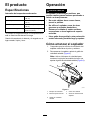
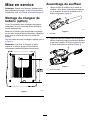
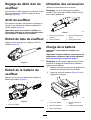
AssemblingtheBlower
1.Slidetheblowertubeontotheblowerhousing.
Youmayneedtopressdownonthetabforthe
blowertubetolockintoplace(Figure2).
g190102
Figure2
1.Tab
2.Alignthecavityonthebatterypackwiththe
tongueinthehandlehousing,graspthehandle,
andpushthebatterypackintothehandleuntil
thelatchlocksintoplace(Figure3).
g194149
Figure3
1.Batterylatch
6

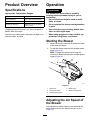
ProductOverview
Specications
AppropriateTemperatureRanges
Chargethebatteryat0°C(32°F)to40°C(104°F)*
Useproductsat
-15°C(5°F)to60°C(140°F)
Storeproductsat-15°C(5°F)to60°C(140°F)
UnplugthechargerifBelow0°C(32°F)orabove
40°C(104°F)
*Chargingtimewillincreaseifyoudonotchargethe
batterywithinthisrange.
Storethetool,batterypack,andbatterychargerinan
enclosedclean,dryarea.
Operation
WARNING
Theblowercanthrowdebris,possibly
causingseriouspersonalinjurytoyouor
bystanders.
•Donotblowhardobjects,suchasnails,
bolts,orrocks.
•Donotoperatetheblowernearbystanders
orpets.
•Useextracarewhencleaningdebrisfrom
stairsorothertightareas.
•Wearsafetygogglesorothersuitableeye
protection,longpants,andshoes.
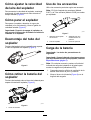
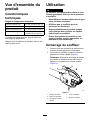
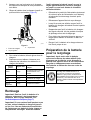
StartingtheBlower
1.Makesurethattheventsontheblowerareclear
ofanydustanddebris.
2.Tostarttheblower,squeezethevariable-speed
trigger(Figure4).
Note:Engagethespeedlocktokeepthe
machineonwithoutpressingthevariable-speed
trigger(Figure4).
g194437
Figure4
1.Speedlock
4.Batterylatch
2.Turboboostbutton5.Blowerventingareas
3.Variable-speedtrigger
AdjustingtheAirSpeedof
theBlower
Toacceleratetheblowerspeed,pressandholdthe
turboboostbuttonforthedesiredamountoftime
(Figure4).
7

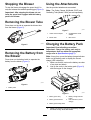
StoppingtheBlower
Tostoptheblower,disengagethespeedlock(ifin
use)andreleasethevariable-speedtrigger(Figure4).
Important:Afterstoppingtheblower,donot
leavethespeedlockengagedwiththebattery
packintheblower.
RemovingtheBlowerTube
Pressdownonthetabtoseparatetheblowertube
fromtheblower(Figure5).
g190104
Figure5
RemovingtheBatteryfrom
theBlower
Pressdownonthebatterylatchtoseparatethe
batteryfromtheblower(Figure6).
g194150
Figure6
1.Batterylatch
UsingtheAttachments
Usetheprovidedattachmentsasneeded.
Note:TheGutterCleanerKit(Model51667)and
OscillatingTube(Model51664)aresoldseparately.
g244381
Figure7
1.Guttercleaneradaptor3.Oscillator/MPHinsert
adapter
2.Blowertube4.MPHinsert
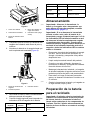
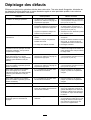
ChargingtheBatteryPack
Important:Readallsafetyprecautions.
Important:Chargethebatterypackonlyin
temperaturesthatarewithintheappropriate
range;refertoSpecications(page7).
Note:Atanytime,pressthebattery-charge-indicator
buttononthebatterypacktodisplaythecurrent
charge(LEDindicators).
1.Makesurethattheventsonthebatteryareclear
ofanydustanddebris.
2.Lineupthecavityinthebatterypack(Figure8)
withthetongueonthecharger.
g244370
Figure8
1.Batterypackcavity4.Battery-charge-indicator
button
2.Batterypackterminals
5.LEDindicators(current
charge)
3.Batterypackventingareas
3.Makesurethattheventsonthebatterycharger
areclearofanydustanddebris.
8

4.Slidethebatterypackintothechargeruntilitis
fullyseated(Figure9).
g194423
Figure9
1.Chargerventingareas
3.Rightindicatorlight
2.Leftindicatorlight
5.Toremovethebatterypack,slidethebattery
backwardoutofthecharger.
6.RefertothefollowingtabletointerprettheLED
indicatorsonthebatterycharger.
LeftLight
RightLight
Indicates:
Off
Red
Chargerison;nobattery
packinserted
RedRedBatterypackischarging
Green
RedBatterypackischarged
Orange
RedBatterypackistoowarm
RedBlinkingRedReplacethebatterypack
Storage
Important:Storethetool,batterypack,and
chargeronlyintemperaturesthatarewithinthe
appropriaterange;refertoSpecications(page7).
Important:Ifyouarestoringthetoolforayearor
longer,removethebatterypackfromthetooland
chargethebatterypackuntil2or3LEDindicators
turnblueonthebattery.Donotstoreafully
chargedorfullydepletedbattery.Whenreadyto
useagain,chargethebatterypackuntiltheleft
indicatorlightturnsgreenonthechargerorall4
LEDindicatorsturnblueonthebattery.
•Disconnecttheproductfromthepowersupply
(i.e.,removetheplugfromthepowersupplyorthe
batterypack)andcheckfordamageafteruse.
•Cleanallforeignmaterialfromtheproduct.
•Whennotinuse,storethetool,batterypack,and
batterychargeroutofthereachofchildren.
•Keepthetool,batterypack,andbatterycharger
awayfromcorrosiveagents,suchasgarden
chemicalsandde-icingsalts.
•T oreducetheriskofseriouspersonalinjury,do
notstorethebatterypackoutsideorinvehicles.
•Storethetool,batterypack,andbatterycharger
inanenclosedclean,dryarea.
PreparingtheBatteryPack
forRecycling
Important:Uponremoval,covertheterminalsof
thebatterypackwithheavy-dutyadhesivetape.
Donotattempttodestroyordisassemblethe
batterypackorremoveanyofitscomponents.
Recycleorproperlydisposeoflithium-ionbattery
packsatabatteryrecyclingfacility.
Formoreinformationonrecyclinglithium-ion
batterypacksandtolocatethebattery
recyclingfacilityclosesttoyou,visit
www.Call2Recycle.org(USandCanadaonly).
IfyouarelocatedoutsideoftheUSand
Canada,pleasecontactyourauthorizedT oro
distributor.
9

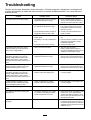
Troubleshooting
Performonlythestepsdescribedintheseinstructions.Allfurtherinspection,maintenance,andrepairwork
mustbeperformedbyanauthorizedservicecenterorasimilarlyqualiedspecialistifyoucannotsolvethe
problemyourself.
Problem
PossibleCauseCorrectiveAction
Thebatterypackloseschargequickly.1.Thebatterypackisoverorunderthe
appropriatetemperaturerange.
1.Movethebatterypacktoaplace
whereitisdryandthetemperatureis
between0°C(32°F)and40°C(104°F).
1.Thebatterychargerisoverorunder
theappropriatetemperaturerange.
1.Unplugthebatterychargerandmove
ittoaplacewhereitisdryandthe
temperatureisbetween0°C(32°F)
and40°C(104°F).
Thebatterychargerisnotworking.
2.Theoutletthatthebatterychargeris
pluggedintodoesnothavepower.
2.Contactyourlicensedelectricianto
repairtheoutlet.
1.Thereismoistureontheleadsofthe
batterypack.
1.Allowthebatterypacktodryorwipeit
dry.
2.Thebatteryisnotfullyinstalledinthe
tool.
2.Removeandthenreplacethebattery
inthetool,ensuringthatitisfully
installedandlatched.
Thetooldoesnotrunorruncontinuously.
3.Thebatterypackislowoncharge.
3.Chargethebatterypack.
Thebatterypackshowsonly3LED
indicatorsafteronlyafewsecondsof
usingafullychargedbattery.
1.Thisisanormaloccurrence.
1.Stopthetoolandpress
battery-charge-indicatorbuttonor
theremovethebatteryfromthetoolto
displaytheactualbatterycharge.
All4LEDindicatorsareblinkingon
thebatterypackafteryoupressthe
battery-charge-indicatorbuttononthe
batterypackandthecurrentcharge
displays(whenthebatterypackisnotin
use).
1.Thebatterypackisoverorunderthe
appropriatetemperaturerange.
1.Movethebatterypacktoaplace
whereitisdryandthetemperatureis
between0°C(32°F)and40°C(104°F).
All4LEDindicatorsareblinkingonthe
batterypackafterreleasingthetrigger
(whenthebatterypackisinuse).
1.Thebatterypackisoverorunderthe
appropriatetemperaturerange.
1.Movethebatterypacktoaplace
whereitisdryandthetemperatureis
between0°C(32°F)and40°C(104°F).
2LEDindicatorsareblinkingon
thebatterypackafteryoupressthe
battery-charge-indicatorbuttononthe
batterypackandthecurrentcharge
displays(whenthebatterypackisnotin
use).
1.Thereisadifferenceinvoltage
betweencellsinthebatterypack.
1.Placethebatteryonthechargeruntil
itisfullycharged.
2LEDindicatorsareblinkingonthe
batterypackafterreleasingthetrigger
(whenthebatterypackisinuse).
1.Thereisadifferenceinvoltage
betweencellsinthebatterypack.
1.Placethebatteryonthechargeruntil
itisfullycharged.
1LEDindicatorisblinkingonthebattery
pack.
1.Thebatterypackvoltageislow.1.Placethebatterypackonthecharger.
Itisdifculttoremovethebatterypack
fromthetool.
1.Thebatterypack/toolisneworthere
iscorrosioninthebatteryterminals
and/ortheterminalsonthetool.
1.Cleantheterminalsonthebatterypack
andthetool.Thenapplydielectric
greasetothebatteryterminals;donot
useanyothertypeoflubricantasitcan
damagetheterminals.
Thespeedlockdoesnotholdwhen
engaged.
1.Thespeedlockscrewisloose.1.Tightenthespeedlockscrewby
turningthespeedlockscrew¼turn.If
thespeedlockstilldoesnotholdwhen
engaged,turnthespeedlockscrewan
additional¼turn.
10

Notes:

TheToroPromise-ElectricProducts
AThree-Year
1
FullWarrantyforResidentialUsefortheUnitedStatesandCanada
TheT oroCompanyanditsafliate,T oroWarrantyCompany,pursuanttoanagreementbetweenthem,jointlywarrantthisproductforthreeyears
againstdefectsinmaterialorworkmanshipwhenusedfornormalresidentialpurposes.*
1
Doesnotincludethebattery.1YearBatteryWarrantyforResidentialUse.
IfyouthinkyourT oroProductcontainsadefectinmaterialsorworkmanship,ifyouhavequestionsorproblems,andbeforereturningthisproductcall
tollfree:
Trimmers:
Chainsaw:
Blowers:
Snowthrowers:
1-800-237-2654(US)1-855-340–7689(USandCanada)1-888-367-6631(US)1-800-808-2963(US)
1-800-248-3258(Canada)1-888-430-1687(Canada)1-800-808-3072(Canada)
Toreceiveareplacementorrepair,atouroption,returnthecompleteunittotheseller.UnitedStatesandCanadacustomersmayreturntheirproduct,
withproofofpurchase,toanyAuthorizedServiceDealer.UnitedStatescustomersmayalsoreturntheirproduct,withproofofpurchase,postage
prepaid,totheT oroServiceCenter,5500SEDelaware,Ankeny,IA50021.
Thiswarrantycoversproductdefectsonly.NeitherTheToroCompanynorToroWarrantyCompanyisliableforindirect,incidental,or
consequentialdamagesinconnectionwiththeuseoftheToroProductscoveredbythiswarranty,includinganycostorexpenseof
providingsubstituteequipmentorserviceduringreasonableperiodsofmalfunctionornon-usependingcompletionofrepairsunderthis
warranty.Somestatesdonotallowexclusionsofincidentalorconsequentialdamages,sotheaboveexclusionsmaynotapplytoyou.This
warrantygivesyouspeciclegalrights,andyoumayalsohaveotherrightswhichvaryfromstatetostate.
CountriesOtherthantheUnitedStatesandCanada
ThiswarrantyisnotvalidinMexico.CustomerswhohavepurchasedT oroproductsexportedfromtheUnitedStatesorCanadashouldcontacttheirToro
Distributor(Dealer)toobtainguaranteepoliciesforyourcountry,province,orstate.IfforanyreasonyouaredissatisedwithyourDistributor’sservice
orhavedifcultyobtainingguaranteeinformation,contacttheT oroimporter.Ifallotherremediesfail,youmaycontactusatT oroWarrantyCompany.
AustralianConsumerLaw
AustraliancustomerswillnddetailsrelatingtotheAustralianConsumerLaweitherinsidetheboxoratyourlocalT oroDealer.
*Residentialusemeansuseoftheproductonthesamelotasyourhome.PartNumber374-0262Rev.G
374-0262RevG


Siustedtienealguna
preguntaoalgún
problema,llamealteléfono
gratuito1-888-367-6631
(EE.UU.)o1-888-430-1687
(Canadá)antesdedevolver
esteproducto.
ADVERTENCIA
CALIFORNIA
AdvertenciadelaPropuesta65
Esteproductocontieneunaomás
sustanciasquímicasqueelEstado
deCaliforniaconsideracausantesde
cáncer,defectoscongénitosotrastornos
delsistemareproductor.
Introducción
Estesopladorestádiseñadoparaserusadopor
usuariosdomésticosparamoverhojasyotros
residuossimilaresenespaciosexteriores.Está
diseñadoprincipalmenteparausarbateríasmodelo
88540(suministradaconelmodelo51690)o88541.
Leaestemanualdetenidamenteparaaprendera
utilizarymantenercorrectamentesuproducto,y
paraevitarlesionesydañosalproducto.Ustedes
responsabledeutilizarelproductodeformacorrecta
ysegura.
Ustedpuedeponerseencontactodirectamentecon
Toroenwww.Toro.comsideseainformaciónsobre
productosyaccesorios,osinecesitalocalizarun
distribuidororegistrarsuproducto.
ElModelo51690Tnoincluyebateríanicargador.
Seguridad
ADVERTENCIA:Cuandoseutilizanaparatosde
jardineríaeléctricos,esnecesarioobservarunas
normasbásicasdeseguridad,incluyendolas
siguientes,andereducirelriesgodeincendio,
descargaeléctricaylesionespersonales:
ADVERTENCIA
Elhacercasoomisodetodaslasadvertencias
einstruccionespuededarlugaradescargas
eléctricas,incendiosy/olesionesgraves.
Leatodaslasadvertenciaseinstrucciones
deseguridad.
Guardetodaslasadvertenciaseinstrucciones
parasureferenciafutura.
Eltérmino"herramientaeléctrica"queapareceenlas
advertenciassereeresiempreaunaherramienta
accionadaporelsuministroeléctricodelared(con
cable)ounaherramientaeléctricaaccionadapor
batería(sincable).
1.Seguridaddelazonadetrabajo
A.Mantengalazonadetrabajolimpiay
bieniluminada.Laszonasdesordenadas
uoscurassonunainvitaciónalaccidente.
B.Noutiliceherramientaseléctricas
enatmósferasexplosivas,comopor
ejemploenpresenciadelíquidos
inamables,gasesopolvo.Las
herramientaseléctricascreanchispasque
puedeninamarelpolvoolosvapores.
C.Mantengaalejadosaniñosyotras
personasmientrasutilizauna
herramientaeléctrica.Lasdistracciones
puedenhacerquepierdaelcontrol.
2.Seguridadpersonal
A.Manténgasealerta,estéatentoa
loqueestáhaciendoyutiliceel
sentidocomúnmientrasutilizauna
herramientaeléctrica.Noutiliceun
herramientaeléctricasiestácansado
obajolainuenciadedrogas,alcohol
omedicamentos.Unabrevefaltade
atenciónmientrasutilizaunaherramienta
eléctricapodríaprovocarlesiones
personalesgraves.
B.Utiliceequiposdeprotecciónpersonal.
Llevesiempreprotecciónocular.El
usodeequiposdeprotecciónpersonal
comomascarillas,calzadodeseguridad
antideslizante,cascoyprotecciónauditiva
encondicionesapropiadasreduciráel
riesgodelesionespersonales.
©2018—TheToro®Company
8111LyndaleAvenueSouth
Bloomington,MN55420
2
Póngaseencontactoconnosotrosenwww.Toro.com.
ImpresoenChina
Reservadostodoslosderechos

C.Eviteelencendidoaccidental.
Asegúresedequeelinterruptorestá
enlaposicióndeAPAGADOantesde
conectarlaherramientaalatomade
corrientey/oalabatería,yantesde
levantarotransportarlaherramienta.
Transportarlasherramientaseléctricas
coneldedosobreelinterruptoroenchufar
herramientaseléctricasconelinterruptoren
laposicióndeencendidoesunainvitación
alaccidente.
D.Nointentealcanzarzonasdemasiado
alejadas.Pisermeymantengael
equilibrioentodomomento.Estopermite
unmayorcontroldelaherramientaen
situacionesimprevistas.
E.Utilicelaropaadecuada.Nolleveropas
ojoyassueltas.Mantengaelpeloatado
ylaropaylosguantesalejadosde
lasáreasdeventilaciónLaropasuelta,
lasjoyasyelpelolargopuedenquedar
atrapadosenlaspiezasmóviles.
F.Mantengalasmanosylospiesalejados
delazonadecorte.
3.Usoycuidadodelasherramientaseléctricas
A.Nofuercelaherramientaeléctrica.
Utilicelaherramientaeléctricaadecuada
paraeltrabajoarealizar.Laherramienta
eléctricacorrectarealizaráeltrabajomejor
yconmayorseguridadalavelocidadpara
laquefuediseñada.
B.Noutilicelaherramientaeléctricasi
elinterruptornolaenciendeyapaga.
Cualquierherramientaeléctricaqueno
puedasercontroladaconelinterruptores
peligrosaydebeserreparada.
C.Retirelabateríadelaherramienta
eléctricaantesderealizarcualquier
ajuste,cambiardeaccesorioo
almacenarlaherramienta.Estasmedidas
deseguridadpreventivasreducenelriesgo
deunarranqueaccidentaldelaherramienta
eléctrica.
D.Sinolaestáusando,guardela
herramientaeléctricafueradelalcance
delosniños,ynopermitaquela
utilicenpersonasnofamiliarizadascon
laherramientaeléctricaoconestas
instruccionesdeuso.Lasherramientas
eléctricassonpeligrosasenmanosde
usuariosinexpertos.
E.Guardebajotecholosaparatosqueno
seestánutilizando.Cuandonoseestán
utilizando,losaparatosdebenguardarseen
unlugarseco,enaltoobajollave,yfuera
delalcancedelosniños.
F.Mantenimientodelasherramientas
eléctricas.Compruebequelaspiezas
móvilesestáncorrectamentealineadas
yquesemuevenlibrementesin
agarrotarse,quenohaypiezasrotas,
yquenohayotrascircunstanciasque
podríanafectaralusodelaherramienta
eléctrica.Siexistendaños,haga
repararlaherramientaeléctricaantes
deusarla.Muchosaccidentessedeben
aunmantenimientodecientedelas
herramientaseléctricas.
G.Mantengalasherramientasdecorte
aladasylimpias.Unaherramientade
cortebienmantenidaconlosbienalados
esmásfácildecontrolaryhaymenos
probabilidadesdequeseagarrote.
H.Utilicelaherramientaeléctricasegún
loindicadoenestasinstruccionesy
delamaneraprevistaparacadatipo
deherramientaeléctrica,teniendoen
cuentalascondicionesdetrabajoyel
trabajoarealizar.Usarlaherramienta
eléctricaparaoperacionesdiferentesdelas
previstaspodríadarlugaraunasituación
depeligro.
I.Mantengalosprotectorescolocadosy
enbuenestadodefuncionamiento.
4.Mantenimiento
Elmantenimientodesuherramienta
eléctricadebeserrealizadoporuntécnico
dereparacionesdebidamentecualicado,
utilizandoúnicamentepiezasderepuesto
idénticas.Sólodeestamanerasegarantiza
elmantenimientodelaseguridaddela
herramientaeléctrica.
5.Seguridaddelasbaterías
A.Nocargueelaparatobajolalluviaoen
lugareshúmedos.
B.Noutiliceaparatosalimentadosporbatería
bajolalluvia.
C.Utiliceúnicamentebateríasdelsiguiente
tipoytamaño:bateríaToromodelo88540
o88541.
D.Retireodesconectelabateríaantesde
realizartareasdemantenimientoolimpieza,
yantesderetirarmaterialesdelaparatode
jardinería.
E.Notirelasbateríasalfuego.Lasceldas
puedenexplosionar.Compruebesila
3

normativalocalcontienealgunainstrucción
especialsobrelaeliminacióndelas
baterías.
F.Noabranimutilela(s)batería(s).El
electrolitoliberadoescorrosivoypuede
causardañosenlosojosolapiel.Puede
sertóxicosiesingerido.
G.Almanipularlasbaterías,tengacuidado
paraevitarcortocircuitosconmateriales
conductores,talescomoanillos,pulseraso
llaves.Labateríaoelconductorpueden
sobrecalentarseycausarquemaduras.
GUARDEESTASINSTRUCCIONES
Pegatinasdeseguridadeinstrucciones
Laspegatinasdeseguridadeinstruccionesestánalavistadeloperadoryestánubicadas
cercadecualquierzonadepeligropotencial.Sustituyacualquierpegatinaqueestédañadao
quefalte.
decal136-2467
136-2467
Modelo51690
decal136-2468
136-2468
Modelo51690T
decal136-2471
136-2471
decal136-2473
136-2473
decal136-2476
136-2476
1.Labateríaseestá
cargando.
3.Labateríaestádemasiado
caliente.
2.Labateríaestá
completamentecargada.
4.Sustituyalabatería.
4

decal136-2533
136-2533
1.Advertencia:leaelManualdeloperador;manténgase
alejadodelaspiezasmóviles;mantengacolocadostodos
losprotectoresycubiertas;utiliceprotecciónocular;no
utiliceencondicioneshúmedas.
decal136-2534
136-2534
1.Labateríanosesuministra
totalmentecargada.
4.Pare:sigaestas
instruccionesantesdel
primeruso.
2.Coloquelabateríaenel
cargador.
5.LeaelManualdel
operador.
3.Espereaquelabatería
estetotalmentecargada
antesdelprimeruso.
decal136-2539
136-2539
1.Carguelabateríaaunatemperaturadeentre0°Cy40°C
(32°Fy104°F).
5

Montaje
Nota:Enelmomentodelacompralabateríanoestá
totalmentecargada.Antesdeusarlaherramientapor
primeravez,consulteCargadelabatería(página8).
Cómomontarelcargador
delabatería(opcional)
Silodesea,monteelcargadordelabatería
rmementeenlaparedutilizandolosoriciosde
montajeenparedenlapartetraseradelcargador.
Mónteloenunespaciointerior(talcomoungarajeu
otrolugarseco),cercadeunatomadecorrientey
fueradelalcancedelosniños.
ConsultelaFigura1paraobtenerasistenciasobre
elmontajedelcargador.
Nota:Coloqueelcargadorsobrelasjaciones
correctamenteposicionadasygíreloparajarloensu
lugar(jacionesnoincluidas).
g194202
Figura1
Montajedelsoplador
1.Desliceeltubodelsopladorsobrelacarcasa
delsoplador.Puedesernecesariopresionar
haciaabajosobrelapestañaparaqueeltubo
delsopladorencajeensusitio(Figura2).
g190102
Figura2
1.Pestaña
2.Alineeelhuecodelabateríaconlalengüeta
delalojamientodelaempuñadura,sujetela
empuñadura,eintroduzcalabateríaenla
empuñadurahastaqueelcierreencajeensu
sitio(Figura3).
g194149
Figura3
1.Cierredelabatería
6

Elproducto
Especicaciones
Intervalosdetemperaturaadecuados
CarguelabateríaaEntre0°Cy40°C(32°Fy
104°F)*
Utiliceelproductoa
Entre-15°Cy60°C(5°Fy
140°F)
Almaceneelproductoa
Entre-15°Cy60°C(5°Fy
140°F)
DesenchufeelcargadoraMenosde0°C(32°F)omás
de40°C(104°F)
*Eltiempodecargaserámayorsilatemperaturano
estáenesteintervalodurantelacarga.
Guardelaherramienta,labateríayelcargadorenun
lugarcerrado,limpioyseco.
Operación
ADVERTENCIA
Elsopladorpuedearrojarresiduos,que
podríancausargraveslesionespersonalesa
ustedoaotraspersonas.
•Nosopleobjetosduroscomoclavos,
pernosopiedras.
•Noutiliceelsopladorcercadeotras
personasoanimalesdomésticos.
•Extremeelcuidadoalsoplarresiduos
enescalerasuotroslugaresdeespacio
reducido.
•Llevegafasdeseguridaduotraprotección
ocularadecuada,pantalónlargoyzapatos.
Cómoarrancarelsoplador
1.Compruebequelosoriciosdeventilacióndel
sopladorestánlibresdepolvoyresiduos.
2.Paraarrancarelsoplador,aprieteelgatillode
velocidadvariable(Figura4).
Nota:Activeelbloqueodevelocidadpara
mantenerlamáquinaencendidasintenerque
apretarelgatillodevelocidadvariable(Figura4).
g194437
Figura4
1.Bloqueodevelocidad
4.Cierredelabatería
2.Botóndepotenciaturbo5.Zonasdeventilacióndel
soplador
3.Gatillodevelocidad
variable
7
La page est en cours de chargement...
La page est en cours de chargement...
La page est en cours de chargement...
La page est en cours de chargement...
La page est en cours de chargement...
La page est en cours de chargement...
La page est en cours de chargement...
La page est en cours de chargement...
La page est en cours de chargement...
La page est en cours de chargement...
La page est en cours de chargement...
La page est en cours de chargement...
La page est en cours de chargement...
La page est en cours de chargement...
La page est en cours de chargement...
La page est en cours de chargement...
-
 1
1
-
 2
2
-
 3
3
-
 4
4
-
 5
5
-
 6
6
-
 7
7
-
 8
8
-
 9
9
-
 10
10
-
 11
11
-
 12
12
-
 13
13
-
 14
14
-
 15
15
-
 16
16
-
 17
17
-
 18
18
-
 19
19
-
 20
20
-
 21
21
-
 22
22
-
 23
23
-
 24
24
-
 25
25
-
 26
26
-
 27
27
-
 28
28
-
 29
29
-
 30
30
-
 31
31
-
 32
32
-
 33
33
-
 34
34
-
 35
35
-
 36
36


Toro PowerPlex 40V MAX Axial Blower Manuel utilisateur
- Catégorie
- Outils électroportatifs
- Taper
- Manuel utilisateur
dans d''autres langues
Documents connexes
-
Toro PowerPlex 40V MAX Axial Blower Manuel utilisateur
-
-
-
-
-
Toro PowerPlex 40V Max Standard 180 WH Battery Pack Manuel utilisateur
-
-
Toro PowerPlex 24in 40V MAX Hedge Trimmer Manuel utilisateur
-
-