Honeywell HTF440 Series Le manuel du propriétaire
- Catégorie
- Ventilateurs ménagers
- Taper
- Le manuel du propriétaire

1
IMPORTANTSAFETY
INSTRUCTIONS
READ AND SAVE THESE SAFETY
INSTRUCTIONS BEFORE USING THIS FAN
When using electrical appliances, basic
precautions should always be followed to reduce
the risk of fire, electric shock, and injury to persons,
including the following:
1. Use this fan only as described in this manual.
Other use not recommended as it may cause
fire, electric shock, or injury to persons.
2. This product is intended for household
use ONLY and not for commercial, industrial
or outdoor use.
3. To protect against electric shock, DO NOT
place fan in window, DO NOT immerse unit,
plug, or cord in water, and DO NOT spray
unit with liquids.
4. This appliance has a polarized plug (one blade
is wider than the other). To reduce the risk of
electric shock, this plug is intended to fit only
one way in a polarized outlet. If the plug does
not fit fully in the outlet, reverse the plug. If it
still does not fit, contact a qualified electrician.
DO NOT attempt to defeat this safety feature.
5. Close supervision is necessary when any
appliance is used by or near children.
6. Turn the fan OFF and unplug the fan from
the outlet when not in use, when moving the
fan from one location to another, and before
cleaning.
7. To disconnect the fan, first turn the unit OFF,
grip the plug and pull it from the wall outlet.
NEVER pull the plug by the cord.
8. DO NOT operate the fan in the presence
of explosive and/or flammable fumes.
9. DO NOT place the fan or any parts near an
open flame, cooking, or other heating appliance.
10. DO NOT use any product with a damaged
cord or plug, any product that malfunctions,
or any product that has been dropped or
damaged in any manner (see warranty).
11. Avoid contact with moving fan parts.
12. The use of attachments not recommended
by the manufacturer may be hazardous.
13. Place the fan on a dry, level surface.
14. DO NOT hang or mount fan on a wall
or ceiling.
15. DO NOT operate if the fan housing
is damaged.
16. A loose fit between the AC outlet (receptacle)
and plug may cause overheating and a
distortion of the plug. Contact a qualified
electrician to replace loose or worn outlet.
17. DO NOT run fan cord under carpeting.
DO NOT cover cord with throw rugs, runners,
or similar coverings. DO NOT route cord
under furniture or appliances. Arrange cord
away from traffic areas and where it will not
be a tripping hazard.
18. Do not use an extension cord or power strip
with this fan.
WARNING: To reduce the risk of fire or
electric shock, DO NOT use this fan with any
solid-state speed control device, other than
the one supplied.
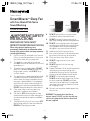
DreamWeaver™Sleep Fan
with Year Round Pink Noise
Sound Blocking
HTF400, HTF440 Series
Owner’s Manual
HTF400 HTF440
1186234_24pg_001 Page 1 07-Nov-18
Black

2
This fan features a fused safety plug which is designed to cut off electric current to the fan if an electrical
fault occurs. Please see below for more information on how to properly use your fan and replace the safety
plug fuse, if needed.
FUSED SAFETY PLUG - FOR US MODELS ONLY
INTRODUCTION
USER SERVICING INSTRUCTIONS
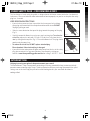
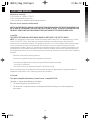
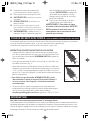
• If your fan loses power and you suspect that the fuse on your fan has blown,
grasp plug and remove from the receptacle or other outlet device. DO NOT
unplug by pulling on cord.
• Slide fuse cover, located on the top of the plug, towards the prongs of the plug.
(Fig. 1)
• Carefully remove the blown fuse and snap a new fuse into place. To reduce the
risk of fire, replace fuse only with 2.5 Amp, 125 volt fuse. Fully close the fuse
door by sliding back into place. (Fig. 2) Discard the blown fuse. The plug should
now be ready for normal use.
•To reduce the risk of fire, DO NOT replace attached plug.
Discard product if the attached plug is damaged.
• If you need further information on how or when to replace the fuse in the safety
plug, please contact Kaz Consumer Relations Department by visiting our
website at www.HoneywellPluggedIn.com/fans or calling 1-800-477-0457.
Helping to create your optimal sleep environment year-round
The DreamWeaver™ Sleep Fan empowers you to design a relaxing, comfortable sleep environment to help
promote a more restorative night’s sleep. Quick tap controls make it easy to change the powerful fan speed
settings even in the dark. Enjoy the pink noise sound blocking benefits year-round with or without a
cooling airflow!
Fig. 1
Fig. 2
1186234_24pg_002 Page 2 07-Nov-18
Black

3
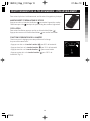
HTF400/440 SERIES OPERATION
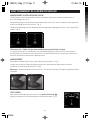
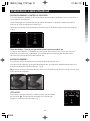
ON/OFF and SPEED CONTROL
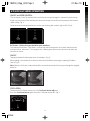
This fan features Quick Tap controls that turn the fan on and cycle through the 3 powerful speed settings.
A light tap in the center of the control panel, located on the top surface will turn the power on at the lowest
speed setting. (Fig 3)
Continue to tap the control panel to increase the speed setting; low, medium, high and off. (Fig 4)
Fig. 3
Fig. 4
Air Shutter – Airflow that you control for year-round use.
The Science of Pink Noise – Pink Noise is a mix of high and low frequencies that sounds more balanced
and natural than “white noise.” The fan generates a soothing tone that remains constant even when you
close the air shutter.
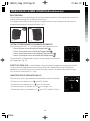
ON/OFF
Toenjoythepowerfulairflow,keeptheairshutteropen.(Fig5)
WhencoolingisnotneededtheairshuttercanbeclosedallwhilemaintainingthesoothingPinkNoise
Sound. (Fig 6)
Note: When the Air Shutter is closed there will be a minimal amount of air that escapes through the top grille
of the fan.
Fig. 5
Fig. 6
OSCILLATION
To activate the Oscillation feature, press the Oscillation button ()once.
Press the Oscillation button again to turn the Oscillation feature off. (Fig 7)
1
2
4
8
Fig. 7
1186234_24pg_003 Page 3 07-Nov-18
Black

4
HTF400/440 SERIES OPERATION (continued)
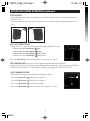
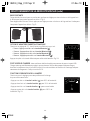
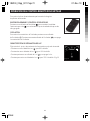
PIVOTING BASE
Direct airflow where you need it, apply light pressure to the top of the unit towards the front edge to pivot the
unit down. (Fig 8)
To direct the airflow up, apply light pressure to the top of the unit towards the back edge pivoting the unit up.
(Fig 9)
Fig. 8 Fig. 9
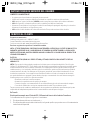
AUTO-OFF TIMER OPTION
Choose from 1, 2, 4, or 8 hour settings by performing the following function:
• 1 hour: Press the Timer button ( )once.
• 2 hours: Press the Timer button ( )twice.
• 4 hours: Press the Timer button ( ) a third time.
•8hours: Press the Timer button ( )a fourth time.
Press the Timer button a fifth time to turn the Timer feature off. (Fig 10 )
USB CHARGING PORT (your fan must be plugged in to provide power to the USB port)
Charge your electronic device while you sleep. Using your own charging cord, simply plug it into the USB outlet
located in the base of the fan, and attach to your device to start charging. This outlet is rated 5V 2A.
LIGHT DIMMING FEATURE
Choose from 4 settings for your control panel lighting preference:
•PresstheLight button ( ) once for 65% brightness
•PresstheLight button ( ) twice for 35% brightness
•PresstheLight button ( ) a third time for no light
•PresstheLight button ( ) a fourth time for 100% brightness. (Fig 11)
1
2
4
8
Fig. 10
1
2
4
8
Fig. 11
1186234_24pg_004 Page 4 07-Nov-18
Black

5
HTF440 ONLY REMOTE-CONTROL OPERATION
To activate the battery in the remote, please remove the plastic pull tab.
ON/OFF AND SPEED CONTROL
Press the Fan button ( ) once to turn the fan on.
Continue to press the ( ) to adjust the speed setting, low, medium, high and off.
OSCILLATION
To activate the oscillation feature, press the Oscillation button ( )once.
Press the Oscillation button ( ) again to turn the Oscillation feature off.
LIGHT DIMMING FEATURE
Choose from 4 settings for your control panel lighting preference:
•PresstheLight button ( ) once for 65% brightness
•PresstheLight button ( ) twice for 35% brightness
•PresstheLight button ( ) a third time for no light
•PresstheLight button ( ) a fourth time for 100% brightness. (Fig 12)
remote
1
2
4
8
Fig. 12
USER SERVICING INSTRUCTIONS
CLEANING AND STORAGE
• Ensure the fan is turned off and unplugged.
• Useonlyasoftclothtogentlywipetheoutersurfacesofthefanclean.
•DO NOT immersethefaninwaterandNEVER allow water to drip into the motor housing.
•DO NOT usegasoline,paintthinner,orotherchemicalstocleanthefan.
• Storeyourfanintheoriginalboxorcoverthefantoprotectitfromdustanddebris.
Storethefaninacool,dryplace.
•DO NOT wrap the power cord around the base of the fan. This could result indamage to the
power cord.
1186234_24pg_005 Page 5 07-Nov-18
Black

6
CUSTOMER SERVICE
Questions or comments
Call us toll-free at: 1-800-477-0457
E-mail: consumerrel[email protected]
Or visit our website at: www.HoneywellPluggedIn.com/fans
Please be sure to specify the model number.
NOTE: IF YOU EXPERIENCE A PROBLEM, PLEASE CONTACT CONSUMER RELATIONS FIRST OR SEE YOUR WARRANTY. DO
NOT RETURN
TO THE ORIGINAL PLACE OF PURCHASE. DO NOT ATTEMPT TO OPEN THE MOTOR HOUSING
YOURSEL
F, DOING SO MAY VOID YOUR WARRANTY AND CAUSE DAMAGE TO THE FAN OR PERSONAL INJURY
In the USA:
THIS DEVICE (HTF400/440 SERIES ONLY) COMPLIES WITH PART 15 OF THE FCC RULES
NOTE: This equipment has been tested and found to comply with the limits for a Class B digital device, pursuant
to Part 15 of the FCC Rules. These limits are designed to provide reasonable protection against harmful
interference in a residential installation. This equipment generates, uses, and can radiate radio frequency energy
and, if not installed and used in accordance with the instructions, may cause harmful interference to radio
communications. However, there is no guarantee that interference will not occur in a particular installation. If this
equipment does cause harmful interference to radio or television reception, which can be determined by turning
the equipment off and on, the user is encouraged to try to correct the interference by one or more of the following
measures:
• Reorient or relocate the receiving antenna.
• Increase the separation between the equipment and receiver.
•Connecttheequipmentintoanoutletonacircuitdifferentfromthattowhich
the receiver is connected.
• Consult the dealer or an experienced radio/TV technician for help.
Please note that changes or modifications of this product not expressly approved by the party responsible for
compliance could void the user’s authority to operate the equipment.
In Canada:
This device complies with Industry Canada license - exempt RSS-210
Operation is subject to the following 2 conditions:
1. This device may not cause interference, and
2. This device must accept intererference, including intereference that may cause undesired operation
of the device.
1186234_24pg_006 Page 6 07-Nov-18
Black

7
1 YEAR LIMITED WARRANTY
You should first read all instructions before
attempting to use this product.
A. This 1 year limited warranty applies to repair
or replacement of product found to be
defective in material or workmanship. This
warranty does not apply to damage resulting
from commercial, abusive, unreasonable use
or supplemental damage. Defects that are
the result of normal wear and tear will not be
considered manufacturing defects under this
warranty. KAZ USA, INC. IS NOT LIABLE FOR
INCIDENTAL OR CONSEQUENTIAL DAMAGES
OF ANY NATURE. ANY IMPLIED WARRANTY
OF MERCHANTABILITY OR FITNESS FOR A
PARTICULAR PURPOSE ON THIS PRODUCT
IS LIMITED IN DURATION TO THE DURATION
OF THIS WARRANTY. Some jurisdictions do not
allow the exclusion or limitation of incidental or
consequential damages or limitations on how long
an implied warranty lasts, so the above limitations
or exclusions may not apply to you. This warranty
gives you specific legal rights, and you also may
have other rights which vary from jurisdiction
to jurisdiction. This warranty applies only to
the original purchaser of this product from the
original date of purchase.
B. At its option, Kaz will repair or replace this
product if it is found to be defective in material
or workmanship. Defective product should be
returned to the place of purchase in accordance
with store policy. Thereafter, while within the
warranty period defective product may be
returned to Kaz.
C. This warranty does not cover damage resulting
from any unauthorized attempts to repair or from
any use not in accordance with the instruction
manual.
Questions or comments
Call us toll-free at: 1-800-477-0457 or
E-mail: consumerrel[email protected]
Or visit our website at:
www.HoneywellPluggedin.com/fans
Please be sure to specify a model number.
Please go to
www.HoneywellPluggedIn.com/register and
registeryourproductundertheCustomerCareCenter
andreceiveproductinformationupdates
and new promotional offers.
NOTE: IF YOU EXPERIENCE A PROBLEM, PLEASE
CONTACT CONSUMER RELATIONS FIRST
ORSEEYOURWARRANTY.DONOTRETURN
THE PRODUCT TO THE ORIGINAL PLACE OF
PURCHASE. DO NOT ATTEMPT TO OPEN THE
MOTOR HOUSING YOURSELF, DOING SO MAY
VOIDYOURWARRANTYANDCAUSEDAMAGETO
THEPRODUCTORPERSONALINJURY.
1186234_24pg_007 Page 7 07-Nov-18
Black

8
1186234_24pg_008 Page 8 07-Nov-18
Black

9
CONSIGNES
DE SÉCURITÉ
IMPORTANTES
LISEZ ET CONSERVEZ CES
MESURES DE SÉCURITÉ AVANT
D’UTILISER CE VENTILATEUR
Lorsque vous utilisez des appareils
électriques, vous devez toujours prendre
certaines précautions élémentaires pour
réduire les risques d’incendie, de choc
électrique et de blessure corporelle,
notamment les mesures suivantes :
POUR LES MODÈLES VENDUS AUX
ÉTATS-UNIS SEULEMENT
Cet appareil présente une protection (fusible)
contre les surcharges. Un fusible grillé signale
une surcharge ou un court-circuit. Si le fusible
saute, débranchez l’appareil de la prise.
Remplacez le fusible selon les instructions
d’entretien fournies (le calibre du fusible
requis est donné sur le produit) et vérifiez
l’appareil. Si le fusible de rechange grille, un
court-circuit peut en être la cause; en ce cas,
l’appareil doit être jeté ou retourné à un centre
de services agréé pour vérification
et/ou réparation.
1. N’employez le ventilateur que tel que décrit
dans ce manuel. Tout autre usage non conseillé
pourrait entraîner incendie, choc électrique et
blessures corporelles.
2. Ce ventilateur est UNIQUEMENT destiné à
l’usage domestique et non à l’emploi commercial,
industriel ou en plein air.
3. Afin de prévenir les chocs électriques, NE
PLACEZ PAS le ventilateur dans une fenêtre,
N’IMMERGEZ ni l’appareil, ni sa fiche, ni son
cordon et NE VAPORISEZ PAS de liquide sur
l’appareil.
4. Cet appareil comprend une fiche polarisée (une
branche est plus large que l’autre). Pour réduire
les risques de choc électrique, la fiche n’enfonce
que dans un sens dans les prises polarisées. Si
elle ne pénètre pas totalement dans la prise,
inversez-la. Si elle ne rentre toujours pas, faites
appel à un électricien. N’ESSAYEZ PAS de
contourner cette mesure de sécurité
5. Surveillez étroitement l’appareil s’il est utilisé par
des enfants ou près d’eux.
6. ÉTEIGNEZ le ventilateur et débranchez-le entre
les utilisations, pour le déplacer et avant de le
nettoyer.
7. Pour le débrancher, ÉTEIGNEZ-le puis saisissez
la fiche pour la tirer hors de la prise. Ne tirez
JAMAIS sur le cordon pour retirer la fiche.
8. NE FAITES PAS fonctionner le ventilateur en
présence de vapeurs explosives ou inflammables.
9. NE PLACEZ ni le ventilateur ni ses pièces près
de flammes nues ou près d’appareils de cuisson
ou de chauffage.
10. N’UTILISEZ PAS un appareil dont la fiche ou
le cordon est abîmé, ou qui fonctionne mal, ou
qui a été échappé ou endommagé de quelque
manière que ce soit (voir la garantie).
11. Évitez tout contact avec les pièces mobiles.
Ventilateur DreamWeaverMC
Blocage du bruit rose à l’année
Série HTF400, HTF440
Manuel du propriétaire
HTF400 HTF440
1186234_24pg_009 Page 9 07-Nov-18
Black

10
INSTRUCTIONS D’ENTRETIEN DESTINÉES À L’UTILISATEUR
• Sivotreventilateuramoinsdepuissanceetquevoussoupçonnezque
lefusiblesurvotreventilateuraitsauté,saisissezlaficheetretirez-lade
la prise ou de tout autre dispositif. NE DÉBRANCHEZ PAS l’appareil en
tirant sur le cordon.
• Faitesglisserlecouvercledufusible,situésurledessusdelafiche,vers
les broches de la fiche. (Fig. 1)
• Retirez délicatement le fusible grillé et insérez un nouveau fusible. Pour
réduirelerisqued’incendie,neremplacezlefusiblequeparunfusiblede
2,5 A, 125 volts. Fermez complètement la porte du fusible en la faisant
glisser.(Fig.2)Jetezlefusiblegrillé.Lafichedevraitmaintenantêtreprête
pour un usage normal.
• Pour réduire le risque d’incendie, NE REMPLACEZ PAS la fiche
de branchement. Contient un dispositif de sécurité (fusible) qu’il
ne faut pas enlever. Jetez l’appareil si la fiche de branchement
est endommagée.
•S’il vous faut de plus amples renseignements en ce qui concerne le
remplacement du fusible de la fiche de sécurité, veuillez communiquer
avec le Service à la clientèle de Kaz, visiter notre site Web au
www.HoneywellPluggedIn.com/fans ou appeler le 1 800 477-0457.
FICHE DE SÉCURITÉ AVEC FUSIBLE- POUR LES MODÈLES VENDUS AUX ÉTATS-UNIS SEULE
12. L’emploi d’accessoires non recommandés
par le fabricant peut se révéler dangereux.
13. Posez l’appareil sur une surface plane et sèche.
14. N’ACCROCHEZ
PAS
le ventilateur au mur ou
au plafond.
15. NE VOUS SERVEZ PAS du ventilateur si le
boîtier est abîmé.
16.
Une fiche mal entrée dans la prise de courant
peut surchauffer et se déformer. Demandez à un
électricien de remplacer toute prise de courant usée.
17. N’ACHEMINEZ PAS le cordon sous de la
moquette. Ne pas le recouvrir de carpettes,
tapis de corridor ou revêtement de sol de
ce genre. NE PASSEZ PAS le cordon sous
des meubles ou des appareils. De plus,
l’éloigner du passage afin qu’il ne risque
pas de faire trébucher.
18.
N’utilisez pas de rallonge ni de barre
d’alimentation avec ce ventilateur.
AVERTISSEMENT : Pour réduire le risque
d’incendie ou de choc électrique, NE FAITES
PAS fonctionner le ventilateur avec une
commande de vitesse transistorisée autre
que celle qui est fournie.
Ceventilateurcomprendunefichedesécuritéavecfusibleconçuepourcouperlecourantauventilateur
en cas de défaillance électrique. Voyez, ci-dessous, comment utiliser correctement
leventilateuretremplacerlefusibledelafichedesécurité,sinécessaire.
Fig. 1
Fig. 2
INTRODUCTION
Vous aider à créer un environnement optimal à l’année pour dormir
Le ventilateur pour la nuit DreamWeaverMC vous donne la possibilité de créer un environnement relaxant et
confortable pour dormir afin de favoriser un sommeil plus réparateur. Grâce aux commandes tactiles, il est
facile de changer les réglages de vitesse du ventilateur puissant, même à la noirceur. Profitez des avantages
du blocage du bruit rose à l’année avec ou sans débit d’air de refroidissement!
1186234_24pg_010 Page 10 07-Nov-18
Black

11
FONCTIONNEMENT DE LA SÉRIE HTF400/440
MARCHE/ARRÊT et RÉGULATEUR DE VITESSE
Ceventilateurestmunidecommandestactilesquimettentl’appareilenmarcheetparcourentles3
puissantsréglagesdevitesse.
Un tapotement léger au centre du panneau de commande, situé sur la surface supérieure, met l’appareil en
marche au réglage de vitesse le plus bas. (Fig. 3)
Continuer de tapoter le panneau de commande pour augmenter le réglage de la vitesse : bas, moyen, élevé
et arrêt. (Fig. 4)
Fig. 3
Fig. 4
Obturateur d’air – Débit d’air que vous contrôlez pour une utilisation à l’année.
Lasciencedubruitrose–Lebruitroseestunmélangedefréquencesélevéesetbassesquisonnent
plus équilibrées et naturelles que le « bruit blanc ». Le ventilateur produit un son apaisant qui demeure
constant même lorsque vous fermez l’obturateur d’air.
MARCHE/ARRÊT
Pour profiter du débit d’air puissant, gardez l’obturateur d’air ouvert. (Fig. 5)
Lorsquevousn’avezpasbesoinderefroidirlapièce,vouspouvezfermerl’obturateurd’airtouten
maintenant le son apaisant du bruit rose. (Fig. 6)
Remarque : Lorsquel’obturateurd’airestfermé,ilyaunminimumd’airquis’échappedelagrilleduhautdu
ventilateur.
Fig. 5
Fig. 6
OSCILLATION
Pour activer l’oscillation, appuyez une fois sur la touche Oscillation ().
Appuyezdenouveausurcettetouchepourarrêtercettefonction.(Fig7)
1
2
4
8
Fig. 7
1186234_24pg_011 Page 11 07-Nov-18
Black

12
FONCTIONNEMENT DE LA SÉRIE HTF400/440 (suite)
BASE PIVOTANTE
Dirigez le débit d’air vers où vous en avez besoin, appliquez une légère pression sur le dessus de l’appareil vers
le devant pour faire pivoter l’appareil vers le bas. (Fig. 8)
Pour diriger le débit d’air vers le haut, appliquez une légère pression sur le dessus de l’appareil vers l’arrière pour
faire pivoter l’appareil vers le haut. (Fig. 9)
Fig. 8
Fig. 9
OPTION DE MINUTERIE D’ARRÊT AUTOMATIQUE
Choisissezunréglagede1,2,4ou8heureseneffectuantcequisuit:
• 1 heure : Appuyez une fois sur la touche Minuterie ( ).
• 2 heures : Appuyez deux fois sur la touche Minuterie ( ).
• 4 heures : Appuyez trois fois sur la touche Minuterie ( ).
• 8 heures : Appuyez quatre fois sur la touche Minuterie ( ).
Appuyez cinq fois sur la touche Minuterie pour arrêter cette fonction. (Fig. 10)
PORT USB POUR CHARGER (votre ventilateur doit être branché pour procurer du courant au port USB)
Chargezvotreappareilélectroniquependantquevousdormez.Utilisezvotreproprecâblepourcharger,
branchez-le simplement dans la prise USB située à la base du ventilateur, et branchez-le à votre appareil pour
commencer le chargement. Cette prise est de 5 V 2A.
FONCTION DE GRADATION DE LA LUMIÈRE
Choisissez parmi 4 réglages pour votre préférence d’éclairage
du panneau de commande :
• Appuyez une fois sur la touche Lumière ( ) pour 65 % de luminosité
•Appuyezdeuxfoissurlatouche Lumière ( ) pour 35 % de luminosité
• Appuyez trois fois sur la touche Lumière ( ) pour aucune lumière
•Appuyezquatrefoissurlatouche Lumière ( ) pour 100 % de
luminosité. (Fig. 11)
1
2
4
8
Fig. 10
1
2
4
8
Fig. 11
1186234_24pg_012 Page 12 07-Nov-18
Black

13
FONCTIONNEMENT DE LA TÉLÉCOMMANDE - HTF440 SEULEMENT
Pour activer la pile dans la télécommande, veuillez retirer la languette en plastique.
MARCHE/ARRÊT ET RÉGULATEUR DE VITESSE
Appuyez une fois sur la touche Ventilateur ( ) pour mettre l’appareil en marche..
Continue to press the ( ) to adjust the speed setting, low, medium, high and off.
OSCILLATION
Pour activer l’oscillation, appuyez une fois sur la touche d’oscillation ( ).
Appuyez de nouveau sur la touche d’oscillation ( ) pour arrêter l’oscillation.
FONCTION DE GRADATION DE LA LUMIÈRE
Choisissez parmi 4 réglages pour votre préférence d’éclairage
du panneau de commande :
• Appuyez une fois sur la touche Lumière ( ) pour 65 % de luminosité
•Appuyezdeuxfoissurlatouche Lumière ( ) pour 35 % de luminosité
• Appuyez trois fois sur la touche Lumière ( ) pour aucune lumière
•Appuyezquatrefoissurlatouche Lumière ( ) pour 100 % de
luminosité. (Fig. 12)
remote
1
2
4
8
Fig. 11
1186234_24pg_013 Page 13 07-Nov-18
Black

14
SERVICE À LA CLIENTÈLE
INSTRUCTIONS D’ENTRETIEN DESTINÉES À L’UTILISATEUR
ENTRETIEN ET RANGEMENT
• Assurez-vousqueleventilateursoitéteintetdébranché.
• Essuyez délicatement les surfaces extérieures avec un linge doux.
•N’immergezJAMAIS le ventilateur et veillez à ce qu’il ne dégoutte pas d’eau dans le boîtier
du moteur.
•N’EMPLOYEZ PAS d’essence, de diluant ou d’autres produits chimiques pour le nettoyage.
• Vous pouvez ranger le ventilateur sans le démonter; couvrez-le afin qu’il ne s’empoussière pas.
Rangez-le dans un endroit frais et sec.
•N’ENROULEZ PAS le cordon autour de la base du ventilateur. Vous pourriez endommager
le cordon.
Aux États-Unis :
CET APPAREIL (SÉRIES HYF260 et HYF290 SEULEMENT) EST CONFORME À LA SECTION 15 DES
RÈGLEMENTS DE LA FCC
REMARQUE : Cet appareil a été testé et déclaré conforme aux limites pour des appareils numériques de classe B,
selon la section 15 des règlements de la FCC. Ces limites sont conçues pour procurer une protection raisonnable
contre les interférences nuisibles dans une installation résidentielle. Cet appareil produit, utilise et peut émettre
de l’énergie radio et, s’il n’est pas installé et utilisé conformément aux instructions, peut causer des interférences
nuisibles aux communications radio. Toutefois, il n’y a pas de garantie qu’aucune interférence ne se produira dans
une installation particulière. Si l’appareil cause des interférences nuisibles à la réception radio ou télévision, qui
peuvent être déterminées en éteignant et en allumant l’appareil, l’utilisateur peut tenter de corriger l’interférence
au moyen de l’une ou plusieurs des mesures suivantes :
• Réorientez ou relocalisez l’antenne de réception.
• Augmentez la distance séparant l’appareil du récepteur.
• Branchez l’appareil dans une prise électrique sur un circuit différent de celui sur lequel le récepteur
est branché.
• Consultez le détaillant ou un technicien radio TV d’expérience pour obtenir de l’aide.
Veuillez noter que les changements ou modifications apportés à ce produit qui ne sont pas expressément
approuvés par la partie responsable de la conformité pourraient annuler l’autorisation de l’utilisateur de faire
fonctionner l’appareil.
Questions ou commentaires
Téléphonez-nous sans frais au : 1 800 477-0457
Courriel : [email protected]
Ou visitez notre site Web au : www.HoneywellPluggedIn.com/fans
N’oubliez pas d’indiquer le numéro de modèle.
REMARQUE : SI VOUS AVEZ UN PROBLÈME, VEUILLEZ COMMUNIQUER AVEC NOTRE SERVICE À LA
CLIENTÈLE OU RELIRE LA GARANTIE. NE RETOURNEZ PAS LE PRODUIT AU MAGASIN OÙ VOUS L’AVEZ
ACHETÉ INITIALEMENT. N’ESSAYEZ PAS D’OUVRIR LE BOÎTIER DU MOTEUR, CAR CE FAISANT VOUS
RISQUEZ D’ANNULER LA GARANTIE, D’ENDOMMAGER L’APPAREIL OU DE VOUS BLESSER.
1186234_24pg_014 Page 14 07-Nov-18
Black

15
GARANTIE LIMITÉE DE 1 AN
Prière de lire toutes les instructions avant de tenter
d’utiliser ce produit.
A. Cette garantie limitée de 1 an s’applique à la
réparation ou au remplacement d’un produit
comportant un vice de matière ou de main-
d’œuvre.Cettegarantienes’appliquepasaux
dégâts découlant d’un usage commercial,
abusif ou déraisonnable, ni aux dégâts
supplémentaires. Les défaillances résultant de
l’usurenormalenesontpasconsidéréescomme
des vices de fabrication en vertu de la présente
garantie. KAZUSA,INC.N’ESTNULLEMENT
RESPONSABLE DES DOMMAGES FORTUITS
OU INDIRECTS, QUELS QU’ILS SOIENT.
TOUTE GARANTIE IMPLICITE DE QUALITÉ
MARCHANDE ET DE CONVENANCE
RELATIVE À CE PRODUIT A LA MÊME DURÉE
LIMITÉE QUE LA PRÉSENTE GARANTIE.
Certaines régions ne permettent pas l’exclusion
ou la limitation des dommages fortuits ou
indirects, ni les limites de durée applicables à
une garantie implicite; par conséquent, il est
possible que ces limitations ou exclusions ne
s’appliquent pas dans votre cas. Cette garantie
vous confère des droits précis, reconnus par la
loi. Ces droits diffèrent d’une région à l’autre, et
ilestpossiblequevousenayezd’autres.Cette
garantie s’applique uniquement à l’acheteur
initial de ce produit, à compter de la date de
l’achat initial.
B. Àsadiscrétion,KazUSA,Inc.réparera
ouremplaceraceproduitsil’onconstatequ’il
comporteunvicedematièreoudemain-
d’œuvre.
C . Cette garantie ne couvre pas les dommages
découlant des tentatives de réparation non
autorisées ou de toute utilisation non conforme
au présent manuel.
Questions ou commentaires
Téléphonez-nous sans frais au :
1800477-0457
Courriel : consumerrelations@kaz.com
Ou visitez notre site Web au :
www.HoneywellPluggedIn.com/fans
N’oubliez pas d’indiquer le numéro de modèle.
Veuillez aller au
www.HoneywellPluggedIn.com/register pour faire
enregistrer votre produit sous « SUPPORT » puis
« Register Product » et recevoir des renseignements
quant aux réactualisations et aux nouvelles
offres promotionnelles.
SERVICE À LA CLIENTÈLE
Au Canada :
Cet appareil répond aux exigences de la norme RSS-210 d’Industrie Canada.
Son fonctionnement est soumis aux 2 conditions suivantes:
1. Cet appareil peut ne pas causer d’interférence, et
2. Cet appareil doit accepter les interférences, y compris les interférences pouvant causer un fonctionnement
non désiré de l’appareil.
1186234_24pg_015 Page 15 07-Nov-18
Black

16
1186234_24pg_016 Page 16 07-Nov-18
Black

17
INSTRUCCIONES
DE SEGURIDAD
IMPORTANTES
LEA Y GUARDE ESTAS INSTRUCCIONES
DE SEGURIDAD ANTES DE UTILIZAR
ESTE VENTILADOR
Cuando utilice aparatos electrodomésticos,
debe seguir siempre las precauciones básicas
para reducir el riesgo de incendio, descarga
eléctrica y lesión a personas, incluyendo
el siguiente:
1. Utilice este ventilador sólo como se
describe en este manual. Otros usos no
son recomendados ya que pueden resultar
en incendio, descarga eléctrica o lesiones
corporales.
2. Este producto está hecho para utilizarse
SÓLO en el hogar y no para uso comercial,
industrial o en el exterior.
3. Para proteger contra descarga eléctrica,
NO coloque el ventilador en la ventana, NO
sumerja en agua la unidad, el enchufe o el
cable y NO rocíe con líquidos.
4. Este aparato tiene un enchufe polarizado
(una pata de la clavija es más ancha que
la otra). Para reducir el riesgo de descarga,
este enchufe fue pensado para entrar sólo
en una dirección en un tomacorriente
polarizado. Si la clavija no entra completa
en el tomacorriente, voltéelo, si aun así no
entra, contacte a un electricista calificado.
NO intente vencer esta característica de
seguridad.
5. Es necesaria supervisión directa cuando este
aparato sea utilizado por o cerca de niños.
6. APAGUE y desconecte el ventilador del
tomacorriente cuando no esté en uso,
cuando lo mueva de un lugar a otro y antes
de limpiarlo.
7. Para desconectar el ventilador, primero
APAGUE la unidad, tome el enchufe y
retírelo del tomacorriente. NUNCA jale
el enchufe por el cable.
8. NO opere el ventilador en presencia
de gases explosivos y/o inflamables.
9. NO coloque el ventilador o cualquiera de las
partes cerca de flama directa, aparatos de
cocina o de calefacción.
10. NO USE ningún producto con el cable o
el enchufe dañados, ningún producto que
funcione mal, o ningún producto que se
haya caído o dañado de alguna manera
(vea la garantía).
11. Evite el contacto con las partes móviles
del ventilador.
12. El uso de accesorios no recomendados
por el fabricante puede ser peligroso.
13. Coloque el ventilador en una superficie
seca y plana.
14. NO cuelgue ni monte el ventilador en
la pared o el techo.
15. NO opere si la cubierta del ventilador
está dañada.
16. Un falso contacto entre un tomacorriente
CA (enchufe empotrado) y el enchufe puede
causar sobrecalentamiento y deformación
en el enchufe. Contacte a un eléctrico
calificado para reemplazar el tomacorriente
flojo o desgastado.
Manual del Usuario
HTF400 HTF440
Ventilador para Dormir DreamWeaver™
con Ruido Rosa Durante Todo el Año
Bloqueo de Sonido
Series HTF400, HTF440
1186234_24pg_017 Page 17 07-Nov-18
Black

18
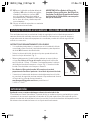
ENCHUFE CON FUSIBLE DE SEGURIDAD - SÓLO PARA MODELOS DE EE.UU.
17. NO pase el cable del ventilador debajo de
alfombras. NO cubra el cable con tapetes,
alfombrillas o cubiertas similares. NO
pase el cable por debajo de muebles o
electrodomésticos. Acomode el cable lejos
de las áreas de tráfico y donde no pueda
causar tropiezos.
18. No use un cable de extensión o un contacto
múltiple con este ventilador.
ADVERTENCIA: Para Reducir el Riesgo de
Incendio o Descarga Eléctrica, No Utilice Este
Ventilador Con Ningún Dispositivo de Control
de Velocidad de Estado Sólido, con excepción
del que se suministra.
Este ventilador cuenta con un enchufe con fusible de seguridad el cual está diseñado para cortar la
corriente eléctrica del ventilador si ocurre una falla eléctrica. Por favor vea en la parte de abajo para
mayor información de cómo utilizar propiamente su ventilador y cambiar el fusible de seguridad del
enchufe, si es necesario.
INSTRUCCIONES DE MANTENIMIENTO DEL USUARIO
• Si su ventilador pierde potencia y sospecha que se ha fundido el fusible de
su ventilador, sujete el enchufe y retire del tomacorriente y otro dispositivo
de salida. NO desconecte tirando del cable.
• Deslice la cubierta del fusible, ubicada en la parte superior del enchufe,
hacia las clavijas del enchufe. (Fig. 1)
• Retire cuidadosamente el fusible fundido y coloque un nuevo fusible en
su lugar. Para Reducir el Riesgo de Incendio, reemplace el fusible sólo
con un fusible de 2.5 Amp, 125 voltios. Cierre completamente la cubierta
del fusible deslizando nuevamente en su lugar. (Fig. 2) Deseche el fusible
fundido. El enchufe debe estar listo para uso normal.
•Para Reducir el Riesgo de Incendio, NO reemplace el enchufe
proporcionado. Deseche el producto si el enchufe adjunto está dañado.
• Si necesita más información de cómo o cuándo debe reemplazar el fusible
en su enchufe de seguridad, por favor contacte al Departamento de Servicio
al Cliente de Kaz visitando nuestro sitio web en
www.HoneywellPluggedIn.com/fans o puede llamar al
1-800-477-0457.
Fig. 2
Fig. 1
INTRODUCCIÓN
Ayudando a crear su entorno óptimo para dormir, durante todo el año
El ventilador para Dormir Dreamweaver™ le permite diseñar un ambiente relajante y confortable para ayudar
a promover un descanso más reparador. Los controles de Pulsación rápida hacen fácil cambiar los ajustes
potentes de velocidad del ventilador incluso en la oscuridad. ¡Disfrute de los beneficios de bloqueo de sonido
del ruido rosa durante todo el año con o sin un flujo de aire de enfriamiento.
1186234_24pg_018 Page 18 07-Nov-18
Black

19
OPERACIÓN DE LA SERIE HTF400/440
ENCENDIDO/APAGADO y CONTROL DE VELOCIDAD
Este ventilador ofrece controles de Pulsación Rápidaque encienden el ventilador y ciclan a través de los 3
ajustes potentes de velocidad.
Una pulsación ligera en el centro del panel de control, ubicado en la superficie superior, encenderá la
unidad en el ajuste de velocidad más bajo (Fig. 3).
Continúe pulsando el panel de control para aumentar el ajuste de velocidad; bajo, medio, alto y apagado
(Fig. 4).
Fig. 3
Fig. 4
Obturador de Aire – Flujo de aire que controla para uso durante todo el año.
LaCienciadelRuidoRosa–ElRuidoRosaesunamezcladefrecuenciasaltasybajasquesuenamás
balanceada y natural que el “ruido blanco”. El ventilador genera un tono relajante que permanece
constante incluso cuando cierre el obturador de aire.
ENCENDIDO/APAGADO
Para disfrutar del flujo de aire potente, mantenga el obturador abierto. (Fig. 5)
Cuando está enfriando no es necesario el obturador de aire, se puede cerrar completamente mientras se
mantiene el Sonido de Ruido Rosa relajante. (Fig. 6)
Nota: CuandosecierraelObturadordeAire,habráunacantidadmínimadeairequeseescapaatravésdela
rejilla superior del ventilador.
Fig. 5
Fig. 6
OSCILACIÓN
ParaactivarlacaracterísticadeOscilación,presioneunavezelbotón
de Oscilación ( ).PresionedenuevoelbotóndeOscilaciónpara
apagar la característica de Oscilación. (Fig. 7)
1
2
4
8
Fig. 7
1186234_24pg_019 Page 19 07-Nov-18
Black

20
OPERACIÓN DE LA SERIE HTF400/440 (continuación)
BASE GIRATORIA
Dirija el flujo de aire hacia donde lo necesite, aplique una ligera presión en la parte superior de la unidad hacia
el borde delantero para girar la unidad hacia abajo. (Fig. 8)
Para dirigir el flujo de aire hacia arriba, aplique una ligera presión en la parte superior de la unidad hacia el
borde posterior para girar la unidad hacia arriba. (Fig. 9)
Fig. 8
Fig. 9
OPCIÓN DE TEMPORIZADOR CON APAGADO AUTOMÁTICO
Elijaentrelosajustesde1,2,4,u8horasrealizandolasiguientefunción:
• 1 hora: Presione una vez el botón del Temporizador ( ).
• 2 horas: Presione dos veces el botón del Temporizador ( ).
• 4 horas: Presione por tercera vez el botón del Temporizador ( ).
• 8 horas: Presione por cuarta vez el botón del Temporizador ( ).
Presione el botón del Temporizador una quinta vez para apagar la característica
del Temporizador. (Fig. 10)
PUERTO DE CARGA USB (su ventilador debe estar enchufado para proporcionar energía al puerto USB)
Cargue su dispositivo electrónico mientras duerme. Utilizando su propio cable de carga, simplemente
conéctelo a la salida USB ubicada en la base del ventilador, y conecte a su dispositivo para iniciar la carga.
Esta salida está clasificada en 5 V~ 2 Amp.
CARACTERÍSTICA DE ATENUACIÓN DE LUZ
Elija entre los 4 ajustes de preferencia de iluminación en el panel de control:
•PresioneunavezelbotóndeLuz( ) para 65% de brillo
•PresionedosveceselbotóndeLuz( )para35%debrillo
• Presione por tercera vez el botón de Luz ( ) para apagar la luz
• Presione por cuarta vez el botón de Luz ( )para100%debrillo.(Fig11)
1
2
4
8
Fig. 10
1
2
4
8
Fig. 11
1186234_24pg_020 Page 20 07-Nov-18
Black
La page est en cours de chargement...
La page est en cours de chargement...
La page est en cours de chargement...
La page est en cours de chargement...
-
 1
1
-
 2
2
-
 3
3
-
 4
4
-
 5
5
-
 6
6
-
 7
7
-
 8
8
-
 9
9
-
 10
10
-
 11
11
-
 12
12
-
 13
13
-
 14
14
-
 15
15
-
 16
16
-
 17
17
-
 18
18
-
 19
19
-
 20
20
-
 21
21
-
 22
22
-
 23
23
-
 24
24


Honeywell HTF440 Series Le manuel du propriétaire
- Catégorie
- Ventilateurs ménagers
- Taper
- Le manuel du propriétaire
dans d''autres langues
Documents connexes
-
Honeywell 32″ High Velocity Air Circulator Turbo Force Tower Fan Le manuel du propriétaire
-
Honeywell HSF1640B Mode d'emploi
-
Honeywell HTF337 Le manuel du propriétaire
-
-
Honeywell HFD280B Le manuel du propriétaire
-
-
-
-
-