La page est en cours de chargement...

Watch Manual

2
TABLE OF CONTENTS
Swiss Military Watch Components 4
General Features and Components 5
Operating Instructions
Standard Three-Hand Watches 6
Chronograph Watches 8
12-hour chronograph with Slide Rule Function (SR) 12
18
23
Traveler Series GMT
25
The 24 Time Zones
30-Day Calendar Watches

3
2
nd
Time Zone Dual Subdial Watches 29
Day, Date, Month Subdial Watches 31
Swing-Out Compass Watches 33
Dual Time Zone Features 38
Watches with Alarm 36
A
Caring for your Watch
3-Year Warranty
Warranty Service
Watch Registration
dditional Features 37
38
39
40
43
41
Features on Watch Bracelets

4
SWISS MILITARY WATCH COMPONENTS
Movements – Swiss quartz movements.
Case Body – All stainless steel or titanium for quality and durability.
Water-Resistant – To 30m (99’), 50m (165’) or 100m (330’) for standard
watches. To 200m (660’) or 1000m (3300’) for dive watches.
Straps/Bracelets – Stainless steel and titanium bracelets feature dive
buckles or deployant jewelry buckles. Straps are offered in genuine calfskin
leather, specially treated rubberized leather, water-resistant rubber or nylon,
or other high-quality materials.
Luminous Markers – Hands, markers, and numerals may be overlaid with
Super Luminova
®
which recharges in seconds when exposed to direct sunlight
for extended nighttime visibility.

5
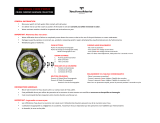
GENERAL FEATURES AND COMPONENTS
Hour, minute and
second hands
Military time
Bezelring
Case
Bracelet or strap
Crown protoctor
Crown (used to set date
and time)
Date
Day

6
Position 1
Position 2
Position 3
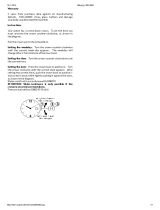
SETTING TIME, DAY AND DATE ON STANDARD
WATCHES
(see Table of Contents on p. 2-3 for other watches)
Important note to assure waterresistance: If the crown of your watch
does not pull directly out or if your watch is water-resistant to 200m or more,
then you may have a watch with a screw-down crown. Rotate the crown coun-
terclockwise until the crown moves away from the watch. This will set the
crown in Position 1.
Always screw down the crown after making any adjustments. This is very
important as the screw-down crown assures water resistance.

7
1. Pull out the crown to Position 2 (one «click» out). Rotate crown counter-
clockwise until the date shows one day earlier than the date you want to set.
2. Pull out the crown to Position 3 (two «clicks» out). Rotate crown so the
watch hands move clockwise until the current date shows. Then set the watch
hands to the correct time. Turn the watch hands past 12 once if you’re setting
the watch for a P.M. time. Push the crown back to Position 1.
3. For a watch with day and date display, pull out the crown of the watch to Po-
sition 2, turn it clockwise to change the day and counterclockwise to change
the date.
4. Return the crown to the fully depressed Position 1, assuring the crown has
been further screwed down on all diver watches.
For Watches Without a Date Display
1. To set the time for watch without date display, pull out the crown to Position
2.
Turn the crown either clockwise or counterclockwise to set the correct
time.
2. Return the crown to the fully depressed Position 1, assuring the crown has
been screwed down on all diver watches.

8
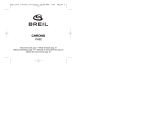
FEATURES OF CHRONOGRAPH (STOPWATCH)
Subdials
(two or three)
Top pusher
Crown
Bottom pusher
Chronograph seconds
hand

9
Position 1
Position 2
Position 3
SETTING THE TIME AND DATE
(For Chronos only)
1. Pull out the crown to Position 2 (one «click» out). Rotate crown counter-
clockwise until the date shows one day earlier than the date you want to set.
2. Pull out the crown to Position 3 (two «clicks» out). Rotate crown so the
watch hands move clockwise until the current date shows. Then set the
watch hands to the correct time. Turn the watch hands past 12 once if
you’re setting the watch for a P.M. time.
3. Return the crown to the fully depressed Position 1, assuring the crown has
been further screwed down on all 200m watches.

10
30-Minute Chronograph (Stopwatch)
The chronograph feature is a stopwatch which measures minutes, seconds,
and 1/10 of a second. It is also capable of measuring split-timed events (tim-
ing a continuous event and sub-events simultaneously; e.g., timing an indi-
vidual lap and an entire race). Note: the 1/10-second timer (right subdial)
will not move until the stop button is pushed. It will then record the elapsed
1/10-seconds.
12-Hour Chronograph (Stopwatch)
dna ,setunim ,sruoh serusaem hcihw hctawpots a si erutaef hpargonorhc ehT
seconds. It is also capable of measuring split-timed events (timing a continu-
ous event and sub-events simultaneously; e.g., timing an individual lap and
an entire race).
Stopwatch (30-Minute or 12-Hour)
1. To start the stopwatch, push the top pusher.
2. To stop it, push the top pusher again
.

11
3. Read the seconds, minutes, and hours on the appropriate dials (see the sec-
tion of this manual that corresponds to your watch for dial identification).
4. To reset the stopwatch to zero, push the bottom pusher.
Note: The clock function will continue to operate while using the stopwatch.
Using the Split-Timing Function
1. Press the top pusher to start the stopwatch.
2. To read a lap or other intermediate segment of time, push the bottom push-
er. The watch hands will stop, but the watch will continue to time the total
event internally.
3. To resume timing the total event, push the bottom pusher again.
4. You may repeat this as often as you like. The internal clock will continue to
time the total event each time you repeat the process.
5. To stop timing the total event, push the top pusher.
6. Reset the stopwatch to zero by pushing the bottom pusher.

12
12-HOUR CHRONOGRAPH
WITH SLIDE RULE FUNCTION (SR)
Inner scale Top pusher
10:00 Crown
Seconds hand
subdial
30-Minute counter
subdial
3:00 Crown
Chronograph
seconds hand
Bottom pusher
12-Hour counter
subdial
Outer scale

13
USING THE 12-HOUR CHRONOGRAPH WITH SLIDE
RULE FUNCTION (SR)
This SR can perform a variety of calculations from currency conversions to
multiplication and division problems with 94% accuracy. With the circular
slide, you can calculate any conversion of a linear nature with a constant ratio
such as ounces to grams, kilograms to pounds, miles to kilometers, etc.
Important note: The 10:00 crown features a screw-down mechanism to
protect against accidental adjustments. Rotate the crown counterclockwise
to move the crown away from the watch. Always screw down the crown af-
ter making adjustments. This is vital for protecting your watch against water
intrusion.
1. Rotate the 10:00 crown counterclockwise until it moves away from the
watch. This will set the crown in Position 2.

14
2. Rotate crown until the large arrow on the inner scale is aligned with the
number «60» on the outer scale. Notice that all the numbers in the inner
and outer scale match up.
3. Decimal points. Depending on the context of your problem, you will decide
whether to read the number “10” on the inner scale as 1, 10, 100 or 1,000.
The markers between numbers indicate the calibration. (e.g., the calibra-
tion between 10 and 11 are each 0.1 so, 2 calibrations above the 10 will
read at 10.2. The calibration between 15 and 16 are each 0.2 so 2 calibra-
tions above the 15 will read as 15.4)
Multiplication
1. Set the large 10 with the arrow on the inner scale over the number you want
to multiply on the outer scale. (e.g., for 32 x 7 = 224, set the (10/arrow)
number opposite the 32 on the outer scale.)
2. Read the result on the outer sca
le opposite the number you are multiplying
by on the inner scale. (e.g., for 32 x 7, read the number on the outer scale
opposite 7 on the inner scale).

15
Division
1. Set the number you are dividing by on the inner scale over the number you
are dividing on the outer scale. (e.g., for 540 ÷ 12 = 45, set the 12 on the
inner scale over 54 on the outer scale.)
2. Read the result on the outer scale opposite the (10/arrow) number on the
inner scale.
Ratios and Conversions
When the numbers on the outer scale and the inner scale match, the ratio
between the two scales is 1:1. When you rotate the inner scale so that the
number (10/arrow) is opposite the 20 on the outer scale, the ratio between
the two scales is 2:1. This feature is useful to convert any linear conversion
like currencies or weight/length from standard to metric. Simply find how
many units of one measurement equals one unit of the other and match up
that number with the number (10/arrow).

16
For example, 1 oz = 28.35 grams, rotate the inner scale until the (10/arrow)
number is below the 28.35 on the outer scale. Now all the numbers on the
outer scale become grams and all the numbers on the inner scale become
ounces. As an example, look at 85 on the outer scale. It is pointing to 30 on
the inner scale. Making a decimal point adjustment to 3.0 you now know that
3 oz. are almost 85 grams.
Currency Conversion
Suppose the currency rate for the Swiss Franc is SFR 1.30 to $1.00 USD.
Rotate the inner scale to set (10/arrow) number opposite the 13 on the outer
scale. The outer scale becomes Swiss Francs and the inner scale reflects the
USD equivalent (e.g., to convert SFR 4.00 to USD, look at the number on the
inner scale opposite the 40 on the outer scale and you will see the number 31.
Therefore, SFR 4.00 = $3.10 USD).

17
Miles and Kilometers
You can convert miles to kilometers or the reverse and subsequently miles/
hour to kilometers/hour and the reverse.
1. Rotate the inner scale until the «STAT» arrow is set opposite the number of
miles you want to convert to km on the outer scale.
2. Read the corresponding km value on the outer scale that is set opposite the
«MPH/KM» arrow on the inner scale. (e.g., to convert 25 mph to kilome-
ters per hour, set the STAT arrow opposite 25 on the outer dial. The MPH/
KM arrow is pointing to 40 which indicates 25 MPH = 40 K/H.)
3. To convert from miles to km, do the reverse.

18
TRAVELER SERIES GMT
Hour hand
Inner bezel
Second hand
Minute hand
2:00 Crown
(screw-down)
4:00
Crown
Second time
zone hand

19
Position 1
Position 2
Position 3
SETTING THE TIME AND DATE ON GMT-WATCHES
1. Pull out the 4:00 crown to Position 2 (one «click» out). Rotate crown
clockwise until the date shows one day earlier than the date you want to set.
2. Pull out the 4:00 crown to Position 3 (two «clicks» out). Rotate crown so
the watch hands move clockwise until the current date shows. Then set
the watch hands to the correct time. Turn the watch hands past 12 once if
you’re setting the watch for a P.M. time.
3. Return the crown to the fully depressed position.

20
SETTING THE 2
ND
TIME ZONE
Important note: The 2:00 crown features a screw-down mechanism to pro-
tect against accidental adjustments. Rotate the crown counterclockwise to
move the crown away from the watch. Always screw down the crown after
making adjustments. This is vital for protecting your watch against water
intrusion.
1. Rotate the 2:00 crown counterclockwise until the crown moves away from
the watch. This will set the crown in Position 2.
2. Rotate the 2:00 crown (be patient, it’s not as easy to rotate as the 4:00
crown) clockwise until a city in the same time zone as your local time zone
appears (e.g., Central Europe = Paris).
3. Pull out the 4:00 crown to Position 2 (one «click» out). Rotate the 4:00
crown counterclockwise to set the hour hand to the local time on the 24-
hour inner bezel.
1/81