
FOUR FRITEUSE À AIR CHAUD
ET GRIL
EN:….2
FR:…29
SP: ..54
AIR FRYER OVEN AND GRILL
HORNO FREIDORA DE AIRE CON
PARRILLA

AFO 52096 BK – 230713
2
www.KALORIK.com
THANK YOU
Thank you for choosing the Kalorik MAXX Air Fryer Oven
We hope you’re delighted with your MAXX. If you are, we’d love it if
you’d shout it from the rooftops, tell your friends or leave us a review.
We’d love to hear about what you’ve been cooking, so tag @kalorik
on social media with your culinary masterpieces.
REGISTER YOUR PURCHASE
To register your product, simply complete the included form, visit
Kalorik.com/register or scan the QR code below.
TECHNICAL SPECIFICATIONS
Model Voltage Wattage Capacity
AFO 52096 BK 120V, 60Hz 1600W 16 Qt / 15 L

AFO 52096 BK – 230713
3
www.KALORIK.com
CONTENTS
PARTS ....................................................................................................... 4
PARTS DESCRIPTION ................................................................................. 5
IMPORTANT SAFEGUARDS ........................................................................ 6
SAFETY TIPS .............................................................................................. 8
POLARIZED PLUG INSTRUCTIONS ............................................................... 8
SHORT CORD INSTRUCTIONS ..................................................................... 8
BEFORE THE FIRST USE .............................................................................. 8
CHARCOAL FILTER ..................................................................................... 9
CONTROL PANEL ..................................................................................... 10
PRODUCT AND PARTS ............................................................................. 10
Using your Kalorik MAXX Air Fryer Oven .................................................... 12
KALORIK MAXX BASIC COOKING GUIDE ...................................................... 17
GET MORE OUT OF YOUR PRODUCT ........................................................ 20
CLEANING AND MAINTENANCE ............................................................... 20
Inside Cleaning ............................................................................................ 21
Housing Cleaning......................................................................................... 21
Replacing The Inner Lamp ........................................................................... 21
TROUBLESHOOTING ................................................................................ 22
WARRANTY ............................................................................................ 24

AFO 52096 BK – 230713
4
www.KALORIK.com
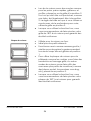
PARTS
4
10
9 11
3
1
13
7
8
2
5
6
2
12
1
4
15

AFO 52096 BK – 230713
5
www.KALORIK.com
PARTS DESCRIPTION
1. Touchscreen control panel
2. Air vents (top, both sides, and back of the unit)
3. Start / Stop button
4. Presets
5. Heating elements (top and bottom)
6. Glass door
7. Door handle
8. Rails / Racks and basket slots
9. Baking tray
10. Air frying basket
11. Air rack
12. Crumb tray
13. Rack handle
14. Grill Grate
15. Charcoal Filter

AFO 52096 BK – 200605
6
www.KALORIK.com
IMPORTANT SAFEGUARDS
When using electrical appliances, basic safety precautions should
always be followed, including the following:
READ ALL INSTRUCTIONS.
1. Check that your mains voltage corresponds to that stated on the
appliance.
2. Do not touch hot surfaces. Use handles or knobs.
3. To protect against electrical shock, fire or personal injury, do not
immerse cord, plugs, or the appliance in water or other liquid.
4. Close supervision is necessary when any appliance is used by or near
children.
5. Unplug from outlet when not in use and before cleaning. Allow to cool
before putting on or taking off parts.
6. Do not operate any appliance with a damaged cord or plug or after
the appliance malfunctions or has been damaged in any manner.
Return the appliance to the nearest authorized service facility for
examination, repair, or adjustment.
7. The use of accessory attachments not recommended by the
appliance manufacturer may cause injuries.
8. Do not use outdoors. This appliance is for HOUSEHOLD USE ONLY.
9. Do not let the cord hang over the edge of a table or counter or touch
hot surfaces.
10. Do not place on or near a hot gas or electric burner or stovetop, or
where it could touch another heated oven.
11. Extreme caution must be used when moving the appliance. Let the
appliance cool to room temperature before handling or moving.
12. When in operation, hot air is released through the air vents. Keep your
hands and face at a safe distance from the air vents and make sure
not to cover them to allow for proper ventilation in the unit. Take
extreme caution when removing the accessories from the appliance,
failure to do so may lead to burns and/or injury.
13. When operating the oven keep at least four inches of space on all
sides of the oven to allow for adequate air circulation.
14. Always operate on a stable, heat resistant surface. Do not use on a
cloth-covered surface, near curtains or other flammable materials.
15. Do not place the oven near the edge of a bench or table during
operation. Ensure the surface is level, clean and free of water, debris,
etc.

AFO 52096 BK – 200605
7
www.KALORIK.com
16. Extreme caution must be used when moving an appliance or parts
containing hot oil or other hot liquids.
17. Do not use the appliance for other than intended use.
18. Oversize foods or metal utensils must not be inserted in the Air Fryer
Oven as they may create a fire or risk of electric shock.
19. A fire may occur if the Air Fryer Oven is covered or touching flammable
material, including curtains, draperies, walls, and the like, when in
operation. Do not store any item on top of the appliance when in
operation.
20. Do not clean with metal scouring pads. Pieces can break off the pad
and touch electrical parts involving a risk of electric shock.
21. Extreme caution should be exercised when using containers
constructed of other than metal or glass.
22. Do not store any materials in this oven when not in use.
23. Do not place any of the following materials in the oven: paper,
cardboard, plastic, and the like.
24. Do not cover crumb tray or any part of the oven with metal foil. This
causes overheating of the oven.
25. Do not leave unit unattended, especially when toasting or broiling.
26. Use extreme caution when disposing of hot grease.
27. Always wear protective, insulated oven gloves when inserting or
removing items from the hot oven.
28. To disconnect, press the Power for 3 seconds to ensure the machine is
off, then remove plug from wall outlet.
29. Never connect this appliance to an external timer switch or separate
remote-control system as this may lead to burns and/or injury.
30. Do not cover or block the air vents while the appliance is in operation.
Doing so will prevent even cooking and may damage the appliance or
cause it to overheat may result in fire or burns.
31. Do not rest cooking utensils or baking dishes on the appliance’s
hot surfaces.
SAVE THESE INSTRUCTIONS
HOUSEHOLD USE ONLY

AFO 52096 BK – 200605
8
www.KALORIK.com
SAFETY TIPS
1. When in use, always use oven mitts or potholders when touching any
outer or inner surface of the oven, or when handling accessories.
2. To reduce risk of fire, keep oven interior clean and free of food, oil,
grease, and any other combustible materials.
3. Do not use metal utensils such as knives to remove food residue from
the heating elements as this can damage the appliance as well as
lead to electrocution.
4. Do not store any materials in the oven when not in use.
POLARIZED PLUG INSTRUCTIONS
This appliance is equipped with a polarized plug (one blade is wider than
the other). To reduce the risk of electric shock, this plug will fit into the
polarized outlet only one way. If the plug does not properly fit into the
outlet at first, reverse it. If it still does not fit, contact a competent qualified
electrician. Do not attempt to modify the plug in any way.
SHORT CORD INSTRUCTIONS
A short power supply cord is provided to reduce the hazards resulting from
becoming entangled in or tripping over a longer cord. Extension cords may
be used if care is exercised in their use.
The electrical rating of the extension cord should be at least that of the
appliance. If the electrical rating of the extension cord is too low, it
could overheat and burn.
The resulting extended cord should be arranged so that it will not drape
over the countertop or tabletop where it can be pulled on by children
or tripped over.
BEFORE THE FIRST USE
Unpack the appliance and accessories and wash and wipe everything
down. Wipe the interior of the oven with a damp cloth or sponge. Dry
with a paper towel. Make sure the oven is dry before operating the
unit.

AFO 52096 BK – 200605
9
www.KALORIK.com
Position the oven on a flat and heat resistant surface so that it is also
positioned at least 4 inches (10cm) away from any surrounding object.
Unwind and plug in the power cord into the wall outlet.
Place the sliding crumb tray inside on the bottom of the unit,
underneath the bottom heating elements. Make sure unit is clean and
everything has been taken out of the oven.
It is normal if some smoke or smell emanates from the appliance when
using it for the first time. This is not harmful. To eliminate any packing oil
that may remain after production, we recommend operating the
appliance for 20 minutes on steak function, putting the thermostat on
its maximum temperature setting (500 °F).
Once you plug in the unit, the Power button will turn on. If left without
operation for 1 minute, the button will turn off. If the Power button turns
off, press or turn the selector dial, or open and close the glass door to
turn it back on.
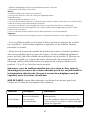
CHARCOAL FILTER
Your MAXX Air Fryer Oven Grill comes with a honeycomb charcoal filter for
odor and smoke control. A ventilation fan gathers the smoke inside the unit
and pushes it out through the filter to absorb odor and smoke before the air
is released. To install:
1. Locate the air exhaust on the back of the unit (see picture above).
2. Take the filter out of its bag.
3. With two hands, grab filter on both sides and place above the filter
slots. (1)
4. Once aligned, slide down pushing in from the sides.
5. Enjoy your smoke and odor free cooking!
We recommend changing the filter after 2 months of use.
1

AFO 52096 BK – 200605
10
www.KALORIK.com
CONTROL PANEL
LED Screen
The LED screen displays the Countdown Timer and Temperature (4),
Temperature button (1), Time button (2), Plus and minus (increase and
decrease) (3), Light button (5), Menu selector (6), Presets (7) and
Power/Start button (8).
PRODUCT AND PARTS
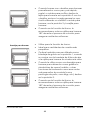
*Use the markings on the door for recommended accessory positions.
Accessory Positioning Diagrams
Follow the diagrams below to use your oven to the fullest and to achieve
consistent and professional results.
Use this accessory to air fry meals as a healthy
alternative to deep-frying in oil. Can be used
with all air frying presets.
Flip or shake food halfway through the cooking
process to cook food evenly.
Air Frying does not require oil. A tablespoon of
oil may be added to enhance flavor.
Air Frying Basket
1
2
5
6
8
7
3
3
4

AFO 52096 BK – 200605
11
www.KALORIK.com
Place on position 2 to air fry and on position 3
to fast air fry.
When using this accessory for foods that may
drip grease or juices, always remember to
place the baking tray on position 1 so it serves
as a drip tray.
The air rack can be used for both the air frying
and oven functions.
This accessory can be used for a variety of
foods including pizza or used when cooking
with cake pans to place on top.
When baking with bakeware for foods like a
loaf, quick bread, cake, and muffin pan, place
on position 2. Anything that needs to be
cooked well from the bottom, like a pie, should
also be on position 2. Rule of thumb is, if you
are using a pan or tin to bake, use position 2
and the air rack.
When using the oven function, we recommend
rotating your rack 180° halfway through the
cooking process to ensure even results.
Used for baking oven function.
Ideal for smaller food bits.
Doubles as a drip tray to catch grease during
cooking when slid into position 1 to catch
crumbs or grease if cooking with the air frying
basket or air rack on a higher level.
When using as a baking sheet for foods like
cookies or grilled cheese, or other baking
functions like roasting smaller cuts of food (like
chicken breasts, corn dogs, etc.), place on
position 2.
When using the oven function, we recommend
rotating your baking tray 180° halfway through
the cooking process to ensure even results.
Air Rack
Baking Tray

AFO 52096 BK – 200605
12
www.KALORIK.com
Use the grill grate with the GRILL function.
To insert, place grill grate on GRILL level, push
all the way until bumpers touch the back of the
cavity and lower onto the heating elements.
Flip food once halfway through cooking time.
Temperature probe allows for smart
temperature control.
Tips
When setting up the Maxx Air fryer oven, always make sure the sliding
crumb tray is inserted prior to starting your cooking process. Rinse and
clean the sliding crumb tray after every use.
When cooking foods that may drip crumbs or grease during the
cooking process, make sure to place the baking tray on position 1. This
will help maintain the unit as clean as possible and protect the lower
heating elements.
Using your Kalorik MAXX Air Fryer Oven
Plug in you Air fryer Oven. Touch the Menu button to scroll through the
presets. If you wish to change the temperature setting, press the
temperature button and adjust buy using the plus (+) and minus (-) buttons.
Same process if you wish to adjust the cooking time.
Got your time and temp set? Touch the power button to begin the cooking
process. The selected preset will blink to indicate the unit is preheating
under the chosen programming. The preset light will blink until the chosen
temperature has been reached.
Need to adjust? Change time or temperature settings with ease at any
point during the cooking process. All you need to do is press the time or
temperature button, and adjust by using the + and – buttons. Wait 3
seconds for the unit to automatically adjust to the new time and/or
temperature.
Grill

AFO 52096 BK – 200605
13
www.KALORIK.com
All done? MAXX is equipped with both an automatic and manual stopping
function.
In automatic stop, once the cooking time has elapsed (0:00), MAXX will
beep three (3) times and enter “Off” mode (display will show “OFF OFF”).
The inner fan will continue to work for 3 minutes to help the unit cool down
if the selected preset used the fan, and all buttons except “ THE POWER”
will turn off. For all the rest of the presets the inner fan will turn on once the
cooking process is done to also assist with the cooling process. After three
minutes, the unit will emit a single beep to tell you the cooling process has
finished.
To turn off MAXX manually, touch the Power button once and the machine
will enter “Off” mode as just described.
Please note that even if the unit is in the process of entering “Off” mode,
you can re-enter Standby mode at any point during the cooling process by
touching the Power button.
Notes:
o MAXX will turn off automatically if the glass door is open during a
prolonged time during a cooking process.
o If unit is left without operation on Standby mode for over 2 minutes, it
will also turn off automatically.
o The inner light turns on automatically and stays on if the glass door is
opened.
o Pressing the Power button for three (3) consecutive seconds will turn the
machine off.
Tip: Flipping or turning food halfway through the cooking process ensures
that the food is evenly cooked.
When the countdown timer reaches 0:00, the unit will beep 3 times,
and the heating elements will turn off. Please note that after cooking
time is done, the fan will remain on for 3 minutes for cooling purposes.
“OFF OFF” will start blinking in the display until cooling process is
finished.
Once the cooling process is done the unit will beep and turn off right
after.
Carefully take out your food with oven mitts and using the tray handle.
Note: the cooking process can be cancelled at any time by pressing
the Power button.

AFO 52096 BK – 200605
14
www.KALORIK.com
Notes:
Although oil is not necessary, a small portion of oil can be sprayed on or
brushed on food before air frying. Make sure to distribute oil evenly on
food.
Some foods release water or oil when cooking. When cooking large
quantities for an extended period, condensation may build up, which
could leave moisture on your countertop.
Use the baking tray to catch dripping liquids or oil.
Position 3 will serve as fast air fry and position 2 as regular air fry. Use fast
air fry for foods that require a more direct contact with the heat source,
e.g., steaks for searing and fries and/or wings for crispier results.
Food Default
Temperature (F)
Default
Time (min)
Air fry 425 20
Grill 500 13
Bacon 425 9
Chicken 350 40
Fries 450 15
Fish 375 10
Shrimp 375 10
Wings 450 15
Defrost 125 40
Dehydrate 130 3 hours
Bake 400 25
Broil 450 15
Pizza 400 20
Pastry 375 20
Warm 160 30
Roast 425 35
Proof 100 60
Toast 400 7
Times and temperatures are indicative, and results can vary on food or quantity

AFO 52096 BK – 200605
15
www.KALORIK.com
*Chicken
-The Chicken preset is perfect for cooking a half chicken.
*Shrimp
-For smaller shrimp, decrease cooking time. For larger shrimp, increase cooking time.
*Steak
- Place grill plate inside on grill position on lower heating elements.
- Using Grill preset, preheat for 5 minutes.
- Flip your steak over halfway through the cooking process.
*Bacon
- Use the baking tray on position 3.
-For thick cut bacon cook for an additional 2-3 minutes.
*Dehydrate
- Use the air frying basket or air rack on positions 2 or 3.
-When dehydrating remember to always take out and flip the accessory used 180° halfway
through the cooking process for even results.
-When using both the air rack and air frying basket also remember to shuffle their rack levels
halfway through the cooking process (swap the one on position 3 to position 2 and vice versa).
-However, for best results purchase the dehydrator set.
*Vegetables
-Add time for ‘hard vegetables’ and lower time for ‘soft vegetables’.
If using the air rack or air frying basket, place the baking tray on
position 1 to use as a drip tray, to help catch any grease or crumbs
during the cooking process.
Baking refers to a wide variety of cooking modes, which is why there
are 3 baking positions ideal for different types of baking. All bakeware
baking (cakes, loaves, muffins) should preferably be used on position 2,
placed on top of the air rack. Baking free-form loaves, cookies,
sandwiches, and roasting should be done on the baking tray placed
on either position 1, 2 or 3, depending on the recipe.
Note: For best results with baked goods, after starting the cooking process,
wait until oven has preheated to the selected temperature (whenever the
preset light stops blinking) before putting your food inside.
CAUTION: Carefully take out your food with oven mitts and using the tray
handle.
Function Description Info
Bake
Recommended for
foods that would
normally be prepared
in a conventional
oven.
Works with prepacked frozen meals.
For best results, preheat oven until
preset light stops blinking.
Recommended accessories: air rack
or baking tray.

AFO 52096 BK – 200605
16
www.KALORIK.com
Broil
Used for meats such as
beef, chicken, or pork.
Also used for top
browning casseroles
and gratins.
Preheat the oven until the set
temperature is reached (the BROIL
preset will stop blinking)
This function usually requires shorter
cooking time.
Food gets cooked quickly during
broil, it is best to watch over food to
not overcook.
Do not use glass oven dishes to broil.
Recommended accessories: air rack
or air frying basket in position 3 and
baking tray in position 1 to catch
grease drippings.
CAUTION: Aluminum foil is not
recommended for covering the
rack.
If covered, the foil prevents the fat
from dripping into the drip tray.
Grease will accumulate on the foil
surface and may catch fire.
Pastry
Use this function to
cook any kind of
dough that is used to
make baked goods.
Preheat oven until preset light stops
blinking.
Donuts, cinnamon rolls, and pies
work great with this function.
Pizza
Recommended for
fresh or frozen pizza.
Preheat oven until preset light stops
blinking.
Recommended accessory: air rack
on position 3 for even cooking.
Rotate pizza 180° halfway through
cooking for even results.
Proof
Proofing can be used
to prepare bread or
pizza dough.
Dough is usually ready when it
appears double in size. Check
regularly when cooking.
Allow dough to complete at least
one rise at room temperature.
Recommended accessory: air rack
on position 2 with proofing dish on
top.
Roast
Roasting can be used
to enhance flavor
through
caramelization and
browning on the
Preheat oven until preset light stops
blinking.
Roasting can get done quicker so it
is suggested to check on food
before time has ended.

AFO 52096 BK – 200605
17
www.KALORIK.com
surface, leaving food
moist and juicy on the
inside.
Used for larger meats and
vegetables.
Recommended accessory: baking
tray.
Toast
Use the toast function
to toast bread to
perfection: crunchy on
the outside and soft on
the inside.
Preheat oven until preset light stops
blinking.
For best results, set food on the
center of the rack spaced out
evenly.
If toast is lighter than desired, place
back inside oven and add more
time by using the selector dial.
Recommended accessory: air rack
on position 3.
KALORIK MAXX BASIC COOKING GUIDE
Food Internal
temp*
Quantity Accessory
Position
Setting Temp Time
Chicken
breast
165°F 8-10 oz Air frying
basket
3 Air Fry
(Fast)
400°F 15-20
min
Chicken
tender-
loins
165°F 3-5 oz Air frying
basket 3 Air Fry
(Fast) 380°F 10-15
min
Chicken
thighs
(bone-in)
165°F 2 x 7-8 oz Air frying
basket 2 Air Fry 450°F 20
min
Chicken
wings
(fresh)
165°F
6
-
8
wings,
1.5 lbs.
total
Air frying
basket 3 Air Fry
(Fast) 400°F 15-20
min
Fish 135°F 6 oz filet Air frying
basket
3 Air Fry
(Fast)
375°F 8-12
min
Tofu 165°F 1-inch thick
Air frying
basket
3
Air Fry
(Fast)
425°F
15
-
20
min
Pork loin 145°F 20-25 oz Air frying
Basket
3 Air Fry
(Fast)
425°F 20-25
min
Mac and
cheese**
(baked)
160°F 4 portions Air rack 2 Air Fry 400°F 10-25
min
Baked
potato
Soft
center*
5.5 oz Air frying
basket
3 Air Fry
(Fast)
400°F 40-45
min
Grilled
cheese
Melty
cheese*
2
sandwiches
Baking
tray
2 Toast 400°F 6 min

AFO 52096 BK – 200605
18
www.KALORIK.com
Personal
Pizza
Melty
cheese*
1 x 8-inch
2 x 4 ½ inch
Air rack 3 Pizza 400°F 15-20
min
Frozen fish
sticks***
165°F 1/2 lb (10
sticks)
Air frying
basket
3 Air Fry
(Fast)
425°F 10
min
Frozen
chicken
nuggets***
165°F 20 nuggets Air frying
basket 3 Air Fry
(Fast) 360°F 6-7
min
Frozen
mozzarella
sticks***
165°F 10 sticks Air frying
basket 3 Air Fry
(Fast) 400°F 6-7
min
Chocolate
chip
cookies
Browned
edges* 4-6 cookies Baking
tray 2 Bake 375°F 10
min
Cake** Tooth-
pick
test*
1 cake (8 ½
round pan)
Tin placed
on air
rack
2 Bake 350°F 25
min
Quick
bread**
Tooth-
pick
test*
1 loaf (9 x 5
in)
Tin placed
on air
rack
2 Bake 375°F 35
min
Muffins
Tooth
-
pick
test*
6-12 muffins
Tin placed
on air
rack
2 Bake 375°F 12
min
Pie**
Bottom
crust
starts to
brown*
Two-crust
pie
Tin placed
on air
rack 2 Air Fry 375°F 15-20
min
Cooking times will vary with different conditions such as size, quantity, initial temperature,
and preparation used. These are meant to serve as basic cooking guidelines to help you
get the most out of your Kalorik MAXX air fryer oven. Additional notes for each food are
found on the next page. Most recipes, unless otherwise indicated, require either to rotate,
flip, or turn food halfway through the cooking process to provide more even results.
*Internal temperatures as recommended by FDA; other doneness standards are
indicative only.
**When in doubt, use BAKE at the recommended time and temperature provided by your
recipe when baking loaves, pies, cakes, and other larger foods that require thorough
internal cooking.
***When in doubt for frozen items, use the directed instructions on the packet and drop
temperature by 25°F.

AFO 52096 BK – 200605
19
www.KALORIK.com
Food Notes:
Chicken
breast
Place baking in position 1 to catch falling grease and juices. Spray air
frying basket with cooking oil before placing breasts. Maximum
recommended capacity is 3 x 10 oz breasts. Let the oven preheat until
the preset light stops blinking. Add an additional 1-2 minutes for each
additional oz/breast. Remember to flip halfway through the cooking
process.
Chicken
tenderloins
Place baking tray in position 1 to catch any falling juices or crumbs
(if breaded). Spray air frying basket with cooking oil before placing
tenderloins on the basket. Let the oven preheat until the preset light
stops blinking. Flip halfway through the cooking process.
Chicken
thighs
(bone-in)
Place baking tray on the lowest level to catch falling grease and juices.
Maximum recommended capacity is 4 bone-in chicken thighs. Add an
additional 1-2 minutes for each additional oz. Flip halfway through the
cooking process.
Chicken
wings
(fresh)
Place baking tray on the lowest level to catch falling grease and juices.
Max recommended amount is 6-8 wings. Flip halfway through the
cooking process.
Fish
Recommended to spray basket with non-stick cooking spray. Fish should
be opaque once cooked through.
Pork loin
Place baking tray on the lowest level to catch falling grease and juices.
Add an additional 2-3 minutes for each additional oz.
Tofu
Make sure to drain and pat dry your tofu. For extra crispy results add a
small amount of corn starch. Flip halfway through cooking time.
Baked
potato
No need to wrap with foil, but you MUST poke holes with a fork to prevent
the potato from exploding and to achieve best results. Covering outside
of potato with a little bit of oil will also help to help crisp up the skin.
Mac and
cheese
(baked)
Assumes cooked macaroni, only used for finishing off the recipe as in a
baked mac and cheese recipe. This is good for adding a nice broil to
your mac and cheese and help the cheese melt. For less browning,
cover tightly with foil.
Grilled
cheese
Butter outside of the bread and flip halfway through cooking time. Try to
avoid going near the sides of the baking pan as it may lead to unwanted
marks on the bread.
Personal
Pizza
Rotate the air rack 180° halfway through the cooking time to ensure even
results. Pizza should be ready when all the cheese is melty, and crust is
golden.
Frozen fish
sticks
Shake the fish sticks halfway through cooking time for maximum
crispiness. No preheating necessary.
Frozen
chicken
nuggets
Shake the nuggets halfway through cooking time for maximum crispiness.
No preheating necessary.

AFO 52096 BK – 200605
20
www.KALORIK.com
See additional cooking notes on the next page.
GET MORE OUT OF YOUR PRODUCT
Browse Chef-created recipes specifically made for your Kalorik product.
Visit our website www.kalorik.com to see our extensive recipe library and
start cooking. Sign up for the Kalorik email mailing list to receive special
offers and recipes and connect with us on social media for daily inspiration.
CLEANING AND MAINTENANCE
Make sure to clean the appliance after each use! Cleaning regularly
prevents the accumulation of grease and helps avoid unpleasant
smells.
Unplug the appliance from the outlet and allow it to cool completely.
Do not immerse the unit in water or wash under running water.
All accessories, except the sliding crumb tray, are dishwasher safe. All
can be washed in hot soapy water.
Frozen
mozzarella
sticks
Flip the mozzarella sticks halfway through cooking time to ensure
maximum crispiness. Use baking pan to prevent cheese drippings. Careful
not to overcook, as it may cause cheese to leak.
Chocolate
chip
cookies
Rotate baking pan 180° halfway through the cooking time to ensure
even cooking. When done, carefully take the baking tray out of the oven
with oven mitts and tap it on your counter to help deflate the cookies
and achieve better results.
Cake
Bake until a toothpick inserted comes out clean. Different pan materials
and sizes will yield different results. Maximum size is 8 ½ inch. Check
doneness 5 minutes before the end of the minimum recommended for
your recipe and add time as needed. Preheat oven until preset light
stops blinking.
Quick
bread
Rotate the loaf pan 180° halfway through cooking. Insert toothpick to
check for doneness. Baking times will vary based on size of loaf and type
of pan used. Preheat oven until preset light stops blinking.
Muffins
Rotate the baking rack 180° halfway through the cooking time to ensure
even cooking. Muffins should be done once an inserted toothpick comes
out clean. Preheat oven until preset light stops blinking.
Pie
Cover the pie loosely with foil if it starts to brown too much. Air Fry works
best for a crispier pie and Bake for a softer pie. Preheat oven until preset
light stops blinking.
La page charge ...
La page charge ...
La page charge ...
La page charge ...
La page charge ...
La page charge ...
La page charge ...
La page charge ...
La page charge ...
La page charge ...
La page charge ...
La page charge ...
La page charge ...
La page charge ...
La page charge ...
La page charge ...
La page charge ...
La page charge ...
La page charge ...
La page charge ...
La page charge ...
La page charge ...
La page charge ...
La page charge ...
La page charge ...
La page charge ...
La page charge ...
La page charge ...
La page charge ...
La page charge ...
La page charge ...
La page charge ...
La page charge ...
La page charge ...
La page charge ...
La page charge ...
La page charge ...
La page charge ...
La page charge ...
La page charge ...
La page charge ...
La page charge ...
La page charge ...
La page charge ...
La page charge ...
La page charge ...
La page charge ...
La page charge ...
La page charge ...
La page charge ...
La page charge ...
La page charge ...
La page charge ...
La page charge ...
La page charge ...
La page charge ...
La page charge ...
La page charge ...
La page charge ...
La page charge ...
La page charge ...
La page charge ...
La page charge ...
La page charge ...
-
 1
1
-
 2
2
-
 3
3
-
 4
4
-
 5
5
-
 6
6
-
 7
7
-
 8
8
-
 9
9
-
 10
10
-
 11
11
-
 12
12
-
 13
13
-
 14
14
-
 15
15
-
 16
16
-
 17
17
-
 18
18
-
 19
19
-
 20
20
-
 21
21
-
 22
22
-
 23
23
-
 24
24
-
 25
25
-
 26
26
-
 27
27
-
 28
28
-
 29
29
-
 30
30
-
 31
31
-
 32
32
-
 33
33
-
 34
34
-
 35
35
-
 36
36
-
 37
37
-
 38
38
-
 39
39
-
 40
40
-
 41
41
-
 42
42
-
 43
43
-
 44
44
-
 45
45
-
 46
46
-
 47
47
-
 48
48
-
 49
49
-
 50
50
-
 51
51
-
 52
52
-
 53
53
-
 54
54
-
 55
55
-
 56
56
-
 57
57
-
 58
58
-
 59
59
-
 60
60
-
 61
61
-
 62
62
-
 63
63
-
 64
64
-
 65
65
-
 66
66
-
 67
67
-
 68
68
-
 69
69
-
 70
70
-
 71
71
-
 72
72
-
 73
73
-
 74
74
-
 75
75
-
 76
76
-
 77
77
-
 78
78
-
 79
79
-
 80
80
-
 81
81
-
 82
82
-
 83
83
-
 84
84


KALORIK AFO 52096 BK Manuel utilisateur
- Taper
- Manuel utilisateur
- Ce manuel convient également à
dans d''autres langues
Documents connexes
-
KALORIK AFO 52484 SS Manuel utilisateur
-
-
-
-
-
-
-
-
-
Autres documents
-
 Comfee’ CO-A181A Manuel utilisateur
-
Comfee CO-A181A (BK) 18L Retro Air Fryer Toaster Oven Manuel utilisateur
-
Silvercrest SHFD 1400 B2 Digital Air Fryer Manuel utilisateur
-
Hamilton Beach Flexi-Grill Manuel utilisateur
-
Cecotec 02221 Manuel utilisateur
-
Ambiano GT-DAF-01 Manuel utilisateur
-
Frigidaire AFT27FRIG Le manuel du propriétaire
