De'Longhi 6926_UM Manuel utilisateur
- Catégorie
- Cafetières
- Taper
- Manuel utilisateur
La page charge ...
La page charge ...
La page charge ...

OVERVIEW/VUE D’ENSEMBLE
Display (preparations)/
Écran (préparations)
13
Lungo/Lungo
14
Espresso/Espresso
15
Ristretto/Ristretto
16
Hot water/Eau chaude
17
Warm milk/Lait chaud
18
Cappuccino/Cappuccino
19
Latte Macchiato/Latte Macchiato
Display (navigation)/
Écran (navigation)
20
Menu/Menu
21
Scroll up when Menu is activated/
Délement vers le haut lorsque le menu est activé
22
Option selection when Menu is activated/
Choix d’options lorsque le menu est activé
23
Scroll down when Menu is activated/
Délement vers le bas lorsque le menu est activé
24
Text display/Achage texte
Rapid Cappuccino System (R.C.S.)/
Système de préparation rapide du
Cappuccino
25
Milk froth regulator knob/
Bouton régulateur pour la mousse de lait
26
Insert position for milk froth regulator knob/Position
d’insertion du bouton régulateur pour la mousse de lait
27
Minimum froth/Minimum (mousse)
28
Maximum froth/Maximum (mousse)
29
«CLEAN»: automatic rinsing function/
«CLEAN»: Fonction de rinçage automatique
30
Milk container lid/Couvercle du conteneur à lait
31
Milk spout/Buse à lait
32
Milk container/Conteneur à lait
33
Milk aspiration tube/Tube d’aspiration du lait
34
R.C.S. connector/Raccordement du système de préparation
rapide du Cappuccino
Overview of machine/
Aperçu de la machine
A
Machine in coee only conguration/
Machine en mode café seulement
B
Machine with Rapid Cappuccino System (for Cappuccino)/
Machine avec système de préparation rapide du Cappuccino
C
Machine with hot water spout/
Machine avec buse à eau chaude
1
Lever/Levier
2
ON/OFF button/Bouton MARCHE/ARRÊT
3
Water tank/Réservoir d’eau
4
Coee outlet/Orice de sortie du café
5
Drip grid/Grille d’égouttage
6
Drip tray/Bac d’égouttage
7
Pivoting cup support (not removable)/
Support à tasse pivotant (non amovible)
8
Used capsule container/Bac de capsules usagées
9
Steam connector door/Panneau de raccordement vapeur
10
Telescopic hot water spout/Buse télescopique pour eau chaude
11
Hot water spout storage area
/
Compartiment d’entreposage pour Buse à eau chaude
12
Steam connector/Raccordement vapeur
4
6926_UM_LATTISSIMA_PREMIUM_Z1A.indb 4 13.11.13 09:56

EN
FR
CONTENT/CONTENU
Nespresso is an exclusive system creating the perfect espresso, time after time. All Nespresso machines are equipped with a unique extraction system that guarantees up to 19 bars of pressure. Each parameter has been
calculated with great precision to ensure that all the aromas from each Grand Cru can be extracted, to give the coee body and create an exceptionally thick and smooth crema.
Nespresso, un système exclusif pour reproduire à l’inni un Espresso parfait. Toutes les machines Nespresso sont équipées d’un système d’extraction unique à très haute pression (jusqu’à 19 bars). Chaque paramètre est calculé
avec précision pour révéler la totalité des arômes de chaque Grand Cru, lui donner du corps et générer une crème de café d’une densité et d’une onctuosité incomparables.
DESCALING/DÉTARTRAGE .............................................................................
WATER HARDNESS SETTING/NIVEAU DE DURETÉ DE L’EAU ..............................
TROUBLESHOOTING/DÉPANNAGE ..................................................................
SPECIFICATIONS/SPÉCIFICATIONS .................................................................
DISPOSAL AND ECOLOGICAL CONCERNS/
RECYCLAGE ET PROTECTION DE L’ENVIRONNEMENT .......................................
CONTACT THE NESPRESSO CLUB/COMMUNIQUEZ AVEC LE CLUB NESPRESSO ......
WARRANTY/GARANTIE ..................................................................................
OVERVIEW/VUE D'ENSEMBLE ............................................................................
PACKAGING CONTENT/CONTENU DE L‘EMBALLAGE ..............................................
MENU NAVIGATION/NAVIGATION MENU ..........................................................
MENU LIST/MENU PRINCIPAL ............................................................................
FIRST USE OR AFTER A LONG PERIOD OF NONUSE/PREMIÈRE UTILISATION OU
APRÈS UNE LONGUE PÉRIODE D’INUTILISATION .................................................
COFFEE PREPARATION/PRÉPARATION DU CAFÉ ..................................................
ASSEMBLING/DISASSEMBLING OF RAPID CAPPUCCINO SYSTEM R.C.S./
MONTER/DÉMONTER LE SYSTÈME DE PRÉPARATION RAPIDE DU CAPPUCCINO .....
PREPARING CAPPUCCINO AND LATTE MACCHIATO/
PRÉPARATION CAPPUCCINO ET LATTE MACCHIATO ..........................................
DAILY CARE/ENTRETIEN QUOTIDIEN ..................................................................
HAND WASHING OF RAPID CAPPUCCINO SYSTEM R.C.S./NETTOYAGE À LA MAIN
DU SYSTÈME DE PRÉPARATION RAPIDE DU CAPPUCCINO .....................................
VOLUME FACTORY SETTINGS/QUANTITÉS PAR DÉFAUT ........................................
16
17
18
19
20
20
21
CAUTION: when you see this sign, please refer to the Important Safeguards to avoid possible harm and damage.
INFORMATION: when you see this sign, please take note of the advice for the correct and safe usage of your coee machine.
AVERTISSEMENT: Lorsque ce symbole apparaît, veuillez consulter les consignes de sécurité pour éviter d’éventuels dangers et dommages.
INFORMATION: Lorsque vous voyez ce symbole, veuillez prendre note des conseils pour utiliser votre machine à café de façon correcte
et sécuritaire.
04
06
06
07
08
10
10
11
14
14
15
5
6926_UM_LATTISSIMA_PREMIUM_Z1A.indb 5 13.11.13 09:56

EN SAFE TY PRECAUTIO NS ............................................................................. 2
FR CONSIGNES DE SECURITE ......................................................................... 4
DE SIC HERHEITSHINWEISE ........................................................................... 7
IT PRECAUZIONI D I SICUREZZ A .................................................................... 10
ES PRECAUCIONES DE SEGURIDAD ................................................................ 12
PT MEDIDAS DE SEGURANÇA......................................................................... 15
NL VEILIGHEIDSMAATREGELEN ..................................................................... 18
GR ΜΈΤ ΡΑ ΑΣΦΑΛΈΙΑ Σ .................................................................................. 20
HU BIZTONSÁGI ELŐÍRÁSOK .......................................................................... 22
CZ BEZPEČNOSTNÍ POKYNY .......................................................................... 25
PL ZASADY BEZPIECZEŃSTWA ....................................................................... 28
RU МЕРЫ ПРЕДОСТОРОЖ НОСТИ ................................................................. 31
EN
FR
MENU NAVIGATION/NAVIGATION MENU
PACKAGING CONTENT/CONTENU DE L‘EMBALLAGE
Coee machine
Machine à café
«Welcome to Nespresso folder»
Trousse «Bienvenue chez Nespresso»
User manual
Mode d’emploi
Important Safeguards
Consignes de sécurité
Capsules set
Ensemble de capsules
Enter the Menu list/Ouvrir le menu principal
Press symbol/Appuyez brièvement sur le symbole .
Browse options/Parcourir les options
Press symbol/Appuyez sur le symbole .
Select option/Choisir une option
Press symbol/Appuyez sur le symbole .
Exit from the Menu list/
Quitter le menu principal
Scroll to EXIT option and select.
Or quickly press symbol.
Sélectionnez l’option [QUITTER]. Ou encore, appuyez
brièvement sur le symbole .
Exit from option and return to Menu list/
Revenir au menu principal
Scroll to EXIT option and select.
Or quickly press symbol.
Sélectionnez l’option [QUITTER]. Ou encore, appuyez
brièvement sur le symbole .
6
6926_UM_LATTISSIMA_PREMIUM_Z1A.indb 6 13.11.13 09:56

EN
FR
Enter the Menu list/Ouvrir le menu principal
Press symbol/Appuyez brièvement sur le symbole .
Browse options/Parcourir les options
Press symbol/Appuyez sur le symbole .
Select option/Choisir une option
Press symbol/Appuyez sur le symbole .
Exit from the Menu list/
Quitter le menu principal
Scroll to EXIT option and select.
Or quickly press symbol.
Sélectionnez l’option [QUITTER]. Ou encore, appuyez
brièvement sur le symbole .
Exit from option and return to Menu list/
Revenir au menu principal
Scroll to EXIT option and select.
Or quickly press symbol.
Sélectionnez l’option [QUITTER]. Ou encore, appuyez
brièvement sur le symbole .
MENU LIST/MENU PRINCIPAL
1
Select this option to set your preferred language. Follow the instructions on the text display.
Cette option permet de choisir la langue privilégiée. Suivez les directives à l’écran.
2
Select this option once the descaling alert appears on the display. Refer to page 16 for descaling process.
Sélectionnez cette option lorsque l’alerte de détartrage apparaît à l’écran. Reportez-vous à la page 16. Vous serez guidé tout au long du processus de détartrage.
3
Select this option to set the water hardness level according to your location. To determine water hardness, use provided sticker. This will optimize the descaling
frequency. Refer to page 17.
Cette option permet d’établir le niveau de dureté de l’eau correspondant à votre emplacement. Pour déterminer le niveau de dureté de l’eau qui convient, utilisez
l’indicateur fourni avec la machine. Vous pourrez ainsi optimiser la fréquence de détartrage. Reportez-vous à la page 17.
4
Select this option to set the time after which the machine switches o automatically. (Available options are 9 minutes, 30 minutes, 2 hours and 8 hours). Follow the
instructions on the text display.
Cette option permet d’établir le délai de mise hors tension automatique de la machine. (Options possibles: 9minutes, 20minutes, 2heures ou 8heures). Suivez les
directives à l’écran.
5
Select this option to reset all parameters of the machine to factory settings.
Cette option permet de rétablir tous les réglages par défaut de la machine.
6
Select this option to empty the water inside the machine in case you need to send it for repair or before a long period of non use. Follow the instructions on the text
display. You will not be able to use the machine for 10 minutes after this process.
Cette option permet de vider l’eau à l’intérieur de la machine avant une réparation ou une longue période d’inutilisation. Suivez les directives à l’écran. Une fois ce
processus terminé, la machine ne peut être utilisée pendant 10minutes.
7
Select this option to program the volume of your beverages (coee cups, hot water and milk based preparations). Follow the instructions on the text display. In addition,
you can reset all the beverages volumes to factory settings.
Cette option permet de faire la programmation du volume de vos boissons (café et préparations à base d’eau chaude et de lait). Suivez les directives à l’écran. En outre,
vous pouvez rétablir tous les réglages par défaut à tout moment.
8
Select this option to access all machine settings at a glance.
Cette option permet de consulter tous les réglages de la machine.
9
Select this option to check the overall status of your machine. The consumption statistics are available either from the rst use (absolute) or since the last descaling
(relative). Machine's serial number is also available.
Cette option permet de vérier l’état global de la machine. Vous pouvez consulter les statistiques de consommation depuis la première utilisation (absolues) ou depuis le
dernier détartrage (relatives). Le numéro de série de la machine est également fourni.
10
Select this option to receive the best advice on how to get optimal milk froth quality day after day. The internet link is provided to know more about this feature.
For more information on this feature, click on the provided link.
Cette option vous permet d’obtenir des conseils d’experts et d’apprendre à créer une mousse de lait de qualité au quotidien. Pour en apprendre davantage sur cette
fonction, cliquez sur l’hyperlien fourni.
11
Exit from the menu list and return to machine ready mode.
Cette option permet de quitter le menu principal et de remettre la machine en mode de préparation.
1
LANGUELANGUAGE
2
DÉTARTRAGEDESCALING
3
DURETÉ DE L'EAUWATER HARDNESS
4
ARRÊT AUTO.AUTO POWER OFF
5
RÉGLAGES USINEFACTORY SETTINGS
6
VIDAGE CIRCUIT LIQ.EMPTY FLUID SYSTEM
7
PROG. VOLUMEVOLUME PROGR.
8
INFO RÉGLAGESSETTINGS INFO
9
MAINTENANCEMAINTENANCE
10
AIDEHELP
11
SORTIEEXIT
7
6926_UM_LATTISSIMA_PREMIUM_Z1A.indb 7 13.11.13 09:56

EN
FR
FIRST USE OR AFTER A LONG PERIOD OF NONUSE/
PREMIÈRE UTILISATION OU APRÈS UNE LONGUE PÉRIODE D’INUTILISATION
CAUTION: rst read the
Important Safeguards to avoid risks
of fatal electrical shock and re.
AVERTISSEMENT: Avant toute
chose, vous devez lire les consignes
de sécurité pour éviter tout risque
de décharge électrique mortelle ou
d’incendie.
1. Remove the water tank, drip tray and capsule
container. Adjust the cable length and store the
excess in the cable guide under the machine.
1. Retirez le réservoir d’eau, le bac d’égouttage et le bac
de capsules. Réglez la longueur du câble d’alimentation et
placez l’excédent dans le guide-câble sous la machine.
5. Insert the hot water spout. Switch
machine ON.
5. Insérez la buse à eau chaude. Appuyez
sur le bouton de mise sous tension.
2. Put the machine in upright position
and plug into a power outlet.
2. Assurez-vous que la machine est en
position verticale avant de la brancher
dans la prise électrique.
6. SET LANGUAGE: set your preferred
language. Press to continue.
6. SET LANGUAGE: Cette option permet
d’établir la langue d’utilisation privilégiée.
Appuyez sur pour continuer.
3. The water tank can be carried by
its cover.
3. Le réservoir d’eau peut être transporté par
son couvercle.
4. Rinse the water tank before lling with
fresh potable water up to maximum level.
4. Rincez le réservoir d’eau, puis remplissez-le d’eau potable
fraîche jusqu’au maximum indiqué.
max
SET LANGUAGE
to continue
LANGUAGE
Actual value : EN
New value : [ ]
to select
05
max
SET LANGUAGE
to continue
LANGUAGE
Actual value : EN
New value : [ ]
to select
05
max
SET LANGUAGE
to continue
LANGUAGE
Actual value : EN
New value : [ ]
to select
05
max
SET LANGUAGE
to continue
LANGUAGE
Actual value : EN
New value : [ ]
to select
05
max
SET LANGUAGE
to continue
LANGUAGE
Actual value : EN
New value : [ ]
to select
05
max
SET LANGUAGE
to continue
LANGUAGE
Actual value : EN
New value : [ ]
to select
05
8
6926_UM_LATTISSIMA_PREMIUM_Z1A.indb 8 13.11.13 09:56

max
First read the safety precautions to avoid risks of fatal electrical shock and fire
Remove the plastic films from grid,
lever and machine panels.
Remove the water tank, drip tray, and capsule
container. Adjust the cable length and store the
excess in the cable guide under the machine.
Put the machine in upright position,
plug machine into mains.
The water tank can be carried by
its cover.
Rinse the water tank before filling with
potable water up to maximum level.
Insert the hot water spout.
Switch machine ON
Set your preferred language.
Press to continue.
SET LANGUAGE
to continue
Select your language by scrolling the
options using up/down arrow. Press to
confirm.
LANGUAGE
Actual value : EN
New value : [ ]
to select
Coffee preparation
x3
x3
110 ml
40 ml
25 ml
05 06
8. Once symbol is pressed, machine heats up.
8. Lorsque vous appuyez sur , la machine commence à chauer.
EN
FR
FIRST USE OR AFTER A LONG PERIOD OF NONUSE/
PREMIÈRE UTILISATION OU APRÈS UNE LONGUE PÉRIODE D’INUTILISATION
INFORMATION: refer to section Assembling/Disassembling of Rapid Cappuccino System.
INFORMATION: Reportez-vous à la section intitulée «Monter/Démonter le système de
préparation rapide du Cappuccino».
11. Disassemble the Rapid Cappuccino System (R.C.S.) and clean all components in the upper level of
your dishwasher. In case a dishwasher is not available, refer to section Hand washing of Rapid Cappuccino
System ( R.C.S.).
11. Démontez et nettoyez le système de préparation rapide du Cappuccino (toutes les pièces vont au lave-
vaisselle; il faut toutefois s’assurer de les mettre dans la partie supérieure du lave-vaisselle). Si vous n’avez
pas de lave-vaisselle, reportez-vous à la section sur le nettoyage à la main du système de préparation
rapide.
10. Rinsing: repeat three times through the hot water spout. Once nished, remove it and store the
hot water spout back in the storage area located on the right hand side of the machine. Close the steam
connector door.
10. Rinçage: Répétez trois fois cette opération en utilisant la buse à eau chaude. Ensuite, retirez la buse et
rangez-la à l’endroit prévu à cette n, sur le côté droit de la machine. Refermez le panneau de
raccordement vapeur.
9. Rinsing: place a container under coee outlet and press
the Lungo button. Repeat three times.
9. Rinçage: Placez un contenant sous la sortie de café et appuyez
sur le bouton Lungo. Répétez trois fois.
7. LANGUAGE: select your language by scrolling the options using
arrow. Press to conrm.
7. LANGUAGE: Sélectionnez votre langue d’utilisation en faisant
déler les options à l’aide de . Appuyez sur pour conrmer.
INFORMATION: machines are fully tested after being produced. Some traces of coee
powder could be found in rinsing water.
INFORMATION: Chaque machine fabriquée est assujettie à des essais exhaustifs. Des résidus
de café peuvent donc être présents dans l’eau de rinçage.
max
SET LANGUAGE
to continue
LANGUAGE
Actual value : EN
New value : [ ]
to select
05
4°
15”
Assembling / disassembling of Rapid Cappuccino system (R.C.S)
07
9
6926_UM_LATTISSIMA_PREMIUM_Z1A.indb 9 13.11.13 09:56

max
First read the safety precautions to avoid risks of fatal electrical shock and fire
Remove the plastic films from grid,
lever and machine panels.
Remove the water tank, drip tray, and capsule
container. Adjust the cable length and store the
excess in the cable guide under the machine.
Put the machine in upright position,
plug machine into mains.
The water tank can be carried by
its cover.
Rinse the water tank before filling with
potable water up to maximum level.
Insert the hot water spout.
Switch machine ON
Set your preferred language.
Press to continue.
SET LANGUAGE
to continue
Select your language by scrolling the
options using up/down arrow. Press to
confirm.
LANGUAGE
Actual value : EN
New value : [ ]
to select
Coffee preparation
x3
x3
110 ml
40 ml
25 ml
05 06
4°
15”
Assembling / disassembling of Rapid Cappuccino system (R.C.S)
07
EN
FR
COFFEE PREPARATION/
PRÉPARATION CAFÉ
ASSEMBLING/DISASSEMBLING OF RAPID CAPPUCCINO SYSTEM R.C.S./
MONTER/DÉMONTER LE SYSTÈME DE PRÉPARATION RAPIDE DU CAPPUCCINO
1. Lift the lever completely and insert a
Nespresso capsule.
1. Soulevez complètement le levier et insérez
une capsule Nespresso.
2. Close the lever and place a cup under the
coee outlet.
2. Abaissez le levier et placez une tasse sous
la sortie de café.
3. Press the Ristretto (25 ml/0.75 oz), the Espresso (40 ml/1.35 oz) or the
Lungo (110 ml/3.7 oz) button. Preparation will stop automatically. To stop
the coee ow or top up your coee, press again.
3. Appuyez sur le bouton Ristretto (25ml/0.75oz), Espresso
(40ml/1.35oz) ou Lungo (110ml/3.7oz). La préparation se fera
automatiquement. Pour interrompre la préparation ou le débit de café,
appuyez à nouveau sur le même bouton.
4. Take the cup. Lift and close the lever
to eject the capsule into the used capsule
container.
4. Prenez votre tasse. Soulevez et abaissez le
levier pour éjecter la capsule dans le bac de
capsules usagées.
1. Remove the milk container lid and unplug
milk aspiration tube.
1. Retirez le couvercle du contenant de lait et
débranchez le tube d’aspiration.
4. Remove the milk spout by pulling it o.
4. Retirez la buse à lait.
2. Remove the milk froth regulator knob by
turning it until and pulling it up.
2. Retirez le bouton régulateur pour la
mousse de lait en le tournant jusqu’au
symbole
et en le tirant vers le haut.
3. Remove Rapid Cappuccino System
connector by unlocking it from to and
pulling it o.
3. Déverrouillez le raccordement du système
de préparation rapide en le tournant de à
, puis retirez-le.
NOTE: during heat up, you can press any coee buttons. The coee will then ow automatically when the
machine is ready.
NOTE: Vous pouvez appuyer sur le bouton voulu pendant que la machine chaue. La préparation se fera
automatiquement lorsque la machine aura atteint la température voulue.
10
6926_UM_LATTISSIMA_PREMIUM_Z1A.indb 10 13.11.13 09:56

4°
15”
Assembling / disassembling of Rapid Cappuccino system (R.C.S)
07
4°
15”
Assembling / disassembling of Rapid Cappuccino system (R.C.S)
07
4°
15”
Assembling / disassembling of Rapid Cappuccino system (R.C.S)
07
4°
15”
Assembling / disassembling of Rapid Cappuccino system (R.C.S)
07
EN
FR
PREPARING CAPPUCCINO AND LATTE MACCHIATO/
PRÉPARATION CAPPUCCINO ET LATTE
MACCHIATO
1. Fill the milk container with desired
quantity of milk.
1. Remplissez le contenant de lait jusqu’au
niveau désiré.
2. Close the milk container. Open the steam connector door
by sliding it to the right. Connect the Rapid Cappuccino
System to the machine.
2. Refermez le contenant de lait. Ouvrez le panneau du
raccordement vapeur en le faisant glisser vers la droite.
Branchez le système de préparation rapide du Cappuccino
à la machine.
3. Machine heats up for approximately
15 sec.
3. La machine chaue pendant environ
15 secondes.
4. Lift the lever completely and insert a
Nespresso capsule.
4. Soulevez complètement le levier et insérez
une capsule Nespresso.
CAUTION: do not use the milk container for any other liquid
other than milk or potable water. Do not use raw unpasteurised
milk and be sure not to use milk after its expiration date as
indicated on the packaging.
AVERTISSEMENT: Le contenant de lait n’est pas conçu pour
des liquides autres que le lait et l’eau potable. Ne pas utiliser de
lait cru et assurez-vous de ne pas utiliser de lait après la date de
péremption indiquée sur l'emballage.
INFORMATION: for a perfect milk froth, use skimmed or semi-skimmed milk at refrigerator
temperature (about 4° C/39.2° F).
INFORMATION: Pour obtenir une mousse parfaite, utilisez du lait écrémé ou semi-écrémé à température
réfrigérée (environ 4° C).
INFORMATION: when the milk
container is empty, before relling,
thoroughly rinse it and the milk
aspiration tube with potable water.
INFORMATION: Avant de remplir le
contenant de lait, rincez-le abondamment
à l’eau potable. Répétez l’opération pour le
tube d’aspiration.
11
6926_UM_LATTISSIMA_PREMIUM_Z1A.indb 11 13.11.13 09:56

Preparing Cappuccino and Latte Macchiato
4°
i
When the milk container is empty, before refilling,
thoroughly rinse it and the milk aspiration tube
with potable water.
Close the milk container. Open the steam
connector door by sliding it to the right. Connect
the Rapid Cappuccino System to the machine.
15”
+
LATTE MACCHIATO
Clean
15”
i
Remove Rapid Cappuccino System
connector by unlocking it from (sign ) to
(sign) and pulling it off
Remove the milk container lid and
unplug milk aspiration tube.
Remove the milk froth regulator knob by
turning it until and pulling it up.
Remove the milk spout by pulling it off.
1 2 3 4
Assembling / disassembling of Rapid Cappuccino system (R.C.S)
RINSE MILK SYSTEM
07 08
EN
FR
PREPARING CAPPUCCINO AND LATTE MACCHIATO/
PRÉPARATION CAPPUCCINO ET LATTE MACCHIATO
INFORMATION: rinse the milk
system after each use.
INFORMATION: Rincez le système de
mousse de lait après chaque utilisation.
9. Place a container under milk spout.
9. Placez un récipient sous la buse à lait.
10. Rotate the milk regulator knob in «CLEAN» position.
Milk system rinsing process starts and hot water combined
with steam ows through the milk spout.
10. Pour lancer le processus de rinçage, tournez le bouton
régulateur jusqu’à la position «CLEAN». De l’eau chaude et
de la vapeur seront éjectées par la buse à lait.
11. Rinsing process lasts approximately
15 sec and stops automatically.
11. Le processus de rinçage dure environ
15secondes et s’arrête automatiquement.
5. Close the lever, place a Cappuccino cup or a
Latte Macchiato glass under the coee outlet
and adjust milk spout position.
5. Abaissez le levier, placez une tasse à
Cappuccino ou un verre à Latte Macchiato
sous la sortie de café et réglez la position de
la buse à lait.
6. Adjust the milk froth regulator knob
according to the volume of froth you want.
6. Ajustez le bouton régulateur pour la
mousse de lait en fonction de la quantité de
mousse désirée.
7. Press the Cappuccino or Macchiato button. The
preparation starts after a few seconds (rst milk and then
coee) and will stop automatically.
7. Appuyez sur le bouton Cappuccino ou Macchiato. La
préparation commencera après quelques secondes (d’abord
le lait, puis le café) et s’arrêtera automatiquement.
8. At the end of the preparation, lift and close
the lever to eject the capsule into the used
capsule container.
8. Une fois la préparation terminée, soulevez
et abaissez le levier pour éjecter la capsule
dans le bac de capsules usagées.
12
6926_UM_LATTISSIMA_PREMIUM_Z1A.indb 12 13.11.13 09:56

PRESS to confirm.
The discaling agent flows alternately
trough the coffee outlet, hot water nozzle
and drip tray.
Descaling
Descaling process: Empty the drip tray and
the used capsules container.
Rinsing process: Empty the drip
tray and the used capsules
container.
Refer to safety precautions
+
100 ml
500 ml
1 2 3
5
7 8
4
6
Lift and close the lever to eject any capsule
in the used capsule container.
Descaling process: Fill water tank with 100
ml of Nespresso descaling agent and 500ml
water.
Descaling process: Insert the hot
water spout.
Enter the Menu, browse the options and
select DESCALING. You will be guided
throughout the whole process. Follow
machine display instructions.
Descaling process: Place one container
of minimum 1 litre under both the coffee
outlet and the hot water spout.
4°
Volume factory settings
LANGUAGE
DESCALING
WATER HARDNESS
09 10
EN
FR
PREPARING CAPPUCCINO AND LATTE MACCHIATO/
PRÉPARATION CAPPUCCINO ET LATTE MACCHIATO
12. Once rinsing has nished, turn the milk
froth regulator knob back in milk position.
12. Une fois le rinçage terminé, tournez
à nouveau le bouton régulateur pour le
remettre dans la position initiale.
13. Disconnect the R.C.S. from machine and place it
immediately in the refrigerator. Close the machine steam
connector door.
13. Débranchez le système de préparation rapide du
Cappuccino et rangez immédiatement le contenant de lait
au réfrigérateur. Refermez le panneau de raccordement
vapeur.
15. And clean all components in the upper
side of your dishwasher. In case a dishwasher
is not available, refer to section Hand washing
of Rapid Cappuccino System (R.C.S.).
15. Toutes les pièces vont au lave-vaisselle;
il faut toutefois s’assurer de les mettre dans
la partie supérieure du lave-vaisselle. Si vous
n’avez pas de lave-vaisselle, reportez-vous
à la section sur le nettoyage à la main du
système de préparation rapide.
INFORMATION: refer to section «Assembling/
Disassembling of Rapid Cappuccino System (R.C.S.)».
INFORMATION: Reportez-vous à la section
intitulée «Monter/Démonter le système de préparation
rapide du Cappuccino».
CAUTION: this milk should not be kept for more than 2 days in the refrigerator. In the case the milk
container is kept outside refrigerator for longer than 2 hours, disassemble the R.C.S. and clean all components
(refer to dishwashing or hand washing recommendations).
AVERTISSEMENT: Ne laissez pas ce lait plus de 2jours au réfrigérateur. Si le contenant de lait est laissé sur
le comptoir pendant plus de 2heures, démontez le système de préparation rapide du Cappuccino et nettoyez
toutes les pièces (reportez-vous à nos directives pour le nettoyage au lave-vaisselle ou à la main).
14. Every two days, disassemble the Rapid Cappuccino
System.
14. Démontez le système de préparation rapide du
Cappuccino tous les 2jours.
13
6926_UM_LATTISSIMA_PREMIUM_Z1A.indb 13 13.11.13 09:56

PRESS to confirm.
The discaling agent flows alternately
trough the coffee outlet, hot water nozzle
and drip tray.
Descaling
Descaling process: Empty the drip tray and
the used capsules container.
Rinsing process: Empty the drip
tray and the used capsules
container.
Refer to safety precautions
+
100 ml
500 ml
1 2 3
5
7 8
4
6
Lift and close the lever to eject any capsule
in the used capsule container.
Descaling process: Fill water tank with 100
ml of Nespresso descaling agent and 500ml
water.
Descaling process: Insert the hot
water spout.
Enter the Menu, browse the options and
select DESCALING. You will be guided
throughout the whole process. Follow
machine display instructions.
Descaling process: Place one container
of minimum 1 litre under both the coffee
outlet and the hot water spout.
4°
Volume factory settings
LANGUAGE
DESCALING
WATER HARDNESS
09 10
EN
FR
2. Lift and close the lever to eject the capsule into the used capsule container. Place
a container under coee outlet and press the Lungo button to rinse. Clean the coee
outlet with a clean damp cloth.
2. Soulevez et abaissez le levier pour éjecter la capsule dans le bac de capsules
usagées. Placez un contenant sous la sortie de café et appuyez sur le bouton Lungo
pour rincer. Nettoyez la sortie café avec un linge humide propre.
3. Carefully rinse away any dirt residue on the hot water
spout with potable water. Clean it with a clean damp cloth.
3. Rincez soigneusement la buse à eau chaude à l’eau
potable an d’éliminer toute trace de résidus. Nettoyez-la
avec un linge humide propre.
1. Disassemble the Rapid Cappuccino System. Refer to
section «Assembling/Disassembling of Rapid Cappuccino
system (R.C.S.)».
1. Démontez le système de préparation rapide du
Cappuccino. Reportez-vous à la section intitulée «Monter/
Démonter le système de préparation rapide du Cappuccino».
2. Rinse away carefully any milk residue with
potable water.
2. Rincez soigneusement à l’eau potable an
d’éliminer tout résidu de lait.
3. Soak all components in warm water (approximately
40° C/104° F) together with soap detergent for at least
30 minutes.
3. Faites tremper toutes les pièces dans de l’eau savonneuse
chaude (environ 40° C/104° F) pendant environ 30minutes.
Utilisez un savon doux.
4. Rinse with potable water and dry them
with a clean damp cloth.
4. Rincez à l’eau potable et essuyez les pièces
à l’aide d’un linge humide propre.
DAILY CARE/ENTRETIEN QUOTIDIEN
INFORMATION: do not use any strong cleaning agent or solvent cleaner. Use a damp cloth and mild cleaning agent to clean the surface of the machine. Do
not put any machine components in dishwasher, except the Rapid Cappuccino System components.
INFORMATION: Ne pas utiliser de détergent puissant ou de solvant. Utilisez un chion humide et un détergent doux pour nettoyer la surface de la machine.
Outre les pièces du système de préparation rapide du Cappuccino, les pièces de votre machine à café ne vont pas au lave-vaisselle.
HAND WASHING OF RAPID CAPPUCCINO SYSTEM R.C.S./
NETTOYAGE À LA MAIN DU SYSTÈME DE PRÉPARATION RAPIDE DU CAPPUCCINO
INFORMATION: when a dishwasher is not available, the R.C.S. components can be washed manually. In that case, the procedure must be performed daily for a maximum eciency.
INFORMATION: Si vous n’avez pas de lave-vaisselle, vous pouvez laver les pièces du système de préparation rapide du Cappuccino à la main. Pour garantir un maximum d’ecacité, cette procédure doit
être répétée chaque jour.
1. Remove drip tray and capsule container. Empty and rinse.
Remove water tank. Empty and rinse water tank before
lling with fresh potable water.
1. Retirez le bac d’égouttage et le bac de capsules. Videz-les
et rincez-les. Retirez le réservoir d’eau. Videz-le, puis rincez-
le avant de le remplir d’eau potable fraîche.
14
6926_UM_LATTISSIMA_PREMIUM_Z1A.indb 14 13.11.13 09:56

PRESS to confirm.
The discaling agent flows alternately
trough the coffee outlet, hot water nozzle
and drip tray.
Descaling
Descaling process: Empty the drip tray and
the used capsules container.
Rinsing process: Empty the drip
tray and the used capsules
container.
Refer to safety precautions
+
100 ml
500 ml
1 2 3
5
7 8
4
6
Lift and close the lever to eject any capsule
in the used capsule container.
Descaling process: Fill water tank with 100
ml of Nespresso descaling agent and 500ml
water.
Descaling process: Insert the hot
water spout.
Enter the Menu, browse the options and
select DESCALING. You will be guided
throughout the whole process. Follow
machine display instructions.
Descaling process: Place one container
of minimum 1 litre under both the coffee
outlet and the hot water spout.
4°
Volume factory settings
LANGUAGE
DESCALING
WATER HARDNESS
09 10
EN
FR
NOTE: *the milk froth volume depends on the kind of milk that is used, its temperature and the
position of the milk regulator knob.
NOTE: *La quantité de mousse de lait dépend du type de lait utilisé, de sa température et de la
position du bouton régulateur.
NOTE: we recommend you to keep factory settings for Ristretto, Espresso and Lungo to ensure the
best in cup results for each of our coee varieties.
NOTE: Nous vous conseillons de conserver les réglages par défaut pour le Ristretto, l’Espresso et le
Lungo an de garantir les meilleurs résultats possible pour chacune de nos variétés de café.
Water volume can be programmed from 50 to 400 ml (1.7 to 13.5 oz).
Milk volume can be programmed from 30 to 200 ml (1 to 6.8 oz).
Coee volume can be progammed from 25 to 200 ml (0.85 to 6.8 oz).
La quantité programmable d’eau peut varier de 50 à 400ml (1.7 to 13.5 oz).
La quantité programmable de lait peut varier de 30 à 200 ml (1 to 6.8 oz).
La quantité programmable de café peut varier de 25 à 200 ml (0.85 to 6.8 oz).
VOLUME FACTORY SETTINGS/QUANTITÉS PAR DÉFAUT
Ristretto 25 ml (0.75 oz)
Ristretto 25 ml (0.75oz)
Cappuccino Milk*: 50 ml (1.7 oz)/
Coee: 40 ml (1.35 oz)
Cappuccino Lait*: 50ml (1.7oz)/
Café: 40ml (1.35oz)
Lungo 110 ml (3.7 oz)
Lungo 110 ml (3.7 oz)
Latte Macchiato Milk*: 150 ml (5 oz)/
Coee: 40 ml (1.35 oz)
Latte Macchiato Lait*: 150ml (5oz)/
Café: 40 ml (1.35oz)
Espresso 40 ml (1.35 oz)
Espresso 40 ml (1.35 oz)
Hot water 125 ml (4.2 oz)
Eau chaude 125 ml (4.2 oz)
Warm milk* 120 ml (4.1 oz)
Lait chaud* 120 ml (4.1 oz)
CAUTION: if coee volumes are programmed higher than
150 ml (5 oz): let the machine cool down for 5 minutes before
making the next coee to prevent the risk of overheating!
AVERTISSEMENT: Laissez la machine refroidir pendant
5 minutes si vous avez programmé des volumes de café 150 ml
ou plus. Risque de surchaue!
15
6926_UM_LATTISSIMA_PREMIUM_Z1A.indb 15 13.11.13 09:56

+
100 ml
500 ml
10
+
100 ml
500 ml
10
+
100 ml
500 ml
10
+
100 ml
500 ml
10
+
100 ml
500 ml
10
+
100 ml
500 ml
10
+
100 ml
500 ml
10
+
100 ml
500 ml
10
EN
FR
DESCALING/DÉTARTRAGE
1. Lift and close the lever to eject any capsule
in the used capsule container.
1. Soulevez et abaissez le levier pour éjecter
la capsule dans le bac de capsules usagées.
2. Enter the Menu, browse the options and select
DESCALING. You will be guided throughout the whole
process. Follow machine display instructions.
2. Allez au menu principal, parcourez les options et
sélectionnez DÉTARTRAGE. Vous serez guidé tout au long
du processus de détartrage. Suivez les directives à l’écran.
CAUTION: refer to safety precautions. AVERTISSEMENT: Reportez-vous aux consignes de sécurité.
7. Press to conrm. The descaling agent ows alternately
through the coee outlet, hot water spout and drip tray.
7. Appuyez sur pour conrmer. Le détartrant passera
tour à tour par la sortie de café, la buse à eau chaude et le
bac d’égouttage.
5. Descaling process: insert the hot water
spout.
5. Processus de détartrage: Insérez la buse
à eau chaude.
6. Descaling process: place one container,
minimum of 1 liter, under both the coee
outlet and the hot water spout.
6. Processus de détartrage: Placez un
récipient d’au moins 1litre sous la sortie de
café et la buse à eau chaude.
3. Descaling process: empty the drip tray
and the used capsules container.
3. Processus de détartrage: Videz le bac
d’égouttage et le bac de capsules usagées.
4. Descaling process: ll water tank with
100 ml (3.4 oz) of Nespresso descaling agent
and 500 ml (17 oz) of potable water.
4. Processus de détartrage: Remplissez
le réservoir d’eau avec 100ml (3.4 oz) de
détartrant Nespresso et 500ml (17 oz) d’eau
potable.
8. Rinsing process: empty the drip tray
and the used capsules container. Rinse with
potable water.
8. Processus de rinçage: Videz le bac
d’égouttage et le bac de capsules usagées.
Rincez-le à l’eau potable.
16
6926_UM_LATTISSIMA_PREMIUM_Z1A.indb 16 13.11.13 09:56

max
1”
1
2
3
4
5
11
max
1”
1
2
3
4
5
11
max
1”
1
2
3
4
5
11
max
1”
1
2
3
4
5
11
max
1”
1
2
3
4
5
11
max
1”
1
2
3
4
5
11
max
1”
1
2
3
4
5
11
max
1”
1
2
3
4
5
11
EN
FR
DESCALING/DÉTARTRAGE
2. Place the water hardness sticker under
water for 1 second.
2. Placez l’indicateur de dureté sous l’eau
pendant 1seconde.
11. Press to conrm. The rinsing cycle continues
alternately through the coee outlet, hot water spout and
drip tray until the water tank runs empty.
11. Appuyez sur pour conrmer. Le cycle de rinçage
alterne entre la sortie de café, la buse à eau chaude et le
bac d’égouttage, et se poursuit jusqu’à ce que le réservoir
d’eau soit vide.
3. The number of red squares indicates the
water hardness level.
3. Le nombre de carrés rouges indique le
niveau de dureté de l’eau.
12. Once the rinsing process is nished, the machine
switches o. Rinse the hot water spout and clean it with a
damp cloth. You have now nished descaling the machine.
12. Une fois le rinçage terminé, la machine se met
automatiquement hors tension. Rincez la buse à eau
chaude, puis nettoyez-la à l’aide d’un linge humide.
Le détartrage est maintenant terminé.
4. Set the value accordingly.
4. Entrez cette valeur dans votre machine.
WATER HARDNESS SETTING/NIVEAU DE DURETÉ DE L’EAU
1. Enter the menu, browse the options and select
WATER HARDNESS. You will be guided to set the value.
Follow machine display instructions.
1. Allez au menu principal, parcourez les options et
sélectionnez DURETÉ EAU. Pour établir le niveau de
dureté de l’eau approprié, suivez les directives à l’écran.
9. Rinsing process: rinse and ll water tank
with potable water up to MAX level.
9. Processus de rinçage: Rincez le
réservoir d’eau, puis remplissez-le d’eau
potable jusqu’à la ligne indiquant le niveau
maximum.
10. Rinsing process: place one container,
minimum of 1 liter, under both the coee
outlet and the hot water spout.
10. Processus de rinçage: Placez un
récipient d’au moins 1litre sous la sortie de
café et la buse à eau chaude.
17
6926_UM_LATTISSIMA_PREMIUM_Z1A.indb 17 13.11.13 09:56
La page charge ...

EN
FR
DÉPANNAGE
Milk Premium
EUR,AUS,NZ: 220240 V, 50/60 Hz, 1300 W
US/CA: 120 V, 60 Hz, 1200 W
19 bar
6.5 kg
1,38 litre
500 ml
13-16 capsules
l=19,4 cm . L=33,2 cm . h=27,4 cm
Troubleshooting
Contact the Nespressso Club
For any additional information, in case of problems
or simply to seek advise, call the Nespresso Club.
Contact details of the Nespresso Club can be found
in the 'Welcome to Nespresso' folder in your
machine box or at nespresso.com
No light on display
Check the mains, plug, voltage, and fuse. In case of problems, call the Nespresso Club.
Coffee comes out very slowly.
Flow speed depends on the coffee variety.
Perform a self check of the machine. Enter the menu list and select Maintenance. Follow instruction
Coffee is not hot enough.
Preheat cup.
Perform a self check of the machine. Enter the menu list and select Maintenance. Follow instruction
Capsule area is leaking (water in capsule container).
Position capsule correctly. If leakages occur, call the Nespresso Club.
Irregular blinking.
Send appliance to repair or call the Nespresso Club.
No coffee, just water runs out (despite inserted capsule).
In case of problems, call the Nespresso Club.
Lever cannot be closed completely
Empty capsule container. Make sure that no capsule is blocked inside the capsule container.
Quality of milk froth is not up to standard
1) For a perfect milk froth, use skimmed or semi-skimmed milk at refrigerator temperature (about 4° C)
2) Rinse after each milk based preparation. Place a recipient under milk outlet, rotate the milk
regulator knob until “CLEAN” position.
3) Every two days, disassemble the R. C. S. and clean all components in the upper level of a
dishwasher
Warranty
Delonghi warrants this product against defects in materials and workmanship for a period of two years from the date of purchase. During this period, Delonghi will either repair or
replace, at its discretion, any defective product at no charge to the owner. Replacement products or repaired parts will be guaranteed for only the unexpired portion of the original
warranty or six months, whichever is greater. This limited warranty does not apply to any defect resulting from accident, misuse, improper maintenance, or normal wear and tear. Any
defect resulting from the usage of non genuine Nespresso capsules will not be covered by this warranty. Except to the extent allowed by applicable law, the terms of this limited warranty
do not exclude, restrict
or modify, and are in addition to, the mandatory statutory rights applicable to the sale of the product to you. If you believe your product is defective, contact Nespresso for instructions on
where to send or bring it for repair. Please visit our website at nespresso.com to discover more about Nespresso
Specifications
P
max
Once the rinsing process is finished, the
machine switches off. Clean the machine
using a damp cloth. You have now finished
descaling the machine.
9
10
11 12
Rinsing process Rinse and fill water with
fresh potable water up to MAX level.
Rinsing process Place one container of
minimum 1 litre under both the coffee
outlet and the hot water spout.
PRESS to confirm.
The rinsing cycle continues trough the coffee
outlet, hot water spout and drip tray until the
water tank is empty.
Water hardness setting
1
programmed buttons blinks 3 times: water hardness is set
i
1”
2 3 4
1
2
3
4
5
Place the water hardness sticker under
water for 1 second.
The number of red squares indicates
the water harness level.
Set the value accordinglyEnter the menu, browse the options and select
WATER HARDNESS.
You will be guided to set the value.
Follow machine display instructions.
max
max
Kg
11 12
US, CA: 120 V, 60 Hz, 1300 W
EUR,AUS,NZ: 220240 V, 50/60 Hz, 1300 W
US/CA: 120 V, 60 Hz, 1200 W
19 bar
6.5 kg
1,38 litre
500 ml
13-16 capsules
l=19,4 cm . L=33,2 cm . h=27,4 cm
Troubleshooting
Contact the Nespressso Club
For any additional information, in case of problems
or simply to seek advise, call the Nespresso Club.
Contact details of the Nespresso Club can be found
in the 'Welcome to Nespresso' folder in your
machine box or at nespresso.com
No light on display
Check the mains, plug, voltage, and fuse. In case of problems, call the Nespresso Club.
Coffee comes out very slowly.
Flow speed depends on the coffee variety.
Perform a self check of the machine. Enter the menu list and select Maintenance. Follow instruction
Coffee is not hot enough.
Preheat cup.
Perform a self check of the machine. Enter the menu list and select Maintenance. Follow instruction
Capsule area is leaking (water in capsule container).
Position capsule correctly. If leakages occur, call the Nespresso Club.
Irregular blinking.
Send appliance to repair or call the Nespresso Club.
No coffee, just water runs out (despite inserted capsule).
In case of problems, call the Nespresso Club.
Lever cannot be closed completely
Empty capsule container. Make sure that no capsule is blocked inside the capsule container.
Quality of milk froth is not up to standard
1) For a perfect milk froth, use skimmed or semi-skimmed milk at refrigerator temperature (about 4° C)
2) Rinse after each milk based preparation. Place a recipient under milk outlet, rotate the milk
regulator knob until “CLEAN” position.
3) Every two days, disassemble the R. C. S. and clean all components in the upper level of a
dishwasher
Warranty
Delonghi warrants this product against defects in materials and workmanship for a period of two years from the date of purchase. During this period, Delonghi will either repair or
replace, at its discretion, any defective product at no charge to the owner. Replacement products or repaired parts will be guaranteed for only the unexpired portion of the original
warranty or six months, whichever is greater. This limited warranty does not apply to any defect resulting from accident, misuse, improper maintenance, or normal wear and tear. Any
defect resulting from the usage of non genuine Nespresso capsules will not be covered by this warranty. Except to the extent allowed by applicable law, the terms of this limited warranty
do not exclude, restrict
or modify, and are in addition to, the mandatory statutory rights applicable to the sale of the product to you. If you believe your product is defective, contact Nespresso for instructions on
where to send or bring it for repair. Please visit our website at nespresso.com to discover more about Nespresso
Specifications
P
max
Once the rinsing process is finished, the
machine switches off. Clean the machine
using a damp cloth. You have now finished
descaling the machine.
9
10
11 12
Rinsing process Rinse and fill water with
fresh potable water up to MAX level.
Rinsing process Place one container of
minimum 1 litre under both the coffee
outlet and the hot water spout.
PRESS to confirm.
The rinsing cycle continues trough the coffee
outlet, hot water spout and drip tray until the
water tank is empty.
Water hardness setting
1
programmed buttons blinks 3 times: water hardness is set
i
1”
2 3 4
1
2
3
4
5
Place the water hardness sticker under
water for 1 second.
The number of red squares indicates
the water harness level.
Set the value accordinglyEnter the menu, browse the options and select
WATER HARDNESS.
You will be guided to set the value.
Follow machine display instructions.
max
max
Kg
11 12
Max./Max. 19 bar
EUR,AUS,NZ: 220240 V, 50/60 Hz, 1300 W
US/CA: 120 V, 60 Hz, 1200 W
19 bar
6.5 kg
1,38 litre
500 ml
13-16 capsules
l=19,4 cm . L=33,2 cm . h=27,4 cm
Troubleshooting
Contact the Nespressso Club
For any additional information, in case of problems
or simply to seek advise, call the Nespresso Club.
Contact details of the Nespresso Club can be found
in the 'Welcome to Nespresso' folder in your
machine box or at nespresso.com
No light on display
Check the mains, plug, voltage, and fuse. In case of problems, call the Nespresso Club.
Coffee comes out very slowly.
Flow speed depends on the coffee variety.
Perform a self check of the machine. Enter the menu list and select Maintenance. Follow instruction
Coffee is not hot enough.
Preheat cup.
Perform a self check of the machine. Enter the menu list and select Maintenance. Follow instruction
Capsule area is leaking (water in capsule container).
Position capsule correctly. If leakages occur, call the Nespresso Club.
Irregular blinking.
Send appliance to repair or call the Nespresso Club.
No coffee, just water runs out (despite inserted capsule).
In case of problems, call the Nespresso Club.
Lever cannot be closed completely
Empty capsule container. Make sure that no capsule is blocked inside the capsule container.
Quality of milk froth is not up to standard
1) For a perfect milk froth, use skimmed or semi-skimmed milk at refrigerator temperature (about 4° C)
2) Rinse after each milk based preparation. Place a recipient under milk outlet, rotate the milk
regulator knob until “CLEAN” position.
3) Every two days, disassemble the R. C. S. and clean all components in the upper level of a
dishwasher
Warranty
Delonghi warrants this product against defects in materials and workmanship for a period of two years from the date of purchase. During this period, Delonghi will either repair or
replace, at its discretion, any defective product at no charge to the owner. Replacement products or repaired parts will be guaranteed for only the unexpired portion of the original
warranty or six months, whichever is greater. This limited warranty does not apply to any defect resulting from accident, misuse, improper maintenance, or normal wear and tear. Any
defect resulting from the usage of non genuine Nespresso capsules will not be covered by this warranty. Except to the extent allowed by applicable law, the terms of this limited warranty
do not exclude, restrict
or modify, and are in addition to, the mandatory statutory rights applicable to the sale of the product to you. If you believe your product is defective, contact Nespresso for instructions on
where to send or bring it for repair. Please visit our website at nespresso.com to discover more about Nespresso
Specifications
P
max
Once the rinsing process is finished, the
machine switches off. Clean the machine
using a damp cloth. You have now finished
descaling the machine.
9
10
11 12
Rinsing process Rinse and fill water with
fresh potable water up to MAX level.
Rinsing process Place one container of
minimum 1 litre under both the coffee
outlet and the hot water spout.
PRESS to confirm.
The rinsing cycle continues trough the coffee
outlet, hot water spout and drip tray until the
water tank is empty.
Water hardness setting
1
programmed buttons blinks 3 times: water hardness is set
i
1”
2 3 4
1
2
3
4
5
Place the water hardness sticker under
water for 1 second.
The number of red squares indicates
the water harness level.
Set the value accordinglyEnter the menu, browse the options and select
WATER HARDNESS.
You will be guided to set the value.
Follow machine display instructions.
max
max
Kg
11 12
~ 6.5 kg
1.3 L/litre
0.5 L/litre
13-16 capsules/capsules
19.4 cm 27.4 cm 33.2 cm
7.6 in 10.8 in 13 in
SPECIFICATIONS/SPÉCIFICATIONS
Aucun voyant à l’écran.
➔ Vériez la prise électrique, la che, la tension et le fusible. Appuyez sur le bouton de mise
en marche, situé derrière l’écran de la machine. Si le problème persiste, appelez le Club
Nespresso.
Message à l’écran: la machine est trop chaude.
➔ Dans certaines conditions, le système de chauage de la machine atteint des
températures élevées (p.ex. après la vidange du système de uides). Patientez; la
machine refroidira d’elle-même.
Le débit de café est très lent.
➔ Le débit dépend du type de café préparé.
➔ Si nécessaire, faire le détartrage. Reportez-vous à la page 16.
Le café n’est pas assez chaud.
➔ Préchauez la tasse.
➔ Si nécessaire, faire le détartrage. Reportez-vous à la page 16.
Il y a une fuite dans le bac de capsules.
➔ Positionnez la capsule correctement. Si le problème persiste, appelez le Club Nespresso.
Les voyants clignotent de façon intermittente.
➔ Faites réparer la machine ou appelez le Club Nespresso.
Il y a seulement de l’eau qui coule, pas de café (bien qu’une
capsule ait été insérée).
➔ Si le problème persiste, appeler le Club Nespresso.
Le levier ne se ferme pas complètement.
➔ Videz le bac de capsules. Assurez-vous qu’aucune capsule n’est bloquée dans le bac de
capsules.
La qualité de la mousse de lait laisse à désirer.
➔ Pour obtenir une mousse parfaite, utilisez du lait écrémé ou semi-écrémé à température
réfrigérée (environ 4° C/39.2° F).
➔ Rincez après chaque préparation à base de lait. Placez un récipient sous la sortie de lait et
tournez le bouton régulateur jusqu’à la position «CLEAN».
➔ Tous les deux jours, démontez le système de préparation rapide du Cappuccino et
nettoyez toutes les pièces au lave-vaisselle (il faut toutefois s’assurer de les mettre dans la
partie supérieure du lave-vaisselle).
Message à l’écran: la machine doit être réparée.
➔ Appelez le club Nespresso ou un représentant N espresso an de faire vérier, ajuster ou
réparer votre machine.
19
6926_UM_LATTISSIMA_PREMIUM_Z1A.indb 19 13.11.13 09:56

EN
FR
For any additional information, in case of problems or simply to seek advise, call the Nespresso Club.
Contact details of the Nespresso Club can be found in the «Welcome to Nespresso» folder in your machine box or at nespresso.com
Pour obtenir des renseignements supplémentaires, en cas de problème ou pour obtenir des conseils, appelez le Club Nespresso.
Les coordonnées du Club Nespresso sont comprises dans la trousse «Bienvenue chez Nespresso», que vous trouverez dans la boîte de votre machine ou sur le site nespresso.com
CONTACT THE NESPRESSO CLUB/COMMUNIQUEZ AVEC LE CLUB NESPRESSO
DISPOSAL AND ECOLOGICAL CONCERNS/RECYCLAGE ET PROTECTION DE L’ENVIRONNEMENT
Disposal and Environmental Protection
Your appliance contains valuable materials that can be recovered or recycled. Separation of the remaining waste materials into dierent types facilitates the recycling of valuable raw material. Leave the appliance at a collection
point. You can obtain information on disposal from your local authorities.
Recyclage et protection de l’environnement
L’appareil contient des matériaux valorisables qui peuvent être récupérés ou recyclés. Le tri des matériaux en diérentes catégories facilite le recyclage des matières premières valorisables. Déposer l’appareil à un point de
collecte. Pour obtenir des renseignements sur le recyclage, communiquer avec les autorités locales.
20
6926_UM_LATTISSIMA_PREMIUM_Z1A.indb 20 13.11.13 09:56

EN
FR
WARRANTY/GARANTIE
De’Longhi warrants this product against defects in materials and workmanship for a period of two years from the date of purchase. During this period, De’Longhi will either repair or replace, at its discretion, any defective
product at no charge to the owner. Replacement products or repaired parts will be guaranteed for only the unexpired portion of the original warranty or six months, whichever is greater. This limited warranty does not apply
to any defect resulting from accident, misuse, improper maintenance, or normal wear and tear. Any defect resulting from the usage of non-genuine Nespresso capsules will not be covered by this warranty. Except to the extent
allowed by applicable law, the terms of this limited warranty do not exclude, restrict or modify, and are in addition to, the mandatory statutory rights applicable to the sale of the product to you. If you believe your product is
defective, contact Nespresso for instructions on where to send or bring it for repair. Please visit our website at nespresso.com to discover more about Nespresso.
De’Longhi garantit ce produit contre les défauts liés aux matériaux et à la fabrication pour une période de deux ans à compter de la date d’achat. Durant cette période, De’Longhi réparera ou remplacera, à sa discrétion, tout
produit défectueux sans frais pour le propriétaire. Les produits échangés et les pièces réparées seront garantis uniquement pendant la durée restante de la garantie originale ou durant six mois, l’échéance la plus lointaine
faisant foi. Cette garantie limitée ne s’applique pas à tout défaut résultant d’un accident, d’une utilisation inadaptée, d’un entretien inadéquat ou de l’usure normale. Tout défaut résultant de l’utilisation de capsules Nespresso
non authentiques ne sera pas couvert par cette garantie. Les conditions de la présente garantie s’ajoutent aux droits statutaires obligatoires applicables à la vente du produit et ne les excluent, ni ne les restreignent ou modient
en rien, sauf dans les limites autorisées par la loi. Si vous pensez que votre produit est défectueux, veuillez contacter Nespresso pour obtenir des précisions sur l’adresse à laquelle il convient de l’envoyer ou de l’apporter pour
réparation. Veuillez consulter notre site Internet au nespresso.com pour de plus amples informations au sujet de Nespresso.
21
6926_UM_LATTISSIMA_PREMIUM_Z1A.indb 21 13.11.13 09:56
La page charge ...
La page charge ...
La page charge ...
La page charge ...
La page charge ...
La page charge ...
La page charge ...
La page charge ...
La page charge ...
La page charge ...
La page charge ...
La page charge ...
La page charge ...
La page charge ...
La page charge ...
La page charge ...
La page charge ...
La page charge ...
La page charge ...
-
 1
1
-
 2
2
-
 3
3
-
 4
4
-
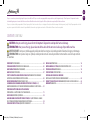 5
5
-
 6
6
-
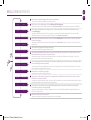 7
7
-
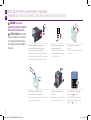 8
8
-
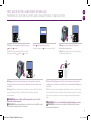 9
9
-
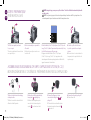 10
10
-
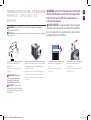 11
11
-
 12
12
-
 13
13
-
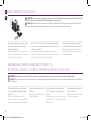 14
14
-
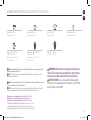 15
15
-
 16
16
-
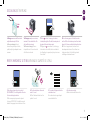 17
17
-
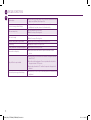 18
18
-
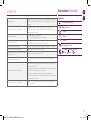 19
19
-
 20
20
-
 21
21
-
 22
22
-
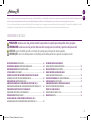 23
23
-
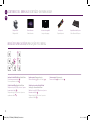 24
24
-
 25
25
-
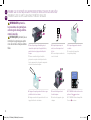 26
26
-
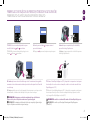 27
27
-
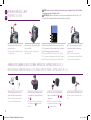 28
28
-
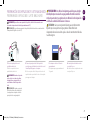 29
29
-
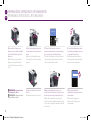 30
30
-
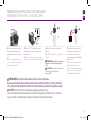 31
31
-
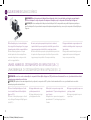 32
32
-
 33
33
-
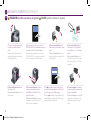 34
34
-
 35
35
-
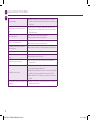 36
36
-
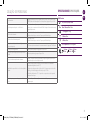 37
37
-
 38
38
-
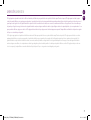 39
39
-
 40
40


De'Longhi 6926_UM Manuel utilisateur
- Catégorie
- Cafetières
- Taper
- Manuel utilisateur
dans d''autres langues
- English: De'Longhi 6926_UM User manual
- español: De'Longhi 6926_UM Manual de usuario
- português: De'Longhi 6926_UM Manual do usuário
Documents connexes
Autres documents
-
DeLonghi Nespresso LATTISSIMA PRO EN 750.MB Manuel utilisateur
-
De’Longhi Lattissima Pro EN 750.MB Manuel utilisateur
-
 Nestle Nespresso EN550S Mode d'emploi
-
-
-
Nespresso by De'Longhi EN560B Manuel utilisateur
-
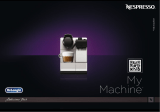 Nestle Nespresso EN550S Manuel utilisateur
-
DeLonghi MAGNIFICA ESAM 03.110.S EX1MAGNIFICA ESAM 03.120 Le manuel du propriétaire
-
-

