Sigel GL140 Artverum Magnetic Glass Board Manuel utilisateur
- Taper
- Manuel utilisateur

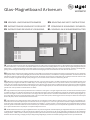
Glas-Magnetboard Artverum
DE MONTAGE- UND SICHERHEITSHINWEISE EN MOUNTING AND SAFETY INSTRUCTIONS
FR INSTRUCTIONS DE MONTAGE ET DE SÉCURITÉ IT ISTRUZIONI DI MONTAGGIO E SICUREZZA
ES INSTRUCCIONES DE MONTAJE Y SEGURIDAD NL MONTAGE- EN VEILIGHEIDSINSTRUCTIES
DE Herzlichen Glückwunsch! Mit dem Glas-Magnetboard Artverum haben Sie die richtige Wahl getroffen. Das beschreibbare Glas-Magnetboard Artverum
ist im Büro & Business, zu Hause oder in Gastronomie die Bühne für Ihre Ideen oder ein Design-Element an der Wand. Ob mit Magneten angeheftet oder per
Marker notiert – auf einem Artverum Board sind Ideen, Notizen und To-dos gut aufgehoben und lassen sich einfach visualisieren. Schlichte, geradlinige Form-
gebung und hochwertiges Sicherheitsglas sowie eine rahmenlose Aufhängung für einen freischwebenden 3D-Look zeichnen Artverum aus.
EN Congratulations! The Artverum magnetic glass board is an excellent choice. The Artverum magnetic glass board can also be written on, and is the perfect
setting for your ideas, as well as being a designer piece for the wall in offices & businesses, in the home or in catering establishments. An Artverum board is the
ideal place to collect and clearly visualise notes, ideas and to-dos. Attach them with a magnet or jot them down with a marker pen. Artverum stands out from
the rest with simple, straight lines and high-quality safety glass, and is mounted without a frame for a free-floating 3D look.
FR Félicitations ! En optant pour le tableau magnétique en verre, vous avez fait le bon choix. Le tableau magnétique en verre inscriptible Artverum est le
support parfait pour organiser vos idées et en même temps, c’est un objet design qui sublimera vos murs que ce soit au bureau, à la maison ou dans la gastro-
nomie. Que vous l’utilisiez pour l’affichage à l’aide d’aimants ou pour l’écriture avec des marqueurs, le tableau Artverum est parfait pour visualiser facilement
vos idées, notes et tâches à effectuer. Artverum se distingue par sa forme rectiligne épurée, son verre de sécurité de haute qualité ainsi que par sa suspension
spéciale sans cadre qui confère un look 3D flottant au tableau.
IT Congratulazioni! Acquistando questo prodotto Artverum avete fatto la scelta giusta. La lavagna magnetica Artverum, con fondo di vetro scrivibile, si presta
in azienda ed ufficio, casa o locale di ristorazione, per dar spazio alle vostre idee o anche come complemento di design per valorizzare le pareti degli interni.
Attaccati con magneti o annotati con il marcatore: su una lavagna Artverum potete fissare e visualizzare comodamente i vostri concetti e lampi di genio, ap-
punti e liste delle cose da fare. Le forme essenziali e pulite, il vetro di sicurezza d’alta qualità, nonché l’aggancio senza cornice per un effetto 3D come sospeso
davanti alla parete, sono le caratteristiche distintive di Artverum.
ES ¡Felicitaciones! Con la adquisición de la pizarra magnética de cristal Artverum usted ha hecho la elección correcta. La pizarra de cristal magnética rot-
ulable Artverum es el escenario perfecto para sus ideas en la oficina, en el negocio, en su casa o en la gastronomía o también un elegante elemento de deco-
ración en la pared. Tanto fijados con imanes como apuntados con rotuladores – sus ideas, apuntes y tareas encontrarán un marco perfecto sobre una pizarra
Artverum y podrán visualizarse fácilmente. Artverum se destaca por un diseño sencillo y rectilíneo y su cristal templado de seguridad de alta calidad, así como
por su aspecto de flotar frente a la pared por una suspensión especial sin marco.
NL Gefeliciteerd! Met het Artverum glas-magneetboard heeft u de juiste keuze gemaakt. Het beschrijfbare glas-magneetboard Artverum is het podium voor
uw ideeën of een designelement aan de wand op kantoor & business, thuis of in restaurants. Of het nu met magneten is bevestigd of met een markeerstift
wordt genoteerd – ideeën, notities en taken zijn in goede handen op een Artverum board en kunnen gemakkelijk worden gevisualiseerd. Artverum wordt ge-
kenmerkt door een eenvoudig, rechtlijnig ontwerp en hoogwaardig veiligheidsglas, evenals een frameloos ophangsysteem voor een vrij zwevende look.
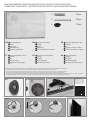
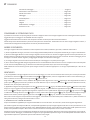
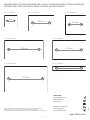
100 x 65 cm
GL140
GL141
GL142
GL541
78 x 48 cm 48 x 48 cm
12 x 78 cm
91 x 46 cm
60 x 40 cm
30 x 30 cm
GL130
GL131
GL110
GL111
GL114
GL164
GL168
GL169
GL252
GL254
GL256
GL262
GL263
GL272
GL275
GL293
GL294
GL295
GL100
GL101
GL104
GL108
GL271
GL144
GL145
GL146
GL147
GL148
GL149
GL258
GL260
GL261
GL270
GL287
GL288
GL289
GL546
GL120
GL121
GL122
GL296
GL393
GL394
GL395
GL396
GL512
GL513
GL514
GL515
GL516 GL157
GL158

2
SICHERHEIT & GARANTIE | SAFETY & GUARANTEE | SÉCURITÉ & GARANTIE |
SICUREZZA & GARANZIA | SEGURIDAD & GARANTÍA! | VEILIGHEID & GARANTIE
DE GLAS-MAGNETBOARDS ARTVERUM VON SIGEL GARANTIEREN HÖCHSTE SICHERHEIT!
→TÜV-geprüfte, rahmenlose Sicherheits-Aufhängung für einen festen, sicheren Halt an der Wand
→TÜV- und GS-geprüfte Produkt-Sicherheit
→Hochwertiges Einscheiben-Sicherheitsglas (EN 12150-1)
EN SIGEL’S ARTVERUM MAGNETIC GLASS BOARDS GUARANTEE THE HIGHEST LEVEL OF SAFETY!
→TÜV-approved safety mountings without frames hold the boards securely to the wall
→TÜV- and GS-approved product safety
→High-quality tempered glass / safety glass (EN 12150-1)
FR LES TABLEAUX MAGNÉTIQUES EN VERRE ARTVERUM SIGEL GARANTISSENT LE PLUS HAUT
NIVEAU DE SÉCURITÉ !
→Fixation murale sécurisée sans cadre contrôlée TÜV pour un maintien parfait du tableau
→Sécurité contrôlée et certifiée TÜV-GS
→Verre trempé haut de gamme (verre de sécurité ESG selon EN 12150-1)
IT LE LAVAGNE ARTVERUM DI SIGEL GARANTISCONO LA MASSIMA SICUREZZA!
→Aggancio di sicurezza, senza cornice, omologato TÜV, per l’affidabile attacco alla parete
→Sicurezza del prodotto certificata TÜV e GS
→Vetro temperato di sicurezza d’alta qualità (conforme alla norma EN 12150-1 ‘ESG’)
ES ¡LAS PIZARRAS DE CRISTAL MAGNÉTICAS ARTVERUM DE SIGEL GARANTIZAN UNA ALTA SEGURIDAD!
→Sistema de fijación de seguridad con certificación TÜV para una colocación mural firme
→TÜV y Normas de seguridad GS
→Cristal templado de elevada calidad de cristal de seguridad ESG (EN12150-1)
NL GLAS-MAGNEETBORDEN ARTVERUM VAN SIGEL GARANDEREN VEILIGHEID OP HET HOOGSTE NIVEAU!
→TÜV getest, randloos veiligheidophangsysteem voor een stevige bevestiging aan de wand
→TÜV- en GS geteste productveiligheid
→Hoogwaardig gehard glas van ESG-veiligheidsglas (EN 12150-1)
JAHRE GARANTIE
YEAR GUARANTEE
*
FOR BOARD SURFACE
AUF BOARD-OBERFLÄCHE
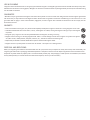
DE HERVORRAGENDE MARKENQUALITÄT – 25 JAHRE GARANTIE AUF DIE GLASOBERFLÄCHE!
→Garantie gilt auf die einwandfreie Beschreibbarkeit und Abwischbarkeit der Glasoberfläche – frei von Flecken oder Rück-
ständen – bei Verwendung des SIGEL Glas-Magnetboard Zubehörs.*
→Garantie gilt nicht in Fällen von Missbrauch, Fahrlässigkeit, unsachgemäßer Verwendung oder einer anderen Verwendungs-
weise, die nicht der mitgelieferten Anleitung entspricht.
→Informationen zur Herstellergarantie und Garantiebedingungen unter www.sigel-office.com/de/herstellergarantie
EN SUPERB BRAND QUALITY – 25-YEAR GUARANTEE FOR THE GLASS SURFACE!
→Guarantee that the glass surface will remain perfect to write on and easy to clean – no smudges or residue – when using
SIGEL glass magnetic board accessories.*
→The guarantee does not apply in cases of mistreatment, negligence, incorrect usage or other methods of utilisation that do
not comply with the enclosed instructions.
→For the terms of our manufacturer‘s guarantee, visit www.sigel-office.com/en-gb/guarantee
FR EXCELLENTE QUALITÉ – 25 ANS DE GARANTIE SUR LA SURFACE EN VERRE
→La garantie s’applique sur la capacité à pouvoir écrire et effacer sur la surface en verre. Nous garantissons que la surface
reste dépourvue de traces et résidus si vous utilisez les accessoires pour tableaux magnétiques en verre SIGEL.*
→Cette garantie ne s‘applique pas en cas de mauvais usage, de négligence, d‘utilisation inappropriée ou pour un autre usage
non conforme au mode d‘emploi fourni.
→Informations sur la garantie du fabricant et les conditions de garantie sur www.sigel-office.com/fr-fr/garantie-du-fabricant
IT ECCEZIONALE QUALITÀ DELLA MARCA – 25 ANNI DI GARANZIA SUL FONDO DI VETRO!
→La garanzia vale per la perfetta scrivibilità e cancellabilità, senza macchie e residui di gesso, del fondo di vetro, previo utilizzo
degli appositi accessori Artverum di SIGEL.*
→La garanzia è esclusa in caso di uso improprio, negligenza, impiego non conforme o altri modi d’impiego non corri
spondenti
alle istruzioni fornite a corredo del prodotto.
→Per info su garanzia produttore e termini di garanzia vai a www.sigel-office.com/it-it/garanzia
ES ¡EXTRAORDINARIA CALIDAD – 25 AÑOS DE GARANTÍA DE LA SUPERFICIE DE VIDRIO!
→Garantizamos una excelente calidad de la superficie de vidrio para escritura y una perfecta limpieza de la misma – sin man-
chas o restos de color – utilizando exclusivamente los accesorios de la pizarra de cristal magnética de SIGEL.*
→La garantía del producto no se aplica en los siguientes casos: daños causados por el uso inadecuado, negligencia o toda
utilización indebida que no correspondan a las especificaciones indicadas en la descripción del artículo.
→Informaciones de garantía del fabricante y condiciones de garantía bajo www.sigel-office.com/es-es/garantia-de-fabricante
NL UITSTEKENDE MERKKWALITEIT – 25 JAAR GARANTIE OP HET GLASOPPERVLAK!
→De garantie geldt voor de vlekkeloze beschrijfbaarheid en afveegbaarheid van het glasoppervlak - geen vlekken en resten -
bij gebruik van SIGEL accessoires.*
→De garantie is niet geldig in geval van misbruik, nalatigheid, onjuist gebruik of een andere wijze van gebruik, die niet in over-
eenstemming is met de meegeleverde gebruiksaanwijzing.
→Informatie over fabrieksgarantie en garantievoorwaarden onder www.sigel-office.com/nl-nl/fabrieksgarantie

3
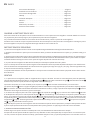
1
Die beigepackten Dübel und Schrauben sind nur für feste Wände geeignet. Für alle anderen Wände verwenden Sie bitte Spezialdübel und -schrauben.
The enclosed anchors and screws are suitable for solid walls only. For all other walls, please use special anchors and screws.
Les vis et chevilles fournies sont uniquement prévues pour des murs pleins. Pour tout autre type de mur veuillez utiliser des vis et chevilles spéciales.
Le viti e i tasselli in dotazione sono idonei soltanto ai muri compatti. Per tutti gli altri tipi di muro si raccomanda di utilizzare viti e tasselli speciali.
Los tornillos y tarugos incluidos son adecuados para muros macizos únicamente. Recomendamos utilizar tornillos y tarugos especiales para otros tipos de paredes, p. ej. huecas, de yeso, etc.
De erbij ingepakte pluggen en schroeven zijn alleen voor solide wanden geschikt. Voor alle andere wanden gebruikt u a.u.b. speciale pluggen en schroeven.
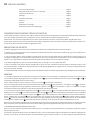
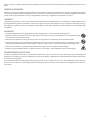
MONTAGEHINWEISE | MOUNTING INSTRUCTIONS | INSTRUCTIONS DE MONTAGE |
ISTRUZIONI DI MONTAGGIO | INSTRUCCIONES DE MONTAJE | MONTAGEAANWIJZINGEN
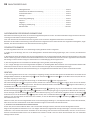
Fig. I
4
Fig. II
Fig. III Fig. IV
11 Glas-Magnetboard
22 Dübel
33 Schrauben
44 Wandhalterung
55 Aufhängung am Board
DE 11 Magnetic Glass Board
22 Anchors
33 Screws
44 Wall fixings
55 Mounting fittings on the board
EN 11 Tableau magnétique en verre
22 Chevilles
33 Vis
44 Support mural pour tableau
55 Système de fixation au support
FR
11 Lavagna magnetica in vetro
22 Tasselli
33 Viti
44 Attacchi a muro
55 Aggancio sul retro lavagna
IT 11 Pizarra de cristal magnética
22 Tarugos
33 Tornillos
44 Soporte de pared
55 Suspensión de pizarra
ES 11 Glas-magneetbord
22 Pluggen
33 Schroeven
44 Wandbevestigingen
55 Ophangpunten aan het bord
NL
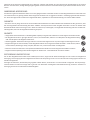
2
2 pcs.
3
2 pcs.
4
2 pcs.
4
5
Montagehinweise
Mounting instructions
Instructions de montage
Istruzioni di montaggio
Instrucciones de montaje
Montageaanwijzingen

4
DE INHALTSVERZEICHNIS
Montagehinweise . . . . . . . . . . . . . . . . . . . . . . . . . . . . . . . . . . . . . . . . . . . . . . . . . . . Seite 3
Aufbewahren der Gebrauchsanweisung . . . . . . . . . . . . . . . . . . . . . . . . . . . . . . . . Seite 4
Sicherheitshinweise . . . . . . . . . . . . . . . . . . . . . . . . . . . . . . . . . . . . . . . . . . . . . . . . . Seite 4
Montage . . . . . . . . . . . . . . . . . . . . . . . . . . . . . . . . . . . . . . . . . . . . . . . . . . . . . . . . . . . Seite 4
Anwendung & Reinigung . . . . . . . . . . . . . . . . . . . . . . . . . . . . . . . . . . . . . . . . . . . . . Seite 5
Garantie . . . . . . . . . . . . . . . . . . . . . . . . . . . . . . . . . . . . . . . . . . . . . . . . . . . . . . . . . . . Seite 5
Magnete . . . . . . . . . . . . . . . . . . . . . . . . . . . . . . . . . . . . . . . . . . . . . . . . . . . . . . . . . . . Seite 5
Entsorgung und Recycling . . . . . . . . . . . . . . . . . . . . . . . . . . . . . . . . . . . . . . . . . . . . Seite 5
Bohrabstände . . . . . . . . . . . . . . . . . . . . . . . . . . . . . . . . . . . . . . . . . . . . . . . . . . . . . . Seite 16
AUFBEWAHREN DER GEBRAUCHSANWEISUNG
Diese Gebrauchsanweisung hilft Ihnen, Ihr neues Glas-Magnetboard optimal zu nutzen. Sie enthält außerdem wichtige Hinweise für die siche-
re Montage und den Gebrauch Ihres Glas-Magnetboards.
Lesen und verstehen Sie diese Gebrauchsanweisung, bevor Sie Ihr neues Glas-Magnetboard montieren und verwenden.
Bewahren Sie diese Gebrauchsanweisung in der Nähe Ihres Glas-Magnetboards auf. Sollten Sie das Glas-Magnetboard weitergeben, sorgen
Sie dafür, dass der nächste Nutzer auch diese Gebrauchsanweisung erhält.
SICHERHEITSHINWEISE
Das Glas-Magnetboard Artverum ist aus Sicherheitsglas (ESG) gemäß EN 12150-1 hergestellt.
1 | Prüfen Sie vor der Montage, dass sich an der Montagestelle in der Wand keine Versorgungsleitungen, wie z. B. Strom, Gas oder Wasser
befinden.
2 | Bitte beachten Sie bei der Montage, dass das Glas-Magnetboard nicht mit spitzen Gegenständen oder harten Untergründen wie Stein oder
Fliesen in Berührung kommt. Dadurch entstandene Schäden können nicht als Reklamation anerkannt werden. Legen Sie das Board während
der Montage auf einen weichen Untergrund. Schutzecken erst nach Beendigung der Montage entfernen.
3 | Das Glas-Magnetboard ist ausschließlich für die Montage an einer geraden, festen Wand geeignet.
4 | Zur richtigen Montage unserer Glas-Magnetboards empfehlen wir die beiliegenden Bohrschablonen. Die entsprechenden Bohrabstände
finden Sie zusätzlich auf Seite 16 und auch auf unserer Internetseite www.sigel-office.com/de/montageanleitungen
Die Firma SIGEL GmbH übernimmt keine Gewährleistung für unsachgemäß montierte Boards oder für daraus resultierende Schäden.
MONTAGE
1 | Das Glas-Magnetboard kann im Hoch- und Querformat aufgehängt werden. Zum leichteren Anzeichnen der Bohrlöcher verwenden Sie die
beiliegende Bohrschablone. Die Wandhalterungen 44 werden mittels Dübel 22 und Schrauben 33 fest an der Wand verschraubt, die Seite mit
dem SIGEL Logo zeigt zu Ihnen (Fig. I).
Tipp: Bitte überprüfen Sie mit Hilfe einer Wasserwaage, ob die Wandhalterungen 44 gerade ausgerichtet sind.
Falls Sie die Wandhalterungen 44 noch justieren müssen, befindet sich in den Wandhalterungen 44 ein Langloch, durch das sich die Position
der Wandhalterung 44 noch leicht korrigieren lässt. Dazu die Schraube etwas lockern und die Wandhalterung 44 waagrecht oder senkrecht, je
nach Bedarf verschieben und wieder fest verschrauben.
2 | Anschließend wird das Glas-Magnetboard 11 in die Wandhalterungen 44 eingehängt (Fig. II). Hierzu befinden sich auf der Rückseite des
Boards zwei Aufhängungen 55. In jeder Aufhängung 55 befinden sich zwei Aussparungen (Fig. III), egal ob Sie Ihr Board im Hoch- oder Quer-
format aufhängen, die Wand
halterung 44 muss immer in die obere Aussparung, nicht in die seitliche, eingeführt werden. Die Aufhängung 55
am Board muss so auf die Wandhalterungen 44 aufgesetzt werden, dass sich beide Wandhalterungen 44 in der Mitte der Aufhängung 55 be-
finden (Fig. III). Jetzt das Board von oben nach unten schieben, so dass die Wandhalterungen 44 in die Aufhängung 55 greifen (Fig. IV) und
das Board fest fixiert wird.
Stellen Sie sicher, dass das Glas-Magnetboard immer an zwei Aufhängungen befestigt ist, und überprüfen Sie den sicheren Halt des Boards,
bevor Sie es loslassen. Silikonfüßchen auf der Board-Rückseite sorgen für einen festen Halt beim Beschriften.
3 | MONTAGE VON MEHREREN BOARDS NEBENEINANDER
Für den Fall, dass Sie mehrere Boards neben- oder untereinander aufhängen möchten, beachten Sie bitte die folgenden Hinweise:
Aufgrund der empfindlichen Glaskanten ist es nicht möglich mehrere Glas-Magnetboards bündig aufzuhängen. Lassen Sie einen Spalt von
mindestens 3 mm zwischen den Boards. Vermeiden Sie bei der Montage, dass die Kanten aneinanderstoßen, dies kann zu Bruch führen.
Dadurch entstandene Schäden können nicht als Reklamation anerkannt werden. Auch hier sollten die Schutzecken erst nach vollendeter
Montage entfernt werden.

5
Montieren Sie das erste Glas-Magnetboard wie im Abschnitt „Montage“ beschrieben. Erst dann zeichnen Sie die Bohrlöcher für das nächste
Board an. Dies hilft Ihnen, etwaige Montageungenauigkeiten vorab zu erkennen und die Positionierung der weiteren Boards danach auszu-
richten.
ANWENDUNG & REINIGUNG
Zur Beschriftung der Glasoberfläche dürfen nur für Glas geeignete Marker verwendet werden. Das Glas-Magnetboard kann trocken oder nass
mit einem weichen Tuch gereinigt werden. Bitte reinigen Sie Ihr Board nicht mit aggressiven Scheuer- und Reinigungsmitteln oder Chemika-
lien. Damit Sie lange Freude an Ihrem Glas-Magnetboard haben, empfehlen wir Ihnen die Verwendung von unserem SIGEL Zubehör.
GARANTIE
* Wir bieten eine 25-jährige Garantie auf die einwandfreie Beschreibbarkeit und Abwischbarkeit der Glasoberfläche. Wir garantieren, dass
das Glas-Magnetboard bei Verwendung des SIGEL Zubehörs und entsprechend unseren Vorgaben abwischbar und frei von Flecken oder
Rückständen bleibt. Diese Garantie gilt nicht in Fällen von Missbrauch, Fahrlässigkeit, unsachgemäßer Verwendung oder einer anderen Ver-
wendungsweise, die nicht der mitgelieferten Anleitung entspricht.
MAGNETE
→Aufgrund der Glasstärke können nur die beiliegenden SuperDym-Magnete oder andere extra starke Magnete verwendet werden.
→Die Magnete können bei zu geringem Abstand (<10 cm) zusammenstoßen, sodass es zum Absplittern der Magnetbeschichtung
oder zum Zersplittern des Magneten führen kann.
→Verletzungsgefahr: Einklemmen der Finger oder Haut zwischen zwei Magneten kann zu Quetschungen und Blutergüssen führen.
→Magnete erzeugen ein weitreichendes, starkes Magnetfeld. Gefahr durch magnetische Felder bei Kredit- und EC-Karten, elektro-
nischen Geräten (Datenträger, Handy, Computer, Monitore usw.), mechanischen Uhren und Hörgeräten.
→Personen mit Herzschrittmachern und implantierten Defibrillatoren dürfen sich keinen magnetischen Feldern aussetzen.
→Magnete sind kein Spielzeug! Halten Sie die Magnete von Kindern fern – Kleinteile können verschluckt werden.
ENTSORGUNG UND RECYCLING
Hat Ihr Glas-Magnetboard das Endes seines Lebenszyklus erreicht, sorgen Sie bei dessen Demontage für eine sichere und fachgerechte
Entsorgung. Die Entsorgung des Glas-Magnetboards inklusive der Verpackung richtet sich nach den örtlichen Entsorgungsvorschriften und
Umweltschutzgesetzen.
Entsorgen Sie Materialien, die dem Recycling zugeführt werden können, mit Rücksicht auf unsere Umwelt sachgerecht. Das Verpackungs-
material besteht aus Plastik und Pappe und ist getrennt nach Materialien umweltgerecht der Wiederverwertung zuzuführen. Hinweise zur
Entsorgung kann Ihnen auch die Kommunalbehörde geben.

6
EN CONTENTS
Mounting instructions . . . . . . . . . . . . . . . . . . . . . . . . . . . . . . . . . . . . . . . . . . . . . . . .Page 3
Storing this user guide . . . . . . . . . . . . . . . . . . . . . . . . . . . . . . . . . . . . . . . . . . . . . . .Page 6
Safety Precautions . . . . . . . . . . . . . . . . . . . . . . . . . . . . . . . . . . . . . . . . . . . . . . . . . . .Page 6
Mounting . . . . . . . . . . . . . . . . . . . . . . . . . . . . . . . . . . . . . . . . . . . . . . . . . . . . . . . . . . . .Page 6
Use & cleaning . . . . . . . . . . . . . . . . . . . . . . . . . . . . . . . . . . . . . . . . . . . . . . . . . . . . . . .Page 7
Guarantee . . . . . . . . . . . . . . . . . . . . . . . . . . . . . . . . . . . . . . . . . . . . . . . . . . . . . . . . . .Page 7
Magnets . . . . . . . . . . . . . . . . . . . . . . . . . . . . . . . . . . . . . . . . . . . . . . . . . . . . . . . . . . . .Page 7
Disposal and recycling . . . . . . . . . . . . . . . . . . . . . . . . . . . . . . . . . . . . . . . . . . . . . . . .Page 7
Distance between drill holes . . . . . . . . . . . . . . . . . . . . . . . . . . . . . . . . . . . . . . . . . Page 16
STORING THIS USER GUIDE
This user guide will help you to make the best use of your new magnetic glass board. In addition to this, it contains important information
about how to safely mount and use your magnetic glass board.
Read this user guide and make sure you have understood it before mounting and using your new magnetic glass board.
Store this user guide near your magnetic glass board. If the magnetic glass board is passed on to another user, make sure that person also
receives this user guide.
SAFETY PRECAUTIONS
The Artverum Magnetic Glass Board is made of tempered safety glass tested to EN 12150-1.
1 | Before mounting, check that there are no service pipes, e.g. for electricity, gas or water, in that part of the wall.
2 | When mounting the magnetic glass board, please ensure that it does not come into contact with sharp objects or hard surfaces such as
stone or tiles. We cannot accept any claims for resulting damage to the board. Place the board on a soft surface until it is ready to be mounted
and do not remove the protective corners until it is attached to the wall.
3 | The magnetic glass board should only be mounted on an even, solid wall.
4 | In order to mount our magnetic glass boards correctly, we recommend using the enclosed drilling templates. You will find the measure-
ments for the relevant distances between drill holes on page 16 and on our website at www.sigel-office.com/en-gb/mounting-instructions
SIGEL GmbH does not assume any responsibility or guarantee for boards that have been incorrectly mounted or for any resulting damage.
MOUNTING
1 | The magnetic glass board can be mounted in portrait or landscape format. The enclosed drilling templates make it simple to mark the
position of the drill holes. The wall fixings 44 are screwed securely to the wall using anchors 22 and screws 33. The side of the board with the
SIGEL logo should be facing outwards (fig. I).
Tip: Please use a spirit level to check that the wall fixings 44 are lined up straight.
The wall fixings 44 have an oblong hole that can be used to adjust their position if necessary. To do so, loosen the screw and move the wall
fixings 44 vertically or horizontally as required. Then tighten the screw again.
2 | The magnetic glass board 11 is then mounted onto the wall fixings 44 (Fig. II). There are two mounting fittings 55 on the back of the board
for this. Each mounting fitting 55 has two openings (Fig. III); the wall fixings 44 must always be slotted into the top opening rather than the
side opening, whether the board is hung in portrait or landscape format. Place the mounting fittings 55 on the back of the board over the wall
fixings 44 so that the wall fixings 44 are in the centre (Fig. III). Now slide the board downwards so that the wall fixings 44 click into the moun-
ting fittings 55 (Fig. IV) and the board is mounted securely.
Make sure that the magnetic glass board is always mounted on two fittings and check that the board is securely in place before letting go.
Silicon pads on the back of the board keep it steady while it is being written on.
3 | MOUNTING SEVERAL BOARDS IN A ROW
Please note the following if mounting several boards next to each other:
Due to the fragile glass edges, the magnetic glass boards should not be mounted right next to each other. There should be a gap of at least
3 mm between the individual boards. When mounting the boards, make sure the edges do not knock against each other, as this can cause
the board to break. SIGEL is not liable for any damage caused in this way. Do not remove the protective corners until the mounting process is
complete.
Mount the first magnetic glass board as described under “Mounting” before marking the drill holes for the next board. This will allow you to
adjust the position of the additional boards to any slight inaccuracies there may be in the position of the first board.

7
USE & CLEANING
The glass surface should be written on using only special markers for glass. The magnetic glass board can be cleaned with a damp or dry cloth.
Please do not use abrasive scouring agents, detergents or chemicals to clean the board. To prolong the life of your board, we recommend using
our own SIGEL accessories.
GUARANTEE
* We offer a 25-year guarantee that the glass surface will remain perfect to write on and to clean. We guarantee that the magnetic glass board
will remain easy to wipe and free of smudges and other residue when using SIGEL accessories and following our instructions for use. This
guarantee does not apply in cases of mistreatment, negligence, incorrect usage or other methods of utilisation that do not comply with the
enclosed instructions.
MAGNETS
→Due to the thickness of the glass, only the enclosed SuperDym neodymium magnets or other extra-strong magnets can be used.
→If the distance between them is too small (< 10 cm), the magnets can collide, causing the magnetic coating to chip or the magnets
to splinter.
→Danger of injury: fingers or skin can be squashed between two magnets, resulting in bruising.
→Magnets create a strong, far-reaching magnetic field. There is a risk of damage to cards with a magnetic strip, electronic applian-
ces (data carriers, mobile phones, computer, monitors, etc.), mechanical watches and hearing aids.
→People with pacemakers and heart defibrillator implants should avoid magnetic fields.
→Magnets are not a toy! Keep them out of the reach of children – small parts are a choking hazard.
DISPOSAL AND RECYCLING
When your magnetic glass board has reached the end of its life cycle, ensure that you dispose of it safely and correctly after disassembly. The
magnetic glass board and its packaging should be disposed of in compliance with local waste disposal regulations and environmental laws.
Dispose of recyclable materials properly and in an environmentally friendly way. The packaging is made of plastic and cardboard, and should
be recycled separately. For further information about waste disposal, contact your local authority.

8
FR TABLE DES MATIÈRES
Instructions de montage . . . . . . . . . . . . . . . . . . . . . . . . . . . . . . . . . . . . . . . . . . . . . .Page 3
Conservation des instructions d´utilisation . . . . . . . . . . . . . . . . . . . . . . . . . . . . . .Page 8
Indications de sécurité . . . . . . . . . . . . . . . . . . . . . . . . . . . . . . . . . . . . . . . . . . . . . . . .Page 8
Montage . . . . . . . . . . . . . . . . . . . . . . . . . . . . . . . . . . . . . . . . . . . . . . . . . . . . . . . . . . . .Page 8
Utilisation & entretien . . . . . . . . . . . . . . . . . . . . . . . . . . . . . . . . . . . . . . . . . . . . . . . . .Page 9
Garantie . . . . . . . . . . . . . . . . . . . . . . . . . . . . . . . . . . . . . . . . . . . . . . . . . . . . . . . . . . . .Page 9
Aimants . . . . . . . . . . . . . . . . . . . . . . . . . . . . . . . . . . . . . . . . . . . . . . . . . . . . . . . . . . . .Page 9
Élimination et recyclage . . . . . . . . . . . . . . . . . . . . . . . . . . . . . . . . . . . . . . . . . . . . . .Page 9
Distances entre les trous de perçage . . . . . . . . . . . . . . . . . . . . . . . . . . . . . . . . . . Page 16
CONSERVATION DES INSTRUCTIONS D‘UTILISATION
Les présentes instructions d’utilisation vous aident à utiliser votre nouveau tableau magnétique en verre de manière optimale. Elles contiennent
aussi des consignes importantes pour le montage sécurisé et l’utilisation de votre tableau magnétique en verre.
Veuillez lire et vous assurer de comprendre ces instructions avant de monter et d’utiliser votre nouveau tableau magnétique en verre.
Conservez les présentes instructions à proximité de votre tableau magnétique en verre. Veuillez transmettre les présentes instructions d’uti-
lisation à tout nouvel utilisateur du tableau magnétique en verre.
INDICATIONS DE SÉCURITÉ
Le tableau magnétique en verre Artverum est réalisé en verre de sécurité trempé (ESG) selon la norme EN 12150-1.
1 | Vérifier avant le montage l‘absence de tout passage de conduites d‘alimentation (comme par ex. d‘électricité, gaz, eau) à l‘endroit du mur
où vous souhaitez fixer le tableau.
2 | Lors du montage, veillez à ce que le tableau ne vienne jamais en contact avec des objets pointus ou des fonds durs comme la pierre ou le
carrelage. Les dommages qui en résulteraient ne pourraient pas être pris en compte lors d‘une réclamation. Durant le montage, déposez le
tableau sur un support doux et souple. Ne retirez pas les protections du tableau avant avoir terminé le montage.
3 | Le tableau magnétique en verre convient exclusivement pour un montage sur un mur plein et bien droit.
4 | Pour un montage correct de nos tableaux magnétiques en verre, nous vous conseillons d‘utiliser les gabarits de perçages fournis. Vous
trouvez les indications concernant les distances entre les trous de perçage également sur la page 16 et sur notre site www.sigel-office.com/
fr-fr/instructions-des-montage
La société SIGEL GmbH n‘assume aucune garantie pour des tableaux montés de manière inappropriée ou pour des dégâts qui en résulteraient.
MONTAGE
1 | Le tableau magnétique en verre peut être suspendu à l‘horizontale ou à la verticale. Pour un repérage plus aisé des trous à percer sur le
mur, utilisez les gabarits de perçages fournis. Les supports muraux 44 sont à fixer très solidement au mur en utilisant chevilles 22 et vis 33, le
côté portant le logo SIGEL doit vous faire face (fig. I)
Astuce : Vérifiez à l‘aide d‘un niveau à bulles, si les supports muraux 44 sont vraiment à l‘horizontale.
S‘il vous faut cependant ajuster encore le positionnement des supports muraux 44, vous trouverez sur ces supports muraux 44 un orifice ob-
long qui vous permettra de corriger légèrement la position des supports muraux 44. Pour cela, desserrer un peu la vis et déplacer le support
mural selon le besoin horizontalement ou verticalement avant de reviser de nouveau à fond.
2 | On accrochera ensuite le tableau magnétique en verre 11 aux supports muraux 44 (Fig. II). Au dos du tableau vous disposez pour cela de 2
éléments pour l‘accrochage 55. Et chacun de ces éléments d‘accrochage 55 comporte deux cavités (Fig.III), peu importe que vous suspendiez
votre tableau en hauteur ou en largeur, le support mural 44 doit toujours être inséré dans la cavité supérieure et non pas celle située latéra-
lement. L‘élément pour l‘accrochage 55 situé sur le tableau doit venir s‘adapter sur le support mural 44 de telle manière que les 2 supports
muraux 44 viennent se positionner au centre de l‘élément d‘accrochage (Fig.III). Dès lors faire glisser le tableau du haut vers le bas, de telle
manière que les supports muraux 44 viennent se loger dans la cavité e (Fig. IV) et que le tableau soit ainsi solidement fixé au mur.
Assurez-vous que le tableau magnétique en verre est bien fixé aux deux points d‘accrochage et vérifiez le bon maintien du tableau avant de le
lâcher. Des petits patins de protection en silicone au dos du tableau garantissent également le bon appui lorsqu‘on écrit sur le tableau.
3 | MONTAGE DE PLUSIEURS TABLEAUX CÔTE A CÔTE
Dans le cas où vous souhaitez monter plusieurs tableaux les uns à la suite des autres horizontalement ou verticalement, veuillez tenir compte
des remarques suivantes :
En raison de la fragilité des bords et coins des tableaux en verre, il n‘est pas possible d‘accoler hermétiquement les tableaux magnétiques en
verre les uns aux autres. Vous devez respecter un minimum d‘espace de 3mm entre les tableaux. Lors du montage, évitez que les bords des

9
tableaux ne subissent des chocs pouvant occasionner cassures ou fêlures. Car les dommages pouvant en résulter ne pourraient être pris en
compte lors d‘une réclamation. Ne retirez les protections d‘angles qu‘après avoir terminé le montage.
Procédez au montage du premier tableau magnétique en verre comme décrit dans le paragraphe „Montage“. Ce n‘est qu‘après cette étape
que vous positionnerez les trous de perçage pour le tableau suivant. Ceci vous aidera à vous rendre compte à l‘avance des inexactitudes de
montage et de modifier ainsi ensuite le positionnement des autres tableaux.
UTILISATION & ENTRETIEN
Seuls les marqueurs conçus pour pouvoir écrire sur du verre devront être utilisés. Le tableau magnétique en verre peut être nettoyé avec un
chiffon doux sec ou humidifié. Nous vous prions de ne pas utiliser de produits corrosifs, détergents ou produits chimiques pour nettoyer votre
tableau. Pour conserver encore longtemps la joie d‘utiliser votre tableau magnétique en verre, nous vous conseillons d‘utiliser les accessoires
complémentaires SIGEL.
GARANTIE
* Nous proposons une garantie de 25 ans sur la capacité à pouvoir écrire et effacer sur la surface en verre. Nous garantissons que le tableau
magnétique en verre restera lavable et dépourvu de traces et résidus si vous utilisez les accessoires complémentaires SIGEL et respectez nos
prescriptions. Cette garantie ne s‘applique pas en cas de mauvaise utilisation, de négligence, d‘utilisation inappropriée ou pour un autre usage
non conforme au mode d‘emploi fourni.
AIMANTS
→En raison de l’épaisseur du verre, veuillez utiliser les aimants SuperDym fournis ou autres aimants à très forte capacité d’adhésion.
→Si vous ne gardez pas assez de distance entre les aimants (<10 cm), il y a risque de collision entre les aimants. La couche magné-
tique peut s’écailler ou l’aimant peut se briser.
→Risque de blessures : Danger de se coincer les doigts ou la peau entre deux aimants cela pourrait entraîner des contusions ou des
petits hématomes.
→Les aimants créent autour d’eux un champ magnétique intense ce qui peut endommager des cartes de crédit ou bancaires, appa-
reils électroniques (supports de données, portables, ordinateurs, écrans etc.), montres mécaniques et appareils auditifs.
→Des personnes portant des stimulateurs cardiaques ou des défibrillateurs implantés ne doivent pas s’exposer à des champs
magnétiques.
→Les aimants ne sont pas de jouets ! Tenez les aimants bien à l’écart des enfants, les petites pièces pouvant être avalées.
ÉLIMINATION ET RECYCLAGE
Si votre tableau magnétique en verre a atteint la fin de son cycle de vie, veillez à ce qu’il soit éliminé en bonne et due forme et de manière sé-
curisée. L’élimination du tableau magnétique en verre y compris l’emballage doit être conforme à la législation locale en matière d’élimination
et de protection de l’environnement.
Éliminez les matériaux recyclables convenablement en tenant compte de notre environnement. Le matériel d’emballage est composé de
plastiques et de cartons, et doit être affecté au recyclage séparément et dans le respect des dispositions environnementales en fonction du
matériau. Pour les consignes d’élimination, vous pouvez également vous référer aux autorités locales compétentes.

10
IT SOMMARIO
Istruzioni di montaggio . . . . . . . . . . . . . . . . . . . . . . . . . . . . . . . . . . . . . . . . . . . . . Pagina 3
Conservare le istruzioni d‘uso . . . . . . . . . . . . . . . . . . . . . . . . . . . . . . . . . . . . . . .Pagina 10
Norme di sicurezza . . . . . . . . . . . . . . . . . . . . . . . . . . . . . . . . . . . . . . . . . . . . . . . .Pagina 10
Montaggio . . . . . . . . . . . . . . . . . . . . . . . . . . . . . . . . . . . . . . . . . . . . . . . . . . . . . . . .Pagina 10
Utilizzo & pulizia . . . . . . . . . . . . . . . . . . . . . . . . . . . . . . . . . . . . . . . . . . . . . . . . . .Pagina 11
Garanzia . . . . . . . . . . . . . . . . . . . . . . . . . . . . . . . . . . . . . . . . . . . . . . . . . . . . . . . . .Pagina 11
Magneti . . . . . . . . . . . . . . . . . . . . . . . . . . . . . . . . . . . . . . . . . . . . . . . . . . . . . . . . .Pagina 11
Smaltimento e riciclaggio . . . . . . . . . . . . . . . . . . . . . . . . . . . . . . . . . . . . . . . . . .Pagina 11
Distanze tra i fori . . . . . . . . . . . . . . . . . . . . . . . . . . . . . . . . . . . . . . . . . . . . . . . . . .Pagina 16
CONSERVARE LE ISTRUZIONI D’USO
Le presenti istruzioni sono una pratica guida per utilizzare al meglio la vostra nuova lavagna magnetica di vetro. Contengono inoltre importanti
suggerimenti per il montaggio e l’uso affidabile del vostro acquisto.
Leggete attentamente ed assicuratevi di aver compreso a fondo le istruzioni prima di montarlo ed utilizzarlo.
Conservate quindi la documentazione a portata di mano per future consultazioni. Trasferendo a terzi la vostra lavagna magnetica di vetro, si
raccomanda di consegnare anche le presenti istruzioni al prossimo utilizzatore.
NORME DI SICUREZZA
La lavagna magnetica Artverum è realizzata in vetro temperato di sicurezza (monolastra, tipo “ESG”) conforme a EN 12150-1.
1 | Prima di appendere la lavagna, assicurarsi che sul luogo prescelto della parete non siano posate tubazioni di gas o acqua e linee elettriche.
2 | Durante il montaggio abbiate cura che la lavagna magnetica di vetro non entri in contatto con oggetti appuntiti o fondi e pavimenti duri, ad
esempio di pietra e piastrellati. Non saranno riconosciuti eventuali reclami per danni insorti in simili circostanze. Durante il montaggio, posare
la lavagna su un fondo morbido. Togliere i proteggispigoli solo dopo aver terminato il montaggio.
3 | La lavagna magnetica di vetro è indicata esclusivamente per il montaggio su una parete piana e rigida.
4 | Per il corretto montaggio delle lavagne magnetiche di vetro raccomandiamo le dime di foratura accluse. Le rispettive misure d’interspazio
tra i fori sono anche disponibili a pag. 16 del nostro sito web www.sigel-office.com/it-it/istruzioni-di-montaggio
SIGEL GmbH non rilascia nessuna garanzia per le lavagne montate in modo non appropriato e ricusa ogni responsabilità per i danni da ciò
risultanti.
MONTAGGIO
1 | Si può appendere la lavagna magnetica di vetro sia sul lato lungo, sia su lato corto. Utilizzare le dime accluse per tracciare più facilmente
i punti da forare. Gli attacchi 44 si fissano mediante tasselli 22 e viti 33 alla parete, il lato con il logo SIGEL è rivolto in vostra direzione (Fig. I).
Dritta: controllare con una livella a bolla se gli attacchi 44 risultano in asse.
Se gli attacchi 44 non risultano in asse, rimediare nel seguente modo: negli attacchi a muro 44 è previsto un foro longitudinale attraverso il
quale si può correggere quanto basta la posizione. A tal fine allentare un po’ la vite e spostare l’attacco 44 sul piano orizzontale o verticale,
secondo il caso, serrare poi di nuovo la vite.
2 | Appendere in seguito la lavagna magnetica in vetro 11 agli attacchi a muro 44 (Fig. II), servendosi dei due agganci 55 previsti sul retro della
lavagna. In ciascun aggancio e sono praticate due sagomature (Fig. III), e a prescindere che appendiate la lavagna sul lato corto o lungo, l’at-
tacco a muro 44 deve sempre ingranare nella sagomatura superiore e mai in quella laterale. Applicare gli agganci 55 sugli attacchi a muro 44
in modo che entrambi gli attacchi a muro 44 vengano a trovarsi al centro del rispettivo aggancio 55 (Fig. III). A questo puto spingere la lavagna
dall’alto verso il basso, facendo ingranare gli attacchi a muro 44 negli agganci 55 (Fig. IV), fissando in tal modo saldamente la lavagna.
Assicuratevi che la lavagna sia sempre fissata sui due agganci, e controllate che sia ben stabile prima di allontanarvi. I piedini di silicone sul
retro garantiscono che la lavagna resti ferma mentre si scrive.
3 | MONTAGGIO DI PIÙ LAVAGNE AFFIANCATE
Se per caso desiderate appendere più lavagne sistemandole una accanto all‘altra o una sotto l‘altra, osservare le seguenti segnalazioni:
per via del margine di vetro alquanto delicato, non è possibile appendere a paro più lavagne magnetiche di vetro. Occorre piuttosto che tra una
lavagna e l‘altra sia libero uno spazio di almeno 3 mm. Nell‘appendere le lavagne, evitare inoltre che i bordi di due moduli possano urtare tra
di loro, infatti potrebbero rompersi. Non saranno riconosciuti eventuali reclami per danni insorti in simili circostanze.
Togliere anche in questo caso i proteggispigoli solo dopo aver terminato il montaggio. Montare la prima lavagna magnetica di vetro come de-
scritto alla sezione “Montaggio“, e tracciare solo in seguito i fori per appendere la prossima lavagna. In tal modo potrete individuare subito se
figurano delle imprecisioni e posizionare quindi correttamente le altre lavagne.

11
UTILIZZO & PULIZIA
Per scrivere sul fondo di vetro si possono usare solo i marcatori idonei a tali superfici. Per pulire il fondo della lavagna, basta passare un panno
morbido asciutto o bagnato. Si raccomanda di non utilizzare detergenti abrasivi o aggressivi, o altri prodotti chimici. Affinché la vostra lavagna
magnetica in vetro possa donarvi lunghe soddisfazioni, vi consigliamo di utilizzare gli appositi accessori SIGEL.
GARANZIA
* Rilasciamo una garanzia di 25 anni sulla corretta scrivibilità e cancellabilità del fondo di vetro. Vi garantiamo che usando gli accessori SIGEL
e seguendo le nostre istruzioni, la lavagna magnetica in vetro resta cancellabile e senza macchie o residui di gesso. La presente garanzia non
vale in caso di uso improprio, negligenza, impiego non conforme o altri modi d’impiego non corrispondenti alle istruzioni fornite a corredo del
prodotto.
MAGNETI
→Causa lo spessore del vetro si possono utilizzare soltanto i magneti in dotazione SuperDym o magneti extra potenti.
→A distanza insufficiente (<10 cm) i magneti possono urtare l‘uno contro l‘altro, il che può scalfire il rivestimento o frantumare il
magnete.
→Pericolo di lesioni: lo schiacciamento di dita o pelle tra due magneti può provocare contusioni o ematomi.
→I magneti creano un campo magnetico molto intenso e ad ampio raggio, in grado di deteriorare carte di credito e bancomat, dis-
positive elettronici (supporti informatici, cellulari, computer, schermi ecc.), orologi meccanici e protesi acustiche.
→Portatori di pacemaker e defibrillatori sottocutanei devono evitare l‘esposizione ai campi magnetici.
→I magneti non sono giocattoli! Tenere i magneti lontano dai bambini – rischio d‘ingestione delle parti piccole.
SMALTIMENTO E RICICLAGGIO
Per disfarvi del prodotto a fine vita, occorre smaltirlo in condizioni di sicurezza e a norma di legge, ottemperando ai regolamenti locali in ma-
teria di rifiuti e alla legislazione ambientale di riferimento.
Smaltire correttamente, nel rispetto dell’ambiente, i materiali riciclabili. L’imballaggio consiste in plastica e cartone e va avviato al recupero in
maniera sostenibile attraverso la raccolta differenziata. Per maggiori informazioni sullo smaltimento potete rivolgervi anche al vostro Comune.

12
ES INDICE
Instrucciones de montaje . . . . . . . . . . . . . . . . . . . . . . . . . . . . . . . . . . . . . . . . . . . Página 3
Guarde la instrucción de uso . . . . . . . . . . . . . . . . . . . . . . . . . . . . . . . . . . . . . . .Página 12
Instrucciones de seguridad . . . . . . . . . . . . . . . . . . . . . . . . . . . . . . . . . . . . . . . . .Página 12
Montaje . . . . . . . . . . . . . . . . . . . . . . . . . . . . . . . . . . . . . . . . . . . . . . . . . . . . . . . . . .Página 12
Utilización & limpieza . . . . . . . . . . . . . . . . . . . . . . . . . . . . . . . . . . . . . . . . . . . . . .Página 13
Garantía . . . . . . . . . . . . . . . . . . . . . . . . . . . . . . . . . . . . . . . . . . . . . . . . . . . . . . . . .Página 13
Imanes . . . . . . . . . . . . . . . . . . . . . . . . . . . . . . . . . . . . . . . . . . . . . . . . . . . . . . . . . .Página 13
Eliminación y reciclado . . . . . . . . . . . . . . . . . . . . . . . . . . . . . . . . . . . . . . . . . . . .Página 13
Distancias entre taladros . . . . . . . . . . . . . . . . . . . . . . . . . . . . . . . . . . . . . . . . . . .Página 16
GUARDAR LA INSTRUCCION DE USO
Estas instrucciones de uso le ayudarán a sacar el máximo beneficio a su nueva pizarra de cristal magnética. Contienen además instrucciones
muy importantes para el montaje seguro y el uso óptimo de su pizarra de cristal magnética.
Lea y entienda correctamente todas las instrucciones de uso antes de montar y utilizar su pizarra de cristal magnética.
Guarde las instrucciones de uso para una posible consulta en el futuro siempre cerca de la pizarra de cristal magnética. Al entregar la pizarra
de cristal magnética a otra persona, asegúrese de entregar también las instrucciones de uso.
INSTRUCCIONES DE SEGURIDAD
La pizarra de cristal magnética Artverum es de cristal templado de seguridad ESG fabricado según estándar EN12150-1.
1 | Verifique antes de montar la pizarra que no se encuentren cables y/o tuberías de abastecimiento en la pared, p. ej. de electricidad, gas o
de agua.
2 | Por favor evite el contacto de la pizarra de cristal magnética durante el montaje con elementos puntiagudos, filosos o con superficies duras
de piedra, baldosas o losetas. Los daños ocasionados no son una razón de reclamación. Recomendamos colocar la pizarra sobre una superfi-
cie blanda durante el montaje para evitar roturas. Quite las ángulos de protección al finalizar el montaje.
3 | La pizarra de cristal magnética es adecuada únicamente para el montaje en paredes verticales y firmes.
4 | Para un montaje correcto de nuestra pizarra magnética le recomendamos utilizar las plantillas de perforación adjuntas. Ud. también encon-
trará las informaciones correspondientes de la distancia entre los agujeros para colgar en la pág.16 y en la pág. web www.sigel-office.com/
es-es/instrucciones-de-montaje-y-seguridad
La empresa SIGEL GmbH no se hace responsable de un montaje incorrecto e inadecuado o de los daños que puedan resultar cómo consecu-
encia del mismo.
MONTAJE
1 | La pizarra de cristal magnética puede ser colgada de forma vertical u horizontal. Para marcar correctamente los puntos de perforación
utilice las plantillas de perforación adjuntas. Los soportes de pared 44 deben ser fijados utilizando los tarugos 22 y atornillando los tornillos 33
de manera muy firme en la pared, el lado con el logo SIGEL visible de frente (fig. I).
Importante: Compruebe con un nivel de albañil que los soportes de pared 44 estén nivelados horizontalmente y a la misma altura.
Los soportes de pared 44 tienen un agujero alargado que puede ser utilizado para corregir ligeramente la posición de los soportes de pared
44 de ser necesario. Para ello recomendamos desatornillar levemente los tornillos y corregir la posición de los soportes de pared 44 en forma
horizontal o vertical según sea necesario y ajustar nuevamente.
2 | A continuación cuelgue la pizarra de cristal magnética 11 en los soportes de pared 44, (Fig. II). Utilice las dos suspensiones 55 ubicadas
en el lado posterior de la pizarra. Cada suspensión de pizarra 55 tiene 2 cavidades (Fig. III). Recuerde que, sin importar la posición final de la
pizarra, ya sea horizontal o vertical, el soporte de pared 44 siempre debe introducirse en la cavidad superior y no en la cavidad lateral. Cada
suspensión de pizarra 55 debe colocarse sobre el soporte de pared 44 de tal manera que ambos soportes 44 se encuentren en el centro de las
suspensiones 55, (Fig. III). Presione ligeramente la pizarra de arriba hacia abajo para que los soportes de pared 44 encajen en las suspensio-
nes 55, (Fig. IV), fijando de esta manera la pizarra.
Asegúrese de que la pizarra de cristal magnética esté correctamente encajada en ambas suspensiones y verifique el montaje antes de soltar
la pizarra. Topes protectores de silicona en el lado posterior de la pizarra garantizan un apoyo seguro al escribir con los rotuladores.
3 | MONTAJE DE VARIAS PIZARRAS EN LÍNEA
Si desea colgar varias pizarras en línea o una debajo de la otra, le recomendamos leer atentamente estos consejos:
Es importante recordar que los bordes de la pizarra son muy delicados. Por ello, aconsejamos dejar un espacio de mín. 3 mm entre las pizar-
ras. Evite, al alinear las pizarras durante el montaje, que los bordes choquen o rocen, ya que ésto puede provocar una rotura del cristal. Los

13
daños ocasionados no son una razón de reclamación. Se recomienda quitar las esqinas de protección luego de finalizar el montaje en la pared.
Cuelgue la primer pizarra de cristal magnética de acuerdo con las explicaciones del párrafo “Montaje”. A continuación, marque los taladros
de perforación de la siguiente pizarra. Así podrá reconocer de antemano eventuales irregularidades en la posición premarcada y corregirla a
tiempo.
UTILIZACIÓN & LIMPIEZA
Para escribir sobre la superficie de pizarra se deben utilizar únicamente los rotuladores indicados para cristal. Para limpiar la pizarra magné-
tica recomendamos utilizer un trapo suave seco o húmedo. Por favor no utilice en ningún caso productos de limpieza agresivos o productos
químicos. Para disfrutar por mucho tiempo de la excelente calidad de la pizarra, le recomendamos utilizar nuestros accesorios de SIGEL.
GARANTÍA
* Garantizamos una excelente calidad de la superficie de vidrio para escritura y una perfecta limpieza de la misma durante 25 años. Además
garantizamos una limpieza perfecta sin restos de tinta o manchas de la pizarra de cristal magnética siempre y cuando Usted utilice los acce-
sorios de SIGEL recomendados y respete las indicaciones correspondientes. Un mal cuidado del artículo, utilización impropia, negligencia o
uso no especificado en la descripción puede originar daños en el material o en la superficie ocasionando la pérdida de la garantía del producto.
IMANES
→Debido al grosor del cristal recomendamos el uso de imanes SuperDym suministrados o bién imanes de potencia extra fuerte.
→Mantenga siempre una distancia mínima de 10 cm entre los imanes. Por la enorme fuerza ejercida entre los imanes, éstos pueden
chocar unos contra otros con fuerza suficiente para desconcharse y provocar astillas.
→Peligro de lesiones: riesgo de aprisionamiento entre dos imanes de dedos o la piel. Esto puede provocar contusiones y hematomas
en las áreas afectadas.
→Los imanes generan fuertes y extensos campos magnéticos que pueden ser peligrosos para dispositivos mecánicos y dañar tar-
jetas de débito y de crédito, aparatos electrónicos (p. ej.: el ordenador portátil, el disco duro del ordenador, el móvil), relojes
mecánicos, audífonos, etc.
→Los imanes pueden interferir en la función del marcapasos y desfibriladores implantados.
→¡Un imán de neodimio no es un juguete! Recomendamos mantener los imanes lejos del alcance de los niños. Los modelos son pequeños y
los niños corren un grave riesgo de ingerirlos por accidente.
ELIMINACIÓN Y RECICLAJE
Cuando su pizarra de cristal magnética haya llegado al fin de su vida útil, asegúrese de desmontar el artículo de forma segura y profesional.
La eliminación de la pizarra de cristal magnética incluso el embalaje debe realizarse de forma correcta de acuerdo con la normativa local de
eliminación y las leyes de protección del medio ambiente.
Elimine los materiales que puedan ser reciclados de forma conveniente y respetuosa con el medio ambiente. El embalaje es de plástico y
cartón y estos materiales deben reciclarse por separado. Si tiene alguna pregunta al respecto, diríjase a la organización encargada de la eli-
minación de residuos en su localidad.

14
NL INHOUDSOPGAVE
Montageaanwijzingen . . . . . . . . . . . . . . . . . . . . . . . . . . . . . . . . . . . . . . . . . . . . . . Pagina 3
Bewaren van de gebruiksaanwijzing . . . . . . . . . . . . . . . . . . . . . . . . . . . . . . . . .Pagina 14
Veiligheidsaanwijzing . . . . . . . . . . . . . . . . . . . . . . . . . . . . . . . . . . . . . . . . . . . . . .Pagina 14
Montage . . . . . . . . . . . . . . . . . . . . . . . . . . . . . . . . . . . . . . . . . . . . . . . . . . . . . . . . .Pagina 14
Gebruik & reiniging . . . . . . . . . . . . . . . . . . . . . . . . . . . . . . . . . . . . . . . . . . . . . . . .Pagina 15
Garantie . . . . . . . . . . . . . . . . . . . . . . . . . . . . . . . . . . . . . . . . . . . . . . . . . . . . . . . . .Pagina 15
Magneten . . . . . . . . . . . . . . . . . . . . . . . . . . . . . . . . . . . . . . . . . . . . . . . . . . . . . . . .Pagina 15
Afvalverwijdering en recycling . . . . . . . . . . . . . . . . . . . . . . . . . . . . . . . . . . . . . .Pagina 15
Boorafstanden . . . . . . . . . . . . . . . . . . . . . . . . . . . . . . . . . . . . . . . . . . . . . . . . . . . .Pagina 16
BEWAREN VAN DE GEBRUIKSAANWIJZING
Deze gebruiksaanwijzing zal u helpen om het meeste uit uw nieuwe glas-magneetbord te halen. Het bevat ook belangrijke informatie voor de
veilige montage en het veilige gebruik van uw glas-magneetbord.
Lees en begrijp deze gebruiksaanwijzing voordat u uw nieuwe glas-magneetbord monteert en gebruikt.
Bewaar deze gebruiksaanwijzing in de buurt van uw glas-magneetbord. Als u het glas-magneetbord doorgeeft, zorg er dan voor dat de volgen-
de gebruiker deze gebruiksaanwijzing ook ontvangt.
VEILIGHEIDSAANWIJZING
Het glas-magneetbord Artverum is van gehard veiligheidsglas volgens EN 12150-1 vervaardigd.
1 | Controleert u voor de montage of er zich op de montageplaats in de wand geen leidingen, zoals bijv. stroom, gas of water bevinden.
2 | Let u er a.u.b. bij de montage op, dat het glas-magneetbord niet met scherpe voorwerpen of een harde ondergrond zoals steen of tegels in
contact komt. Daardoor ontstane schade kan niet worden gereclameerd. Legt u het bord gedurende de montage op een zachte ondergrond.
De bescherminghoeken pas na de montage verwijderen.
3 | Het glas-magneetbord is uitsluitend geschikt voor montage op een rechte, stevige wand.
4 | Voor de juiste montage van onze glas-magneetborden adviseren wij de bijgevoegde boorsjablonen. De passende boorafstanden vindt u
additioneel op pagina 16 en ook op onze internetsite www.sigel-office.com/nl-nl/montageaanwijzingen
De firma SIGEL GmbH is niet aansprakelijk voor verkeerd gemonteerde borden of voor de daardoor ontstane schade.
MONTAGE
1 | Het glas-magneetbord kan horizontaal of verticaal worden opgehangen. Voor het makkelijker aftekenen van de boorgaten gebruikt u de
bijgevoegde boorsjablonen. De wandbevestigingen 44 worden d.m.v. pluggen 22 en schroeven 33 vast aan de wand geschroefd, de pagina met
het SIGEL Logo toont het u (Fig. I).
Tip: Controleert u a.u.b. met behulp van een waterpas of de wandbevestigingen 44 exact horizontaal zijn aangebracht.
Indien u de wandbevestigingen 44 nog moet afstellen, bevindt zich in de wandbevestigingen 44 een lang gat, waardoor de positie van de
wandbevestigingen 44 nog licht te corrigeren is. Daarvoor de schroef iets losser draaien en de wandbevestiging 44 horizontaal of verticaal naar
wens verschuiven en weer vast aandraaien.
2 | Aansluitend wordt het glas-magneetbord 11 in de wandbevestigingen 44 gehangen (Fig. II). Hiervoor bevinden zich op de achterkant van
het bord twee ophangpunten 55. In ieder ophangpunt 55 bevinden zich twee uitsparingen (Fig. III), het maakt niet uit of u het bord horizon-
taal of verticaal ophangt, de wand
-bevestiging 44 moet altijd in de bovenste uitsparing, niet in diegene aan de zijkant, gestoken worden. De
ophangpunten 55 op het bord moeten zo op de wandbevestigingen 44 gezet worden, dat zich beide wandbevestigingen 44 in het midden van
de ophangpunten 55 bevinden (Fig. III), Nu het bord van boven naar beneden schuiven, zodat de wandbevestigingen 44 in de ophangpunten
55 vallen (Fig. IV) en het bord vast wordt gefixeerd.
Zorgt u er in ieder geval voor, dat het glas-magneetbord altijd op 2 ophangpunten bevestigd is, en controleert u of het bord stevig hangt voor-
dat u het loslaat. Voetjes van silicone op de achterkant zorgen ervoor dat het bord stevig hangt bij het beschrijven.
3 | MONTAGE VAN MEERDERE BORDEN NAAST ELKAAR
Indien u meerdere borden naast of onder elkaar wilt ophangen, volgt u dan alstublieft de volgende aanwijzingen:
Vanwege de kwetsbare glaskanten is het niet mogelijk meerdere glas-magneetborden tegen elkaar aan op te hangen. Laat u een spleet van
minimaal 3 mm tussen de borden. Voorkomt u bij de montage dat de kanten tegen elkaar aan stoten, dit kan een breuk veroorzaken. Daar-
door ontstane schades kunnen niet als reclamatie worden geaccepteerd. Ook hier dienen de beschermhoeken pas na de montage te worden
verwijderd.
Monteert u het eerste glas-magneetbord zoals in de paragraaf “montage“ is beschreven. Pas daarna tekent u de boorgaten voor het volgende

15
bord af. Dit helpt u mogelijke montage-onnauwkeurigheden vooraf te herkennen en de positionering van de volgende borden daaraan aan te
passen.
GEBRUIK & REINIGING
Voor het schrijven op het glasoppervlak mogen alleen voor glas geschikte markeerstiften worden gebruikt. Het glas-magneetbord kan droog of
nat met een zachte doek worden schoongemaakt. Maakt u uw bord a.u.b. niet met agressieve schuur- en schoonmaakmiddelen of chemicaliën
schoon. Opdat u langer plezier heft van uw glas-magneetbord, adviseren wij u het gebruik van onze SIGEL accessoires.
GARANTIE
* Wij bieden een garantie van 25 jaar op de vlekkeloze beschrijfbaarheid en afveegbaarheid van het glasoppervlak. Wij garanderen dat het
glas-magneetbord bij gebruik van de SIGEL accessoires en volgens onze instructies afveegbaar en vrij van vlekken of resten blijft. Deze ga-
rantie geldt niet in geval van misbruik, nalatigheid, verkeerd gebruik of een andere toepassing, die niet overeenkomt met de meegeleverde
aanwijzingen.
MAGNETEN
→Vanwege de glasdikte kunnen de bijgevoegde SuperDym-magneten of extra sterke magneten worden gebruikt.
→Magneten kunnen bij te korte afstand (‹10 cm) tegen elkaar aan knallen en dat kan tot het afsplinteren van de magneetcoating of
het versplinteren van de magneten leiden.
→Blessuregevaar: Afknellen van de vingers of huid tussen twee magneten kan tot kneuzingen en blauwe plekken leiden.
→Magneten veroorzaken een ver reikend, sterk magneetveld. Gevaar door magnetische velden bij credit- en bankkaarten, elektri-
sche apparaten (informatiedragers, mobile telefoons, computers, monitoren, etc.), mechanische horloges en gehoorapparaten.
→Personen met pacemakers en geïmplanteerde defibrillatoren mogen zich niet in magnetische velden begeven.
→Magneten zijn geen speelgoed! Houdt u magneten uit de buurt van kinderen – kleine onderdelen kunnen worden ingeslikt.
VERWIJDERING EN RECYCLING
Als uw glas-magneetbord het einde van zijn levensduur heeft bereikt, zorgt u er dan voor dat het bij demontage veilig en vakkundig wordt
afgevoerd. De verwijdering van het glas-magneetbord inclusief de verpakking is gebaseerd op de plaatselijke afvalverwerkingsvoorschriften
en milieubeschermingswetten.
Voer materialen die kunnen worden gerecycled op de juiste manier af, met aandacht voor ons milieu. Het verpakkingsmateriaal bestaat uit
plastic en karton en dient naar materiaal gescheiden te worden gerecycled. U kunt ook contact opnemen met uw gemeente voor advies over
verwijdering.

16
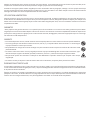
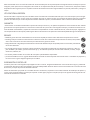
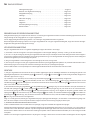
BOHRABSTÄNDE | DISTANCE BETWEEN DRILL HOLES | DISTANCES ENTRE LES TROUS DE PERÇAGE
DISTANZE TRA I FORI | DISTANCIAS ENTRE TALADROS | BOORAFSTANDEN
Angaben von Bohrlochmitte zu Bohrlochmitte | Measurements from centre of one drill hole to the other
Distances entre les centres des trous de perçage | Specifiche da centro a centro dei due fori
Indicaciones del centro de un taladro al centro del otro | Afstanden van middelpunt boorgat tot middelpunt boorgat
sigel-ofce.com
SIGEL GmbH
Bäumenheimer Str. 10
86690 Mertingen
Deutschland
Telefon +49 90 78 81-0
kontakt@sigel.de
www.sigel-office.com
03.2022
57,5 cm
Board | 12 x 78 cm
27,5 cm
Board | 48 x 48 cm
39,5 cm
Board | 60 x 40 cm
57,5 cm
Board | 78 x 48 cm
70,5 cm
Board | 91 x 46 cm
79,5 cm
Board | 100 x 65 cm
17 cm
Board | 30 x 30 cm
-
 1
1
-
 2
2
-
 3
3
-
 4
4
-
 5
5
-
 6
6
-
 7
7
-
 8
8
-
 9
9
-
 10
10
-
 11
11
-
 12
12
-
 13
13
-
 14
14
-
 15
15
-
 16
16


Sigel GL140 Artverum Magnetic Glass Board Manuel utilisateur
- Taper
- Manuel utilisateur
dans d''autres langues
Documents connexes

Autres documents
-
IKEA Mala Manuel utilisateur
-
Hama 00100981 Le manuel du propriétaire
-
-
-
Kyosho No.34419T1FAZER MK2 FZ02L1969 Chevy El Camino SS 396 Manuel utilisateur
-
 Aurora AOne AOne Pattress Le manuel du propriétaire
-
Dorma AGILE 150 Installation Instruction, Care Instructions, Service And Maintenance
