La page est en cours de chargement...

1
Glas-Magnetboard artverum®
// Montage- und Sicherheitshinweise
// Mounting and safety instructions
// Instructions de montage et de sécurité
www.sigel.de
Herzlichen Glückwunsch! Mit diesem stylischen Glas-Magnetboard artverum® von Sigel haben Sie sich für ein hochwertiges, TÜV-geprüftes
Produkt entschieden, einsetzbar als stylische Plan- und Organisationstafel oder auch mit der projektionsfähigen Oberfläche für Ihre Power-
Point- und Video-Präsentationen. Die Besonderheiten:
- Rahmenlose Aufhängung für einen frei schwebenden 3D-Look
- Magnetisch und beschriftbar
- Im Hoch- oder Querformat anbringbar
- Aus Tempered Glas (Sicherheitsglas ESG gemäß EN 12150-1) gefertigt
Die projektionsfähigen Boards (GL 300 und GL 301) sind für alle handelsüblichen Projektionsgeräte geeignet.
D
Félicitations! En optant pour le tableau magnétique en verre artverum® de Sigel, vous avez choisi un produit haut de gamme contrôlé par le
TÜV (contrôle technique allemand) utilisable comme tableau d’organisation élégant ou comme écran de projection pour vos présentations
PowerPoint ou vidéo grâce à sa surface adaptée à la projection. Les points forts:
- L’accrochage sans cadre confère au tableau un look 3D
- Double fonction: affichage magnétique et écriture
- Fixation horizontale ou verticale possible
- En verre trempé (verre sécurit ESG selon EN 12150-1)
Les tableaux magnétiques en verre adaptés à la projection (GL 300 et GL 301) conviennent à tous les appareils de projection du marché.
F
Congratulations! In choosing this stylish artverum® Magnetic Glass Board you have chosen a high-quality, TÜV-approved product that
can be used as a stylish board for planning and organisation or as a projection screen for Power Point and video presentations. The special
features:
- Mounted without frames for a free-floating, 3D look
- Magnetic; can also be written on
- Mounting in portrait or landscape format
- Made of tempered glass (safety glass tested to EN 12150-1)
The projection screen boards (GL 300 and GL 301) are suitable for use in combination with all standard projectors.
GB
150 x 100 cm
180 x 120 cm
160 x 120 cm 196 x 110 cm

2
INHALT // CONTENTS // CONTENU
2 pcs.
6 pcs.
6 pcs.
6 pcs.
2 pcs.
Die beigepackten Dübel und Schrauben sind nur für feste Wände geeignet. Für alle anderen Wände verwenden Sie bitte Spezialdübel und -schrauben.
The enclosed anchors and screws are suitable for solid walls only. For all other walls, please use special anchors and screws.
Les vis et chevilles fournies sont uniquement prévues pour des murs pleins. Pour tout autre type de mur veuillez utiliser des vis et chevilles spéciales.
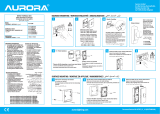
MONTAGEHINWEISE // MOUNTING INSTRUCTIONS // INSTRUCTIONS DE MONTAGE
Fig. I
Fig. V
Fig. VI
Fig. VII
Fig. II Fig. III Fig. IV
D
Glas-Magnetboard
SuperDym-Magnete
Dübel
Schrauben
Wandhalterung
Aufhängung am Board
Haltegriff
GB
Magnetic Glass Board
SuperDym magnets
Anchors
Screws
Wall fixings
Mounting fittings on the board
Handle
F
Tableau magnétique en verre
Aimants SuperDym
Chevilles
Vis
Support mural pour tableau
Élément d’accrochage du tableau
Poignée de maintien

3
GB
MOUNTING INSTRUCTIONS
1 // Before mounting, check that there are no service pipes, e.g. for electricity, gas or water, in that part of the wall.
2 // When mounting the magnetic glass board, please ensure that it does not come into contact with sharp objects or hard surfaces such as stone
or tiles. We cannot accept any claims for resulting damage to the board. Place the board on a soft surface until it is ready to be mounted and do
not remove the protective corners until it is attached to the wall.
3 // The magnetic glass board should only be mounted on an even, solid wall.
4 // Two people are required to mount the board.
5 // In order to mount our magnetic glass boards correctly, we recommend using the enclosed drilling templates. The exact distances between the
drill holes can be found on page 6 and on our website at www.sigel.de/montage
MOUNTING INSTRUCTIONS FOR PROJECTION SCREEN MAGNETIC GLASS BOARDS GL 300 AND GL 301
6 // Ideal viewing height (minimum distance between the bottom of the projection screen and the floor): for professional use, at least 125 cm;
for home cinemas, at least 60-90 cm
7 // Minimum viewing distance: distance from the projection screen board to the first row of seats = height of the board x 1.5
MOUNTING
1 // The magnetic glass board can be mounted in portrait or landscape format. The enclosed drilling templates make it simple to mark the position
of the drill holes. The wall fixings
are screwed securely to the wall using anchors
and screws
. The side of the board with the Sigel logo
should be facing outwards (fig. I).
Tip: Please use a spirit level to check that the wall fixings
are lined up straight.
The wall fixings
have an oblong hole that can be used to adjust their position if necessary. To do so, loosen the screw and move the wall fixings
vertically or horizontally as required. Then tighten the screw again.
2 // Two people are required to mount the magnetic glass board. A handle
is provided for each person.
Tip: to simplify the positioning of the board, mark the wall lightly in pencil (fig. II), e.g. to indicate the width of the board. Likewise, you can mark the
position of the corners and the mounting fittings (for distances see pg. 6).
To mount the board, use the handle
to hold the lower edge of the board (fig. III) while holding the side of the board with your other hand (fig.
IV). The magnetic glass board
is then mounted onto the wall fixings
(fig. V). There are six mounting fittings
on the back of the board for
this. Each mounting fitting
has two openings (fig. VI); the wall fixings
must always be slotted into the top opening rather than the side ope-
ning, whether the board is hung in portrait or landscape format. Place the mounting fittings
on the back of the board over the wall fixings
so that the wall fixings
are in the centre (fig. VI). Now slide the board downwards so that the wall fixings
click into the mounting fittings
(fig. VII) and the board is mounted securely.
Make sure that the magnetic glass board is mounted on all six fittings and check that the board is securely in place before letting go. Silicon pads
on the back of the board keep it steady while it is being written on.
SAFETY PRECAUTIONS
The artverum® Magnetic Glass Board is made of tempered safety glass tested to EN 12150-1.
The glass surface should be written on using only special markers for glass. The magnetic glass board can be cleaned with a damp or dry cloth.
Please do not use abrasive scouring agents, detergents or chemicals to clean the board. To prolong the life of your board, we recommend using
our own Sigel accessories: liquid chalk markers and microfibre cloth.
Sigel GmbH does not assume any responsibility or guarantee for boards that have been incorrectly mounted or for any resulting damage.
GUARANTEE
* We offer a 25-year guarantee that the glass surface will remain perfect to write on and to clean. We guarantee that the
magnetic glass board will remain easy to wipe and free of smudges and other residue when using Sigel accessories and
following our instructions for use. This guarantee does not apply in cases of mistreatment, negligence, incorrect usage or
other methods of utilisation that do not comply with the enclosed instructions.
TÜV-APPROVED
With TÜV-approved safety mounting fittings plus superb function and product quality - tested and approved by the Global
Safety Certification of the TÜV Saar branch (usability).
MAGNETS
For attaching notes, postcards, etc, use the enclosed SuperDym magnets or magnets with an extra-strong hold. Treat the SuperDym
magnets with caution at all times and separate them by sliding them apart sideways. Please ensure that there is a distance of at least
5 cm between the individual magnets (GL 195, GL 196, GL 197) on the artverum® Magnetic Glass Board. If used incorrectly, two or more
magnets may collide unexpectedly, causing the magnets to splinter and the magnetic coating to chip. Splinters can fly off the magnet,
injuring people nearby and damaging the glass surface of the board. Careless use can lead to fingers or skin becoming jammed between
two magnets, resulting in bruising. Magnets create a strong, far-reaching magnetic field. Among other things, they can cause damage to
televisions, laptops, computer hard drives, credit cards and EC cards, data carriers, mechanical watches, hearing aids and loudspeakers.
Magnets can affect the functioning of pacemakers and heart defibrillator implants. Magnets are not toys! Keep them away from children
– small parts are a choking hazard. Make sure that the magnets are kept out of the reach of children. Sigel cannot be held liable for any
damage or injury caused by a failure to follow these safety measures.
GARANTIE
AUF BOARDOBERFLÄCHE
GUARANTEE
F OR BOARD SURFACE
25
JAHRE
YEAR
*

4
F
INSTRUCTIONS DE MONTAGE
1 // Vérifier avant le montage l‘absence de tout passage de conduites d‘alimentation (comme par ex. d‘électricité, gaz, eau) à l‘endroit du mur où
vous souhaitez fixer le tableau.
2 // Lors du montage, veillez à ce que le tableau ne vienne jamais en contact avec des objets pointus ou des fonds durs comme la pierre ou le
carrelage. Les dommages qui en résulteraient ne pourraient pas être pris en compte lors d‘une réclamation. Durant le montage, déposez le tableau
sur un support doux et souple. Ne retirez pas les protections du tableau avant avoir terminé le montage.
3 // Le tableau magnétique en verre convient exclusivement pour un montage sur un mur plein et bien droit.
4 // 2 personnes sont nécessaires pour monter le tableau en verre magnétique.
5 // Pour un montage correct de nos tableaux magnétiques en verre, nous vous conseillons d‘utiliser le gabarits de perçage fourni. Vous trouverez
les indications sur les distances entre les trous de perçagesur la page 6 et sur notre site internet www.sigel.de/montage
INSTRUCTIONS DE MONTAGE POUR TABLEAUX MAGNÉTIQUES EN VERRE ADAPTÉS À LA PROJECTION GL 300 ET GL 301
6 // Hauteur d’écran optimale (distance minimum entre le bord inférieur de l’écran de projection et le sol) : usage professionnel 125 cm au mini-
mum, usage dédié au home-cinéma entre 60 – 90 cm.
7 // Distance de vue minimum : Distance entre l’écran de projection et le premier rang = hauteur d’écran x 1,5
MONTAGE
1 // Le tableau magnétique en verre peut être suspendu à l‘horizontale ou à la verticale. Pour un repérage plus aisé des trous à percer sur le mur,
utilisez les gabarits de perçage fournis. Les supports muraux
sont à fixer très solidement au mur en utilisant chevilles
et vis
, le côté portant
le logo Sigel doit vous faire face (fig. I)
Astuce : Vérifiez à l‘aide d‘un niveau à bulles, si les supports muraux
sont vraiment à l‘horizontale.
S‘il vous faut cependant ajuster encore le positionnement des supports muraux
, vous trouverez sur ces supports muraux
un orifice oblong
qui vous permettra de corriger légèrement la position des supports muraux
. Pour cela, desserrer un peu la vis et déplacer le support mural
selon le besoin horizontalement ou verticalement avant de revisser de nouveau à fond.
2 // Deux personnes sont nécessaires pour suspendre le tableau magnétique en verre. 1 poignée de maintien
par personne est fournie.
Astuce : Pour faciliter l’opération, vous pouvez faire des petits traits de repère sur le mur (fig. II), pour, par exemple, marquer la largeur du tableau ou le
niveau de l’emplacement des éléments de fixation du tableau (distances voir page 6).
Pour l’accrocher, maintenez le tableau d’une main par le bord inférieur à l’aide de la poignée de maintien
(fig. III) et avec l’autre main, sur le côté
latéral (fig. IV). On accroche ensuite le tableau magnétique en verre
aux supports muraux
(fig. V). Au dos du tableau, vous disposez pour cela
de six éléments pour l‘accrochage
. Et chacun de ces éléments d‘accrochage
comporte deux cavités (fig.VI), peu importe que vous suspendiez
votre tableau en hauteur ou en largeur, le support mural doit toujours être inséré dans la cavité supérieure et non pas dans celle située latérale-
ment. L‘élément pour l‘accrochage
situé sur le tableau doit venir s‘adapter sur le support mural de telle manière que les 6 supports muraux
viennent se positionner au centre de l‘élément d‘accrochage
(fig.VI). Dès lors, faire glisser le tableau du haut vers le bas, de telle manière que les
supports muraux
viennent se loger dans la cavité (fig. VII) et que le tableau soit ainsi solidement fixé au mur.
Assurez-vous que le tableau magnétique en verre est bien fixé aux six points d‘accrochage et vérifiez le bon maintien du tableau avant de le lâcher.
Des petits patins de protection en silicone au dos du tableau garantissent également le bon appui lorsqu‘on écrit sur le tableau.
INDICATIONS DE SÉCURITÉ
Le tableau magnétique en verre artverum® est réalisé en verre sécurit trempé (ESG) selon la norme EN 12150-1.
Seuls les marqueurs conçus pour pouvoir écrire sur du verre devront être utilisés. Le tableau magnétique en verre peut être nettoyé avec un
chiffon doux sec ou humidifié. Nous vous prions de ne pas utiliser de produits corrosifs, détergents ou produits chimiques pour nettoyer votre
tableau. Pour conserver encore longtemps la joie d‘utiliser votre tableau magnétique en verre, nous vous conseillons d‘utiliser les accessoires
complémentaires Sigel : le marqueur craie et le chiffon microfibre.
La société Sigel GmbH n‘assume aucune garantie pour des tableaux montés de manière inappropriée ou pour des dégâts qui en résulteraient.
GARANTIE
* Nous proposons une garantie de 25 ans sur la capacité à pouvoir écrire et effacer sur la surface en verre. Nous garantis-
sons que le tableau magnétique en verre restera lavable et dépourvu de traces et résidus si vous utilisez les accessoires
complémentaires Sigel et respectez nos prescriptions. Cette garantie ne s‘applique pas en cas de mauvaise utilisation, de
négligence, d‘utilisation inappropriée ou pour un autre usage non conforme au mode d‘emploi fourni.
CONTRÔLÉ PAR LE TÜV
Avec fixation murale sécurisée contrôlée par le TÜV, qualité produit et fonctionnalité récompensées. Contrôlé par le SGS-
TÜV Saar (aptitude à l‘emploi).
AIMANTS
Pour fixer de manière fiable feuilles de notes, cartes postales, etc., servez-vous des aimants SuperDym fournis ou d‘aimants à très fort pouvoir
d‘adhérence. Manipulez toujours les aimants SuperDym avec beaucoup de précaution et séparez-les, les uns des autres, en les faisant glisser
sur le côté. Sur le tableau artverum® (GL 195, GL 196, GL 197), conservez une distance minimum d’au moins 5 cm entre chaque aimant. Toute
utilisation incorrecte peut favoriser une collision imprévue entre deux ou plusieurs aimants. Ils peuvent se cogner avec une énergie telle
qu’ils se brisent et la couche de surface éclate. La projection des éclats peut provoquer des blessures et endommager la surface en verre. Si
vous manipulez les aimants sans précaution, des pincements graves de doigt ou de peau peuvent survenir et provoquer ainsi des contusi-
ons ou des hématomes. Les aimants créent autour d’eux un champ magnétique intense qui peut endommager certains appareil et objets :
téléviseurs, ordinateurs portables, disques durs d’ordinateurs cartes de crédit ou autres cartes magnétiques, supports de données, montres
mécaniques, appareils auditifs et haut-parleurs. Des aimants peuvent porter atteinte au fonctionnement des stimulateurs cardiaques et des
défibrillateurs implantés. Les aimants ne sont pas des jouets! Tenez les aimants bien à l‘écart des enfants, les petites pièces pouvant être
avalées. Veillez à garder les aimants hors de portée des enfants. En cas de non observation des mesures de sécurité énoncées, Sigel décline
toute responsabilité pour les dégâts éventuels qui en résulteraient.
GARANTIE
AUF BOARDOBERFLÄCHE
GUARANTEE
F OR BOARD SURFACE
25
JAHRE
YEAR
*

5
D
MONTAGEHINWEISE
1 // Prüfen Sie vor der Montage, dass sich an der Montagestelle in der Wand keine Versorgungsleitungen, wie z. B. Strom, Gas oder Wasser befinden.
2 // Bitte beachten Sie bei der Montage, dass das Glas-Magnetboard nicht mit spitzen Gegenständen oder harten Untergründen wie Stein oder
Fliesen in Berührung kommt. Dadurch entstandene Schäden können nicht als Reklamation anerkannt werden. Legen Sie das Board während der
Montage auf einen weichen Untergrund. Schutzecken und Kantenschutz erst nach Beendigung der Montage entfernen.
3 // Das Glas-Magnetboard ist ausschließlich für die Montage an einer geraden, festen Wand geeignet.
4 // Zur Montage des Glas-Magnetboards werden zwei Personen benötigt.
5 // Zur richtigen Montage unserer Glas-Magnetboards empfehlen wir die beiliegende Bohrschablonen. Die entsprechenden Bohrabstände fin-
den Sie auf Seite 6 und auch auf unserer Internetseite www.sigel.de/montage
MONTAGEHINWEISE PROJEKTIONSFÄHIGE GLASMAGNETBOARDS GL 300 UND GL 301
6 // Optimale Sichthöhe (Mindestabstand der Unterseite der Projektionswand zum Boden): professioneller Einsatz mind. 125 cm, Heimkino-
Einsatz mind. 60 – 90 cm
7 // Mindest-Sichtdistanz: Entfernung des Projektionsboards zur ersten Sitzreihe = Boardhöhe x 1,5
MONTAGE
1 // Das Glas-Magnetboard kann im Hoch- und Querformat aufgehängt werden. Zum leichteren Anzeichnen der Bohrlöcher verwenden Sie die
beiliegenden Bohrschablonen. Die Wandhalterungen
werden mittels Dübel
und Schrauben
fest an der Wand verschraubt, die Seite mit
dem Sigel Logo zeigt zu Ihnen (Fig. I).
Tipp: Bitte überprüfen Sie mit Hilfe einer Wasserwaage, ob die Wandhalterungen
gerade ausgerichtet sind.
Falls Sie die Wandhalterungen
noch justieren müssen, befindet sich in den Wandhalterungen
ein Langloch, durch das sich die Position der
Wandhalterung
noch leicht korrigieren lässt. Dazu die Schraube etwas lockern und die Wandhalterung
waagrecht oder senkrecht, je nach
Bedarf verschieben und wieder fest verschrauben.
2 // Zum Aufhängen des Glas-Magnetboards werden zwei Personen benötigt. Pro Person ist ein Haltegriff
beigelegt.
Tipp: Zur leichteren Orientierung können Sie sich kleine entfernbare Markierungen (Fig. II) setzen, z. B. die Breite des Boards an der Wand. Ebenso können
Sie am Kantenschutz und an der Wand Markierungen auf Höhe der rückseitigen Wandhalterungen vornehmen (Abstände S. 6).
Zum Anbringen halten Sie das Board mit dem Haltegriff
am unteren Rand (Fig. III) und mit der zweiten Hand halten Sie das Board seitlich fest
(Fig. IV). Anschließend wird das Glas-Magnetboard
in die Wandhalterungen
eingehängt (Fig. V). Hierzu befinden sich auf der Rückseite des
Boards sechs Aufhängungen
. In jeder Aufhängung
befinden sich zwei Aussparungen (Fig. VI), egal ob Sie Ihr Board im Hoch- oder Quer-
format aufhängen, die Wandhalterung
muss immer in die obere Aussparung, nicht in die seitliche, eingeführt werden. Die Aufhängung
am Board muss so auf die Wandhalterungen
aufgesetzt werden, dass sich die sechs Wandhalterungen
in der Mitte der Aufhängung
befinden (Fig. VI). Jetzt das Board von oben nach unten schieben, so dass die Wandhalterungen
in die Aufhängung
greifen (Fig. VII) und das
Board fest fixiert wird.
Stellen Sie sicher, dass das Glas-Magnetboard immer an sechs Aufhängungen befestigt ist und überprüfen Sie den sicheren Halt des Boards, bevor
Sie es loslassen. Silikonfüßchen auf der Board-Rückseite sorgen für einen festen Halt beim Beschriften.
SICHERHEITSHINWEISE
Das Glas-Magnetboard artverum® ist aus Sicherheitsglas (ESG) gemäß EN 12150-1 hergestellt.
Zur Beschriftung der Glasoberfläche dürfen nur für Glas geeignete Marker verwendet werden. Das Glas-Magnetboard kann trocken oder nass
mit einem weichen Tuch gereinigt werden. Bitte reinigen Sie Ihr Board nicht mit aggressiven Scheuer- und Reinigungsmitteln oder Chemikalien.
Damit Sie lange Freude an Ihrem Glas-Magnetboard haben, empfehlen wir Ihnen die Verwendung von unserem Sigel Zubehör: Kreidemarker und
Mikrofasertuch.
Die Firma Sigel GmbH übernimmt keine Gewährleistung für unsachgemäß montierte Boards oder für daraus resultierende Schäden.
GARANTIE
* Wir bieten eine 25-jährige Garantie auf die einwandfreie Beschreibbarkeit und Abwischbarkeit der Glasoberfläche. Wir
garantieren, dass das Glas-Magnetboard bei Verwendung des Sigel Zubehörs und entsprechend unseren Vorgaben ab-
wischbar und frei von Flecken oder Rückständen bleibt. Diese Garantie gilt nicht in Fällen von Missbrauch, Fahrlässigkeit,
unsachgemäßer Verwendung oder einer anderen Verwendungsweise, die nicht der mitgelieferten Anleitung entspricht.
TÜVGEPRÜFT
Mit TÜV-geprüfter Sicherheitsaufhängung und ausgezeichneter Funktion und Produktqualität – geprüft von SGS-TÜV Saar
(Gebrauchstauglichkeit).
MAGNETE
Zur Anbringung von Notizzetteln, Postkarten etc. verwenden Sie die beiliegenden SuperDym-Magnete oder Magnete mit extrastarker
Haftkraft. Behandeln Sie die SuperDym-Magnete immer mit größter Vorsicht und trennen Sie sie durch seitliches Wegschieben. Bitte
halten Sie einen Abstand von Magnet zu Magnet von mind. 5 cm (GL 195, GL 196, GL 197) auf dem artverum® Glasboard. Bei nicht
sachgemäßer Behandlungsweise kann es zum unerwarteten Zusammenprall von zwei bzw. mehreren Magneten und zum Zersplittern
des Magnetes und zum Absplittern der Magnetbeschichtung kommen. Splitter können weggeschleudert werden und Sie verletzen und
es kann zu Beschädigungen der Glasoberfläche kommen. Bei unvorsichtiger Handhabung können Sie sich Finger oder Haut zwischen
zwei Magneten einklemmen. as kann zu Quetschungen und Blutergüssen an den betroffenen Stellen führen. Magnete erzeugen ein
weit reichendes, starkes Magnetfeld. Sie können unter anderem Fernseher, Laptop, Computer-Festplatten, Kredit- und EC-Karten, Da-
tenträger, mechanische Uhren, Hörgeräte und Lautsprecher beschädigen. Magnete können die Funktion von Herzschrittmachern und
implantierten Defibrillatoren beeinflussen. Magnete sind kein Spielzeug! Halten Sie die Magnete von Kindern fern – Kleinteile können
verschluckt werden. Stellen Sie sicher, dass die Magnete nicht in die Hände von Kindern gelangen. Sollten die genannten Sicherheits-
maßnahmen nicht eingehalten werden, kann Sigel keine Haftung für eventuelle Schäden übernehmen.
GARANTIE
AUF BOARDOBERFLÄCHE
GUARANTEE
F OR BOARD SURFACE
25
JAHRE
YEAR
*

6
GARANTIE
AUF BOARDOBERFLÄCHE
GUARANTEE
F OR BOARD SURFACE
25
JAHRE
YEAR
*
Sigel GmbH
86690 Mertingen
Germany
www.sigel.de
BOHRABSTÄNDE // DISTANCE BETWEEN DRILL HOLES // DISTANCES ENTRE LES TROUS DE PERÇAGE
No. GL 190 - GL 191
No. GL 195 - GL 197
No. GL 180 - GL 182
No. GL 170 - GL 175
No. GL 199 No. GL 189
Angaben von Bohrlochmitte zu Bohrlochmitte
Measurements from centre of one drill hole to the other
Distances entre les centres des trous de perçage
BOARD // 180 x 120 cm
80 cm 80 cm
80 cm 80 cm
99,5 cm 99,5 cm99,5 cm
10,25 cm 10,25 cm 10,25 cm
10 cm
10 cm
BOARD // 150 x 100 cm
65 cm 65 cm
65 cm 65 cm
79,5 cm 79,5 cm79,5 cm
10 cm
10 cm
10,25 cm 10,25 cm 10,25 cm
BOARD // 160 x 120 cm
70 cm 70 cm
70 cm 70 cm
99,5 cm 99,5 cm 99,5 cm
10,25 cm 10,25 cm 10,25 cm
10 cm
10 cm
BOARD // 196 x 110 cm
88 cm 88 cm
88 cm 88 cm
10,25 cm 10,25 cm 10,25 cm
89,5 cm
89,5 cm89,5 cm
10 cm
10 cm
1
Glas-Magnetboard artverum®
// Montage- und Sicherheitshinweise
// Mounting and safety instructions
// Instructions de montage et de sécurité
www.sigel.de
Herzlichen Glückwunsch! Mit diesem stylischen Glas-Magnetboard artverum® von Sigel haben Sie sich für ein hochwertiges, TÜV-geprüftes
Produkt entschieden, einsetzbar als stylische Plan- und Organisationstafel oder auch mit der projektionsfähigen Oberfläche für Ihre Power-
Point- und Video-Präsentationen. Die Besonderheiten:
- Rahmenlose Aufhängung für einen frei schwebenden 3D-Look
- Magnetisch und beschriftbar
- Im Hoch- oder Querformat anbringbar
- Aus Tempered Glas (Sicherheitsglas ESG gemäß EN 12150-1) gefertigt
Die projektionsfähigen Boards (GL 300 und GL 301) sind für alle handelsüblichen Projektionsgeräte geeignet.
D
Félicitations! En optant pour le tableau magnétique en verre artverum® de Sigel, vous avez choisi un produit haut de gamme contrôlé par le
TÜV (contrôle technique allemand) utilisable comme tableau d’organisation élégant ou comme écran de projection pour vos présentations
PowerPoint ou vidéo grâce à sa surface adaptée à la projection. Les points forts:
- L’accrochage sans cadre confère au tableau un look 3D
- Double fonction: affichage magnétique et écriture
- Fixation horizontale ou verticale possible
- En verre trempé (verre sécurit ESG selon EN 12150-1)
Les tableaux magnétiques en verre adaptés à la projection (GL 300 et GL 301) conviennent à tous les appareils de projection du marché.
F
Congratulations! In choosing this stylish artverum® Magnetic Glass Board you have chosen a high-quality, TÜV-approved product that
can be used as a stylish board for planning and organisation or as a projection screen for Power Point and video presentations. The special
features:
- Mounted without frames for a free-floating, 3D look
- Magnetic; can also be written on
- Mounting in portrait or landscape format
- Made of tempered glass (safety glass tested to EN 12150-1)
The projection screen boards (GL 300 and GL 301) are suitable for use in combination with all standard projectors.
GB
150 x 100 cm
180 x 120 cm
160 x 120 cm 196 x 110 cm
/