
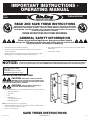
IMPORTANT INSTRUCTIONS -
OPERATING MANUAL
SAVE THESE INSTRUCTIONS
1. Read all instructions before installing or using switch.
2. Use this unit only in the manner intended by the manufacturer. If you have questions,
contact the manufacturer.
3. Installation work and electrical wiring must be done by qualified person(s) in accordance
with all applicable codes and standards, including fire-related construction.
4. When cutting or drilling into wall or ceiling, do not damage electrical wiring and other
hidden utilities.
5. This unit must be grounded.
www.airkinglimited.com
DH55 Rev. H 04-16 1 of 4
Dehumidistat
Model:
DH55
This device is intended to be used in conjunction with an Air King exhaust fan that clears the air of excessive moisture
as may occur after showering. This device CAN NOT reduce relative humidity below the level of the main living space.
NOTICE:
Electrical rating: Voltage- 120V AC
Full load: 10A
Using humidity range: 10% - 80% RH
Operating ambient temperature 10 – 40 ° C
INSTALLATION INSTRUCTIONS
CAUTION:
INSTALLATION BY A LICENSED ELECTRICIAN IS
RECOMMENDED. INSTALLATION AND USE OF THIS EQUIPMENT SHOULD
BE IN ACCORDANCE WITH PROVISIONS OF THE NATIONAL ELECTRICAL CODE, APPLICABLE
LOCAL CODES AND PERTINENT INDUSTRY STANDARDS.
CAUTION: MAKE SURE POWER IS SWITCHED OFF AT
SERVICE PANEL BEFORE STARTING INSTALLATION.
1. Unpack dehumidistat from the carton and confirm that all pieces are present. You should have:
1 - Switch Cover with Switch
1 - Switch Plate
1 - Knob
1 - Bag Containing:
2 - Gang Box Mounting Screws
1 - Instruction/Safety Sheet
NOTE: This unit is designed to fit over a single gang box.
2. Determine dehumidistat location. This control should be mounted on an inside wall where
normal air circulation can surround the control.
3. Remove cover from back plate.
READ AND SAVE THESE INSTRUCTIONS
READ CAREFULLY BEFORE ATTEMPTING TO ASSEMBLE, INSTALL, OPERATE OR MAINTAIN
THE PRODUCT DESCRIBED. PROTECT YOURSELF AND OTHERS BY OBSERVING ALL SAFETY
INFORMATION. FAILURE TO COMPLY WITH INSTRUCTIONS COULD RESULT IN PERSONAL
INJURY AND/OR PROPERTY DAMAGE!
RETAIN INSTRUCTIONS FOR FUTURE REFERENCE.
GENERAL SAFETY INFORMATION
When using electrical appliances, basic precautions should
always be followed to reduce the risk of fire, electric shock and
injury to person, including the following:

WIRING
CAUTION:
ALL ELECTRICAL CONNECTIONS MUST BE MADE
IN ACCORDANCE WITH LOCAL CODES, ORDINANCES, OR NATIONAL
ELECTRICAL CODE. IF YOU ARE UNFAMILIAR WITH METHODS OF INSTALLING ELECTRICAL
WIRING, SECURE THE SERVICES OF A QUALIFIED ELECTRICIAN.
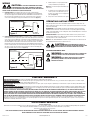
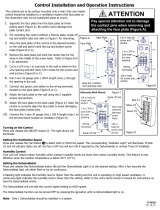
3a. Dehumidistat Only: For installations where the fan is to be controlled from the
dehumidistat only. Connect the Black lead from the dehumidistat to the Hot (Black) wire
from the power supply. Connect the Red lead from the dehumidistat to the Black wire from
the fan. Connect the ground wire (green or bare copper) from the house to the Green
screw of the mounting plate. Use approved methods for all connections (Figure 1).
3b. Dehumidistat with manual On switch: For installations where a switch (not included) to
manually turn the fan on is preferred or required, run two Hot (Black) wires from the power
source. Connect one Hot (Black) wire to the black lead of the dehumidistat. Connect the
other Hot (Black) wire from the power source to the on switch. Connect the Red lead from
the dehumidistat to the Black wire from the fan. Run a Black wire from the on switch to
the Black wire of the fan (both the Black wire from the dehumidistat and the Black wire
from the on switch will be connected to the Black wire from the fan). Connect the ground
wire (green or bare copper) from the house to the Green screw of the mounting plate.
Use approved methods for all connections (Figure 2).
www.airkinglimited.com
DH55 Rev. H 04-16 2 of 4
LIMITED WARRANTY
WHAT THIS WARRANTY COVERS: This product is warranted against defects in workmanship and/or materials.
HOW LONG THIS WARRANTY LASTS: This warranty extends only to the original purchaser of the product and lasts for one (1) year from the date of original purchase or until the original
purchaser of the product sells or transfers the product, whichever first occurs.
WHAT AIR KING WILL DO: During the warranty period, Air King will, at its sole option, repair or replace any part or parts that prove to be defective or replace the whole product with the same
or comparable model.
WHAT THIS WARRANTY DOES NOT COVER: This warranty does not apply if the product was damaged or failed because of accident, improper handling or operation, shipping damage, abuse,
misuse, unauthorized repairs made or attempted. This warranty does not cover shipping costs for the return of products to Air King for repair or replacement. Air King will pay return shipping
charges from Air King following warranty repairs or replacement
ANY AND ALL WARRANTIES, EXPRESSED OR IMPLIED (INCLUDING, WITHOUT LIMITATION, ANY IMPLIED WARRANTY OF MERCHANTABILITY), LAST ONE YEAR FROM THE DATE OF
ORIGINAL PURCHASE OR UNTIL THE ORIGINAL PURCHASER OF THE PRODUCT SELLS OR TRANSFERS THE PRODUCT, WHICHEVER FIRST OCCURS AND IN NO EVENT SHALL AIR KING’S
LIABILITY UNDER ANY EXPRESS OR IMPLIED WARRANTY INCLUDE (I) INCIDENTAL OR CONSEQUENTIAL DAMAGES FROM ANY CAUSE WHATSOEVER, OR (II) REPLACEMENT OR
REPAIR OF ANY HOUSE FUSES, CIRCUIT BREAKERS OR RECEPTACLES. NOTWITHSTANDING ANYTHING TO THE CONTRARY, IN NO EVENT SHALL AIR KING’S LIABILITY UNDER ANY EX-
PRESS OR IMPLIED WARRANTY EXCEED THE PURCHASE PRICE OF THE PRODUCT AND ANY SUCH LIABILITY SHALL TERMINATE UPON THE EXPIRATION OF THE WARRANTY PERIOD.
Some states and provinces do not allow limitations on how long an implied warranty lasts, or the exclusion or limitation of incidental or consequential damages, so these exclusions or
limitations may not apply to you. This warranty gives you specific legal rights. You may also have other rights which vary from state to state and province to province. Proof of purchase is
required before a warranty claim will be accepted.
CUSTOMER SERVICE:
Toll-Free (800) 465-7300
Our Customer Service team is available to assist you with product questions, service center locations, and replacement parts. They can be reached Monday through Friday, 8am-4pm Eastern.
Please have your model number available, as well as the type and style (located on the label inside of your product).
Please do not return product to place of purchase.
www.airkinglimited.com
PARTS FOR DISCONTINUED, OBSOLETE AND CERTAIN OTHER PRODUCTS MAY NOT BE AVAILABLE. DUE TO SAFETY REASONS, MANY ELECTRONIC COMPONENTS AND MOST
HEATER COMPONENTS ARE NOT AVAILABLE TO CONSUMERS FOR INSTALLATION OR REPLACEMENT.
4. Mount back plate securely to gang box with
screws provided in the parts package.
NOTE: Make sure the back plate is flat without any
undue stress.
5. Re-install front cover by aligning the two holes
on the top of the cover with the two posts on
the plate. Secure with cover screw supplied in
parts pack (Figure 3).
6. Turn power on at circuit breaker or fuse panel.
OPERATING INSTRUCTIONS
Using the adjustment knob, turn the dehumidistat down to its lowest setting, then to the
highest setting. Cycle at least 3 times to assure proper system function. Return control knob
pointer to desired setting.
DEHUMIDISTAT: The dehumidistat is designed to automatically power the fan when the
humidity level rises above the chosen level. If the fan is not operating, adjust the humidity
setting on the dehumidistat to a lower setting. Once the desired humidity level is reached, the
fan will automatically turn off.
MANUAL ON SWITCH: An optional manual on switch allows the user to power the fan no
matter what the humidity level is. When the switch is turned on, the fan will turn on. This is
especially useful for odor control in bathrooms.
NOTE: Either the dehumidistat OR the on switch can power the fan. To turn the fan off, both
the dehumidistat and the manual on switch must be off.
CAUTION: NEVER USE THE DEHUMIDISTAT SWITCH AS A
MEANS TO TURN OFF THE POWER TO THE FAN WHEN SERVICING. ALWAYS
TURN THE POWER OFF AT THE CIRCUIT BREAKER OR FUSE PANEL.
CALIFORNIA RESIDENTS ONLY:
WARNING: THIS PRODUCT CAN EXPOSE YOU TO A CHEMICAL [OR
CHEMICALS] KNOWN TO THE STATE OF CALIFORNIA TO CAUSE CANCER.
WARNING: THIS PRODUCT CAN EXPOSE YOU TO A CHEMICAL
[OR CHEMICALS] KNOWN TO THE STATE OF CALIFORNIA TO CAUSE
REPRODUCTIVE TOXICITY.
Screw
Figure 3
Post
Fan
Neutral (White)
Hot (Black)
Dehumidistat
Figure 1
Hot (Red)
Ground
Hot (Black)
On/Off Switch
Dehumidistat
Figure 2
Fan
Neutral (White)
Hot (Red)
Ground

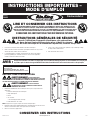
INSTRUCTIONS IMPORTANTES –
MODE D’EMPLOI
CONSERVER CES INSTRUCTIONS
1. Lisez toutes les instructions avant d’installer ou d’utiliser l’interrupteur.
2. Utiliser cette unité seulement de la manière pour laquelle le fabricant l’a conçu. Si vous
aviez des questions, veuillez contacter le fabricant.
3. Le travail d’installation et le câblage électrique doivent être effectués par une(des)
personne(s) qualifiée(s) en conformité avec tous les codes et normes applicables,
incluant la construction relative aux incendies.
4. Lors de coupe ou de perçage des murs et plafonds, ne pas endommager le filage
électrique et autres utilités cachées.
5. Cette unité doit être mise à la terre.
www.airkinglimited.com
DH55 Rev. H 04-16 3 of 4
Déshumidistat
Modéle:
DH55
Cet appareil est destiné à être utilisé en conjonction avec un ventilateur Air King qui purifie l’air d’une humidité excessive qui peut
se produire après la douche. Cet appareil NE PEUT PAS réduire l’humidité relative en dessous du niveau de la salle principale.
AVIS :
Caractéristiques électriques : Tension- 120V AC
Pleine charge : 10A
Taux d’utilisation d’humidité: 10% - 80% HR
Température ambiante de fonctionnement 10 - 40 ° C
INSTRUCTIONS D’INSTALLATION
AVERTISSEMENT:
L’INSTALLATION PAR UN
ÉLECTRICIEN AGRÉÉ EST RECOMMANDÉE. L’INSTALLATION ET L’UTILISATION
DE CET APPAREIL DOIT ÊTRE CONFORME AVEC LES NORMES DU CODE NATIONAL D’ÉLECTRICITÉ,
LES CODES LOCAUX APPLICABLES ET LES NORMES INDUSTRIELLES PERTINENTES.
AVERTISSEMENT: VOUS ASSURER QUE
L’ALIMENTATION EST COUPÉE AU PANNEAU DE SERVICE AVANT DE
COMMENCER L’INSTALLATION.
1. Déballez le déshumidistat du carton et vérifiez que toutes les pièces sont présentes. Vous
devriez avoir :
1 - Couverture d’interrupteur avec interrupteur
1 - Plaque d’interrupteur
1 - Bouton
1 - Sac contenant :
2 - Vis de montage de la boîte électrique
1 - Feuille d’instruction / de sécurité
NOTE: Cet appareil est conçu pour s’ajuster sur une boîte électrique simple.
2. Déterminez l’emplacement du déshumidistat. Cette commande doit être montée sur un mur
intérieur où la circulation normale de l’air peut entourer la commande.
3. Retirez le couvercle de la plaque arrière.
LIRE ET CONSERVER CES INSTRUCTIONS
LIRE SOIGNEUSEMENT AVANT DE TENTER D’ASSEMBLER, INSTALLER, OPÉRER OU DE
RÉPARER LE PRODUIT DÉCRIT. PROTÉGEZ VOUS-MÊME ET LES AUTRES EN OBSERVANT
TOUTE L’INFORMATION DE SÉCURITÉ. FAILLIR À SE CONFORMER AUX INSTRUCTIONS PEUT
RÉSULTER EN BLESSURE PERSONNELLE GRAVE ET/OU EN DOMMAGE À LA PROPRIÉTÉ.
CONSERVER CES INSTRUCTIONS POUR RÉFÉRENCES FUTURES.
INSTRUCTIONS GÉNÉRALES DE SÉCURITÉ
Lors de l’utilisation d’appareils électriques, des précautions
de base doivent toujours être suivies pour réduire les risques
d’incendie, de choc électrique et de blessures corporelles, incluant ce qui suit:

CÂBLAGE
AVERTISSEMENT:
TOUTES LES CONNEXIONS
DOIVENT ÊTRE FAITES EN CONFORMITÉ AVEC LES CODES
ÉLECTRIQUES LOCAUX OU NATIONAUX. SI VOUS N’ÊTES PAS FAMILIER AVEC LES
MÉTHODES D’INSTALLATION DE CÂBLAGE ÉLECTRIQUE, RECOURREZ AUX SERVICES D’UN
ÉLECTRICIEN QUALIFIÉ.
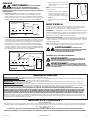
3a. Déshumidistat seulement : Pour les installations où le ventilateur doit être contrôlé à
partir du déshumidistat seulement. Connectez le fil noir du déshumidistat au fil (noir)
chaud de l’alimentation. Connectez le fil rouge du déshumidistat au fil noir du ventilateur.
Raccorder le fil de mise à la terre (vert ou cuivre nu) de la maison à la vis verte de la plaque
de montage. Utilisez des méthodes approuvées pour toutes les connexions (Figure 1).
3b. Déshumidistat avec un interrupteur de marche manuel: Pour les installations où un
interrupteur (non fourni) pour activer manuellement le ventilateur est préférable ou nécessaire,
connectez deux fils (noirs) chauds de la source d’alimentation. Connectez un fil (noir) chaud
au fil noir du déshumidistat. Connectez l’autre fil (noir) chaud de la source d’alimentation à
l’interrupteur de marche. Connectez le fil rouge du déshumidistat au fil noir du ventilateur.
Connectez un fil noir de l’interrupteur au fil noir du ventilateur (le fil noir du déshumidistat et
le fil noir du commutateur seront tous les deux connectés au fil noir du ventilateur). Raccorder
le fil de mise à la terre (vert ou cuivre nu) de la maison à la vis verte de la plaque de montage.
Utilisez des méthodes approuvées pour toutes les connexions (Figure 2).
www.airkinglimited.com
DH55 Rev. H 04-16 4 of 4
4. Montez la plaque arrière en toute sécurité sur
la boîte électrique avec les vis fournies dans le
sachet de pièces..
NOTE: Assurez-vous que la plaque arrière est plate,
sans stress excessif.
5. Réinstallez le couvercle avant en alignant les
deux trous sur le dessus du couvercle avec
les deux ergots de la plaque. Fixez avec la vis
du couvercle fournie dans le sachet de pièces
(Figure 3).
6. Allumez au disjoncteur ou au panneau de
fusibles.
MODE D’EMPLOI
En utilisant le bouton de réglage, tournez le déshumidistat à son plus bas réglage, puis à
la position la plus élevée. Tournez au moins 3 fois pour assurer le bon fonctionnement du
système. Retournez le pointeur du bouton de commande au réglage désiré.
DÉSHUMIDISTAT : Le déshumidistat est conçu pour alimenter automatiquement le ventilateur
lorsque le taux d’humidité dépasse le niveau choisi. Si le ventilateur ne fonctionne pas, ajustez
le réglage de l’humidité sur le déshumidistat à un niveau inférieur. Une fois que le niveau
d’humidité désiré est atteint, le ventilateur s’éteint automatiquement.
INTERRUPTEUR DE MARCHE MANUEL : Un interrupteur de marche manuel optionnel permet
à l’utilisateur d’amorcer le ventilateur, peu importe le niveau d’humidité. Lorsque l’interrupteur
est amorcé, le ventilateur se met en marche. Ceci est particulièrement utile pour contrôler les
odeurs dans les salles de bains.
NOTE : le déshumidistat ou le commutateur peuvent amorcer le ventilateur. Pour arrêter le
ventilateur, le déshumidistat et l’interrupteur de marche manuel doivent être éteints.
AVERTISSEMENT: NE JAMAIS UTILISER
L’INTERRUPTEUR DU DÉSHUMIDISTAT POUR ÉTEINDRE LE VENTILATEUR
LORS DE L’ENTRETIEN. COUPEZ TOUJOURS LE COURANT AU
DISJONCTEUR OU AU PANNEAU DE FUSIBLE.
RÉSIDENTS DE LA CALIFORNIE UNIQUEMENT :
AVERTISSEMENT : CE PRODUIT PEUT VOUS EXPOSER
À UN PRODUIT CHIMIQUE [OU À DES PRODUITS CHIMIQUES] CONNU(S) PAR
L’ÉTAT DE LA CALIFORNIE POUR CAUSER LE CANCER.
AVERTISSEMENT : CE PRODUIT PEUT VOUS EXPOSER
À UN PRODUIT CHIMIQUE [OU À DES PRODUITS CHIMIQUES] CONNU(S) PAR
L’ÉTAT DE LA CALIFORNIE POUR CAUSER LA TOXICITÉ ENVERS LES FONCTIONS
DE LA REPRODUCTION.
Vis
Figure 3
Poteau
GARANTIE LIMITÉE
QUE COUVRE CETTE GARANTIE : Ce produit est garanti contre tout vice de fabrication ou de matière.
COMBIEN DE TEMPS CETTE GARANTIE DURE : Cette garantie se rapporte seulement à l’acheteur original du produit et dure pendant cinq (5) années de la date de l’achat original ou
jusqu’à ce que l’acheteur original du produit vend ou transfère le produit, celui qui se produit en premier.
QUE FERA AIR KING : Au cours de la période de garantie, Air King, à son choix, réparera ou remplacera n’importe quelle partie ou pièces qui s’avèrent défectueuses ou remplacera le
produit entier par le même modèle ou un modèle comparable.
CE QUE CETTE GARANTIE NE COUVRE PAS : Cette garantie ne s’applique pas si le produit était endommagé ou arrête de fonctionner en raison d’un accident, d’une mauvaise manipulation ou
opération, de dommages d’expédition, d’abus, de mauvaise utilisation, de réparation faite ou tentées non autorisées. Cette garantie ne couvre pas les coûts d’expédition pour le retour des produits
à Air King pour la réparation ou le remplacement. Air King payera les frais d’expédition de retour de Air King après les réparations ou le remplacement de garantie.
TOUTES LES GARANTIES, EXPRESSES OU TACITES (COMPRENANT, SANS LIMITATION, TOUTE GARANTIE TACITE DE VALEUR MARCHANDE), DURENT UN AN DE LA DATE DE L’ACHAT
ORIGINAL OU JUSQU’À CE QUE L’ACHETEUR ORIGINAL DU PRODUIT VEND OU TRANSFÈRE LE PRODUIT, CELUI QUI SE PRODUIT EN PREMIER ET DANS AUCUN CAS AIR KING N’ASSUME
AUCUNE RESPONSABILITÉ EXPRESSE OU TACITE POUR (I) DES DOMMAGES ACCIDENTELS OU INDIRECTS DE N’IMPORTE QUELLE CAUSE, OU (II) LE REPLACEMENT OU LA RÉPARATION
DE TOUS FUSIBLES, DISJONCTEURS OU RÉCEPTACLES DE MAISON. MALGRÉ N’IMPORTE QUOI À L’EFFET CONTRAIRE, DANS AUCUN CAS LA RESPONSABILITÉ D’AIR KING, SOUS UNE
GARANTIE EXPRESSE OU TACITE, NE DÉPASSERA LE PRIX D’ACHAT DU PRODUIT ET UNE TELLE RESPONSABILITÉ SE TERMINERA AVEC L’EXPIRATION DE LA PÉRIODE DE GARANTIE.
Certains états et provinces ne permettent pas les limitations de la période de garantie, ou l’exclusion ou la restriction des dommages accidentels ou indirects, et, par conséquent, les présentes
restrictions ne peuvent pas s’appliquer. La présente garantie vous donne des droits légaux spécifiques et peut-être certains autres droits qui peuvent varier selon la province. La preuve d’achat
est exigée avant qu’une réclamation de garantie ne soit acceptée.
SERVICE À LA CLIENTÈLE :
Sans frais (800) 465-7300
Notre équipe de service à la clientèle est disponible pour vous aider avec des questions sur le produit, les adresses des centres de service, et les pièces de rechange. Vous pouvez la rejoindre,
du lundi au vendredi, de 8h:00 à 16h:00 HNE. Veuillez avoir le numéro du modèle disponible, ainsi que le genre et le style (qui se trouvent sur l’étiquette à l’intérieur de votre produit). Veuillez
ne pas renvoyer le produit à l’endroit de l’achat.
www.airkinglimited.com
IL SE PEUT QUE LES PIÈCES POUR LES PRODUITS DISCONTINUÉS, OBSOLÈTES ET AUTRES PRODUITS NE SOIENT PAS DISPONIBLES. POUR DES RAISONS DE SÛRETÉ, BEAUCOUP DE
COMPOSANTS ÉLECTRONIQUES ET LA PLUPART DES COMPOSANTS DES CHAUFFAGES NE SONT PAS À LA DISPOSITION DES CONSOMMATEURS POUR L’INSTALLATION OU LE REMPLACEMENT.
ventilateur
Neutre (Blanc)
Fil Chaud (Noir)
Déshumidistat
Figure 1
Fil Chaud (Rouge)
Fil de Masse
Fil Chaud (Noir)
Interrupteur
Déshumidistat
Figure 2
ventilateur
Neutral (White)
Fil Chaud (Rouge)
Fil de Masse
-
 1
1
-
 2
2
-
 3
3
-
 4
4


dans d''autres langues
- English: AirKing DH55 User manual
Autres documents
-
Lifebreath RNC series Le manuel du propriétaire
-
Honeywell Dehumidifier DR90 Manuel utilisateur
-
Honeywell ER150B Guide d'installation
-
Honeywell Dehumidifier H8908C/D Manuel utilisateur
-
 Honeywell Home H46C1166 Guide d'installation
-
Broan DH100W Guide d'installation
-
Fantech VHR 704 Mode d'emploi
-
-
 Airia 99-BC04 Installation and Operation Instructions
-
 Airlogic AC600 Mode d'emploi


