
SHOT PRO DUAL ELECTRONIC
BASKETBALL GAME
ASSEMBLY INSTRUCTIONS
NG2246BL
Please Do Not Hesitate to
Contact Our Consumer Hotline
at
800-759-0977
with Any Questions That May
Arise During Assembly or
Use of This Product!
Ver. 0118

THANK YOU!
Thank you for purchasing this product. We work around the clock and around the globe to ensure
that our products maintain the highest possible quality. However, in the rare case of issues during
assembly or use of this product, please contact our Consumer Hotline at 800-759-0977 for immediate
assistance before contacting your retailer. Please read the warranty information at the back of these
assembly instructions for further details.
2
CARE AND USE
1. This product is intended for INDOOR use only.
2. Do NOT drag the chair when moving it, as this will damage the legs.
ASSEMBLY TIPS
1. Find a clean, level surface to begin the assembly of your game table. We recommend that two adults
work together to assemble this game. You may want to carefully cut or tear the four corners of the box
so that the bottom of the box can be used as your work surface.
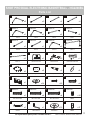
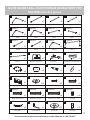
2. Remove all of the contents from box and verify that you have all of the parts shown on the Parts
Identifier before you begin assembly. Note: Some parts may be pre-installed or pre-assembled.
3. Some figures or drawings may not look exactly like product.
4. When installing parts that have more than one screw or bolt, hand tighten all screws or bolts
in place before final tightening with screwdriver or wrench.
5. Electric screwdrivers may be helpful during assembly; however, please set a low torque and use
extreme caution because screws may be stripped or overtightened, resulting in damaged parts, if the
electric screwdriver’s torque is set too high.
WARNINGS!
READ AND FOLLOW ALL ASSEMBLY, OPERATION AND SAFETY INSTRUCTIONS CAREFULLY.
CHOKE HAZARD - THIS ITEM MAY CONTAIN SMALL BALLS AND PARTS
NOT SUITABLE FOR CHILDREN UNDER 3 YEARS OF AGE.
IMPORTANT! PLEASE READ THESE ASSEMBLY INSTRUCTIONS
IN ENTIRETY BEFORE ASSEMBLING YOUR PRODUCT.

3
8
9 10
11
12 13 14
15
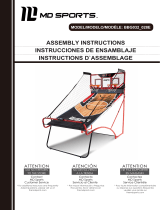
Switch Sensor Control Box with Wire Electronic Scorer
2 3-1 3-2
x2 x2 x1 x1
5 6 74
x1 x2 x2
x1 x1 x2 x1
x2 x1 x2 x1
x1
Rim
17 18 19
Inflation Pump with NeedleRim Support Plate
x2 x1
20
Backboard
x1
M6 Washer
21
x24
M6 x 18mm Bolt
22
x16
M8 x 56mm Bolt
23
x6
24
M8 x 60mm Bolt
x1
M8 x 80mm Bolt
25
x4
M8 x 95mm Bolt
26
x4
M6 Nut
27
x16
28
Wrench
x1
Allen Wrench
x1
29
x30
30
31
16
x2
Hinge Bracket
x2
Tube 1
Tube 2 Tube 3-1 Tube 3-2
Tube 6 Tube 7
Tube 4 Tube 5
1
NGP2110
NGP6034
NGP2113
NGP2122
NGP2114
NGP2112
NGP2117
NGP2111
NGP2118
NGP2116
NGP2121
NGP2115
NGP2225
NGP2120
NGP2123
NGP2119
NGP2124 NGP6038 NGP2126NGP2125
NGP2127 NGP2134* NGP2134*NGP2134*
NGP2134* NGP2134* NGP2134*NGP2134*
NGP2134* NGP2134*NGP2134*
M8 Nut
x17
NGP2134*
Tube 10
Tube 11
Tube 8 Tube 9
SHOT PRO DUAL ELECTRONIC BASKETBALL - NG2246BL
Parts List
Tube 12
M8 Washer
*Items included in Hardware Pack, NGP2134
6/16
For replacement parts please call 800-759-0977.

4
For replacement parts please call 800-759-0977.
32 34
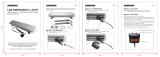
M6 Plastic Washer
x8
35
Net
Power Adapter
36
x2
x7
x1
38
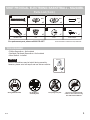
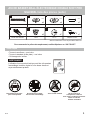
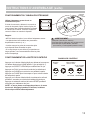
Power Tools
- Set Low Torque
High Torque
over tightened
X 2
Strong Adults Needed No Children in
Assembly Area
Keep away from pets Do not use or keep product
outdoors. For indoor use only.
No wet/humid conditions.
TOOLS REQUIRED
• Phillips Screwdriver - Not included
• Standard (Flat Head) Screwdriver - Not included
• Allen Wrench - Included
Electric Screwdrivers may be helpful during assembly;
however, please set a low torque and use extreme caution.
CAUTION!
NGP2134* NGP2134*
*Items included in Hardware Pack, NGP2134
Basketball
7" Dia.
x2
NGP2134*
M8 x 105mm Bolt
SHOT PRO DUAL ELECTRONIC BASKETBALL - NG2246BL
Parts List (Cont.)
Plastic Spacer
x1
NGP2134*
x4
M8 Plastic Washer
Black Black
37
NGP2217 NGP2224NGP2129
33
Ball Return Net
x1
NGP2128
39
Black
6/16

5
THANK YOU!ASSEMBLY INSTRUCTIONS
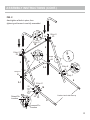
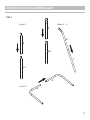
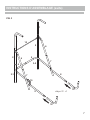
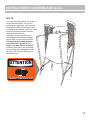
FIG. 1
2
2
3-1
3-2
4
5
Step 1
Step 3
Step 2 x2
6
7

THANK YOU!
6
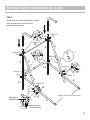
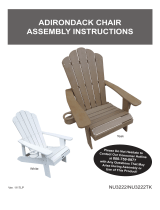
ASSEMBLY INSTRUCTIONS (CONT.)
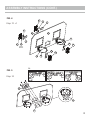
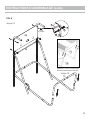
FIG. 2
1
1
12
2
2
3-1
3-2
6
6
4
5
7
7
9
8
Position 8 and 9 with button up
26
Step 4
Step 5
26
Step 8
Step 6
Step 9
Step 10
Step 7
23
23
19
Raised Pin
Location
Lowered Pin
Location
26
26
23
32
Step 11
24
Hand tighten all bolts in place, then
tightening with wrench once fully assembled.
12
2
31
30
30
23
26
31
30
30
30
26
30
31
32
32
30
30
30,31
24
9
7
Black
Tube
Through
19 & 4
32
Through
19 & 9
39
19

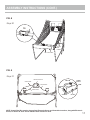
ASSEMBLY INSTRUCTIONS (CONT.)
7
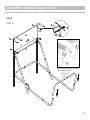
FIG. 3
1
1
12
2
2
3-1
3-2
6
6
4
5
7
7
9
8
Step 12 x2
10
10
19

ASSEMBLY INSTRUCTIONS (CONT.)
8
27
14
14
16
16
21
21
22
22
27
34
21
17
17
20
21
34
13
13
36
36
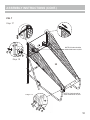
FIG. 4
FIG. 5
Step 13 x2
Step 14
Plastic
Washer

Insert #11 through end of #33 before
connecting #11 to #10s
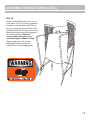
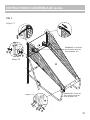
ASSEMBLY INSTRUCTIONS (CONT.)
9
25 35
30
1
31
33
Step 16
11
FIG. 6
Step 15
20
Plastic
Washer
12

NOTE: #12 tube should be
inside of ball return net, #33
NOTE: #12 tube should be
inside of ball return net, #33
THANK YOU!
10
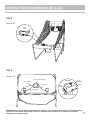
ASSEMBLY INSTRUCTIONS (CONT.)
FIG. 7
Ramp
Tab
20
25
33
35
30
1
2
31
Step 17
33
1
33
25
31
12
33
23
30
31
30
Step 18
Step 19
12

ASSEMBLY INSTRUCTIONS (CONT.)
11
Sensor Wire
Sensor Wire
Electronic Scorer
Control Wire
FIG. 9A
ON / OFF
Control Wire
Control
Wire
Holders
VISITOR
HOME
POWER
SUPPLY
CONTROL
WIRE
FIG. 8
FIG. 9
15
Step 20
Step 21
NOTE: Control Box Wire must be plugged into Electronic Scorer and Controller turned on, along with Electronic
Scorer, for Scorer to work. Scorer will NOT work until this is done.

Game can be folded when not in use to
save space. This is a 2-person operation.
One person should depress BOTH lock
pins in on hinge bracket, while the other
carefully lifts the front of the return net up.
Make sure lock pins are fully engaged in
up or down position. Please be
cautious when doing this as to
not pinch fingers or hand in hinge.
Always make sure lock pins are
disengaged before moving net.
Failing to do so will damage game.
ASSEMBLY INSTRUCTIONS (CONT.)
12
FIG. 10

13
ON / OFF
CONTROL
WIRE /
CONTROL
CABLE
VISITOR
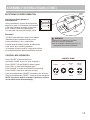
ELECTRONIC SCORER OPERATION
Use Enclosed Power Adapter or
Install Batteries:
Using a screwdriver, unscrew lid and open the
battery box. Insert 3 “AA” batteries ( not included)
in the order of polarity as shown on the inside
cover. Close the cover and tighten screw.
Turn the power ON using the ON/OFF switch.
Reminders:
• DO NOT insert batteries if using Power Adapter.
• Batteries must be installed according to the
correct polarization (+ and -) requirement.
• Please clean the battery contacts, and also those
of the device, prior to battery installation.
• If the game will not be used for a long period of time,
we recommend that the batteries should be removed.
ASSEMBLY INSTRUCTIONS (CONT.)
WARNING:
!
1) Requires 3 “AA” batteries (not included).
2) Do not mix old and new batteries.
3) Do not mix alkaline, standard (carbon zinc), or
rechangeable (nickel-cadmium) batteries.
ON/OFF
PLAY
SELECT
UP
SELECT
DOWN
SOUND
PAUSE
RESET
CONTROL PANEL
CONTROL BOX OPERATION
Press "ON/OFF" to activate the scorer.
Scoreboard "HOME" shows "01" (pre- set game 1).
Press "SELECT UP and DOWN" to select a game.
Press "PLAY" to enter selected game mode.
Press "SOUND" to switch sound ON/OFF while playing.
Press "PAUSE" to pause or start time counting.
Press and hold the button "ON/OFF" 3 seconds to turn off scorer.
Press and hold the button "RESET" 3 seconds to reset the games.
NOTE: If no shot is made or no button is pressed in 15 mins,
scorer will be turned off automatically.
HOME
POWER
SUPPLY

1. Beat the Clock
Press "PLAY" to enter game 1.
Press "UP/Down" to select single/multiple players
(P1/P2/P3/P4).
Press "PLAY" after the number of players is selected.
Press "UP/Down" to select playing time, 30/45/60 seconds.
Press "PLAY" to begin the game.
Scoreboard "HOME" shows Player 1, 3;
Scoreboard "VISITOR" shows Player 2, 4.
All shots worth 2 points until last 10 seconds, then each
score counts 3 points. Countdown 5 seconds to next
player's turn when one player finishes game. Player with
most points scored wins ( LED will flash on player with
higher score).
Press "PLAY" to restart this game.
2. 3 Point Beat the Clock
Press "PLAY" to enter game 2.
Press "UP/Down" to select single/multiple players
(P1/P2/P3/P4).
Press "PLAY" after the number of players is selected.
Press "UP/Down" to select playing time, 30/45/60 seconds.
Press "PLAY" to begin the game.
Scoreboard "HOME" shows Player 1, 3;
Scoreboard "VISITOR" shows Player 2, 4.
All shots made count 3. Countdown 5 seconds to next
player's turn when one player finishes game. Player with
most points scored wins ( LED will flash on player with
higher score).
Press "PLAY" to restart this game.
3. Battle Back
Press "PLAY" to enter game 3.
Press "UP/Down" to select multiple players (P2/P4).
Press "PLAY" to begin the game.
Shot made in "HOME" frame, +2 points scored display on
"HOME" board and -2 points for "VISITOR".
Shot made in "VISITOR" frame, +2 points scored display
on "VISITOR" board and -2 points for "HOME".
Once a player scores 10 points they win and game
is finished.
Press "PLAY" to restart this game.
4. Horse
Press "PLAY" to enter game 4.
Press "UP/Down" to select multiple players (P2/P3/P4).
CHOOSE FROM 8 DIFFERENT GAME OPTIONS
14
Press "PLAY" after the number of players is selected.
Player has to make a shot in 2 seconds.
First player is allowed to shoot at any hoop (HOME or
VISITOR). If first player scores in 2 seconds, no letter is
given. Game continues for next player. Scoreboard will
display "next player (P2P3/P4)" and LED will flash twice
in a second. After flash, next player has to duplicate the
shot in the same hoop selected by first player.
If player can't score in 2 seconds, player receives the first
letter "H" which will display on scoreaboard. Game remains
for the same player untill the player scores. If player keeps
missing, player receives "O" followed by "R", "S", "E".
After the letter "E" is given, the player is out.
The first player to spell "horse" is out. Play continues until
last player to spell “horse” wins.
Press "PLAY" to restart this game.
5. Check Point
Press "PLAY" to enter game 5.
Press "UP/Down" to select single/multiple players
(P1/P2/P3/P4).
Press "PLAY" after the number of players is selected.
"HOME" displays "player", "VISITOR" displays "24" points,
pre-set 40 seconds playing time.
Points scored will display on scoreboard "HOME".
Before time is out, once 24/52/68/86 points is scored,
playing time increases 10/20/10/20 seconds respectively.
Countdown 5 seconds to next player's turn when one
player finishes game.
Player with most points scored wins ( LED will flash on
player with higher score).
Game is finished when a player scores 98 points.
Press "PLAY" to restart this game.
6. Around the World
Use tape to mark shooting lines.
Press "PLAY" to enter game 6.
Press "UP/Down" to select single/multiple players
(P1/P2/P3/P4).
Press "PLAY" after the number of players is selected.
"HOME" scoreboard displays Player 1/2/3/4, "VISITOR"
displays points scored.
Once score reaches 10 points or time reaches 99 seconds,
5 second countdown, until next player’s turn, when one
player finishes game.
Player who finishes the game first wins (LED will flash
on winner).
Press "PLAY" to restart this game.

7. Left and Right Shoot
Press "PLAY" to enter game 7.
Press "UP/Down" to select single/multiple players
(P1/P2/P3/P4).
Press "PLAY" after the number of players is selected.
Press "UP/Down" to select playing time, 30/45/60 seconds.
Press "PLAY" to begin the game.
Scoreboard "HOME" displays Player,
"VISITOR" displays points
Make a shot in "HOME" frame when LED is flasing on
"HOME", 2 points scored display on “HOME”.
Make a shot in "VISITOR" frame when LED is flasing on
"VISITOR", 2 points scored display on “VISITOR”.
5 second countdown, until next player’s turn, when one
player finishes game.
Player with most points scored wins ( LED will flash on
player with higher score).
Press "PLAY" to restart this game.
8. One on One
Press "PLAY" to enter game 8.
Press "UP/Down" to select single/multiple players
(P1/P2/P3/P4).
Press "PLAY" after the number of players is selected.
Press "UP/Down" to select playing time, 30/45/60 seconds.
Press "PLAY" to begin the game.
Scoreboard "HOME" displays Players 1 and 3,
"VISITOR" displays Players 2 and 4.
All shots worth 2 points until last 10 seconds, then each
score counts 3 points. Countdown 5 seconds to next
player's turn when one player finishes game. Player with
most points scored wins ( LED will flash on player with
higher score).
Press "PLAY" to restart this game.
CHOOSE FROM 8 DIFFERENT GAME OPTIONS
15

180-DAY LIMITED WARRANTY
16
This product is warranted to the original purchaser to be free from defects in material or workmanship
for a period of 180 days from the date of the original retail purchase.
This warranty does not cover defects or damage due to improper installation, alteration, accident or
any other event beyond the control of the manufacturer. Defects or damage resulting from misuse,
abuse or negligence will void this warranty. This warranty does not cover scratching or damage that
may result from normal usage.
This product is not intended for institutional or commercial use; the manufacturer does not assume
any liability for such use. Institutional or commercial use will void this warranty.
This warranty is nontransferable and is expressly limited to the repair or replacement of the defective
product. During the warranty period, the manufacturer shall repair or replace defective parts at no
cost to the purchaser. Shipping charges and insurance are not covered and are the responsibility of
the purchaser. Labor charges and related expenses for removal, installation or replacement of the
product or components are not covered under this warranty.
The manufacturer reserves the right to make substitutions to warranty claims if parts are unavailable
or obsolete.
The manufacturer shall not be liable for loss of use of the product or other consequential or incidental
costs, expenses or damages incurred by the consumer of any other use. The user assumes all risk of
injury resulting from the use of this product.
This warranty is expressly in lieu of all other warranties, expressed or implied, including warranties of
. Neither the manufac-
turer nor any of its representatives assumes any other liability in connection with this product.
All warranty claims must be made through the retailer where the product was originally
purchased. A purchase receipt or other proof of date of purchase will be required to process
all warranty claims. The model number and part numbers found within the assembly
instructions will be required when submitting any parts requests or warranty claims.
For further warranty information or inquiries, please call 800-759-0977

JEU DE BASKET-BALL
ÉLECTRONIQUE DOUBLE
SHOT PRO
INSTRUCTIONS D’ASSEMBLAGE
NG2246BL
Ver. 0118
Contactez
notre
service à la clientèle au
800-759-0977
avec des questions sur le montage
ou l'utilisation de ce produit.

MERCI!
Merci d’avoir acheté notre produit. Nous travaillons 24 heures sur 24, partout dans le monde, à garantir
que nos produits sont de la meilleure qualité possible. Toutefois, dans les rares cas de problèmes lors
du montage ou de l'utilisation de ce produit, se il vous plaît communiquer avec notre service à la clientèle
au 800-759-0977 pour une aide immédiate avant de contacter votre revendeur. Pour obtenir de plus amples
renseignements, veuillez lire l'information relative à la garantie au verso de ce guide d’instructions.
2
ENTRETIEN ET USAGE
1. Ce produit doit être utilisé À L’INTÉRIEUR seulement.
2. NE JAMAIS déplacer la chaise en la traînant, cela pourrait endommager les pieds.
INSTRUCTIONS D’ASSEMBLAGE
1. Trouver une surface propre et plane, pour commencer le montage de votre table de jeu. La table
s’assemble à l’envers pour être ensuite retournée sur ses pieds, une fois l’assemblage complété.
Cette table est lourde et nécessite au moins deux adultes forts pour la soulever et la retourner.
2. Retirez le contenu de la boîte, avant de commencer l’assemblage, assurez-vous d’avoir toutes
les pièces telles que listées et illustrées au tableau d’identification. Avis : certaines pièces sont
préassemblées ou préinstallées.
3. Certaines illustrations ou dessins peuvent ne pas ressembler au produit que vous avez acheté.
4. Quand vous fixez en place une pièce avec plus d’une vis ou écrou, veuillez, en premier, les
visser à la main et terminer la fixation avec un tournevis ou une clé.
5. Un tournevis électrique peut être utile lors de l’assemblage, mais veuillez le régler à basse torque
et l’utiliser avec prudence; si la torque est trop élevée, la vis peut se défaire ou être trop serrée.
AVERTISSEMENTS!
LIRE TOUTES LES INSTRUCTIONS D’ASSEMBLAGE ET LES CONSIGNES DE SÉCURITÉ ATTENTIVEMENT.
RISQUE D’ÉTOUFFEMENT – CERTAINS ÉLÉMENTS DU PRODUIT CONTIENNENT
DE PETITES PIÈCES - NE CONVIENT PAS À UN ENFANT DE MOINS DE TROIS ANS.
IMPORTANT! VEUILLEZ LIRE, EN ENTIER, TOUTES LES
INSTRUCTIONS AVANT D’ASSEMBLER VOTRE PRODUIT.

3
8
9 10
11
12 13 14
15
Interrupteur Marqueur électronique
2 3-1 3-2
x2 x2 x1 x1
5 6 74
x1 x2 x2
x1 x1 x2 x1
x2 x1 x2 x1
x1
17 18 19
x2 x1
20
x1
21
x24
Boulon 6 mm x 18mm
22
x16
Boulon 8 mm x 56mm
23
x6
24
Boulon 8 mm x 60mm
x1
Boulon 8 mm x 80mm
25
x4
Boulon 8 mm x 95mm
26
x4
Écrou M6
27
x16
28
Clé anglaise
x1
Clé hexagonale
x1
29
x30
30
31
16
x2
Charnière support
x2
Tube 1
Tube 2 Tube 3-1 Tube 3-2
Tube 6 Tube 7
Tube 4 Tube 5
1
NGP2110
NGP6034
NGP2113
NGP2122
NGP2114
NGP2112
NGP2117
NGP2111
NGP2118
NGP2116
NGP2121
NGP2115
NGP2225
NGP2120
NGP2123
NGP2119
NGP2124 NGP6038 NGP2126NGP2125
NGP2127 NGP2134* NGP2134*NGP2134*
NGP2134* NGP2134* NGP2134*NGP2134*
NGP2134* NGP2134*NGP2134*
Écrou M8
x17
NGP2134*
Tube 10
Tube 11
Tube 8 Tube 9
JEU DE BASKET-BALL ÉLECTRONIQUE DOUBLE
SHOT PRO
NG2246BL
liste des pièces
Tube 12
Rondelle M8
*Pièces incluses dans le sac de quincaillerie NGP2134
Pour commander les pièces de remplacement, veuillez téléphoner au 1 800 759-0977
Le boîtier de commande avec fil
Panier
Pompe à air avec aiguillePanneau de support pour panier
Panneau arrière
Rondelle 6 mm
6/16

4
Rondelle en plastique
M6
Panier
Adaptateur secteur
*Pièces incluses dans le sac de quincaillerie NGP2134
Ballon
17,7 cm
Boulon 8 mm x 105mm
JEU DE BASKET-BALL ÉLECTRONIQUE DOUBLE
SHOT PRO
NG2246BL
liste des pièces (suite)
Filet de retour de ballon
noir noir
Pour commander les pièces de remplacement, veuillez téléphoner au 1 800 759-0977
Outils électriques –
régler à basse vitesse
Haute vitesse –
trop serré
X 2
Deux adultes sont requis
pour la manipulation
Ne pas laisser un enfant
dans la zone d’assemblage
Outils requis
• Tournevis cruciforme – non inclus
• Tournevis standard (à tête plate) – non inclus
• Clé hexagonale- incluse
L’utilisation d’un tournevis électrique peut être utile pendant
l’assemblage; toutefois, réglez-le à une basse vitesse et
soyez extrêmement prudent.
AVERTISSEMENT!
Tenir loin des animaux Ne pas l’utiliser ou
l’entreposer à l’extérieur.
Pour usage à l’intérieur seulement.
Éviter les endroits
mouillés et humides.
Rondelle en plastique
M8
noir
Entretoise en plastique
6/16
32 34
x8
35
36
x2
x7
x1
38
NGP2134* NGP2134*
x2
NGP2134*
x1
NGP2134*
x4
37
NGP2217 NGP2224NGP2129
33
x1
NGP2128
39
La page est en cours de chargement...
La page est en cours de chargement...
La page est en cours de chargement...
La page est en cours de chargement...
La page est en cours de chargement...
La page est en cours de chargement...
La page est en cours de chargement...
La page est en cours de chargement...
La page est en cours de chargement...
La page est en cours de chargement...
La page est en cours de chargement...
La page est en cours de chargement...
-
 1
1
-
 2
2
-
 3
3
-
 4
4
-
 5
5
-
 6
6
-
 7
7
-
 8
8
-
 9
9
-
 10
10
-
 11
11
-
 12
12
-
 13
13
-
 14
14
-
 15
15
-
 16
16
-
 17
17
-
 18
18
-
 19
19
-
 20
20
-
 21
21
-
 22
22
-
 23
23
-
 24
24
-
 25
25
-
 26
26
-
 27
27
-
 28
28
-
 29
29
-
 30
30
-
 31
31
-
 32
32


dans d''autres langues
- English: Hathaway BG2246BL User manual
Documents connexes
Autres documents
-
 ESPN BG132Y20016 Mode d'emploi
-
MD Sports BBG032_028E Manuel utilisateur
-
-
-
-
-
 evergear 8956823 Le manuel du propriétaire
-
Island Umbrella NU3221 Manuel utilisateur
-
VTech Count And Win Sports Center Parents Le manuel du propriétaire
-
 Island Retreat NU3222TK Mode d'emploi


