mothercare Amazonas Soft Carrier_0725178 Mode d'emploi
- Catégorie
- Porte-bébés
- Taper
- Mode d'emploi
Ce manuel convient également à

www.amazonas-baby-world.com
Trageanleitung
für AMAZONAS
®
Soft Carrier
Instruction / Instructions pour l‘utilisation du porte-bébé

www.amazonas-baby-world.com
DE
Trageanleitung .................................................................................................... 2
EN
Instruction ............................................................................................................ 5
FR
Instructions pour l‘utilisation du porte-bébé .................................................. 8
2

www.amazonas-baby-world.com
3
DE
Trageanleitung
AMAZONAS
®
SOFT CARRIER
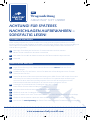
ACHTUNG! FÜR SPÄTERES
NACHSCHLAGEN AUFBEWAHREN –
SORGFÄLTIG LESEN!
Bitte legen Sie Ihr Baby auf den Rücken. Es wird automatisch die Knie anziehen.
Messen Sie den Abstand von Kniekehle zu Kniekehle.
Nun stellen Sie mit Hilfe der Klettverschlüsse den Stoff dem Abstand entsprechend ein.
Geschafft!
1
2
3
Damit ihr Baby bequem sitzt und seine Hüfte sich in einer gesunden Position befindet ist es wichtig,
vor dem Tragen die richtige Stegbreite einzustellen. Der Steg ist der Stoff der Trage, auf dem das Baby sitzt.
Dieser sollte von Kniekehle zu Kniekehle reichen. Die Knie Ihres Babys sollten höher sein als der Po
und der Rücken gerundet.
STEGBREITE EINSTELLEN
BAUCHTRAGE ANLEGEN
Legen Sie den Bauchgurt an. Dabei sollte das Rückenteil vom oberen Ende des Gurtes
herunterhängen.
Schließen Sie den Gurt am Rücken. Achten Sie dabei bitte auf das Klickgeräusch der Schnalle.
Ziehen Sie den Gurt fest.
Setzen Sie das Kind auf die obere Kante des Bauchgurtes. Raffen Sie den Stoff mit der freien Hand
und führen Sie ihn zwischen den Beinchen zum Nacken. Die optimale Höhe des Bauchgurts
erkennen Sie daran, dass Sie Ihrem Baby bequem einen Kuss auf den Kopf geben können.
Das Kind zieht automatisch die Beinchen an und sitzt somit ergonomisch korrekt.
Schwingen Sie nacheinander die Schultergurte über Ihre Schultern.
Dabei Sichern Sie bitte immer Ihr Baby am Rücken.
Der obere Rand des Rückenteils sollte auf Höhe des Babynackens sein.
Greifen Sie einen der Schultergurte hinter Ihrem Rücken.
Führen Sie diesen nach vorne. Durch das Festhalten des Gurtes sichern Sie den Rücken des Babys.
Greifen Sie mit der anderen Hand nach dem zweiten Gurt und führen Sie ihn nach vorne.
Nun können Sie unter Spannung den Sitz der Gurte mithilfe kreisender Schulterbewegungen korrigieren.
1
2
3
4a
5
4b
6
7
8

www.amazonas-baby-world.com
4
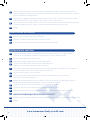
Führen Sie die Schultergurte unter den Knien Ihres Babys nach vorne. Sichern Sie die Gurte mit
einem Doppelknoten direkt unter seinem Po. Sie können die Schleife vorne machen oder die Gurte
hinter dem Rücken nochmal knoten.
Korrigieren Sie gegebenenfalls die Sitzposition Ihres Kindes. Greifen Sie es an den Oberschenkeln
und schieben den Po in den Tragetuch Stoff, damit er tiefer ist als die Knie.
Durch das Anziehen der Bändchen an den Seiten und im Nacken können Sie das Rückenpanel der
Größe Ihres Babys anpassen. Ziehen Sie danach das Rückenteil an den Seiten straff.
Fertig!
9
10
11
12
BAUCHTRAGE AUSZIEHEN
Lösen Sie den Doppelknoten der Schultergurte.
Nehmen Sie nacheinander die Gurte von den Schultern..
Sichern Sie dabei Immer den Rücken bzw. das Köpfchen des Babys.
1
2
3
RÜCKENTRAGE ANLEGEN
Legen Sie den Bauchgurt an und schließen Sie die Schnalle. Lassen Sie 2 Fingerbreit Platz
zwischen Gurt und Körper, damit sich Die Trage leicht um die Taille drehen lässt.
Drehen Sie den Bauchgurt auf die Hüfte.
Setzen Sie Ihr Baby auf die obere Kante des Bauchgurtes.
Führen Sie den Rückenstoff bis zum Nacken des Babys und
straffen Sie ihn mit beiden Händen an den Schultern.
Nun greifen Sie mit der vorderen Hand beide Schultergurte knapp vor Babys Gesicht zusammen.
Sichern Sie dabei stets mit der anderen Hand seinen Rücken.
Legen Sie den hinteren Gurt nach vorne.
Führen Sie jetzt Ihre hintere Hand zwischen Ihnen und dem Baby nach vorne durch.
Nun greifen Sie mit dieser Babys Po.
Während Sie das Kind am Po sichern, schieben Sie es auf den Rücken bis das Baby mittig sitzt.
Wenn Sie sich dabei nach vorne bücken, sichern Sie das Kind zusätzlich.
Legen Sie einen der Gurte, unter Spannung, auf die andere Schulter.
Führen Sie die Gurte unter den Knien Ihres Babys nach hinten durch.
Überkreuzen Sie die Gurte unter dem Po des Kindes und führen Sie sie wieder nach vorne
Sichern Sie die Gurte an Ihrem Bauch durch einen Doppelknoten.
Ziehen Sie den Bauchgurt mit der Schnalle wieder fest.
Fädeln Sie den schmalen Brustgurt durch den zweiten Schultergurtträger und schließen Sie die Schnalle.
Fertig!
1
2
3
4
6
5
7
8
9
10
11
12
13
14

www.amazonas-baby-world.com
5
RÜCKENTRAGE AUSZIEHEN
Nehmen Sie den Brustgurt ab.
Lösen Sie den Doppelknoten und lockern Sie den Bauchgurt etwas.
In einer nach vorn gebeugten Haltung greifen Sie beide Schultergurte mit einer Hand
auf Höhe Ihrer Schulterblätter und führen die Gurte, unter Spannung, auf einer Schulter zusammen.
Schieben Sie das Baby, mit einer Hand sichernd, auf Ihre Hüfte.
Nehmen Sie Ihr Baby heraus und lösen Sie den Bauchgurt.
1
2
3
4
5
Bei besonders kleinen Babys und Neugeborenen ist Folgendes zu beachten:
Der Steg muss relativ schmal sein. Bitte messen Sie diesen, wie Eingangs bereits erklärt, ab.
Sie müssen den Bauchgurt höher anlegen, damit sie dem Baby noch bequem einen Kuss
auf den Oberkopf geben können. So ist die Hüfte nicht überspreizt und Ihr Kind ist auf optimaler Sitzhöhe!
BAUCHTRAGE (FÜR NEUGEBORENE) ANLEGEN
Legen Sie den Bauchgurt so an, dass der Tragetuchstoff am unteren Ende des Buchgurtes
herunterhängt. So verkürzt sich der Rückenteil der Trage. Schließen Sie die Schnalle hinter dem Rücken.
Achten Sie darauf, dass der Bauchgurt oberhalb der Taille liegt.
Setzten Sie nun ihr Baby in die „Tasche“, die aus dem Tragetuchstoff am unteren Rand
des Bauchgurts entstanden ist. Achten Sie darauf, dass der Stoff von Kniekehle zu Kniekehle reicht.
Schwingen Sie nacheinander die Schultergurte über Ihre Schultern.
Greifen Sie einen der Schultergurte hinter dem Rücken und führen Sie ihn nach vorne.
Während Sie diesen Gurt in der Hand halten sichern Sie den Rücken des Babys.
Greifen Sie mit der anderen Hand nach dem zweiten Gurt. Halten Sie beide Gurte unter Spannung.
Nun können Sie den Sitz der Schultergurte mithilfe kreisender Schulterbewegungen korrigieren.
Führen Sie die Schultergurte unter den Knien Ihres Babys nach vorne.
Sichern Sie die Gurte mit einem Doppelknoten unter dem Po des Babys.
Sie können die Schleife vorne machen oder die Gurte hinter dem Rücken nochmals knoten.
Durch das Anziehen der Bändchen an den Seiten
und im Nacken können Sie das Rückenpanel der Größe Ihres Babys anpassen.
Ziehen Sie danach das Rückenteil an den Seiten straff.
Fertig!
1a
2
3
1b
4
5
6
7
8a
9
10
8b

www.amazonas-baby-world.com
6
EN
Instruction
AMAZONAS
®
SOFT CARRIER
CAUTION!
KEEP SAFE FOR FUTURE REFERENCE –
READ CAREFULLY!
Please lay your baby on its back. It will automatically pull in its knees.
Measure the distance from one knee hollow to the other.
Now adjust the material to the required distance using the Velcro fasteners.
Done!
1
2
3
It is important to set the correct bridge width before use so that your baby is sitting comfortably
and its hips are in a healthy position. The bridge is the material of the carrier that the baby sits on.
It should extend from knee hollow to knee hollow.
Your baby’s knees should be higher than its bottom, and its back should be rounded.
BRIDGE WIDTH ADJUSTMENT
PUTTING ON THE FRONT CARRIER
Put on the waist strap. The rear section must hang down from the top end of the strap.
Close the strap at the back. Listen for the clicking noise of the buckle. Pull the strap tight.
Place the child onto the upper edge of the waist strap. Gather the material with your free hand
and guide it between the baby’s legs to its neck. The waist strap is at the optimum height if you
can comfortably kiss your baby’s head. The child will automatically pull in its legs and will therefore
be sitting in an ergonomically correct position.
Swing the shoulder straps over your shoulders one after the other.
Please ensure that your baby’s back is supported at all times when doing this.
The upper edge of the rear section should be at the height of the baby’s neck.
Take hold of one of the shoulder straps behind your back.
Guide this towards the front. By holding the strap firmly, you will be supporting the baby’s back.
Take hold of the second strap with your other hand and guide it towards the front.
Now you can correct the seat of the straps under tension using circular shoulder movements.
1
2
3
4a
5
4b
6
7
8

www.amazonas-baby-world.com
7
Guide the shoulder straps towards the front beneath the your baby’s knees.
Secure the straps with a double knot directly beneath the baby’s bottom.
You can make the loop at the front or knot the straps again behind your back.
Correct the sitting position of your child if necessary.
Hold its thighs and slide its bottom into the sling material so that it is lower than the baby’s knees.
The back panel can be adjusted to the size of your baby by tightening the straps at the side
and the neck. Then pull the rear section tight at the sides.
Done!
9
10
11
12
TAKING OFF THE FRONT CARRIER
Undo the double knots of the shoulder straps.
Remove the straps from your shoulders one after another.
Always support your baby’s back and head when doing this.
1
2
3
PUTTING ON THE BACK CARRIER
Put on the waist strap and close the clasp. Allow two finger widths of space between
the strap and your body so that the carrier rotates easily around your waist.
Rotate the waist strap onto your hip.
Place your baby onto the upper edge of the waist strap.
Guide the back material as far as the baby‘s neck and tension it at the shoulders with both hands.
Now take hold of both shoulder straps just in front of the baby’s face with your front hand.
Always support the baby‘s back with your other hand.
Move the rear strap to the front.
Now guide your rear hand through between you and the baby towards the front.
Now take hold of the baby’s bottom with this hand.
While supporting the child by its bottom, slide it onto its back until the baby is sitting in the middle.
The child will be provided with additional support if you bend forwards while doing this.
Place one of the straps onto the other shoulder (under tension).
Guide the straps beneath the knees of your baby towards the rear.
Cross the straps beneath the child‘s bottom and guide them back to the front again.
Secure the straps at your stomach with a double knot.
Tighten the waist strap again using the clasp.
Thread the narrow chest strap through the second shoulder strap carrier and close the clasp.
Done!
1
2
3
4
6
5
7
8
9
10
11
12
13
14

www.amazonas-baby-world.com
8
REMOVING THE BACK CARRIER
Remove the chest strap.
Undo the double knot and slacken the waist strap a little.
Lean forward, and take hold of both shoulder straps with one hand at the height of your shoulder
blades. Guide the straps onto one shoulder (under tension).
Slide the baby onto your hip while supporting it with one hand.
Take out the baby and slacken the waist strap.
1
2
3
4
5
For very small babies and newborns, please note the following: The bridge must be relatively narrow.
Please measure it using the method that was explained at the beginning. The waist strap must be
positioned somewhat higher so that you can still comfortably kiss the top of the baby’s head.
This prevents over-spreading of the hips, and your child will be at an optimum sitting height!
PUTTING ON THE FRONT CARRIER (FOR NEWBORNS)
Put on the waist strap so that the sling material is hanging down at the bottom end of the waist strap.
This shortens the rear section of the sling. Close the clasp behind your the back.
Ensure that the waist strap is positioned above your waistline.
Place your baby into the “pocket” which was created by the sling material at the lower edge
of the waist strap. Make sure that the material extends from one knee hollow to the other.
Swing the shoulder straps over your shoulders one after the other.
Take hold of one of the shoulder straps behind your back and guide it towards the front.
Support the baby‘s back while holding this strap in your hand.
Take hold of the second strap with your other hand. Hold both straps under tension.
Now you can correct the seat of the shoulder straps using circular shoulder movements.
Guide the shoulder straps towards the front beneath the your baby’s knees.
Secure the straps with a double knot beneath the baby’s bottom
You can make the loop at the front or knot the straps again behind your back.
The back panel can be adjusted to the size of your baby by tightening the straps at the side
and the neck.
Then pull the rear section tight at the sides.
Done!
1a
2
3
1b
4
6
5
7
9
10
8
a
8b

www.amazonas-baby-world.com
9
FR
Instructions pour
l‘utilisation du porte-bébé
AMAZONAS
®
SOFT CARRIER
IMPORTANT ! À CONSERVER
POUR UNE UTILISATION ULTÉRIEURE –
LIRE AVEC ATTENTION !
Posez votre bébé sur le dos. Il va automatiquement replier ses genoux.
Mesurez la distance d’un pli de genou à l’autre.
Les bandes auto-agrippantes vous permettent de régler la largeur du tissu.
Et voilà !
1
2
3
Pour que votre bébé soit assis bien confortablement avec les hanches dans une position saine,
il est important de bien régler l’entrejambe. L’entrejambe est la partie du porte-bébé sur lequel
le bébé est assis. Il doit le porter d’un pli de genou à l‘autre.
Les genoux de votre bébé doivent être plus haut que les fesses et le dos doit être arrondi.
RÉGLAGE DE L’ENTREJAMBE
INSTALLER LE PORTE-BÉBÉ SUR LE VENTRE
Placez la sangle abdominale autour de la taille. Le dos du porte bébé pend
depuis la partie supérieure de la sangle abdominale.
Fermez la sangle dans votre dos. Veillez à bien fermer la boucle (clic). Resserrez la sangle.
Posez votre bébé sur le bord supérieur de la sangle abdominale. Relevez le tissu avec votre main libre
et passez-le entre les jambes de votre bébé, pour le remonter jusqu’à sa nuque. La sangle abdomina-
le est à la bonne hauteur si vous pouvez embrasser votre bébé sur la tête. Le bébé rétracte automati-
quement ses jambes pour se retrouver dans une bonne position ergonomique.
Passez l’une après l’autre les bretelles sur vos épaules. Tenez toujours votre bébé avec une main dans
son dos.
Le bord supérieur du porte-bébé doit arriver à la nuque du bébé.
Attrapez une des bretelles dans votre dos.
Ramenez-la vers l‘avant. Tenez votre bébé lorsque vous attrapez les bretelles.
Avec l’autre main, attrapez la deuxième sangle et ramenez-la vers l’avant.
Vous pouvez maintenant tendre les bretelles et en corriger la position en faisant des mouvements
circulaires avec vos épaules.
1
2
3
4a
5
4b
6
7
8

www.amazonas-baby-world.com
10
Faites passer l‘extrémité des bretelles sous les genoux du bébé, à l’avant. Fixez les bretelles par
un double-nœud, sous les fesses du bébé. Vous pouvez faire une boucle à l‘avant ou repasser
le bout des bretelles dans votre dos et refaire un nœud.
Corrigez la position du bébé, si nécessaire. Attrapez ses cuisses et rectifiez la position de ses fesses
dans le tissu du porte-bébé, pour qu’il ait les fesses en-dessous des genoux.
Vous pouvez ajuster le tissu dans le dos du bébé en réglant les bandes sur les côtés et
dans la nuque. Le tissu du dos du porte-bébé doit ensuite être tendu.
Et voilà !
9
10
11
12
ENLEVER LE PORTE-BÉBÉ EN POSE VENTRALE
Défaites le double-nœud des bretelles.
Enlevez les bretelles une à une de vos épaules.
Retenez toujours le dos et la tête de votre bébé.
1
2
3
INSTALLER LE PORTE-BÉBÉ SUR LE DOS
Posez la sangle abdominale et fermez la boucle. Laissez un espace large de deux doigts
entre la sangle et votre corps, pour faciliter le mouvement du porte-bébé autour de la taille.
Mettez le porte-bébé au niveau de la hanche.
Posez votre bébé sur le bord supérieur de la sangle abdominale.
Remontez le tissu du dos du porte-bébé sur la nuque de votre bébé et tendez le tissu
de vos deux mains au niveau de ses épaules
Avec votre main qui se trouve sur le devant, attrapez les deux bretelles juste devant
le visage de votre bébé. Tenez toujours le dos du bébé avec l’autre main.
Passez la bretelle arrière sur l’avant.
Passez maintenant votre main arrière entre vous et le bébé, vers l’avant.
Avec cette main, maintenez les fesses du bébé.
Tout en tenant votre bébé sous les fesses, poussez-le dans votre dos, jusqu’à ce qu‘il
soit au milieu de votre dos. Penchez-vous un peu en avant pour sécuriser votre bébé
Passez une des bretelles, tendues, sur l‘autre épaule.
Passez les bretelles sous les genoux de bébé vers l‘arrière.
Croisez les bretelles sous les fesses du bébé et repassez-les vers l’avant.
Sécurisez les bretelles par un double-nœud sur votre ventre.
Resserrez la sangle abdominale à l‘aide de la boucle.
Passez la sangle pectorale fine sous la deuxième bretelle et fermez la boucle.
Et voilà !
1
2
3
4
6
5
7
8
9
10
11
12
13
14

www.amazonas-baby-world.com
11
ENLEVER LE PORTE-BÉBÉ DU DOS
Enlevez la sangle pectorale.
Défaites le double-nœud et desserrez légèrement la sangle abdominale.
Penchez-vous légèrement en avant et attrapez les deux bretelles d’une main
à la hauteur des omoplates passez les bretelles tendues par-dessus une épaule.
Ramenez votre bébé sur une hanche, en le maintenant d’une main.
Sortez votre bébé et défaites la sangle abdominale.
1
2
3
4
5
Pour porter des bébés de petite taille ou des nouveau-nés : L’entrejambe doit être relativement étroit.
Mesurez-le comme nous vous l’avons expliqué au début. Vous devez placer la sangle abdominale
plus haut, pour pouvoir embrasser votre bébé sur la tête. Ses hanches ne sont ainsi pas trop tendues
et votre bébé est assis à la bonne hauteur !
INSTALLER LE PORTE-BÉBÉ SUR LE VENTRE (POUR LES NOUVEAUX-NÉS)
Placez la sangle abdominale de telle sorte que le tissu du porte-bébé pendent sur le bas de la ceinture.
Cela permet de raccourcir la longueur du dos du porte-bébé. Fermez la boucle dans votre dos.
Veillez à ce que la sangle abdominale soit au-dessus de votre taille.
Posez votre bébé dans la « poche » formée par le tissu du porte-bébé sur le bas de la sangle.
Veillez à ce que le tissu aille d’un pli de genou à l’autre.
Faites passer les bretelles par-dessus les épaules, l’une après l‘autre.
Attrapez une des bretelles dans votre dos et passez-la vers l’avant. Tenez toujours votre bébé d’une main.
De l‘autre main, attrapez l‘autre bretelle. Tenez les deux bretelles, tendues. Vous pouvez maintenant
rectifier la position des bretelles en faisant des mouvements circulaires avec vos épaules.
Faites passer les bretelles sous les genoux de bébé, à l’avant.
Fixez les bretelles en faisant un double-nœud sous les fesses de bébé.
Vous pouvez faire la boucle sur le devant ou dans votre dos.
Vous pouvez ajuster le tissu dans le dos du bébé en réglant les bandes sur les côtés
et dans la nuque.
Le dos du porte-bébé doit ensuite être tendu.
Et voilà !
1a
2
3
1b
4
6
5
7
8a
9
10
8b

www.amazonas-baby-world.com
AMAZONAS GmbH
Am Kirchenhölzl 15
82166 Gräfelfing, Germany
V/XIX
-
 1
1
-
 2
2
-
 3
3
-
 4
4
-
 5
5
-
 6
6
-
 7
7
-
 8
8
-
 9
9
-
 10
10
-
 11
11
-
 12
12


mothercare Amazonas Soft Carrier_0725178 Mode d'emploi
- Catégorie
- Porte-bébés
- Taper
- Mode d'emploi
- Ce manuel convient également à
dans d''autres langues
Documents connexes
Autres documents
-
 Love Radius 97866210 Mode d'emploi
-
AMAZONAS Winter Cover User And Safety Manuallines
-
CYBEX my.GO Manuel utilisateur
-
 Love Radius 97866070 Mode d'emploi
-
-
Britax Baby-Safe Mode d'emploi
-
-
AMAZONAS Carry Sling Instructions Manual
-
 Contours Cocoon ZC007 Manuel utilisateur
-


