
2-342-348-03 (1)
Tabletop Stand
2004 Sony Corporation Printed in Japan
SU-42FW
•
Mounting Instructions
Instructions de montage
Montageanleitung
Instrucciones de montaje
Instruzioni per il montaggio
2
2 1
•
•
•
SU-42FW FWD
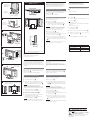
/ Dimensions / Dimensions
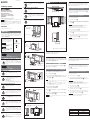
The SU-42FW is a Tabletop Stand for the FWD series Flat Panel Displays.
Follow the instructions to assemble the Tabletop Stand and install your
display to it. For more details on the applicable display units, refer to the
instruction manual of your display unit.
Assembling the Tabletop Stand
Align the screw holes on the Main Bracket with the corresponding holes on
the Stand. Secure the Main Bracket to the Stand using the screws.
A
Use nine +K6× 12 screws (supplied).
Installing the Flat Panel Display
Before installation, remove the Cable Cover on the display and connect all
the cables to the Flat Panel Display.
1 Remove the Cable Cover. B
2 Put four hooks on the rear of the display in the corresponding holes on
the Main Bracket of the Tabletop Stand, then slide the display straight
downward. C
Warning
• Two persons should work together on the installation.
• Before securing the display to the Stand, check to make sure that all
hooks are properly hooked in the corresponding holes.
• Bundle the cables and draw them through the hole on the Stand.
3 Secure the display to the Stand. D
Use four +K5× 25 screws (supplied).
4 Route the cables inside of the Stand and attach the Cable Cover again,
then caps.
E
5 Anchor the Stand to a wall. Draw a wire (or the like) through the holes
in the Security attachments located on the upper part of the Main
Bracket and fix the wire to a wall.
F
Warning
For details on how to protect the display from tipping over, contact your
authorized Sony dealer.
Français
mm/Unit: mm (inches)/Unité: mm (pouces)
SU-42FW FWD
A
+K6 12 9
1 B
2
4
4
C
•
2
•
•
3 D
+K5 25 4
4
E
5
F
A
B
/Stand/Support
C
/
Main Bracket/
Console principale
D
E
/
Parts number / Numéro de pièce
English
/Screws/Vis
/Screws/Vis
( K6 12)
7-621-562-20
/Screws/Vis
( K5 25)
7-682-280-09
/Hooks/
Crochet
/Screws/Vis
F
/Security attachments/Fixations de sécurité
/
Cable Cover/
Protection des câbles
Le support de table SU-42FW est destiné aux écrans plats de la série FWD.
Suivez les instructions pour assembler le support de téléviseur et y installer
votre moniteur. Pour plus d’informations sur les écrans concernés, reportez-
vous au mode d’emploi de votre écran.
Assemblage du support de téléviseur
Alignez les orifices des vis de la console principale sur les orifices du
support correspondants. Fixez la console principale sur le support à l’aide
des vis.
A
Utilisez neuf vis +K6× 12 (fournies).
Installation du moniteur à écran plat
Avant l’installation, retirez la protection des câbles sur l’écran et raccordez
tous les câbles à l’écran plat.
1 Retirez la protection des câbles. B
2 Placez les quatre crochets à l’arrière du moniteur dans les orifices
correspondants sur la console principale du support de téléviseur, puis
faites glisser le moniteur directement vers le bas. C
Avertissement
• L’installation requiert l’intervention de deux personnes.
• Avant de fixer le moniteur au support, vérifiez que tous les crochets sont
correctement fixés dans les orifices correspondants.
• Rassemblez les câbles et faites-les passer par l’orifice du support.
3 Fixez le moniteur au support. D
Utilisez quatre vis +K5× 25 (fournies).
4 Faites passer les câbles à l’intérieur du support et fixez de nouveau la
protection des câbles, puis les caches. E
5 Fixez le support à un mur. Faites passer un câble (ou similaire) par les
orifices des fixations de sécurité situées sur la partie supérieure de la
console principale et fixez le câble à un mur. F
Avertissement
Pour plus de renseignements sur la façon d'empêcher le moniteur de
basculer, contactez votre revendeur Sony agréé.
/Caps/Caches
/Caps/Caches
2-187-462-01
/Cable Cover
on the Display/
Protection des câbles
500 (19
11
/16)
200 (7
7
/8)
97.5 (3
27
/
32
)
492 (19
3
/8)
440 (17
5
/16)
440 (17
5
/
16
)
542.7 (21
3
/
8
)
295 (11
5
/8)
291.4 (11
15
/
32
)
686.7 (27
1
/
32
)
FWD-42LX1
The display unit in the illustration is the FWD-42LX1.
L’écran illustré est le modèle FWD-42LX1.

Printed in Japan
Deutsch
Español
Italiano
Einheit: mm/Unidad: mm (pulgadas)/Unità: mm/
Abmessungen / Dimensiones /
Dimensioni /
70% VOC
Printed on 70% or more recycled paper using VOC (Volatile
Organic Compound)-free vegetable oil based ink.
A
B
Ständer/Soporte/Supporto/
C
Haupthalterung/
Abrazadera principal/
Staffa principale/
D
E
Schrauben/
Tornillos/Viti/
Haken/Gancho/
Gancio/
Schrauben/Tornillos/
Viti/
F
Sicherheitsbeschläge/Dispositivos adicionales de seguridad/
Attacchi di sicurezza/
Kabelabdeckung/
Cubierta del cable/
Copricavo/
Der SU-42FW ist ein Tischständer für die Flachbildschirme der FWD-Serie.
Bauen Sie den Tischständer wie in dieser Anleitung erläutert zusammen
und installieren Sie den Bildschirm darauf. Weitere Informationen zu den
verwendbaren Anzeigegeräten finden Sie in der Bedienungsanleitung Ihres
Anzeigegeräts.
Zusammenbauen des Tischständers
Richten Sie die Bohrungen an der Haupthalterung an den entsprechenden
Bohrungen am Ständer aus. Befestigen Sie die Haupthalterung mit den
Schrauben am Ständer.
A
Verwenden Sie dazu neun +K6× 12-Schrauben (mitgeliefert).
Installieren des Flachbildschirms
Nehmen Sie vor der Installation die Kabelabdeckung vom Bildschirm ab
und schließen Sie alle Kabel an den Flachbildschirm an.
1 Nehmen Sie die Kabelabdeckung ab. B
2 Führen Sie die vier Haken an der Rückseite des Bildschirms in die
entsprechenden Öffnungen an der Haupthalterung des Tischständers
ein und senken Sie den Bildschirm dann gerade nach unten ab. C
Achtung
• Die Installation muss von zwei Personen ausgeführt werden.
• Überprüfen Sie, ob alle Haken richtig in den entsprechenden Öffnungen
sitzen, bevor Sie den Bildschirm am Ständer befestigen.
• Bündeln Sie die Kabel und ziehen Sie sie durch die Öffnung im Ständer.
3 Befestigen Sie den Bildschirm am Ständer. D
Verwenden Sie dazu vier +K5× 25-Schrauben (mitgeliefert).
4 Verlegen Sie die Kabel im Ständer und bringen Sie die
Kabelabdeckung und dann die Kappen wieder an. E
5 Verankern Sie den Ständer an einer Wand. Ziehen Sie einen Draht
oder etwas Ähnliches durch die Bohrungen in den
Sicherheitsbeschlägen am oberen Teil der Haupthalterung und
befestigen Sie den Draht an einer Wand. F
Achtung
Ihr autorisierter Sony-Händler informiert Sie gern darüber, wie Sie den
Bildschirm so sichern können, dass er nicht kippt oder herunterfällt.
L’unità SU-42FW è un supporto da tavolo per i monitor a schermo piatto
della serie FWD.
Seguire le istruzioni per il montaggio del supporto da tavolo e per
l’installazione del monitor sul supporto stesso. Per ulteriori dettagli sui
monitor compatibili, fare riferimento al manuale di istruzioni del monitor in
uso.
Montaggio del supporto da tavolo
Allineare i fori per le viti sulla staffa principale con i fori corrispondenti sul
supporto. Fissare la staffa principale al supporto utilizzando le viti.
A
Utilizzare nove viti +K6× 12 (in dotazione).
Installazione del monitor a schermo piatto
Prima di procedere all’installazione, rimuovere il copricavo del display e
collegare tutti i cavi al monitor a schermo piatto.
1 Rimuovere il copricavo. B
2 Applicare quattro ganci nella parte posteriore del display inserendoli
nei corrispondenti fori sulla staffa principale del supporto da tavolo,
quindi fare scorrere il display verso il basso mantenendolo in posizione
verticale. C
Attenzione
•È necessario che due persone effettuino l’installazione.
• Prima di fissare il display al supporto, assicurarsi di verificare che tutti i
ganci siano correttamente inseriti nei fori corrispondenti.
• Sistemare i cavi e farli passare attraverso il foro presente sul supporto.
3 Fissare il display al supporto. D
Utilizzare quattro viti +K5× 25 (in dotazione).
4 Fare passare i cavi all’interno del supporto, quindi applicare di nuovo il
copricavo, quindi i cappucci. E
5 Fissare il supporto ad una parete. Fare passare un cavo (o simili)
attraverso i fori presenti negli attacchi di sicurezza situati nella parte
superiore della staffa principale, quindi fissare il cavo ad una parete.
F
Attenzione
Per ulteriori informazioni su come evitare che il display cada, rivolgersi al
rivenditore autorizzato Sony di fiducia.
El modelo de soporte de escritorio SU-42FW ha sido diseñado para
utilizarse con los monitores de panel plano de la serie FWD.
Siga las instrucciones para montar el soporte de escritorio e instalar el
monitor sobre él. Para obtener más información sobre los monitores
compatibles, consulte el manual de instrucciones del monitor.
Montaje del soporte de escritorio
Alinee los orificios de los tornillos de la abrazadera principal con los orificios
correspondientes del soporte. Fije la abrazadera principal al soporte
mediante los tornillos.
A
Utilice nueve tornillos +K6× 12 (suministrados).
Instalación del monitor de panel plano
Antes de la instalación, quite la cubierta del cable del monitor y conecte
todos los cables al monitor de panel plano.
1 Quite la cubierta del cable. B
2 Coloque cuatro ganchos en la parte posterior del monitor en los
orificios correspondientes de la abrazadera principal del soporte de
escritorio y, a continuación, deslice el monitor hacia abajo. C
Advertencia
• Asegúrese de que sean dos personas las que realizan la instalación.
• Antes de fijar el monitor al soporte, compruebe que todos los ganchos
están colocados correctamente en los orificios correspondientes.
• Agrupe los cables y hágalos pasar por el orificio del soporte.
3 Fije el monitor en el soporte. D
Utilice cuatro tornillos +K5× 25 (suministrados).
4 Pase los cables por el interior del soporte y vuelva a colocar la cubierta
del cable y, a continuación, los capuchones. E
5 Fije el soporte en una pared. Pase un cable (o similar) a través de los
orificios de los dispositivos adicionales de seguridad situados en la
parte superior de la abrazadera principal y fije el cable en una pared.
F
Advertencia
Para obtener más información sobre cómo evitar que el monitor se caiga,
póngase en contacto con su proveedor Sony autorizado.
Kappen/Capuchones/
Cappucci/
Kabelabdeckung am
Bildschirm/Cubierta del
cable del monitor/
Copricavo del display/
500 (19
11
/16)
200 (7
7
/8)
97.5 (3
27
/
32
)
492 (19
3
/8)
440 (17
5
/16)
440 (17
5
/
16
)
542.7 (21
3
/
8
)
295 (11
5
/8)
291.4 (11
15
/
32
)
686.7 (27
1
/
32
)
Schrauben/Tornillos/Viti/
(+K5× 25)
Teilenummer / Número de componentes / Numero dei componeti /
Schrauben/Tornillos/Viti/
(+K6× 12)
7-621-562-20
7-682-280-09
Kappen/Capuchones/Cappucci/
2-187-462-01
A
×
1 B
2
C
•
•
•
3 D
×
4 E
5
F
Die Display-Einheit in der Abbildung ist der FWD-42LX1.
El monitor que aparece en la ilustración corresponde al modelo FWD-
42LX1.
Il monitor visualizzato nell’illustrazione è la FWD-42LX1.
-
 1
1
-
 2
2


dans d''autres langues
- italiano: Sony SU-42FW Manuale del proprietario
- English: Sony SU-42FW Owner's manual
- español: Sony SU-42FW El manual del propietario
- Deutsch: Sony SU-42FW Bedienungsanleitung
- 日本語: Sony SU-42FW 取扱説明書