Pioneer KRP-WM01 Le manuel du propriétaire
- Taper
- Le manuel du propriétaire

This product is sold assuming that it will be installed by a
qualified installation technician with the required level of
knowledge and skill. Always have an installation specialist
or your dealer install and mount this product.
Pioneer shall not be held liable for any damage or injuries
resulting from this product's improper installation or
mounting, improper use, modification, or natural disasters.
En vendant ce produit, Pioneer suppose qu’il sera installé
par un installateur qualifié doté des connaissances et des
compétences nécessaires. Faites toujours installer ou
monter ce produit par un installateur spécialisé ou par
votre revendeur.
Pioneer ne saura être tenu responsable des dommages
matériels ou corporels qui résulteraient d’une installation
ou d’un montage défaillant, d’une mauvaise utilisation, de
la modification de ce produit ou encore de catastrophes
naturelles.

2
Ja
据付工事専門業者取扱品
このたびは、パイオニア製品をお買い求めいただきまして
まことにありがとうございます。お使いになる前には取扱
説明書をよくお読みになり、安全に正しくご使用ください。
また、お読みになったあとも、この取扱説明書は大切に保
管してください。
「据付工事」について
◦本機は十分な技術・技能を有する専門業者が据え付
けを行うことを前提に販売されているものです。据
え付け・取り付けは必ず工事専門業者または販売店
にご依頼ください。
◦なお、据え付け、取り付けの不備、誤使用、改造、
天災などによる事故損傷については、弊社は一切責
任を負いません。
安全上のご注意
安全上の絵表示について
取扱説明書および製品に記されている注意事項には、損害
のレベルや内容を示す絵表示が付けられていることがあり
ます。それら絵表示の意味は以下のとおりです。
警告
注意
人がけがをしたり財産に損害を受
ける恐れがある内容を示します。
人が死亡または重傷を負う恐れが
ある内容を示します。
警告・注意
(気をつけること)
禁止
(やってはいけないこと)
指示・強制
(しなければならないこと)
警告
異常時の処理
異常や不具合が発見されたら、すみやかに修理を
工事専門業者に依頼してください。
設置
本機は十分な技術・技能を有する専門業者が取り付
けを行うことを前提に販売されているものです。据
え付け・取り付けは必ず工事専門業者または販売店
にご依頼ください。工事が不完全ですと、破損や落
下など、事故の原因になります。
設置場所は金具とディスプレイの質量に十分耐えう
る強度を持つ場所を選定してください。破損や落下
など事故の原因になります。また、壁の構造強度に
より取り付けできない場合がありますので、工事専
門業者へご相談ください。
ディスプレイ周囲温度が 40℃を超えないよう空気
の流通を確保してください。ディスプレイ内部に熱
がこもり故障の原因となることがあります。
ディスプレイの通風孔をふさがないでください。通
風孔をふさぐと内部に熱がこもり、火災の原因とな
ることがあります。
人が容易にぶら下がったり寄り掛かれる場所には設
置しないでください。破損や落下など、事故の原因
になります。
振動や衝撃の加わるような場所には設置しないでく
ださい。破損や落下など、事故の原因になります。
屋外や温泉、海辺の近くには設置しないでください。
ディスプレイを長期間ご使用になりますと、ディス
プレイの熱や空気の流れで壁面が変色することがあ
りますのでご注意ください。
組み立ての手順を守り、指定の箇所はすべて確実に
ネジ留めしてください。指定を守らないと、破損や
落下など、事故の原因になります。
各部のネジを緩めたりすると落下などの事故の原因
になりますので、絶対に緩めないでください。
指定外のディスプレイへの取り付けや、改造および
他の用途での使用はしないでください。破損や落下
など、事故の原因になります。
安全のため、必ず二重安全の落下防止対策を行って
ください。
安全のため、60 型ディスプレイの場合は必ず3人
以上、50 型ディスプレイの場合は必ず2人以上で
設置を行ってください。
その他の設置場所については、ディスプレイ本体の
取扱説明書を熟読し、その内容を必ず守ってくださ
い。
使用方法
ぶら下がったり、寄り掛かったりしないでくださ
い。破損や落下など、事故の原因になります。
ディスプレイ金具内部や壁取り付け部など、目に
付かないところが破損し、ディスプレイが落下す
る危険を生じることがあります。ディスプレイな
どの修理点検時やお店の内装工事の時など、必ず
工事専門業者に点検を依頼してください。できれ
ば、定期的に工事専門業者に点検を依頼してくだ
さい。
本金具を長期使用されると、環境によっては経年
変化で強度が不足する場合があります。5年を目
安として、工事専門業者に点検を依頼し、使用し
て問題ないことをお確かめください。
注意
作業の際には、ディスプレイと周辺機器の電源を切
り、電源プラグをコンセントから抜いてください。
ディスプレイの取り付け、取り外しの時に指を挟
まないようご注意ください。

3
Ja
本製品とフラットパネルディスプレイの対応表
壁掛け金具 フラットパネルディスプレイ
KRP-WM01 KRP-600 シリーズ
KRP-WM02 KRP-500 シリーズ
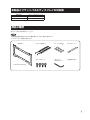
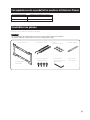
部品の確認
組み立ての前に部品を確認してください。
◦壁側金具を壁面に固定するためのネジ類は付属していません。別途ご用意ください。
◦プラスドライバーを別途ご用意ください。

4
Ja
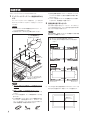
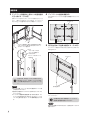
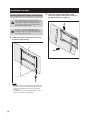
設置手順
◦落下防止対策の壁側のアイプレート(またはヒートン)は、
ディスプレイの重さに十分耐える強度のある場所に取り
付けてください。
◦ワイヤーの先端がディスプレイの通風孔などから内部に
入らないよう、端末処理にご注意ください。
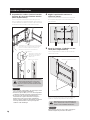
2
壁側金具を壁に取り付ける。
左右対称の位置に固定してください。(8 カ所以上)
このとき使用するネジ、ボルト類は壁の強度や材質に
適したものを別途ご用意ください。
取り付け場所に、金具とディスプレイの質量に十分耐える強
度があることを確認してください。
① はじめに壁や梁の強度を確認しながらディスプレイを
取り付ける位置を決め、画面センターの位置を出す。
※ディスプレイのイラストは KRP-600M です。
1
ディスプレイにディスプレイ側金具を取り付
ける。
ディスプレイとディスプレイ側金具を、上下をまちが
えないように M8 ツバ付ボルトで固定してください
(4 カ所)。
◦ディスプレイにキズおよび破損が生じないように、シー
トのようなものを敷いてください。
◦必ず安定したテーブルなどの上で取り付けてください。
◦スピーカーを取り付ける場合は、この段階で取り付けて
ください。取り付け方はスピーカーの取扱説明書をご覧
ください。
◦各種ケーブル類は、この段階で取り付けてください。
また、各種ケーブル類は、周辺機器側には接続しないで
ください。
◦ディスプレイ側金具で、ケーブル類を挟まないようご注
意ください。
◦この状態の時にワイヤーをディスプレイ側金具に取り付
けてください。落下防止用のワイヤー、カラビナ、アイ
プレート(またはヒートン)はディスプレイの重さに十
分耐える強度を持つ市販品をお求めください。

5
Ja
設置手順
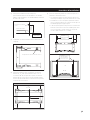
② 画面センターから上側 192 mm(KRP-WM01 の場
合)、94 mm(KRP-WM02 の場合)に位置出し用の
ネジを仮留めする。
192 mm*
94 mm**
ネジを仮留めする
画面センター
* : KRP-WM01
** : KRP-WM02
③ 手順②のネジに壁側金具を引っ掛ける。
④ 天井から壁側金具までの距離(A
1
、A
2
)、または床か
ら金具までの距離(B
1
、B
2
)を測り、水平になるよ
うに調整してから壁へネジまたはボルトに付属のワッ
シャーを付けて8カ所に固定する。
B
1 B2
A1 A2
⑤ 目印ラベルを壁およびディスプレイに貼る。
◦ 目印ラベルは壁掛け位置の目印にする一時的なラベ
ルです。
◦ あらかじめ目印ラベルを壁の目立たない場所にため
し貼りして、壁紙に影響がないことをお確かめくだ
さい。
◦ 目印ラベルをディスプレイの表面に貼ると、糊のこ
りを起こす可能性がありますので、図のようにディ
スプレイの背面側に貼ってください。
150 mm

6
Ja
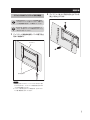
設置手順
3
ディスプレイ側金具の上部のツメを壁側金具
に引っ掛ける。(2 カ所)
目印ラベルに合わせてディスプレイを取り付けてくだ
さい。上部のツメがきちんと引っ掛かり、ディスプレイ
が水平で正しい位置に取り付いたか確認してください。
安全のため、60 型ディスプレイの取り付け作
業は必ず 3 人以上、50 型ディスプレイの取り
付け作業の場合は必ず 2 人以上で行ってくださ
い。
◦取り付けの際、スピーカーを付けた場合はスピーカー部
分を持たないでください。
◦配線などが金具やディスプレイに挟まれたりしないよう
にしてください。
◦ディスプレイ側金具を壁側金具に引っ掛けた状態で、ディ
スプレイの下側を強く引っ張らないでください。ディス
プレイの上側が壁に当たり、キズや故障の原因となりま
す。
4
ディスプレイの位置を調整する。
左右方向にディスプレイの位置を微調整することがで
きます。
5
落下防止用ネジで金具を固定する。(2 カ所)
ディスプレイ側金具下の落下防止用ネジが止まるまで
締め込みます。
固定したあとは目印ラベル、落下防止の注意タグをは
がしてください。
必ず落下防止用ネジを締め込み、ディスプレイ
側金具と壁側金具を固定してください。
落下防止の注意タグをはがすときに、指を切らないようにご
注意ください。

7
Ja
設置手順
フラットパネルディスプレイを外す場合
作業を始める前にディスプレイと周辺機器の電源
プラグをコンセントから抜いてください。必要に応
じて周辺機器側の配線ケーブル類を外してください。
安全のため、60 型ディスプレイの場合は必ず 3
人以上、50 型ディスプレイの場合は必ず 2 人以上
で取り外しを行ってください。
1
ディスプレイ側金具を固定している落下防止
用ネジを緩める。
◦落下防止用ネジにはストッパーがついているため、取り
外しはできません。ディスプレイ下側を手前に引けるよ
うになるまで緩めてください。
◦ワイヤーで落下防止をしている場合には、必ずワイヤー
も一緒に取付具から外してください。
2
ディスプレイを少し手前に持ち上げてから、
真上に持ち上げて外す。

8
Ja
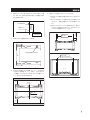
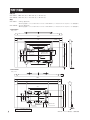
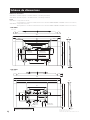
外形寸法図
外形寸法
KRP-WM01:994mm(W)×694mm(H)×25mm(D)
KRP-WM02:645mm(W)×516mm(H)×22mm(D)
質量
KRP-WM01:6.6kg(金具のみ)
60.6kg(金具+フラットパネルディスプレイ< KRP-600 シリーズのディスプレイとスピーカー取付時>)
KRP-WM02:3.7kg(金具のみ)
38.2kg(金具+フラットパネルディスプレイ< KRP-500 シリーズのディスプレイとスピーカー取付時>)
KRP-WM01
( 単位:mm)
1465
1677
106
822
928
642
320
532
422
106
235.5 994 235.5
16814 694
876
183243
30
160220
64
25
18-6 x 63
10-8.5 x 20.5
192
175
KRP-WM02
( 単位:mm)
123383 83
1399
573
469
200
294 645
294
84.5
44.5
173.5
149.5
60.5
94
19116 516
723
64*
2
22
2-6 x 120
10-8.5 x 20.5
4-6 x 63
67*
1
170
©2008 パイオニア株式会社 禁無断転載

9
En
Product Requiring Professional
Installation
Thank you for buying Pioneer’s product.
Please read through the Operating Instructions to learn how
to operate your model safely and properly.
Please be advised to keep the Operating Instructions in your
place for future reference.
Notes on Installation:
• Thisproductissoldassumingthatitwillbeinstalled
by a qualified installation technician with the
required level of knowledge and skill. Always have an
installation specialist or your dealer install and mount
this product.
• Pioneershallnotbeheldliableforanydamage
or injuries resulting from this product's improper
installation or mounting, improper use, modification,
or natural disasters.
SAFETY CAUTIONS
Handling in Case of Anomaly
If you detect an anomaly or fault, promptly have a qualified
technician perform repairs.
Installation
• Thisproductissoldassumingthatitwillbeinstalledbya
qualified installation technician with the required level of
knowledge and skill. Always have an installation specialist
or your dealer install and mount this product. Improper
installation may cause the product to break or fall.
• Selectalocationthatisstrongenoughtosupportthe
weight of the wall mount and display to prevent the
productfromgettingdamagedorfallingdown.Somewalls
may lack the structural strength required for mounting this
product, so consult with a qualified technician.
• Ensurethatthereissufficientventilationsothatthe
ambient temperature around the display does not exceed
40
°C Heat accumulation inside the display may cause
display failure.
• Donotblocktheventilationopeningsofthedisplay,asthis
would cause heat to build up inside and may result in fire.
• Donotinstallthisproductinalocationwherepeople
may hang from it or lean against it, as this may cause the
product to break or fall.
• Donotinstallthisproductinalocationwhereitwillbe
subjected to vibration or shocks, as this may cause the
product to break or fall.
• Donotinstallthedisplayoutdoors,atahotspring,ornear
a beach.
• Useofthedisplayforalongtimemaycausediscoloration
of the wall due to the heat of the display and the air flow.
• Followthedescribedassemblyprocedureandsecurelyfix
thescrewsinallthespecifiedlocations.Failuretosodo
may cause the display to break or fall.
• Looseninganyofthescrewsmaycausethedisplaytofall,
so absolutely never loosen the screws.
• DonotmountthePioneerdisplayandtelevisionotherthan
specified, do not modify it, and do not use it for other than
its intended purposes, as this may cause it to break or fall.
• Besuretoimplementdoublefallpreventionmeasuresto
be safe.
• Inthecaseofa60-inchdisplay,alwayshavethreeormore
persons on hand when installing the display. In the case of
a50-inchdisplay,havetwoormorepersonsonhand.
• Thoroughlyreadtheoperatinginstructionsofthe
Pioneer display and television for additional information
about installation locations, and be sure to follow this
information.
Usage Method
• Donothangfromorleanagainstthedisplay,asthismay
cause it to break or fall.
• Themetalfittingsinsidethedisplay,thewallmounting
parts, and other places hidden from sight may suffer
damage and cause the display to fall. Therefore, when
having the display inspected or repaired, or when
performing interior finish work at your shop, be sure to
have a qualified technician inspect these items. If possible,
have these items checked periodically.
• Themetalfittingsofthedisplaymayundergochangesdue
to environmental factors when used for a long time, and
lose some of their strength as a result. After five years or
so, have a qualified technician inspect them to make sure
that they can safely continue to be used.
Beforestarting,switchoffthepowerofthedisplayand
peripheral devices, and disconnect all power plugs from the
power outlets.
Becarefulnottogetyourhandscaughtwhenmountingand
removing the display.

10
En
Correspondence Between this Product and Pioneer Displays and Televisions
Wall mount unit Pioneer displays and televisions
KRP-WM01 PRO-141FD/KRP-600M/KRP-600A
KRP-WM02 PRO-101FD/KRP-500M/KRP-500A
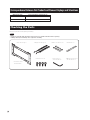
Checking the Parts
Check the parts before beginning assembly.
Ìi
• Screwsforfixingthewallsidefittingstothewallarenotincluded.Purchasethemseparately.
• APhillipsdriver(notincluded)isalsorequiredforassembly.
• Wall side fittings ×1
• Display side fittings ×2
• M8 Allen bolts ×4
• Guide label ×1
• Operating instructions
(this document) ×1
• Allen wrench ×1
(6 mm for M8 use)
• Washer (for M8 use) ×8
* Illustration shows
the KRP-WM01.

11
En
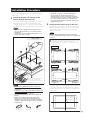
Installation Procedure
• Attachtheeyeplate(oreyebolt)onthesideof
thewallwherethefall-preventionmeasureis
implementedatalocationofsufcientstrengthto
resisttheweightofthePioneerdisplayandtelevision.
• Becarefultoterminatethewiressothattheywill
not get inside the ventilation openings of the Pioneer
displayandtelevision.
2
AttachtheWallsidefittingstothewall.
Attach the wall side fittings to the wall in a horizontally
symmetricalpattern(eightormorelocations).Besure
to use screws and bolts suited for the strength and
material of the wall.
Ìi
Makesurethattheinstallationlocationissufciently
strongtowithstandtheweightofthePioneerdisplayand
television.
KRP-WM01
KRP-WM02
: Attachment holes (attach wall side mount at horizontally
symmetrical locations, eight or more locations)
* If using eight or more locations, use other attachment
holes.
1
FirstselectthePioneerdisplayandtelevisionattachment
location by checking the strength of the wall or beam,
and then determine the location that corresponds to the
screen center.
Screen center
*
The Pioneer display and television illustration shows the
KRP-600M.
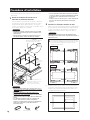
1
Attachthedisplaysidefittingstothe
Pioneerdisplayandtelevision.
SecurelyattachthedisplaysidefittingstothePioneer
displayandtelevisionwiththeM8Allenbolts(four
locations), being careful to correctly orient the display
side fittings the right side up as shown in the illustration.
Ìi
• PlacethePioneerdisplayandtelevisiondownona
sheetorsimilarmaterialtoprotectitfromscratches
anddamage.
• AlwaysplacethePioneerdisplayandtelevisionona
stablesurfacesuchasatable.
Be sure to pass the speaker
cables, etc., between the
Pioneer display and television
and fall-prevention screw.
Pass a safety wire through the
holes of the display side fittings.
Fall prevention
screw
Cables
Place is so the
top is here.
Ìi
• Ifyouplantoinstallspeakers,dosoatthisstage.
Fortheinstallationprocedure,refertotheoperating
instructions.
• ConnectthevariouscablestothePioneerdisplayand
televisionatthisstage.Donotyetconnectthevarious
cablestotheirrespectiveperipherals.
• Becarefulnottopinchthecablesinthedisplayside
ttings.
• Inthisstate,attachthewiretothedisplayside
ttings.Useacommerciallyavailablesafetywire,
springhook,andeyeplate(oreyebolt)ofsufcient
strengthtosupporttheweightofthePioneerdisplay
andtelevision.
Eye boltEye plateSpring hook

12
En
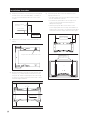
Installation Procedure
2
Temporarily attach the screw used for positioning about
192mm(inthecaseoftheKRP-WM01),or94mm(in
thecaseoftheKRP-WM02)abovethescreencenter
location.
192mm*
94 mm**
Screencenter
* : KRP-WM01
**: KRP-WM02
Temporarily attach
the screw.
3
Hang the wall side fittings on the screw referred to in
step
2
.
Hang the wall side fittings on the screw.
4
Measurethedistancefromtheceilingtothewallside
fittings (A
1
, A
2
), and the distance from the floor to the
fitting(B
1
,B
2
), and after adjusting the wall side fittings
so that is level, fasten it to the wall with screws or bolts
fitted with supplied washers.
Ceiling
Floor
B1 B2
A1 A2
A1 = A2
or
B1 = B2
Screen center
5
Attach the guide labels to the wall and the Pioneer
display and television.
•Theguidelabelsareprovisionallabelsusedtoindicate
the wall attachment locations.
•Firstattachtheguidelabelstoaninconspicuous
location on the wall and check that they do not
damage the wall paper.
•Attachingtheguidelabelstothesurfaceofthe
Pioneer display and television may cause adhesive to
remain stuck to the surface, so attach the guide labels
on the rear side of the display as shown in the figure.
150 mm
Attach the guide
labels to the Pioneer
display and television.
Attach the guide
labels to the wall.

13
En
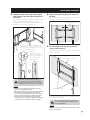
Installation Procedure
3
Hang the hooks at the top of the display
sidefittingstothewallsidefittings(two
locations).
Attach the Pioneer display and television so that it aligns
with the guide labels. Check that the top hooks are
firmly hung and that the Pioneer display and television is
attached in its correct position and is level.
Hang the hooks at the top of the display side
fittings to the wall side fittings, pass a wire in
each spring hook, and attach it to the eye plate
(or eye bolt) attached to the wall.
Attach the wire after
temporarily attaching it to
the rear case with tape, etc.
Fix the wire to the eye
plate (or eye bolt).
Spring hook
Caution
Inthecaseofa60-inchdisplay,always
havethreeormorepersonsonhandwhen
installingthedisplay.Inthecaseofa50-inch
display,havetwoormorepersonsonhand.
Ìi
• Ifspeakersareattached,donotholdthespeakers
whenperformingthisattachment.
• Makesurethatthewiring,etc.,doesnotgetcaughtin
thettingsorthePioneerdisplayandtelevision.
• DonotforcefullypulldownthebottomofthePioneer
displayandtelevisionwhenthedisplaysidettings
hangfromthewallsidettingsbecausethismay
causethetoppartofthePioneerdisplayandtelevision
totouchthewall,resultinginscratchesordamage.
4
Adjust the Pioneer display and television
position.
The position of the Pioneer display and television can be
fine-adjustedhorizontallyandvertically.
Pioneer display and television
Wall mount unit
5
Fixthefittingswiththefall-prevention
screws(twolocations).
Tightenthetwofall-preventionscrewsofthedisplayside
fittings all the way.
Fall-prevention screws
Pioneer display and television
After fixing the fittings, remove the guide labels and the
fall prevention caution tag.
Caution
Besuretotightenthefall-preventionscrews
tosecurelyxthedisplaysidettingsand
thewallsidettings.
Ìi
Whenremovingthefall-preventioncautiontag,becareful
nottocutyourngers.

14
En
Installation Procedure
Removing the Pioneer display and television
Caution
Beforebeginningthisprocedure,removethe
powerplugsofthePioneerdisplayandtelevision
andperipheralequipmentfromtheiroutlets.If
necessary,alsoremovetheconnectingcableson
theperipheralequipmentside.
Caution
Inthecaseofa60-inchdisplay,alwayshave
threeormorepersonsonhandwhenremoving
thedisplay.Inthecaseofa50-inchdisplay,have
twoormorepersonsonhand.
1
Loosenthefall-preventionscrewsfixing
thedisplaysidefittings.
Fall-prevention screws
Pioneer display and television
Ìi
• Thefall-preventionscrewscannotberemovedbecause
theyhaveastopper.Loosenthemuntilthelowerpart
ofthePioneerdisplayandtelevisioncanbepulled
towardyou.
• Ifasecuritywireisusedforfallprevention,besureto
removealsothewirefromthettings.
2
After lifting the Pioneer display and
televisionslightlytowardyou,removeit
bygentlyliftingitstraightup.

15
En
External Dimensions Diagram
ExternalDimensions
KRP-WM01:994mm(W)×694mm(H)×25mm(D)(39-1/8in.(W)×27-5/16in.(H)×31/32in.(D))
KRP-WM02:645mm(W)×516mm(H)×22mm(D)(25-13/32in.(W)×20-5/16in.(H)×7/8in.(D))
Weight
KRP-WM01: 6.6kg(14.6lbs)(ttingsonly)
60.6kg(133.6lbs)
(fittings+Pioneerdisplayandtelevision<PRO-141FD/KRP-600M/KRP-600Adisplaywithspeakers>)
KRP-WM02:3.7kg(8.2lbs)(fittingsonly)
38.2kg(84.2lbs)
(fittings + Pioneer display and television <PRO-101FD/KRP-500M/KRP-500Adisplaywithspeakers>)
KRP-WM01
Unit:mm(inch)
1465 (57-11/16)
1677 (66-1/32)
106
(4-3/16)
822 (32-3/8)
928 (36-17/32)
642 (25-9/32)
320 (12-19/32)
532 (20-15/16)
422 (16-5/8)
106
(4-3/16)
235.5 (9-9/32) 994 (39-1/8) 235.5 (9-9/32)
168 (6-5/8)
14
(9/16)
694 (27-5/16)
876 (34-1/2)
183 (7-7/32)243 (9-9/16)
30 (1-3/16)
160 (6-5/16)220 (8-21/32)
64 (2-17/32)
25 (31/32)
18-6 x 63
(18-1/4 x 2-15/32)
10-8.5 x 20.5
(10-11/32 x 13/16)
Screen center
192 (7-9/16)
175 (6-7/8)
KRP-WM02
Unit:mm(inch)
1233 (48-17/32)
83
(3-9/32)
83
(3-9/32)
1399 (55-3/32)
573 (22-9/16)
469 (18-15/32)
200 (7-7/8)
294 (11-9/16) 645 (25-13/32)
294 (11-9/16)
44.5
(1-3/4)
149.5
(5-7/8)
60.5
(2-3/8)
191 (7-17/32)16 (5/8)
516 (20-5/16)
723 (28-15/32)
64*
2
(2-17/32*
2
)
22 (7/8)
2-6 x 120
(2-1/4 x 4-23/32)
10-8.5 x 20.5
(10-11/32 x 13/16)
Screen center
4-6 x 63
(4-1/4 x 2-15/32)
67*
1
(2-5/8*
1
)
170 (6-11/16)
94
(3-11/16)
173.5
(6-27/32)
84.5
(3-5/16)
*
1
Depth to the speaker brackets
*
2
Depth of the Pioneer display and television
Published by Pioneer Corporation.
Copyright©2008PioneerCorporation.
All rights reserved.

16
Fr
Produit devant être installé par
un professionnel
Nous vous remercions d’avoir choisi un produit Pioneer.
Veuillez lire attentivement ce mode d’emploi pour savoir
comment utiliser votre pied de table correctement et en toute
sécurité. Nous vous conseillons de conserver soigneusement
ce mode d’emploi à portée de main et dans un endroit sûr
afin de pouvoir vous y référer le cas échéant.
Remarquessurl’installation:
• Envendantceproduit,Pioneersupposequ’il
sera installé par un installateur qualifié doté des
connaissances et des compétences nécessaires.
Faitestoujoursinstalleroumonterceproduitparun
installateur spécialisé ou par votre revendeur.
• Pioneernesauraêtretenuresponsabledes
dommages matériels ou corporels qui résulteraient
d’une installation ou d’un montage défaillant, d’une
mauvaise utilisation, de la modification de ce produit
ou encore de catastrophes naturelles.
AVERTISSEMENTS
Marcheàsuivreencasd’anomalie
Sivousdétectezuneanomalieouundéfaut,faiteseffectuer
les réparations nécessaires dans les meilleurs délais par un
technicien qualifié.
Installation
• Envendantceproduit,Pioneersupposequ’ilserainstallé
par un installateur qualifié doté des connaissances et des
compétencesnécessaires.Faitestoujoursinstallerou
monter ce produit par un installateur spécialisé ou par
votrerevendeur.Unemauvaiseinstallationpeutentraîner
la casse ou la chute du produit.
• Sélectionnezunendroitsuffisammentsolidepour
supporter le poids des fixations murales et de l’écran afin
d’éviter que ce dernier ne soit endommagé ou ne tombe.
Certainsmurspeuventnepasêtreassezsolidespour
que l’écran y soit installé, aussi consultez un technicien
qualifié.
• Veillezàcequelapiècesoitsuffisammentaéréeetàce
que la température ambiante à proximité de l’écran ne
dépassepasles40°C.Uneaccumulationdechaleurà
l’intérieurdel’écranpeutêtreàl’originedepannes.
• N’obstruezpaslestrousd’aérationdel’écran,lachaleur
s’accumulerait à l’intérieur et pourrait provoquer un
incendie.
• N’installezpasceproduitàunendroitoùdesgens
pourraient se pendre à lui ou s’adosser contre lui, il
pourrait tomber ou se casser.
• N’installezpasceproduitàunendroitoùilseraitsoumis
à des vibrations ou à des chocs, il pourrait tomber ou se
casser.
• N’installezpasl’écranenextérieur,prèsd’unesourced’eau
chaude ou à proximité d’une plage.
• L’utilisationdel’écranpendantuneduréeprolongéepeut
entraînerunedécolorationdumurenraisondelachaleur
de l’écran et de la ventilation.
• Suivezlaprocéduredemontagedécriteetvissezlesvis
danslesendroitsindiqués.Sivousnelefaitespas,l’écran
pourrait tomber ou se casser.
• Sivousdesserrezl’unedesvis,l’écranpourraittomber.
Aussi ne desserrez absolument jamais les vis.
• N’installezpaslemoniteurettéléviseurPioneerautrement
que conformément aux instructions, ne le modifiez pas et
ne l’utilisez pas à des fins autres que celles pour lesquelles
il est prévu. Il pourrait tomber ou se casser.
• Pourplusdesécurité,doublezlesmesurespourempêcher
les chutes.
• Danslecasd’unécran60pouces,faites-voustoujours
aider d’au moins trois personnes lors de l’installation.
Danslecasd’unécran50pouces,faites-vousaiderd’au
moins deux personnes.
• Lisezattentivementlemoded’emploidumoniteuret
téléviseur Pioneer pour de plus amples informations sur
les lieux d’installation et suivez les consignes qui vous sont
données.
Moded’utilisation
• Nevouspendezpasàl’écranetnevousadossezpas
contre lui, il risquerait de tomber ou de se casser.
• Lesfixationsenmétalquisetrouventàl’intérieurde
l’écran,lespiècesdelastructured’installationmuraleet
d’autresendroitsnonvisiblespeuventêtreendommagés
et provoquer la chute de l’écran. Par conséquent, lorsque
vous faites réparer ou inspecter l’écran, ou lors de la
réalisation de travaux de finition intérieure dans votre
magasin,faites-lesinspecterparuntechnicienqualifié.Si
possible,faitescontrôlercespiècespériodiquement.
• Encasd’utilisationprolongée,lesfixationsenmétalde
l’écran peuvent se modifier sous l’action de facteurs
environnementaux et perdre de leur solidité. Au bout
d’environcinqansd’utilisation,faites-lesinspecterparun
technicienqualifiépourvousassurerqu’ellespeuventêtre
encore utilisées en toute sécurité.
Avant de commencer, mettez l’écran et tous les
périphériques hors tension et débranchez tous les cordons
d’alimentation.
Veillez à ne pas vous faire coincer les mains lors de
l’installation ou de la désinstallation de l’écran.

17
Fr
Correspondance entre ce produit et les moniteurs et téléviseurs Pioneer
Kitd’installationmurale Moniteurs et téléviseurs Pioneer
KRP-WM01 PRO-141FD/KRP-600M/KRP-600A
KRP-WM02 PRO-101FD/KRP-500M/KRP-500A
Contrôler les pièces
Inspectezlespiècesavantdecommencerlemontage.
,i>ÀµÕi
• Lesvisd’installationdesfixationsmuralessurlemurnesontpasfournies.Achetez-lesséparément.
• Untourneviscruciformeestégalementnécessairepourlemontage(nonfourni).
• Fixations murales ×1
• Fixations de l’ écran ×2
• Boulons à tête creuse
hexagonale M8 ×4
• Etiquettes-guides ×1
• Clé hexagonale ×1
(6 mm pour l’utilisation
de boulons M8)
• Rondelle
(pour boulons M8) ×8
* Le schéma montre
le KRP-WM01.
• Mode d’emploi
(ce document) ×1

18
Fr
Procédure d’installation
• Posezlepitonducôtédumuroulamesureanti-chute
estmiseenœuvreàunendroitsufsammentrésistant
pour supporter le poids du moniteur et téléviseur
Pioneer.
• Veillezàrentrerleslsdefaçonàcequ’ilsn’obstruent
paslestrousd’aérationdumoniteurettéléviseur
Pioneer.
2
Installerlesfixationsmuralesaumur.
Installez les fixations murales au mur en les disposant de
façon symétrique horizontalement (huit emplacements
ou plus). Veillez à bien utiliser des vis et des boulons
adaptés à la résistance et à la composition du mur.
,i>ÀµÕi
Veillezàcequel’endroitchoisipourl’installationsoit
sufsammentsolidepourrésisteraupoidsdumoniteuret
téléviseurPioneer.
KRP-WM01
KRP-WM02
:
Trous de fixation (disposez les fixations murales de façon
horizontalement symétrique, huit emplacements ou plus)
*Si vous utilisez huit emplacements ou plus, utilisez
d’autres trous de fixation.
1
Commencezparchoisirl’endroitoùvousallezinstaller
le moniteur et téléviseur Pioneer en vérifiant la solidité
du mur ou de la poutre, puis déterminez l’endroit qui
correspond au centre de l’écran.
Centre de l’écran
*
LeschémadumoniteurettéléviseurPioneermontrele
KRP-600M.
1
Posezlesfixationsdel’écransurle
moniteurettéléviseurPioneer.
Fixezsolidementlesfixationsdel’écransurlemoniteur
ettéléviseurPioneeràl’aidedesboulonsàtêtecreuse
hexagonaleM8(quatreemplacements),enveillantà
orienter correctement les fixations de l’écran dans le bon
sens comme indiqué sur le schéma.
,i>ÀµÕi
• CouchezlemoniteurettéléviseurPioneersurundrap
ouunmorceaudetissupouréviterlesérauresetles
détériorations.
• PlaceztoujourslemoniteurettéléviseurPioneersur
unesurfacestable,commeunetableparexemple.
Veillez à bien faire passer les
câbles d’enceintes, etc. entre
le moniteur et téléviseur
Pioneer et la vis anti-chute.
Vis anti-chute
Câbles
Passez un fil de sécurité dans les
trous des fixations de l’écran.
Placez-le de façon
à ce que le haut
se trouve ici.
,i>ÀµÕi
• Sivoussouhaitezinstallerdesenceintes,faites-leàce
moment-là.Pourlaprocédured’installation,consultez
lemoded’emploi.
• Branchezmaintenantlesdifférentscâblessurle
moniteurettéléviseurPioneer.Nelesraccordez
toutefoispasencoreauxpériphériquescorrespondants.
• Veillezànepascoincerlescâblesdanslesxationsde
l’écran.
• Acemoment-là,attachezlelsurlesxationsde
l’écran.Utilisezunldesécuritévendudansle
commerce,unmousquetonetunpitonsufsamment
solides pour supporter le poids du moniteur et
téléviseurPioneer.
PitonPatte de fixationMousqueton

19
Fr
Procédure d’installation
2
Posez provisoirement la vis utilisée pour le
positionnementenviron192mm(danslecasduKRP-
WM01)ou94mm(danslecasduKRP-WM02)audessus
du centre de l’écran.
192mm*
94 mm**
Centre de l’écran
* : KRP-WM01
**: KRP-WM02
Posez provisoirement
la vis.
3
Suspendezlesfixationsmuralesàlavismentionnéeà
l’étape
2
.
Suspendez les fixations murales à la vis.
4
Mesurezladistanceentreleplafondetlesfixations
murales (A
1
, A
2
) ainsi que la distance entre le sol et
lesfixations(B
1
,B
2
)et,aprèsavoirajustélesfixations
muralesdefaçonàcequ’ellessoientaumêmeniveau,
fixez-lesaumuràl’aidedesvisouboulonsainsiquedes
rondelles qui sont fournies.
Plafond
Sol
B1 B2
A1 A2
A1 = A2
ou
B1 = B2
Centre de l’écran
5
Posezlesétiquettes-guidessurlemurainsiquesurle
moniteur et téléviseur Pioneer.
•Lesétiquettes-guidessontdesétiquettesprovisoires
utilisées pour indiquer les points de fixation sur le mur.
•Toutd’abord,collezlesétiquettes-guideàunendroit
oùellessontpeuvisiblessurlemuretvériezqu’elles
n’endommagent pas le papier peint.
•Sidesétiquettes-guidessontposéessurlasurfacedu
moniteur et téléviseur Pioneer, de l’adhésif peut rester
collersurlasurface.Posez-lesdoncàl’arrièrede
l’écran comme indiqué sur le schéma.
150 mm
Collez les
étiquettes-guides
sur le mur.
Collez les
étiquettes-guides
sur le moniteur et
téléviseur Pioneer.

20
Fr
Procédure d’installation
3
Suspendezlescrochetssituésenhautdes
fixationsdel’écranauxfixationsmurales
(deuxemplacements).
Posez le moniteur et téléviseur Pioneer de façon à ce
qu’ilsoitalignésurlesétiquettes-guides.Vérifiezqueles
crochets du haut sont bien accrochés et que le moniteur
et téléviseur Pioneer est droit et fixé au bon endroit.
Suspendez les crochets qui se trouvent en haut
des fixations de l’écran aux fixations murales,
passez un fil dans chaque mousqueton et
attachez-le au piton qui est fixé au mur.
Attachez le fil après l’avoir
attaché provisoirement à
l’arrière avec du ruban
adhésif, etc..
Fixez le fil sur le piton.
Mousqueton
Attention
Danslecasd’unécran60pouces,faites-vous
toujoursaiderd’aumoinstroispersonnes
lorsdel’installation.Danslecasd’unécran
50pouces,faites-vousaiderd’aumoinsdeux
personnes.
,i>ÀµÕi
• Sidesenceintessontinstallées,nesaisissezpasl’écran
parlesenceintespendantl’installation.
• Veillezàcequelescâbles,etc.nesecoincentpasdans
lesxationsoudanslemoniteurettéléviseurPioneer.
• Neforcezpassurlapartiebassedu moniteur et
téléviseurPioneerpourlafairebaisserlorsqueles
xationsdel’écransontaccrochéesauxxations
murales.Lapartiesupérieuredumoniteurettéléviseur
Pioneerpourraittoucherlemuretprovoquerdes
érauresoudesdommages.
4
Réglezlapositiondumoniteuret
téléviseurPioneer.
LapositiondumoniteurettéléviseurPioneerpeut
êtrerégléedefaçonprécisehorizontalementet
verticalement.
Moniteur et téléviseur Pioneer
Kit d'installation murale
5
Posezlesfixationsàl’aidedesvisanti-
chute(deuxemplacements).
Serrezcomplètementlesdeuxvisanti-chutedes
fixations de l’écran.
Vis anti-chute
Moniteur et téléviseur Pioneer
Unefoislesfixationsposées,retirezlesétiquettes-
guides et l’étiquette de prévention des chutes.
Attention
Veillezàbienserrerlesvisanti-chutepour
quelesxationsdel’écranetlesxations
muralessoientsolidementmaintenues.
,i>ÀµÕi
Faitesattentiondenepasvouscouperlesdoigtsen
retirantl’étiquettedepréventiondeschutes.
La page est en cours de chargement...
La page est en cours de chargement...
La page est en cours de chargement...
La page est en cours de chargement...
La page est en cours de chargement...
La page est en cours de chargement...
La page est en cours de chargement...
La page est en cours de chargement...
La page est en cours de chargement...
-
 1
1
-
 2
2
-
 3
3
-
 4
4
-
 5
5
-
 6
6
-
 7
7
-
 8
8
-
 9
9
-
 10
10
-
 11
11
-
 12
12
-
 13
13
-
 14
14
-
 15
15
-
 16
16
-
 17
17
-
 18
18
-
 19
19
-
 20
20
-
 21
21
-
 22
22
-
 23
23
-
 24
24
-
 25
25
-
 26
26
-
 27
27
-
 28
28
-
 29
29


Pioneer KRP-WM01 Le manuel du propriétaire
- Taper
- Le manuel du propriétaire
dans d''autres langues
- italiano: Pioneer KRP-WM01 Manuale del proprietario
- English: Pioneer KRP-WM01 Owner's manual
- Nederlands: Pioneer KRP-WM01 de handleiding
- 日本語: Pioneer KRP-WM01 取扱説明書
Documents connexes
-
Pioneer KRP-SW01 Mode d'emploi
-
-
-
-
-
-
-