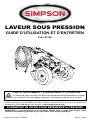
Simpson SM1200 Mode d'emploi
- Catégorie
- Nettoyeurs haute pression
- Taper
- Mode d'emploi

Part Number 7114262 / ENGLISH REV B - 7/2023
For 61102
SAVE THIS MANUAL FOR FUTURE REFERENCE
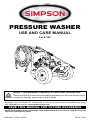
USE AND CARE MANUAL
PRESSURE WASHER
READ THIS MANUAL CAREFULLY BEFORE OPERATION
Failure to follow the instructions and safety precautions in this manual can result
in property damage, serious injury and/or death.
NOTE: Photographs and line drawings used in this manual are for reference only and may not
represent your specic model.
If your pressure washer is not working or if there are parts missing or broken, please DO NOT
RETURN IT TO THE PLACE OF PURCHASE. Contact our Customer Service Department by calling
1-877-362-4271 or emailing [email protected]

Page II
NOTES
THIS PAGE WAS INTENTIONALLY LEFT BLANK

Page 1
●All information in this publication was based on the latest product information available at
the time of printing. The FNA Group reserves the right to update, change, and/ improve
the product and this document at any time, without notice, and without incurring any
obligation.
● This manual may cover more than one machine. The pictures and gures in the manual
should be used for reference only. There may be dierences between your product and
the pictures, drawings, and diagrams in this manual.
DISCLAIMERS
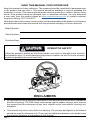
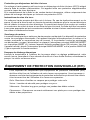
Lifting the pressure washer by the motor handle can result in damage to the machine
and potential injury. To avoid damaging the pressure washer, be sure to lift the pressure
washer by grasping the metal frame only.
OPERATOR SAFETY
CAUTION:CAUTION:
SAVE THIS MANUAL FOR FUTURE USE
Write down the model number, serial number, and purchase date of this product in the spaces
provided below then keep this manual with the purchase receipt(s) for future reference.
Keep this manual for future reference. This manual should be considered a permanent part
of the product and stay with it. This manual should be available to anyone operating the
product(s) it covers. This manual should remain with the product(s) it covers if sold to a new
owner. If the manual becomes damaged, lost, or otherwise unusable, you may download
a new copy from the product pages at www.simpsoncleaning.com or contact customer
support by calling 1-877-362-4271.
Model Number:
Serial Number:
Purchase Date:

Page 2
TABLE OF CONTENTS
DISCLAIMERS 1
PERSONAL PROTECTIVE EQUIPMENT
7
5
5
5
5
Hazard Alert Symbols
Additional Instructions
Read this Manual Before Operating
SAFETY INSTRUCTIONS
Adding the Pump Breather Cap
Install Knob-style Handle
ASSEMBLY
Organize Accessories
Assemble the Spray Gun
8
8
8
9
9
COMPONENT LOCATION 10
OPERATING CHECKLIST
Operating Conditions
Location
12
12
12
UNPACKING 8
Setting the Metering Valve
Connecting Hoses
MISTING OPERATION
Application of Mist
Starting the Mister
Shutting O and Cleaning the Mister
15
14
14
17
15
18
Setting the Metering Valve
Connecting Hoses
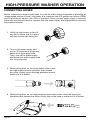
HIGH-PRESSURE WASHER OPERATION
Nozzle Selection
Purging Air from the Pump
Nozzle Installation
Starting the Pressure Washer
Shutting o the Pressure Washer
20
19
19
21
20
22
22
24

Page 3
USING CHEMICALS 25
27TROUBLESHOOTING
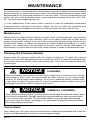
MAINTENANCE
Maintenance
Cleaning the Pressure Washer
Connections
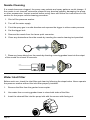
Nozzle Cleaning
Water Inlet Filter
Pump Maintenance
29
29
29
29
30
30
31
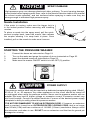
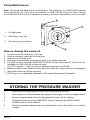
31STORING THE PRESSURE WASHER
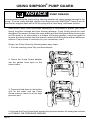
32USING SIMPSON® PUMP GUARD
Pressure Washing
Preparation
Terms
OPERATION TIPS
Adjusting Pressure
26
26
26
26
26
33WARRANTY

Page 4
THIS PAGE WAS INTENTIONALLY LEFT BLANK

Page 5
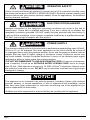
WARNING:WARNING:
DANGER:DANGER:
CAUTION:CAUTION:
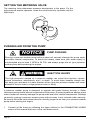
This manual contains important safety information and instructions. Do not operate
this product until you have read, and completely understand all safety, operation, and
maintenance instructions listed in this manual. Failure to follow the information contained
in this manual will result in property damage, injury, and/or death.
NOTE: The warnings and precautions discussed in this manual cannot cover all conditions
and situations that may occur. The operator must understand awareness and caution are
factors which cannot be built into this product and so must be exercised by the operator.
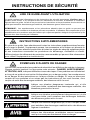
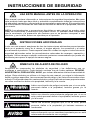
READ THIS MANUAL BEFORE OPERATING
Be sure to understand the safety symbols and denitions listed below. Each symbol
contains one of four words: DANGER, WARNING, CAUTION, NOTICE, indicating
dierent levels of hazard severity. These symbols are used throughout this manual and
are followed by information about a specic hazard, the consequences of the hazard, and
instructions on how to avoid the hazard. Failure to heed these symbols and follow the
instructions provided with them will result in property damage, injury, and/or death.
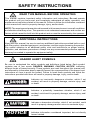
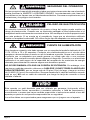
HAZARD ALERT SYMBOLS
Indicates an imminently dangerous situation, which if not
avoided, will result in property damage, serious injury, and/
or death.
Indicates a potentially hazardous situation, which if not
avoided, could result in property damage, serious injury, and/
or death.
Indicates a hazardous situation, which if not avoided, could
result in property damage and/or minor to moderate injury.
Indicates information considered important, but not directly
hazard related.
SAFETY INSTRUCTIONS
ADDITIONAL INSTRUCTIONS
Along with this manual, be sure to read any additional instructions provided both on and
with the product, attached equipment, accessories, and the engine powering the product.
Pay careful attention to all additional safety rules and instructions on proper startup,
operation, and shutdown procedures. Always use any recommended protective apparel
that may be needed to operate the equipment safely.
NOTICE

Page 6
Failure to read and follow the operator’s manual and all of its instructions before using
the product could result in DEATH or SERIOUS INJURY. Read this manual carefully and
become failure with your electric pressure washer. Know its applications, its limitations
and any hazards involved.
OPERATOR SAFETY
WARNING:WARNING:
This pressure washer shall only be used with a dedicated receptacle/plug rated 120vAC,
60 Hz at 15 -or- 20 amperes. Any other appliances on the circuit should be turned o
or unplugged when using the pressure washer. Never use the pressure washer with an
adapter that may lead to higher voltage or excessive current. Excessive current may
trip circuit breaker. Consult a qualied electrician if unsure of the desired power supply
receptacle’s ability to safely power this pressure washer.
POWER SUPPLY
CAUTION:CAUTION:
IT IS NOT RECOMMENDED TO USE AN EXTENSION CORD. If, however, an extension
cord is required, it must be an OUTDOOR RATED 3-PRONG CORD, that is no longer
than 50 feet (15M) and has a minimum of 14 AWG (2.5mm2) conductors. Always uncoil
the extension cord when in use. DO NOT use an extension cord that has its ground pin
damaged or missing.
NOTICE
This appliance is not intended to be used by persons (including children) with reduced
physical, sensory, or mental capabilities, or lack of experience and knowledge, unless
they have been given supervision or instruction concerning use of the appliance by a
person responsible for their safety.
Children should be supervised to ensure that they do not play with the appliance.
Improper connection of the equipment grounding conductor can result in the risk of
electrocution. Check with a qualied electrician if you are in doubt as to whether the
receptacle is properly grounded. DO NOT modify the plug provided with this product. If
it will not t the receptacle, have a proper receptacle installed by a qualied electrician.
DO NOT use any type of adapter with this product.
ELECTROCUTION HAZARD
DANGER:DANGER:

Page 7
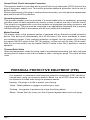
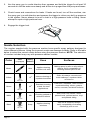
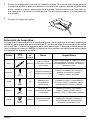
PERSONAL PROTECTIVE EQUIPMENT (PPE)
It is important to understand what personal protective equipment (PPE) should be
utilized when using your pressure washer. Below is a list of PPE items that should
be utilized at all times when using the pressure washer.
Hearing - Ear plugs or mus to protect your hearing.
Vision - Safety glasses or goggles to protect your eyes.
Clothing - Long pants to protected your legs from ying debris.
Shoes - Shoes that fully cover your feet to protect against debris and over spray.
This pressure washer is provided with a ground fault circuit interrupter (GFCI) built into the
plug of the power supply cord. This device provides additional protection from the risk of
electric shock.
Ground Fault Circuit Interrupter Protection
Should replacement of the plug or cord becomes necessary, use only identical replacement
parts that include GFCI protection.
Grounding Instructions
This pressure washer must be grounded. If it should malfunction or breakdown, grounding
provides a path of least resistance for electric current to reduce the risk of electric shock.
This product is equipped with a cord that contains an equipment grounding conductor and
a grounding plug. The plug must be connected to an appropriate receptacle that is properly
installed and grounded in accordance with all local codes and ordinances.
Thermal Relief Valve
When the temperature inside the pump rises to a predetermined setting, this valve will open
allowing the hot water to exit and cool water to enter, cooling the pump. The value will then
close.
Motor Overload
The electric motor in this pressure washer is equipped with an thermal overload protection
device. This device will automatically shut o the motor if the motor overheats or draws
too excessive current. If the overload protection is tripped, turn the power o by turning
the master ON/OFF switch to the OFF (0) position. Let the unit cool for thirty (30) minutes.
After the unit has cooled, turn the master ON/OFF switch to the ON (l) position to resume
operation.

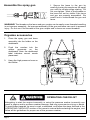
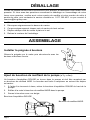
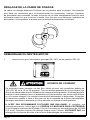
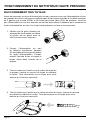
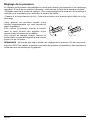
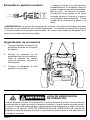
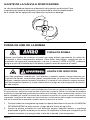
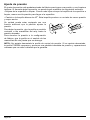
Install knob-style handle
Slide the handle onto the frame then secure
it with the included knobs and bolts.
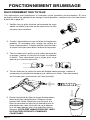
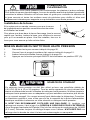
Adding the pump breather cap (if applicable)
A RED shipping plug is in the pump that must be replaced with a BLACK breather cap.
The plug is easy to replace with the following steps:
1. Using a bladed screw driver, remove the RED shipping plug from the top of the pump.
2. Hand thread the BLACK breather cap into the pump.
3. Snug the cap with your ngers.
RED shipping plug
BLACK breather cap
Page 8
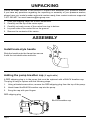
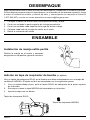
UNPACKING
ASSEMBLY
Follow the steps outlined in this section to unpack and assemble your pressure washer.
If you have any questions regarding the unpacking or assembly of your pressure washer,
please have your model number and serial number ready, then contact customer support at
1-877-362-4271 or email [email protected].
1. Place the shipping carton on a solid, at surface.
2. Carefully cut the top of the carton open.
3. Carefully cut each corner of the carton from top to bottom.
4. Lay each side of the carton at on the ground.
5. Remove the contents of the carton.

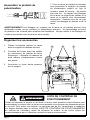
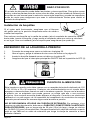
WARNING!
The threads on the lance and gun coupler can be easily cross threaded resulting
in an improper assembly. An improper assembly of the gun and lance can result in personal
injury. Do not use if the threads on the gun coupler and or lance are cross
threaded.
1. Secure the lance to the gun by
carefully turning the coupler on the spray
gun until the coupler stops rotating. Do
not over tighten. Most of the threads on
the lance will not be visible if the lance
and gun are properly assembled. Be
careful not to cross-thread the gun and
lance.
Assemble the spray gun
Page 9
Organize accessories
1. Place the spray gun and lance
assembly into the holder on the
dashboard.
2. Push the nozzles into the
rubber grommets on the
dashboard. Note: the dashboard
label indicates correct nozzle
placement.
3. Hang the high-pressure hose on
the holder.
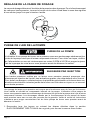
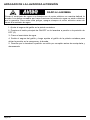
WARNING:WARNING:
Attempting to start the engine incorrectly or using the pressure washer incorrectly can
result in engine and/or pressure washer damage, and may cause serious injury or death.
To avoid these hazards, be sure to read, understand, and follow the steps outlined in the
OPERATING CHECKLIST section of the owner’s manual before starting the engine, and
follow all the guidelines for proper use of the pressure washer.
OPERATING CHECKLIST
123

Page 10
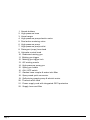
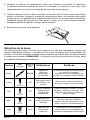
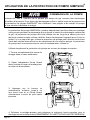
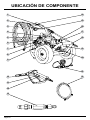
COMPONENT LOCATION
9
13
21
22
18
19
14
15
16
17
1
2
3
4
5
6
7
8
12
11
10
20

10. Dedicated misting gun
9. Unloader control knob
8. Detergent (soap) hose barb
7. High-pressure pump outlet
6. High-pressure pump
5. Dual action metering valve
4. High-pressure pump electric motor
3. Hose hanger
2. High-pressure hose
1. Nozzle holders
12. Misting gun trigger lock
11. Misting gun trigger
22. Supply hose and lter
21. Power supply cord with integrated GFCI protection
20. Thermal relief valve
19. Self-priming supply pump & electric motor
18. Spray wand quick connector
17. Garden hose coupler & water inlet lter
16. ON / OFF switch
15. Spray gun holder
14. High-pressure spray gun
13. QC misting nozzle
Page 11

Page 12
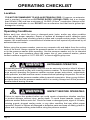
OPERATING CHECKLIST
Location
Operating Conditions
IT IS NOT RECOMMENDED TO USE AN EXTENSION CORD. If, however, an extension
cord is required, it must be an OUTDOOR RATED 3-PRONG CORD, that is no longer
than 50 feet (15M) and has a minimum of 14 AWG (2.5mm2) conductors. Always uncoil
the extension cord when in use. DO NOT use an extension cord that has its ground pin
damaged or missing.
Before each use, check for loose or damaged parts, leaks, and/or any other condition
that may aect proper operation. Repair or replace all damaged and/or defective parts
immediately. Always keep all safety guards in place and in proper working order. For safety
reasons, the manufacturer recommends all maintenance and repairs be performed by an
authorized service center.
Before using the pressure washer, remove any excessive dirt and debris from the cooling
vents of the motor. Always operate the pressure washer on a level surface and never move
or tip the pressure washer while operating. Use the pressure washer only for its intended
purpose. If you have questions about the proper use of your pressure washer, please
contact customer support at 1-877-362-4271 or [email protected].
WARNING:WARNING:
Untrained persons, young children, and pets can be seriously injured or killed if allowed
to incorrectly operate or play with running pressure washer. To avoid these hazards, be
sure anyone operating the pressure washer receives proper instructions, understands
safe operation, and has read the owner’s manual before operating this product. Do not let
children operate the pressure washer without parental supervision. Keep young children
and pets away from the pressure washer while it is running. Always turn o the pressure
washer before leaving the area.
UNTRAINED OPERATION
WARNING:WARNING:
Failure to inspect this product before use could create a hazardous situation resulting
in product damage, serious injury, and/or death. To avoid these hazards, inspect the
pressure washer before each use. Check for loose or damaged parts, signs of oil leaks,
missing guards, plugged cooling vents, or any other condition that may aect proper
operation. Repair or replace all damaged or defective parts and keep all safety guards in
place and in proper working order before using the pressure washer.
INSPECT BEFORE OPERATING

Page 13
WARNING:WARNING:
The high pressures created by a pressure washer can cause uid injection injuries,
severe lacerations, amputations, and / or death. To avoid these hazards, always aim
the spray gun and lance in a safe direction when using the pressure washer and never
attempt to touch a leak in a high-pressure hose or tting.
INJECTION INJURY
WARNING:WARNING:
This product has many parts that move at high speeds. Moving parts can cause crushing
injuries, broken bones, severe lacerations, and/or traumatic amputations. To prevent
injury, never place ngers, hands, feet, or other body parts near running engine. Never
operate product with covers, shrouds, or other guards removed. Do not wear loose-tting
clothing, dangling drawstrings, or any other hanging items that could become entangled
in moving parts while operating. Tie up long hair and remove jewelry before operating.
MOVING PARTS

Page 14
These instructions are specically for performing a misting operation. If you would like to use
the high-pressure washing operations, please follow the instructions starting on page 19.
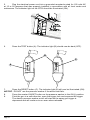
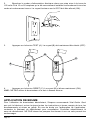
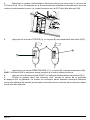
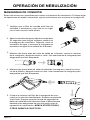
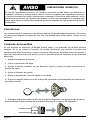
CONNECTING HOSES
Verify the inlet screen is free of
any dirt or debris and is in place
with the convex side facing out.
1.
Connect the included supply
hose to the garden hose coupler.
2.
While pulling back on the pump outlet collar, insert the high-pressure hose
connector then release the collar. Gently tug on the high-pressure hose to make
sure it is locked.
3.
While pulling back on the high-pressure hose outlet collar, insert the misting gun
connector then release the collar. Gently tug on the hose to make sure it is locked.
4.
Place the lter end of the supply hose into the
disinfecting solution. Simpson recommends Vital Oxide.
Always refer to the manufacturers Material Data Safety
Sheet for your desired disinfectant to make sure it is
safe for misting operation. NEVER USE BLEACH OR
OTHER CAUSTIC CHEMICALS.
5.
MISTING OPERATION

This pressure washer shall only be used with a dedicated receptacle/plug rated 120vAC,
60 Hz at 15 -or- 20 amperes. Any other appliances on the circuit should be turned o
or unplugged when using the pressure washer. Never use the pressure washer with an
adapter that may lead to higher voltage or excessive current. Excessive current may
trip circuit breaker. Consult a qualied electrician if unsure of the desired power supply
receptacle’s ability to safely power this pressure washer.
POWER SUPPLY
CAUTION:CAUTION:
IT IS NOT RECOMMENDED TO USE AN EXTENSION CORD. If, however, an extension
cord is required, it must be an OUTDOOR RATED 3-PRONG CORD, that is no longer
than 50 feet (15M) and has a minimum of 14 AWG (2.5mm2) conductors. Always uncoil
the extension cord when in use. DO NOT use an extension cord that has its ground pin
damaged or missing.
Page 15
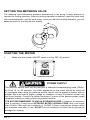
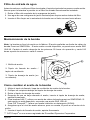
The metering valve determines pressure development in the pump. A lower pressure is
required for misting operation. When the misting operation is desired, rotate the valve knob
fully counterclockwise until the knob stops. Once you start the misting operation, you will
adjust the knob for the desired mist density.
SETTING THE METERING VALVE
1. Make sure the master ON/OFF switch is in the OFF (0) position.
STARTING THE MISTER

Page 16
A
C
RESET
TEST
RESET
TEST
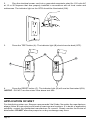
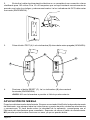
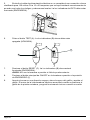
3. Press the TEST button (A). The indicator light (B) should now be dark (OFF).
4. Press the RESET button (C). The indicator light (B) will now be illuminated (ON).
B
NOTICE - DO NOT use the mister if the above test fails.
2. Plug the electrical power cord into a grounded receptacle rated for 120 volts AC
at 15 or 20 amperes that was properly installed in accordance with all local codes and
ordinances. The indicator light on the GFCI should be illuminated (ON).
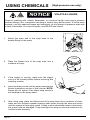
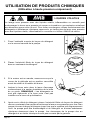
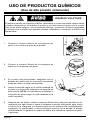
APPLICATION OF MIST
For disinfecting mister use, Simpson recommends Vital Oxide. No matter the manufacturer,
always follow all instructions and heed all warnings and cautions. If in doubt of application
suitability, contact the disinfectant manufacturer for consult. Closely monitor the bucket of
disinfectant. DO NOT allow the pumps to run dry as damage may occur.

Page 17
2. Press the master ON/OFF button on the mister to the ON (l) position.
3. Point the misting gun at the surface to be disinfected,
open the trigger lock and squeeze the trigger. Adjust the
metering valve knob to create the desired density of mist.
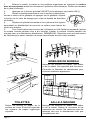
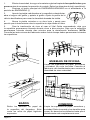
1. Remove dirt, grime or organic matter by cleaning the hard, non-porous
surface before beginning the misting operation. Remove food from the surface(s).
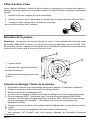
WASHROOMS
Remove paper goods from the surface
of the sink. Avoid misting exposed
toilet paper roll(s).
OFFICE FURNITURE
Clean the surfaces of paper, debris and dirt.
Do not spray fabrics. Consult the disinfectant
manufacturer for other material suitability.
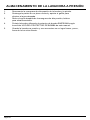
LUNCHROOM
Clean the surfaces of paper, debris and dirt.
Remove food and eating utensils. Do not
return food until disinfectant is completely dry.
4. Move the misting gun at a slow, even pace allowing
the disinfectant to coat the surface without leaving
areas untreated.
5. For virus inactivations when using the recommend Vital Oxide, allow surface
to remain wet for ve to ten minutes. Allow surface to remain wet for ten minutes
for bacterial disinfection. NOTE: Refer to the manufacturers instructions as to how
long the surfaces need to remain wet.

Page 18
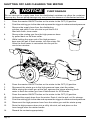
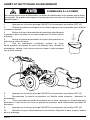
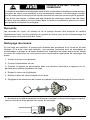
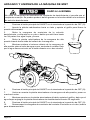
SHUTTING OFF AND CLEANING THE MISTER
NOTICE
Do not remove the supply hose from the disinfectant container nor allow the container
to pump dry. Severe pump damage may occur from the absence of disinfectant solution.
PUMP DAMAGE
1. Press the master ON/OFF button on the mister to the OFF (O) position.
2. Point the misting gun to the side and squeeze the trigger to release stored pressure.
3. Remove the supply hose from the disinfecting
solution and place it into a bucket or pail that is 3/4
lled with fresh, clean water.
4. Remove the misting gun from the high-pressure hose
by pulled back on the hose collar.
5. While holding the open end of the high-pressure
hose over the pail of fresh waster, turn the mister ON.
Allow the fresh water to recirculate into the pail for
one to two minutes.
6. Press the master ON/OFF button on the mister to the OFF (O) position.
7. Reconnect the mister gun to the high-pressure hose; start the mister.
8. While aiming the mister gun at the pail, squeeze the trigger allowing fresh
water to ush the mister gun free of disinfectant for 30 seconds.
10. Unthread the supply hose from the mister. Drain it into the pail; coil for storage.
12. Disconnect the high-pressure hose from the mister gun and the mister pump.
9. Press the master ON/OFF button on the mister to the OFF (O) position.
13. Drain the high-pressure hose into a utility tub sink; coil and place on the
hose hanger near the mister handle.
11. Point the misting gun to the side and squeeze the trigger to release stored pressure.
14. Discard the contents appropriately
La page est en cours de chargement...
La page est en cours de chargement...
La page est en cours de chargement...
La page est en cours de chargement...
La page est en cours de chargement...
La page est en cours de chargement...
La page est en cours de chargement...
La page est en cours de chargement...
La page est en cours de chargement...
La page est en cours de chargement...
La page est en cours de chargement...
La page est en cours de chargement...
La page est en cours de chargement...
La page est en cours de chargement...
La page est en cours de chargement...
La page est en cours de chargement...
La page est en cours de chargement...
La page est en cours de chargement...
La page est en cours de chargement...
La page est en cours de chargement...
La page est en cours de chargement...
La page est en cours de chargement...
La page est en cours de chargement...
La page est en cours de chargement...
La page est en cours de chargement...
La page est en cours de chargement...
La page est en cours de chargement...
La page est en cours de chargement...
La page est en cours de chargement...
La page est en cours de chargement...
La page est en cours de chargement...
La page est en cours de chargement...
La page est en cours de chargement...
La page est en cours de chargement...
La page est en cours de chargement...
La page est en cours de chargement...
La page est en cours de chargement...
La page est en cours de chargement...
La page est en cours de chargement...
La page est en cours de chargement...
La page est en cours de chargement...
La page est en cours de chargement...
La page est en cours de chargement...
La page est en cours de chargement...
La page est en cours de chargement...
La page est en cours de chargement...
La page est en cours de chargement...
La page est en cours de chargement...
La page est en cours de chargement...
La page est en cours de chargement...
La page est en cours de chargement...
La page est en cours de chargement...
La page est en cours de chargement...
La page est en cours de chargement...
La page est en cours de chargement...
La page est en cours de chargement...
La page est en cours de chargement...
La page est en cours de chargement...
La page est en cours de chargement...
La page est en cours de chargement...
La page est en cours de chargement...
La page est en cours de chargement...
La page est en cours de chargement...
La page est en cours de chargement...
La page est en cours de chargement...
La page est en cours de chargement...
La page est en cours de chargement...
La page est en cours de chargement...
La page est en cours de chargement...
La page est en cours de chargement...
La page est en cours de chargement...
La page est en cours de chargement...
La page est en cours de chargement...
La page est en cours de chargement...
La page est en cours de chargement...
La page est en cours de chargement...
La page est en cours de chargement...
La page est en cours de chargement...
La page est en cours de chargement...
La page est en cours de chargement...
La page est en cours de chargement...
La page est en cours de chargement...
La page est en cours de chargement...
La page est en cours de chargement...
La page est en cours de chargement...
La page est en cours de chargement...
La page est en cours de chargement...
La page est en cours de chargement...
La page est en cours de chargement...
La page est en cours de chargement...
La page est en cours de chargement...
La page est en cours de chargement...
La page est en cours de chargement...
La page est en cours de chargement...
La page est en cours de chargement...
La page est en cours de chargement...
La page est en cours de chargement...
La page est en cours de chargement...
La page est en cours de chargement...
La page est en cours de chargement...
-
 1
1
-
 2
2
-
 3
3
-
 4
4
-
 5
5
-
 6
6
-
 7
7
-
 8
8
-
 9
9
-
 10
10
-
 11
11
-
 12
12
-
 13
13
-
 14
14
-
 15
15
-
 16
16
-
 17
17
-
 18
18
-
 19
19
-
 20
20
-
 21
21
-
 22
22
-
 23
23
-
 24
24
-
 25
25
-
 26
26
-
 27
27
-
 28
28
-
 29
29
-
 30
30
-
 31
31
-
 32
32
-
 33
33
-
 34
34
-
 35
35
-
 36
36
-
 37
37
-
 38
38
-
 39
39
-
 40
40
-
 41
41
-
 42
42
-
 43
43
-
 44
44
-
 45
45
-
 46
46
-
 47
47
-
 48
48
-
 49
49
-
 50
50
-
 51
51
-
 52
52
-
 53
53
-
 54
54
-
 55
55
-
 56
56
-
 57
57
-
 58
58
-
 59
59
-
 60
60
-
 61
61
-
 62
62
-
 63
63
-
 64
64
-
 65
65
-
 66
66
-
 67
67
-
 68
68
-
 69
69
-
 70
70
-
 71
71
-
 72
72
-
 73
73
-
 74
74
-
 75
75
-
 76
76
-
 77
77
-
 78
78
-
 79
79
-
 80
80
-
 81
81
-
 82
82
-
 83
83
-
 84
84
-
 85
85
-
 86
86
-
 87
87
-
 88
88
-
 89
89
-
 90
90
-
 91
91
-
 92
92
-
 93
93
-
 94
94
-
 95
95
-
 96
96
-
 97
97
-
 98
98
-
 99
99
-
 100
100
-
 101
101
-
 102
102
-
 103
103
-
 104
104
-
 105
105
-
 106
106
-
 107
107
-
 108
108
-
 109
109
-
 110
110
-
 111
111
-
 112
112
-
 113
113
-
 114
114
-
 115
115
-
 116
116
-
 117
117
-
 118
118
-
 119
119
-
 120
120


Simpson SM1200 Mode d'emploi
- Catégorie
- Nettoyeurs haute pression
- Taper
- Mode d'emploi
dans d''autres langues
- English: Simpson SM1200 User guide
- español: Simpson SM1200 Guía del usuario
Documents connexes
Autres documents
-
DeWalt DXPW1500E Mode d'emploi
-
EGO FN1800/FN1800-FC 56 Volt Lithium-Ion Cordless Misting Fan Manuel utilisateur
-
-
-
-
-
Agri-Fab 45-02933 Manuel utilisateur
-
-
 Mi-T-M HDC Series Le manuel du propriétaire
-
