GE GTS18FGLBB Mode d'emploi
- Catégorie
- Congélateurs
- Taper
- Mode d'emploi
Ce manuel convient également à

SAFETY INFORMATION .........3
USING THE REFRIGERATOR
Temperature Control ...................5
Refrigerator Shelves ...................5
Drawers ..............................6
Freezer Shelf ..........................6
CARE AND CLEANING ...........7
INSTALLATION INSTRUCTIONS
Preparing to Install the Refrigerator ......9
Reversing the Door Swing .............10
TROUBLESHOOTING
Normal Operating Sounds .............13
Troubleshooting Tips ..................14
WARRANTY .......................16
ACCESSORY .......................17
CONSUMER SUPPORT ..........18
ENGLISH/FRANÇAIS/
ESPAÑOL
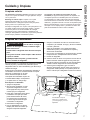
Write the model and serial
numbers here:
Model # _________________
Serial # _________________
Find these numbers on a label
on the left side, near the middle
of the refrigerator compartment.
49-60780 08-17 GEA
GTS18, GTS21 Models
OWNER’S MANUAL &
INSTALLATION
INSTRUCTIONS
REFRIGERATORS
Top-Freezer
GE is a trademark of the General Electric Company. Manufactured under trademark license.

2 49-60780
THANK YOU FOR MAKING GE APPLIANCES A PART OF YOUR HOME.
Whether you grew up with GE Appliances, or this is your first, we’re happy to have you in the family.
We take pride in the craftsmanship, innovation and design that goes into every GE Appliances
product, and we think you will too. Among other things, registration of your appliance ensures that we
can deliver important product information and warranty details when you need them.
Register your GE appliance now online. Helpful websites and phone numbers are available in the
Consumer Support section of this Owner’s Manual. You may also mail in the pre-printed registration
card included in the packing material.

49-60780 3
STATE OF CALIFORNIA PROPOSITION 65 WARNINGS
WARNING
This product contains one or more chemicals known to the State of California to cause
cancer and birth defects or other reproductive harm.
CAUTION
To reduce the risk of injury when using your refrigerator, follow these basic safety
precautions.
■ Donotcleanglassshelvesorcoverswithwarm
water when they are cold. Glass shelves and
covers may break if exposed to sudden temperature
changes or impact, such as bumping or dropping.
Tempered glass is designed to shatter into many
small pieces if it breaks.
■ Keepfingersoutofthe“pinchpoint”areas;
clearances between the doors and between the
doors and cabinet are necessarily small. Be careful
closing doors when children are in the area.
■ Donottouchthecoldsurfacesinthefreezer
compartment when hands are damp or wet, skin
may stick to these extremely cold surfaces.
■ Donotrefreezefrozenfoodswhichhavethawed
completely.
■ Inrefrigeratorswithautomaticicemakers,avoid
contact with the moving parts of the ejector
mechanism, or with the heating element that
releasesthecubes.Donotplacefingersorhands
on the automatic ice making mechanism while the
refrigerator is plugged in.
SAFETY INFORMATION
READ AND SAVE THESE INSTRUCTIONS
WARNING
To reduce the risk of fire, explosion, electric shock, or injury when using your
refrigerator, follow these basic safety precautions:
■ Thisrefrigeratormustbeproperlyinstalled
andlocatedinaccordancewiththeInstallation
Instructionsbeforeitisused.
■ Unplugtherefrigeratorbeforemakingrepairs,
replacing a light bulb, or cleaning.
NOTE: Power to the refrigerator cannot be
disconnected by any setting on the control panel.
NOTE: Repairs must be performed by a qualified
Service Professional.
■ Replaceallpartsandpanelsbeforeoperating.
■ Donotuseanextensioncord.
■ Donotstoreorusegasolineorotherflammable
vapors and liquids in the vicinity of this or any other
appliance.
■ Donotstoreexplosivesubstancessuchasaerosol
cans with a flammable propellant in this appliance.
■ Topreventsuffocationandentrapmenthazards
tochildren,removethefreshfoodandfreezer
doors from any refrigerator before disposing of it or
discontinuing its use.
■ Toavoidseriousinjuryordeath,childrenshouldnot
stand on, or play in or with the appliance.
■ Childrenandpersonswithreducedphysical,sensory
or mental capabilities or lack of experience and
knowledge can use this appliance only if they are
supervised or have been given instructions on safe
useandunderstandthehazardsinvolved.
■ Thisapplianceisintendedtobeusedinhousehold
and similar applications such as: staff kitchen areas
inshops,officesandotherworkingenvironments;
farmhouses;byclientsinhotels,motels,bed
&breakfastandotherresidentialenvironments;
catering and similar non-retail applications.
IMPORTANT SAFETY INFORMATION
READ ALL INSTRUCTIONS BEFORE USING THE APPLIANCE
INSTALLATION
WARNING
EXPLOSION HAZARD
Keepflammablematerialsandvapors,suchasgasoline,awayfromrefrigerator.Failuretodosocanresultinfire,
explosion, or death.

4 49-60780
PROPER DISPOSAL OF YOUR OLD REFRIGERATOR
Do not, under any circumstances, cut or remove the third (ground) prong from the power cord. For
personal safety, this appliance must be properly grounded.
The power cord of this appliance is equipped with a
3-prong (grounding) plug which mates with a standard
3-prong(grounding)walloutlettominimizethe
possibilityofelectricshockhazardfromthisappliance.
Have the wall outlet and circuit checked by a qualified
electrician to make sure the outlet is properly
grounded.
Where a standard 2-prong wall outlet is encountered, it
is your personal responsibility and obligation to have it
replaced with a properly grounded 3-prong wall outlet.
Donotuseanadapter.
The refrigerator should always be plugged into its own
individual electrical outlet which has a voltage rating
that matches the rating plate.
A115VoltAC,60Hz,15-or20-ampfused,grounded
electrical supply is required. This provides the best
performance and also prevents overloading house
wiringcircuitswhichcouldcauseafirehazardfrom
overheated wires.
Never unplug your refrigerator by pulling on the power
cord. Always grip plug firmly and pull straight out from
the outlet.
Immediatelydiscontinueuseofadamagedsupply
cord.Ifthesupplycordisdamaged,itmustbe
replaced by a qualified service professional with an
authorizedservicepartfromthemanufacturer.
When moving the refrigerator away from the wall, be
careful not to roll over or damage the power cord.
CONNECTING ELECTRICITY
WARNING
ELECTRICAL SHOCK HAZARD
Plug into a grounded 3-prong outlet
Donotremovethegroundprong
Donotuseanadapter
Donotuseanextensioncord.
Failuretofollowtheseinstructionscanresultindeath,fire,orelectricalshock.
SAFETY INFORMATION
IMPORTANT SAFETY INFORMATION
READ ALL INSTRUCTIONS BEFORE USING THE APPLIANCE
READ AND SAVE THESE INSTRUCTIONS
WARNING
SUFFOCATION AND ENTRAPMENT HAZARD
Failuretofollowthesedisposalinstructionscanresultindeathorseriousinjury
IMPORTANT: Child entrapment and suffocation
are not problems of the past. Junked or abandoned
refrigerators are still dangerous even if they will sit
for“justafewdays.”Ifyouaregettingridofyourold
refrigerator, please follow the instructions below to help
prevent accidents.
Before You Throw Away Your Old Appliance
■Takeoffthefreshfoodandfreezerdoors.
■ Leave the shelves in place so that children may not
easily climb inside.
Refrigerant and Foam Disposal:
DisposeofapplianceinaccordancewithFederalandLocalRegulations.Contactyourlocalauthoritiesforthe
environmentally safe disposal of your appliance.

49-60780 5
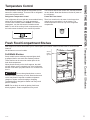
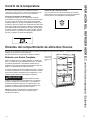
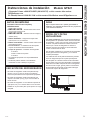
The temperature control adjusts the refrigerator from its
warmest to coldest settings. There are both a refrigerator
controlandafreezercontrol.
Refrigerator Temperature Control
Your refrigerator will come with the recommended factory
settinginthemidposition.Forcoldertemperature,
turn the knob clockwise toward Coldest.Forwarmer
temperature, turn the dial counter-clockwise toward
Cold. To turn off the cooling in both compartments, turn
the knob counter-clockwise to the vertical off position.
You will hear and feel the control click, and the knob will
not turn farther. Note that this does not shut off power to
the refrigerator.
Freezer Air Flow Control
Thereisacontrolontheairtowerinthefreezerthat
controlshowmuchcoldairisinthefreezer.The
actual temperature control is only in the refrigerator
compartment.
Temperature Control
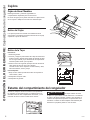
Fresh Food Compartment Shelves
USING THE REFRIGERATOR: Temperature Control / Shelves
Shelf supports at various levels allow you to custom-space your shelves. Shelves shown below in recommended
locations.
Not all features are on all models.
Full-Width Shelves
Some models have a stationary tempered glass shelf,
a spillproof shelf or two steel wire stationary shelves.
These shelves can be moved to another place in the
fresh food compartment.
When placed correctly on the shelf supports, the shelf
will stop before coming completely out of the refrigerator
and will not tilt when you place food on it or remove food
from it.
CAUTION
Donotcleanglassshelvesorcovers
with warm water when they are cold. Glass shelves and
covers may break if exposed to sudden temperature
changes or impact such as bumping or dropping.
Tempered glass is designed to shatter into many small
pieces if it breaks.
NOTE:Donotblockairoutletbyplacingfooditems
directly against it. Erratic temperatures may result.
Cold
Coldest
Airow
behind
light bulb

6 49-60780
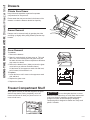
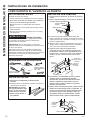
Drawers
USING THE REFRIGERATOR: Drawers/FreezerShelf
Climate Zone Drawer
Keepfruitsandvegetablesorganizedinseparate
compartments for easy access.
Excess water that may accumulate in the bottom of the
drawers or under the drawers should be wiped dry.
Drawer Removal
Drawerscanberemovedeasilybygraspingthesides
and lifting up slightly while pulling drawers past the stop
location.
Cover Removal
To remove:
1. Remove the drawers.
2. Reach in, push the back of glass cover up. Tilt it and
take it out. Avoid cleaning the cold glass cover with
hot water because the extreme temperature difference
may cause it to break.
3. Remove the drawer frame. (Always remove the glass
cover before you take out the drawer frame.)
Lift the frame off the supports at each side and back,
pull it forward, tilt it and take it out.
To replace:
1. Lower the frame until it rests on the supports at each
side and back.
2. Replace the glass cover
3. Replace the drawers.
Freezer Compartment Shelf
When placed correctly on the shelf supports, the glass
shelf will stop before coming completely out of the
freezerandwillnottiltwhenyouplacefoodonitor
remove food from it.
CAUTION
Donotcleanglassshelvesorcovers
with warm water when they are cold. Glass shelves and
covers may break if exposed to sudden temperature
changes or impact such as bumping or dropping.
Tempered glass is designed to shatter into many small
pieces if it breaks.

49-60780 7
Care and Cleaning
CARE AND CLEANING
Cleaning the Outside
The door handles and trim (on some models). Clean
withaclothdampenedwithsoapywater.Drywithasoft
cloth.
Keep the outside clean. Wipe with a clean cloth lightly
dampened with kitchen appliance wax or mild liquid dish
detergent.Dryandpolishwithaclean,softcloth.
Donotwipetherefrigeratorwithasoileddishclothor
wet towel. These may leave a residue that can erode
thepaint.Donotusescouringpads,powderedcleaners,
bleach or cleaners containing either bleach or ammonia
because these products can scratch and weaken the
paint finish.
The stainless steel doors and door handles (on some
models) can be cleaned with a commercially available
stainless steel cleaner. Cleaners with oxalic acid such as
BarKeepersFriendSoftCleanser™willremovesurface
rust,tarnishandsmallblemishes.Useonlyaliquid
cleanser free of grit and rub in the direction of the brush
lineswithadampsoftsponge.Donotuseappliance
wax or polish on the stainless steel.
Cleaning the Condenser
WARNING
To reduce the risk of death or
electric shock, you must follow these
instructions:
■ Unplug the refrigerator before removing any
panels.
■ Do not contact or damage any wiring while the
panel is removed.
■ Replace all parts and panels before plugging
the refrigerator back in.
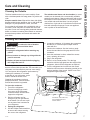
Periodically, the condenser of the refrigerator will
become covered with dust and dirt. This can make your
refrigerator cool less effectively and use more energy.
You can improve the refrigerators' performance by
cleaningthecondenser.Itislocated
at the back of your refrigerator, at the
bottom, behind the access cover.
Cleaning the condenser requires a
philliips screwdriver, vacuum cleaner
and soft brush with a long handle.
To clean the condenser:
1. Turn off the refrigerator.
2. Turn the leveling legs at each
front corner of the refrigerator
counterclockwise until the rollers
support the refrigerator.
3. Roll the refrigerator out far
enough so you can get behind it
at the bottom. Be sure not to pull
out any water lines connected to
your refrigerator.
4. Unplug the refrigerator.
5.UsethePhillipsheadscrewdriver
to remove the screws securing
the cover to the refrigerator.
6.Locatethecondenser.Itisbetweenthecompressor
andthefan.Itisablacksquareshapemadeof
tubes with fins.
7.Vacuumthecondenser.Usethebrushtogently
loosen dust and dirt from the gaps and fins of the
condenser.
8. Once the condenser is clean, reinstall the access
cover, replacing all screws.
9. Plug in the refrigerator.
10. Return it to its normal position. Turn the legs
clockwise until the legs again bear the weight of the
refrigerator. Also level the refrigerator as required
11. Turn the refrigerator back on and turn the control
clockwise until it returns to mid setting (vertical) or the
previous position of the control. Check to see if the
refrigerator begins operating.
Compressor
Access Cover
Fan
Condenser - clean with a soft,
long handled brush and a
vacuum cleaner

8 49-60780
Care And Cleaning
CARE AND CLEANING
Preparing for Vacation
Forlongvacationsorabsences,removefoodand
unplug the refrigerator. Move the temperature control
dial to the OFF position, and clean the interior with a
baking soda solution of one tablespoon (15 ml) of baking
soda to one quart (1 liter) of water. Leave the doors
open.
Ifanicemeakerhasbeeninstalleditmustbeturnedoff;
movetheswitchtotheOFFpositiononthepowerswitch
model. Shut off the water supply to the refrigerator.
Ifthetemperaturecandropbelowfreezing,havea
qualified servicer drain the water supply system (on
some models) to prevent serious property damage due
to flooding.
Preparing to Move
Secure all loose items such as grille, shelves and
drawers by taping them securely in place to prevent
damage.
To prevent the doors from opening while moving, secure
them to the case with tape. Be sure the refrigerator stays
in an upright position during moving.
Light Bulb Replacement
WARNING
Before replacing a burned-out light
bulb, the refrigerator should be unplugged in order to
avoid contact with a live wire filament. (A burned-out
light bulb may break when being replaced.) Turning the
control to the OFF position does not remove power to
the light circuit.
Dependingonyourmodel,thelightsintherefrigerator
andfreezercompartmentsmayuseeither5watt
LEDbulbswithamediumbaseor40wattappliance
incandescentbulbswithamediumbase.Followthe
instructions specific to your model.
IMPORTANT:
●UseonlyULlistedLEDreplacementbulbsthatare
recommended for wet/damp environments. The
refrigeratorandfreezerareconsideredtobewet/damp
environments.IfusingabrandofLEDbulbotherthan
therecommendedLEDbulb,beforeinstallation,read
andfollowallinstructionsontheLEDpackaging.LED
bulbs should be 5 Watts with a medium base.
●IfanincandescentbulbisusedtoreplaceanLED
bulb, use only incandescent bulbs for household
appliances with a maximum wattage of 40 with a
medium base.
Moving the Refrigerator
Be careful when moving the refrigerator away from
the wall. All types of floor coverings can be damaged,
particularly cushioned coverings and those with
embossed surfaces.
Turn the leveling legs at each front corner of the
refrigerator counterclockwise until the rollers support
the refrigerator. Pull the refrigerator straight out and
return it to position by pushing it straight in. Moving the
refrigerator in a side direction may result in damage to
the floor covering or refrigerator.
When pushing the refrigerator back, make sure you don’t
roll over the power cord or ice maker supply line (on
some models).
After rolling the refrigerator back into place, turn the legs
clockwise until the legs again bear the weight of the
refrigerator.
Cleaning the Inside
To help prevent odors, leave an open box of baking
sodainthefreshfoodandfreezercompartments.
Unplug the refrigerator before cleaning.
Ifthisisnotpractical,wringexcessmoistureoutof
sponge or cloth when cleaning around switches, lights or
controls.
Usewarmwaterandbakingsodasolution—abouta
tablespoon (15 ml) of baking soda to a quart (1 liter) of
water.Thisbothcleansandneutralizesodors.Rinseand
wipe dry.
After cleaning the door gaskets, apply a thin layer of
petroleum jelly to the door gaskets at the hinge side.
This helps keep the gaskets from sticking and bending
out of shape.
CAUTION
Donotcleanglassshelvesorcovers
with warm water when they are cold. Glass shelves and
covers may break if exposed to sudden temperature
changes or impact such as bumping or dropping.
Tempered glass is designed to shatter into many small
pieces if it breaks.
Donotwashanyplasticrefrigeratorpartsinthe
dishwasher.

49-60780 9
Installation Instructions GTS21 Models
BEFORE YOU BEGIN
Read these instructions completely and
carefully.
• IMPORTANT – Save these instructions for
local inspector’s use.
• IMPORTANT – Observe all governing
codes and ordinances.
• Note to Installer – Be sure to leave these
instructions with the Consumer.
• Note to Consumer – Keepthese
instructions for future reference.
• Skill level–Installationofthisappliance
requires basic mechanical skills.
• Completion time–RefrigeratorInstallation
15 minutes
ReversingtheDoorSwing
15 minutes
• Proper installation is the responsibility of the
installer.
• Product failure due to improper installation is not
covered under the Warranty.
• Donotinstalltherefrigeratorwherethe
temperaturewillgobelow55°F(12.7°C)because
it will not run often enough to maintain proper
temperatures.
• Donotinstalltherefrigeratorwherethe
temperaturewillgoabove100°F(37°C)because
it will not perform properly.
• Donotinstalltherefrigeratorinalocationexposed
to water (rain, etc.) or direct sunlight.
•Installitonafloorstrongenoughtosupportitfully
loaded.
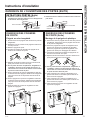
REFRIGERATOR LOCATION
Allow a 2" (50mm) back clearance for ease of
installation, proper air circulation and plumbing and
electrical connections.
CLEARANCES
Leveling legs near each front corner of the
refrigerator are adjustable. They firmly position the
refrigerator and prevent it from moving when the
doors are opened. Leveling legs should be set so
the front of the refrigerator is raised just enough that
the doors close easily when opened about halfway.
Turn the leveling legs clockwise to raise the
refrigerator, counterclockwise to lower it.
Rollers next to the leveling legs allow you to move
the refrigerator away from the wall for cleaning.
Turn the legs counterclockwise until the weight
of the refrigerator is transferred from them to the
rollers. After rolling the refrigerator back into place,
turn the legs clockwise until the legs again bear the
weight of the refrigerator.
ROLLERS AND LEVELING LEGS
If you have questions, call 1.800.GE.CARES or visit our Website at: GEAppliances.com.
In Canada, call 1.800.561.3344 or Visit our Website at: www.geappliances.ca
INSTALLATION INSTRUCTIONS

10 49-60780
Installation Instructions
INSTALLATION INSTRUCTIONS
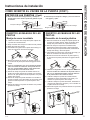
When reversing the door swing:
• Read the instructions all the way through before
starting.
• Tighten all hinge screws but avoid over-tightening
to prevent stripping.
• Handle parts carefully to avoid scratching paint.
• Set screws down by their related parts to avoid
losing them.
• Provide a non-scratching work surface for the
doors.
CAUTION
Lifting Hazard
TheFreshFoodandFreezerdoorsareheavy.Use
both hands to secure the doors before lifting.
IMPORTANT: Once you begin, do not move the
cabinet until door-swing reversal is completed.
These instructions are for changing the hinges from
therightsidetotheleftside—ifyoueverwantto
change the hinges back to the right side, follow these
same instructions and reverse all references to left
and right.
IMPORTANT NOTES
REVERSING THE DOOR SWING
Phillips screwdriver
TOOLS REQUIRED
Masking tape
5/16”&3/8"
open-end wrenches
or adjustable
wrench
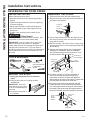
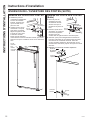
REMOVING THE DOORS
1. Tapethefreezerdoorshutwithmaskingtape.
2. Remove the hinge cover and screws that hold the
top hinge to the cabinet.
3. Lift the hinge straight up to free the hinge pin from
the socket in the top of the door and set it aside,
along with its screws.
4. Remove the tape. Lift the door off the center hinge
pin and set the door on a non-scratching surface with
the outside up.
5. Unscrewcenterhingepin.Besuretoretainplastic
washer(s) for reinstallation. Remove refrigerator
door from bottom hinge and set the door on a non-
scratching surface with the outside up.
6.UseeitherawrenchorT25Torxscrewdriverto
remove center hinge and plastic spacer(s) by
unscrewing center bolt, loosening side bolts and
sliding hinge to the center of the cabinet. Tighten bolts
back into place and replace the center bolt.
7. Remove the center bolt on the opposite side and
loosensidebolts.Flipthecenterhingeandspacer
over so the placement of the hinge pin will be toward
the outside. Slide center hinge and spacers behind
side bolts. Reinstall center bolt and tighten side bolts.
BEFORE YOU START
1. Unplug the refrigerator from its electrical
outlet.
2. Empty all door shelves, including the dairy
compartment.
IMPORTANT: Donotlet
either door drop to the floor.
To do so could damage the
door stop.
3. Remove the front grille if
it is installed.
Torx T25
(some models)
Pliers
Top Hinge
Top Hinge
Cover
Center Hinge
Pin and Washer
Center Bolt
Loosen
Side Bolts
Hinge and
Spacer
Center Bolt
Center
Hinge
Pin and
Washer
Hinge and
Spacer

49-60780 11
Installation Instructions
INSTALLATION INSTRUCTIONS
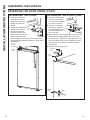
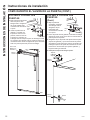
REVERSING THE DOOR SWING (CONT.)
REMOVING THE DOORS (Cont.)
8. Remove the bottom hinge bolts and relocate the
bottom hinge to the opposite side of the cabinet.
Tighten bolts.
9. Unscrewthehingepinandmovetotheotherhole
and tighten.
REVERSING THE DOOR HANDLES
Stainless Steel Handle
1. Remove handle screws from the top and bottom of
fresh food door.
2. Loosensetscrewonhandlewiththeprovided1/8”
wrench.
3. Remove door handle.
4. Change places between the handle fastener and
plug button on door front.
5. Move the plug buttons on top and front of the door
to fill the now vacant holes.
6. Onboththerefrigeratorandfreezerdoors,remove
the screws from the door stop on one side with a
Phillipsscrewdriver.Installthedoorstopontothe
other side of the door.
7. Attach handle to fresh food door with screws at
topofhandle.Use1/8”allenwrenchtotightenset
screw at bottom of handle.
8. Attachhandletofreezerdoorwithscrewsat
bottomofhandle.Usetheprovided1/8”allen
wrench to tighten set screw at top of handle.
9. Attachbadgeonfreezerdooroppositethehandle.
REVERSING THE DOOR HANDLES
Plastic Handle Assembly
1. Remove handle screws from the top of fresh food
door. Remove handle screws from the bottom of
freezerdoor.
2. Remove door handle on fresh food door by sliding
the handle up off of the fastener. Remove door
handleonfreezerdoorbyslidingthehandledown
off of the fastener.
3. Change places between the handle fastener and
plug button on door front.
4. Move the plug buttons on top and front of the door
to fill the now vacant holes.
5. Onboththerefrigeratorandfreezerdoors,remove
the screws from the door stop on one side with a
Phillipsscrewdriver.Installthedoorstopontothe
other side of the door.
6. Attach handle to fresh food door by sliding handle
down onto fastener and with screws at top of
handle.
7. Attachhandletofreezerdoorbyslidinghandleup
onto fastener and with screws at bottom of handle.
8. Attachbadgeonfreezerdooroppositethehandle.
Bottom Hinge
Hinge Pin
Bottom Hinge
Hinge Pin

12 49-60780
RE-HANGING THE DOORS (Cont.)
3. Lowerthefreezerdoor
onto the center hinge
pin. Be sure the washer
is in place on the pin.
4. Tilt the door towards
thecabinet.Installthe
top hinge fitting the pin
into the socket on the
top of the door.
5. Make sure the door is slightly above the top of the
cabinet and the gap between the doors is even
acrossthefront.Tightenthetophingescrews.Do
not over-tighten these screws. Tighten them until
they are just snug, and then turn them another
one-half turn.
6. Replace the top hinge cover.
Installation Instructions
INSTALLATION INSTRUCTIONS
REVERSING THE DOOR SWING (CONT.)
Top
Hinge
Top Hinge
Cover
Center
Hinge
Gap
RE-HANGING THE DOORS
1. Lower the fresh food
door onto the bottom
hinge pin. Be sure the
washer is in place on
the pin.
2. Tilt the door towards the
cabinet. As the door is
brought into position,
align the socket in the
door with the hole in the
center hinge. Place the
center hinge pin into the hole in the center hinge
and tighten. Make sure the washer is on the top of
the hinge pin.
Hinge
Pin with
Washer
Center
Hinge
Plastic
Washer
Hinge
Pin
Hinge
Pin
Plastic
Washer

49-60780 13
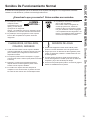
Normal Operating Sounds
TROUBLESHOOTING TIPS: Normal Operating Sounds
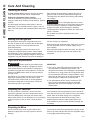
■ The new high
efficiency compressor
may run faster and
longer than your old
refrigerator and you may hear a high-pitched hum
or pulsating sound while it is operating.
■ You may hear a whooshing sound when the doors
close.Thisisduetopressureequalizingwithinthe
refrigerator.
Newer refrigerators sound different from older refrigerators. Modern refrigerators have more features and use newer
technology.
■ You may hear the fans spinning at high
speeds.
This happens when the refrigerator
is first plugged in, when the doors
are opened frequently or when a
large amount of food is added to the
refrigeratororfreezercompartments.
The fans are helping to maintain the
correct temperatures.
CLICKS,POPS,
CRACKSandCHIRPS
■ You may hear cracking or popping sounds when
the refrigerator is first plugged in. This happens as
the refrigerator cools to the correct temperature.
■ The compressor may cause a clicking or chirping
sound when attempting to restart (this could take
up to 5 minutes).
■ Expansion and contraction of cooling coils during
and after defrost can cause a cracking or popping
sound.
■ On models with an ice maker, after an ice making
cycle, you may hear the ice cubes dropping into the
ice bucket.
WATERSOUNDS
■ Theflowofrefrigerantthroughthefreezercoolingcoils
may make a gurgling noise like boiling water.
■ Water dropping on the defrost heater can cause a
sizzling,poppingorbuzzingsoundduringthedefrost
cycle.
■ A water dripping noise may occur during the defrost
cycle as ice melts from the evaporator and flows into
the drain pan.
■ Closing the door may cause a gurgling sound due to
pressureequalization.
Do you hear what I hear? These sounds are normal.
HUMMM...
WHOOSH...

14 49-60780
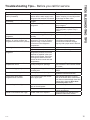
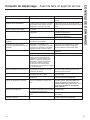
Troubleshooting Tips... Before you call for service
TROUBLESHOOTING TIPS
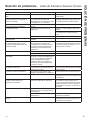
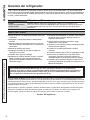
Savetimeandmoney!Reviewthechartsonthefollowingpagesfirstandyoumaynotneedtocallforservice.If
needed, service can be scheduled by visiting us online GEAppliances.com or calling 800.GECARES 800.432.2737.
InCanadavisitGEAppliances.caorcall800.561.3344.
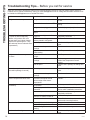
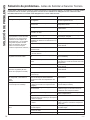
Problem Possible Causes What to Do
Refrigerator does not operate Refrigerator in defrost cycle. Wait about 30 minutes for defrost cycle
to end.
EitherorbothcontrolssettoOFF Set the controls to a lower temperature
setting.
Refrigerator is unplugged. Push the plug completely into the outlet.
The fuse is blown/circuit breaker is
tripped.
Replace fuse or reset the breaker.
Motor operates for long periods
or cycles on and off frequently.
(Modern refrigerators with more
storagespaceandalargerfreezer
require more operating time. They
start and stop often to maintain even
temperatures.)
Normal when refrigerator is first
plugged in.
Wait 24 hours for the refrigerator to
completely cool down.
Often occurs when large amounts of
food are placed in refrigerator.
This is normal.
Doorleftopen. Check to see if package is holding door
open.
Hot weather or frequent door
openings.
This is normal.
Temperature controls set at the
coldest setting.
See Temperature Control section.
Refrigeratororfreezercompartment
too warm
Temperature control not set cold
enough.
See Temperature Control section.
Warm weather or frequent door
openings.
Set the temperature control one step
colder. See Temperature Control
section.
Doorleftopen. Check to see if package is holding door
open.
Frostoricecrystalsonfrozenfood
(frost within package is normal)
Doorleftopen. Check to see if package is holding door
open.
Too frequent or too long door
openings.
This is normal.
Dividerbetweenrefrigeratorand
freezercompartmentsfeelswarm.
Automatic energy saver system
circulates warm liquid around
thefrontedgeofthefreezer
compartment.
This helps prevent condensation on the
outside.
Automatic ice maker does not work
(if installed).
Icemakerpowerswitchisinthe
OFFposition.
Set the power switch to ON position.
Water supply turned off or not
connected.
SeeInstallingthewaterlinesectionof
the ice maker installation instructions.
Freezercompartmenttoowarm. Wait 24 hours for the refrigerator to
completely cool down.
Piled up cubes in the storage bin
cause the ice maker to shut off.
Level cubes by hand.
Icecubesstuckinicemaker. Turnotheicemaker,removecubes,
and turn the ice maker back on.
Icecubeshavebadodor/taste Icestoragebinneedscleaning. Emptyandwasbin.Discardoldice.
Foodtransmittingodor/tastetoice Wrap foods well.
Interiorofrefrigeratorneeds
cleaning.
See Care and Cleaning section.
Slowicecubefreezing Doorleftopen. Check to see if package is holding door
open.

49-60780 15
Troubleshooting Tips... Before you call for service
Problem Possible Causes What to Do
Frequentbuzzingsoundfromtheice
maker (if installed).
IcemakerpowerswitchisintheON
position but the water supply to the
refrigerator has not been connected.
SetthepowerswitchtotheOFF
position.KeepingitintheONposition
will damage the water valve.
No ice cube production (if ice maker
is installed).
Supply line or shutoff valve is
clogged.
Call a plumber.
Refrigerator has odor. Foodstransmittingodorto
refrigerator.
Foodswithstrongodorsshouldbe
tightly wrapped.
Keepanopenboxofbakingsoda
intherefrigerator;replaceevery3
months.
Interiorneedscleaning. See Care and Cleaning section.
Moisture forms on outside of
refrigerator.
Not unusual during periods of high
humidity.
Wipe surface dry.
Moisture collects inside (in humid
weather, air carries moisture into
refrigerator when doors are opened)
Duetothehigherhumidityinthe
refrigerator, you may on occasion
experience fog or small amounts
of moisture in the refrigerator
compartment.
This is normal and may come and
goasdierentfoodloadsand
environmental conditions change.
Wipe dry with a paper towel if desired.
Interiorlightdoesnotwork No power at the outlet. Replace fuse or reset the breaker.
Light bulb is burned out. See Care and Cleaning section.
Hot air from the bottom of the
refrigerator
Normalairflowcoolingmotor.Inthe
refrigeration process, it is normal
that heat be expelled in the area
under the refrigerator. Some floor
coverings are sensitive and will
discolor at these normal and safe
temperatures.
This is normal.
Refrigerator never shuts off but the
temperatures are ok.
Adaptive defrost keeps compressor
running during door openings.
This is normal. The refrigerator will
cycleoafterthedoorremainsclosed
for 2 hours.
Doornotclosingproperly. Doorgasketonhingesidesticking
or folding over.
Applyparanwaxtothefaceofthe
gasket.
Doordoesnotclosebyitself Leveling legs need adjusting. See Rollers and Leveling Legs in the
Installationinstructionssection.
Freezerdooropenswhen
refrigerator door is closed.
This is normal if the door closes
after it pops open.
This indicates that there is a good
sealonthefreezerdoor.Ifthefreezer
door does not automatically close after
popping open, then see Door does
not close by itself, above.
Foodfreezingintherefrigerator. Foodtooclosetotheairventatthe
back of the refrigerator.
Move food away from the air vent.
Refrigerator control is set too cold. Move the refrigerator control to a
warmer temperature.
Handle is loose/handle has a gap. Handle needs to be adjusted. SeeReversingDoorHandlesinthe
InstallationInstructionssection.
TROUBLESHOOTING TIPS

16 49-60780
WARRANTY
Staple your receipt here. Proof of the original purchase
date is needed to obtain service under the warranty.
Refrigerator Warranty
For US Customers, allwarrantyserviceprovidedbyourFactoryServiceCenters,oranauthorizedCustomerCare
®
technician. To schedule service, on-line, 24 hours a day, visit us at GEAppliances.com, or call 800.GE.CARES
(800.432.2737). Please have serial number and model number available when calling for service.
In Canada, call 800.561.3344.
■ Service trips to your home to teach you how to
use the product.
■ Improper installation, delivery or maintenance.
■ Failure of the product if it is abused, misused, or
used for other than the intended purpose or used
commercially.
■ Loss of food due to spoilage.
■ Replacement of house fuses or resetting of circuit
breakers.
■ Damage caused after delivery.
■ Replacement of the water filter cartridge, if
included, due to water pressure that is outside
the specified operating range or due to excessive
sediment in the water supply.
■ Replacement of the light bulbs, if included, or
water filter cartridge, if included, other than as
noted above.
■ Damage to the product caused by accident, fire,
floods or acts of God.
■ Incidental or consequential damage caused by
possible defects with this appliance.
■ Product not accessible to provide required service.
■ Damage caused by a non-GE Brand water filter.
■ Damage to finish, such as surface rust, tarnish, or
small blemishes not reported within 48 hours of
delivery.
■ Products which are not defective, broken, or which
are working as described in the owner’s manual.
What is Not Covered:
For US Customers: This warranty is extended to the original purchaser and any succeeding owner for
productspurchasedforhomeusewithintheUSA.Iftheproductislocatedinanareawhereservicebya
GEAppliancesAuthorizedServicerisnotavailable,youmayberesponsibleforatripchargeoryoumay
berequiredtobringtheproducttoanAuthorizedGEAppliancesServicelocationforservice.InAlaska,
the warranty excludes the cost of shipping or service calls to your home.
Some states do not allow the exclusion or limitation of incidental or consequential damages. This warranty
gives you specific legal rights, and you may also have other rights which vary from state to state. To
know what your legal rights are, consult your local or state consumer affairs office or your state’s Attorney
General.
Warrantor US: GE Appliances, a Haier company
EXCLUSION OF IMPLIED WARRANTIES—Your sole and exclusive remedy is product repair
as provided in this Limited Warranty. Any implied warranties, including the implied warranties
of merchantability or fitness for a particular purpose, are limited to one year or the shortest
period allowed by law.
For the Period of: GE Appliances Will Replace
One Year
Fromthedateofthe
original purchase
Any part of the refrigerator which fails due to a defect in materials or workmanship.
Duringthelimited one-year warranty, GE Appliances will also provide, free of
charge, all labor and related service to replace the defective part.
For Customers in Canada: This warranty is extended to the original purchaser and any succeeding owner
for products purchased in Canada for home use within Canada. In-home warrant service will be provided in
areas where it is available and deemed reasonable by Mabe to provide.
Warrantor Canada: MC Commercial, Burlington, Ontario, L7R 5B6

49-60780 17
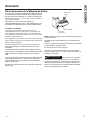
Ice Maker Accessory Kit:
AnIM4Dicemakeraccessorykitisavailableatextra
cost.
Foricemakerinstallation,followInstallationInstruction
"V" using the short (8") fill tube assembly, unless fill tube
is already installed.
To order, call GE Appliances at 800.GECARES
(800.432.2737)orvisitGEAppliances.com.InCanada,
visit GEAppliances.ca or call 800.561.3344.
AUTOMATIC ICE MAKER
The ice maker will produce approximately 70-100
cubesina24-hourperiod,dependingonthefreezer
compartment temperature, room temperature, number of
door openings and other use conditions.
Iftherefrigeratorisoperatedbeforethewaterconnection
is made to the ice maker, set the switch OFF.
When the refrigerator has been connected to the water
supply, set the switch ON position.
Theicemakerwillfillwithwaterwhenitcoolsto15°F.
A newly-installed refrigerator may take 12 to 24 hours to
begin making ice cubes.
Once the ice maker starts to make ice, it may take up
to 48 hours to fill the bin, depending on the temperature
settings and number of door openings.
Youwillhearabuzzingsoundeachtimetheicemaker
fills with water.
NOTICE: Throw away the first few batches of ice to
allow the water line to clear.
Be sure nothing interferes with the sweep of the feeler
arm.
When the bin fills to the level of the feeler arm, the ice
maker will stop producing ice.
Itisnormalforseveralcubestobejoinedtogether.
Ificeisnotusedfrequently,oldicecubeswillbecome
cloudy, taste stale, shrink or fuse together.
CAUTION
Avoid contact with the moving parts
of the ejector mechanism, or with the heating element
(located on the bottom of the ice maker) that releases
thecubes.Donotplacefingersorhandsonthe
automatic ice making mechanism while the refrigerator is
plugged in.
Accessory
ON
OFF
Icemaker
FeelerArm
Power Switch
ACCESSORY

18 49-60780
PrintedinUnitedStates
GE Appliances Website
Have a question or need assistance with your appliance? Try the GE Appliances Website 24 hours a day, any day
of the year! You can also shop for more great GE Appliances products and take advantage of all our on-line support
servicesdesignedforyourconvenience.IntheUS:GEAppliances.comInCanada:GEAppliances.ca
Register Your Appliance
Register your new appliance on-line at your convenience! Timely product registration will allow for enhanced
communication and prompt service under the terms of your warranty, should the need arise. You may also mail in
the pre-printed registration card included in the packing material.
IntheUS:GEAppliances.com/register
InCanada:Prodsupport.mabe.ca/crm/Products/ProductRegistration.aspx
Schedule Service
Expert GE Appliances repair service is only one step away from your door. Get on-line and schedule your service at
yourconvenienceanydayoftheyear.IntheUS:GEAppliances.com/ge/service-and-support/service.htm
or call 800.432.2737 during normal business hours.
InCanada:GEAppliances.ca/en/support/service-request or call 800.561.3344
Extended Warranties
Purchase a GE Appliances extended warranty and learn about special discounts that are available while your
warranty is still in effect. You can purchase it on-line anytime. GE Appliances Services will still be there after your
warranty expires.
IntheUS:GEAppliances.com/ge/service-and-support/shop-for-extended-service-plans.htm
or call 800.626.2224 during normal business hours.
InCanada:GEAppliances.ca/en/support/purchase-extended-warranty or call 800.290.9029
Remote Connectivity
Forassistancewithwirelessnetworkconnectivity(formodelswithremoteenable),
visit our website at GEAppliances.com/ge/connected-appliances/orcall800.220.6899intheUSonly.
Parts and Accessories
Individualsqualifiedtoservicetheirownappliancescanhavepartsoraccessoriessentdirectlytotheirhomes
(VISA,MasterCardandDiscovercardsareaccepted).Orderon-linetoday24hourseveryday.
IntheUS:GEApplianceparts.com or by phone at 877.959.8688 during normal business hours.
Instructions contained in this manual cover procedures to be performed by any user. Other servicing
generally should be referred to qualified service personnel. Caution must be exercised, since improper
servicing may cause unsafe operation.
Customers in Canada should consult the yellow pages for the nearest Mabe service center, visit our website at
GEAppliances.ca/en/products/parts-filters-accessories or call 800.661.1616.
Contact Us
IfyouarenotsatisfiedwiththeserviceyoureceivefromGEAppliances,contactusonourWebsitewithallthe
details including your phone number, or write to:
IntheUS:GeneralManager,CustomerRelations|GEAppliances,AppliancePark|Louisville,KY40225
GEAppliances.com/ge/service-and-support/contact.htm
InCanada:Director,ConsumerRelations,MabeCanadaInc.|Suite310,1FactoryLane|Moncton,N.B.E1C9M3
GEAppliances.ca/en/contact-us
CONSUMER SUPPORT
Consumer Support

MESURES DE SÉCURITÉ .........3
UTILISATION DU
RÉFRIGÉRATEUR
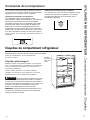
Bouton de commande
de la température ......................5
Clayettes de réfrigérateur. . . . . . . . . . . . . . .5
Bacs de rangement ....................6
Clayette de congélateur ................6
ENTRETIEN ET NETTOYAGE ....7
INSTRUCTIONS
D’INSTALLATION
Préparation à l’installation
du réfrigérateur .......................9
Inversion de l’ouverture des portes .....10
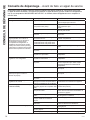
DÉPANNAGE
Bruits normaux de fonctionnement .....13
Conseils de dépannage ................14
GARANTIE .........................16
ACCESSORY .......................17
SOUTIEN
AU CONSOMMATEUR ...........18
FRANÇAIS
Écrivez ici le numéro de modèle et
le numéro de série :
Modèle # ________________
Série # __________________
Vous les trouvez sur une étiquette
dans le coin supérieur gauche du
compartiment réfrigérateur.
49-60780 08-17 GEA
Modèles GTS21
RÉFRIGÉRATEUR
Congélateur au sommet
GE est une marque déposée de General Electric Company. Fabriqué sous licence de marque.
MANUEL
D’UTILISATION ET
INSTRUCTIONS
D’INSTALLATION

2 49-60780
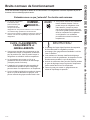
NOUS VOUS REMERCIONS D’ACCUEILLIR GE APPLIANCES CHEZ VOUS
Que vous ayez grandi avec GE Appliances ou qu’il s’agisse de votre première acquisition, nous
sommes heureux de vous accueillir dans notre famille.
Nous sommes fiers du savoir-faire, de l’innovation et de l’esthétique qui composent chaque appareil
GE Appliances, et nous pensons que vous le serez aussi. Dans cette optique, nous vous rappelons
que l’enregistrement de votre électroménager vous assure la communication de renseignements
importants sur le produit et la garantie lorsque vous en avez besoin.
Enregistrez votre électroménager GE en ligne dès maintenant. Des sites Web et des numéros de
téléphone utiles figurent dans la section Soutien au consommateur de ce manuel d’utilisation.
Vous pouvez aussi poster la fiche de garantie pré-imprimée incluse dans l’emballage.
La page est en cours de chargement...
La page est en cours de chargement...
La page est en cours de chargement...
La page est en cours de chargement...
La page est en cours de chargement...
La page est en cours de chargement...
La page est en cours de chargement...
La page est en cours de chargement...
La page est en cours de chargement...
La page est en cours de chargement...
La page est en cours de chargement...
La page est en cours de chargement...
La page est en cours de chargement...
La page est en cours de chargement...
La page est en cours de chargement...
La page est en cours de chargement...
La page est en cours de chargement...
La page est en cours de chargement...
La page est en cours de chargement...
La page est en cours de chargement...
La page est en cours de chargement...
La page est en cours de chargement...
La page est en cours de chargement...
La page est en cours de chargement...
La page est en cours de chargement...
La page est en cours de chargement...
La page est en cours de chargement...
La page est en cours de chargement...
La page est en cours de chargement...
La page est en cours de chargement...
La page est en cours de chargement...
La page est en cours de chargement...
La page est en cours de chargement...
La page est en cours de chargement...
-
 1
1
-
 2
2
-
 3
3
-
 4
4
-
 5
5
-
 6
6
-
 7
7
-
 8
8
-
 9
9
-
 10
10
-
 11
11
-
 12
12
-
 13
13
-
 14
14
-
 15
15
-
 16
16
-
 17
17
-
 18
18
-
 19
19
-
 20
20
-
 21
21
-
 22
22
-
 23
23
-
 24
24
-
 25
25
-
 26
26
-
 27
27
-
 28
28
-
 29
29
-
 30
30
-
 31
31
-
 32
32
-
 33
33
-
 34
34
-
 35
35
-
 36
36
-
 37
37
-
 38
38
-
 39
39
-
 40
40
-
 41
41
-
 42
42
-
 43
43
-
 44
44
-
 45
45
-
 46
46
-
 47
47
-
 48
48
-
 49
49
-
 50
50
-
 51
51
-
 52
52
-
 53
53
-
 54
54


GE GTS18FGLBB Mode d'emploi
- Catégorie
- Congélateurs
- Taper
- Mode d'emploi
- Ce manuel convient également à
dans d''autres langues
- English: GE GTS18FGLBB User guide
- español: GE GTS18FGLBB Guía del usuario
Documents connexes
-
GE GPS12FSHSB Le manuel du propriétaire
-
GE GTR12 Manuel utilisateur
-
GE GCE06GGHBB Le manuel du propriétaire
-
GEAppliances GPE12FGKWW Manuel utilisateur
-
GE GPE12 Guide d'installation
-
-
-
GE GDE03GLKLB Le manuel du propriétaire
-
GE GTS18GTHWW Manuel utilisateur
-
GE GTS21FMKES Le manuel du propriétaire