Royal Garden FCS70438RNRGDS Mode d'emploi
- Taper
- Mode d'emploi

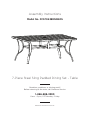
Assembly Instructions
7-Piece Steel Sling Padded Dining Set - Chair
Questions, problems, or missing parts?
Before returning to the store, call Customer Service.
1-866-988-3300
8 a.m. - 5 p.m., PST Monday - Friday
Model No. FCS70438RSTRGDS
Retain this manual for future use.

FCS70438RSTRGDS
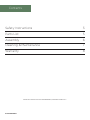
Contents
Safety Instructions
Parts List
Assembly
Cleaning & Maintenance
Warranty
3
4
5
9
10
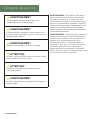
IMPORTANT: RETAIN FOR FUTURE REFERENCE, AND READ CAREFULLY.

WARNING
Please keep children out of the assembly
area before assembly.
WARNING
Never use this product as support. Do not shake,
lean, or climb on the product at any time.
WARNING
Do not place heavy objects on the chair.
WARNING
When not in use, secure the product in a cool
and covered location.
WARNING
Do not locate the product near any heat source.
WARNING
Warning: Weight limit for the chairs is 250lbs
(113.39Kg) for each set.
Safety Instructions
FCS70438RSTRGDS

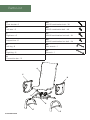
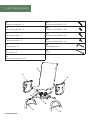
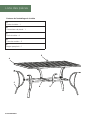
Parts List
A
Chair bucket- 6
C
Right arm - 6
AA
M6x30 combination bolt - 36
B
Left arm - 6
E
Left leg - 6
D
Support bar - 6
G
Connection bar - 12
F
Right leg - 6
BB
M6x15 combination bolt - 48
CC
M8x28 combination hex bolt - 24
DD
M8x20 combination hex bolt - 24
EE
Hex wrench - 1
FF
Wrench - 1
FCS70438RSTRGDS
C
A
B
G
E
D
F

Assembly
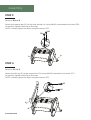
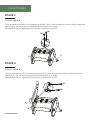
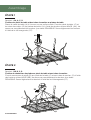
STEP 1
Requires: AA, A, C
Attach the right arm (C) to the chair bucket (A) using M6x30 combination bolts (AA).
Do not fully tighten the bolts at this step.
NOTE: Loosely tighten the bolts using the hex wrench (EE).
FCS70438RSTRGDS
STEP 2
Requires: AA, A, B
Attach the left arm (B) to the chair bucket (A) using M6x30 combination bolts (AA).
Do not fully tighten the bolts at this step.
NOTE: Loosely tighten the bolts using the hex wrench (EE).
A
AA
C
A
AA
B

Assembly
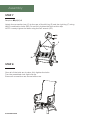
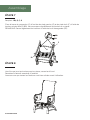
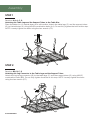
STEP 3
Requires: DD, A, D
Attach the support bar (D) to the chair bucket (A) using M8x20 combination hex bolts (DD).
Do not fully tighten the bolts at this step.
NOTE: Loosely tighten the bolts using the wrench (FF).
FCS70438RSTRGDS
Assembly
STEP 4
Requires: CC, D, E
Attach the left leg (E) to the support bar (D) using M8x28 combination hex bolts (CC).
Do not fully tighten the bolts at this step.
NOTE: Loosely tighten the bolts using the wrench (FF).
Assembly
D
DD
DD
A
E
D
CC
CC

Assembly
FCS70438RSTRGDS
Chair Assembly
STEP 5
Requires: CC, D, F
Attach the right leg (F) to the support bar (D) using M8x28 combination hex bolts (CC).
Do not fully tighten the bolts at this step.
NOTE: Loosely tighten the bolts using the wrench (FF).
Assembly
F
D
C
C
CC
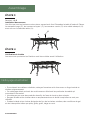
STEP 6
Requires: BB, E, F, G
Attach the connection bar (G) to the front of the left leg (E) and the right leg (F) using
M6x15 combination bolts (BB). Do not fully tighten the bolts at this step.
NOTE: Loosely tighten the bolts using the hex wrench (EE).
BB
BB
F
G
E

FCS70438RSTRGDS
AssemblyChair Assembly
STEP 7
Requires: BB, E, F, G
Attach the connection bar (G) to the rear of the left leg (E) and the right leg (F) using
M6x15 combination bolts (BB). Do not fully tighten the bolts at this step.
NOTE: Loosely tighten the bolts using the hex wrench (EE).
Assembly
G
BB
BB
E
F
STEP 8
Once all of the bolts are in place, fully tighten the bolts.
Turn the assembled chair right side up.
Ensure all connections are secure before use.

FCS70438RSTRGDS
Cleaning & Maintenance
• For best results, clean the frame and fabric with a damp cloth and dry thoroughly.
This will help prevent mildew by removing dirt particles that may accumulate.
• Do not clean with abrasive materials, bleach, or solvents.
• Store the seating set in a dry, sheltered place when not in use.
• Keep the seating set away from fire, extreme heat, freezing conditions, and inclement
weather such as rain, hail, sleet, snow, or wind.

Warranty
Outdoor Furniture
IMPORTANT
If you have any problems with this product (missing or damaged parts, assembly issues, etc.),
PLEASE DO NOT RETURN TO THE RETAILER/STORE
from where you purchased the product.
Please call our Toll-Free Customer Service Hotline at:
1-866-988-3300
To expedite any future warranty claims, please retain the instruction sheet, warranty card and
receipt for future use.
Care and Maintenance
Store furniture in an upright position. Be careful to never allow water to build up in frames as this
will cause corrosion and freeze damage in cold climates. Wash all frames with a solution of mild
soap and water. Rinse with clean water and dry with a soft absorbent cloth towel. Frames can be
treated with a liquid wax for maximum protection against UV rays and/or salty, damp air. If your
set includes cushions, slings, and/or an umbrella they may be cleaned by hand with a solution of
soap and water with a clean water rinse. (Never machine wash cushions, slings or umbrella covers
as this will result in shrinkage or damage). After cleaning cushions tip on end and allow to drip
dry. (Never use a commercial or home dryer to tumble dry fabric goods). Do not use bleach or
solvents to clean any product! This will void the warranty.
FCS70438RSTRGDS

Warranty
Outdoor Furniture
1-YEAR LIMITED WARRANTY PROGRAM
For a period of one (1) year after date of purchase, the Manufacturer will either repair or replace defective
components in accordance with this Limited Warranty. This warranty is between the Manufacturer and the
original purchaser and is valid only when accompanied by the original purchaser’s sales receipt showing
original date of purchase and location of purchase. Replacements under this warranty revert back to the
date of original purchase for future warranty.
warranty applies in normal residential use only and is not intended for commercial use. The Manufacturer
can make substitutions as required of materials, components, and sub-components of comparable value
and utility. This warranty is limited to product repair or replacement (to be determined solely by the
Manufacturer). Warranty return is limited to only the single affected component.
This limited warranty covers only manufacturing defects and does not cover normal wear and tear, damage
due to acts of nature (such as, but not limited to freezing or high winds), abuse or misuse, including
chemical damage from suntan oil or other chemicals, exposure to extreme heat or cold, abrasion or
excessive weight. This product is intended to be used in standard installations only. This warranty is void
if the product is not used for its intended purpose. The Manufacturer disclaims liability for any aspect of
installation and any inconvenience caused by a defective part of a component.
Certain items are not covered by this warranty. These include, but are not limited to the following:
1. Components subjected to abuse, including abuse intended to simulate failure.
2. Damages caused by retailer, shipper or installation crew (such as scratches, dents, tears, chips, etc.).
3. Any part which merely exhibits normal wear yet functions essentially as new, including chips, scratches or
stretching of materials and stitching.
4. Tears, punctures, scratches or any damage caused by improper installation or use.
5. Damage to frames/welds resulting from improper assembly or exposure to water and/or sub-freezing
temperatures is not covered. General frame rusting is not covered.
6. Fading and/or discoloration of fabrics/cushions/straps/wicker resulting from exposure to the elements,
7. Umbrella bases are not covered under any circumstances.
To make a claim, call the toll-free number below. Please have available a copy of the original sales receipt
along with a brief description of the problem. Please also provide your email address and daytime telephone
or cell phone number. All items may be charged actual freight costs plus $15 for handling. Repairs or
replacement will be made at the Manufacturer’s option. Sales and use taxes, plus shipping and handling
charges are the responsibility of the consumer.
THIS IS THE ENTIRE EXCLUSIVE EXPRESS LIMITED LIABILITY. THE MANUFACTURER NEITHER MAKES
THOSE OF RETAILING DEALERS. THIS EXCLUSIVE REMEDY IS LIMITED TO RECEIPT OF A CREDIT IN
CONNECTION WITH THE REPAIR OR REPLACEMENT OF ANY PRODUCT OR COMPONENT DEEMED
TO BE DEFECTIVE UNDER THE TERMS AND CONDITIONS AS STATED IN THIS WARRANTY. NEITHER
ARISING OUT OF ANY BREACH OF THIS WARRANTY OR NEGLIGENCE EVEN IF IT HAS BEEN ADVISED
ARE NO OTHER EXPRESS OR IMPLIED WARRANTIES OTHER THAN THE WARRANTY DESCRIBED
OR FITNESS FOR A PARTICULAR PURPOSE ARE EXPRESSLY DISCLAIMED.
FCS70438RSTRGDS

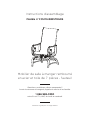
Mobilier de salle à manger rembourré
en acier et toile de 7�pièces - fauteuil
Modèle no FCS70438RSTRGDS
Instructions d’assemblage
Questions, problèmes, pièces manquantes?
Avant de retourner au magasin, appelez le service à la clientèle.
1 866 988-3300
entre 8 h et 17 h, HNP, du lundi au vendredi
Conservez ce guide pour un usage ultérieur.

FCS70438RSTRGDS
Contents
3
4
5
9
10
Consignes de sécurité
Assemblage
Nettoyage et entretien
Garantie
Liste des pièces
IMPORTANT : CONSERVEZ À TITRE DE RÉFÉRENCE ULTÉRIEURE ET LISEZ ATTENTIVEMENT.

FCS70438RSTRGDS
AVERTISSEMENT
Veuillez garder les enfants hors de l’aire
d’assemblage avant l’assemblage.
AVERTISSEMENT
N’utilisez jamais ce produit comme support. Ne
secouez jamais ce produit et ne vous appuyez ou
grimpez jamais dessus.
AVERTISSEMENT
Ne placez pas d’objets lourds sur ce siège.
ATTENTION
Lorsqu’il n’est pas utilisé, placez le produit à l’abri
dans un endroit frais et couvert.
ATTENTION
Ne placez ce produit à proximité d’aucune
source de chaleur.
AVERTISSEMENT
La limite de poids pour les sièges est 113,39 kg
(250 lb) pour chaque siège.
Consignes de sécurité

Liste des pièces
A
Baquet de fauteuil - 6
C
Accoudoir droit - 6
AA
Boulon mixte M6x30 - 36
B
Accoudoir gauche - 6
E
Pied gauche - 6
D
Barre de soutien - 6
BB
Boulon mixte M6x15 - 48
CC
Boulon mixte M8x28 - 24
DD
Boulon mixte M8x20 - 24
FCS70438RSTRGDS
EE
Clé hexagonale - 1
FF
Clé - 1
G
Barre de connexion - 12
F
Pied droit - 6
C
A
B
G
E
D
F

ÉTAPE 1
Requiert :
Fixez l’accoudoir droit (C) au baquet de fauteuil (A) à l’aide de boulons mixtes M6x30 (AA).
Ne serrez pas complètement les boulons à ce stade.
REMARQUE: Serrez légèrement les boulons à l’aide de le clé hexagonale (EE).
FCS70438RSTRGDS
ÉTAPE 2
Requiert :
Fixez l’accoudoir gauche (B) au baquet de fauteuil (A) à l’aide de boulons mixtes M6x30 (AA).
Ne serrez pas complètement les boulons à ce stade.
REMARQUE: Serrez légèrement les boulons à l’aide de clé hexagonale (EE).
AssemblyAssemblageAssemblage
A
AA
C
A
AA
B
AA, A, C
AA, A, B

ÉTAPE 3
Requiert :
Fixez la barre de soutien (D) au baquet de fauteuil (A) à l’aide de boulons mixtes à tête hexagonale
M8x20 (DD). Ne serrez pas complètement les boulons à ce stade.
REMARQUE: Serrez légèrement les boulons à l’aide de la clé (FF).
FCS70438RSTRGDS
ÉTAPE 4
Requiert :
Fixez le pied gauche (E) à la barre de soutien (D) à l’aide des boulons mixtes à tête hexagonale
M8x28 (CC). Ne serrez pas complètement les boulons à ce stade.
REMARQUE: Serrez légèrement les boulons à l’aide de la clé (FF).
AssemblageAssemblage
D
DD
DD
A
E
D
CC
CC
DD, A, D
CC, D, E

Assembly
ÉTAPE 5
Requiert :
Fixez le pied droit (F) à la barre de soutien (D) à l’aide des boulons mixtes à tête hexagonale
M8x28 (CC). Ne serrez pas complètement les boulons à ce stade.
REMARQUE: Serrez légèrement les boulons à l’aide de la clé (FF).
FCS70438RSTRGDS
Assemblage
ÉTAPE 6
Requiert :
Fixez la barre de connexion (G) à l’avant du pied gauche (E) et du pied droit (F) à l’aide de
boulons mixtes M6x15 (BB). Ne serrez pas complètement les boulons à ce stade.
REMARQUE: Serrez légèrement les boulons à l’aide de la clé hexagonale (EE).
Assemblage
F
D
C
C
CC
BB
BB
F
G
E
CC, D, F
BB, E, F, G

FCS70438RSTRGDS
ÉTAPE 7
Requiert :
Fixez la barre de connexion (G) à l’arrière du pied gauche (E) et du pied droit (F) à l’aide de
boulons mixtes M6x15 (BB). Ne serrez pas complètement les boulons à ce stade.
REMARQUE: Serrez légèrement les boulons à l’aide de la clé hexagonale (EE).
ÉTAPE 8
Une fois que tous les boulons sont en place, serrez-les à fond.
Remettez le fauteuil assemblé à l’endroit.
Assurez-vous que toutes les fixations sont bien solides avant l’utilisation.
Assemblage
G
BB
BB
E
F
BB, E, F, G

FCS70438RSTRGDS
Nettoyage et entretien
• Pour obtenir les meilleurs résultats, nettoyez l’armature et le tissu avec un linge humide et
séchez soigneusement.
• Ce nettoyage aide à prévenir les moisissures en éliminant les particules de saleté qui
pourraient s’accumuler.
• Ne nettoyez pas avec des produits abrasifs, de l’eau de Javel ou des solvants.
• Rangez l’ensemble de sièges dans un emplacement sec et abrité lorsqu’il n’est pas utilisé.
• Gardez l’ensemble de sièges éloigné du feu, de la chaleur extrême, des conditions de gel et
des intempéries telles que pluie, grêle, grésil, neige ou vent.
La page est en cours de chargement...
La page est en cours de chargement...
La page est en cours de chargement...
La page est en cours de chargement...
La page est en cours de chargement...
La page est en cours de chargement...
La page est en cours de chargement...
La page est en cours de chargement...
La page est en cours de chargement...
La page est en cours de chargement...
La page est en cours de chargement...
La page est en cours de chargement...
La page est en cours de chargement...
La page est en cours de chargement...
La page est en cours de chargement...
La page est en cours de chargement...
La page est en cours de chargement...
La page est en cours de chargement...
La page est en cours de chargement...
La page est en cours de chargement...
-
 1
1
-
 2
2
-
 3
3
-
 4
4
-
 5
5
-
 6
6
-
 7
7
-
 8
8
-
 9
9
-
 10
10
-
 11
11
-
 12
12
-
 13
13
-
 14
14
-
 15
15
-
 16
16
-
 17
17
-
 18
18
-
 19
19
-
 20
20
-
 21
21
-
 22
22
-
 23
23
-
 24
24
-
 25
25
-
 26
26
-
 27
27
-
 28
28
-
 29
29
-
 30
30
-
 31
31
-
 32
32
-
 33
33
-
 34
34
-
 35
35
-
 36
36
-
 37
37
-
 38
38
-
 39
39
-
 40
40


Royal Garden FCS70438RNRGDS Mode d'emploi
- Taper
- Mode d'emploi
dans d''autres langues
Autres documents
-
YOTRIO 6 x 9 Foot Rectangular Market Umbrella Assembly Instructions
-
-
-
-
-
-
-
-
 Garden Treasures 63004 Manuel utilisateur
-
Sunrise Medical Quickie IRIS Le manuel du propriétaire
