YOTRIO Better Homes & Gardens Providence Daybed Assembly Instructions
- Taper
- Assembly Instructions

WarrantyCoverageRequirements:
1.CopyofyourOriginalStoreReceipt.
2.Picturesofthedamagedparts.
3.Youmustknowthenameofyourproductandanycorrespondingitem
numbersaswellasthenameofthestorewhereyoupurchasedtheitem.
4.PleasegatherallofthisinformationBEFOREyoucallcustomerservice.
DONOTRETURNTORETAILER
IFYOUHAVEANYQUESTIONSORCONCERNS
PLEASEVISITOURWEBSITE
AT:
www.yotrioint.com www.yotrioint.com www.yotrioint.com www.yotrioint.com
ORTOLLFREE
AT:
1-866-905-4107 1-866-905-4107 1-866-905-4107 1-866-905-4107
MONDAY-FRIDAY8:30AMTO5:00PMPACIFICSTANDARDTIME/11:30
AMTO8:00PMEASTERNSTANDARDTIME
YOTRIO YOTRIO YOTRIO YOTRIOCUSTOMER CUSTOMER CUSTOMER CUSTOMERCARE CARE CARE CARE

:
1. Une copie de votre reçu de caisse original.
2. Des photos des pièces endommagées.
3.
correspondant ainsi que le nom du magasin où vous avez acheté le produit.
4.
NE RETOURNEZ PAS AU MAGASIN
SI VOUS AVEZ DES QUESTIONS OU DES PRÉOCCUPATIONS,
VEUILLEZ VISITER NOTRE SITE WEB AU :
www.yotrioint.com
www.yotrioint.com
www.yotrioint.com
www.yotrioint.com
OU APPELER SANS FRAIS LE :
1 866 905-4107
DU LUNDI AU VENDREDI, DE 8 H 30 À 17 H, HEURE NORMALE DU
PACIFIQUE, OU DE 11 H 30 À 20 H, HEURE NORMALE DE L’EST
SERVICE À LA CLIENTÈLE YOTRIO

CAREANDMAINTENANCE
Beforeusing,wipetheproductcompletelywithasoft,drycloth.
Spot‐cleanCushionsandslingsusingasponge,mildsoapandwater.Rinsethoroughlywithcleanwater.To
preventmildew,allowtoairdrycompletelybeforeusingorstoring.
Nevermachinewashortumbledrycushions,slingsorumbrellacoversasthiswillresultinshrinkageor
damage.
Rinsewickerpatiofurniturewithahoseorpressurewasher.Ifthewickerisreallydirty,youcanusemild
soapwithwater.Allowtodrycompletelybeforeusingorstoring.
Tocleanyourpatioumbrella,useasoftbrushandmildsoapandwater.Allowtodrycompletelybefore
storing.
Avoidplacinghotobjectsdirectlyontotabletopsurfacewithoutaheatprotector.
Alwaysstoreand/orcoveryourpatiofurnitureinacooldryplacewhennotinusedandawayfromdirect
sunlight.
Whenstoring,neverwrapcushionsinplastic.Plasticdoesn'tallowthecushiontobreatheandcancauseit
tomildewifthere'sanymoisturepresent.
Alwaysplaceyourpatiofurnitureawayfromfire,extremeheat,freezingconditionsandinclementweather
suchasrain,hail,sleet,snoworwind.
Neverusebleachorstrongsolventstocleanasthiswillcausedamagetobothfabricandmetalfinishes.
Donotallowwatertobuildupinframesasthiswillcausecorrosionanddamage.
ONE‐YEARFRAMEANDONE‐YEARFABRIC/WICKER/FINISHETC.LIMITEDWARRANTY
Youmustretaintheoriginalreceipttoobtainwarrantyservice.
Framesarewarrantedagainstdefectsinmaterialsandworkmanshipforaperiodofoneyearfromthedate
oforiginalpurchase.
Thiswarrantydoesnotcoverdamagetoframesorweldsduetocommercialuse,improperassembly,acts
ofnature,fire,freezingandabusiveuse.
Rust,corrosion,and/orruststainsarenotcoveredbywarranty.
Purchasedpartsarenotcoveredunderthiswarranty.
Fabriconcushions,slingsandumbrellaiswarrantedoneyearagainstseparationattheseams.
Fading,mildew,andcolordiscolorationduetoexposuretotheelements,chemicalsandspillsarenot
covered.
ThePowdercoatand/orpaintarewarrantedoneyearagainstblistering,peeling,orcrackling.
Fadingduetoexposuretoelements,chemicalsandspillsisnotcovered.Scratchesandchipsduetonormal
wearandusearenotcovered.
WickerWeavearewarrantedoneyearagainstbreakage,separation,ortearing.
Fadingordiscolorationduetoexposurefromchemicals,spillsand/ortheelementsisnotcovered.
Warrantycoversfreereplacementofitemwithinoneyearofpurchase.Aftertheoneyearitremainsthe
customer'sresponsibilityforfreightandpackagingchargestoandfromourservicecenter.
Wedonotcompensatetheindividualoranyoutsidepartyforassemblingordisassemblingtheproduct.
Anyreplacementofwarranteditemswillbeintheoriginalstyleandcolor,orsimilarstyleandcolorifthe
originalisun‐availableorhasbeendiscontinued.
Questions,problems,missingparts?Beforereturningtoyourretailer,callourcustomerservicedepartment
at(866)905‐4107,8:30a.m.–5:00p.m.PST/11:30a.m.‐8:00p.m.,EST,Monday‐Friday.

SOIN ET ENTRETIEN
Enlevez les taches des coussins et des toiles avec une éponge, du savon doux et de l’eau.
Ne lavez jamais les coussins, les éléments en toile ou toiles de parasol à la machine et ne les séchez
jamais dans une sécheuse, car ils pourraient rétrécir ou être endommagés.
Rincez le mobilier de jardin en osier avec un tuyau d’arrosage ou laveuse à haute pression.
Rangez et/ou recouvrez toujours votre mobilier de jardin dans un emplacement frais et sec lorsqu’il n’est
coussins de respirer et peut causer leur moisissure si une humidité quelconque est présente.
intempéries telles que pluie, grêle, grésil, neige ou vent.
Ne laissez pas d’eau s’accumuler dans les armatures, puisque ceci sera source de corrosion et de dommages
au produit.
GARANTIE[1} {2]D’UN AN SUR L’ARMATURE ET GARANTIE[1} {2]LIMITÉE D’UN AN SUR
LE TISSU/OSIER/FINI ETC.
d’un mauvais assemblage, de catastrophes naturelles, d’un incendie, du gel et d’un usage abusif.
produits chimiques et à des déversements ne sont pas couvertes.
craquelures pour une période d’un an.
pas couverte. Les éraflures et ébréchures causées par une usure normale ne sont pas couvertes.
déversements et/ou aux intempéries n’est pas couverte.
Au bout d’un an, le client doit payer les frais d’emballage et de transport aller-retour au centre de service.
modèle ou une couleur similaire si le produit original n’est pas disponible ou a été abandonné.
à la clientèle au (866) 905-4107 entre 8 h 30 et 17 h, HNP, ou entre 11 h 30 et 20 h, HNE, du lundi au vendredi.

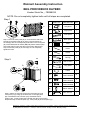
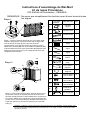
PART LIST DESCRIPTION QTY
ALeft panel 1
BRight panel 1
CFront panel 1
DBack panel 1
ESeat 1
FPole-1 4
GPole-2 2
HCanopy 1
ISeat cushion 1
JLong pillow 2
KPillow 4
AA M6x20
Bolt & Washer 16
BB M6x30
Bolt & Washer 8
CC M6x45
Bolt & Washer 2
DD 8
EE
Plastic washer
Allen wrench 1
Questions, problems, missing parts? Before returning to your retailer, call our customer service department
at (866) 905-4107, 8:30 a.m. – 5:00 p.m. PST /11:30 a.m.- 8:00 p.m., EST, Monday- Friday.
NOTE: Do not completely tighten bolts until all steps are completed.
BHG PROVIDENCE DAYBED
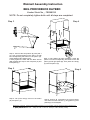
Step 1: Place the back panel (D) on a soft surface. Attach the
seat (E) to the back panel (D) by lining up the bolt holes on
the seat (E) with the corresponding bolt holes on the back panel
(D). Insert M6x30 bolt & washer (BB) with plastic washers (DD)
and loosely tighten using the Allen wrench (EE). Repeat this
step for the front panel (C) and seat (E). Do not completely
tighten the bolts.
CC
AA
AA
AA
AA
Step 2: Attach the right panel (B) to the back panel (D) and
front panel (C) by lining up the bolt holes on the right panel
(B). Insert M6x45 bolt & washer (CC) and M6x20 bolt &
washer (AA). Loosely tighten the bolts with the Allen wrench (EE).
Repeat this step for the left panel (A) , back panel (D) and front panel (C).
Step 1
BB
DD
DD
C
E
D
Step 2
B
A
C
E
D
Vendor Stock No FBS68035
Walmart Assembly Instruction

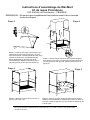
Step 3: Connect the two poles-2 (G) with pole-1
(F). Line up the bolt holes on the pole-1 (F) with
the corresponding bolt holes on the pole-2 (G).
Insert M6x20 bolt & washer (AA).
Loosely tighten the bolts with the Allen wrench
(EE
). Repeat this step for the left panel (A) and
back panel (C).
Step 5: Tie up the canopy velcro on the Pole-2
(G) and pole-1 (F).
Step 4: Fully tighten all bolts completely. Insert the
poles-1 into the corresponding bolt holes on the left
panel (A) and right panel (B). Then place the canopy
(H) onto the pole-2 (G).
Step 6: Ensure all connections are secure before
use. Place the seat cushions (I), long pillows (J) and
pillows (K) on the daybed.
Questions, problems, missing parts? Before returning to your retailer, call our customer service department
at ,8:30 a.m. – 5:00 p.m. PST /11:30 a.m.- 8:00 p.m., EST, Monday- Friday.
(866) 905-4107
NOTE: Do not completely tighten bolts until all steps are completed.
H
FG
D
B
C
A
K
J
I
Step 3
F
G
F
Step 4
Step 5 Step 6
BHG PROVIDENCE DAYBED
Vendor Stock No FBS68035
Walmart Assembly Instruction

LISTE DES
PIÈCES DESCRIPTION QTÉ
APanneau
gauche 1
BPanneau droit 1
CPanneau avant 1
DPanneau arrière 1
ESiège 1
FTige-1 4
GTige-2 2
HAuvent 1
ICoussin de
siège 1
JLong coussin
d’appoint 2
KCoussin
d’appoint 4
AA Boulon M6x20
avec rondelle 16
BB Boulon M6x30
avec rondelle 8
CC Boulon M6x45
avec rondelle 2
DD 8
EE
Rondelle en
plastique
Clé hexagonale 1
REMARQUE : Ne serrez pas complètement les boulons avant d’avoir terminé toutes
les étapes.
CC
AA
AA
AA
AA
Étape 1
BB
DD
DD
C
E
D
Étape 2
B
A
C
E
D
Questions, problèmes, pièces manquantes? Avant de retourner à votre détaillant, veuillez appeler notre
service à la clientèle au (866) 905-4107[1}entre {2]8 h 30 et 17 h, HNP, ou entre 11 h 30 et 20 h, HNE,
du lundi au vendredi.
Étape 1 : Placez le panneau arrière (D) sur une surface molle.
Alignez le siège (E) sur le panneau arrière (D) en alignant les
trous de boulon du siège (E) avec les trous de boulon
correspondants sur le panneau arrière (D). Insérez le boulon
M6x30 avec rondelle (BB) avec des rondelles en plastique (DD)
et serrez légèrement avec la clé hexagonale (EE).Répétez cette
étape pour le panneau avant (C) et le siège (E).Ne serrez pas
complètement les boulons.
Étape 2 : Fixez le panneau droit (B) au panneau arrière (D) et
au panneau avant (C) en alignant les trous de boulon sur le
panneau droit (B).Insérez un boulon M6x45 avec rondelle (CC)
et un boulon M6x20 avec rondelle (AA). Serrez légèrement les
boulons avec la clé hexagonale (EE). Répétez cette étape pour
le panneau gauche (A), le panneau arrière (D) et le panneau
avant (C).
VNº d’article du fournisseur : FBS68035
Lit de repos Providence
Instructions d’assemblage de Wal-Mart

.
H
FG
D
B
C
A
K
J
I
Étape 3
F
G
F
Étape 4
Étape 5 Étape 6
VNº d’article du fournisseur : FBS68035
REMARQUE : Ne serrez pas complètement les boulons avant d’avoir terminé
toutes les étapes.
Lit de repos Providence
Étape 3 : Fixez les deux tiges-2 (G) à la tige-1 (F).
Alignez les trous de boulon de la tige-1 (F) avec
les trous de boulon correspondants de la tige-2 (G).
Insérez un boulon avec rondelle M6x20 (AA).
Serrez légèrement les boulons avec la clé
hexagonale (EE). Répétez cette étape pour le
panneau gauche (A) et le panneau arrière (C).
Étape 4 : Serrez tous les boulons à fond. Insérez les tiges-1
dans les trous de boulon correspondants du panneau gauche
(A) et du panneau droit (B). Puis, placez l’auvent (H) sur la
tige-2 (G).
Étape 5 : Attachez le Velcro de l’auvent sur la
tige-2 (G) et la tige-1 (F).
Étape 6 : Assurez-vous que toutes les fixations sont serrées
solidement avant l’utilisation. Installez les coussins de siège (I),
les longs coussins d’appoint (J) et les coussins d’appoint (K) sur
le lit de repos.
Questions, problèmes, pièces manquantes? Avant de retourner à votre détaillant, veuillez appeler notre
service à la clientèle au (866) 905-4107[1}entre {2]8 h 30 et 17 h, HNP, ou entre 11 h 30 et 20 h, HNE,
du lundi au vendredi.
Instructions d’assemblage de Wal-Mart
-
 1
1
-
 2
2
-
 3
3
-
 4
4
-
 5
5
-
 6
6
-
 7
7
-
 8
8


YOTRIO Better Homes & Gardens Providence Daybed Assembly Instructions
- Taper
- Assembly Instructions
dans d''autres langues
Documents connexes
-
YOTRIO Providence 7 Piece Dining Set – Table Assembly Instructions
-
-
-
-
-
-
-
-
-