Haier HVUE06 Manuel utilisateur
- Catégorie
- Boissons glacées
- Taper
- Manuel utilisateur
Ce manuel convient également à

Thermal Electric Wine Cellar
Thermique Electrique Rafraîchisseur á Vin
Térmico Eléctrico Enfriador de Vino
User Manual
Model # HVUE06, HVUE12
Guide de l’Utilisateur
Modéle # HVUE06, HVUE12
Manual del Usuario
Para Modelo de # HVUE06, HVUE12
Quality • Innovation • Style
(HVUE06)
(HVUE12)

1
English
IIMMPPOORRTTAANNTT SSAAFFEEGGUUAARRDDSS
W
W
h
h
e
e
n
n
u
u
s
s
i
i
n
n
g
g
t
t
h
h
i
i
s
s
a
a
p
p
p
p
l
l
i
i
a
a
n
n
c
c
e
e
,
,
a
a
l
l
w
w
a
a
y
y
s
s
e
e
x
x
e
e
r
r
c
c
i
i
s
s
e
e
b
b
a
a
s
s
i
i
c
c
s
s
a
a
f
f
e
e
t
t
y
y
p
p
r
r
e
e
-
-
c
c
a
a
u
u
t
t
i
i
o
o
n
n
s
s
,
,
i
i
n
n
c
c
l
l
u
u
d
d
i
i
n
n
g
g
t
t
h
h
e
e
f
f
o
o
l
l
l
l
o
o
w
w
i
i
n
n
g
g
:
:
1) Read all of the instructions before using this appliance.
2) This wine cellar must be properly installed in accordance with the
installation instructions before it is used. See grounding instructions in
the installation section.
3) Never unplug your wine cellar by pulling on the power cord. Always
grasp the plug firmly and pull straight out from the outlet.
4) Repair or replace immediately, all electric service cords that have
become frayed or otherwise damaged. Do not use a cord that shows
cracks or abrasion damage along its length, the plug or the connector
end.
5) Unplug your wine cellar before cleaning or before making any repairs.
Note: If for any reason this product requires service, we strongly
recommend that a certified technician performs the service.
6) If your wine cellar is not being used, we recommend that you remove
the door and leave the shelves in place. This will reduce the possibility
of danger to children.
7) This wine cellar should not be recessed or built-in an enclosed cabinet.
It is designed for freestanding installation only.
8) Do not operate your wine cellar in the presence of explosive fumes.
9) Do not store foods in wine cellar as interior temperature may not be
cool enough to prevent spoilage.
S
S
A
A
V
V
E
E
T
T
H
H
E
E
S
S
E
E
I
I
N
N
S
S
T
T
R
R
U
U
C
C
T
T
I
I
O
O
N
N
S
S
D
D
A
A
N
N
G
G
E
E
R
R
R
R
i
i
s
s
k
k
o
o
f
f
c
c
h
h
i
i
l
l
d
d
e
e
n
n
t
t
r
r
a
a
p
p
m
m
e
e
n
n
t
t
.
.
B
B
e
e
f
f
o
o
r
r
e
e
y
y
o
o
u
u
t
t
h
h
r
r
o
o
w
w
a
a
w
w
a
a
y
y
y
y
o
o
u
u
r
r
o
o
l
l
d
d
a
a
p
p
p
p
l
l
i
i
a
a
n
n
c
c
e
e
,
,
t
t
a
a
k
k
e
e
o
o
f
f
f
f
t
t
h
h
e
e
d
d
o
o
o
o
r
r
s
s
.
.
L
L
e
e
a
a
v
v
e
e
t
t
h
h
e
e
s
s
h
h
e
e
l
l
v
v
e
e
s
s
i
i
n
n
p
p
l
l
a
a
c
c
e
e
s
s
o
o
t
t
h
h
a
a
t
t
c
c
h
h
i
i
l
l
d
d
r
r
e
e
n
n
m
m
a
a
y
y
n
n
o
o
t
t
e
e
a
a
s
s
i
i
l
l
y
y
c
c
l
l
i
i
m
m
b
b
i
i
n
n
s
s
i
i
d
d
e
e
.
.

2
English
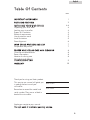
TTaabbllee OOff CCoonntteennttss
P
AGE
I
I
M
M
P
P
O
O
R
R
T
T
A
A
N
N
T
T
S
S
A
A
F
F
E
E
G
G
U
U
A
A
R
R
D
D
S
S
1
P
P
A
A
R
R
T
T
S
S
A
A
N
N
D
D
F
F
E
E
A
A
T
T
U
U
R
R
E
E
S
S
3
I
I
N
N
S
S
T
T
A
A
L
L
L
L
I
I
N
N
G
G
Y
Y
O
O
U
U
R
R
W
W
I
I
N
N
E
E
C
C
E
E
L
L
L
L
A
A
R
R
4-6
Unpacking your wine cellar 4
Leveling your wine cellar 4
Proper Air Circulation 4
Electrical requirements 5
Use of extension cords 5
Install Limitations 5
Door Alignment 6
W
W
I
I
N
N
E
E
C
C
E
E
L
L
L
L
A
A
R
R
F
F
E
E
A
A
T
T
U
U
R
R
E
E
S
S
A
A
N
N
D
D
U
U
S
S
E
E
7
Temperature Adjustment 7
P
P
R
R
O
O
P
P
E
E
R
R
W
W
I
I
N
N
E
E
C
C
E
E
L
L
L
L
A
A
R
R
C
C
A
A
R
R
E
E
A
A
N
N
D
D
C
C
L
L
E
E
A
A
N
N
I
I
N
N
G
G
8
Cleaning and Maintenance 8
Power interruptions 8
Vacation & moving care 8
T
T
R
R
O
O
U
U
B
B
L
L
E
E
S
S
H
H
O
O
O
O
T
T
I
I
N
N
G
G
9
W
W
A
A
R
R
R
R
A
A
N
N
T
T
Y
Y
10
Thank you for using our Haier product.
This easy-to-use manual will guide you
in getting the best use of your
wine cellar.
Remember to record the model and
serial number. They are on a label in
back of the wine cellar
.
Model number
Serial number
Date of purchase
Staple your receipt to your manual.
Y
Y
o
o
u
u
w
w
i
i
l
l
l
l
n
n
e
e
e
e
d
d
i
i
t
t
t
t
o
o
o
o
b
b
t
t
a
a
i
i
n
n
w
w
a
a
r
r
r
r
a
a
n
n
t
t
y
y
s
s
e
e
r
r
v
v
i
i
c
c
e
e
.
.

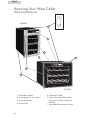
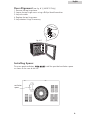
1. Removable Shelves
2. Leveling Legs (4) (not shown)
3. Recessed Handle
4. Hinge Cover
5. Ventilation Spacer
6. Glass See-though Door (door
frame will vary per model pur-
chased)
7. Adjustable Temperature Control
English
3
1
3
4
5
Knowing Your Wine Cellar
Parts and Features
2
6
7
(HVUE06)
(HVUE12)

English
4
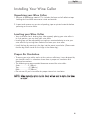
Installing Your Wine Cellar
Unpacking your Wine Cellar
1. Remove all packaging material. This includes the base and all adhesive tape
holding the wine cellar accessories inside and outside.
2. Inspect and remove any remains of packing, tape or printed materials before
powering on the wine cellar.
Leveling your Wine Cellar
• Your wine cellar has 4 leveling legs. After properly placing your wine cellar in
its final position, you can level your wine cellar.
• Leveling legs can be adjusted by turning them counterclockwise to raise your
wine cellar or by turning them clockwise to lower your wine cellar.
• Install the legs by screwing in the legs into the preset screw holes. (Please note
that the leg which stands on the hinge is the shorter leg.)
Proper Air Circulation
• To assure your wine cellar works at the maximum efficiency it was designed for,
you should install it in a location where there is proper air circulation and
electrical connections.
• The following are recommended clearances around the wine cellar:
Sides……………2 "(50mm)
Top....................4" (100mm)
Back..................2" (50mm)
• Do not over fill your wine cellar for proper internal air circulation.
N
N
O
O
T
T
E
E
:
:
A
A
l
l
l
l
o
o
w
w
e
e
n
n
o
o
u
u
g
g
h
h
s
s
p
p
a
a
c
c
e
e
i
i
n
n
t
t
h
h
e
e
f
f
r
r
o
o
n
n
t
t
o
o
f
f
t
t
h
h
e
e
u
u
n
n
i
i
t
t
t
t
o
o
o
o
p
p
e
e
n
n
t
t
h
h
e
e
d
d
o
o
o
o
r
r
t
t
o
o
1
1
2
2
0
0
˚
˚
.
.

5
English
Electrical Requirement
• Make sure there is a suitable power Outlet (110 volts, 15 amps outlet) with
proper grounding to power the wine cellar.
• Avoid the use of three plug adapters or cutting off the third grounding in order
to accommodate a two plug outlet. This is a dangerous practice since it pro-
vides no effective grounding for the wine cellar and may result in shock haz-
ard.
Use of Extension Cords
• Avoid the use of an extension cord because of potential safety hazards under
certain conditions. If it is necessary to use an extension cord, use only a 3-wire
extension cord that has a 3-blade grounding plug and a 3-slot outlet that will
accept the plug. The marked rating of the extension cord must be equal to or
greater than the electrical rating of the appliance.
Install Limitations
• Do not install your wine cellar in any location not properly insulated or heated
e.g. garage etc.
• Select a suitable location for the wine cellar on a hard even surface away from
direct sunlight or heat source e.g. radiators, baseboard heaters, cooking
appliances etc. Any surface unevenness should be corrected with the leveling
legs located on the front and rear bottom corners of the wine cellar. Avoid
placing unit where there may be electrical interference.
• Your wine cellar is designed for free-standing installation only. It is not
designed for built-in application.
N
N
O
O
T
T
E
E
:
:
T
T
o
o
m
m
i
i
n
n
i
i
m
m
i
i
z
z
e
e
t
t
h
h
e
e
r
r
i
i
s
s
k
k
o
o
f
f
r
r
u
u
s
s
t
t
i
i
n
n
g
g
,
,
l
l
e
e
a
a
k
k
a
a
g
g
e
e
a
a
n
n
d
d
i
i
n
n
s
s
u
u
l
l
a
a
t
t
i
i
o
o
n
n
d
d
a
a
m
m
a
a
g
g
e
e
,
,
a
a
v
v
o
o
i
i
d
d
p
p
l
l
a
a
c
c
i
i
n
n
g
g
t
t
h
h
e
e
u
u
n
n
i
i
t
t
i
i
n
n
a
a
p
p
l
l
a
a
c
c
e
e
w
w
h
h
e
e
r
r
e
e
h
h
e
e
a
a
v
v
y
y
m
m
o
o
i
i
s
s
t
t
u
u
r
r
e
e
i
i
s
s
p
p
r
r
e
e
s
s
e
e
n
n
t
t
.
.
U
U
n
n
d
d
e
e
r
r
n
n
o
o
c
c
i
i
r
r
c
c
u
u
m
m
s
s
t
t
a
a
n
n
c
c
e
e
s
s
s
s
p
p
i
i
l
l
l
l
o
o
r
r
d
d
i
i
r
r
e
e
c
c
t
t
l
l
y
y
a
a
p
p
p
p
l
l
y
y
w
w
a
a
t
t
e
e
r
r
o
o
n
n
t
t
o
o
o
o
r
r
i
i
n
n
t
t
o
o
t
t
h
h
e
e
u
u
n
n
i
i
t
t
.
.

Door Alignment (see fig. # 1) (HVUE12 Only))
1. Remove the top hinge cover.
2. Loosen the top hinge screws using a Phillips Head Screwdriver.
3. Adjust the door.
4. Replace the top hinge cover.
5. Adjust bottom hinge if necessary.
Installing Spacer
To ensure good ventilation,
Y
Y
O
O
U
U
M
M
U
U
S
S
T
T
install the provided ventilation spacer
as shown on the rear of the unit.
English
6
fig. # 1
ventilation
spacer

7
English
Wine Cellar Features & Use
General Features
Temperature Adjustments:
• Your wine cellar has electronic temperature control on the front of the unit.
You can set the temperature of your wine cellar at any setting you desire. The
temperature will range from 39˚F to 72˚F. When initially turned on, the LED
will show the ambient. The LED will then display the internal temperature.
N
N
O
O
T
T
E
E
:
:
W
W
h
h
i
i
t
t
e
e
w
w
i
i
n
n
e
e
t
t
e
e
m
m
p
p
e
e
r
r
a
a
t
t
u
u
r
r
e
e
i
i
s
s
c
c
o
o
o
o
l
l
e
e
r
r
t
t
h
h
a
a
n
n
r
r
e
e
d
d
w
w
i
i
n
n
e
e
t
t
e
e
m
m
p
p
e
e
r
r
a
a
t
t
u
u
r
r
e
e
.
.
By pressing the (+) temperature button on the display you can increase the
temperature and pressing the (-) temperature button will lower the temperature.
Your wine cellar also has a light for you viewing pleasure. A light switch on the
control panel will activate the light manually. Under normal operation it is best
for the light to remain off.
Please note that the actual cabinet temperature in a thermal electric unit is
dependent on the ambient temperature. You may set the cabinet temperature
within range but the unit may not reach the preset temperature.
For the HVUE12 when the ambient temperature is 77˚F the lowest temperature
that can be reached is 50˚F. When ambient temperature is 66˚F the cabinet
temperature can reach approximately 39˚F.
For the HUVUE06 when the ambient temperature is 77˚F the lowest temperature
that can be reached is 45˚F. When the ambient temperature is 71˚F the cabinet
temperature can reach approximately 39˚F.
N
N
o
o
t
t
e
e
:
:
The display temperature is from 0˚F to 99˚F. thus when the cooler is
installed if the ambient temperature is higher than 99˚F or lower then 0˚F the
display will show “--” until the cabinet has cooled down to 99˚F or warmed up to
0˚F. When the wine cooler is started the temperature display will show the ambi-
ent temperature
When the ambient temperature is below the pre-set temperature, the cellar will
not operate until the ambient temperature increase to higher than the pre
-
set
temperature.
(HVUE12)

8
Warning: To avoid electric shock always unplug your
wine cellar before cleaning. Ignoring this
warning may result in death or injury.
Caution: Before using cleaning products, always read and
follow manufacturer’s instructions and warnings to avoid
personal injury or product damage.
General:
• Prepare a cleaning solution of 3-4 tablespoons of
baking soda mixed with warm water. Use sponge or soft
cloth, dampened with the cleaning solution, to wipe down
your wine cellar.
• Rinse with clean warm water and dry with a soft cloth.
• Do not use harsh chemicals, abrasives, ammonia, chlorine
bleach,concentrated detergents, solvents or metal scouring
pads. SOME of these chemicals may
dissolve, damage and/or discolor your wine cellar.
Proper Wine Cellar Care and Cleaning
Cleaning and Maintenance
Power Interruptions
• Occasionally there may be power interruptions due to thunderstorms or other
causes. Remove the power cord from AC outlet when a power outage occurs.
When power has been restored, replug power cord to AC outlet.
Vacation and Moving Care
• For long vacations or absences, unplug the unit, empty contents from wine
cellar, and clean the wine cellar and door gaskets according to "General clean-
ing" section. P
rop doors open, so air can circulate inside.When moving always
move the wine cellar vertically
. Do not move the unit lying on its side.

English
9
Troubleshooting
Wine Cellar does not operate
• Check if wine cellar is plugged in.
• Check if there is power at the ac outlet, by checking the circuit breaker.
Wine appears too warm
• Frequent door openings.
• Allow time for recently added wine to reach desired temperature.
• Check gaskets for proper seal.
• Adjust temperature control to colder setting.
Wine temperature is too cold
• If temperature control setting is too cold, adjust to a warmer setting.
Wine cooler runs too frequently
• This may be normal to maintain constant temperature during
high temperature and humid days.
• Doors may have been opened frequently or for an extended
period of time.
• Check gasket for proper seal.
• Check to see if doors are completely closed.
Moisture build up on interior or exterior
of the wine cellar:
• This is normal during high humidity periods.
• Prolonged or frequent door openings.
• Check door gaskets for proper seal.
Wine Cellar door does not shut properly:
• Level the wine cooler.
• Check for blockages e.g. wine bottles, shelves.

English
10
What is covered and for how
long?
This warranty covers all defects in
workmanship or materials for a period
of:
12 months labor (carry-in)
12 months parts
The warranty commences on the date
the item was purchased and the origi-
nal purchase receipt must be presented
to the authorized service center before
warranty repairs are rendered.
EXCEPTIONS: Commercial or
Rental Use warranty
90 days labor (carry-in only)
90 days parts
No other warranty applies
What is covered.
1. The mechanical and electrical parts,
which serve as a functional, purpose
of this appliance for a period of 12
months. This includes all parts
except finish, and trim.
What will be done?
1. We will repair or replace, at our dis-
cretion any mechanical or electrical
part which proves to be defective in
normal usage during the warranty
period so specified.
2. There will be no charge to the
purchaser for parts and labor on
any covered items during the initial
12
month period. Beyond this period
only parts are covered in the remain-
ing warranty
. Labor is not provided
and must be paid by the customer.
3. Contact your nearest authorized
service center. For the name of the
nearest service center please call
1-877-337-3639
THIS WARRANTY COVERS
APPLIANCES WITHIN THE
CONTINENTAL UNITED STATES,
PUERTO RICO AND CANADA.
IT DOES NOT COVER
THE FOLLOWING:
Damages from improper installation.
Damages in shipping.
Defects other than manufacturing.
Damage from misuse, abuse, accident,
alteration, lack of proper care and
maintenance or incorrect current or
voltage.
Damage from other than household
use.
Damage from service by other than an
authorized dealer or service center.
Decorative trims or replaceable
light bulbs.
Transportation and shipping.
Labor (after the initial 12 months).
THIS LIMITED WARRANTY IS GIVEN IN
LIEU OF ALL OTHER WARRANTIES,
EXPRESSED OR, INCLUDING THE
WARRANTIES OF MERCHANTABILITY
AND FITNESS FOR A PARTICULAR
PURPOSE
The remedy provided in this warranty is
exclusive and is granted in lieu of all
other remedies.
This warranty does not cover incidental
or consequential damages, so the
above limitations may not apply to
you. Some States do not allow limita-
tions on how long an implied warranty
lasts, so the above limitations may not
apply to you.
This warranty gives you specific legal
rights, and you may have other rights,
which vary, from state to state.
Haier America
New Y
ork, NY 10018
Limited Warranty

11
Français
MMEESSUURREESS DDEE SSEECCUURRIITTEE
L
L
i
i
r
r
e
e
l
l
’
’
e
e
n
n
s
s
e
e
m
m
b
b
l
l
e
e
d
d
e
e
s
s
i
i
n
n
s
s
t
t
r
r
u
u
c
c
t
t
i
i
o
o
n
n
s
s
a
a
v
v
a
a
n
n
t
t
d
d
’
’
u
u
t
t
i
i
l
l
i
i
s
s
e
e
r
r
l
l
’
’
a
a
p
p
p
p
a
a
r
r
e
e
i
i
l
l
.
.
L
L
o
o
r
r
s
s
d
d
e
e
l
l
’
’
u
u
t
t
i
i
l
l
i
i
s
s
a
a
t
t
i
i
o
o
n
n
d
d
e
e
c
c
e
e
t
t
a
a
p
p
p
p
a
a
r
r
e
e
i
i
l
l
,
,
p
p
r
r
e
e
n
n
d
d
r
r
e
e
t
t
o
o
u
u
t
t
e
e
s
s
l
l
e
e
s
s
m
m
e
e
s
s
u
u
r
r
e
e
s
s
d
d
e
e
s
s
é
é
c
c
u
u
r
r
i
i
t
t
é
é
d
d
e
e
b
b
a
a
s
s
e
e
,
,
y
y
c
c
o
o
m
m
p
p
r
r
i
i
s
s
l
l
e
e
s
s
s
s
u
u
i
i
v
v
a
a
n
n
t
t
e
e
s
s
:
:
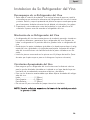
1) N’utiliser cet appareil que pour l’usage pour lequel il est prévu,
tel qu’il est indiqué dans le guide d’utilisation et d’entretien.
2)
Ce réfrigérateur à vin doit être installé correctement, selon les instructions
d'installation, avant d'être utilisé. Voir les instructions de mise à la terre
dans la section d'installation.
3) Ne jamais débrancher le réfrigérateur à vin en tirant sur le cordon
d'alimentation. Saisissez toujours la fiche fermement et la tirez-la directement
de la prise de courant.
4) Réparez ou remplacez immédiatement tous les cordons d'alimentation qui
sont frangés ou endommagés. N'utilisez pas de cordon qui présente des fis-
sures ou de l'abrasion sur le fil ou aux extrémités.
5) Débranchez votre réfrigérateur avant de le nettoyer ou d'en faire l'entretien
général.
N
N
o
o
t
t
e
e
:
:
N'essayez pas de faire les réparations vous-mêmes. Contactez
un agent de service qualifié pour toute réparation.
6) Si vous remplacez un vieux réfrigérateur à vin, enlevez les portes avant de
l'entreposer ou de le jeter et laissez les étagères en place. Cela réduira les
dangers potentiels pour les enfants.
7) Ce réfrigérateur à vin ne doit pas être suspendu ou encastré. Il est conçu pour
être installé de façon indépendante seulement (veuillez vous référer à la sec-
tion Installation pour de plus amples informations).
8) Ne faites pas fonctionner le réfrigérateur à vin en présence d'émanations
explosives.
9) N'enregistrez pas les nourritures dans le refroidisseur de vin car la tempéra-
ture intérieure peut ne pas être assez fraîche pour empêcher la détérioration
V
V
E
E
U
U
I
I
L
L
L
L
E
E
Z
Z
C
C
O
O
N
N
S
S
E
E
R
R
V
V
E
E
R
R
C
C
E
E
S
S
I
I
N
N
S
S
T
T
R
R
U
U
C
C
T
T
I
I
O
O
N
N
S
S
D
D
A
A
N
N
G
G
E
E
R
R
L
L
e
e
s
s
e
e
n
n
f
f
a
a
n
n
t
t
s
s
p
p
o
o
u
u
r
r
r
r
a
a
i
i
e
e
n
n
t
t
s
s
e
e
r
r
e
e
t
t
r
r
o
o
u
u
v
v
e
e
r
r
c
c
o
o
i
i
n
n
c
c
é
é
s
s
d
d
a
a
n
n
s
s
v
v
o
o
t
t
r
r
e
e
r
r
é
é
f
f
r
r
i
i
g
g
é
é
r
r
a
a
t
t
e
e
u
u
r
r
à
à
v
v
i
i
n
n
u
u
s
s
a
a
g
g
é
é
a
a
v
v
a
a
n
n
t
t
q
q
u
u
e
e
v
v
o
o
u
u
s
s
n
n
e
e
p
p
u
u
i
i
s
s
s
s
i
i
e
e
z
z
v
v
o
o
u
u
s
s
e
e
n
n
d
d
é
é
b
b
a
a
r
r
r
r
a
a
s
s
s
s
e
e
r
r
.
.
R
R
e
e
t
t
i
i
r
r
e
e
r
r
l
l
e
e
s
s
p
p
o
o
r
r
t
t
e
e
s
s
.
.
L
L
a
a
i
i
s
s
s
s
e
e
r
r
l
l
e
e
s
s
é
é
t
t
a
a
g
g
è
è
r
r
e
e
s
s
e
e
n
n
p
p
l
l
a
a
c
c
e
e
d
d
e
e
m
m
a
a
n
n
i
i
è
è
r
r
e
e
à
à
c
c
e
e
q
q
u
u
e
e
l
l
e
e
s
s
e
e
n
n
f
f
a
a
n
n
t
t
s
s
n
n
e
e
p
p
u
u
i
i
s
s
s
s
e
e
n
n
t
t
p
p
a
a
s
s
g
g
r
r
i
i
m
m
p
p
e
e
r
r
f
f
a
a
c
c
i
i
l
l
e
e
m
m
e
e
n
n
t
t
à
à
l
l
’
’
i
i
n
n
t
t
é
é
r
r
i
i
e
e
u
u
r
r
"
"
.
.

12
Français
Nous vous remercions d’avoir
choisi ce produit Haier. Ce guide
d’utilisation facile d’emploi permet
une utilisation optimum du
réfrigérateur á vin.
Ne pas oublier de prendre note du
numéro de modèle et de série. Ils
sont inscrits sur une plaquette
apposée l’arrière
réfrigérateur à vin.
Numéro de modèle
Numéro de série
Date d’achat
Agrafer le ticket de caisse au guide.
D
D
e
e
v
v
r
r
a
a
ê
ê
t
t
r
r
e
e
p
p
r
r
é
é
s
s
e
e
n
n
t
t
é
é
p
p
o
o
u
u
r
r
t
t
o
o
u
u
t
t
s
s
e
e
r
r
v
v
i
i
c
c
e
e
a
a
p
p
r
r
è
è
s
s
-
-
v
v
e
e
n
n
t
t
e
e
s
s
o
o
u
u
s
s
g
g
a
a
r
r
a
a
n
n
t
t
i
i
e
e
.
.
SSoommmmaaiirree
P
AGE
M
M
E
E
S
S
U
U
R
R
E
E
S
S
D
D
E
E
S
S
E
E
C
C
U
U
R
R
I
I
T
T
E
E
E
E
11
P
P
I
I
E
E
C
C
E
E
S
S
E
E
T
T
C
C
A
A
R
R
A
A
C
C
T
T
E
E
R
R
I
I
S
S
T
T
I
I
Q
Q
U
U
E
E
S
S
13
I
I
N
N
S
S
T
T
A
A
L
L
L
L
A
A
T
T
I
I
O
O
N
N
D
D
U
U
R
R
E
E
F
F
R
R
I
I
G
G
E
E
R
R
A
A
T
T
U
U
E
E
R
R
A
A
V
V
I
I
N
N
14-16
Désemballage du Réfrigérateur á Vin 14
Réglage du Réfrigérateur á Vin 14
Circulation d’Air Adéquate 14
Caractéristiques Electriques 15
L'usage de Rallonges 15
Limitations d'installation 15
Alignement de porte 16
C
C
A
A
R
R
A
A
C
C
T
T
E
E
R
R
I
I
S
S
T
T
I
I
Q
Q
U
U
E
E
S
S
D
D
U
U
R
R
E
E
F
F
R
R
I
I
G
G
E
E
R
R
A
A
T
T
E
E
U
U
R
R
A
A
V
V
I
I
N
N
18
Ajustements de Température 18
E
E
N
N
T
T
R
R
E
E
T
T
I
I
E
E
N
N
E
E
T
T
N
N
E
E
T
T
T
T
O
O
Y
Y
A
A
G
G
E
E
D
D
U
U
R
R
E
E
F
F
R
R
I
I
G
G
E
E
R
R
A
A
T
T
E
E
U
U
R
R
A
A
V
V
I
I
N
N
19
Nettoyage et Maintenance 19
Coupures de Courant 19
Entretien lors des Vacances ou d'un Déménagement 19
G
G
U
U
I
I
D
D
E
E
D
D
E
E
D
D
E
E
P
P
A
A
N
N
N
N
A
A
G
G
E
E
20-21
G
G
A
A
R
R
A
A
N
N
T
T
I
I
E
E
22

13
Français
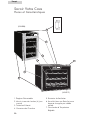
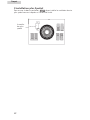
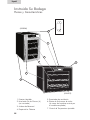
Savoir Votre Cave
Pieces et Caracteristiques
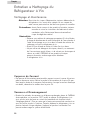
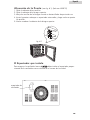
1. Étagères Démontables
2.
Mise à niveau des Jambes (4) (non
montré)
3. Traitement Enfoncé
4. Couverture de Charnière
5. Entretoise de Ventilation
6.
V
erre V
oir
-bien que Porte (la trame
de porte changera par modèle
acheté)
7. Commande de Température
Réglable
1
3
4
5
2
6
7
(HVUE06)
(HVUE12)

14
Français
Installation du Refrigérateur á Vin
Désemballage du Réfrigérateur á Vin
1. Retirer l’ensemble du matériel d’emballage. Ceci comprend la base en
mousse ainsi que l’ensemble du matériel adhésif qui maintient les accessoires
du réfrigérateur à vin l'intérieur tout comme à l’extérieur. Faire glisser et retirer
la protection plastique ou en mousse servant à préserver le compresseur de
tout dommage causé par les vibrations
2. Inspecter et enlever tout restant d’emballage, de scotch ou de
matériaux imprimés avant de brancher le réfrigérateur à vin.
Réglage du Réfrigérateur á Vin
• Votre refroidisseur de vin a quatre jambes de mise à niveau qui sont
plac dans les coins avant et arrière de votre refroidisseur de vin.
• Pour régler les pieds de mise à niveau, les tourner dans le sens des aiguilles
d’une montre afin de surélever le réfrigérateur á vin et dans le sens inverse des
aiguilles d’une montre pour l’abaisser.
• Installer les jambes en vissant dans les jambes dans le règle à l'avance les
trous de vis. (S'il vous plaît la note que la jambe qui se tient sur le gond est la
jambe plus courte.)
Circulation d’Air Adéquate
• Pour être sûr que le réfrigérateur á vin fonctionne à son maximum d'efficacité,
l'installer dans un environnement favorable à une bonne circulation d'air et
possédant des connexions de plomberie et d’électricité saines.
• Les indications suivantes concernent l’espace recommandé autour du réfrigéra-
teur á vin:
Latéralement ................2 "(50mm)
Partie supérieure..........4" (100mm)
Arrière .........................2" (50mm)
• Ne remplissez pas au-dessus du niveau votre refroidisseur de vin pour
le circulaton interne approprié d'air.
N
N
O
O
T
T
E
E
:
:
P
P
e
e
r
r
m
m
e
e
t
t
à
à
a
a
s
s
s
s
e
e
z
z
d
d
'
'
e
e
s
s
p
p
a
a
c
c
e
e
d
d
a
a
n
n
s
s
l
l
e
e
d
d
e
e
v
v
a
a
n
n
t
t
d
d
e
e
l
l
'
'
u
u
n
n
i
i
t
t
é
é
p
p
o
o
u
u
r
r
o
o
u
u
v
v
r
r
i
i
r
r
l
l
a
a
p
p
o
o
r
r
t
t
e
e
à
à
1
1
2
2
0
0
?
?

15
Français
Caractéristiques Electriques
• Pour l’alimentation du réfrigérateur á vin, veiller à utiliser une prise de courant
convenable (prise de 110 volts,15 amp) raccordée à la terre.
• Eviter d’utiliser des adaptateurs à trois fiches ou de sectionner la troisième fiche
reliée à la terre dans le but d’utiliser un branchement à deux fiches. Cette pra-
tique pourrait s’avérer dangereuse dans la mesure où le réfrigérateur á vin
n’est pas relié convenablement à la terre, et risquerait de causer des risques
d’électrocution.
L'usage de Rallonges
• Eviter l'usage d'une rallonge à cause des dangers de sûreté potentiels sous les
certaines conditions. Si c'est nécessaire d'utiliser une rallonge, utiliser seulement
une rallonge à 3 fils qui a un mettre à terre le bouchon de 3 lames et une sor-
tie de 3 entailles qui accepteront le bouchon. L'évaluer marqué de la rallonge
doit être égal à ou plus grand que l'évaluer électrique de l'appareil.
Limitations relatives à l’Installation
• Ne pas installer le réfrigérateur á vin dans un endroit qui n’est pas conven-
ablement isolé ou chauffé ; comme par exemple un garage, etc. Le réfrigéra-
teur á vin n’est pas conçu pour fonctionner à des températures inférieures à
12°C.
• Choisir un endroit convenable et placer le réfrigérateur á vin sur une surface
solide et plane, loin de sources de chaleur telles que: les radiateurs, les élé-
ments chauffants à plinthes, les cuisinières, etc. N'importe quelle inégalité de
plancher devrait être corrigée avec les jambes de mise à niveau plac sur les
coins plan et arrière de votre refroidisseur de vin.
• Votre refroidisseur de vin est conçu pour l'installation debout libre
seulement Il OS non conçu pour le bult dans l'application.
N
N
O
O
T
T
E
E
:
:
P
P
o
o
u
u
r
r
m
m
i
i
n
n
i
i
m
m
i
i
s
s
e
e
r
r
l
l
e
e
r
r
i
i
s
s
q
q
u
u
e
e
d
d
e
e
r
r
o
o
u
u
i
i
l
l
l
l
e
e
r
r
,
,
l
l
e
e
s
s
d
d
o
o
m
m
m
m
a
a
g
g
e
e
s
s
d
d
e
e
f
f
u
u
i
i
t
t
e
e
e
e
t
t
i
i
s
s
o
o
l
l
a
a
t
t
i
i
o
o
n
n
,
,
é
é
v
v
i
i
t
t
e
e
r
r
p
p
l
l
a
a
ç
ç
a
a
n
n
t
t
l
l
'
'
u
u
n
n
i
i
t
t
é
é
d
d
a
a
n
n
s
s
u
u
n
n
e
e
n
n
d
d
r
r
o
o
i
i
t
t
o
o
ù
ù
l
l
'
'
h
h
u
u
-
-
m
m
i
i
d
d
i
i
t
t
é
é
l
l
o
o
u
u
r
r
d
d
e
e
e
e
s
s
t
t
p
p
r
r
é
é
s
s
e
e
n
n
t
t
e
e
.
.
E
E
n
n
a
a
u
u
c
c
u
u
n
n
c
c
a
a
s
s
r
r
e
e
n
n
v
v
e
e
r
r
s
s
e
e
r
r
o
o
u
u
d
d
i
i
r
r
e
e
c
c
t
t
e
e
m
m
e
e
n
n
t
t
a
a
p
p
p
p
l
l
i
i
q
q
u
u
e
e
r
r
d
d
e
e
l
l
'
'
e
e
a
a
u
u
s
s
u
u
r
r
o
o
u
u
d
d
a
a
n
n
s
s
l
l
'
'
u
u
n
n
i
i
t
t
é
é
.
.

16
Français
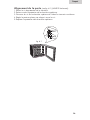
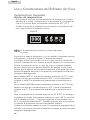
Alignement de la porte (see fig. # 1) (HVUE12 Seulement))
1. Retirer la vis de protection de la charnière.
2. Retirer ensuite la protection de la charnière supérieure.
3. Desserrer les vis de la charnière supérieure à l’aide d’un tournevis cruciforme.
4. Régler la porte ou placer une cale puis serrer les vis.
5. Replacer la protection dela charnière supérieure.
fig. # 1

17
Français
L'installation plus Spatial
Pour assurer la bonne ventilation,
V
V
O
O
U
U
S
S
devez installer la ventilation fournie
plus spatial comme indiquée sur l'arrière de l'unité.
la ventila-
tion plus
spatial

Caracteristiques et utilisation de la cave a vin
Caracteristiques generales
Ajustez la temperature:
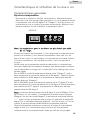
• Votre cave a vin contient un controle de temperature electronique situe au
devant de l’unite. Vous pouvez regler votre cave a vin a la temperature desiree.
La temperature varie entre 39 degres F et 72 degres F. Une fois la cave a vin
est branchee et mise en marche, le panneau de commande affichera la tem-
perature ambiante . Ensuite il affichera la temperature interne.
N
N
o
o
t
t
e
e
:
:
L
L
a
a
t
t
e
e
m
m
p
p
e
e
r
r
a
a
t
t
u
u
r
r
e
e
p
p
o
o
u
u
r
r
l
l
e
e
v
v
i
i
n
n
b
b
l
l
a
a
n
n
c
c
e
e
s
s
t
t
p
p
l
l
u
u
s
s
f
f
r
r
o
o
i
i
d
d
e
e
q
q
u
u
e
e
c
c
e
e
l
l
l
l
e
e
d
d
u
u
v
v
i
i
n
n
r
r
o
o
u
u
g
g
e
e
.
.
En pressant le bouton de temperature (+) vous augmentez la temperature et en
pressant sur le bouton (-) vous abaissez la temperature. Votre cave a vin est
fournie d’une lumiere. Un commutateur sur le panneau de commande, activera
la lumiere manuellement. Sous condition normale, il vaut mieu eteindre la
lumiere.
Veuillez noter que la temperature actuelle du cabinet dan un unite electrique
thermique depend de la temperature ambiante. Vous pouvez regler la tempera-
ture du cabinet dans la marge mais il se peut que l’unite n’atteingne pas la tem-
perature reglee.
Pour le HVUE12, quand la temperature ambiante est de 77degres F, la plus
basse temperature qui puisse etre atteinte est de 55 degresF . Quand la temper-
ature ambiante est de 66 degres F, la temperature du cabinet peut atteindre
appoximativement 39 degres F.
Pour le HUVUE06, quand la temperature ambiante est de 77 degres F, la plus
basse temperature qui puisse etre atteinte est de 45 degres F. Quand la tempera-
ture ambiante est de 71 degres F, la temperature du cabinet peut atteindre
approximativement 39 degres F.
N
N
o
o
t
t
e
e
:
:
Le panneau de commande varie de 0 degres F jusqu’a 99degres F. Une
fois la cave a vin est installee, si la temperature ambiante est plus haute que
99degres F, ou plus basse que 0 degres F, le panneau de commande affichera
“—” jusqu’a ce que la temperature de la cave a vin refroidisse et atteigne 99
degres F, ou se rechauffe et atteingne 0 degresF . Une fois la cave a vin est en
marche, le panneau de commande affichera la temperature ambiante.
Quand la temperature ambiante est au dessous du niveau de la temperature
reglee, la cave a vin ne fonctionnera pas jusqu’a ce que la temperature
ambiante escale a une temperature plus haute que celle qui est pre-reglee.
Français
18
(HVUE12)

19
Français
Attention: Pour éviter les risques d’électrocution; toujours débrancher le
réfrigérateur á vin avant de le nettoyer. Le non respect de
cette mesure peut entraîner des blessures graves ou mortelles.
Précautions: Avant d’avoir recours à des produits d’entretien, toujours
consulter et suivre les instructions du fabricant et recom-
mandations afin d’éviter toute blessure éventuelle et
risque de dégât de matériel.
Généralités:
• Préparer une solution de nettoyage comportant 3 à 4 cuillerées
à soupe de bicarbonate de soda mélangé à de l’eau chaude. A
l’aide d’une éponge ou un tissu doux humectés de solution de
nettoyage; essuyer le réfrigérateur á vin.
• Rincer à l’eau chaude et sécher à l’aide d’un tissu doux.
• Ne pas utiliser de détergents chimiques, abrasifs, ou contenant
de l’ammoniaque ou du chlore, ni de solvants ou de tampons à
récurer en métal. CERTAINS de ces produits chimiques
peuvent dissoudre, endommager et/ou décolorer
le réfrigérateur á vin.
Entretien e Nettoyage du
Réfrigerateur á Vin
Nettoyage et Maintenance
Coupures de Courant
• Des pannes d’alimentation occasionnelles peuvent survenir à cause d’une tem-
pête ou de causes autres. Retirer le cordon d’alimentation de la prise CA pen-
dant toute la durée de la coupure d’alimentation. Lorsque le courant électrique
est rétabli, rebrancher le cordon dans la prise CA.
Vacances et Déménagement
• Pendant les périodes de vacances ou d’absence prolongée, placer le CADRAN
de température sur la position ‘OFF’ (arrêt) et nettoyer le réfrigérateur á vin
ainsi que les joints de porte en suivant les procédures du chapitre intitulé
‘Nettoyage général’. Faire en sorte que la porte reste ouverte de manière à ce
que l’air puisse circuler à l’intérieur. Toujours déplacer le réfrigérateur á vin en
position verticale. Ne pas déplacer l’appareil en position horizontale.Ceci
pourrait endommager le système d’étanchéité.
La page est en cours de chargement...
La page est en cours de chargement...
La page est en cours de chargement...
La page est en cours de chargement...
La page est en cours de chargement...
La page est en cours de chargement...
La page est en cours de chargement...
La page est en cours de chargement...
La page est en cours de chargement...
La page est en cours de chargement...
La page est en cours de chargement...
La page est en cours de chargement...
La page est en cours de chargement...
La page est en cours de chargement...
La page est en cours de chargement...
La page est en cours de chargement...
-
 1
1
-
 2
2
-
 3
3
-
 4
4
-
 5
5
-
 6
6
-
 7
7
-
 8
8
-
 9
9
-
 10
10
-
 11
11
-
 12
12
-
 13
13
-
 14
14
-
 15
15
-
 16
16
-
 17
17
-
 18
18
-
 19
19
-
 20
20
-
 21
21
-
 22
22
-
 23
23
-
 24
24
-
 25
25
-
 26
26
-
 27
27
-
 28
28
-
 29
29
-
 30
30
-
 31
31
-
 32
32
-
 33
33
-
 34
34
-
 35
35
-
 36
36


Haier HVUE06 Manuel utilisateur
- Catégorie
- Boissons glacées
- Taper
- Manuel utilisateur
- Ce manuel convient également à
dans d''autres langues
- English: Haier HVUE06 User manual
- español: Haier HVUE06 Manual de usuario
Documents connexes
-
Haier HVUE06 Manuel utilisateur
-
Haier HVTS04 Manuel utilisateur
-
-
-
-
Haier HVTS18DABB - Dual-Zone Wine Cooler Manuel utilisateur
-
-
-