Harbinger MLS800 Le manuel du propriétaire
- Catégorie
- Équipement musical supplémentaire
- Taper
- Le manuel du propriétaire
Ce manuel convient également à

MLS800
LINE ARRAY PA SYSTEM
OWNER’S MANUAL

TABLE OF CONTENTS
2
MLS800 OWNER’S MANUAL
MLS800
LINE ARRAY PA SYSTEM
Important Safety information .......................................................................3
Parts ...............................................................................................................5
Collapsed vs. Extended ...............................................................................6
MLS800 Mixer Panel ...................................................................................7
Specifications ..............................................................................................10
Troubleshooting ..........................................................................................11
Warranty/FCC statements ............... ..........................................................12
WELCOME
CONGRATULATIONS on your purchase of a Harbinger
MüV MLS 800 Watt Line Array PA System. By following
these guidelines and suggestions, you’ll enjoy many years
of great sound and reliable service.
MüV Series Line Array PA Systems are perfect for musicians,
DJs, and presenters needing flexible and portable solutions
for both audience-pleasing amplification, and performer-
friendly on-stage monitoring. Your MLS800 can be
setup on a stand, or placed on a table. You can also link
multiple MüV MLS Series Line Array PA Systems to form a
larger system.
YOUR NEW MüV SERIES POWERED LOUDSPEAKER
INCLUDES:
• Full-range powered Line Array PA System
- 800 Watt Class-D Amplifier with built-in Limiter
- 6 matched 2.75-inch full-range speakers in precision line array
• 3 Channel Mixer with Line Out
- Mic/line input
- Guitar/line input
- Aux input
- Line output
• Dual band EQ
• Tower stand mount for instant audio connections
• LED indicators for power and limiter
• Built-in Bluetooth audio functionality to wirelessly connect your
portable audio device or computer
H
A
V
E
Q
U
E
S
T
I
O
N
S
?
888-286-1809
OR VISIT OUR WEBSITE AT: HARBINGERPROAUDIO.COM

MLS800
LINE ARRAY PA SYSTEM
3
MLS800 OWNER’S MANUAL
IMPORTANT SAFETY PRECAUTIONS
1. Read these instructions.
2. Keep these instructions.
3. Heed all warnings.
4. Follow all Instructions.
5. Do not use this apparatus near water.
6. Clean only with dry cloth.
7. Do not block any ventilation openings. Install in accordance with the
manufacturer's instructions. DO NOT turn on the amplifier module
before connecting all other external devices.
8. Do not install near any heat sources such as radiators, heat registers,
stoves, or other apparatus (including amplifiers) that produce heat.
9. Do not defeat the safety purpose of the polarized or grounding-type
plug. A polarized plug has two blades with one wider than the other. A
grounding type plug has two blades and a third grounding prong. The
wide blade or the third prong is provided for your safety. If the provided
plug does not fit into your outlet, consult an electrician for replacement
of the obsolete outlet.
10. Protect the power cord from being walked on or pinched particularly at
plugs, convenience receptacles, and the point where they exit from the
apparatus.
11. Only use attachment/accessories specified by the manufacturer.
12. Use only the cart, stand, tripod, bracket or table specified
by the manufacturer, or sold with the apparatus. When a
cart is used, use caution when moving the cart/apparatus
combination to avoid injury from tip-over.
13. Unplug this apparatus during lightning storms or when unused for long
periods of time.
14. Refer all servicing to qualified service personnel. Servicing is required
when the apparatus has been damaged in any way, such as power
supply cord or plug is damaged, liquid has been spilled or objects have
fallen into the apparatus, the apparatus has been exposed to rain or
moisture, does not operate normally, or has been dropped.
15. POWER SOURCES – This product should be operated only from the
type of power source indicated on the rating label. If you are not sure
of the type of power supply to your home, consult your product dealer
or local power company.
16. Where the mains plug or an appliance coupler is used as the disconnect
device, the disconnect device shall remain readily operable.
17. OBJECT AND LIQUID ENTRY – Care should be taken so that objects do
not fall and liquids are not spilled into the enclosure through openings.
18. Water and Moisture: This product should be kept away from direct
contact with liquids. The apparatus shall not be exposed to dripping or
splashing and that no objects filled with liquids, such as vases, shall be
placed on the apparatus.
19. Keep the speaker system out of extended or intense direct sun light.
20. No containers filled with any type of liquid should be placed on or near
the speaker system.
21. SERVICING – The user should not attempt any service to the speaker
and/or amplifier beyond that described in the operating instructions.All
other servicing should be referred to qualified service personnel.
22. VENTILATION – Slots and openings in the amplifier are provided
for ventilation and to ensure reliable operation of the product and to
protect it from overheating. These openings must not be blocked or
covered. The openings should never be blocked by placing the product
on a bed, sofa, rug or other similar surface. This product should not be
placed in a built-in installation such as a bookcase or rack.
23. Protective earthing terminal: The apparatus should be connected to a
main socket outlet with a protective earthing connection.
24. ACCESSORIES – Do not place this product on an unstable
cart, stand, tripod, bracket, or table. The product may fall,
causing serious injury to a child or adult, and serious damage
to the product. Use only with a cart, stand, tripod, bracket,
or table recommended by the manufacturer, or sold with the product.
25. When moving or not using the appliance, secure the power cord
(e.g., wrap it with a cable tie). Be careful not to damage the power
cord. Before using it again, make sure the power cord has not been
damaged. If the power cord has been damaged at all, bring the unit
and cord to a qualified service technician for repair or replacement as
specified by the manufacturer.
26. LIGHTNING – For added protection during a lightning storm, or when
it is left unattended and unused for long periods of time, unplug it from
the wall outlet. This will prevent damage to the product due to lightning
and power-line surges.
27. REPLACEMENT PARTS – When replacement parts are required,
be sure the service technician has used replacement parts specified
by the manufacturer or have the same characteristics as the original
part. Unauthorized substitutions may result in fire, electric shock, or
other hazards.
WARNING: To reduce the risk of fire or shock do
not expose this equipment to rain or moisture.
AVERTISEEMENT: Pour réduire les risques
d’incendie et d’électrocution, ne pas exposer ce
matérial à la pluie ou à l’humidité.
RISK OF
ELECTRIC SHOCK
DO NOT OPEN
RISQUE DE CHOC
ELECTRIQUE NE
PAS OUVRIR
RISK OF
ELECTRIC SHOCK
DO NOT OPEN
RISQUE DE CHOC
ELECTRIQUE NE
PAS OUVRIR
CAUTION: To reduce the risk of electric shock, do not
remove chassis. No user-serviceable parts inside.
Refer servicing to qualified service personnel.
AVERTISEEMENT: Pour réduire les risques d’incendie et
d’électrocution, ne pas exposer ce matérial à la pluie ou
à l’humidité.

IMPORTANT SAFETY PRECAUTIONS
4
MLS800 OWNER’S MANUAL
MLS800
LINE ARRAY PA SYSTEM
To prevent electric shock, do not use a polarized plug with an
extension cord, receptacle or other outlet unless the blades can be
fully inserted to prevent blade exposure.
WARNING: To reduce the risk of fire or shock do
not expose this equipment to rain or moisture.
AVERTISEEMENT: Pour réduire les risques
d’incendie et d’électrocution, ne pas exposer ce
matérial à la pluie ou à l’humidité.
RISK OF
ELECTRIC SHOCK
DO NOT OPEN
RISQUE DE CHOC
ELECTRIQUE NE
PAS OUVRIR
CAUTION: To reduce the risk of electric shock, do not
remove chassis. No user-serviceable parts inside.
Refer servicing to qualified service personnel.
APPARATUS SHALL NOT BE EXPOSED TO DRIPPING OR SPLASHING
AND THAT NO OBJECTS FILLED WITH LIQUIDS, SUCH AS VASES,
SHALL BE PLACED ON THE APPARATUS.
WARNING: To reduce the risk of fire or shock do
not expose this equipment to rain or moisture.
AVERTISEEMENT: Pour réduire les risques
d’incendie et d’électrocution, ne pas exposer ce
matérial à la pluie ou à l’humidité.
RISK OF
ELECTRIC SHOCK
DO NOT OPEN
RISQUE DE CHOC
ELECTRIQUE NE
PAS OUVRIR
CAUTION: To reduce the risk of electric shock, do not
remove chassis. No user-serviceable parts inside.
Refer servicing to qualified service personnel.
THIS SYMBOL IS INTENDED TO ALERT THE USER TO THE PRESENCE
OF IMPORTANT OPERATING AND MAINTENANCE (SERVICING)
INSTRUCTIONS IN THE LITERATURE ACCOMPANYING THE UNIT.
Caution - To prevent electric shock hazard, do not connect to
mains power supply while grille is removed.
Caution - To prevent electric shock hazard, replace grille.
WARNING
To reduce the risk of fire or electric shock, do not expose this
apparatus to rain or moisture.
The exclamation point triangular symbol is intended to alert the
user to the presence of important operating and maintenance
(servicing) instructions in the user manual accompanying the
Amplifier.
The lightning flash with an arrow triangular symbol is intended to
alert the user to the presence of non-insulated “dangerous voltage”
within the product’s enclosure, and may be of sufficient magnitude
to constitute a risk of electric shock.
WARNING
Handle the power supply cord with care.
Do not damage or deform it as it may cause electric shock or
malfunction when used. Hold the plug attachment when removing
from wall outlet. Do not pull on the power cord.
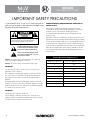
HEARING DAMAGE AND PROLONGED EXPOSURE TO
EXCESSIVE SPLS
This product is capable of producing extremely loud volume
levels that can cause permanent hearing damage to performers,
production crews or the audience. Hearing protection is
recommended during long-term exposure to high SPLs (sound
pressure levels).
Remember, if it hurts, it is definitely too loud! Long term exposure to
high SPLs first causes temporary threshold shifts; limiting your ability
to hear the actual loudness and exercise good judgment. Repeated
long-term exposure to high SPLs will cause permanent hearing loss.
Please note the recommended exposure limits in the accompanying
table. More information about these limits is available on the US
government Occupational Safety and Health (OSHA) website at:
www.osha.gov.
Permissible Noise Exposures (1)
Duration per day, hours Sound level dBA slow response
8 90
6 92
4 95
3 97
2 100
1.5 102
1 105
0.5 110
0.25 or less 115

MLS800
LINE ARRAY PA SYSTEM
PARTS
5
MLS800 OWNER’S MANUAL
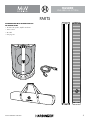
THE HARBINGER MüV MLS800 CONSISTS
OF SEVERAL PARTS
• The main sub speaker, amplifier and mixer
• Tower sections
• AC cable
• Carrying case

MLS800
LINE ARRAY PA SYSTEM
COLLAPSED VS. EXTENDED POSITION
You have a choice of whether to include or remove the center
section, to best fit your usage.
6
MLS800 OWNER’S MANUAL
QUICK START GUIDE
SETTING UP / HELPFUL TIPS
• Position the MLS800 in the desired location, and ensure the speaker is stable.
• Make sure the POWER switch is OFF.
• Make certain INPUT GAIN 1, INPUT GAIN 2, and MASTER VOLUME are down.
• Set EQUALIZER knobs to center (12 o’clock).
A
Extended Position (center section included)
This setup is best for larger performance areas such as
an auditorium or club.
B
Collapsed Position (center section removed)
This is a good setup for small gatherings such as intimate
meetings or performances where the bass and high
frequencies should be projected evenly at listeners
nearby in a sitting position.
A
B

MLS800
LINE ARRAY PA SYSTEM
7
MLS800 OWNER’S MANUAL
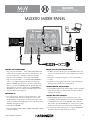
MAKING THE CONNECTIONS
• Plug connection to INPUT 1 — check that the MIC/LINE switch
matches the source (Mic for microphones and instruments, Line
for mixers, keyboards, or instruments with active pickups).
• Plug connection to INPUT 2 — this works just like INPUT 1.
• Plug connection to INPUT 3 — check that AUX/BLUETOOTH
switch is set to AUX if using physical cable connections for
INPUT 3. STEREO jack is great for your phone, mobile audio
device or computer. -10dB LINE jacks are great for keyboard,
drum machine or other line level devices. See BLUETOOTH
CONTROLS section to use a Bluetooth-enabled device as the
source for INPUT 3. (see page 8).
POWERING UP
• Turn on the power to any devices plugged into Input 1, Input
2, or Aux Input and ensure their output volumes are turned
up. (Generally you’ll get the best sound by turning their output
volume to maximum, then making any volume adjustment via the
MLS800’s input gain controls).
• Power ON the MLS800.
• Slowly turn INPUT 1 GAIN, INPUT 2 GAIN and INPUT 3 GAIN
to the desired levels.
POWER/CLIP LED AND PROPER LEVELS
• This LED should normally be green when MLS800’s AC power
cord is connected to an electrical outlet, and the Power Switch is
turned on.
• If this LED is constantly turning red, one of the input signals is
too high.
• Turn down each input gain volume knob in turn to find which is
distorting, and set that knob to avoid clipping.
FLOOR MONITOR APPLICATIONS
• Turn the LOW Equalizer knob down slightly to reduce unwanted
rumble and low-frequency build-up. This will reduce feedback
and make vocals clearer.
LINKING MULTIPLE SPEAKERS
• If linking multiple speakers, connect all input sources to the
first MLS800, plug the LINE OUT connection of first MLS800
to the LINE IN connection of next MLS800, and continue the
daisy chain to the last MLS800. (This is common where multiple
monitor mixers share the same feed from the mixing board.)
• To avoid “pops” when turning power on/off, the last MLS800
should be powered on last, and powered off first.
MLS800 MIXER PANEL

MLS800
LINE ARRAY PA SYSTEM
MLS800 MIXER PANEL
8
MLS800 OWNER’S MANUAL
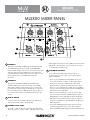
1
CHANNEL 1
This input accepts balanced XLR plugs, and balanced/unbal-
anced TRS (tip/ring/sleeve) ¼" plugs. Set the LINE/MIC
switch to match the type of device you’ve connected to prevent
distortion. When using an unbalanced ¼” instrument jack,
start with the button in LINE setting. Then, if the gain is too low,
turn the volume down, select MIC, and slowly raise
the volume.
2
CHANNEL 2
This input accepts balanced XLR plugs, and balanced/
unbalanced TRS (tip/ring/sleeve) ¼” plugs. Set the GTR/
MIC switch to match the type of device you’ve connected to
prevent distortion. When using an unbalanced ¼” instrument
jack, start with the button in GTR setting. Then, if the gain is too
low, turn the volume down, select MIC, and slowly raise the
volume.
3
AUX/BT SWITCH
Set this switch to choose whether Channel 3 should take its
audio from the AUX jacks, or Bluetooth (BT).
4
CHANNEL 3 AUX JACKS
The small
1
/
8
” jack is perfect for connecting a portable audio
device like a phone, computer, MP3, or CD player. The L (left)
and R (right) jacks can be used for -10dB line level devices like
keyboards or drum machines. For best results, do not use the
1
/
8
” and L/R jacks simultaneously.
5
BLUETOOTH CONTROLS
To use a Bluetooth-enabled device like your phone or
computer as the source for Input 3, you must first “pair” it
with your MLS800.
• Power on your MLS800, and enable Bluetooth on your
source device (phone, computer or other mobile device).
• From your source device, display its list of discovered
Bluetooth devices, and look for “Harbinger” there. If you
don’t see it, try scrolling the list to make sure it’s not hidden
off-screen. If it’s not listed, push and release the PAIR/play/
pause button on your MLS800.
• Once you do see “Harbinger” on the list, select it, and
your source device and your MLS800 will pair, while the
MLS800 plays a chime and lights the Bluetooth LED blue.
• Play audio from your Bluetooth source device, and you’ll
now hear it via INPUT 3 of your MLS800, as the Bluetooth
LED slowly flashes.
• Pressing the PAIR/play/pause button will now remotely
control the play/pause action of your device, with the
Bluetooth LED flashing during play, and solid while paused.
6
3
1
2
4
7
8
5
9

MLS800 MIXER PANEL
9
MLS800 OWNER’S MANUAL
MLS800
LINE ARRAY PA SYSTEM
• To “disconnect” your Bluetooth device from Input 3, press
and hold the PAIR/play/pause button. The LED will turn off
and you will hear a chime.
• When you power on your MLS800, it will look for any
previously paired device, and pair with it automatically if
available.
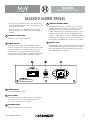
6
CHANNEL 3 LEVEL KNOB
This knob sets the volume for Channel 3.
7
POWER/CLIP LED
This LED is green to indicate that the MLS800’s AC power
cord is connected to an electrical outlet, and the Power Switch
is turned on. When audio is playing into the speaker if you
see the LED become red this indicates that the speaker is
being overdriven, and the limiter is engaged. If the CLIP LED is
constantly lit, first reduce the Gain on the Input channels.
8
LOW AND HIGH EQ KNOBS
The LOW knob will provide +/- 12dB of boost or cut below
100Hz. Turn LOW up to add bass or warmth to the speaker.
Turn LOW down to remove rumble and noise when the
program material does not contain low frequencies, or when
using the speaker as a floor monitor. The HIGH knob will
provide +/- 12dB of boost or cut above 10kHz. Turn HIGH up
to add clarity and definition to vocals, acoustic instruments, or
backing tracks. Turn HIGH down to reduce hiss or feedback.
9
LINE OUT +4DB
The LINE OUT provides a +4db level signal and is used to link
multiple MLS800 units together using the same audio signal.
Connect the LINE OUT of the first MLS800 to a Line Input of
the next MLS800 in the signal path.
10
POWER SWITCH
Turns the MLS800 ON or OFF.
11
FUSE CARRIER
Only replace the fuse when the device is disconnected from
mains. Only use fuse of the same rating and power. The
correct fuse is specified on the rear panel.
12
IEC POWER INPUT
The IEC AC cable plug inserts into this jack.
10 11
10 11 12

MLS800
LINE ARRAY PA SYSTEM
SPECIFICATIONS
10
MLS800 OWNER’S MANUAL
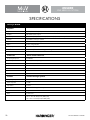
Harbinger MLS800
Amplifier
Inputs 2 x XLR/TRS combo jacks, Stereo RCA & Stereo
1
/
8
” inputs, Bluetooth
Outputs XLR balanced line output
Power output RMS 120W(SUB) RMS, 400W peak, +120W(SAT) RMS, 400W peak
Volume Input Gain control per channel
EQ Main out 2 band shelving EQ
LED’s Power / Clip indicator
Power Input 100-240V ~50/60 Hz switchable 250W
Amplifier Class D amplifier with switching power design
Subwoofer Active vented subwoofer
Frequency Response 55-200Hz
Max output SPL 114dB (at max amp output)
Impedance 4 Ohm
Driver 8” subwoofer, 1.5” vc 33Oz
Cabinet PP plastic
Grill 1.0mm steel
Satellite Passive full-range speaker
Frequency response 180-20kHz
Max output SPL 114dB
Impedance 4 ohms
Driver 6 x 2.75” full range line array
Cabinet PP plastic
Grill 1.0mm steel
MEAS / G.W.
10.5 x 20 x 85.5CM/1PC/5KG (SAT)
52 x 41.5 x 52.5CM/1PC/13KG (SUB)

MLS800
LINE ARRAY PA SYSTEM
TROUBLESHOOTING
11
MLS800 OWNER’S MANUAL
Mixer and Amplifier Will Not Turn On
Is the included power cord correctly connected to a power outlet?
Amplifier Turns Off Suddenly
Are any vents of the mixer blocked? Since inadequate venting will cause the product to overheat, turn off the mixer and uncover the
vents to allow the product & its internal amplifier to cool. After a few minutes, the product should reset itself and can return to normal
playback.
Is the POWER/CLIP LED flashing continuously?
If the POWER/CLIP LED is flashing, the amplifier is being used beyond its design capabilities. Turn off and on and
resume playback.
No Sound From the Speaker(s)
Are external instruments and/or microphones correctly connected to inputs? Are those sources powered on, and is all cabling
functional? Are the input gain controls of all active inputs set appropriately? If using Bluetooth, is the AUX/BLUETOOTH switch
set to Bluetooth, have your source device and MLS800 been successfully paired, is your source device still active (not asleep
or out of battery power), and playing out audio, with its output level control set appropriately?
Distortion/Noise in the Audio Signal, Low Output Level
You will generally get lowest noise (hiss) by having any source device’s own output level set to max, and then making any reductions
of volume via the MLS800 input gain knobs. Are the output levels of any source devices set appropriately? Are the INPUT GAIN
controls for all inputs set to appropriate levels? Are the MIC/LINE switches of each input set appropriately? Are both the STEREO jack
and the -10dB LINE IN jacks on INPUT 3 being used (connected) at the same time? If the POWER/CLIP LED is lighting, you should try
adjusting each INPUT GAIN knob in turn to find which is the source of clipping.
Sound Level is too loud During Voice Announcements
Is the INPUT GAIN level for the input for the mic set too high? Are the levels for your other inputs set too low, either on the source
device(s), or at their INPUT GAIN controls?

12
MLS800 OWNER’S MANUAL
MLS800
LINE ARRAY PA SYSTEM
WARRANTY
2 YEAR HARBINGER LIMITED WARRANTY
Harbinger provides, to the original purchaser, a two (2) year limited warranty on
materials and workmanship on all Harbinger cabinets, loudspeaker and amplifier
components from the date of purchase.
For warranty support, please visit our website at www.HarbingerProAudio.com,
or contact our Support Team at 888-286-1809 for assistance. Harbinger will repair
or replace the unit at Harbinger’s discretion.
This warranty does not cover service or parts to repair damage caused by neglect,
abuse, normal wear and tear and cosmetic appearance to the cabinetry not directly
attributed to defects in materials or workmanship. Also excluded from coverage are
damages caused directly or indirectly due to any service, repair(s), or modifications
of the cabinet, which has not been authorized or approved by Harbinger. This
two (2) year warranty does not cover service or parts to repair damage caused
by accident, disaster, misuse, abuse, burnt voice-coils, over-powering, negligence,
inadequate packing or inadequate shipping procedures.
The sole and exclusive remedy of the foregoing limited warranty shall be limited
to the repair or replacement of any defective or non-conforming component. All
warranties including, but not limited to, the express warranty and the implied
warranties of merchantability and fitness for a particular purpose are limited to the
two (2) year warranty period. Some states do not allow limitation on how long an
implied warranty lasts, so the above limitation may not apply to you. There are no
express warranties beyond those stated here. In the event that applicable law does
not allow the limitation of the duration of the implied warranties to the warranty
period, then the duration of the implied warranties shall be limited to as long as is
provided by applicable law. No warranties apply after that period.
Retailer and manufacturer shall not be liable for damages based upon
inconvenience, loss of use of product, loss of time, interrupted operation or
commercial loss or any other incidental or consequential damages including but not
limited to lost profits, downtime, goodwill, damage to or replacement of equipment
and property, and any costs of recovering, reprogramming, or reproducing any
program or data stored in equipment that is used with Harbinger products. This
guarantee gives you specific legal rights; you may have other legal rights, which
vary from state to state.
Harbinger P.O. Box 5111, Thousand Oaks, CA 91359-5111
All trademarks and registered trademarks mentioned herein are recognized as the
property of their respective holders
1610 16117896
FCC STATEMENTS
1. Caution: Changes or modifications to this unit not expressly approved by the
party responsible for compliance could void the user’s authority to operate the
equipment.
2. Note: This equipment has been tested and found to comply with the limits for
a Class B digital device, pursuant to Part 15 of the FCC Rules. These limits are
designed to provide reasonable protection against harmful interference in a
residential installation. This equipment generates, uses, and can radiate radio
frequency energy and, if not installed and used in accordance with the instructions,
may cause harmful interference to radio communications. However, there is
no guarantee that interference will not occur in a particular installation. If this
equipment does cause harmful interference to radio or television reception, which
can be determined by turning the equipment off and on, the user is encouraged to
try to correct the interference by one or more of the following measures:
• Reorient or relocate the receiving antenna.
• Increase the separation between the equipment and receiver.
• Connect the equipment into an outlet on a circuit different from that to which
the receiver is connected.
• Consult the dealer or an experienced radio/TV technician for help.
Have a question about service, warranty or parts?
CALL 888-286-1809 (TOLL FREE)
So we may serve you better, please register on-line at www.HarbingerProAudio.com
-
 1
1
-
 2
2
-
 3
3
-
 4
4
-
 5
5
-
 6
6
-
 7
7
-
 8
8
-
 9
9
-
 10
10
-
 11
11
-
 12
12


Harbinger MLS800 Le manuel du propriétaire
- Catégorie
- Équipement musical supplémentaire
- Taper
- Le manuel du propriétaire
- Ce manuel convient également à
dans d''autres langues
- English: Harbinger MLS800 Owner's manual
Documents connexes
Autres documents
-
Simmons DA2012B Manuel utilisateur
-
Peavey Impulse 1015P Manuel utilisateur
-
YORKVILLE YXL15P Le manuel du propriétaire
-
YORKVILLE EF215P Le manuel du propriétaire
-
-
 YORKVILLE TX8P Le manuel du propriétaire
-
Ashly MX-406 Mode d'emploi
-
Crest Audio LQ10P LOUDSPEAKER - S Manuel utilisateur
-
Taylor Circa Mode d'emploi
