ibx LBX INC-R Refrigerated Manuel utilisateur
- Taper
- Manuel utilisateur

LBX INC-R Refrigerated Incubator
Please read the User Manual carefully before use, and follow all operating and safety instructions!
user manual
english

2
User Manual
LBX INC-R Refrigerated Incubator
Preface
Users should read this Manual carefully, follow the instructions and procedures, and beware of all the cautions
when using this instrument.
Service
If help is needed, you can always contact your dealer or Labbox via www.labbox.com (declare an incidence)
Please, provide the customer service representative with the following information:
▪Serial number
▪Description of the problem
▪Your contact information
Warranty
This instrument is guaranteed to be free from defects in materials and workmanship under normal use and service,
for a period of 24 months from the date of invoice. The warranty is extended only to the original purchaser. It
shall not apply to any product or parts which have been damaged on account of improper installation, improper
connections, misuse, accident or abnormal conditions of operation.
For claim under the warranty, please contact your supplier.

3
Structure features
1. The case is made of high quality cold-rolled steel plate with plastic spraying on the surface.
2. Mirror-stainless working room, easy cleaning, shelves can be adjusted.
3. Micro-Computer Temp. Controller and Automatic defrosting system, big LCD Screen.
4. Sole Temp. limited alarm system. Over-Temp. electric cut off and timing function.
5. R134A compressor and fans.
6. Double doors, inner door is of mirror stainless steel, silicon seal, outside door is of magnetic silicon.
7. 50mm diameter test hole.
Product specifications
Model
INCR-070-001
INCR-150-001
Voltage
220~240V 50Hz/60Hz
Temp. Range
0-65℃
Temp. Motion
±0.5℃
Temp. Uniformity
±1,5℃
Cryogen
R134a
Power
800W
1000W
Inner Chamber size (cm)
35 x 41,5 x 50
40 x 49 x 75
Exterior Size (cm)
56 x 57 x 103
62 x 64 x 129
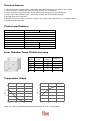
Inner Chamber Temp. Distribution map
9
7
8
4
1
3
2
6
5
Temperature Graph
3020100
30 60
10 20 30 40 50 60
30 40 50 90
Tem
Tine
Tine
Tem
Freeze Characteristic Graph(SPX-250 model)
Freeze Characteristic Graph(SPX-250 model)
Note: The above specification testing has been made in a 25 ºC environment
Temp.
point
Temp.
(℃)
Temp.
point
Temp.(℃)
①
36.63
⑤
36.91
②
36.93
⑥
36.86
③
37.50
⑦
36.88
④
37.33
⑧
36.64
⑨
37.15

4
Working conditions
1. Environment Temp.: 5~32℃ (if setting temp.≦10℃,environment≦28℃).
2. Humidity:≦80%RH 3. Air Pressure: 80-106Kpa
4. There must be no shaking of the incubator and no caustic air around the chamber.
5. Should avoid light and cooling environment.
6. Keep distance of dust, install horizontally and make sure there is distance between the equipment and wall.
Safety information
1. After you receive the equipment, to avoid the damage of the compressor during a long transportation period,
please keep the machine without moving during one day before using it. To make sure equipment safety, please
install outer protection and also supply power as the equipment requires.
2. Do not test the flammable, combustible, poisonous or corrosive material.
3. The equipment should be installed horizontally.
4. Only trained personnel can disassembly and repair the equipment.
5. If you add one working equipment into the chamber, if the power is bigger than 2A, plug the power outside,
do not use this equipment power.
6. When the chamber temp.≧50 ℃, please do not set the low temp. settings to make sure the compressor can
be used for a long time.
7. Anyone who operates the equipment must first read this manual
Operation cautions
1. There is a test hole at the top of the incubator. If you add another equipment inside the chamber, please do it
through this hole.
2. If there is no need for U.V. light, turn off the U.V. lamp to avoid influence on temperature.
3. Before operating the cooling function, please dry the chamber for 1 hour under 50 ºC.
4. The chamber has a vertical air system. Please do not fully fill the shelfs with materials, the test material must
occupy less than 1/3 of the shelf.
5. Once the test environment > 35℃ or Use Temp. > 50℃, do not set the low temp. setting
6. Please clean the chamber and surface of the machine with pure water. When the machine is not used, please
plug off the electricity, and make sure the inside and outside is clean and dry.

5
Controller operation instruction
ⅰ. Controller Specification
Temp. setting range: 0.0 - 60.0 ℃
Timer setting range: 0 - 99minutes 59 seconds
Display error: < 0.5%
Sensor: PT100
ⅱ. Instruction of panel
UP/Light
Illuniation Set
DOWN/ Opeate
Alarm
Refrigeration
Heating
Stop
83 0.0
Tem. testting number
Tem. setting number
℃
83 0.0
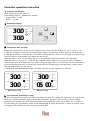
ⅲ. Temperature time operation
Example: Set temperature to 30 ºC, once reached, 5 hours later, stop the machine (T = 30 ºC. Timer = 5 h)
1. Click the set button to enter into the setting temp. condition, set the temp. at 30℃ using up and down keys.
2. Click the set button, to enter the timer set condition, change the hours from “0” to “5” using up and down keys,
once you need to set the minutes, also follow the above step.
When the timer is set to “0”, it is means there is no timing function, and the incubator runs continuously.
When the timer is not set to “0”, when the inner chamber temp. reaches the set temp. the timer will initiate,
when the time ends, the machine will stop. When it stops, the light will turn on, the buzzer will tweet 30 seconds,
press the down keyboard for 4 seconds, the system will start working again, when the buzzer sounds, please
click any keyboard to stop the sound.
3. Illumination: click the illumination button and then it will turn on, click again and it will close.
Without timer setting With timer setting
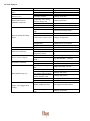
ⅳ. Inner Chamber Specification setting
Press the set button for more than 3 seconds, the screen will show “LC”. Modify the number to “3” using up and
down keys, click the set button again to access the parameters. By clicking the set button, you can change
through the parameters in the next table and modify each specification, press the set button for 3 seconds to
exit the settings, the specification will be saved automatically. If during 30 seconds, no button is pressed, it will
exit settings automatically and will not keep the specification.
Alarm
制冷
Heating
停止
Stop
3 0.0
Tem. testting number
Tem. Setting number运行时间
时间设定 时间设定
℃
3 00.
报警
制冷
停止
温度设定值
定
Refrigeration
Alarm
Heating
Stop
3 0.0
Tem. testting number
Tem. Setting number
℃
3 00.
Refrigeration
Alarm
制冷
Heating
停止
Stop
3 0.0
Tem. testting number
Tem. Setting number运行时间
时间设定 时间设定
℃
Refrigeration
Alarm
Heating
Stop
3 0.0
Tem. testting number
Tem. Setting number
℃
Refrigeration
Alarm
05 00:

6
1. The internal parameters as follows:
Parameter
Name Function
(Range)
Factory Specification
Lc
Password :“Lc=3”can modify the specification
P--
Proportional band : Time proportional adjust function:
Down P, can heat fast, UP P will reduce the over-
adjust
(2.0~25.0)
15.0
AL--
Over-Temp. Display error alarm:
Under “PV﹤SP+Al”, buzzer tweeting and make
refrigeration
(0.0~20.0)
3.0℃
CT--
Compressor operate delay:
Compressor delay protect time, operate twice time﹥
﹦cT minutes
(0.~10.0Min)
3 Min
Up--
Heating refrigeration backlash: compressor in manual
mode, when “PV﹥﹦SP+uP” and compressor delay
time out, then compressor begin to work
(-50.0~50.0)
0.2
Dn--
Cooling refrigeration backlash: compressor in manual
model, when “PV<﹦SP+dn”, the compressor shut
down.
-51.0~uP-0.1)
0
T--
Control cycle
(1~60sec)
5
P--
Proportional band
(1.0~measure value)
35
I--
Integration time
(1~1000sec)
200
d--
Differential time
(1~1000sec)
200
Pb--
“0” adjust: Sensor zero display error adjusts.
Pb= actual temp.-display number
(-9.9~9.9)
0.0
Pk--
Full adjust: Sensor full error adjusts.
PK=1000*(actual temp.-display number)/meter test
number
(-999~999)
0
Note: 1. To make sure the precise result, can modify the P ( range between 10.0~20.0), normally it does not need
any change, please use the factory specification.
2. When display error, normally change the Pb, no need change the PK.

7
2. Check ambient Temperature
Press the set button for more than 3 seconds, it will show “LC”, change it to “18” using up and down keys. Click
set button and screen will show the ambient temperature. Press set button 3 seconds to exit this screen, the
specification will keep automatically. If during 30 seconds, no button is pressed, it will exit settings automatically
and will not keep the specification.
3. Compressor operating mode and frost related parameters
Press the set button for more than 3 seconds, it will show “LC”, change it to “123” using up and down keyboard,
click set button, can check the internal parameter value. Press the SET key to change parameters and up and
down arrows to modify each parameter value and then click SET button for more than 3 seconds to leave this
screen, the specification will keep automatically. If during 30 seconds, no button is pressed, it will exit settings
automatically and will not keep the specification.
Paramet
er
Name
Function
(Range)factory
value
Lc-
Password
when“Lc=18”, we can check the ambient
temperature.
Hd-
Ambient
temp.
Parameter
Parameter Function
(range)Factory value
Lc-
“Lc=123”can see and modify each parameter.
S-H
When “ambient temp.-SH” > Temp. Setting value,
the compressor normally open operation. On the
contrary, the compressor break-off work.
Note: when” S-H=50.0”, the compressor doesn’t
work.
(-20.0~50.0)
40.0
Ft-
Fan delay, stop the fan when frost;After frost
melting, fan delay Ft- second start.
(0~99s)50S
dt1
SP≤15℃ Frost interval 1
(0~250Hours)
12Hours
Hs1
Frost melting output 1
(0~250S) 60S
dt2
15℃<SP≤30℃ Frost interval 2
(0~250Hours)
12Hours
Hs2
Frost melting output 2
(0~250S) 55S
HA
Compressor switched on and off automatically.
1 is to automatically judge the switch compressor
according to the ambient temperature.
0 is to control the compressor on and off according
uP and dn.
(0~1)1
cH
Frosting and evaporator switching options, 0 for
frosting, 1 for evaporation switching
(0~1)0

8
XI. Fault Analysis
Phenomenon
Cause analysis
Treatment
Power director does not
show
Without power
Inspect the plug
Fuse broken
Change fuse
Temp. Controller
shows“□□□□”
Sensor broken
Change sensor
Controller broken
Change controller
Evaporator frost or
Chamber with frost
Open the door
frequently when doing
the Low-Temp. test
Over 50 degree make dry and
reduce open door
Left hole with bad seal
Inject the inner hole by rubber
Door opening
Close the door
Hard to make the Temp.
down
Evaporator frost
Dry the chamber
Environment Temp. too
high
Down environment Temp.
Fan works or not
Check fuse and fan
Compressor works or not
Change Compressor
Compressor works but not
refrigeration
Check the cryogen
Check the ice or oil block
Specification mixed
Setting correct and restart
Temp. up continue
Evaporator frost
Dry the chamber
Abnormal Knocking
Circle Fans loose
Check and adjust
Condenser, Fan,
compressor loose
Check and adjust or contact with
us
Bad evenness degree
Sample hot
Reduce sample quantity
Evaporator frost、wind
block
Dry the chamber、Restart
Controller instability
Power do not match
Change the Power
Voltage instability
Make sure stability voltage
Hard make Temp. up
Over-Temp. setting too
low
Adjust the Temp. correct
Meter setting too low
Set the Temp. correct
Meter heating director on
but without input function
Change the meter
Meter heating but the
heater doesn’t work
Change the heater
Fan doesn’t work
Change fan or fuse
Sensor broken
Change sensor
Temp. over bigger than
setting
Meter setting incorrect
Set again and the manual
Heater working do not
stop
Change Controller

9
Nota importante para los aparatos electrónicos vendidos en España
Important note for electronic devices sold in Spain
Remarque importante pour les appareils électroniques vendus en Espagne
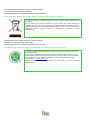
Instrucciones sobre la protección del medio ambiente y la eliminación de aparatos electrónicos:
Nota importante para los aparatos electrónicos vendidos en Francia
Important note for electronic devices sold in France
Remarque importante pour les appareils électroniques vendus en France
Informations sur la protection du milieu environnemental et élimination des déchets électroniques :
Los aparatos eléctricos y electrónicos marcados con este símbolo no pueden desecharse en
vertederos.
De conformidad con la Directiva 2002/96/ CE, los usuarios de la Unión Europea de
aparatos eléctricos y electrónicos, tienen la oportunidad de retornar el instrumento para su
eliminación al distribuidor o fabricante del equipo después de la compra de uno nuevo. La
eliminación ilegal de aparatos eléctricos y electrónicos es castigada con multa
administrativa.
Les appareils électriques et électroniques portant ce symbole ne peuvent pas être jetés
dans les décharges.
En réponse à la règlementation, Labbox remplit ses obligations relatives à la fin de vie
des équipements électriques de laboratoire qu’il met sur le marché en finançant la filière
de recyclage de Récylum dédiée aux DEEE Pro qui les reprend gratuitement (plus
d’informations sur www.recylum.com).
L’élimination illégale d’appareils électriques et électroniques est punie d’amende
administrative.

www.labbox.com
-
 1
1
-
 2
2
-
 3
3
-
 4
4
-
 5
5
-
 6
6
-
 7
7
-
 8
8
-
 9
9
-
 10
10


ibx LBX INC-R Refrigerated Manuel utilisateur
- Taper
- Manuel utilisateur
dans d''autres langues
Autres documents
-
Phcbi MCO-80IC-PE Mode d'emploi
-
Danfoss AK-CC 250 (115V Guide d'installation
-
AccuCold MLRS62BIADAMCLK Manuel utilisateur
-
-
-
lbx instruments HDB Digital LED Dry Bath Manuel utilisateur
-
-
Danfoss Application Handbook - Automatic Controls for Industrial Refrigeration Systems Mode d'emploi
-
-
Baxi LUNA HT 1.650 Installation And Servicing Instructions