Aiwa XC-37M Operating Instructions Manual
- Catégorie
- Lecteurs de cassettes
- Taper
- Operating Instructions Manual

8A-AM1-903-01
000228AMI-U-9
En (English)
E (Español)
XC-37M
U
F (Français)
OPERATING INSTRUCTIONS
MANUAL DE INSTRUCCIONES
MODE D’EMPLOI
COMPACT DISC PLAYER
REPRODUCTOR DE DISCOS COMPACTOS
LECTEUR DE DISQUES COMPACTS
For assistance and information
call toll free 1-800-BUY-AIWA
(United States and Puerto Rico)

1
ENGLISH
ENGLISH
PRECAUTIONS
Read the Operating Instructions carefully and completely before
operating the unit. Be sure to keep the Operating Instructions
for future reference. All warnings and cautions in the Operating
Instructions and on the unit should be strictly followed, as well
as the safety suggestions below.
Installation
1 Water and moisture — Do not use this unit near water, such
as near a bathtub, washbowl, swimming pool, or the like.
2 Heat — Do not use this unit near sources of heat, including
heating vents, stoves, or other appliances that generate heat.
It also should not be placed in temperatures less than 5°C
(41°F) or greater than 35°C (95°F).
3 Mounting surface — Place the unit on a flat, even surface.
4 Ventilation — The unit should be situated with adequate
space around it so that proper heat ventilation is assured.
Allow 10 cm (4 in.) clearance from the rear and the top of the
unit, and 5 cm (2 in.) from the each side.
- Do not place the unit on a bed, rug, or similar surface that
may block the ventilation openings.
- Do not install the unit in a bookcase, cabinet, or airtight rack
where ventilation may be impeded.
5 Objects and liquid entry — Take care that objects or liquids
do not get inside the unit through the ventilation openings.
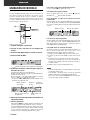
6 Carts and stands — When
placed or mounted on a stand or
cart, the unit should be moved
with care.
Quick stops, excessive force, and
uneven surfaces may cause the
unit or cart to overturn or fall.
WARNING
TO REDUCE THE RISK OF FIRE OR ELECTRIC
SHOCK, DO NOT EXPOSE THIS APPLIANCE TO
RAIN OR MOISTURE.
“CAUTION:TO REDUCE THE RISK OF
ELECTRIC SHOCK,
DO NOT REMOVE COVER (OR BACK).
NO USER-SERVICEABLE PARTS INSIDE.
REFER SERVICING TO QUALIFIED
SERVICE PERSONNEL.”
CAUTION
RISK OF ELECTRIC SHOCK
DO NOT OPEN
Explanation of Graphical Symbols:
The lightning flash with arrowhead symbol, within
an equilateral triangle, is intended to alert the user
to the presence of uninsulated “dangerous voltage”
within the product’s enclosure that may be of
sufficient magnitude to constitute a risk of electric
shock to persons.
The exclamation point within an equilateral triangle
is intended to alert the user to the presence of
important operating and maintenance (servicing)
instructions in the literature accompanying the
appliance.
7 Condensation — Moisture may form on the CD pickup lens
when:
- The unit is moved from a cold spot to a warm spot
- The heating system has just been turned on
- The unit is used in a very humid room
- The unit is cooled by an air conditioner
When this unit has condensation inside, it may not function
normally. Should this occur, leave the unit for a few hours,
then try to operate again.
8 Wall or ceiling mounting — The unit should not be mounted
on a wall or ceiling, unless specified in the Operating
Instructions.
Electric Power
1 Power sources — Connect this unit only to power sources specified
in the Operating Instructions, and as marked on the unit.
2 Polarization — As a safety feature, some units are equipped
with polarized AC power plugs which can only be inserted
one way into a power outlet. If it is difficult or impossible to
insert the AC power plug into an outlet, turn the plug over and
try again. If it still does not easily insert into the outlet, please
call a qualified service technician to service or replace the
outlet. To avoid defeating the safety feature of the polarized
plug, do not force it into a power outlet.
3 AC power cord
- When disconnecting the AC power cord, pull it out by the
AC power plug. Do not pull the cord itself.
- Never handle the AC power plug with wet hands, as this
could result in fire or shock.
- Power cords should be routed to avoid being severely bent,
pinched, or walked upon. Pay particular attention to the cord
from the unit to the power socket.
- Avoid overloading AC outlets and extension cords beyond
their capacity, as this could result in fire or shock.
4 Extension cord — To help prevent electric shock, do not use a
polarized AC power plug with an extension cord, receptacle, or
other outlet unless the polarized plug can be completely inserted
to prevent exposure of the blades of the plug.
5 When not in use — Unplug the AC power cord from the power
outlet if the unit will not be used for several months or more.
When the cord is plugged in, a small amount of current continues
to flow to the unit, even when the power is turned off.
Maintenance
Clean the unit only as recommended in the Operating
Instructions.
Damage Requiring Service
Have the units serviced by a qualified service technician if:
- The AC power cord or plug has been damaged
- Foreign objects or liquid have got inside the unit
- The unit has been exposed to rain or water
- The unit does not seem to operate normally
- The unit exhibits a marked change in performance
- The unit has been dropped, or the cabinet has been damaged
DO NOT ATTEMPT TO SERVICE THE UNIT YOURSELF.

En
ENGLISH
2
TABLE OF CONTENTS
PRECAUTIONS ................................................................... 1
PREPARATIONS
CONNECTIONS .................................................................. 2
BEFORE OPERATION ........................................................ 3
REMOTE CONTROL ........................................................... 3
CD PLAYING
BASIC OPERATIONS ......................................................... 4
RANDOM/REPEAT PLAY ................................................... 5
PROGRAMMED PLAY ........................................................ 6
RECORDING
AI EDIT RECORDING ......................................................... 7
PROGRAMMED EDIT RECORDING.................................. 8
GENERAL
CARE AND MAINTENANCE .............................................. 9
SPECIFICATIONS ............................................................... 9
PARTS INDEX ................................................................... 10
Owner’s record
For your convenience, record the model number and serial
number (you will find them on the rear of your set) in the space
provided below. Please refer to them when you contact your Aiwa
dealer in case of difficulty.
Model No. Serial No. (Lot No.)
XC-37M
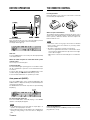
PREPARATIONS
PREPARATIONS
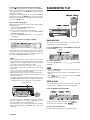
CONNECTIONS
Before connecting the AC cord
The rated voltage of your unit shown on the rear panel is 120 V
AC. Check that the rated voltage shown on the rear panel matches
your local voltage.
IMPORTANT
• Insert plugs firmly into the jacks. A loose connection may cause
noise.
• Connect AC cords after connecting all equipment.
• Consult the operating instructions of the connected equipment
before making connections.
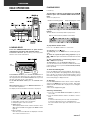
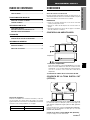
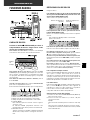
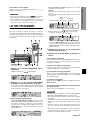
CONNECTING TO AN AMPLIFIER
1
Connect the amplifier.
Connect the red plug to the AUDIO OUT R jack and white
plug to the L jack with the supplied audio connecting cord
with RCA phono plugs. Likewise connect the plugs to the CD
or AUX IN jacks of the amplifier.
2
Connect the AC cords to AC outlets.
CONNECTING TO DIGITAL OUT (OPTICAL)
JACK
This unit can output CD digital sound signals through this jack.
Use an optical cable to connect digital audio equipment (digital
amplifier, DAT deck, MD recorder, etc.).
Remove the dust cap a from the DIGITAL OUT (OPTICAL) jack.
Then, connect an optical cable plug b to the DIGITAL OUT
(OPTICAL) jack.
When the DIGITAL OUT (OPTICAL) jack is not being used
Attach the supplied dust cap.
XC-37M
Amplifier

3
ENGLISH
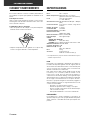
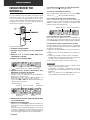
THE REMOTE CONTROL
Inserting batteries
Detach the battery cover on the rear of the remote control and
insert two R6 (size AA) batteries.
When to replace the batteries
The maximum operational distance between the remote control
and the sensor in the display window should be approximately 5
meters (16 feet). When this distance decreases, replace the
batteries with new ones.
NOTE
• If the remote control is not going to be used for an extended
period of time, remove the batteries to prevent possible
electrolyte leakage.
• The remote control may not operate correctly when:
- The line of sight between the remote control and the remote
sensor inside the display window is exposed to intense light,
such as direct sunlight
- Other remote controls are used nearby (those of a television,
etc.)
BEFORE OPERATION
To turn on the unit
After connecting the AC cord of the connected amplifier, press the
POWER button on the amplifier and on the CD player.
The display window lights up.
After use
Press the POWER button to turn off the power. 6 is displayed dimly
on the display window.
When the radio reception of connected stereo system
contains noise
Turn off the power of this CD player.
The flash window
The flash window lights up during power on and flashes when
the disc compartment is opened or closed, and when the trays
are rotated.
To turn the flash window off, press the POWER button on the
unit while keeping the s STOP/CLEAR button pressed.
To turn the flash window back on, repeat the procedure.
Auto power off (SLEEP)
Press the SLEEP button on the unit during CD playing. The
SLEEP indicator is displayed, and the power automatically turns
off when the play finishes.
The SLEEP button can function only when it is pressed during
CD playing.
To cancel the auto power off
Press the SLEEP button while CD playing, so that SLEEP
indicator on the display disappears.
NOTE
• If the SLEEP button is pressed while the repeat play is in
operation, the repeat play is canceled.
• Do not subject the unit to shocks while the disc compartment is
opening or closing. Doing so can cause errors or damage the
discs.
Using the headphones
Connect headphones to the PHONES jack with a stereo standard
plug (ø6.3 mm,
1
/4 inch).

En
ENGLISH
4
PREPARATIONS
CD PLAYING
CD PLAYING
BASIC OPERATIONS
LOADING DISCS
Press the z OPEN/CLOSE button to open the disc
compartment. Load disc(s) with the label side up.
To load one or two discs, place the disc(s) on the tray(s) in the
direction of the arrows as illustrated.
To load three to five discs, press the DISC CHANGE button to
rotate the trays after placing two discs. Place the next disc on
the empty tray. Each time the DISC CHANGE button is pressed,
the trays rotate and one disc can be placed.
To use with the remote control, press the CHANGE button
instead.
After placing the discs, press the zOPEN/CLOSE button to
close the disc compartment.
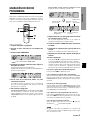
The display shows the information of the disc to be played.
1 Disc number of the disc in the playback tray
2 Total number of tracks on the selected disc
3 Total playing time of the selected disc
4 OVER indicator
This is displayed when the disc contains 21 tracks or more.
While a track after 20th is being played, the OVER indicator
lights up.
5 Music calendar
Note that only the first 20 tracks are displayed, even if the
disc contains 21 tracks or more.
PLAYING DISCS
Load disc(s).
To play all discs in the disc compartment, press the ca
button or press one of the DISC DIRECT PLAY buttons
twice.
All discs are played once.
To play one disc only, press one of the DISC DIRECT PLAY
buttons.
The disc with the selected tray number is played once.
To play with the remote control
Press one of the DISC 1-5 buttons to select a disc.
To stop play, press the s button.
To pause play, press the ca button. To resume play, press
again.
To search for a particular point during playback, keep the
r or t button pressed and release the button at the desired
point.
To skip to the beginning of a track during playback, press
r or t button repeatedly.
To remove discs, press the z OPEN/CLOSE button.
You can remove the two discs that face you. When the disc to be
removed does not face you, press the DISC CHANGE(CHANGE)
button repeatedly.
To check the remaining time
Press the DISPLAY button during playback. Each time it is
pressed, the elapsed time of the playing track, the elapsed playing
time of the disc, the amount of time remaining until the current
track finishes playing, and the amount of time remaining until all
tracks finish playing are displayed in turn.
To skip discs
Press the DISC SKIP button on the remote control to skip a disc
and press the c/a button to play the next disc. Play begins
with the next disc and all the discs are played once, including the
skipped disc.
• Discs can be skipped during play.
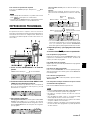
Selecting a track directly
1 Press one of the DISC DIRECT PLAY(DISC 1-5) buttons to
select a disc.
2 Press the numbered buttons and the +10 button to select a
track.
Example:
To select the 25th track, press the +10, +10 and 5 buttons.
To select the 10th track, press the +10 and 0 buttons.
The selected track starts to play and continues to the end of
that disc.
Number of track being played
Elapsed playing time of track
Tray
number
Only the selected disc tray number is surrounded

5
ENGLISH
Replacing discs during play
While one disc is playing, the other discs can be replaced without
interrupting play.
1 Press the DISC CHANGE(CHANGE) button.
Two discs can be replaced.
2 Remove the discs and replace with other discs.
To replace the other two discs, press the DISC CHANGE
(CHANGE) button again.
3 Press the z OPEN/CLOSE button to close the disc
compartment.
If “Err” (error) appears in the display window
It means that an error has occured in the movement of the disc
compartment. The disc compartment may not close. A disc or
something must be stuck in the disc compartment. Remove it,
then press the zOPEN/CLOSE button to close.
NOTE
• When loading an 8-cm (3-inch) disc, make sure to put it onto
the inner circle of the tray precisely. Otherwise, the disc may be
damaged or the disc compartment will not open. If it does not
open, please consult your Aiwa dealer for repair.
• Do not place more than one compact disc on the disc tray.
• Do not tilt the unit with discs loaded. Doing so may cause
malfunctions.
• Do not use irregular shape CDs (example: heart-shaped,
octagonal ones). It may result in malfunctions.
• When transporting the unit, remove the discs from the trays.
• When replacing the discs during play, do not replace discs other
than those facing you.
If you place a disc on the empty right inner tray, and then press
the zOPEN/CLOSE button “Err” is displayed and the disc
compartment may not close. Remove the disc on that tray.
• The unit may not play a CD-R/RW disc that is recorded on
personal computers or some kinds of CD-R/RW recorders
because of differences in recording platforms.
• Do not attach any seal or label to either side (the recordable
side or the labeled side) of a CD-R/RW disc. It may cause
malfunction.
Never place here.
RANDOM/REPEAT PLAY
RANDOM PLAY
All the tracks on the selected disc or on all discs in the
compartment can be played randomly.
Press the RANDOM button so that RANDOM in the display
is surrounded by “
”.
To cancel random play
Press the RANDOM button so that “ ” in the display
disappears.
NOTE
• Even if the f/r button is pressed, the previously played
track cannot be skipped.
• Direct selection of the tracks with the numbered buttons is not
possible.
• While
mode is selected, pressing the RANDOM
button will cancel this repeat mode.
REPEAT PLAY
The current track, all the tracks on the selected disc, or all tracks
on all discs in the compartment can be played repeatedly.
Press the REPEAT button repeatedly.
To repeat the selected disc or all discs, select .
To repeat only the current track, select
.
To repeat only selected tracks
Program the desired tracks before selecting repeat play.
(off)
(off)
To start play from the point where you last stopped
Press the s button during play to stop. Next, press the DISPLAY
button, and the display flashes to indicate the point where you
last stopped. Lastly, press the c/a button, then play restarts
from this last stop point.
Play starts from the last stop point only if you press the DISPLAY
button before pressing the c/a button. If you don’t press the
DISPLAY button, play starts from the beginning of the disc when
you press the c/a button.

ENGLISH
6
En
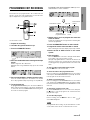
PROGRAMMED PLAY
The CD player has a built-in memory function that allows play of
up to 32 memory banks over five discs in any order. Each of 32
memory banks can be one track or one whole disc.
1
Press the PRGM/CHECK button in stop mode.
PRGM in the display is surrounded by “ ”.
2
Press one of the DISC DIRECT PLAY(DISC 1-5)
buttons to select a disc.
If the disc number displayed on the window is the desired
disc to be programmed, skip step 2 and go to step 3 directly.
3
To set the program.
To program the whole disc, press the selected DISC
DIRECT PLAY(DISC 1-5) button again, the tracks numbers
on the music calendar flash for 6 seconds. Press the PRGM/
CHECK button within this 6 seconds to program.
To program a track, press the numbered buttons and the +10
button.
Example:
To select the 12th track, press the +10 and 2 buttons.
To select the 20th track, press the +10, +10 and 0 buttons.
• r and t buttons can also be used to select a track by
pressing this buttons repeatedly and then press the PRGM/
CHECK button within 6 seconds to program this selected
track.
4
Repeat step 2 and 3 to program other tracks or
disc.
5
Press the ca button to start play.
To check the program
Each time the PRGM/CHECK button is pressed before playing, a
disc number, a track number, and a program number are displayed.
To add tracks to the program
Repeat steps 2 and 3 in stop mode. The track will be programmed
after the last track.
To delete a programmed track
Press the PRGM/CHECK button in stop mode to display the track
to be deleted, and then press the DELETE button on the main
unit.
To clear the program
Press the s button in stop mode, or press the zOPEN/CLOSE
button.
To check the amount of time remaining until the current
track finishes playing
Press the DISPLAY button during playing.
NOTE
• The DISC CHANGE, DISC SKIP and DISC DIRECT PLAY
buttons do not operate during programmed play.
• You cannot see the amount of time remaining of all programmed
tracks.
• If track 31 and above of a disc is programmed, the total playing
time of the selected tracks is not displayed.
• If the total playing time of the selected tracks is more than 99:59,
the display window will show -- : --.
• When the whole disc is programmed as one program track, the
tracks of this programmed disc cannot be played in random.
Selected track
number
Program number
Total number of
selected tracks
Total playing time of
the selected tracks
Disc number
CD PLAYING
To cancel repeat play
Press the REPEAT button so that “ ” in the display
disappears.
NOTE
• During random play,
mode cannot be selected to
repeat only the current track.
• If the REPEAT button is pressed while the auto power off is in
operation, the auto power off is canceled.

7
ENGLISH
AI EDIT RECORDING
The AI EDIT function lets you record tracks from one disc without
worrying about tape lengths and track lengths. When you insert
a CD, the unit automatically calculates track lengths. If necessary,
it rearranges the order of tracks, so that no track is cut short.
Use the remote control.
1
Prepare for recording.
2
Load the disc(s) onto the disc trays.
3
Press the DISC SKIP button to select a disc.
4
Press the AI EDIT button.
“ ” appears around AI and EDIT in the display.
5
Press the numbered buttons to designate the tape
length.
Enter a length from 10 to 99 minutes.
Example: when using a 60-minute tape, press the 6 and 0
buttons.
In a few seconds, the microcomputer determines the tracks
to be recorded on each side of the tape.
• The r and t buttons are also available to designate
the tape length.
6
Select the proper function (CD or AUX) in the
stereo system.
7
Start recording.
Press the c/a button on the unit to start play and the button
for recording on the connected stereo system.
After play of programmed tracks on side A finishes, the unit
pauses. Reverse the cassette tape and start play and recording
again. Play of programmed tracks on side B starts.
Selected disc number
Tape side
Total number of
programmed tracks
Time remaining on
the tape
Programmed
tracks
To stop recording in the middle of the program
Press the s button on the cassette deck.
To clear the edit program
Before recording, press the s button twice so that “ ”
around EDIT disappears.
To check the order of the programmed tracks
Before recording, press the AI EDIT button to select side A or B,
and press the PRGM/CHECK button repeatedly. The tracks in
the program are shown from the first track.
To delete a programmed track
Before recording, press the AI EDIT button to select side A or B,
and press the PRGM/CHECK button repeatedly to display the
track to be deleted, and then press the DELETE button on the
main unit.
To add tracks to the edit program
If there is any time remaining on the tape after step 5, you can
add tracks from other discs in the CD compartment before
recording starts.
1 Press the AI EDIT button to select side A or B.
2 Press one of the DISC 1-5 buttons to select a disc.
3 Press the numbered buttons to select tracks.
If the playing time of a selected track is longer than the
remaining time, it is not added.
4 Repeat steps 2 and 3 to add more tracks.
NOTE
• The AI edit recording cannot be used with discs containing
31 tracks or more.
• When tracks are added or deleted, the AI edit mode will change
to programmed edit mode automatically.
In this case, use the PRGM EDIT button to select side A or B
instead of AI EDIT button.
Track number Program number
RECORDING

ENGLISH
8
En
PROGRAMMED EDIT RECORDING
This function lets you program tracks to be recorded from all of
the discs, in any order. The remaining time on each side of the
tape is displayed as you program the tracks.
Use the remote control.
1
Prepare for recording.
2
Load the disc(s) onto the disc trays.
3
Press the PRGM EDIT button.
“ ” appears around PRGM and EDIT in the display.
4
Press the numbered buttons to designate the tape
length.
Enter a length from 10 to 99 minutes.
Example: when using a 60-minute tape, press the 6 and 0
buttons.
5
Press one of the DISC 1-5 buttons to select a disc.
If the disc number displayed on the window is the desired
disc to be programmed, skip step 5 and go to step 6 directly.
6
To set the program.
To program the whole disc, press the selected DISC 1-5
button again, the track numbers on the music calendar flash
for 6 seconds. Press the PRGM/CHECK button during these
6 seconds to enter the program.
To program a track to be recorded on side A, press the
numbered buttons and the +10 button.
7
Repeat steps 5 and 6 to program the rest of the
tracks on side A.
A track whose playing time is longer than the remaining time
cannot be programmed.
8
Press the PRGM EDIT button to select side B.
9
Program the tracks to be recorded on side B.
After confirming the side in the display, repeat steps 5 and 6.
10
Select the CD or AUX function in the stereo
system.
11
Start recording.
Press the c/a button on the unit to start play and the button
for recording on the connected stereo system.
After play of programmed tracks on the front side finishes, the
unit pauses. Reverse the cassette tape and start play and
recording again. Play of programmed tracks on the reverse side
starts.
To stop recording in the middle of the program
Press the s button on the cassette deck.
To check the order of the programmed tracks
Before recording, press the PRGM EDIT button to select side A
or B, and press the PRGM/CHECK button repeatedly. The tracks
in the program are shown from the first track.
To delete a programmed track
Before recording, press the PRGM EDIT button to select side A
or B, and press the PRGM/CHECK button repeatedly to display
the track to be deleted, and then press the DELETE button on the
main unit.
To change the program of each side
Press the PRGM EDIT button to select side A or B, and press
the s button to clear the program of the selected side. Then
program tracks again.
To clear the edit program
Before recording, press the s button twice so that “ ”
around EDIT disappears.
NOTE
In programmed edit recording, only the first 30 tracks of a disc
can be edited, even if the disc contains 31 tracks or more.
Selected disc number
Tape side
Total number of
programmed tracks
Time remaining of
side A
Selected track
number
RECORDING

9
ENGLISH
CARE AND MAINTENANCE
Occasional care and maintenance of the unit and the software
are needed to optimize the performance of your unit.
To clean the cabinet
Use a soft cloth lightly moistened with mild detergent solution.
Do not use strong solvents such as alcohol, benzine or thinner.
Care of discs
• Before playing a disc, wipe the disc from the center out with a
cleaning cloth.
• After playing a disc, store the disc in its case. Do not leave the
disc in places that are hot or humid.
SPECIFICATIONS
Disc Compact disc
Scanning method Non-contact optical scanner
(semiconductor laser application)
Laser Semiconductor laser
(λ = 750 – 800 nm)
Rotation speed Approx. 500 rpm – 200 rpm (CLV)
Error correction Cross Interleave, Reed Solomon code
No. of channels 2 channels
D-A converter 1-bit dual
Wow/Flutter Unmeasurable
Signal to noise ratio 90 dB (1 kHz, 0 dB)
Harmonic distortion 0.05 % (1 kHz, 0 dB)
Low pass filter 8 times digital filter
Outputs
DIGITAL OUT (OPTICAL)
AUDIO OUT 2.0 V (47 k ohms)
PHONES(stereo) accepts headphones of 32 ohms or more
Power requirements 120 V AC, 60 Hz
Power consumption 12 W
Dimensions (W × H × D)
430 × 147 × 364 mm
Weight 5.3 kg
Accessories Remote control (1)
Audio connecting cord(1)
• Specifications and external appearance are subject to change
without notice.
GENERAL
NOTE
This equipment has been tested and found to comply with the
limits for a Class B digital device, pursuant to Part 15 of the
FCC Rules. These limits are designed to provide reasonable
protection against harmful interference in a residential
installation.
This equipment generates, uses, and can radiate radio frequency
energy and, if not installed and used in accordance with the
instructions, may cause harmful interference to radio communi-
cations. However, there is no guarantee that interference will not
occur in a particular installation. lf this equipment does cause
harmful interference to radio or television reception, which can
be determined by turning the equipment off and on, the user is
encouraged to try to correct the interference by one or more of
the following measures:
- Reorient or relocate the receiving antenna.
- lncrease the separation between the equipment and
receiver.
- Connect the equipment into an outlet on circuit different
from that to which the receiver is connected.
- Consult the dealer or an experienced radio/TV technician
for help.
CAUTION
Modifications or adjustments to this product, which are not
expressly approved by the manufacturer, may void the user’s
right or authority to operate this product.

ENGLISH
10
En
PARTS INDEX
Instructions about each part on the unit or remote control are
indicated on the pages listed below.
Main unit
Parts Pages
DELETE 6,7,8
DISC CHANGE 4
DISC DIRECT PLAY 4,6
DISPLAY 4,6
z OPEN/CLOSE 4
PHONES 3
caPLAY/PAUSE 4,6
POWER 3
PRGM/CHECK 6,7,8
RANDOM 5
REPEAT 5
SLEEP 3
sSTOP/CLEAR 3,4,6,7,8
0-9, +10 4,6
t/g 4,6
f/r 4,6
Remote control
Parts Pages
AI EDIT 7
CHANGE 4
DISC SKIP 4,7
DISC 1-5 4,6,7,8
DISPLAY 4,6
zOPEN/CLOSE 4
POWER 3
PRGM/CHECK 6,7,8
PRGM EDIT 8
RANDOM 5
REPEAT 5
t/gSKIP/SEARCH 4,6,7,8
f/rSKIP/SEARCH 4,6,7,8
c/a 4,6,7,8
s 4,6,7,8
0-9, +10 4,6,7,8
GENERAL

1
ESPAÑOL
ESPAÑOL
PRECAUCIONES
Lea con atención y en su totalidad las Manual de instrucciones,
antes de utilizar la unidad. Asegúrese de guardar las
Instrucciones de funcionamiento para su consulta en el futuro.
Todas las advertencias y precauciones en dichas instrucciones
deben cumplirse estrictamente, junto con las recomendaciones
de seguridad a continuación.
Instalación
1 Agua y humedad — No emplee esta unidad cerca del agua,
como cerca de una bañera, ducha, piscina o similar.
2 Calor — No utilice esta unidad cerca de fuentes de calor,
incluyendo conductos de ventilación, hornos u otros aparatos
que generen calor. No debe colocarla en lugares con una
temperatura inferior a 5°C o superior a 35°C.
3 Superficie de montaje — Coloque la unidad sobre una
superficie plana y regular.
4 Ventilación — La unidad debe colocarse con el espacio
adecuado alrededor, para que pueda disiparse correctamente
el calor. Deje un espacio de 10 cm en la parte trasera y
superior de la unidad, y 5 cm a ambos lados.
- No coloque la unidad sobre una cama, alfombra o superficie
similar que pueda bloquear las aberturas de ventilación.
- No instale la unidad en una estantería, gabinete o soporte
hermético en que pueda obstaculizarse la ventilación.
5 Entrada de objetos o líquidos — Tenga cuidado de que no
entren objetos o líquidos dentro de la unidad por las aberturas
de ventilación.
6 Soportes móviles y carros —
Cuando monte la unidad sobre
un soporte móvil o carro, deber
moverla con cuidado. Las
paradas rápidas, fuerza
excesiva o superficies
irregulares pueden causar que
la unidad o el soporte móvil se
vuelquen o caigan.
ADVERTENCIA
PARA REDUCIR EL RIESGO DE INCENDIO O
DESCARGA ELECTRICA, NO EXPONGA ESTE
APARATO A LA LLUVIA O LA HUMEDAD.
“CAUTION:TO REDUCE THE RISK OF
ELECTRIC SHOCK,
DO NOT REMOVE COVER (OR BACK).
NO USER-SERVICEABLE PARTS INSIDE.
REFER SERVICING TO QUALIFIED
SERVICE PERSONNEL.”
CAUTION
RISK OF ELECTRIC SHOCK
DO NOT OPEN
Explicación de los símbolos gráficos:
El símbolo del rayo dentro de un triángulo
equilátero advierte al usuario de la presencia de
“tensión peligrosa” no aislada dentro de la cubierta
del producto que puede ser de magnitud
suficiente como para suponer un riesgo de
choque eléctrico para las personas.
El símbolo de exclamación dentro de un triángulo
equilátero advierte al usuario de la presencia de
instrucciones de uso y mantenimiento
importantes en la documentación que acompaña
al aparato.
7 Condensación — Puede condensarse humedad en el
objetivo de recogida del disco compacto en los siguientes
casos:
- Cuando mueva la unidad de un sitio frío a otro caliente.
- Acabe de encenderse la calefacción.
- Utilice la unidad en una habitación con gran humedad.
- La unidad se enfríe por el aire acondicionado.
Cuando se haya condensado humedad dentro de la unidad,
es posible que no funcione correctamente. Si es así, déjela
apagada varias horas e intente utilizarla otra vez.
8 Montaje en una pared o techo — La unidad no debe
montarse sobre una pared o un techo, a menos que se
especifique otra cosa en las Manual de instrucciones.
Alimentación eléctrica
1 Fuentes de alimentación — Conecte esta unidad sólo a las
fuentes de alimentación especificadas en las Manual de
instrucciones, de la forma marcada en la unidad.
2 Polarización — Como función de seguridad, algunas
unidades están equipadas con enchufes de CA polarizados
que sólo pueden introducirse de una forma en los enchufes.
Si es difícil o imposible insertar el enchufe de CA en una
toma, déle la vuelta y vuelva a intentarlo. Si no se introduce
fácilmente, llame a un técnico cualificado para que arregle o
cambie la toma. Para no omitir la función de seguridad el
enchufe polarizado, no lo fuerce si no entra bien en el enchufe.
3 Cable de alimentación de CA
- Cuando desconecte el cable de alimentación de CA, tire
del adaptador de enchufe de CA. No tire del cable.
- No manipule el adaptador de enchufe de CA con las manos
mojadas, ya que puede producirse un incendio o una
descarga eléctrica.
- Los cables de alimentación deben estar firmemente fijados,
para evitar que puedan doblarse excesivamente, pinzarse
o pisarse. Ponga especial atención en el cable desde la
unidad hasta la toma de alimentación.
- Evite sobrecargar las tomas de CA y los cables alargadores
por encima de su capacidad, ya que puede producirse un
incendio o descarga eléctrica.
4 Cable de extensión — Para evitar choques eléctricos, no
utilice el cable de alimentación polarizado con un cable de
extensión, enrollable u otra toma a no ser que el enchufe
polarizado pueda insertarse completamente para evitar la
exposición de las clavijas del enchufe.
5 Cuando no utilice la unidad — Desenchufe el cable de
alimentación de CA del tomacorriente de CA si no va a utilizar
la unidad durante varios meses o más tiempo. Cuando el cable
está conectado, sigue fluyendo una corriente reducida a la
unidad, aunque esté apagada.
Mantenimiento
Limpie la unidad sólo como se recomienda en las Manual de
instrucciones.
Daños que requieren reparaciones
Haga que un técnico cualificado repare esta unidad en los
siguientes casos:
- El cable de alimentación o el adaptador de enchufe de CA se
han dañado.
- Han entrado objetos o líquido en el interior de la unidad.
- La unidad se ha expuesto a la lluvia o el agua.
- La unidad parece funcionar incorrectamente.
- La unidad muestra cambios evidentes en su funcionamiento.
- La unidad se ha caído o su carcasa est dañada.
NO INTENTE REPARAR LA UNIDAD POR SU CUENTA.

E
ESPAÑOL
2
INDICE DE CONTENIDO
PRECAUCIONES ................................................................ 1
PROCEDIMIENTOS INICIALES
CONEXIONES ..................................................................... 2
ANTES DE UTILIZAR LA UNIDAD .................................... 3
CONTROL REMOTO ........................................................... 3
REPRODUCCION DE CD
FUNCIONES BASICAS ...................................................... 4
REPRODUCCION ALEATORIA/REPETIDA ...................... 5
REPRODUCCION PROGRAMADA .................................... 6
GRABACIÓN
GRABACIÓN DE EDICION AI ............................................ 7
GRABACIÓN DE EDICION PROGRAMADA ..................... 8
INFORMACION GENERAL
CUIDADO Y MANTENIMIENTO .......................................... 9
ESPECIFICACIONES.......................................................... 9
INDICE DE LAS PARTES ................................................. 10
Registro de propietario
Para más comodidad, anote el número de modelo y el de serie
(los encontrará en la parte trasera del equipo) en la tabla
siguiente. Mencione estos números a su distribuidor cuando deba
contactar con él si tiene problemas con el equipo.
Número de modelo Número de serie (número de lote)
XC-37M
PROCEDIMIENTOS INICIALES
PROCEDIMIENTOS INICIALES
CONEXIONES
Antes de conectar el cable de CA
El voltaje nominal de la unidad, mostrado en el panel trasero, es
120 V CA. Compruebe sila tensión nominal mostrada en el panel
trasero concuerda con la tensión de su localidad.
IMPORTANTE
• Inserte los enchufes firmemente en las tomas. Una mala
conexión puede producir ruido.
• Enchufe los cables de CA después de conectar todos los
equipos.
• Consulte las instrucciones de uso de los equipos conectados
antes de realizar las conexiones.
CONEXIÓN A UN AMPLIFICADOR
1
Conecte el amplificador.
Conecte el enchufe rojo a la toma AUDIO OUT R y el enchufe
blanco a la toma L utilizando el cable de conexión de audio
suministrado con los enchufes RCA. De la misma manera,
conecte los enchufes a las tomas CD o AUX IN del
amplificador.
2
Conecte los cables de CA a las tomas de CA.
CONEXIÓN DE LA TOMA DIGITAL OUT
(OPTICAL)
Esta unidad puede transmitir señales digitales de sonido de CD
por esta toma. Utilice un cable óptico para conectar equipos de
audio digitales (amplificador digital, platina de DAT, grabadora
MD, etc.)
Retire la tapa protectora a de la toma DIGITAL OUT (OPTICAL).
Después, conecte el adaptador de cable óptico b a la toma
DIGITAL OUT (OPTICAL).
Cuando no se utilice la toma DIGITAL OUT (OPTICAL)
Coloque la tapa protectora suministrada.
XC-37M
Amplificador

3
ESPAÑOL
CONTROL REMOTO
Inserción de las pilas
Extraiga la tapa de las pilas en la parte trasera del control remoto
e inserte dos pilas R6 (tamaño AA).
Cuándo cambiar las pilas
La distancia de funcionmiento máxima del control remoto y del
sensor en la unidad principal es de 5 metros, aproximadamente.
Cambie las pilas por otras nuevas cuando disminuya esta
distancia.
NOTA
• Si no va a utilizar el mando a distancia durante un periodo de
tiempo prolongado, extraiga las pilas para evitar una posible
fuga de electrolitos.
• El mando a distancia puede no funcionar correctamente en los
siguientes casos:
- El recorrido entre el mando a distancia y el sensor remoto
dentro del visor est expuesto a una luz intensa, como la luz
solar directa.
- Se utilizan cerca otros mandos a distancia (como el del
televisor, etc.)
Uso de auriculares
Conecte los auriculares a la toma PHONES utilizando una clavija
estéreo estándar (ø6,3 mm).
ANTES DE UTILIZAR LA UNIDAD
Para encender el aparato
Después de conectar el cable de alimentación de CA del
amplificador conectado, presione el botón POWER del
amplificador o del reproductor de discos compactos.
El visualizador se encenderá.
Después del uso
Presione el botón POWER para desconectar la alimenatición. 6
aparece de forma tenue en la ventana del visor.
Cuando la recepción de radio del sistema de estéreo
conectado contiene ruido
Apague este reproductor de CD.
La ventanilla de parpadeo
La ventanilla parpadeante se encenderá durante la conexión de
la alimentación y parpadeará cuando el compartimento del disco
se abra o se cierre, y cuando giren las bandejas.
Para apagar la ventanilla, pulse el botón POWER de la unidad
principal mientras mantiene pulsado el botón s STOP/CLEAR.
Para volver a encender la ventanilla, repita el procedimiento.
Desconexión automática (SLEEP)
Pulse el botón SLEEP de la unidad durante la reproducción de
un CD. Se muestra el indicador SLEEP y la unidad se apaga de
forma automática una vez finalizada la reproducción.
El botón SLEEP sólo puede funcionar si se pulsa durante la
reproducción de un CD.
Para cancelar la desconexión automática
Pulse el botón SLEEP mientras se reproduce el CD para que
desaparezca el indicador SLEEP.
NOTA
• Si se pulsa el botón SLEEP durante la reproducción repetida
Se cancela la reproducción repetida.
• No someta la unidad a vibraciones o golpes mientras se abre
o se cierra el compartimiento de discos, ya que ello puede
producir errores o daños a los discos.

E
ESPAÑOL
4
REPRODUCCION DE CD
FUNCIONES BASICAS
CARGA DE DISCOS
Presione el botón
zz
zz
z OPEN/CLOSE para abrir el
compartimiento de discos. Cargue uno o varios
discos con la etiqueta hacia arriba.
Para insertar uno o dos discos, colóquelos en las bandejas
en la dirección de las flechas como muestra la ilustración.
Para insertar de tres a cinco discos, pulse el botón DISC
CHANGE para que las bandejas giren después de colocar dos
discos. Coloque el siguiente disco en la bandeja vacía. Cada
vez que pulse dicho botón, las bandejas giran y será posible
colocar un disco.
Para utilizar la unidad con el mando a distancia, pulse el
botón CHANGE.
Una vez colocado el disco, pulse el botón z OPEN/CLOSE
para cerrar el compartimiento de discos.
El visor muestra la información del disco que va a reproducirse.
1 Número del disco de la bandeja de reproducción
2 Número total de canciones del disco seleccionado
3 Tiempo de reproducción total del disco seleccionado
4 Indicador OVER
Este indicador aparecerá cuando el disco tenga 21
canciones o más.
El indicador OVER parpadeará mientras esté
reproduciéndose una canción posterior a la número 20.
5 Calendario musical
Tenga en cuenta que se visualizan solamente las primeras
20 canciones, aunque el disco contenga 21 canciones o
más.
REPRODUCCION DE DISCOS
Cargue los discos.
Para reproducir todos los discos del compartimiento de
discos, pulse el botón ca o bien pulse dos veces uno
de los botones DISC DIRECT PLAY.
Todos los discos se reproducen una vez.
Para reproducir sólo un disco, presione uno de los
botones DISC DIRECT PLAY.
El disco con el número de bandeja seleccionado se reproduce
una vez.
Para iniciar la reproducción con el mando a distancia
Pulse uno de los botones DISC 1-5 para seleccionar un disco.
Para detener la reproducción, presione el botón s.
Para introducir la reproducción en pausa, presione el botón
a. Para reanudar la reproducción, vuelva a presionarlo.
Para buscar un punto determinado durante la reproducción,
mantenga presionado el botón r o t y suéltelo en el punto
deseado.
Para omitir el principio de un tema durante la reproducción,
presione varias veces el botón r o t.
Para retirar los discos, presione el botón z OPEN/CLOSE.
Sólo es posible extraer los dos discos orientados hacia fuera. Si
desea extraer un disco que no esté orientado hacia fuera, pulse
varias veces el botón DISC CHANGE (CHANGE).
Para comprobar el tiempo restante
Presione el botón DISPLAY durante la reproducción. Cada vez
que lo pulse, el tiempo transcurrido de la canción de
reproducción, el tiempo de reproducción transcurrido del disco,
el tiempo restante hasta que la canción actual termina de
reproducirese y el tiempo restante hasta que todas las canciones
terminan de reproducirse se visualizan en orden.
Para omitir discos
Pulse el botón DISC SKIP del mando a distancia para omitir un
disco y el botón c/a para reproducir el disco siguiente. La
reproducción se inicia con el disco siguiente y se reproducen
todos los discos una vez, incluido el disco omitido.
• Es posible omitir discos durante la reproducción.
Selección de un canción directamente
1 Presione uno de los botones DISC DIRECT PLAY (DISC 1-5)
para seleccionar un disco.
2 Presione los botones numéricos y el botón +10 para
seleccionar un tema.
Ejemplo:
Para seleccionar el tema 25, presione los botones +10, +10 y
5.
Para seleccionar el tema 10, presione los botones +10 y 0.
La reproducción comienza en el tema seleccionado y continúa
hasta el final del disco.
Número de tema que se
reproduce
Tiempo de reproducción
transcurrido
Número
de
bandeja
Sólo el número de bandeja de disco seleccionado
aparece en un círculo.
PROCEDIMIENTOS INICIALES
REPRODUCCION DE CD

5
ESPAÑOL
Cambio de los discos durante la reproducción
Pueden cambiarse los demás discos sin interrumpir la
reproducción del disco actual.
1 Presione el botón DISC CHANGE.
Es posible reemplazar dos discos.
2 Retire los discos y cámbielos por otros.
Para reemplazar los otros dos discos, vuelva a pulsar el botón
DISC CHANGE.
3 Presione el botón z OPEN/CLOSE para cerrar el
compartimiento de discos.
Si aparece “Err (error)” en el visualizador
Esto significa que se ha producido un error en el movimiento del
compartimiento de discos. No puede cerrarse el compartimiento
de discos. Un disco u otro objeto se ha atascado en el
compartimiento. Extráigalo y pulse el botón z OPEN/CLOSE
para cerrarlo.
NOTA
• Si inserta un disco de 8 cm, asegúrese de colocarlo con
precisión en el círculo interior de la bandeja. En caso contrario,
es posible que el disco se dañe o que el compartimiento de
discos no se abra. Si éste no se abre, póngase en contacto
con un proveedor Aiwa para su reparación.
• No ponga más de un disco compacto en una misma bandeja
de disco compacto.
• No incline la unidad habiendo discos introducidos. Haser esto
podría causar averías.
• No utilice discos compactos de forma irregular (por ejemplo:
forma de corazón, octogonales). Puede provocar un mal
funcionamiento.
• Cuando transporte la unidad, retire los discos de las bandejas.
• Al reemplazar los discos durante la reproducción, reemplace
sólo los que estén orientados hacia fuera.
Si coloca un disco en la bandeja interior vacía de la derecha y,
a continuación, pulsa el botón zOPEN/CLOSE, aparecerá el
mensaje “Err” y es posible que el compartimiento de discos no
se cierre. Extraiga el disco de dicha bandeja.
• La unidad tal vez no reproduzca un disco CD-R/RW grabado
en una computadora personal o en alguna clase de grabadora
CD-R/RW debido a las diferencias en los formatos de grabación.
• No ponga ninguna pegatina ni etiqueta en ninguna de las caras
(cara grabable o cara de la etiqueta) de un disco CD-R/RW.
Eso podría causar un fallo en el funcionamiento.
Nunca ponga aquí.
REPRODUCCION ALEATORIA/
REPETIDA
REPRODUCCIÓN ALEATORIA
Todas los temas del disco seleccionado o de todos los discos
pueden reproducirse de forma aleatoria.
Pulse el botón RANDOM para que RANDOM del visualizador
quede rodeado por “
”.
Para cancelar la reproducción aleatoria
Presione el botón RANDOM para qie desaparezca “ ” del
visualizador.
NOTA
• Aunque pulse el botón f/r, no será posible omitir el tema
anteriormente reproducido.
• No es posible seleccionar directamente los temas con los
botones numéricos durante la reproducción aleatoria.
• Mientras está seleccionado el modo
, puede pulsar
el botón RANDOM para cancelar este modo de repetición.
REPRODUCCIÓN REPETIDA
Es posible reproducir de forma repetida el tema actual, todos
los temas del disco seleccionado o todos los temas de todos los
discos del compartimiento.
Presione repetidamente el botón REPEAT.
Para repetir el disco seleccionado o todos los discos, seleccione
.
Para repetir solamente la canción actual seleccione
.
Para repetir sólo las canciones seleccionados
Programe las canciones deseadas antes de seleccionar el modo
de reproducción repetida.
(apagado)
(apagado)
Para iniciar la reproducción desde el punto donde la
detuvo la última vez
Pulse el botón s durante la reproducción para detenerla. A
continuación, pulse el botón DISPLAY, la indicación parpadeará
para indicar el punto donde detuvo la reproducción la última vez.
Por último, pulse el botón c/a la reproducción volverá a iniciarse
desde este punto.
La reproducción se iniciará a partir del punto donde la detuvo la
última vez sólo si pulsa el botón DISPLAY antes de pulsar
c/a. Si no pulsa el botón DISPLAY, la reproducción se iniciará
desde el principio del disco cuando pulse el botón c/a.

ESPAÑOL
6
E
REPRODUCCION PROGRAMADA
El reproductor de discos compactos tiene una fonción de
memoria incorporada que le permite reproducir hasta 32 bancos
de memoria de cinco discos en cualquier orden. Cada uno de
los 32 bancos de memoria puede consistir en una canción o en
todo un disco.
1
Pulse el botón PRGM/CHECK en el modo de
parada.
PRGM estará rodeado por “ ” en el visualizador.
2
Presione uno de los botones DISC DIRECT PLAY
(DISC1-5) para seleccionar un disco.
Si el número de disco que muestra el visor corresponde al
disco que se desea programar, omita el paso 2 y proceda
directamente con el paso 3.
3
Para ajustar el programa.
Para programar todo el disco, vuelva a pulsar el botón DISC
DIRECT PLAY (DISC 1-5). Los números de tema del
calendario musical parpadean durante 6 segundos. Pulse el
botón PRGM/CHECK dentro de este plazo de 6 segundos
para programar.
Para programar un tema, pulse los botones numéricos y el
botón +10.
Ejemplo:
Para seleccionar el tema 12, presione los botones +10 y 2.
Para seleccionar el tema 20, presione los botones +10, +10 y
0.
• Los botones r y t también pueden utilizarse para
seleccionar un tema. Para ello, es necesario pulsarlos varias
veces y, a continuación, pulsar el botón PRGM/CHECK
dentro de 6 segundos para programar el tema seleccionado.
4
Repita los pasos 2 y 3 para programar más temas
o disco.
5
Presione el botón
ee
ee
e para iniciar la reproducción.
Para comprobar la programación
Cada vez que presione el botón PRGM/CHECK antes de la
reproducción, se visualizará un número de disco, un número de
canción y un número de programa.
Para añadir temas al programa
Repita los pasos 2 y 3 en modo de parada. El tema se programará
después del último.
Para borrar un tema programado
Pulse el botón PRGM/CHECK en modo de parada para que
aparezca el tema que desee borrar y pulse el botón DELETE de
la unidad principal.
Para cancelar la programación
Presione el botón s en el modo de parada, o presione el botón
zOPEN/CLOSE.
Para comprobar el tiempo restante hasta que la canción
actuak termine de reproducirse
Pulse el botón DISPLAY durante la reproducción.
NOTA
• Los botones DISC CHANGE, DISC SKIP y DISC DIRECT PLAY
no funcionarán durante la reproducción programada.
• No podrá ver el tiempo restante de todas las canciones
programadas.
• Si se programan 31 temas o más, no se muestra el tiempo
total de reproducción de los temas seleccionados.
• Si el tiempo total de reproducción de los temas seleccionados
es superior a 99:59, el visor mostrará --:--.
• Si el disco completo se programa como un tema de programa,
los temas de dicho disco programado no podrán reproducirse
en orden aleatorio.
Número del
tema
seleccionado
Número de
programación
Número total de temas
seleccionados
Tiempo total de
reproducción de los temas
seleccionados
Número de disco
REPRODUCCION DE CD
Para cancelar la reproducción repetida
Pulse el botón REPEAT para que desaparezca “ ” del
visualizador.
NOTA
• Durante la reproducción aleatoria, no es posible seleccionar el
modo
para repetir sólo el tema actual.
• Si se pulsa el botón REPEAT mientras está activada la función
de desconexión automática, se cancela dicha función.

7
ESPAÑOL
GRABACIÓN DE EDICION AI
La función AI EDIT le permite grabar canciones de un disco sin
tener que preocuparse de la duración de la cinta y de las
canciones. Cuando inserte un disco compacto, el aparato
calculará automáticamente la duración de las canciones. Si es
necesario, cambiará el orden de las canciones para que no se
produzca ningún corte de canción.
Utilice el control remoto.
1
Prepare todo para la grabación.
2
Cargue el disco o discos en las bandejas de
discos.
3
Pulse el botón DISC SKIP para omitir un disco.
4
Pulse el botón AI EDIT.
“ ” aparecerá alrededor de AI y EDIT en el visualizador.
5
Presione los botones numéricos para asignar la
duración de la cinta.
Introduzca una duración de 10 a 99 minutos.
Ejemplo: Cuando utilice una cinta de cassette de 60 minutos,
presione los botones 6 y 0.
En unos segundos, el microprocesador establece los temas
que van a grabarse en cada lado de la cinta.
• Los botones r y t también pueden utilizarse para
especificar la longitud de cinta.
6
Seleccione la función adecuada (CD o AUX) en el
equipo de estéreo.
7
Inicie la grabación.
Pulse el botón c/a en el aparato para iniciar la reproducción
y el botón de grabación del equipo de estéreo conectado.
Una vez finalizada la reproducción de los temas de la cara A,
el aparato se detiene. Es necesario darle la vuelta al cassette
y volver a iniciar la reproducción y grabación. Se inicia la
reproducción de los temas programados de la cara B.
GRABACIÓN
Número del disco
seleccionado
Cara A de
la cinta
Número total de canciones
programadas
Tiempo restante de
la cinta
Canciones
programadas
Para parar la grabación en medio del programa
Presione el botón s de la platina de casete.
Para eliminar el programa editado
Antes de grabar, pulse dos veces el botón s para que
desaparezca “
” de alrededor de EDIT.
Para comprobar el orden de los números de temas
programados
Antes de grabar, presione el botón AI EDIT para seleccionar la
carae A o B, y presione repetidamenete el botón PRGM/CHECK.
Las canciones del programa se mostrarán a partir de la promera
canción.
Para borrar un tema programado
Antes de grabar, pulse el botón AI EDIT para seleccionar la cara
A o B, pulse varias veces el botón PRGM/CHECK para que
aparezca el tema que desee borrar y, a continuación, pulse el
botón DELETE de la unidad principal.
Para añadir temas al contenido de edición
Si el tiempo restante es suficiente para grabar más temas en el
paso 5, puede añadir temas de los otros discos en el
compartimiento antes de que empiece la grabación.
1 Presione el botón AI EDIT para seleccionar el lado A o B.
2 Presione uno de los botones DISC 1-5 para seleccionar un
disco.
3 Presione los botones numéricos para seleccionar temas.
Si el tiempo de reproducción de un tema seleccionado es
más largo que el tiempo restante de la cinta de cassette, no
se añade el tema.
4 Repita los pasos 2 y 3 para añadir más temas.
NOTA
• La función de AI edición no se puede utilizar con discos que
contengan 31 temas o más.
• Si ha añadido o eliminado temas, el modo de edición Al
cambiará al de edición programada automáticamente.
En este caso, utilice el botón PRGM EDIT para seleccionar la
cara A o B en lugar del botón AI EDIT.
Número de tema
Número de programa

ESPAÑOL
8
E
GRABACIÓN DE EDICION
PROGRAMADA
Esta función le permitirá programar las canciones para grabar
tamándolas de todos los discos del comprtimiento de discos
compactos, en cualquier orden. El tiempo restante de cada cara
de la cinta se visualizará cuando programe las canciones.
Utilice el control remoto.
1
Prepare todo para la grabación.
2
Cargue el disco o discos en las bandejas de
discos.
3
Pulse el botón PRGM EDIT.
“ ” aparecerá alrededor PRGM y EDIT.
4
Presione los botones numéricos para asignar la
duración de la cinta.
Introduzca una duración de 10 a 99 minutos.
Ejemplo: Cuando utilice una cinta de cassette de 60 minutos,
presione los botones 6 y 0.
5
Pulse uno de los botones DISC 1-5 para
seleccionar un disco.
Si el número de disco que muestra el visor corresponde al
disco que se desea programar, omita el paso 5 y proceda
directamente con el paso 6.
6
Para ajustar el programa.
Para programar todo el disco, vuelva a pulsar el botón DISC
1-5 seleccionado. Los números de tema del calendario
musical parpadean durante 6 segundos. Pulse el botón
PRGM/CHECK durante estos 6 segundos para introducir el
programa.
Para programar un tema que vaya a grabarse en la cara
A, pulse los botones numéricos y el botón +10.
7
Repita los pasos 5 y 6 para programar el resto de
las canciones para la cara A.
No se puede programar un tema con un tiempo de
reproducción más largo que el tiempo restante.
8
Presione el botón PRGM EDIT para seleccionar
el lado B.
9
Programe las canciones que vaya a grabar en la
cara B.
Después de confirmar B en el visor, repita el paso 5 y 6.
10
Seleccione la función CD o AUX en el equipo de
estéreo.
11
Inicie la grabación.
Pulse el botón c/a en el aparato para iniciar la reproducción
y el botón de grabación del equipo de estéreo conectado.
Una vez finalizada la reproducción de los temas de la cara A,
el aparato se detiene. Es necesario darle la vuelta al cassette
y volver a iniciar la reproducción y grabación. Se inicia la
reproducción de los temas programados de la cara inversa.
Para parar la grabación en medio del programa
Presione el botón s de la platina de casete.
Para comprobar el orden de temas programados
Antes de comenzar la grabación, presione el botón PRGM EDIT
para seleccionar el lado A o B, y presione varias veces el botón
PRGM/CHECK. The tracks in the program are shown from the
first track.
Para borrar un tema programado
Antes de grabar, pulse el botón PRGM EDIT para seleccionar la
cara A o B, pulse varias veces el botón PRGM/CHECK para que
aparezca el tema que desee borrar y, a continuación, pulse el
botón DELETE de la unidad principal.
Para cambiar los temas programados de cada cara
Pulse el botón PRGM EDIT para seleccionar la cara A o B y
pulse el botón s para borrar el programa de la cara seleccionada.
A continuación, programe de nuevo los temas.
Para cancelar la edición programada
Antes de grabar, pulse dos veces el botón s para que
desaparezca “
” de alrededor de EDIT.
NOTA
En grabación de edition programada, solo el primero 30
canciones del disco puede ser editada, aungue el disco tengan
disco 31 canciones o más.
Número del disco
seleccionado
Cara A de
la cinta
Número total de temas
programados
Tiempo restante de
la cara A
Número de la
canción
seleccionada
GRABACIÓN

9
ESPAÑOL
CUIDADO Y MANTENIMIENTO
Es necesario realizar en ocasiones el cuidado y mantenimiento
de la unidad y sus partes para optimizar el rendimiento de la
misma.
Para limpiar la carcasa
Utilice un paño suava ligeramente remojado con una solución
de detergente suava. No utilice disolventes fuertes, tales como
alcohol, bencina o diluyente.
Cuidado de los discos compactos
• Antes de reproducir un disc, límpeilo con un paño de limpieza,
frotándolo desde el centro hacia afuera.
• Después de reproducir un disco, guárdelo en su caja. No deje
los discos en lugares húmedos o a alta temperatura.
ESPECIFICACIONES
Disco Disco compacto
Método de exploración
Explorador óptico sin contacto
(aplicación de láser de semiconductor)
Laser Láser de semiconductor
(λ = 750 – 800 nm)
Velocidad de rotación
Aproximadamente 500 rpm – 200 rpm
(CLV)
Corrección de error Intercalación cruzada, código Reed
Solomon
Número de canales 2 canales
Convertidor D-A 1 bit doble
Fluctuación/Trémolo No medible
Relación señal a ruido
90 dB (1 kHz, 0 dB)
Distorsión armónica 0,05 % (1 kHz, 0 dB)
Filtro pasabajos Filtro digital óctuple
Salidas
DIGITAL OUT (OPTICAL)
AUDIO OUT 2,0 V (47 k ohms)
PHONES(estéreo) admite auriculares de 32 ohmios o más
Alimentación eléctrica 120 V AC, 60 Hz
Consumo de energía 12 W
Dimensiones (W × H × D)
430 × 147 × 364 mm
Peso 5,3 kg
Accesorio Control remoto (1)
Cable de conexión de audio (1)
•
Las especificaciones y aspecto externo de la unidad est n sujetos
a cambios sin previo aviso.
INFORMACION GENERAL
NOTA
Este equipo se ha comprobado y determinado que cumple con
los límites de dispositivo digital de clase B, según la parte 15
de las Normas de la FCC. Estos límites se han diseñado para
ofrecer una protección razonable frente a interferencias
dañinas en instalaciones residenciales.
Este equipo genera, utiliza y puede irradiar energía de radio
frecuencia y, si no se instala y utiliza de acuerdo con las
instrucciones, puede provocar interferencias dañinas a
comunicaciones de radio. Sin embargo, no hav garantía de que
dichas interferencias no se darán en una instalación en particular.
Si este equipo causa interferencias a la recepción de radio o
televisión, lo que puede averiguarse encendiendo y apagado el
aparato, animamos al usuario a corregir la interferencia con una
o varias de estas medidas:
- Reoriente o recoloque la antena receptora.
- Aumente la separación entre el equipo y el receptor.
- Conecte el equipo a una toma de circuito distinto del que
está conectado el receptor.
- Pida ayuda al distribuidor o a un técnico de Radio/TV.
PRECAUCIÓN
Las modificaciones o ajustes realizadas a este producto sin
aprobación expresa y por escrito por parte del fabricante pueden
anular el derecho o autoridad del usuario para emplear este
producto.
La page charge ...
La page charge ...
La page charge ...
La page charge ...
La page charge ...
La page charge ...
La page charge ...
La page charge ...
La page charge ...
La page charge ...
La page charge ...
La page charge ...
-
 1
1
-
 2
2
-
 3
3
-
 4
4
-
 5
5
-
 6
6
-
 7
7
-
 8
8
-
 9
9
-
 10
10
-
 11
11
-
 12
12
-
 13
13
-
 14
14
-
 15
15
-
 16
16
-
 17
17
-
 18
18
-
 19
19
-
 20
20
-
 21
21
-
 22
22
-
 23
23
-
 24
24
-
 25
25
-
 26
26
-
 27
27
-
 28
28
-
 29
29
-
 30
30
-
 31
31
-
 32
32


Aiwa XC-37M Operating Instructions Manual
- Catégorie
- Lecteurs de cassettes
- Taper
- Operating Instructions Manual
dans d''autres langues
- English: Aiwa XC-37M
- español: Aiwa XC-37M
Documents connexes
-
Aiwa XC-35 Operating Instructions Manual
-
-
Aiwa NSX-Aj14 Manuel utilisateur
-
-
-
-
-
-
-