Toro 55cm Recycler Lawn Mower Manuel utilisateur
- Catégorie
- Tondeuses à gazon
- Taper
- Manuel utilisateur

FormNo.3376-682-ASMRevA
55cmRecycler
®
LawnMower
ModelNo.20954—SerialNo.313000001andUp
Operator'sManual
Introduction
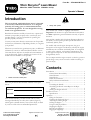
Thisrotary-blade,walk-behindlawnmowerisintended
tobeusedbyresidentialhomeowners.Itisdesigned
primarilyforcuttinggrassonwell-maintainedlawns
onresidentialproperties.Itisnotdesignedforcutting
brushorforagriculturaluses.
Readthisinformationcarefullytolearnhowtooperateand
maintainyourproductproperlyandtoavoidinjuryand
productdamage.Youareresponsibleforoperatingthe
productproperlyandsafely.
YoumaycontactTorodirectlyatwww.Toro.comforproduct
andaccessoryinformation,helpndingadealer,ortoregister
yourproduct.
Wheneveryouneedservice,genuineToroparts,oradditional
information,contactanAuthorizedServiceDealerorToro
CustomerServiceandhavethemodelandserialnumbersof
yourproductready.Figure1identiesthelocationofthe
modelandserialnumbersontheproduct.
Figure1
1.Modelandserialnumberplate
Writetheproductmodelandserialnumbersinthespace
below:
ModelNo.
SerialNo.
Thismanualidentiespotentialhazardsandhassafety
messagesidentiedbythesafetyalertsymbol(Figure2),
whichsignalsahazardthatmaycauseseriousinjuryordeath
ifyoudonotfollowtherecommendedprecautions.
Figure2
1.Safetyalertsymbol
Thismanualuses2wordstohighlightinformation.
Importantcallsattentiontospecialmechanicalinformation
andNoteemphasizesgeneralinformationworthyofspecial
attention.
ThisproductcomplieswithallrelevantEuropeandirectives.
Fordetails,seetheseparateproduct-specicDeclarationof
Conformity(DOC)sheet.
Formodelswithstatedenginehorsepower,thegross
horsepoweroftheenginewaslaboratoryratedbytheengine
manufacturerinaccordancewithSAEJ1940.Ascongured
tomeetsafety,emission,andoperatingrequirements,the
actualenginehorsepoweronthisclassoflawnmowerwill
besignicantlylower.
Donottamperwiththeenginecontrolsoralterthegovernor
speed;doingsomaycreateanunsafeconditionresultingin
personalinjury.
Contents
Introduction..................................................................1
GeneralLawnMowerSafety.....................................2
SoundPressure......................................................3
SoundPower..........................................................3
Hand/ArmVibration..............................................3
SafetyandInstructionalDecals.................................4
Setup............................................................................5
1InstallingtheHandle.............................................5
2InstallingtheRecoil-starterRopeintheRope
Guide.................................................................5
3FillingtheEnginewithOil......................................5
ProductOverview..........................................................6
Specications.........................................................6
Operation.....................................................................7
FillingtheFuelTank................................................7
CheckingtheEngineOilLevel..................................7
AdjustingtheCuttingHeight....................................8
StartingtheEngine..................................................8
UsingtheSelf-propelDrive.......................................9
StoppingtheEngine................................................9
RecyclingtheClippings............................................9
BaggingtheClippings..............................................9
©2012—TheToro®Company
8111LyndaleAvenueSouth
Bloomington,MN55420
Registeratwww.Toro.com.
OriginalInstructions(EN)
PrintedintheUSA
AllRightsReserved
*3376-682-ASM*A

Side-dischargingtheClippings..................................10
OperatingTips......................................................11
Maintenance.................................................................12
RecommendedMaintenanceSchedule(s)......................12
PreparingforMaintenance.......................................12
ReplacingtheAirFilter............................................13
ChangingtheEngineOil.........................................13
ReplacingtheBlade................................................14
AdjustingtheSelf-propelDriveCable........................15
CleaningundertheMachineHousing........................15
Storage........................................................................16
PreparingtheMachineforStorage............................16
FoldingtheHandle.................................................16
RemovingtheMachinefromStorage.........................16
Safety
Improperlyusingormaintainingthismowercanresult
ininjury.Toreducethepotentialforinjury,complywith
thesesafetyinstructions.
Torodesignedandtestedthismachineforreasonablysafe
service;however,failuretocomplywiththefollowing
instructionsmayresultinpersonalinjury.
Toensuremaximumsafety,bestperformance,and
togainknowledgeoftheproduct,itisessentialthat
youandanyotheroperatorofthemowerreadand
understandthecontentsofthismanualbeforethe
engineiseverstarted.Payparticularattentiontothe
safetyalertsymbol(Figure2),whichmeansCaution,
Warning,orDanger—“personalsafetyinstruction.”
Readandunderstandtheinstructionbecauseithasto
dowithsafety.Failuretocomplywiththeinstruction
mayresultinpersonalinjury.
GeneralLawnMowerSafety
ThefollowinginstructionshavebeenadaptedfromEN836.
Thiscuttingmachineiscapableofamputatinghandsandfeet
andofthrowingobjects.Failuretoobservethefollowing
safetyinstructionscouldresultinseriousinjuryordeath.
Training
•Readtheinstructionscarefully.Befamiliarwiththe
controlsandtheproperuseoftheequipment.
•Neverallowchildrenorpeopleunfamiliarwiththese
instructionstousethemower.Localregulationscan
restricttheageoftheoperator.
•Keepinmindthattheoperatororuserisresponsiblefor
accidentsorhazardsoccurringtootherpeopleortheir
property.
•Understandexplanationsforallpictogramsusedonthe
mowerorintheinstructions.
Gasoline
WARNING-Gasolineishighlyammable.Takethe
followingprecautions.
•Storefuelincontainersspecicallydesignedforthis
purpose.
•Refueloutdoorsonlyanddonotsmokewhilerefueling.
•Addfuelbeforestartingtheengine.Neverremovethe
capofthefueltankoraddgasolinewhiletheengineis
runningorwhentheengineishot.
•Ifgasolineisspilled,donotattempttostarttheengine
butmovethemowerawayfromtheareaofspillageand
avoidcreatinganysourceofignitionuntilgasolinevapors
havedissipated.
•Replaceallfueltankandcontainercapssecurely.
Preparation
•Whilemowing,alwayswearsubstantialfootwearandlong
trousers.Donotoperatetheequipmentwhenbarefoot
orwearingopensandals.
•Thoroughlyinspecttheareawheretheequipmentisto
beusedandremoveallstones,sticks,wires,bonesand
otherforeignobjects.
•Beforeusing,alwaysvisuallyinspecttoseethatguards,
andsafetydevices,suchasdeectorsand/orgrass
catchers,areinplaceandworkingcorrectly.
•Beforeusing,alwaysvisuallyinspecttoseethattheblades,
bladeboltsandcutterassemblyarenotwornordamaged.
Replacewornordamagedbladesandboltsinsetsto
preservebalance.
Starting
•Donottiltthemowerwhenstartingtheengineunlessthe
mowerhastobetiltedforstarting.Inthiscase,donot
tiltitmorethanabsolutelynecessaryandliftonlythepart
whichisawayfromtheoperator.
•Starttheenginecarefullyaccordingtoinstructionsand
withfeetwellawayfromtheblade(s)andnotinfrontof
thedischargechute.
Operation
•Nevermowwhilepeople,especiallychildren,orpetsare
nearby.
•Mowonlyindaylightoringoodarticiallight.
•Stayalertforholesintheterrainandotherhiddenhazards.
•Donotputhandsorfeetnearorunderrotatingparts.
Keepclearofthedischargeopeningatalltimes.
•Neverpickuporcarryalawnmowerwhiletheengineis
running.
•Useextremecautionwhenreversingorpullinga
pedestriancontrolledlawnmowertowardsyou.
•Walk,neverrun.
•Slopes:
2

–Donotmowexcessivelysteepslopes.
–Exerciseextremecautionwhenonslopes.
–Mowacrossthefaceofslopes,neverupanddown,
andexerciseextremecautionwhenchangingdirection
onslopes.
–Alwaysbesureofyourfootingonslopes.
•Reducespeedonslopesandinsharpturnstoprevent
overturningorlossofcontrol.
•Stopthebladeifthelawnmowerhastobetiltedfor
transportationwhencrossingsurfacesotherthangrass
andwhentransportingthelawnmowertoandfromthe
areatobemowed.
•Donotoperatetheengineinaconnedspacewhere
dangerouscarbonmonoxidefumescancollect.
•Stoptheengine
–wheneveryouleavethelawnmower.
–beforerefueling.
–beforeremovingthegrasscatcher.
–beforemakingheightadjustmentunlessadjustment
canbemadefromtheoperator'sposition.
•Stoptheengineanddisconnectthespark-plugwire.
–beforeclearingblockagesoruncloggingchute.
–beforechecking,cleaningorworkingonthelawn
mower.
–afterstrikingaforeignobject,inspectthelawnmower
fordamageandmakerepairsbeforerestartingand
operatingthelawnmower.
–iflawnmowerstartstovibrateabnormally(check
immediately).
•Lightningcancausesevereinjuryordeath.Ifyousee
lightningorhearthunderinthearea,donotoperatethe
machine;seekshelter.
•Watchoutfortrafcwhencrossingornearroadways.
MaintenanceandStorage
•Keepallnuts,bolts,andscrewstighttobesurethe
equipmentisinsafeworkingcondition.
•Donotusepressure-cleaningequipmentonmachine.
•Neverstoretheequipmentwithgasolineinthetankand
insideabuildingwherefumescanreachanopename
orspark.
•Allowtheenginetocoolbeforestoringinanyenclosure.
•Toreducetherehazard,keeptheengine,silencer,
batterycompartmentandgasolinestorageareafreeof
grass,leaves,orexcessivegrease.
•Checkgrasscatchercomponentsandthedischargeguard
frequentlyandreplacewithmanufacturer'srecommended
parts,whennecessary.
•Replacewornordamagedpartsforsafety.
•Replacefaultysilencers.
•Ifthefueltankhastobedrained,dothisoutdoors.
•Donotchangetheenginegovernorsettingsoroverspeed
theengine.Operatinganengineatexcessivespeedcan
increasethehazardofpersonalinjury.
•Becarefulduringadjustmentofthelawnmowerto
prevententrapmentofthengersbetweenmovingblades
andxedpartsofthelawnmower.
•Toensurethebestperformanceandsafety,
purchaseonlygenuineTororeplacementpartsand
accessories.Donotuse
willt
partsandaccessories;
theymaycauseasafetyhazard.
SoundPressure
Thisunithasasoundpressurelevelattheoperator’searof89
dBA,whichincludesanUncertaintyValue(K)of1dBA.
Thesoundpressurelevelwasdeterminedaccordingtothe
proceduresoutlinedinEN836.
SoundPower
Thisunithasaguaranteedsoundpowerlevelof98dBA,
whichincludesanUncertaintyValue(K)of1dBA.
Thesoundpowerlevelwasdeterminedaccordingtothe
proceduresoutlinedinISO11094.
Hand/ArmVibration
Measuredvibrationlevelforrighthand=5.5m/s
2
Measuredvibrationlevelforlefthand=5.4m/s
2
UncertaintyValue(K)=2.2m/s
2
Measuredvaluesweredeterminedaccordingtotheprocedures
outlinedinEN836.
3

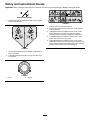
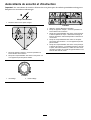
SafetyandInstructionalDecals
Important:Safetyandinstructiondecalsarelocatednearareasofpotentialdanger.Replacedamageddecals.
Manufacturer'sMark
1.Indicatesthebladeisidentiedasapartfromtheoriginal
machinemanufacturer.
112-8760
1.Thrownobjecthazard—keepbystandersasafedistance
fromthemachine.
2.Cutting/dismembermentofhandorfoot—stayawayfrom
movingparts.
112-8867
1.Lock2.Unlock
114-7982
1.Warning—readtheOperator'sManual.
2.Thrownobjecthazard—keepbystandersasafedistance
fromthemachine.
3.Cutting/dismembermenthazardofhandorfoot,mower
blade—disconnectthesparkplugwireandreadthe
instructionsbeforeservicingorperformingmaintenance.
4.Cutting/dismembermenthazardofhandorfoot,mower
blade—stayawayfrommovingparts.
5.Cutting/dismembermenthazardofhandorfoot,mower
blade—donotoperateupanddownslopes;operatesideto
sideonslopes;stoptheenginebeforeleavingtheoperating
position;andlookbehindyouwhenbackingup.
4

Setup
Important:Removeanddiscardtheprotectiveplastic
sheetthatcoverstheengine.
1
InstallingtheHandle
NoPartsRequired
Procedure
WARNING
Foldingorunfoldingthehandleimproperlycan
damagethecables,causinganunsafeoperating
condition.
•Donotdamagethecableswhenfoldingor
unfoldingthehandle.
•Ifacableisdamaged,contactanAuthorized
ServiceDealer.
1.Removethehandleknobsfromthemachinehousing
(Figure3).
Important:Routethecablestotheoutsideofthe
handleknobsasyouinstallthehandle.
G020724
Figure3
2.Movethehandletotheoperatingposition.
3.Installandtightenthehandleknobsthatyouremoved
instep1.
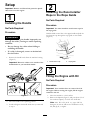
2
InstallingtheRecoil-starter
RopeintheRopeGuide
NoPartsRequired
Procedure
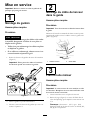
Important:Youmustinstalltherecoil-starterropein
theropeguide.
Holdtheblade-controlbartotheupperhandleandpullthe
recoil-starterropethroughtheropeguideonthehandle
(Figure4).
Figure4
1.Recoil-starterrope2.Ropeguide
3
FillingtheEnginewithOil
NoPartsRequired
Procedure
Important:Yourmachinedoesnotcomewithoilin
theengine.Beforestartingtheengine,lltheengine
crankcasewithoil.
1.Movethemachinetoalevelsurface.
2.Removethedipstick(Figure5)andpourabout3/4of
thecrankcasecapacityofoilintotheoil-lltube.
Note:Max.ll:0.59l(20.oz.),type:SAE30
detergentoilwithanAPIserviceclassicationofSF,
SG,SH,SJ,SL,orhigher.
5

Figure5
1.Dipstick
3.Wipethedipstickcleanwithacleancloth.
4.Insertthedipstickfullyintotheoil-lltube.
5.Removethedipstickandreadtheoillevelonthe
dipstick;refertoFigure5.
•IftheoilisbelowtheAddmarkonthedipstick,
slowlypourasmallamountofoilintotheoil-ll
tube,wait3minutes,andthenrepeatsteps3
through5untiltheoillevelisattheFullmarkon
thedipstick.
•IftheoilisabovetheFullmarkonthedipstick,
draintheexcessoiluntiltheoillevelisattheFull
markonthedipstick.Todraintheexcessoil,refer
toChangingtheEngineOil(page13).
Important:Iftheoillevelinthecrankcaseistoo
lowortoohighandyouruntheengine,youmay
damagetheengine.
6.Installthedipstickintotheoil-lltubesecurely.
Important:
Changetheengineoilaftertherst5
operatinghours
;changeityearlythereafter.Refer
toChangingtheEngineOil(page13).
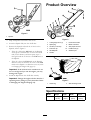
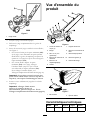
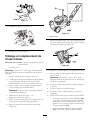
ProductOverview
Figure6
1.Cutting-heightlever(4)
7.Recoil-starthandle
2.Sparkplug
8.Blade-controlbar
3.Airlter(notshown)9.Self-propel-drivebar
4.Fuel-tankcap
10.Handleknob(2)
5.Oilll/dipstick
11.Washoutport
6.Handle
Figure7
1.Grassbag2.Side-dischargechute
Specications
ModelWeightLengthWidthHeight
2095437kg
(81lb)
150cm
(59in)
58cm
(23in)
107cm
(42in)
6

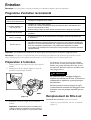
Operation
FillingtheFuelTank
DANGER
Gasolineisextremelyammableandexplosive.A
reorexplosionfromgasolinecanburnyouand
others.
•Topreventastaticchargefromignitingthe
gasoline,placethecontainerand/ormachine
directlyonthegroundbeforelling,notina
vehicleoronanobject.
•Fillthetankoutdoorswhentheengineiscold.
Wipeupspills.
•Donothandlegasolinewhensmokingoraround
anopenameorsparks.
•Storegasolineinanapprovedfuelcontainer,out
ofthereachofchildren.
Fillthefueltankwithfreshunleadedregulargasolinefroma
majorname-brandservicestation(Figure8).
Note:Neverusemethanol,gasolinecontainingmethanol,or
gasolinecontainingmorethan10%ethanolbecausethefuel
systemcouldbedamaged.Donotmixoilwithgasoline.
Important:Toreducestartingproblems,addfuel
stabilizertothefuelallseason,mixingitwithgasoline
lessthan30daysold.
Figure8
CheckingtheEngineOilLevel
ServiceInterval:Beforeeachuseordaily
Note:Max.ll:0.59l(20.oz.),type:SAE30detergent
oilwithanAPIserviceclassicationofSF,SG,SH,SJ,SL,
orhigher.
1.Movethemachinetoalevelsurface.
2.Removethedipstick(Figure9).
Figure9
1.Dipstick
3.Wipethedipstickcleanwithacleancloth.
4.Insertthedipstickfullyintotheoil-lltube.
5.Removethedipstickandreadtheoillevelonthe
dipstick;refertoFigure9.
•IftheoilisbelowtheAddmarkonthedipstick,
slowlypourasmallamountofoilintotheoil-ll
tube,wait3minutes,andthenrepeatsteps3
through5untiltheoillevelisattheFullmarkon
thedipstick.
•IftheoilisabovetheFullmarkonthedipstick,
draintheexcessoiluntiltheoillevelisattheFull
markonthedipstick.Todraintheexcessoil,refer
toChangingtheEngineOil(page13).
Important:Iftheoillevelinthecrankcaseistoo
lowortoohighandyouruntheengine,youmay
damagetheengine.
6.Installthedipstickintotheoil-lltubesecurely.
7

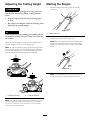
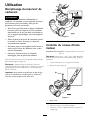
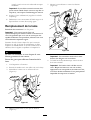
AdjustingtheCuttingHeight
WARNING
Adjustingthecuttingheightmaybringyouinto
contactwiththemovingblade,causingserious
injury.
•Stoptheengineandwaitforallmovingparts
tostop.
•Donotputyourngersunderthehousingwhen
adjustingthecuttingheight.
CAUTION
Iftheenginehasbeenrunning,themuferwillbe
hotandcanseverelyburnyou.Keepawayfromthe
hotmufer.
Adjustthecuttingheightasdesired.Setthefrontwheelsto
thesameheightastherearwheels(Figure10).
Note:Toraisethemachine,movethefrontcutting-height
leversrearwardandtherearcutting-heightleversforward.
Tolowerthemachine,movethefrontcutting-heightlevers
forwardandtherearcutting-heightleversrearward.
G020725
Figure10
1.Raisethemachine2.Lowerthemachine
Note:Thecuttingheightsettingsare25mm(1in);35mm
(1-3/8in);44mm(1-3/4in);54mm(2-1/8in);64mm
(2-1/2in);73mm(2-7/8in);83mm(3-1/4in);92mm
(3-5/8in);and102mm(4in).
StartingtheEngine
1.Holdtheblade-controlbaragainstthehandle
(Figure11).
Figure11
1.Blade-controlbar
2.Pulltherecoil-starthandle(Figure12).
Note:Whenyoupulltherecoil-starthandle,pullit
lightlyuntilyoufeelresistance,thenpullitsharply
(Figure12).Allowtheropetoreturntothehandle
slowly.
Figure12
Note:Ifthemachinedoesnotstartafterseveral
attempts,contactanAuthorizedServiceDealer.
8

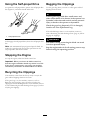
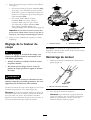
UsingtheSelf-propelDrive
Tooperatetheself-propeldrive,squeezetheself-propeldrive
bar(Figure13)towardthehandleandholdit.
Figure13
1.Self-propel-drivebar
Todisengagetheself-propeldrive,releasetheself-propel-drive
bar.
Note:Themaximumself-propelgroundspeedisxed.To
reducethegroundspeed,increasethespacebetweenthe
self-propel-drivebarandthehandle.
StoppingtheEngine
Tostoptheengine,releasetheblade-controlbar.
Important:Whenyoureleasetheblade-controlbar,
boththeengineandbladeshouldstopwithin3seconds.
Iftheydonotstopproperly,stopusingyourmachine
immediatelyandcontactanAuthorizedServiceDealer.
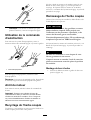
RecyclingtheClippings
Yourmachinecomesfromthefactoryreadytorecyclethe
grassandleafclippingsbackintothelawn.
Ifthegrassbagisonthemachine,removeit;referto
RemovingtheGrassBag(page10)beforerecyclingthe
clippings.Ifthesidedischargechuteisonthemachine,remove
it;refertoRemovingtheSide-dischargeChute(page11)before
recyclingtheclippings.
BaggingtheClippings
Usethegrassbagwhenyouwanttocollectgrassandleaf
clippingsfromthelawn.
WARNING
Aworngrassbagcouldallowsmallstonesand
othersimilardebristobethrownintheoperator'sor
bystander'sdirectionandresultinseriouspersonal
injuryordeathtotheoperatororbystanders.
Checkthegrassbagfrequently.Ifitisdamaged,
installanewTororeplacementbag.
Iftheside-dischargechuteisonthemachine,removeit;
refertoRemovingtheSide-dischargeChute(page11)before
baggingtheclippings.
WARNING
Thebladeissharp;contactingthebladecanresult
inseriouspersonalinjury.
Stoptheengineandwaitforallmovingpartstostop
beforeleavingtheoperatingposition.
9

InstallingtheGrassBag
1.Raiseandholdupthereardeector(Figure14).
Figure14
1.Notches
3.Grassbagpin(2)
2.Reardeector
2.Installthegrassbag,ensuringthatthepinsonthebag
restinthenotchesonthehandle(Figure14).
3.Lowerthereardeector.
RemovingtheGrassBag
Toremovethebag,reversethestepsabove.
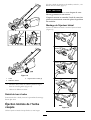
Side-dischargingtheClippings
Usethesidedischargeforcuttingverytallgrass.
Ifthegrassbagisonthemachine,removeit;referto
RemovingtheGrassBag(page10).
WARNING
Thebladeissharp;contactingthebladecanresult
inseriouspersonalinjury.
Stoptheengineandwaitforallmovingpartstostop
beforeleavingtheoperatingposition.
10

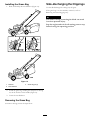
InstallingtheSide-dischargeChute
Liftupthesidedeectorandinstalltheside-dischargechute
(Figure15).
Figure15
RemovingtheSide-dischargeChute
Toremovetheside-dischargechute,liftupthesidedeector,
removetheside-dischargechute,andlowertheside-discharge
deector.
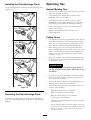
OperatingTips
GeneralMowingTips
•Cleartheareaofsticks,stones,wire,branches,andother
debristhatthebladecouldhit.
•Avoidstrikingsolidobjectswiththeblade.Never
deliberatelymowoveranyobject.
•Ifthemachinestrikesanobjectorstartstovibrate,
immediatelystoptheengine,disconnectthewirefrom
thesparkplug,andexaminethemachinefordamage.
•Forbestperformance,installanewbladebeforethe
cuttingseasonbegins.
•ReplacethebladewhennecessarywithaToro
replacementblade.
CuttingGrass
•Cutonlyaboutathirdofthegrassbladeatatime.Donot
cutbelowthe54mm(2-1/8in)settingunlessthegrassis
sparseoritislatefallwhengrassgrowthbeginstoslow
down.RefertoAdjustingtheCuttingHeight(page8).
•Whencuttinggrassover15cm(6in)tall,mowatthe
highestcuttingheightsettingandwalkslower;thenmow
againatalowersettingforthebestlawnappearance.If
thegrassistoolong,themachinemayplugandcause
theenginetostall.
•Mowonlydrygrassorleaves.Wetgrassandleavestend
toclumpontheyardandcancausethemachinetoplug
ortheenginetostall.
WARNING
Wetgrassorleavescancauseseriousinjuryif
youslipandcontacttheblade.Mowonlyindry
conditions.
•Beawareofapotentialrehazardinverydryconditions,
followalllocalrewarnings,andkeepthemachinefree
ofdrygrassandleafdebris.
•Alternatethemowingdirection.Thishelpsdispersethe
clippingsoverthelawnforevenfertilization.
•Ifthenishedlawnappearanceisunsatisfactory,tryone
ormoreofthefollowing:
–Replacethebladeorhaveitsharpened.
–Walkataslowerpacewhilemowing.
–Raisethecuttingheightonyourmachine.
–Cutthegrassmorefrequently.
–Overlapcuttingswathsinsteadofcuttingafullswath
witheachpass.
–Setthecuttingheightonthefrontwheelsonenotch
lowerthantherearwheels.Forexample,setthefront
wheelsat54mm(2-1/8in)andtherearwheelsat
64mm(2-1/2in).
11

CuttingLeaves
•Aftercuttingthelawn,ensurethathalfofthelawnshows
throughthecutleafcover.Youmayneedtomakemore
thanonepassovertheleaves.
•Iftherearemorethan13cm(5in)ofleavesonthelawn,
setthefrontcuttingheightoneortwonotcheshigher
thantherearcuttingheight.
•Slowdownyourmowingspeedifthemachinedoesnot
cuttheleavesnelyenough.
Maintenance
Note:Determinetheleftandrightsidesofthemachinefromthenormaloperatingposition.
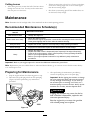
RecommendedMaintenanceSchedule(s)
MaintenanceService
Interval
MaintenanceProcedure
Aftertherst5hours
•Changetheengineoil.
Beforeeachuseordaily
•Checktheengineoillevel.
•Ensurethattheenginestopswithin3secondsafterreleasingtheblade-controlbar.
•Cleangrassclippingsanddirtfromunderthemachinehousing.
Every25hours
•Replacetheairlter;replaceitmorefrequentlyindustyoperatingconditions.
Beforestorage
•Emptythefueltankbeforerepairsasdirectedandbeforeannualstorage.
Yearly
•Changetheengineoil.
•Replacethebladeorhaveitsharpened(morefrequentlyiftheedgedullsquickly).
•Cleantheair-coolingsystem;cleanitmorefrequentlyindustyoperatingconditions.
Refertoyourengineoperator'smanual.
•Refertoyourengineoperator'smanualforanyadditionalyearlymaintenance
procedures.
Important:Refertoyourengineoperator'smanualforadditionalmaintenanceprocedures.
Note:ReplacementpartsareavailablefromanAuthorizedServiceDealer(gotowww.toro.comtondthenearestdealer)
oratwww.shoptoro.com.
PreparingforMaintenance
1.Stoptheengineandwaitforallmovingpartstostop.
2.Disconnectthespark-plugwirefromthesparkplug
(Figure16)beforeperforminganymaintenance
procedure.
Figure16
3.Afterperformingthemaintenanceprocedure(s),
connectthespark-plugwiretothesparkplug.
Important:Beforetippingthemachinetochange
theoilorreplacetheblade,allowthefueltankto
rundrythroughnormalusage.Ifyoumusttip
themachinepriortorunningoutoffuel,usea
handfuelpumptoremovethefuel.Alwaystipthe
machineontoitsside,withthedipstickdown.
WARNING
Tippingthemachinemaycausethefuelto
leak.Gasolineisammable,explosiveand
cancausepersonalinjury.
Runtheenginedryorremovethegasoline
withahandpump;neversiphon.
12

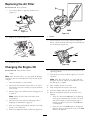
ReplacingtheAirFilter
ServiceInterval:Every25hours
1.Useascrewdrivertoopentheair-ltercover
(Figure17).
Figure17
2.Replacetheairlter(Figure18).
Figure18
3.Installthecover.
ChangingtheEngineOil
ServiceInterval:Aftertherst5hours
Yearly
Note:Max.ll:0.59l(20.oz.),type:SAE30detergent
oilwithanAPIserviceclassicationofSF,SG,SH,SJ,SL,
orhigher.
1.Movethemachinetoalevelsurface.
2.Ensurethatthefueltankcontainslittleornofuelso
thatfueldoesnotleakoutwhenyoutipthemachine
ontoitsside.
3.Runtheengineafewminutesbeforechangingtheoil
towarmit.
Note:Warmoilowsbetterandcarriesmore
contaminants.
4.Disconnectthewirefromthesparkplug;referto
PreparingforMaintenance(page12).
5.Placeanoildrainpanbesidethemachineontheside
nearesttotheoil-lltube.
6.Removethedipstickfromtheoil-lltube(Figure19).
Figure19
1.Dipstick
7.Tipthemachineontoitsside,withtheoil-lltube
down,todraintheusedoilthroughtheoil-lltubeinto
theoil-drainpan(Figure20).
Figure20
8.Afterdrainingtheusedoil,returnthemachinetothe
operatingposition.
9.Pourabout3/4ofthecrankcasecapacityofoilinthe
crankcase.
Note:Max.ll:0.59l(20.oz.),type:SAE30
detergentoilwithanAPIserviceclassicationofSF,
SG,SH,SJ,SL,orhigher.
10.Wait3minutesfortheoiltosettle.
11.Wipethedipstickcleanwithacleancloth.
12.Insertthedipstickfullyintotheoil-lltube.
13.Removethedipstickandreadtheoillevelonthe
dipstick.
•IftheoilisbelowtheAddmarkonthedipstick,
slowlypourasmallamountofoilintotheoil-ll
tube,wait3minutes,andthenrepeatsteps11
through13untiltheoillevelisattheFullmark
onthedipstick.
•IftheoilisabovetheFullmarkonthedipstick,
draintheexcessoiluntiltheoillevelisattheFull
markonthedipstick.
13

Important:Iftheoillevelinthecrankcaseistoo
lowortoohighandyouruntheengine,youmay
damagetheengine.
14.Installthedipstickintotheoil-lltubesecurely.
15.Disposeoftheusedoilproperlyatalocalrecycling
center.
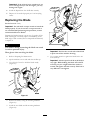
ReplacingtheBlade
ServiceInterval:Yearly
Important:
Youwillneedatorquewrenchtoinstallthe
bladeproperly
.Ifyoudonothaveatorquewrenchor
areuncomfortableperformingthisprocedure,contact
anAuthorizedServiceDealer.
Examinethebladewheneveryourunoutofgasoline.Ifthe
bladeisdamagedorcracked,replaceitimmediately.Ifthe
bladeedgeisdullornicked,haveitsharpenedandbalanced,
orreplaceit.
WARNING
Thebladeissharp;contactingthebladecanresult
inseriouspersonalinjury.
Weargloveswhenservicingtheblade.
1.RefertoPreparingforMaintenance.
2.Tipthemachineontoitssidewiththeairlterup.
3.Useablockofwoodtoholdthebladesteady
(Figure21).
Figure21
4.Removetheblade,savingallmountinghardware
(Figure21).
5.Installthenewbladeandallmountinghardware
(Figure22).
Figure22
Important:Positionthecurvedendsoftheblade
topointtowardthemachinehousing.
6.Useatorquewrenchtotightenthebladeboltto82
N-m(60ft-lb).
Important:Abolttorquedto82N-m(60ft-lb)is
verytight.Whileholdingthebladewithablock
ofwood,putyourweightbehindtheratchetor
wrenchandtightentheboltsecurely.Thisboltis
verydifculttoovertighten.
14

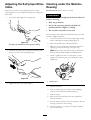
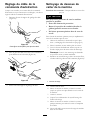
AdjustingtheSelf-propelDrive
Cable
Wheneveryouinstallanewself-propelcableorifthe
self-propeldriveisoutofadjustment,adjusttheself-propel
drivecable.
1.Loosenthecable-supportnut(Figure23).
Figure23
Thisgureissimpliedforthepurposeofclarity.
2.Pulldownthecablejacket(towardthemachine)until
thereisnoslackinthecable(Figure24).
Figure24
3.Tightenthenutonthecablesupport.
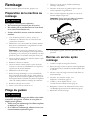
CleaningundertheMachine
Housing
ServiceInterval:Beforeeachuseordaily
WARNING
Themachinemaydislodgematerialfromunderthe
machinehousing.
•Weareyeprotection.
•Stayintheoperatingposition(behindthe
handle)whentheengineisrunning.
•Donotallowbystandersinthearea.
Forbestresults,cleanunderthemachinehousingsoonafter
youhavecompletedmowing.
1.Lowerthemachinetoitslowestcutting-heightsetting;
refertoAdjustingtheCuttingHeight(page8).
2.Movethemachineontoaatpavedsurface.
3.Washouttheareaunderthereardeectorwherethe
clippingsgofromthehousingtothegrassbag.
Note:Washouttheareawiththebag-on-demandin
boththefullyforwardandfullyrearwardpositions.
4.Attachagardenhosethatisconnectedtoawater
supplytothewashoutportonthemachinehousing
(Figure25).
Figure25
1.Washoutport
5.Turnthewateron.
6.Starttheengineandrunituntilnomoreclippings
comeoutfromunderthemachinehousing.
7.Stoptheengine.
8.Shutoffthewateranddisconnectthegardenhose
fromthemachine.
9.Starttheengineandrunitforafewminutestodrythe
housingtopreventitfromrusting.
10.Allowtheenginetocoolbeforestoringthemachine
inanenclosedarea.
15

Storage
Storethemachineinacool,clean,dryplace.
PreparingtheMachinefor
Storage
WARNING
Gasolinevaporscanexplode.
•Donotstoregasolinemorethan30days.
•Donotstorethemachineinanenclosurenear
anopename.
•Allowtheenginetocoolbeforestoringit.
1.Onthelastrefuelingoftheyear,addfuelstabilizerto
thefuelasdirectedbytheenginemanufacturer.
2.Disposeofanyunusedfuelproperly.Recycleit
accordingtolocalcodes,oruseitinyourautomobile.
Note:Oldfuelinthefueltankistheleadingcauseof
hardstarting.Donotstorefuelwithoutstabilizermore
than30days,anddonotstorestabilizedfuelmorethan
90days.
3.Runthemachineuntiltheenginestopsfromrunning
outoffuel.
4.Starttheengineagain.
5.Allowtheenginetorununtilitstops.Whenyoucan
nolongerstarttheengine,itissufcientlydry.
6.Disconnectthewirefromthesparkplug.
7.Removethesparkplug,add30ml(1oz.)ofoilthrough
thesparkplughole,andpullthestarterropeslowly
severaltimestodistributeoilthroughoutthecylinder
topreventcylindercorrosionduringtheoff-season.
8.Looselyinstallthesparkplug.
9.Tightenallnuts,bolts,andscrews.
FoldingtheHandle
WARNING
Foldingorunfoldingthehandleimproperlycan
damagethecables,causinganunsafeoperating
condition.
•Donotdamagethecableswhenfoldingor
unfoldingthehandle.
•Ifacableisdamaged,contactanAuthorized
ServiceDealer.
1.Removetheignitionkey(electric-startmodelonly).
2.Loosenthehandleknobsuntilyoucanmovetheupper
handlefreely.
3.FoldtheupperhandleforwardasshowninFigure26.
Important:Routethecablestotheoutsideofthe
handleknobsasyoufoldthehandle.
Figure26
4.Tounfoldthehandle,reversethestepsabove.
RemovingtheMachinefrom
Storage
1.Checkandtightenallfasteners.
2.Removethesparkplugandspintheenginerapidly
usingthestartertoblowexcessoilfromthecylinder.
3.Installthesparkplugandtightenitwithatorque
wrenchto15ft-lb(20N-m).
4.Performanyneededmaintenanceprocedures;referto
PreparingforMaintenance(page12).
5.Checktheengineoillevel;referto
CheckingtheEngineOilLevel(page7).
6.Fuelthefueltankwithfreshgasoline;referto
FillingtheFuelTank(page7).
7.Connectthewiretothesparkplug.
16

Notes:
17

Notes:
18

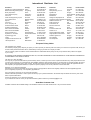
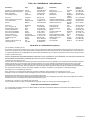
InternationalDistributorList
Distributor:
Country:
PhoneNumber:Distributor:
Country:
PhoneNumber:
AtlantisSuveSulamaSisstemleriLt
Turkey902163448674
MaquiverS.A.Colombia
5712364079
BalamaPrimaEngineeringEquip.HongKong85221552163
MaruyamaMfg.Co.Inc.
Japan81332522285
B-RayCorporation
Korea82325512076
AgrolancKft
Hungary3627539640
CascoSalesCompany
PuertoRico7877888383
Mountelda.s.CzechRepublic
420255704220
CeresS.A.CostaRica
5062391138
MunditolS.A.
Argentina541148219999
CSSCTurfEquipment(pvt)Ltd.SriLanka
94112746100
OslingerTurfEquipmentSA
Ecuador59342396970
CyrilJohnston&Co.
NorthernIreland442890813121
OyHakoGroundandGardenAb
Finland35898700733
EquiverMexico525553995444ParklandProductsLtd.NewZealand6433493760
FemcoS.A.Guatemala
5024423277
PratoVerdeS.p.A.
Italy390499128128
G.Y.K.CompanyLtd.
Japan81726325861
Prochaska&Cie
Austria4312785100
GeomechanikiofAthensGreece
30109350054
RTCohen2004Ltd.
Israel97298617979
GuandongGoldenStarChina
862087651338Riversa
Spain
34952837500
HakoGroundandGardenSweden
4635100000
ScSvendCarlsenA/S
Denmark4566109200
HakoGroundandGarden
Norway4722907760
SolvertS.A.S.
France33130817700
HayterLimited(U.K.)
UnitedKingdom441279723444
SpyprosStavrinidesLimitedCyprus
35722434131
HydroturfInt.CoDubai
UnitedArabEmirates97143479479
SurgeSystemsIndiaLimited
India911292299901
HydroturfEgyptLLC
Egypt2025194308T-MarktLogisticsLtd.Hungary3626525500
IrriamcPortugal351212388260ToroAustraliaAustralia61395807355
IrrigationProductsInt'lPvtLtd.India862283960789ToroEuropeNVBelgium3214562960
JeanHeybroekb.v.Netherlands31306394611
EuropeanPrivacyNotice
TheInformationToroCollects
ToroWarrantyCompany(Toro)respectsyourprivacy.Inordertoprocessyourwarrantyclaimandcontactyouintheeventofaproductrecall,weaskyou
tosharecertainpersonalinformationwithus,eitherdirectlyorthroughyourlocalTorocompanyordealer.
TheTorowarrantysystemishostedonserverslocatedwithintheUnitedStateswhereprivacylawmaynotprovidethesameprotectionasapplies
inyourcountry.
BYSHARINGYOURPERSONALINFORMATIONWITHUS,YOUARECONSENTINGTOTHEPROCESSINGOFYOURPERSONALINFORMATION
ASDESCRIBEDINTHISPRIVACYNOTICE.
TheWayToroUsesInformation
Toromayuseyourpersonalinformationtoprocesswarrantyclaims,tocontactyouintheeventofaproductrecallandforanyotherpurposewhichwetell
youabout.ToromayshareyourinformationwithToro'safliates,dealersorotherbusinesspartnersinconnectionwithanyoftheseactivities.Wewillnot
sellyourpersonalinformationtoanyothercompany.Wereservetherighttodisclosepersonalinformationinordertocomplywithapplicablelawsand
withrequestsbytheappropriateauthorities,tooperateoursystemsproperlyorforourownprotectionorthatofotherusers.
RetentionofyourPersonalInformation
Wewillkeepyourpersonalinformationaslongasweneeditforthepurposesforwhichitwasoriginallycollectedorforotherlegitimatepurposes
(suchasregulatorycompliance),orasrequiredbyapplicablelaw.
Toro'sCommitmenttoSecurityofYourPersonalInformation
Wetakereasonableprecautionsinordertoprotectthesecurityofyourpersonalinformation.Wealsotakestepstomaintaintheaccuracyandcurrent
statusofpersonalinformation.
AccessandCorrectionofyourPersonalInformation
Ifyouwouldliketorevieworcorrectyourpersonalinformation,pleasecontactusbyemailat[email protected].
AustralianConsumerLaw
AustraliancustomerswillnddetailsrelatingtotheAustralianConsumerLaweitherinsidetheboxoratyourlocalToroDealer.
374-0269RevF

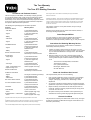
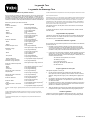
TheToroWarranty
and
TheToroGTSStartingGuarantee
ConditionsandProductsCovered
TheToroCompanyanditsafliate,ToroWarrantyCompany,pursuant
toanagreementbetweenthem,jointlypromisetorepairfortheoriginal
purchaser
1
theToroProductlistedbelowifdefectiveinmaterialsor
workmanshiporiftheToroGTS(GuaranteedtoStart)enginewillnotstart
ontherstorsecondpull,providedtheroutinemaintenancerequiredin
theOperator'sManualhavebeenperformed.
Thefollowingtimeperiodsapplyfromthedateofpurchase:
ProductsWarrantyPeriod
WalkPowerMowers
•CastDeck
5yearsResidentialUse
2
90DaysCommercialUse
•Engine
5yearsGTSGuarantee,
ResidentialUse
3
•Battery2years
•SteelDeck
2yearsResidentialUse
2
90DaysCommercialUse
•Engine
2yearsGTSGuarantee,
ResidentialUse
3
TimeMasterMowers3yearsResidentialUse
2
90DaysCommercialUse
•Engine
3yearsGTSGuarantee,
ResidentialUse
3
•Battery2years
ElectricHandHeldProducts2yearsResidentialUse
2
NoWarrantyforCommercialUse
Snowthrowers
•SingleStage
2yearsResidentialUse
2
45DaysCommercialUse
•Engine
2yearsGTSGuarantee,
ResidentialUse
3
•TwoStage
3yearsResidentialUse
2
45DaysCommercialUse
•Chute,chutedeectorand
impellerhousingcover
Lifetime(originalowneronly)
5
ElectricSnowthrowers
2yearsResidentialUse
2
NoWarrantyforCommercialUse
AllRide-OnUnitsBelow
•Engine
Seeenginemanufacturer'swarranty
4
•Battery2yearsResidentialUse
2
•Attachments2yearsResidentialUse
2
DHLawn&GardenTractors
2yearsResidentialUse
2
90DaysCommercialUse
XLSLawn&GardenTractors
3yearsResidentialUse
2
90DaysCommercialUse
TimeCutter
3yearsResidentialUse
2
90DaysCommercialUse
TITANMowers3yearsor240hours
5
•Frame
Lifetime(originalowneronly)
6
ZMasterMowers—2000Series
4yearsor500hours
5
•Frame
Lifetime(originalowneronly)
6
1
OriginalPurchasermeansthepersonwhooriginallypurchasedtheToroProduct.
2
Residentialusemeansuseoftheproductonthesamelotasyourhome.Useatmorethanone
locationisconsideredcommercialuseandthecommercialusewarrantywouldapply.
3
TheToroGTSStartingGuaranteedoesnotapplywhentheproductisusedcommercially.
4
SomeenginesusedonToroProductsarewarrantedbytheenginemanufacturer.
5
Whicheveroccursrst.
6
LifetimeFrameWarranty-Ifthemainframe,consistingofthepartsweldedtogethertoformthe
tractorstructurethatothercomponentssuchastheenginearesecuredto,cracksorbreaksin
normaluse,itwillberepairedorreplaced,atToro'soption,underwarrantyatnocostforparts
andlabor.Framefailureduetomisuseorabuseandfailureorrepairrequiredduetorustor
corrosionarenotcovered.
Thiswarrantycoversthecostofpartsandlabor,butyoumustpay
transportationcosts.
Warrantymaybedeniedifthehourmeterisdisconnected,altered,or
showssignsofbeingtamperedwith.
OwnerResponsibilities
YoumustmaintainyourToroProductbyfollowingthemaintenance
proceduresdescribedintheOperator'sManual.Suchroutine
maintenance,whetherperformedbyadealerorbyyou,isatyourexpense.
InstructionsforObtainingWarrantyService
IfyouthinkthatyourToroProductcontainsadefectinmaterialsor
workmanship,followthisprocedure:
1.Contactyoursellertoarrangeserviceoftheproduct.Ifforany
reasonitisimpossibleforyoutocontactyourseller,youmaycontact
anyToroAuthorizedDistributortoarrangeservice.Seeattached
DistributorList.
2.Bringtheproductandyourproofofpurchase(salesreceipt)to
theservicingoutlet.Ifforanyreasonyouaredissatisedwiththe
servicingoutlet’sanalysisorwiththeassistanceprovided,contact
usat:
ToroCustomerCareDepartment,RLCDivision
ToroWarrantyCompany
8111LyndaleAvenueSouth
Bloomington,MN55420-1196
001–952–948–4707
ItemsandConditionsNotCovered
Thisexpresswarrantydoesnotcoverthefollowing:
•Costofregularmaintenanceserviceorwearparts,suchasblades,
rotorblades(paddles),scraperblades,belts,fuel,lubricants,oil
changes,sparkplugs,pneumatictires,cable/linkageorbrake
adjustments
•Anyproductorpartwhichhasbeenalteredormisusedandrequires
replacementorrepairduetoaccidentsorlackofpropermaintenance
•Repairsnecessaryduetofailuretousefreshfuel(lessthanone
monthold),orfailuretoproperlypreparetheunitpriortoanyperiod
ofnon-useoveronemonth
•Allrepairscoveredbythesewarrantiesmustbeperformedbyan
authorizedToroservicingoutletusingapprovedreplacementparts.
GeneralConditions
Thepurchaseriscoveredbythenationallawsofeachcountry.Therights
towhichthepurchaserisentitledwiththesupportoftheselawsarenot
restrictedbythiswarranty.
374-0268RevE
La page est en cours de chargement...
La page est en cours de chargement...
La page est en cours de chargement...
La page est en cours de chargement...
La page est en cours de chargement...
La page est en cours de chargement...
La page est en cours de chargement...
La page est en cours de chargement...
La page est en cours de chargement...
La page est en cours de chargement...
La page est en cours de chargement...
La page est en cours de chargement...
La page est en cours de chargement...
La page est en cours de chargement...
La page est en cours de chargement...
La page est en cours de chargement...
La page est en cours de chargement...
La page est en cours de chargement...
La page est en cours de chargement...
La page est en cours de chargement...
-
 1
1
-
 2
2
-
 3
3
-
 4
4
-
 5
5
-
 6
6
-
 7
7
-
 8
8
-
 9
9
-
 10
10
-
 11
11
-
 12
12
-
 13
13
-
 14
14
-
 15
15
-
 16
16
-
 17
17
-
 18
18
-
 19
19
-
 20
20
-
 21
21
-
 22
22
-
 23
23
-
 24
24
-
 25
25
-
 26
26
-
 27
27
-
 28
28
-
 29
29
-
 30
30
-
 31
31
-
 32
32
-
 33
33
-
 34
34
-
 35
35
-
 36
36
-
 37
37
-
 38
38
-
 39
39
-
 40
40


Toro 55cm Recycler Lawn Mower Manuel utilisateur
- Catégorie
- Tondeuses à gazon
- Taper
- Manuel utilisateur
dans d''autres langues
Documents connexes
-
Toro TimeMaster 76cm Lawn Mower Manuel utilisateur
-
-
Toro 55cm Recycler Lawn Mower Manuel utilisateur
-
-
Toro 20in Recycler/Rear Bagging Lawn Mower Manuel utilisateur
-
-
-
-
-