Toro 22in Recycler Lawn Mower Manuel utilisateur
- Catégorie
- Tondeuses à gazon
- Taper
- Manuel utilisateur

FormNo.3371-62$60RevA
22inRecycler
®
LawnMower
ModelNo.20373—SerialNo.312000001andUp
Operator'sManual
ReplacementpartsareavailablefromanAuthorizedServiceDealeroratwww.shoptoro.com.
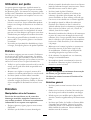
Introduction
Thisrotary-blade,walk-behindlawnmoweris
intendedtobeusedbyresidentialhomeowners.
Itisdesignedprimarilyforcuttinggrasson
well-maintainedlawnsonresidentialproperties.It
isnotdesignedforcuttingbrushorforagricultural
uses.
Readthisinformationcarefullytolearnhowtooperate
andmaintainyourproductproperlyandtoavoidinjury
andproductdamage.Youareresponsibleforoperating
theproductproperlyandsafely.
YoumaycontactTorodirectlyatwww.Toro.comfor
productandaccessoryinformation,helpndingadealer,
ortoregisteryourproduct.
Wheneveryouneedservice,genuineToroparts,
oradditionalinformation,contactanAuthorized
ServiceDealerorToroCustomerServiceandhave
themodelandserialnumbersofyourproductready.
Figure1identiesthelocationofthemodelandserial
numbersontheproduct.
G017291
Figure1
1.Modelandserialnumberplate
Writetheproductmodelandserialnumbersinthespace
below:
ModelNo.
SerialNo.
Thismanualidentiespotentialhazardsandhassafety
messagesidentiedbythesafetyalertsymbol(Figure2),
whichsignalsahazardthatmaycauseseriousinjury
ordeathifyoudonotfollowtherecommended
precautions.
Figure2
1.Safetyalertsymbol
Thismanualuses2wordstohighlightinformation.
Importantcallsattentiontospecialmechanical
informationandNoteemphasizesgeneralinformation
worthyofspecialattention.
WARNING
CALIFORNIA
Proposition65Warning
Theengineexhaustfromthisproduct
containschemicalsknowntotheStateof
Californiatocausecancer,birthdefects,
orotherreproductiveharm.
Important:Thisengineisnotequippedwitha
sparkarrestermufer.ItisaviolationofCalifornia
PublicResourceCodeSection4442touseoroperate
theengineonanyforest-covered,brush-covered,or
grass-coveredland.Otherstatesorfederalareas
mayhavesimilarlaws.
ThissparkignitionsystemcomplieswithCanadian
ICES-002.
Theenclosed
EngineOwner'sManual
issupplied
forinformationregardingtheUSEnvironmental
ProtectionAgency(EPA)andtheCalifornia
©2011—TheToro®Company
8111LyndaleAvenueSouth
Bloomington,MN55420
Registeratwww.Toro.com.
OriginalInstructions(EN)
PrintedintheUSA
AllRightsReserved

EmissionControlRegulationofemissionsystems,
maintenance,andwarranty.Replacementsmaybe
orderedthroughtheenginemanufacturer.
Formodelswithstatedenginehorsepower,thegross
horsepoweroftheenginewaslaboratoryratedbythe
enginemanufacturerinaccordancewithSAEJ1940.
Asconguredtomeetsafety,emission,andoperating
requirements,theactualenginehorsepoweronthisclass
oflawnmowerwillbesignicantlylower.
Safety
ThislawnmowermeetsorexceedstheCPSCblade
safetyrequirementsforwalk-behindrotarylawnmowers
andtheB71.1specicationsoftheAmericanNational
StandardsInstituteineffectatthetimeofproduction.
Readandunderstandthecontentsofthismanual
beforeyoustarttheengine.
Thesafetyalertsymbol(Figure2)isusedtoalertyou
topotentialpersonalinjuryhazards.Obeyallsafety
messagesthatfollowthissymboltoavoidpossibleinjury
ordeath.Improperlyusingormaintainingthismower
couldresultininjuryordeath.Toreducethispotential,
complywiththefollowingsafetyinstructions.
Thefollowinginstructionshavebeenadaptedfromthe
ANSI/OPEIstandardB71.1-2003.
Thiscuttingmachinecanamputatehandsandfeet
andthrowobjects.Failuretoobservethefollowing
safetyinstructionscouldresultinseriousinjuryor
death.
GeneralOperation
•Read,understand,andfollowallinstructionsonthe
machineandinthemanual(s)beforestarting.
•Donotputhandsorfeetnearorunderthemachine.
Keepclearofthedischargeopeningatalltimes.
•Onlyallowresponsibleadults,whoarefamiliarwith
theinstructions,tooperatethismachine.
•Cleartheareaofobjectssuchasrocks,wire,toys,
etc.,whichcouldbethrownbytheblade.Staybehind
thehandlewhentheengineisrunning.
•Besuretheareaisclearofbystandersbefore
operating.Stopmachineifanyoneentersthearea.
•Donotoperatemachinebarefootedorwhilewearing
sandals.Alwayswearsubstantialfootwear.
•Donotpullmachinebackwardunlessabsolutely
necessary.Alwayslookdownandbehindbeforeand
whilemovingbackward.
•Neverdirectdischargedmaterialtowardanyone.
Avoiddischargingmaterialagainstawallor
obstruction.Materialmayricochetbacktoward
theoperator.Stopthebladewhencrossinggravel
surfaces.
•Donotoperatemachinewithouttheentiregrass
catcher,dischargeguard,rearguard,orothersafety
protectivedevicesinplaceandworking.
•Neverleavearunningmachineunattended.
•Stoptheengineandwaituntilthebladecomes
toacompletestopbeforecleaningthemachine,
removinggrasscatcher,oruncloggingthedischarge
guard.
•Operatemachineonlyindaylightorgoodarticial
light.
•Donotoperatemachinewhileundertheinuence
ofalcoholordrugs.
•Neveroperatemowerinwetgrass.Alwaysbesure
ofyourfooting;walk;neverrun.
•Disengagethedrivesystem,ifsoequipped,before
startingtheengine.
•Ifthemachineshouldstarttovibrateabnormally,
stoptheengineandcheckforthecauseimmediately.
Vibrationisgenerallyawarningoftrouble.
•Alwaysweareyeprotectionwhenoperatingmachine.
•Seemanufacturer'sinstructionsforproperoperation
andinstallationofaccessories.Onlyuseaccessories
approvedbythemanufacturer.
SlopeOperation
Slopesareamajorfactorrelatedtoslipandfallaccidents,
whichcanresultinsevereinjury.Operationonallslopes
requireextracaution.Ifyoufeeluneasyonaslope,do
notmowit.
•Mowacrossthefaceofslopes;neverupanddown.
Exerciseextremecautionwhenchangingdirection
onslopes.
•Watchforholes,ruts,bumps,rocks,orotherhidden
objects.Uneventerraincouldcauseaslipandfall
accident.Tallgrasscanhideobstacles.
•Donotmowonwetgrassorexcessivelysteepslopes.
Poorfootingcouldcauseaslipandfallaccident.
•Donotmowneardrop-offs,ditches,or
embankments.Youcouldloseyourfootingor
balance.
2

Children
Tragicaccidentscanoccuriftheoperatorisnotalertto
thepresenceofchildren.Childrenareoftenattractedto
themachineandthemowingactivity.Neverassume
thatchildrenwillremainwhereyoulastsawthem.
•Keepchildrenoutofthemowingareaandunderthe
watchfulcareofaresponsibleadultotherthanthe
operator.
•Bealertandturnmoweroffifachildentersthearea.
•Neverallowchildrentooperatethemachine.
•Useextracarewhenapproachingblindcorners,
shrubs,trees,orotherobjectsthatmayblockyour
viewofachild.
Service
SafeHandlingofGasoline
Toavoidpersonalinjuryorpropertydamage,use
extremecareinhandlinggasoline.Gasolineis
extremelyammableandthevaporsareexplosive.
•Extinguishallcigarettes,cigars,pipes,andother
sourcesofignition.
•Useonlyanapprovedgasolinecontainer.
•Neverremovegascaporaddfuelwiththeengine
running.Allowenginetocoolbeforerefueling.
•Neverrefuelthemachineindoors.
•Neverstorethemachineorfuelcontainerwhere
thereisanopename,spark,orpilotlightsuchas
onawaterheateroronotherappliances.
•Neverllcontainersinsideavehicleoronatruck
ortrailerbedwithaplasticliner.Alwaysplace
containersonthegroundawayfromyourvehicle
beforelling.
•Removegas-poweredequipmentfromthetruck
ortrailerandrefuelitontheground.Ifthisisnot
possible,thenrefuelsuchequipmentwithaportable
container,ratherthanfromagasolinedispenser
nozzle.
•Keepthenozzleincontactwiththerimofthefuel
tankorcontaineropeningatalltimesuntilfuelingis
complete.Donotuseanozzlelock-opendevice.
•Iffuelisspilledonclothing,changeclothing
immediately.
•Neveroverllfueltank.Replacegascapandtighten
securely.
WARNING
Exhaustcontainscarbonmonoxide,anodorless,
deadlypoisonthatcankillyou.
Donotruntheengineindoorsorinanenclosed
area.
GeneralService
•Neveroperatemachineinaclosedarea.
•Keepallnutsandboltstighttobesuretheequipment
isinsafeworkingcondition.
•Nevertamperwithsafetydevices.Checktheir
properoperationregularly.
•Keepmachinefreeofgrass,leaves,orotherdebris
build-up.Cleanupoilorfuelspillageandremove
anyfuel-soakeddebris.Allowmachinetocool
beforestoring.
•Ifyoustrikeaforeignobject,stopandinspectthe
machine.Repair,ifnecessary,beforestarting.
•Nevermakeanyadjustmentsorrepairswiththe
enginerunning.Disconnectthesparkplugwireand
groundagainstenginetopreventunintendedstarting.
•Checkgrasscatchercomponentsandthedischarge
guardfrequentlyandreplacewithmanufacturer's
recommendedparts,whennecessary.
•Mowerbladesaresharp.Wrapthebladeorwear
gloves,anduseextracautionwhenservicingthem.
•Donotchangetheenginegovernorsettingor
overspeedtheengine.
•Maintainorreplacesafetyandinstructionlabels,as
necessary.
3

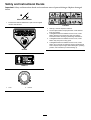
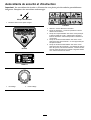
SafetyandInstructionalDecals
Important:Safetyandinstructiondecalsarelocatednearareasofpotentialdanger.Replacedamaged
decals.
Manufacturer'sMark
1.Indicatesthebladeisidentiedasapartfromtheoriginal
machinemanufacturer.
94-8072
108-8117
112-8867
1.Lock2.Unlock
114-7982
1.Warning—readtheOperator'sManual.
2.Thrownobjecthazard—keepbystandersasafedistance
fromthemachine.
3.Cutting/dismembermenthazardofhandorfoot,mower
blade—disconnectthesparkplugwireandreadthe
instructionsbeforeservicingorperformingmaintenance.
4.Cutting/dismembermenthazardofhandorfoot,mower
blade—stayawayfrommovingparts.
5.Cutting/dismembermenthazardofhandorfoot,mower
blade—donotoperateupanddownslopes;operatesideto
sideonslopes;stoptheenginebeforeleavingtheoperating
position;andlookbehindyouwhenbackingup.
4

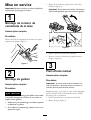
Setup
Important:Removeanddiscardtheprotective
plasticsheetthatcoverstheengine.
1
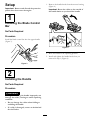
InstallingtheBladeControl
Bar
NoPartsRequired
Procedure
Installthebladecontrolbarintotheupperhandle
(Figure3).
Figure3
2
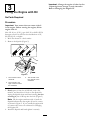
InstallingtheHandle
NoPartsRequired
Procedure
WARNING
Foldingorunfoldingthehandleimproperlycan
damagethecables,causinganunsafeoperating
condition.
•Donotdamagethecableswhenfoldingor
unfoldingthehandle.
•Ifacableisdamaged,contactanAuthorized
ServiceDealer.
1.Removethehandleknobsfromthemowerhousing
(Figure4).
Important:Routethecablestotheoutsideof
thehandleknobsasyouinstallthehandle.
G017314
Figure4
2.Movethehandletotheoperatingposition.
3.Installandtightenthehandleknobsthatyou
removedinstep1(Figure4).
5

3
FillingtheEnginewithOil
NoPartsRequired
Procedure
Important:Yourmowerdoesnotcomewithoil
intheengine.Beforestartingtheengine,llthe
enginewithoil.
Max.ll:20oz.(0.59l),type:SAE30orSAE10W-30
detergentoilwithanAPIserviceclassicationofSF,
SG,SH,SJ,SL,orhigher.
1.Movethemowertoalevelsurface.
2.Removethedipstick(Figure5).
G017323
Figure5
1.Theoillevelisatits
maximum.
3.Theoillevelistoo
low—addoiltothe
crankcase.
2.Theoillevelistoo
high—removeoilfrom
thecrankcase.
3.Slowlypouroilintotheoilllhole,waitafew
minutes,andchecktheoillevelonthedipstickby
wipingthedipstickcleanandtheninserting,butnot
screwingin,theoilllcapintothehole(Figure5).
Note:Filltheenginecrankcasewithoiluntilthe
dipstickindicatesthattheengineoilleveliscorrect
asshowninFigure5.Ifyouoverlltheenginewith
oil,removetheexcessoilasdirectedinChanging
theEngineOil.
4.Installthedipstickandhandtightenitsecurely.
Important:
Changetheengineoilaftertherst
5operatinghours
;changeityearlythereafter.
RefertoChangingtheEngineOil.
6

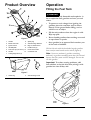
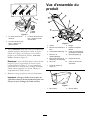
ProductOverview
G017316
Figure6
1.Handle
8.Sparkplug
2.Bladecontrolbar
9.Side-dischargedeector
3.Ignitionswitch10.Bag-on-demandlever
4.Oilll/dipstick11.Handleknob(2)
5.Fueltankcap(notshown)
12.Recoilstarthandle
6.Airlter13.Controlbarlock
7.Cuttingheightlever(4)
Figure7
1.Grassbag2.Sidedischargechute
Operation
FillingtheFuelTank
DANGER
Gasolineisextremelyammableandexplosive.A
reorexplosionfromgasolinecanburnyouand
others.
•Topreventastaticchargefromignitingthe
gasoline,placethecontainerand/ormower
directlyonthegroundbeforelling,notina
vehicleoronanobject.
•Fillthetankoutdoorswhentheengineiscold.
Wipeupspills.
•Donothandlegasolinewhensmokingoraround
anopenameorsparks.
•Storegasolineinanapprovedfuelcontainer,out
ofthereachofchildren.
Fillthefueltankwithfreshunleadedregulargasoline
fromamajorname-brandservicestation(Figure8).
Note:Neverusemethanol,gasolinecontaining
methanol,orgasolinecontainingmorethan10%ethanol
becausethefuelsystemcouldbedamaged.Donotmix
oilwithgasoline.
Important:Toreducestartingproblems,add
fuelstabilizertothefuelallseason,mixingitwith
gasolinelessthan30daysold.
G017304
Figure8
7

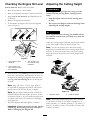
CheckingtheEngineOilLevel
ServiceInterval:Beforeeachuseordaily
1.Movethemowertoalevelsurface.
2.Removethedipstickandwipeitwithacleancloth.
3.Insert,butdonotscrewin,thedipstickintothe
oilllhole.
4.Removethedipstickandcheckit.
5.Todeterminetheproperoillevelonthedipstick,
refertoFigure9).
G017323
Figure9
1.Theoillevelisatits
maximum.
3.Theoillevelistoo
low—addoiltothe
crankcase.
2.Theoillevelistoo
high—removeoilfrom
thecrankcase.
6.Iftheoillevelislow,slowlypouroilintotheoilll
hole,waitafewminutes,andchecktheoillevelon
thedipstickbywipingthedipstickcleanandthen
inserting,butnotscrewingin,theoilllcapinto
thehole.
Note:Max.ll:20oz.(0.59l),type:SAE30
orSAE10W-30detergentoilwithanAPIservice
classicationofSF,SG,SH,SJ,SL,orhigher.
Note:Filltheenginecrankcasewithoiluntilthe
dipstickindicatesthattheengineoilleveliscorrect
asshowninFigure9.Ifyouoverlltheenginewith
oil,removetheexcessoilasdirectedinChanging
theEngineOil.
7.Installthedipstickandhandtightenitsecurely.
Important:
Changetheengineoilaftertherst
5operatinghours
;changeityearlythereafter.
RefertoChangingtheEngineOil.
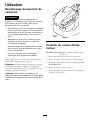
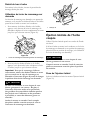
AdjustingtheCuttingHeight
WARNING
Adjustingthecuttingheightmaybringyouinto
contactwiththemovingblade,causingserious
injury.
•Stoptheengineandwaitforallmovingparts
tostop.
•Donotputyourngersunderthehousingwhen
adjustingthecuttingheight.
CAUTION
Iftheenginehasbeenrunning,themuferwillbe
hotandcanseverelyburnyou.Keepawayfromthe
hotmufer.
Adjustthecuttingheightasdesired.Setthefrontwheels
tothesameheightastherearwheels(Figure10).
Note:Toraisethemower,movethefrontcutting
heightleversrearwardandtherearcuttingheightlevers
forward.Tolowerthemower,movethefrontcutting
heightleversforwardandtherearcuttingheightlevers
rearward.
Figure10
1.Raisethemower2.Lowerthemower
Note:Thecuttingheightsettingsare1inch(25mm);
1-3/8inches(35mm);1-3/4inches(44mm);2-1/8
inches(54mm);2-1/2inches(64mm);2-7/8inches(73
mm);3-1/4inches(83mm);3-5/8inches(92mm);and
4inches(102mm).
8

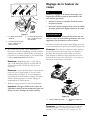
StartingtheEngine
1.Iftheignitionswitchonyourmower(Figure11)isa
toggleswitch(withbothan“I”anda“Stop”),push
theswitchtothe(“I”)position.Otherwise,goto
step2.
G017317
Figure11
1.Ignitiontoggleswitch
2.Pulltherecoilstarterlightlyuntilyoufeelresistance,
thenpullitsharply(Figure12).Allowtheropeto
returntothehandleslowly.
Figure12
Note:Ifthemowerdoesnotstartafterseveral
attempts,contactanAuthorizedServiceDealer.
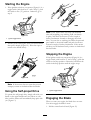
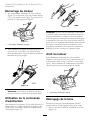
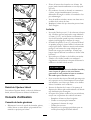
UsingtheSelf-propelDrive
Tooperatetheself-propeldrive,simplywalkwithyour
handsontheupperhandleandyourelbowsatyour
sides,andthemowerwillautomaticallykeeppacewith
you(Figure13).
Figure13
Note:Ifthemowerdoesnotfreelyrollbackward
afterself-propelling,stopwalking,holdyourhands
inplace,andallowthemowertorollacoupleof
inches/centimetersforwardtodisengagethewheel
drive.Youcanalsotryreachingjustunderthepersonal
pacehandletothemetalhandleandpushthemower
forwardacoupleofinches/centimeters.Ifthemower
stilldoesnotrollbackwardeasily,contactanAuthorized
ServiceDealer.
StoppingtheEngine
Iftheignitionswitchonyourmower(Figure14)isa
toggleswitch(withbothan“I”anda“Stop”),pushthe
switchtotheStopposition.Otherwise,holddownthe
switchintheStoppositionuntiltheenginestops.
G017317
Figure14
1.Ignitiontoggleswitch
EngagingtheBlade
Whenyoustartyourengine,thebladedoesnotturn.
Youmustengagethebladetomow.
1.Pullthecontrolbarlockback(Figure15).
9

Figure15
2.Pullthebladecontrolbartothehandle(Figure16).
Figure16
3.Holdthebladecontrolbaragainstthehandle
(Figure17).
Figure17
DisengagingtheBlade
Releasethebladecontrolbar(Figure18).
Figure18
Important:Whenyoureleasethebladecontrol
bar,thebladeshouldstopwithin3seconds.If
itdoesnotstopproperly,stopusingyourmower
immediatelyandcontactanAuthorizedService
Dealer.
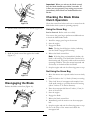
CheckingtheBladeBrake
ClutchOperation
Checkthecontrolbarbeforeeachusetoensurethatthe
bladebrakeclutchsystemisoperatingproperly.
UsingtheGrassBag
ServiceInterval:Beforeeachuseordaily
Youcanusethegrassbagtoperformanadditionaltest
tocheckthebladebrakeclutch.
1.Installtheemptygrassbagonthemower.
2.Starttheengine.
3.Engagetheblade.
Note:Thebagshouldbegintoinate,indicating
thatthebladeisengagedandrotating.
4.Releasethebladecontrolbar.
Note:Ifthebagdoesnotimmediatelydeate,the
bladeisstillrotating.Thebladebrakeclutchmaybe
deterioratingand,ifignored,couldresultinanunsafe
operatingcondition.Havethemowerinspectedand
servicedbyanAuthorizedServiceDealer.
5.Stoptheengineandwaitforallmovingpartstostop.
NotUsingtheGrassBag
1.Movethemowerontoapavedsurfaceinanon-windy
area.
2.Setall4wheelstothe3-1/4inch(83mm)cutsetting.
3.Takeahalfsheetofnewspaperandcrumpleitinto
aballsmallenoughtogounderthemowerhousing
(about3inchesor76mmindiameter).
4.Placethenewspaperballabout5inches(13cm)in
frontofthemower.
5.Starttheengine.
6.Engagetheblade.
7.Releasethebladecontrolbar.
8.Immediatelypushthemoweroverthenewspaper
ball.
9.Stoptheengineandwaitforallmovingpartstostop.
10.Gotothefrontofthemowerandcheckthe
newspaperball.
10

Note:Ifthenewspaperballdidnotgounderthe
mower,repeatsteps4through10.
11.Ifthenewspaperisunravelledorshredded,theblade
didnotstopproperly,whichcouldresultinanunsafe
operatingcondition.ContactanAuthorizedService
Dealer.
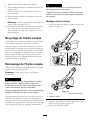
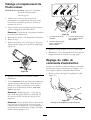
RecyclingtheClippings
Yourmowercomesfromthefactoryreadytorecyclethe
grassandleafclippingsbackintothelawn.
Ifthegrassbagisonthemowerandthebag-on-demand
leverisinthebaggingposition,movethelever
totherecyclingposition(refertoOperatingthe
Bag-on-DemandLever)beforerecyclingtheclippings.
Iftheside-dischargechuteisonthemower,removeit
(refertoRemovingtheSideDischargeChute)before
recyclingtheclippings.
BaggingtheClippings
Usethegrassbagwhenyouwanttocollectgrassand
leafclippingsfromthelawn.
Note:Ensurethebagisseatedinthecorrectposition.
WARNING
Aworngrassbagcouldallowsmallstonesand
othersimilardebristobethrownintheoperator'sor
bystander'sdirectionandresultinseriouspersonal
injuryordeathtotheoperatororbystanders.
Checkthegrassbagfrequently.Ifitisdamaged,
installanewTororeplacementbag.
Ifthesidedischargechuteisonthemower,removeit
(refertoRemovingtheSideDischargeChute)before
baggingtheclippings.Ifthebag-on-demandleverisin
therecyclingposition,moveittothebaggingposition
(refertoOperatingtheBag-on-DemandLever).
WARNING
Thebladeissharp;contactingthebladecanresult
inseriouspersonalinjury.
Stoptheengineandwaitforallmovingpartstostop
beforeleavingtheoperatingposition.
InstallingtheGrassBag
1.Raiseandholdupthereardeector(Figure19).
G017305
1
2
3
Figure19
1.Notches
3.Grassbagpin(2)
2.Reardeector
2.Installthegrassbag,ensuringthatthepinsonthe
bagrestinthenotchesonthehandle(Figure19).
3.Lowerthereardeector.
RemovingtheGrassBag
Toremovethebag,reversethestepsabove.
11

OperatingtheBag-on-DemandLever
Thebag-on-demandfeatureallowsyoutoeithercollect
orrecyclegrassandleafclippingswhilethegrassbag
isattachedtothemower.
•Forbaggingthegrassandleafclippings,pressthe
buttononthebag-on-demandleverandmovethe
leverforwarduntilthebuttonontheleverpopsup
(Figure20).
G017306
Figure20
1.Bag-on-demandlever(inbaggingposition)
•Forrecyclingthegrassandleafclippings,pressthe
buttonontheleverandmovetheleverrearward
untilthebuttonontheleverpopsup.
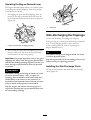
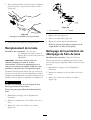
Important:Forproperoperation,removeanygrass
clippingsanddebrisfromthebag-on-demanddoor
andthesurroundingopening(Figure21)beforeyou
movethebag-on-demandleverfromoneposition
toanother.
WARNING
Thebladeissharp;contactingthebladecanresult
inseriouspersonalinjury.Also,anopenrear
dischargeareacouldallowsmallstonesandother
similardebristobethrownintheoperator'sor
bystander'sdirectionandresultinseriouspersonal
injuryordeathtotheoperatororbystanders.
Stoptheengineandwaitforallmovingpartsto
stopbeforecleaningthebag-on-demanddoorand
thesurroundingopening.
G017307
Figure21
1.Cleanhere
Side-dischargingtheClippings
Usethesidedischargeforcuttingverytallgrass.
Ifthegrassbagisonthemowerandthebag-on-demand
leverisinthebaggingposition,movethelever
totherecyclingposition(refertoOperatingthe
Bag-on-DemandLever).
WARNING
Thebladeissharp;contactingthebladecanresult
inseriouspersonalinjury.
Stoptheengineandwaitforallmovingpartstostop
beforeleavingtheoperatingposition.
InstallingtheSideDischargeChute
Liftupthesidedeectorandinstallthesidedischarge
chute(Figure22).
12

Figure22
RemovingtheSideDischargeChute
Toremovethesidedischargechute,liftuptheside
deector,removethesidedischargechute,andlower
thesidedischargedeector.
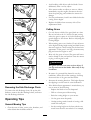
OperatingTips
GeneralMowingTips
•Cleartheareaofsticks,stones,wire,branches,and
otherdebristhatthebladecouldhit.
•Avoidstrikingsolidobjectswiththeblade.Never
deliberatelymowoveranyobject.
•Ifthemowerstrikesanobjectorstartstovibrate,
immediatelystoptheengine,disconnectthewire
fromthesparkplug,andexaminethemowerfor
damage.
•Forbestperformance,installanewbladebeforethe
cuttingseasonbegins.
•ReplacethebladewhennecessarywithaToro
replacementblade.
CuttingGrass
•Cutonlyaboutathirdofthegrassbladeatatime.
Donotcutbelowthe2-1/8-inch(54mm)setting
unlessthegrassissparseoritislatefallwhengrass
growthbeginstoslowdown.RefertoAdjustingthe
CuttingHeight.
•Whencuttinggrassover6inches(15cm)tall,mow
atthehighestcuttingheightsettingandwalkslower;
thenmowagainatalowersettingforthebestlawn
appearance.Ifthegrassistoolong,themowermay
plugandcausetheenginetostall.
•Mowonlydrygrassorleaves.Wetgrassandleaves
tendtoclumpontheyardandcancausethemower
toplugortheenginetostall.
WARNING
Wetgrassorleavescancauseseriousinjuryif
youslipandcontacttheblade.Mowonlyindry
conditions.
•Beawareofapotentialrehazardinverydry
conditions,followalllocalrewarnings,andkeep
themowerfreeofdrygrassandleafdebris.
•Alternatethemowingdirection.Thishelpsdisperse
theclippingsoverthelawnforevenfertilization.
•Ifthenishedlawnappearanceisunsatisfactory,try
oneormoreofthefollowing:
–Replacethebladeorhaveitsharpened.
–Walkataslowerpacewhilemowing.
–Raisethecuttingheightonyourmower.
–Cutthegrassmorefrequently.
–Overlapcuttingswathsinsteadofcuttingafull
swathwitheachpass.
–Setthecuttingheightonthefrontwheelsone
notchlowerthantherearwheels.Forexample,
13

setthefrontwheelsat2-1/8-inch(54mm)and
therearwheelsat2-1/2inches(64mm).
CuttingLeaves
•Aftercuttingthelawn,ensurethathalfofthelawn
showsthroughthecutleafcover.Youmayneedto
makemorethanonepassovertheleaves.
•Iftherearemorethan5inches(13cm)ofleaves
onthelawn,setthefrontcuttingheightoneortwo
notcheshigherthantherearcuttingheight.
•Slowdownyourmowingspeedifthemowerdoes
notcuttheleavesnelyenough.
14

Maintenance
Note:Determinetheleftandrightsidesofthemachinefromthenormaloperatingposition.
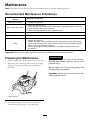
RecommendedMaintenanceSchedule(s)
MaintenanceService
Interval
MaintenanceProcedure
Aftertherst5hours
•Changetheengineoil.
Beforeeachuseordaily
•Checktheengineoillevel.
•Ensurethattheenginestopswithin3secondsafterreleasingthebladecontrolbar.
•Checkthebladebrakeclutchoperation.
•Cleangrassclippingsanddirtfromunderthemower.
Every25hours
•Cleanthebladebrakeclutchshield.
Beforestorage
•Emptythefueltankbeforerepairsasdirectedandbeforeannualstorage.
Yearly
•Replacetheairlter;replaceitmorefrequentlyindustyoperatingconditions.
•Changetheengineoil.
•Replacethebladeorhaveitsharpened(morefrequentlyiftheedgedullsquickly).
•Cleantheaircoolingsystem;cleanitmorefrequentlyindustyoperatingconditions.
Refertoyourengineoperator'smanual.
•Refertoyourengineoperator'smanualforanyadditionalyearlymaintenance
procedures.
Important:Refertoyourengineoperator'smanualforadditionalmaintenanceprocedures.
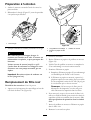
PreparingforMaintenance
1.Stoptheengineandwaitforallmovingpartstostop.
2.Disconnectthesparkplugwirefromthesparkplug
(Figure23)beforeperforminganymaintenance
procedure.
G017308
Figure23
1.Sparkplugwire
3.Afterperformingthemaintenanceprocedure(s),
connectthesparkplugwiretothesparkplug.
WARNING
Tippingthemowermaycausethefueltoleak.
Gasolineisammable,explosiveandcancause
personalinjury.
Runtheenginedryorremovethegasolinewith
ahandpump;neversiphon.
Important:Alwaystipthemowerontoitsside
withthedipstickdown.
15

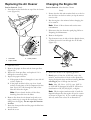
ReplacingtheAirCleaner
ServiceInterval:Yearly
1.Pressdownonthelatchtabsontopoftheaircleaner
cover(Figure24).
Figure24
1.Latchtabs
3.Foampre-lter
2.Paperairlter
2.Openthecover.
3.Removethepaperairlterandthefoampre-lter
(Figure24).
4.Inspectthefoampre-lter,andreplaceitifitis
damagedorexcessivelydirty.
5.Inspectthepaperairlter.
A.Ifthepaperairlterisdamagedoriswetwithoil
orfuel,replaceit.
B.Ifthepaperairlterisdirty,tapitonahard
surfaceseveraltimesorblowcompressedairless
than30psi(207kPa)throughthesideofthe
lterthatfacestheengine.
Note:Donotbrushthedirtoffthelter;
brushingforcesdirtintothebers.
6.Removedirtfromtheaircleanerbodyandcover
usingamoistrag(totrapthedirtandkeepitfrom
fallingintotheengine).Donotwipedirtintothe
airduct.
7.Insertthefoampre-lterandthepaperairlterinto
theaircleaner.
8.Installthecover.
ChangingtheEngineOil
ServiceInterval:Aftertherst5hours
Yearly
1.Ensurethatthefueltankcontainslittleornofuelso
thatfueldoesnotleakoutwhenyoutipthemower
ontoitsside.
2.Runtheengineafewminutesbeforechangingthe
oiltowarmit.
Note:Warmoilowsbetterandcarriesmore
contaminants.
3.Disconnectthewirefromthesparkplug.Referto
PreparingforMaintenance.
4.Removethedipstick.
5.Tipthemowerontoitsside,withthedipstickdown,
todraintheusedoiloutthroughtheoillltube
(Figure25).
Figure25
6.Returnthemowertotheoperatingposition.
7.Slowlypouroilintotheoilllhole,waitafew
minutes,andchecktheoillevelonthedipstickby
wipingthedipstickcleanandtheninserting,butnot
screwingin,theoilllcapintothehole.
Note:Max.ll:20oz.(0.59l),type:SAE30
orSAE10W-30detergentoilwithanAPIservice
classicationofSF,SG,SH,SJ,SL,orhigher.
Note:Filltheenginecrankcasewithoiluntilthe
dipstickindicatesthattheengineoilleveliscorrect
asshownin(Figure26).Ifyouoverlltheengine
withoil,removetheexcessoilasdirectedin5.
16

G017323
Figure26
1.Theoillevelisatits
maximum.
3.Theoillevelistoo
low—addoiltothe
crankcase.
2.Theoillevelistoo
high—removeoilfrom
thecrankcase.
8.Installthedipstickandhandtightenitsecurely.
9.Disposeoftheusedoilproperlyatalocalrecycling
center.
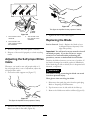
AdjustingtheSelf-propelDrive
Cable
Wheneveryouinstallanewself-propelcableorif
theself-propeldriveisoutofadjustment,adjustthe
self-propeldrivecable.
1.Loosenthecablesupportnut(Figure27).
Figure27
Thisgureissimpliedforthepurposeofclarity.
2.Pulldownthecablejacket(towardthemower)until
thereisnoslackinthecable(Figure28).
Figure28
Thisgureissimpliedforthepurposeofclarity.
3.Tightenthenutonthecablesupport.
ReplacingtheBlade
ServiceInterval:Yearly—Replacethebladeorhave
itsharpened(morefrequentlyifthe
edgedullsquickly).
Important:
Youwillneedatorquewrenchtoinstall
thebladeproperly
.Ifyoudonothaveatorque
wrenchorareuncomfortableperformingthis
procedure,contactanAuthorizedServiceDealer.
Examinethebladewheneveryourunoutofgasoline.If
thebladeisdamagedorcracked,replaceitimmediately.
Ifthebladeedgeisdullornicked,haveitsharpenedand
balanced,orreplaceit.
WARNING
Thebladeissharp;contactingthebladecanresult
inseriouspersonalinjury.
Weargloveswhenservicingtheblade.
1.Disconnectthesparkplugwirefromthesparkplug.
RefertoPreparingforMaintenance.
2.Tipthemowerontoitssidewiththeairlterup.
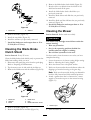
3.Removethe2bladenutsandthestiffener(Figure29).
17

Figure29
1.Bladenuts
2.Stiffener
4.Removetheblade(Figure29).
5.Installthenewblade(Figure29).
6.Installthestiffeneryoupreviouslyremoved.
7.Installthebladenutsandtorquethemto15to
27ft-lb(20to37N-m).
CleaningtheBladeBrake
ClutchShield
ServiceInterval:Every25hours
Cleanthebladebrakeclutchshieldyearlytopreventthe
bladefromstallingwhileyoumow.
1.Disconnectthesparkplugwirefromthesparkplug.
RefertoPreparingforMaintenance.
2.Tipthemowerontoitssidewiththeairlterup.
3.Removethe2bladenutsandthestiffener(Figure30).
Figure30
1.Bladenuts4.Bladedriver
2.Stiffener
5.Disk
3.Blade6.Bladebrakeclutchshield
4.Removetheblade(Figure30).
5.Removethebladedriveranddisk(Figure30).
6.Removethebladebrakeclutchshield(Figure30).
7.Brushorblowoutdebrisfromtheinsideofthe
shieldandaroundalltheparts.
8.Installthebladebrakeclutchshieldthatyou
previouslyremoved.
9.Installthebladedriveranddiskthatyoupreviously
removed.
10.Installthebladeandthestiffenerthatyoupreviously
removed(Figure30).
11.Installthebladenutsandtorquethemto15to
27ft-lb(20to37N-m).
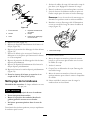
CleaningtheMower
ServiceInterval:Beforeeachuseordaily
WARNING
Themowermaydislodgematerialfromunderthe
mowerhousing.
•Weareyeprotection.
•Stayintheoperatingposition(behindthe
handle)whentheengineisrunning.
•Donotallowbystandersinthearea.
Forbestresults,cleanthemowersoonafteryouhave
completedmowing.
1.Lowerthemowertoitslowestcuttingheightsetting.
RefertoAdjustingtheCuttingHeight.
2.Movethemowerontoaatpavedsurface.
3.Washouttheareaunderthereardeectorwherethe
clippingsgofromthehousingtothegrassbag.
Note:Washouttheareawiththebag-on-demandin
boththefullyforwardandfullyrearwardpositions.
4.Attachagardenhosethatisconnectedtoawater
supplytothewashoutportonthemowerhousing
(Figure31).
G017312
Figure31
1.Washoutport
5.Turnthewateron.
18

6.Starttheengineandrunituntiltherearenomore
clippingsthatcomeoutfromunderthemower
housing.
7.Stoptheengine.
8.Shutoffthewateranddisconnectthegardenhose
fromthemower.
9.Starttheengineandrunitforafewminutestodry
thehousingtopreventitfromrusting.
10.Allowtheenginetocoolbeforestoringthemower
inanenclosedarea.
Storage
Storethemowerinacool,clean,dryplace.
PreparingtheMowerfor
Storage
WARNING
Gasolinevaporscanexplode.
•Donotstoregasolinemorethan30days.
•Donotstorethemowerinanenclosurenearan
opename.
•Allowtheenginetocoolbeforestoringit.
1.Onthelastrefuelingoftheyear,addfuelstabilizer
tothefuelasdirectedonthestabilizerlabeling.
2.Disposeofanyunusedfuelproperly.Recycleit
accordingtolocalcodes,oruseitinyourautomobile.
Note:Oldfuelinthefueltankistheleadingcause
ofhardstarting.Donotstorefuelwithoutstabilizer
morethan30days,anddonotstorestabilizedfuel
morethan90days.
3.Runthemoweruntiltheenginestopsfromrunning
outoffuel.
4.Starttheengineagain.
5.Allowtheenginetorununtilitstops.Whenyoucan
nolongerstarttheengine,itissufcientlydry.
6.Disconnectthewirefromthesparkplug.
7.Removethesparkplug,add1oz.(30ml)ofoil
throughthesparkplughole,andpullthestarterrope
slowlyseveraltimestodistributeoilthroughoutthe
cylindertopreventcylindercorrosionduringthe
off-season.
8.Installthesparkplugandtightenitwithatorque
wrenchto15ft-lb(20N-m).
9.Tightenallnuts,bolts,andscrews.
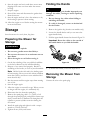
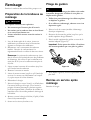
FoldingtheHandle
WARNING
Foldingorunfoldingthehandleimproperlycan
damagethecables,causinganunsafeoperating
condition.
•Donotdamagethecableswhenfoldingor
unfoldingthehandle.
•Ifacableisdamaged,contactanAuthorized
ServiceDealer.
1.Removetheignitionkey(electric-startmodelsonly).
2.Loosenthehandleknobsuntilyoucanmovethe
upperhandlefreely.
3.FoldtheupperhandleforwardasshowninFigure32.
Important:Routethecablestotheoutsideof
thehandleknobsasyoufoldthehandle.
G017313
Figure32
4.Tounfoldthehandle,reversethestepsabove.
RemovingtheMowerfrom
Storage
Connectthewiretothesparkplug.
19

TheToroTotalCoverageGuarantee
22inRecycler
®
A2-YearFullWarranty(45DayLimitedWarrantyforCommercialUse)20inMulcher/Bagger
TheToroGTSStartingGuarantee
WalkPowerMowers
A3-YearFullWarranty(NotApplicableforCommercialUse)
ConditionsandProductsCovered
TheToroCompanyanditsafliate,ToroWarrantyCompany,pursuantto
anagreementbetweenthem,jointlypromisetorepairtheToroProduct
listedbelowifusedforresidentialpurposes*;ifitisdefectiveinmaterials
orworkmanshiporifitstopsfunctioningduetothefailureofacomponent;
oriftheToroGTS(GuaranteedtoStart)enginewillnotstartontherstor
secondpull,providedtheroutinemaintenancerequiredintheOperator's
Manualhavebeenperformed.
Thiswarrantycoversthecostofpartsandlabor,butyoumustpay
transportationcosts.
Thefollowingtimeperiodsapplyfromthedateofpurchase:
ProductsWarrantyPeriod
22inRecyclerand20in
Mulcher/BaggerandAttachments
2-yearfullwarranty
GTS(GuaranteedtoStart)3-yearfullwarranty
Engine
3-yearfullwarranty
Battery
1-yearfullwarranty
LimitedWarrantyforCommercialUse*
Gas-poweredToroProductsusedforcommercial,institutional,or
rentaluse,arewarrantedfor45daysagainstdefectsinmaterialsor
workmanship.Componentsfailingduetonormalweararenotcovered
bythiswarranty.
TheToroGTS(GuaranteedtoStart)StartingGuaranteedoesnotapply
whentheproductisusedcommercially*.
InstructionsforObtainingWarrantyService
IfyouthinkthatyourToroProductcontainsadefectinmaterialsor
workmanship,orifanormal,able-bodiedadultcannolongerstartyour
product'sengineinoneortwopulls,followthisprocedure:
1.ContactanyAuthorizedToroServiceDealertoarrangeserviceattheir
dealership.Tolocateadealerconvenienttoyou,refertotheYellow
Pagesofyourtelephonedirectory(lookunder“LawnMowers”)or
accessourwebsiteatwww.Toro.com.Youmayalsocallthenumbers
listedinitem#3tousethe24-hourToroDealerlocatorsystem.
2.Bringtheproductandyourproofofpurchase(salesreceipt)tothe
ServiceDealer.Thedealerwilldiagnosetheproblemanddetermine
ifitiscoveredunderwarranty.
3.IfforanyreasonyouaredissatisedwiththeServiceDealer’s
analysisorwiththeassistanceprovided,contactusat:
CustomerCareDepartment,RLCDivision
TheToroCompany
8111LyndaleAvenueSouth
Bloomington,MN55420-1196
Tollfreeat866-214-9807(U.S.customers)
Tollfreeat866-214-9808(Canadiancustomers)
OwnerResponsibilities
YoumustmaintainyourToroProductbyfollowingthemaintenance
proceduresdescribedintheOperator'sManual.Suchroutine
maintenance,whetherperformedbyadealerorbyyou,isatyourexpense.
ItemsandConditionsNotCovered
Thereisnootherexpresswarrantyexceptforspecialemissionsystem
coverageandenginewarrantycoverageonsomeproducts.Thisexpress
warrantydoesnotcoverthefollowing:
•Costofregularmaintenanceserviceorparts,suchaslters,fuel,
lubricants,oilchanges,sparkplugs,airltersbladesharpening
orwornblades,cable/linkageadjustments,orbrakeandclutch
adjustments
•Anyproductorpartwhichhasbeenalteredormisusedandrequires
replacementorrepairduetoaccidentsorlackofpropermaintenance
•Repairsnecessaryduetofailuretousefreshfuel(lessthanone
monthold),orfailuretoproperlypreparetheunitpriortoanyperiod
ofnon-useoveronemonth
•Pickupanddeliverycharges
•Operationalmisuse,neglect,oraccidents
•RepairsorattemptedrepairsbyanyoneotherthananAuthorized
ToroServiceDealer
•Repairsoradjustmentstocorrectstartingdifcultiesduetothe
following:
–failuretofollowpropermaintenanceprocedures
–rotarymowerbladestrikinganobject
–contaminantsinthefuelsystem
–improperfuel(consultyourOperator'sManualifindoubt)
–failuretodrainthefuelsystempriortoanyperiodofnon-use
overonemonth
•Specialoperationalconditionswherestartingmayrequiremorethan
twopulls:
–rsttimestartsafterextendedperiodofnon-useoverthree
monthsorseasonalstorage
–cooltemperaturestartssuchasthosefoundinearlyspringand
lateautumn
–improperstartingprocedures-ifyouarehavingdifcultystarting
yourunit,pleasechecktheOperator'sManualtoensurethat
youareusingthecorrectstartingprocedures.Thiscansavean
unnecessaryvisittoanAuthorizedToroServiceDealer.
GeneralConditions
Allrepairscoveredbythesewarrantiesmustbeperformedbyan
AuthorizedT oroServiceDealerusingToro-approvedreplacementparts.
RepairbyanAuthorizedToroServiceDealerisyoursoleremedyunder
thiswarranty.
NeitherTheToroCompanynorToroWarrantyCompanyisliablefor
indirect,incidental,orconsequentialdamagesinconnectionwiththe
useoftheToroProductscoveredbythesewarranties,includingany
costorexpenseofprovidingsubstituteequipmentorserviceduring
reasonableperiodsofmalfunctionornon-usependingcompletionof
repairsunderthesewarranties.
Somestatesdonotallowexclusionsofincidentalorconsequential
damages,sotheaboveexclusionsmaynotapplytoyou.
Thiswarrantygivesyouspeciclegalrights,andyoumayalsohaveother
rightswhichvaryfromstatetostate.
CountriesOtherthantheUnitedStatesorCanada
CustomerswhohavepurchasedToroproductsexportedfromtheUnitedStatesorCanadashouldcontacttheirToroDistributor(Dealer)toobtain
guaranteepoliciesforyourcountry,province,orstate.IfforanyreasonyouaredissatisedwithyourDistributor'sserviceorhavedifcultyobtaining
guaranteeinformation,contacttheT oroimporter.Ifallotherremediesfail,youmaycontactusatToroWarrantyCompany.
*Residentialpurposesmeansuseoftheproductonthesamelotasyourhome.Useatmorethanonelocation,orinstitutionalorrentaluse,isconsidered
commercialuse,andthecommercialusewarrantywouldapply.
374-0254RevC
La page est en cours de chargement...
La page est en cours de chargement...
La page est en cours de chargement...
La page est en cours de chargement...
La page est en cours de chargement...
La page est en cours de chargement...
La page est en cours de chargement...
La page est en cours de chargement...
La page est en cours de chargement...
La page est en cours de chargement...
La page est en cours de chargement...
La page est en cours de chargement...
La page est en cours de chargement...
La page est en cours de chargement...
La page est en cours de chargement...
La page est en cours de chargement...
La page est en cours de chargement...
La page est en cours de chargement...
La page est en cours de chargement...
La page est en cours de chargement...
La page est en cours de chargement...
La page est en cours de chargement...
La page est en cours de chargement...
La page est en cours de chargement...
-
 1
1
-
 2
2
-
 3
3
-
 4
4
-
 5
5
-
 6
6
-
 7
7
-
 8
8
-
 9
9
-
 10
10
-
 11
11
-
 12
12
-
 13
13
-
 14
14
-
 15
15
-
 16
16
-
 17
17
-
 18
18
-
 19
19
-
 20
20
-
 21
21
-
 22
22
-
 23
23
-
 24
24
-
 25
25
-
 26
26
-
 27
27
-
 28
28
-
 29
29
-
 30
30
-
 31
31
-
 32
32
-
 33
33
-
 34
34
-
 35
35
-
 36
36
-
 37
37
-
 38
38
-
 39
39
-
 40
40
-
 41
41
-
 42
42
-
 43
43
-
 44
44


Toro 22in Recycler Lawn Mower Manuel utilisateur
- Catégorie
- Tondeuses à gazon
- Taper
- Manuel utilisateur
dans d''autres langues
Documents connexes
-
Toro 50cm Mulching/Rear Bagging Lawn Mower Manuel utilisateur
-
Toro 55cm Recycler Lawn Mower Manuel utilisateur
-
-
-
-
-
-
-
-