
Fulham Co. Inc.: 12705 South Van Ness Ave., Hawthorne, CA 90250 · Telephone: 1-323-779-2980 · Fax: 1-323-754-9060 [email protected] www.fulham.com
Installation Instructions subject to change without notice. Page 1 of 7
INSTALLATION INSTRUCTIONS
1X4 High-Bay Refrofit Kit
LED HIGH-BAY KIT
RETROFIT KIT INSTALLATION MANUAL
FOR FLUORESCENT HIGH-BAY LUMINAIRES
VR44-MU-495-xyy-2400A
6/22/18 INS-VR44-1X4HIGHBAY, Rev B

Fulham Co. Inc.: 12705 South Van Ness Ave., Hawthorne, CA 90250 · Telephone: 1-323-779-2980 · Fax: 1-323-754-9060 [email protected] www.fulham.com
Installation Instructions subject to change without notice. Page 2 of 7
1.0 INSTALLATION WARNINGS
1.0 AVERTISSEMENTS D'INSTALLATION
1.
2.
3.
4.
5.
6.
7.
8.
"THIS PRODUCT MUST BE INSTALLED IN ACCORDANCE WITH THE APPLICABLE INSTALLATION CODE
BY A PERSON FAMILIAR WITH THE CONSTRUCTION AND OPERATION OF THE PRODUCT AND
HAZARDS INVOLVED.”
“WARNING - Risk of fire or electric shock. LED Retrofit kit installation requires knowledge of luminaires electrical
systems. If not qualified, do not attempt installation. Contact a qualified electrician.”
“WARNING - Risk of fire or electric shock. Install this kit only in the luminaires that has the construction features
and dimensions shown in the photographs and/or drawings and where the input rating of the retrofit kit does not
exceed the input rating of the luminaire.”
“WARNING - To prevent wiring damage or abrasion, do not expose wiring to edges of sheet metal or other sharp
objects.”
“WARNING –Risk of fire or electric shock. Luminaire wiring and electrical parts may be damaged when drilling
for installation of LED retrofit kit. Check for enclosed wiring and components."
"CAUTION – RISK OF FIRE. CONSULT A QUALIFIED ELECTRICIAN TO ENSURE CORRECT BRANCH
CIRCUIT CONDUCTOR."
“THE RETROFIT KIT IS ACCEPTED AS A COMPONENT OF A LUMINAIRE WHERE THE SUITABILITY OF
THE COMBINATION SHALL BE DETERMINED BY THE AUTHORITIES HAVING JURISDICTION.”
Do not make or alter any open holes in an enclosure of wiring or electrical components during kit installation.
1.
2.
3.
4.
5.
6.
7.
8.
CE PRODUIT DOIT ÊTRE INSTALLÉ SELON LE CODE D'INSTALLATION PERTINENT, PAR UNE PERSONNE
QUI CONNAÎT BIEN LE PRODUIT ET SON FONCTIONNEMENT AINSI QUE LES RISQUES INHÉRENTS.
AVERTISSEMENT - Risque d’incendie ou de choc électrique. L’installation de ce nécessaire de modernisation
exige une personne familière avec la construction et le fonctionnement du système électrique du luminaire et
des risques associés. Toute personne qui n’est pas qualifiée ne doit faire aucune tentative d’installation et doit
contacter une personne qualifiée.
AVERTISSEMENT - Risque d’incendie ou de choc électrique. N’installer ce nécessaire que dans les luminaires
don't les caractéristiques de construction et les dimensions sont conforme à celles illustrées dans les photos
et/ou les dessins et dont la puissance d’entrée nominale du nécessaire de modernisation ne dépasse pas celle
du luminaire.
AVERTISSEMENT - Afin de prévenir l’endommagement ou l’abrasion des câbles, éviter tout contact entre ces
derniers et le bord d’un objet tranchant tel qu’une tôle.
“AVERTISSEMENT -Risk d'incendie ou de choc électrique. Le câblage du luminaire et les pièces électriques
peuvent être endommagés lors du forage pour l'installation d'un kit de reconditionnement LED. Vérifiez le
câblage et les composants inclus. "
ATTENTION – RISQUE D'INCENDIE, CONSULTER UN ÉLECTRICIEN QUALIFIÉ POUR VOUS ASSURER
QUE LES CONDUCTEURS DE LA DÉRIVATION SONT ADÉQUATS.
LE NÉCESSAIRE DE MODERNISATION EST ACCEPTÉ À TITRE DE COMPOSANT D’UN LUMINAIRE
LORSQUE LA PERTINENCE DE LA COMBINAISON DOIT ËTRE DÉTERMINÉE PAR PAR LES AUTORITÉS
COMPÉTENTES.
Ne faites pas ou ne modifiez aucun trou ouvert dans une enceinte de câblage ou de composants électriques
pendant l'installation du kit
LED HIGH-BAY KIT
INS-VR44-1X4HIGHBAY, Rev B
6/22/18
RETROFIT KIT INSTALLATION MANUAL
FOR FLUORESCENT HIGH-BAY LUMINAIRES

Fulham Co. Inc.: 12705 South Van Ness Ave., Hawthorne, CA 90250 · Telephone: 1-323-779-2980 · Fax: 1-323-754-9060 [email protected] www.fulham.com
Installation Instructions subject to change without notice. Page 3 of 7
4.0 RECOMMENDED TOOLS (Not Included)
Power Drill W/ Philips Bit
Mfr: Lithonia Lighting - Model: IBZT5 4L
Minimum Luminaire
Dimensions
Original Luminaire
2.0 ORIGINAL LUMINAIRE DIMENSIONS
Remove all the original luminaire parts, hardware, lamp, and ballast in order to begin the retrofit.
Original luminaire diffuser and original ground wire will need to be kept for this retrofit.
This Kit can be retrofitted into any luminaire with a similar length/height width greater than or equal to the Minimum
Luminaire Dimensions described above.
2-3/8”
(60mm)
13-1/4”
(337mm)
48-1/16”
(1220mm)
LED HIGH-BAY KIT
Dimensions are inches (millimeters)
Retrofit kit components will be provided as listed below:
3.0 RETROFIT KIT COMPONENTS
LED Modules LED Driver LED Harness
LED Diffuser Lens
(Optional)
LED Diffuser End Caps
(Optional)
Mounting Hardware Retrofit Warning Label
WARNING: Risk of fire and electrical shock.
Luminaire wiring and electrical parts may be
damaged when drilling for installation of LED
retrofit kit. Check for enclosed wiring and
components.
Avertissement: Risque d' incendie et
d'électrocution. câblage des luminaires et pièces
électriques peuvent être endommagés lors du
forage pour l'installation du kit de conversion à
DEL. Vérifier le câblage et les composants ci-joint
Name Plate Label
Ph:(323) 599-5001
www.fulham.com
US01
Input Current: xxx A @120VAC x.
0 000 0 0 0 00 0 0 0
E486779
Suitable for Dry or Damp Locations DATE CODE
Input Voltage: 120-277VAC (50/60Hz)
LED LUMINAIRE RETROFIT KIT
VR44-MU-455-840-2100A
277V
INS-VR44-1X4HIGHBAY, Rev B
6/22/18
RETROFIT KIT INSTALLATION MANUAL
FOR FLUORESCENT HIGH-BAY LUMINAIRES

Fulham Co. Inc.: 12705 South Van Ness Ave., Hawthorne, CA 90250 · Telephone: 1-323-779-2980 · Fax: 1-323-754-9060 [email protected] www.fulham.com
Installation Instructions subject to change without notice. Page 4 of 7
5.0 RETROFIT KIT DESCRIPTION
LED HIGH-BAY KIT
A
D
C
BC
ITEM
DESCRIPTION
QTY
A.
LED Modules
*4
B.
LED Driver
*1
C.
LED Harness: TLC-HN04
1
D.
6-20 X 3/8” Pan Head Self Drilling Screws
*26
E.
Retrofit Warning Label
1
F
LED Module Lens: TLE-OPT-120-013 (Optional)
*4
G.
LED Module Lens End Caps: TLE-OPT-120-020 (Optional)
*8
H.
Name Plate Label
1
F
G
*Note: Item quantity will vary based on retrofit kit model purchased. Please refer to retrofit kit spec sheet for more details.
WARNING: Risk of fire and electrical shock.
Luminaire wiring and electrical parts may be
damaged when drilling for installation of LED
retrofit kit. Check for enclosed wiring and
components.
Avertissement: Risque d' incendie et
d'électrocution. câblage des luminaires et pièces
électriques peuvent être endommagés lors du
forage pour l'installation du kit de conversion à
DEL. Vérifier le câblage et les composants ci-joint
Ph:(323) 599-5001
www.fulham.com
US01
Input Current: xxxA @120VAC x.
0 000 0 0 0 00 0 0 0
E486779
Suitable for Dry or Damp Locations DATE CODE
Input Voltage: 120-277VAC (50/60Hz)
LED LUMINAIRE RETROFIT KIT
VR44-MU-455-840-2100A
277V
H
INS-VR44-1X4HIGHBAY, Rev B
6/22/18
RETROFIT KIT INSTALLATION MANUAL
FOR FLUORESCENT HIGH-BAY LUMINAIRES

Fulham Co. Inc.: 12705 South Van Ness Ave., Hawthorne, CA 90250 · Telephone: 1-323-779-2980 · Fax: 1-323-754-9060 [email protected] www.fulham.com
Installation Instructions subject to change without notice. Page 5 of 7
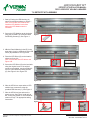
Start by removing the Lens from the
luminaire. See Picture #1.
Remove the lamps and the ballast/driver
channel cover from the luminaire. See
Picture #2.
Remove the original ballast from the
luminaire. See Picture #3.
The original ground wire and ballast/driver
channel cover will need to be kept for this
retrofit.
Luminaire should look like Picture #3 in order
to begin the retrofit.
1.
2.
3.
4.
5.
Picture #1
Picture #2
Picture #3
6.0 ORIGINAL LUMINAIRE DISASSEMBLY
LED HIGH-BAY KIT
INS-VR44-1X4HIGHBAY, Rev B
6/22/18
RETROFIT KIT INSTALLATION MANUAL
FOR FLUORESCENT HIGH-BAY LUMINAIRES

Fulham Co. Inc.: 12705 South Van Ness Ave., Hawthorne, CA 90250 · Telephone: 1-323-779-2980 · Fax: 1-323-754-9060 [email protected] www.fulham.com
Installation Instructions subject to change without notice. Page 6 of 7
Start by Placing the LED Modules (A)
onto the luminaire as shown on Figure 1.
Note: If kit includes LED Module lens
install the LED Module Lens before
placing the LED Module onto the
Luminaire.
Secure the LED Modules to the luminaire
using the provided 6-20 x3/8”Pan Head
Self Drilling Screws (D). See Figure 1.
1.
2.
Affix the Retrofit Warning Label (E) in the
area where it can be visible during the LED
Driver (B) installation. See Figure 2A.
Place the LED Driver (B) on the location
shown on figure 2-A.
Note: If kit includes two LED drivers see
Figure 2-B.
Secure the LED Driver (B) to the luminaire
using the original screw. If the original
screw is not available, use the provided 6-
20 x 3/8” Pan Head Self Drilling Screws
(D). See Figure 2-A or Figure 2-B.
3.
4.
5.
Figure 1
Figure 2-B
Figure 3
7.0 RETROFIT KIT ASSEMBLY
LED module with lens installed
Figure 2-A
LED HIGH-BAY KIT
Wire the LED driver output wires to LED
module input connectors using the
provided LED Harness (C). See Figure 3.
Wire the LED driver input wires to the
power source. See Figure 3 and refer to
the “Connecting Power To The Retrofit Kit”
section of Page 7 for appropriate wiring
instructions.
6.
7.
WARNING: Risk of fire and electrical shock.
Luminaire wiring and electrical parts may be
damaged when drilling for installation of LED
retrofit kit. Check for enclosed wiring and
components.
Avertissement: Risque d' incendie et
d'électrocution. câblage des luminaires et pièces
électriques peuvent être endommagés lors du
forage pour l'installation du kit de conversion à
DEL. Vérifier le câblage et les composants ci-joint
INS-VR44-1X4HIGHBAY, Rev B
6/22/18
RETROFIT KIT INSTALLATION MANUAL
FOR FLUORESCENT HIGH-BAY LUMINAIRES

Fulham Co. Inc.: 12705 South Van Ness Ave., Hawthorne, CA 90250 · Telephone: 1-323-779-2980 · Fax: 1-323-754-9060 [email protected] www.fulham.com
Installation Instructions subject to change without notice.
INS-VR44-1X4HIGHBAY, Rev B
Page 7 of 7
Place the provided Name Plate Label (H) on
the luminaire in a readily visible location to
anyone attempting to service the luminaire.
See Figure 4.
8.
Figure 4
8.0 WARRANTY
Connecting Power to the Retrofit Kit:
1)
2)
3)
Connect the green wire (Ground) from the luminaire to the Ground that is being fed by the power source. Connect
these two wires by using a wire connector with a minimum 18AWG rating.
Connect the white wire (Neutral) from the LED Driver to the Neutral being fed by the power source. Connect these
two wires by using a wire connector with a minimum 18AWG rating.
Connect the Black wire (Line) from LED Driver to the Line being fed by the power source. Connect these two wires
by using a wire connector with a minimum 18AWG rating.
Replace the ballast/driver channel cover and
luminaire lens. See Figure 5-A.
Note: if kit included Module Lens then the
completed retrofit should look like Figure 5-B.
Completed retrofit should look like Figure 5-A
or Figure 5-B.
9.
10.
Please refer to LinearHO kit spec sheet for warranty information
Figure 5-A
7.0 RETROFIT KIT ASSEMBLY
Figure 5-B
LED HIGH-BAY KIT
Ph:(323) 599-5001
www.fulham.com
US01
Input Current: A @120VAC x.xxx
0 000 0 0 0 00 0 0 0
E486779
Suitable for Dry or Damp Locations DATE CODE
Input Voltage: 120-277VAC (50/60Hz)
LED LUMINAIRE RETROFIT KIT
VR44-MU-455-840-2100A
277V
6/22/18
RETROFIT KIT INSTALLATION MANUAL
FOR FLUORESCENT HIGH-BAY LUMINAIRES
-
 1
1
-
 2
2
-
 3
3
-
 4
4
-
 5
5
-
 6
6
-
 7
7


dans d''autres langues
- English: Fulham VR44 User manual
Documents connexes
Autres documents
-
Vizio TJTUNV010ACxxxB Manuel utilisateur
-
 VIZION FULHAM VJTUNV015LNxyyB11 12 Inch Wall Sconce Luminaire Manuel utilisateur
-
 VIZION FULHAM VJTUNV010LNxyyB05 Wall Pack Luminaire Manuel utilisateur
-
GE current LEDL144 Guide d'installation
-
CREE LIGHTING ZR-RK Guide d'installation
-
RAB Lighting T8-14-48G-830-SD-BYP Mode d'emploi
-
GE current LEDL136 Guide d'installation
-
-
-

