Empire UltraSaver90Plus Vent Translation Kit Le manuel du propriétaire
- Taper
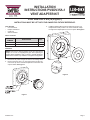
- Le manuel du propriétaire

37853-0-0117 Page 1
INSTALLATION
INSTRUCTIONS PVSDV35A-1
VENT ADAPTER KIT
FOR USE ON: PVS(18,35)(N,P)
INSTRUCTIONS MUST BE LEFT WITH THE OWNER FOR FUTURE REFERENCE.
3. I
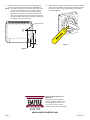
nstall the adapter plate and secure with the three #10 x 1/2
Phillips head screws provided. The screw heads will overlap
the edge of the adapter plate to secure it in place. See Figure 2.
Figure 2
Tools Needed:
• 5/16” Nut Driver
• Phillips Screwdriver
• Caulk Gun
• Silicone Sealant
Carton Contents:
PART
NUMBER
DESCRIPTION QTY
32329 Adapter Plate 1
B100165 #10 x 1/2 Phillips Head Screws 3
Installation
NOTE: This kit is for replacing Empire round vent caps with an
adapter to 2” PVC or Polypropylene pipe when replacing an
existing heater installation with a PVS18 or PVS35 UltraSaver
wallfurnace.Thiskitisonlyavailableinasingleueconguration.
1.
Disconnect the power and gas and remove the existing heater.
2. Remove the three #10 x 1/2” hex-head screws securing the
round vent cap to the outside wall plate and remove the vent
cap and tubes. See Figure 1.
Figure 1

37853-0-0117Page 2
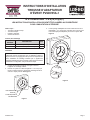
4. Install the PVS wall furnace and venting according to the
instructions provided with the wall furnace. See Figure 3.
NOTE: Theheightfromtheoortothecenteroftheueoutlet
on the PVS wall furnace is 16 5/16” and will not align
with the center of the existing vent outside wall plate.
Either the vent opening on the inside wall must be re-
paired,orthewallfurnacemayberaisedoffoftheoor
using the PVSWS1 wall mount shroud kit or construction
of a platform under the wall furnace.
16 5/16"
7 5/8"
2 3/4"
FLUE OUTLET
Figure 3
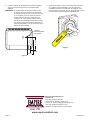
5. Applysiliconearoundtheuepipewhereitexitstheadapter
plate. See the installation instructions provided with the wall
furnaceforproperuepipelengthoutsideoftheadapter
plate. See Figure 4.
Figure 4
www.empirecomfort.com
Empire Comfort Systems Inc.
Belleville, IL
If you have a general question
about our products, please e-mail
us at [email protected].
If you have a service or repair
question, please contact your dealer.

37853-0-0117 Page 1
INSTRUCTIONS D’INSTALLATION
TROUSSE D’ADAPTATEUR
D’ÉVENT PVSDV35A-1
À UTILISER SUR : PVS(18,35)(N,P)
LES INSTRUCTIONS D’INSTALLATION DOIVENT ÊTRE LAISSÉES AU PROPRIÉTAIRE
POUR CONSULTATION ULTÉRIEURE.
3.
Poserlaplaqued’adaptationetlaxeràl’aidedestroisvisà
tête Phillips n
o
10 x 1/2 fournies. Les têtes de vis vont recouvrir
leborddelaplaqued’adaptationpourlaxerenplace.Voir
Figure 2.
Figure 2
Outils requis :
• Tournevisàdouille5/16po
• Tournevis Phillips
• Pistoletàcalfeutrer
• Scellant de silicone
Contenu de l’emballage
NUMÉRO
DE PIÈCE
DESCRIPTION QTÉ
32329 Plaque d’adaptation 1
B100165 VisàtêtePhillipsn
o
10 x 1/2 po 3
Installation
REMARQUE : Cette trousse est destinée à remplacer les
capuchons d’évent ronds Empire par un adaptateur reliant un
tuyau en PVC ou en polypropylène de 2 po lors du remplacement
d’une installation de chauffage existante par un appareil de
chauffage UltraSaver PVS18 ou PVS35. Cette trousse est offerte
seulementencongurationàtuyaudefuméesimple.
1. Couper l’alimentation électrique et de gaz et enlever
l’appareil de chauffage existant.
2. Enleverlesquatrevisàtêtehexagonalen
o
10 x 1/2 po qui
xentlecapotprofondsurl’appareildechauffagemuralet
enlever le capot profond. Voir Figure 1.
Figure 1
RALLONGE EN
OPTION
PLAQUE MURALE
EXTÉRIEURE

37853-0-0117Page 2
4. Installer l’appareil de chauffage mural PVS et la ventilation
selon les instructions fournies avec cet appareil. Voir
Figure 3.
REMARQUE : La hauteur depuis le plancher jusqu’au centre
de la sortie du tuyau de fumée sur l’appareil de
chauffage mural PVS est de 16-5/16 po (414 mm)
et ne s’alignera pas sur le centre de la plaque
muraleextérieuredel’évent.Soitl’oricede
ventilation sur le mur intérieur doit être réparé,
soit l’appareil de chauffage mural doit être relevé
parrapportauplancheràl’aidedelatroussede
capot mural PVSWS1 ou de la construction d’une
plateforme sous l’appareil.
16 5/16"
7 5/8"
2 3/4"
FLUE OUTLET
Figure 3
5. Appliquerdusiliconeautourdutuyaudefuméeàl’endroit
où il quitte la plaque d’adaptation. Voir les instructions
d’installation fournies avec l’appareil de chauffage mural
pourdéterminerlalongueurdetuyaudefuméeappropriéeà
l’extérieur de la plaque d’adaptation. Voir Figure 4.
Figure 4
www.empirecomfort.com
Empire Comfort Systems Inc.
Belleville, IL
Pour toute question générale
concernant nos produits, veuillez nous
envoyeruncourrielà[email protected].
Pour toute question d’entretien ou de
réparation, veuillez contacter votre revendeur.
ORIFICE
D’ÉVACUATION
DE FUMÉE
-
 1
1
-
 2
2
-
 3
3
-
 4
4


Empire UltraSaver90Plus Vent Translation Kit Le manuel du propriétaire
- Taper
- Le manuel du propriétaire
dans d''autres langues
Documents connexes
-
Empire Heating Systems UltraSaver90Plus Wall Mount Shroud Le manuel du propriétaire
-
-
-
-
-
-
-
-
-
Empire DV-55-1SPP Installation Instructions And Owner's Manual