ZyXEL Communications NSA221 Guide de démarrage rapide
- Catégorie
- Les routeurs
- Taper
- Guide de démarrage rapide
Ce manuel convient également à

www.zyxel.com
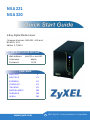
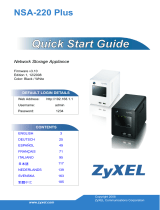
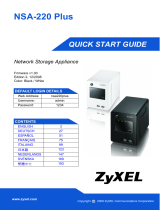
NSA221
NSA320
2-Bay Digital Media Server
Firmware Versions: NSA221, 4.00 and
NSA320, 4.01
Edition 3, 7/2012
DEFAULT LOGIN DETAILS
Web Address nsa221 or nsa320
Username: admin
Password: 1234
CONTENTS
ENGLISH 5
DEUTSCH 23
ESPAÑOL 43
FRANÇAIS 63
ITALIANO 83
NEDERLANDS 103
SVENSKA 123
LEGAL 141
2012 ZyXEL Communications Corporation
C

[Document Title]
4
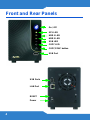
Front and Rear Panels
USB Port
On / Off
SYS LED
HDD 1 LED
USB LED
HDD 2 LED
COPY LED
COPY/SYNC button
USB Ports
LAN Port
RESET
Power

ENGLISH
5
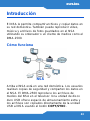
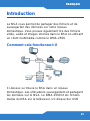
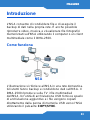
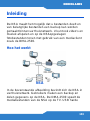
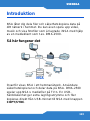
Introduction
The NSA lets you share files and back up data on your
home network. You can also play video, music, and
photo files stored on the NSA using your computer or a
media client such as the DMA-2500.
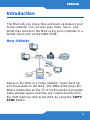
How It Works
Above is the NSA in a home network. Users back up
and share data on the NSA. The DMA-2500 plays the
NSA’s media files on the TV. A USB hard drive provides
extra storage space and files are copied directly from
the USB memory stick to the NSA by using the COPY/
SYNC button.
NSA
ENGLISH

6
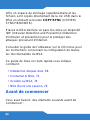
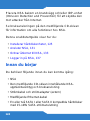
Place the NSA behind a firewall and/or IDP (Intrusion
Detection and Prevention) device to protect it from
attacks from the Internet.
See the User’s Guide on the included CD for details on
configuring all of the NSA’s features.
This Quick Start Guide shows you how to:
• Install Hard Drive, 7
• Connect the NSA, 13
• Access the NSA, 15
• Log into the NSA, 19
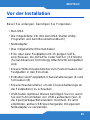
Before You Begin
You need the following before you start:
•NSA
• Included CD containing the NAS Starter Utility and
User’s Guide
• Power cord and power supply (external)
• Included Ethernet cable
• One or two SATA I or SATA II (3.0 Gbit/s) (Serial
Advanced Technology Attachment) compatible hard
disk(s) with 15-pin SATA power connectors

ENGLISH
7
• Included hard disk chassis brackets (4) and screws (8)
• Phillips screwdriver to attach chassis brackets to the
hard disk(s)
• USB cable (optional: you only need this if you want to
expand storage capacity by connecting USB drives).
Make sure that the USB device uses its own external
power adapter if it has one.
• Computer with Network Interface Card (NIC) and TCP/
IP installed
• Network device such as a switch, router, or hub
(optional)
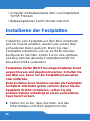
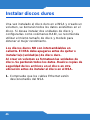
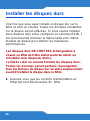
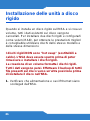
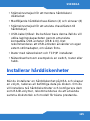
Install Hard Drive
Once you install a hard drive on the NSA and create a
volume, all existing data on the disk will be erased. If
you want to install two hard drives and configure them
as a RAID volume, it is recommended to use the same
disk size and model for best performance.
The NSA must be turned off before you remove or
install hard drive(s).
Creating a volume formats the hard drives. All data
will be lost. Back up any files on the disk to another
location before you install the disk in the NSA.

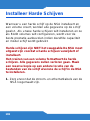
8
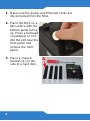
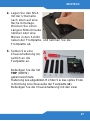
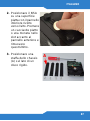
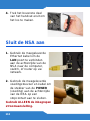
1. Make sure the power and Ethernet cords are
disconnected from the NSA.
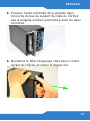
2. Place the NSA on a
flat surface with the
bottom panel facing
up. Press a flat head
screwdriver or coin
into the slot near the
front panel and
remove the front
panel.
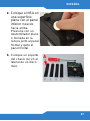
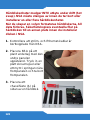
3. Place a chassis
bracket (A) on the
side of a hard disk.
A

ENGLISH
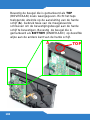
9
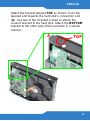
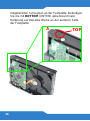
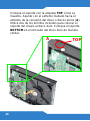
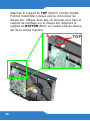
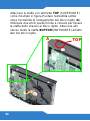
Attach the bracket labeled TOP as shown. Point the
tapered end towards the hard disk’s connection end
(A). Use two of the included screws to attach the
chassis bracket to the hard disk. Attach the BOTTOM
bracket to the other side of the hard disk in a similar
manner.
TOP
A

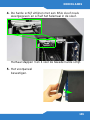
10
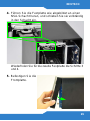
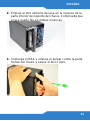
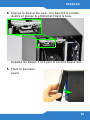
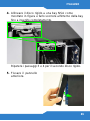
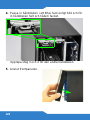
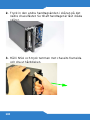
4. Align the hard disk with an NSA bay as shown and
slide it all the way into the bay.
Repeat steps 3 and 4 for the second hard disk.
5. Attach the front panel.

ENGLISH
11
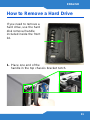
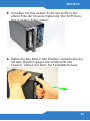
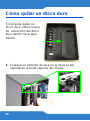
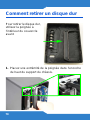
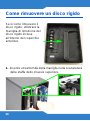
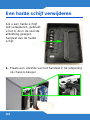
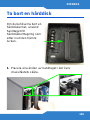
How to Remove a Hard Drive
If you need to remove a
hard drive, use the hard
disk removal handle
included inside the front
lid.
1. Place one end of the
handle in the top chassis bracket notch.

12
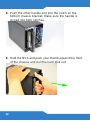
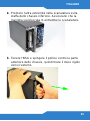
2. Push the other handle end into the notch on the
bottom chassis bracket. Make sure the handle is
locked into both notches.
3. Hold the NSA and push your thumb against the front
of the chassis and pull the hard disk out.

ENGLISH
13
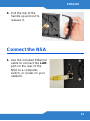
4. Pull the top of the
handle up and out to
release it.
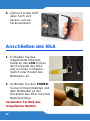
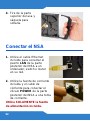
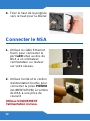
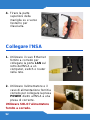
Connect the NSA
1. Use the included Ethernet
cable to connect the LAN
port on the rear of the
NSA to a computer,
switch, or router on your
network.

14
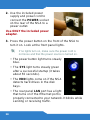
2. Use the included power
supply and power cord to
connect the POWER socket
on the rear of the NSA to a
power outlet.
Use ONLY the included power
adapter.
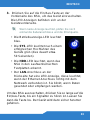
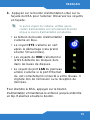
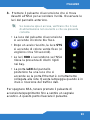
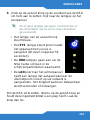
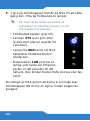
3. Press the power button on the front of the NSA to
turn it on. Look at the front panel lights.
If no lights turn on, make sure the power cord is
not loose and that the power source is turned on.
• The power button light turns steady
blue.
• The SYS light turns steady green
after a successful startup (it takes
about 50 seconds).
• The HDD lights come on if the NSA
detects hard drives in the disk
bays.
• The rear panel LAN port has a light
that turns on if the Ethernet port is
properly connected to your network. It blinks while
sending or receiving traffic.

ENGLISH
15
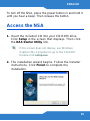
To turn off the NSA, press the power button in and hold it
until you hear a beep. Then release the button.
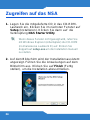
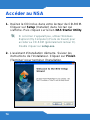
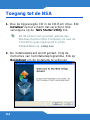
Access the NSA
1. Insert the included CD into your CD-ROM drive.
Click Setup in the screen that displays. Then click
the NAS Starter Utility link.
If this screen does not display, use Windows
Explorer (My Computer) to go to the CD-ROM.
Double-click setup.exe.
2. The installation wizard begins. Follow the installer
instructions. Click Finish to complete the
installation.

16
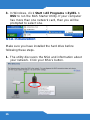
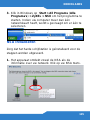
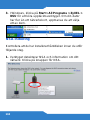
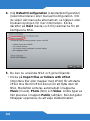
3. In Windows, click Start > All Programs > ZyXEL >
NSU to run the NAS Starter Utility. If your computer
has more than one network card, then you will be
prompted to select one.
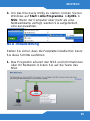
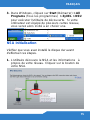
NSA Initialization
Make sure you have installed the hard drive before
following these steps.
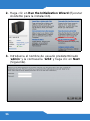
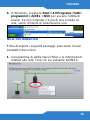
1. The utility discovers the NSA and information about
your network. Click your NSA’s button.

ENGLISH
17
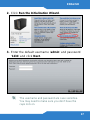
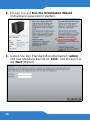
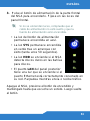
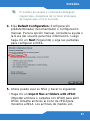
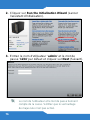
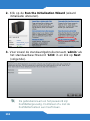
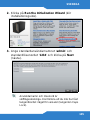
2. Click Run the Initialization Wizard.
3. Enter the default username ‘admin’ and password
‘1234’ and click Next.
The username and password are case sensitive.
You may need to make sure you don’t have the
caps lock on.

18
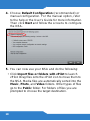
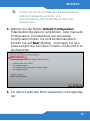
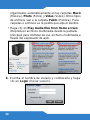
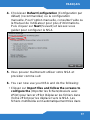
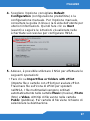
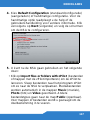
4. Choose Default Configuration (recommended) or
manual configuration. For the manual option, refer
to the help or the User’s Guide for more information.
Then click Next and follow the screens to configure
the NSA.
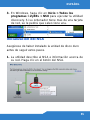
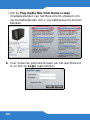
5. You can now use your NSA and do the following:
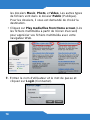
• Click Import files or folders with zPilot to launch
zPilot. Drag files onto the zPilot icon to move them to
the NSA. Media files are automatically sorted into the
Music, Photo, and Video folders. Other types of files
go to the Public folder. For folders of files you are
prompted to choose the target destination.

ENGLISH
19
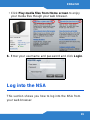
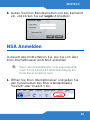
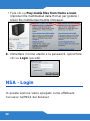
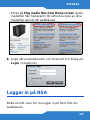
• Click Play media files from Home screen to enjoy
your media files though your web browser.
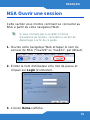
6. Enter your username and password and click Login.
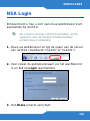
Log into the NSA
This section shows you how to log into the NSA from
your web browser.

20
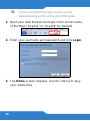
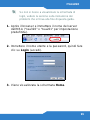
If you cannot get to the login screen, see the
troubleshooting section at the end of this guide.
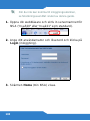
1. Open your web browser and type in the server name
of the NSA (“nsa221” or “nsa320” by default).
2. Enter your username and password and click Login.
3. The Home screen displays. Use the menus to play
your media files.

ENGLISH
21
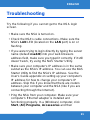
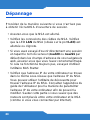
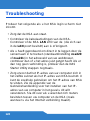
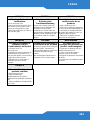
Troubleshooting
Try the following if you cannot get to the NSA login
screen.
• Make sure the NSA is turned on.
• Check the NSA’s cable connections. Make sure the
NSA’s LAN LED (located on the LAN port) is on or
flashing.
• If you were trying to login directly by typing the server
name (default nsa320) into your web browsers
address field, make sure you typed it correctly. If it still
doesn’t work, try using the NAS Starter Utility.
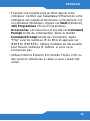
• Make sure your computer’s IP address is in the same
subnet as the NSA’s IP address. You can use the NAS
Starter Utility to find the NSA’s IP address. See the
User’s Guide appendix on setting up your computer’s
IP address for how to change your computer’s IP
address. Skip this if you know that there are routers
between your computer and the NSA (like if you are
connecting through the Internet).
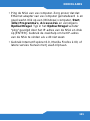
• Ping the NSA from your computer. Make sure your
computer’s Ethernet adapter is installed and
functioning properly. In a (Windows) computer, click
Start, (All) Programs, Accessories and then

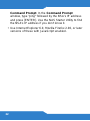
22
Command Prompt. In the Command Prompt
window, type “ping” followed by the NSA’s IP address
and press [ENTER]. Use the NAS Starter Utility to find
the NSA’s IP address if you don’t know it.
• Use Internet Explorer 6.0, Mozilla Firefox 2.00, or later
versions of these with JavaScript enabled.
La page est en cours de chargement...
La page est en cours de chargement...
La page est en cours de chargement...
La page est en cours de chargement...
La page est en cours de chargement...
La page est en cours de chargement...
La page est en cours de chargement...
La page est en cours de chargement...
La page est en cours de chargement...
La page est en cours de chargement...
La page est en cours de chargement...
La page est en cours de chargement...
La page est en cours de chargement...
La page est en cours de chargement...
La page est en cours de chargement...
La page est en cours de chargement...
La page est en cours de chargement...
La page est en cours de chargement...
La page est en cours de chargement...
La page est en cours de chargement...
La page est en cours de chargement...
La page est en cours de chargement...
La page est en cours de chargement...
La page est en cours de chargement...
La page est en cours de chargement...
La page est en cours de chargement...
La page est en cours de chargement...
La page est en cours de chargement...
La page est en cours de chargement...
La page est en cours de chargement...
La page est en cours de chargement...
La page est en cours de chargement...
La page est en cours de chargement...
La page est en cours de chargement...
La page est en cours de chargement...
La page est en cours de chargement...
La page est en cours de chargement...
La page est en cours de chargement...
La page est en cours de chargement...
La page est en cours de chargement...
La page est en cours de chargement...
La page est en cours de chargement...
La page est en cours de chargement...
La page est en cours de chargement...
La page est en cours de chargement...
La page est en cours de chargement...
La page est en cours de chargement...
La page est en cours de chargement...
La page est en cours de chargement...
La page est en cours de chargement...
La page est en cours de chargement...
La page est en cours de chargement...
La page est en cours de chargement...
La page est en cours de chargement...
La page est en cours de chargement...
La page est en cours de chargement...
La page est en cours de chargement...
La page est en cours de chargement...
La page est en cours de chargement...
La page est en cours de chargement...
La page est en cours de chargement...
La page est en cours de chargement...
La page est en cours de chargement...
La page est en cours de chargement...
La page est en cours de chargement...
La page est en cours de chargement...
La page est en cours de chargement...
La page est en cours de chargement...
La page est en cours de chargement...
La page est en cours de chargement...
La page est en cours de chargement...
La page est en cours de chargement...
La page est en cours de chargement...
La page est en cours de chargement...
La page est en cours de chargement...
La page est en cours de chargement...
La page est en cours de chargement...
La page est en cours de chargement...
La page est en cours de chargement...
La page est en cours de chargement...
La page est en cours de chargement...
La page est en cours de chargement...
La page est en cours de chargement...
La page est en cours de chargement...
La page est en cours de chargement...
La page est en cours de chargement...
La page est en cours de chargement...
La page est en cours de chargement...
La page est en cours de chargement...
La page est en cours de chargement...
La page est en cours de chargement...
La page est en cours de chargement...
La page est en cours de chargement...
La page est en cours de chargement...
La page est en cours de chargement...
La page est en cours de chargement...
La page est en cours de chargement...
La page est en cours de chargement...
La page est en cours de chargement...
La page est en cours de chargement...
La page est en cours de chargement...
La page est en cours de chargement...
La page est en cours de chargement...
La page est en cours de chargement...
La page est en cours de chargement...
La page est en cours de chargement...
La page est en cours de chargement...
La page est en cours de chargement...
La page est en cours de chargement...
La page est en cours de chargement...
La page est en cours de chargement...
La page est en cours de chargement...
La page est en cours de chargement...
La page est en cours de chargement...
La page est en cours de chargement...
La page est en cours de chargement...
La page est en cours de chargement...
La page est en cours de chargement...
La page est en cours de chargement...
La page est en cours de chargement...
La page est en cours de chargement...
La page est en cours de chargement...
-
 1
1
-
 2
2
-
 3
3
-
 4
4
-
 5
5
-
 6
6
-
 7
7
-
 8
8
-
 9
9
-
 10
10
-
 11
11
-
 12
12
-
 13
13
-
 14
14
-
 15
15
-
 16
16
-
 17
17
-
 18
18
-
 19
19
-
 20
20
-
 21
21
-
 22
22
-
 23
23
-
 24
24
-
 25
25
-
 26
26
-
 27
27
-
 28
28
-
 29
29
-
 30
30
-
 31
31
-
 32
32
-
 33
33
-
 34
34
-
 35
35
-
 36
36
-
 37
37
-
 38
38
-
 39
39
-
 40
40
-
 41
41
-
 42
42
-
 43
43
-
 44
44
-
 45
45
-
 46
46
-
 47
47
-
 48
48
-
 49
49
-
 50
50
-
 51
51
-
 52
52
-
 53
53
-
 54
54
-
 55
55
-
 56
56
-
 57
57
-
 58
58
-
 59
59
-
 60
60
-
 61
61
-
 62
62
-
 63
63
-
 64
64
-
 65
65
-
 66
66
-
 67
67
-
 68
68
-
 69
69
-
 70
70
-
 71
71
-
 72
72
-
 73
73
-
 74
74
-
 75
75
-
 76
76
-
 77
77
-
 78
78
-
 79
79
-
 80
80
-
 81
81
-
 82
82
-
 83
83
-
 84
84
-
 85
85
-
 86
86
-
 87
87
-
 88
88
-
 89
89
-
 90
90
-
 91
91
-
 92
92
-
 93
93
-
 94
94
-
 95
95
-
 96
96
-
 97
97
-
 98
98
-
 99
99
-
 100
100
-
 101
101
-
 102
102
-
 103
103
-
 104
104
-
 105
105
-
 106
106
-
 107
107
-
 108
108
-
 109
109
-
 110
110
-
 111
111
-
 112
112
-
 113
113
-
 114
114
-
 115
115
-
 116
116
-
 117
117
-
 118
118
-
 119
119
-
 120
120
-
 121
121
-
 122
122
-
 123
123
-
 124
124
-
 125
125
-
 126
126
-
 127
127
-
 128
128
-
 129
129
-
 130
130
-
 131
131
-
 132
132
-
 133
133
-
 134
134
-
 135
135
-
 136
136
-
 137
137
-
 138
138
-
 139
139
-
 140
140
-
 141
141
-
 142
142


ZyXEL Communications NSA221 Guide de démarrage rapide
- Catégorie
- Les routeurs
- Taper
- Guide de démarrage rapide
- Ce manuel convient également à
dans d''autres langues
Documents connexes
-
ZyXEL Communications NSA310 Le manuel du propriétaire
-
ZyXEL Communications 1-Bay Manuel utilisateur
-
 ZyXEL Communications NSA-220 Plus Guide de démarrage rapide
-
 ZyXEL Communications NSA-220 Manuel utilisateur
-
 ZyXEL Communications DMA-1000W Manuel utilisateur
-
 ZyXEL Communications CAM5525 Guide de démarrage rapide
-
 ZyXEL Communications CAM5525 Guide de démarrage rapide


Autres documents
-
ZyXEL NSA-2401 Le manuel du propriétaire
-
Copystar KM-5035 Mode d'emploi
-
SonicWALL NSa 4650 Guide de démarrage rapide
-
Cisco Linksys NAS200 Quick Installation
-
ZyXEL DMA-2500 Le manuel du propriétaire
-
ZyXEL NBG2105 Guide de démarrage rapide
-
SonicWALL NSa 2650 Guide d'installation
-
-
-
Allnet ALL6501 Quick Install Guide