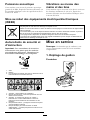
Toro Eurocycler 34cm Electric Lawn Mower Manuel utilisateur
- Catégorie
- Scarificateurs de pelouse
- Taper
- Manuel utilisateur
Ce manuel convient également à

FormNo.3358-357RevB
Eurocycler™34cmand41cmElectricLawn
Mowers
ModelNo.21080—SerialNo.270A00001andUp
ModelNo.21081—SerialNo.270B00001andUp
ModelNo.21082—SerialNo.270C00001andUp
ModelNo.21090—SerialNo.270D00001andUp
ModelNo.21091—SerialNo.270E00001andUp
ModelNo.21092—SerialNo.270F00001andUp
Operator'sManual
Contents
Introduction..............................................................1
Safety........................................................................1
SafeOperatingPractices....................................1
SoundPressure..................................................2
SoundPower.....................................................2
Vibration,Hand/arm........................................2
.........................................................................2
WasteofElectrical/ElectronicEquipment
(WEEE)........................................................3
SafetyandInstructionalDecals..........................3
Setup.........................................................................3
1.UnfoldingtheHandle.....................................3
2.AssemblingtheGrassBox..............................4
ProductOverview.....................................................5
Specications....................................................5
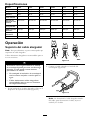
Operation..................................................................6
SecuringtheExtensionCord.............................6
PlanningYourMowingPattern..........................6
StartingtheMotor.............................................6
StoppingtheMotor...........................................7
AdjustingtheHeight-of-Cut..............................7
BaggingtheClippings........................................7
MowingTips.....................................................8
Maintenance..............................................................9
Double-insulatedAppliances.............................9
CleaningtheMowerHousing.............................9
ServicingtheBlade............................................9
ServicingtheOn/OffandBladeBrake
System.........................................................10
Storage....................................................................10
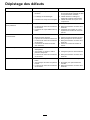
Troubleshooting......................................................11
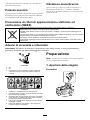
Introduction
Thislawnmowerhasbeendesignedforprivateuse
onresidentialpropertyonly.Itisnottobeusedfor
commercialpurposesonpublicproperty.
ThankyouforchoosingaToroelectricmowerfor
residentialuse.Readthismanualcarefullytolearn
howtooperateandmaintainyourmowerproperly.
Theinformationinthismanualcanhelpyouand
othersavoidinjuryandproductdamage.Although
Torodesignsandproducessafeproducts,youare
responsibleforoperatingtheproductproperlyand
safely.
Regulationsontheoperationofmowersvaryfrom
oneareatoanother.Consultwithlocalauthorities
forregulationsandrestrictionsregardingpermitted
mowingtimesinyourarea.
Safety
Readandunderstandthecontentsofthismanual
beforestartingthemotor.
Thisisthesafetyalertsymbol.Itisusedtoalert
youtopotentialpersonalinjuryhazards.Obeyall
safetymessagesthatfollowthissymboltoavoid
possibleinjuryordeath.
Improperlyusingormaintainingthislawn
mowercouldresultininjuryordeath.Toreduce
thispotential,complywiththefollowingsafety
instructions.
Toreducetheriskofre,electricshock,and
personalinjurywhenusingthiselectriclawn
mower,alwaysfollowthesesafetyinstructions.
Thefollowingsafetyinformationhasbeenadapted
fromEuropeanStandardEN836:1997andCEI/IEC
60335-77:2001.
SafeOperatingPractices
GeneralInformation
•Readtheinstructionscarefully.Befamiliarwiththe
controlsandtheproperuseoftheequipment.
©2007—TheToro®Company
8111LyndaleAvenueSouth
Bloomington,MN55420
Registeratwww.Toro.com.
OriginalInstructions(EN)
PrintedinHungary
AllRightsReserved

•Neverallowchildrenorpeopleunfamiliarwith
theseinstructionstousethelawnmower.Local
regulationscanrestricttheageoftheoperator.
•Nevermowwhilepeople,especiallychildrenor
pets,arenearby.
•Theoperatororuserisresponsibleforaccidentsor
hazardsoccurringtootherpeopleortheirproperty.
Preparation
•Whilemowing,alwayswearsubstantialfootwear
andlongtrousers.Donotoperatetheequipment
whenbarefootorwearingopensandals.
•Thoroughlyinspecttheareawheretheequipment
istobeusedandremoveallobjectswhichcanbe
thrownbythemachine.
•Beforeusing,alwaysvisuallyinspecttoseethat
theblade,bladebolts,andcutterassemblyarenot
wornordamaged.Replaceawornordamaged
bladeandboltsasasettopreservebalance.
•Tororecommendsthatthemowershouldbe
suppliedwitharesidualcurrentdevice(RCD)
havingatrippingcurrentofnotmorethan30mA.
•Useonly1.00mm
2
sizeextensioncordnomore
than30mlongsuitableforoutdooruse(if
applicable).
Handling
•Mowonlyindaylightoringoodarticiallight.
•Avoidoperatingtheequipmentinwetgrass,where
feasible.
•Alwaysbesureofyourfootingonslopes.
•Walk;neverrun.
•Forwheeledrotarymowers,mowacrosstheface
ofslopes,neverupanddown.
•Exerciseextremecautionwhenchangingdirection
onslopes.
•Donotmowexcessivelysteepslopes.
•Useextremecautionwhenreversingorpullingthe
lawnmowertowardyou.
•Switchoffthemowerwhentransportingitfrom
onecuttingareatoanother.Stoptheblade
wheneveryoumovethemoweroffthelawn.
•Neveroperatethelawnmowerwithdefective
guardsorwithoutmountedsafetydevices(for
example,deectorsand/orgrasscatchers)inplace.
•Switchonthemotorcarefullyaccordingto
instructionsandwithfeetwellawayfromtheblade.
•Donottiltthelawnmowerwhenswitchingonthe
motor,exceptifthelawnmowerhastobetilted
forstarting.Inthiscase,donottiltitmorethan
absolutelynecessaryandliftonlythepartwhich
isawayfromtheoperator.Alwaysensurethat
bothhandsareintheoperatingpositionbefore
returningtheappliancetotheground.
•Donotputhandsorfeetnearorunderrotating
parts.Keepclearofthedischargeopeningatall
times.
•Neverpickuporcarryalawnmowerwhilethe
motorisrunning.
•Pulltheplugfromthesocket:
–wheneveryouleavethelawnmower;
–beforeclearingablockageorremovingmaterial
fromthechute;
–beforechecking,cleaning,orworkingonthe
lawnmower;
–afterstrikingaforeignobject.Inspectthelawn
mowerfordamageandmakerepairsbefore
restartingandoperatingthelawnmower;
–ifthelawnmowerstartstovibrateabnormally
(checkimmediately).
MaintenanceandStorage
•Keepallnuts,bolts,andscrewstighttobesurethe
equipmentisinsafeworkingcondition.
•Checkthegrasscatcherfrequentlyforwearor
deterioration.
•Replacewornordamagedpartsforsafety.
•Ensurethatonlytheproperreplacementcutting
bladeisused.
•PurchaseonlygenuineTororeplacementpartsand
accessories.
SoundPressure
Thisunithasamaximumsoundpressurelevelatthe
operator’searof83dBA,basedonmeasurementsof
identicalmachinesperEN11201.
SoundPower
Thisunithasaguaranteedsoundpowerlevelof96
dBA,basedonmeasurementsofidenticalmachines
perEN11094.
Vibration,Hand/arm
Thisunitdoesnotexceedahand/armvibrationlevel
of4.8m/s
2
,basedonmeasurementsofidentical
machinesperEN836.
2

WasteofElectrical/ElectronicEquipment(WEEE)
•EUdirective2002/96/ECclassiesthisproductasanelectricalorelectronictool.
•DoNotdisposeofthistoolasunsortedmunicipalwaste.
•Disposeofthistoolatacollectionorrecyclingcenteraccordingtolocalandnationallaw.
•Theconsumerhasanimportantroleinreducingthedisposalofwastebyreturningwaste
electronic/electricaltoolsforrecycling.
•Recyclingavoidsthedispersionofhazardousmaterialsintothemunicipalwastestream.
•Thecrossed-outbinsymbolremindstheusernottodisposeofthisproductasunsortedmunicipalwaste.
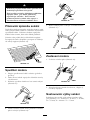
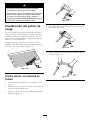
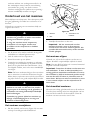
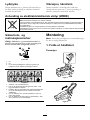
SafetyandInstructional
Decals
Important:Safetyandinstructiondecalsare
locatednearareasofpotentialdanger.Replace
damagedorlostdecals.
110-1168
1.Off
2.On
3.Toengagethemower,pressandholdthebuttonwhile
pullingbackonthecontrolbar.
110-8417
1.Warning—readtheOperator’sManual.
2.Thrownobjecthazard—keepbystandersasafedistance
fromthemachine.
3.Attention,donottouchrotatingblade!Disconnect
powercordandreadtheinstructionsbeforeservicingor
performingmaintenance.
4.Electricshockhazard—keepthemachineoutoftherain
andotherwetconditions.
5.Electricalhazard,cuttingofelectricalcord—donotpush
themachineoverthepowercord.
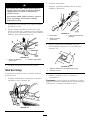
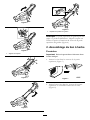
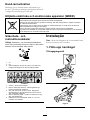
Setup
Note:Donotconnectthemowertoapowersource
untilthemowerisfullyassembled.
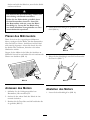
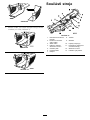
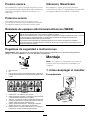
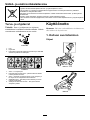
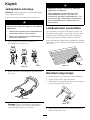
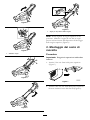
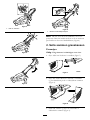
1.UnfoldingtheHandle
Procedure
Figure1
Figure2
3

Figure3
1.Alignthemarks
Figure4
Figure5
Figure6
1.Marksforhandlepositions
Note:Youcansettheupperhandleto1of3
positions.Lineupthemarkto1ofthe3marksonthe
innersideoftheupperhandlelock(Figure6).
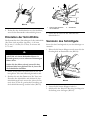
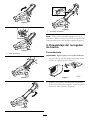
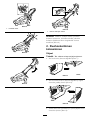
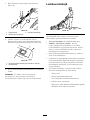
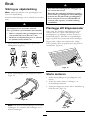
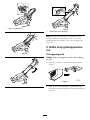
2.AssemblingtheGrassBox
Procedure
Important:Followthestepsintheordershown.
1.Slidethesideintothelatchesinthetop(Figure7).
Figure7
2.Slidetheothersideintothelatchesinthetopand
latchtherearofthe2sidestogether(Figure8).
Figure8
3.Startingattherear,alignandpushtheremainder
ofthesidelatchestogether(Figure9).
4

Figure9
Figure10
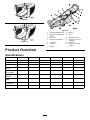
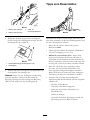
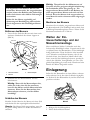
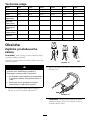
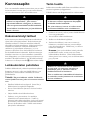
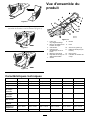
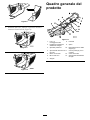
ProductOverview
Figure11
1.Recycling/bagginglever
8.Button
2.Height-of-cutadjustment
button
9.Plug
3.Reardoor
10.Handlelocks(4)
4.Grassboxllindicator11.Extensioncord(not
supplied)
5.Controlbar12.Grassbox
6.Cordlock13.Height-of-cutlevel
reading
7.Handle
Specications
Model210802108121082210902109121092
Weight16kg17kg16kg19kg20kg19kg
Length137cm137cm137cm145cm145cm145cm
Width39cm39cm39cm45cm45cm45cm
Nominalwidth
ofcut
34cm34cm34cm41cm41cm41cm
Nominalheight
ofcutrange
20to75mm20to75mm20to75mm20to75mm20to75mm20to75mm
Grassbox
volume
32L32L32L40L40L40L
Nominalmotor
RPM
3000rpm3000rpm3000rpm3000rpm3000rpm3000rpm
Voltsand
Frequency
230V/50Hz230V/50Hz230V/50Hz230V/50Hz230V/50Hz230V/50Hz
Power1.2kW1.2kW1.2kW1.2kW1.2kW1.2kW
5

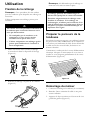
Operation
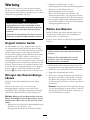
SecuringtheExtensionCord
Note:Thisprocedureisformowersthatrequirean
extensioncord.
Useonlyanextensioncordrecommendedforoutdoor
use.
Contactingwaterwhileoperatingthemower
couldcauseanelectricshock,whichcan
causeaninjuryordeath.
•Don’thandletheplugorthemowerwith
wethandsorwhilestandinginwater.
•Useonlyanextensioncordrecommended
foroutdoorcoldweatheruse.
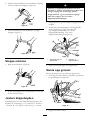
1.Formaloopintheextensioncordandsecureitin
thecordlock(Figure12).
Figure12
2.Connecttheextensioncordtothemowerplug
(Figure13).
Figure13
Note:Donotunplugtheextensioncordby
pullingonthecord;tounplugthecord,graspthe
plug,notthecord.
Theelectricalcordcouldbedamaged,
causingashockorre.
Thoroughlyinspecttheelectricalcordbefore
usingthemower.Ifthecordisdamaged,do
notoperatethemower.HaveanAuthorized
ToroServiceDealerreplaceorrepaira
damagedcordimmediately.
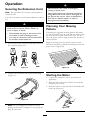
PlanningYourMowing
Pattern
Followingthesuggestedmowingpatternwillreduce
theriskofrunningoverthecordwiththemower,and
thecordwillnotsustainunnecessarywear.Donot
allowthepowercordtowraparoundtrees,shrubs,or
otherobstacles.
Beginbymowingneartheelectricalpowersource.
Mowbackandforth,graduallymowingawayfromthe
powersource(
Figure14).
Figure14
StartingtheMotor
1.Connecttheextensioncordtothemower(if
applicable).
2.Plugtheotherendofthecordintoahousehold
electricalpoweroutlet.
3.Pushthebuttonontheleftsideofthehandleand
holditin(Figure15).
Figure15
6

4.Whileholdinginthebutton,pullthecontrolbar
towardthehandle(Figure16).
Figure16
5.Holdthecontrolbartothehandleandreleasethe
button(
Figure17).
Figure17
StoppingtheMotor
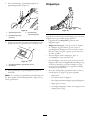
1.Releasethecontrolbar(Figure18).
Figure18
2.Disconnectthemowerfromthepowersourceif
youleavethemowerunattended.
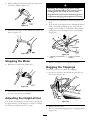
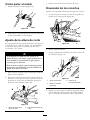
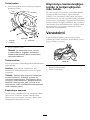
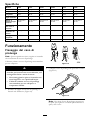
AdjustingtheHeight-of-Cut
Themowerhas6height-of-cutpositions(allheights
areapproximate):A=20mm;B=31mm;C=42mm;
D=53mm;E=64mm;andF=75mm.
Adjustingthecuttingheightleverscould
bringyourhandsandfeetintocontactwitha
movingbladeandresultinseriousinjury.
Stopthemotorandwaitforallmovingpartsto
stopbeforechangingtheheight-of-cutsetting.
1.Stopthemotorandwaitforallmovingpartsto
stop.
2.Pressdownontheheight-of-cutadjustmentbutton
withyourthumbandpushdownorliftupthe
height-of-cuthandletothedesiredcuttingheight
settingshownontheheight-of-cutlevelreading
(Figure19).
Figure19
1.Height-of-cutadjustment
button
2.Height-of-cutlevel
reading
3.Releasetheheight-of-cutadjustmentbutton.
BaggingtheClippings
Installthegrassboxtocollecttheclippings.
1.Liftupthereardoorandinstallthegrassboxon
themower(Figure20).
Figure20
2.Releasethereardoor.
3.Movetherecycling/bagginglevertobaggingmode
(Figure21).
7

Figure21
1.Baggingmode
3.Recycling/bagginglever
2.Recycling(mulching)
mode
4.Mowwiththegrassboxattacheduntilthegrass
boxindicatorshowsthatthegrassboxisfull
(Figure22).
Figure22
1.Grassboxindicator(grassboxisfull)
2.Grassbox
5.Removethegrassboxfromthemowerandempty
thecontents.
Note:Toconvertfrombaggingtorecycling,movethe
recycling/bagginglevertorecyclingmode(Figure21)
andremovethegrassbox.
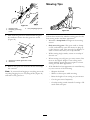
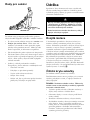
MowingTips
Figure23
Followtheseinstructionwhethercuttinggrassforthe
bestcuttingresultsandlawnappearance.
•Maintainasharpbladethroughoutthemowing
season.
•Onlymowdrygrass.Wetgrasstendstoclump
ontheyardandmaycausethemowertoplugup
orthemotortostall.Theymayalsobeslipperyto
walkonandcouldcauseyoutoslipandfall.
•Whilecuttingsingleswaths,ensureanoverlapof
about4cm.
•Whencuttingverytallgrass,youmaywanttorst
mowatthehighestheight-of-cutsettinganda
slowerwalkingspeed;thenmowagainatalower
settingforbestlawnappearance.
•Ifthenishedcutlawnappearanceisunsatisfactory,
tryoneormoreofthefollowing:
–Sharpentheblade.
–Walkataslowerpacewhilemowing.
–Raisetheheight-of-cutsettingonyourmower.
–Cutthegrassmorefrequently.
–Overlapcuttingswathsinsteadofcuttingafull
swathwitheachpass.
8

Maintenance
Torohasdesignedthisproducttogiveyouyearsof
trouble-freeuse.Shoulditneedservice,bringthe
producttoanAuthorizedToroServiceDealer.
Whenthemowerisconnectedtoahousehold
powersource,themowerisoperational.
Someonecouldaccidentallystartthemower
andcauseaseriousinjurytoyouorother
bystanders.
Alwaysdisconnectthemowerfromthepower
sourcewhenyouleavethemowerunattended.
Double-insulatedAppliances
Inadouble-insulatedappliance,twosystemsof
insulationareprovidedinsteadofgrounding.No
groundingmeansisprovidedonadouble-insulated
appliance,norshouldameansforgroundingbe
addedtotheappliance.Servicingadouble-insulated
appliancerequiresextremecareandknowledgeof
thesystem,andshouldbedoneonlybythequalied
servicepersonnelatanAuthorizedToroService
Dealer.Replacementpartsforadouble-insulated
appliancemustbeidenticaltothepartstheyreplace.A
double-insulatedapplianceismarkedwiththewords
“DoubleInsulation”or“DoubleInsulated.”The
symbol(squarewithinasquare)
mayalsobemarked
ontheappliance.
CleaningtheMowerHousing
Aftereachuse,cleanthemowerhousing.
Beforecleaning,stopthemotor,waitforallmoving
partstostop,anddisconnectthemowerfromthe
powersource.
Important:Donotcleanthemowerwithwater.
Moisturecangettrappedinthemowerandmay
causecorrosionofinternalparts.
•Cleantheundersideofthemowerhousing.
Removedirtandgrassclippingswithahardwood
scraper.
•Removethedebrisfromthehousingventsalong
thetopofthemower.
•Brushallthedebrisoffthemowerhousing.
•Inspectthepowerplugreceptacleforsignsof
meltingorheating.Oldworn-outextensioncord
plugsthattlooselyintheplugreceptaclecan
causeoverheatingfrompoorcontact.Replace
anydamagedextensioncordsimmediately(if
applicable).
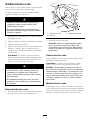
ServicingtheBlade
Alwaysmowwithasharpblade.Assharpbladecuts
thegrassevenly,withouttearingorshreddingthegrass.
Whenyoureplacetheblade,useonlygeniuneToro
replacementblades.
Someonecouldaccidentallystartthemotor
andcauseaseriousinjurytotheoperatoror
tobystanders.
Donotattempttoinspect,remove,orreplace
thebladewithoutrstdisconnectingthe
mowerfromthepowersource.
1.Stopthemotorandwaitforallmovingpartsto
stop.
2.Disconnectthemowerfromtheelectricalpower
source.
3.Tipthemowerontoitsside.
4.Carefullyexaminethebladeforsharpnessand
wear,especiallywheretheatandcurvedpartsof
theblademeet.Ifyounoticewear,replacethe
blade.
Note:Forbestperformance,installanewblade
beforethemowingseasonbegins.Duringthe
season,ledownsmallnicksonthebladeto
maintainitscuttingedge.
Awornordamagedbladecouldbreakand
apieceofbladecouldbethrowninthe
operator’sorbystander’sdirection,causing
seriouspersonalinjuryordeath.
Inspectthebladeperiodicallyforwearor
damage,andreplaceawornordamaged
blade.
9

RemovingtheBlade
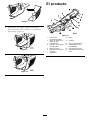
1.Grasptheendoftheblade(Figure24)witharag
orthicklypaddedglove.
Figure24
1.Bladebolt3.Bladeadapter
2.Blade
2.Removethebladeboltandtheblade.
Important:Ifthebladeadaptercomesoff,
ensurethatyouinstallitbeforeinstallingthe
bladeandbladebolt.Operatingthemower
withoutthebladeadapterwilldamagethe
mower.
SharpeningtheBlade
Usealetosharpenthetopsideofthebladeand
maintaintheoriginalcuttingangle.
Note:Thebladewillremainbalancedifyouremove
thesameamountofmaterialfrombothcuttingedges.
Important:Checkthebalanceofthebladeby
puttingitonabladebalancer.Youcanpurchase
aninexpensivebalanceratahardwarestore.A
balancedbladestaysinahorizontalposition;an
unbalancedbladesettlestotheheavyside.If
thebladeisnotbalanced,lemoremetaloffthe
cuttingedgeontheheavyendoftheblade.
InstallingtheBlade
Installasharp,balancedbladeandthebladebolt.The
sailpartoftheblademustpointtowardthetopofthe
mowerhousingtoensurecorrectinstallation.Tighten
thebladeboltto15N⋅m.
ServicingtheOn/Offand
BladeBrakeSystem
Themotorandbladearedesignedtostopwithin3
secondsafteryoureleasethecontrolbar.Ensurethat
thecontrolbarfunctionsproperlyeachtimebefore
youoperatethemower.Ifthebladedoesnotstop
within3secondsorthereisagrindingorscraping,
metal-to-metalnoisewhenyoureleasethecontrol
bar,contactanAuthorizedToroServiceDealer.This
samerecommendationappliesifyouobserveheavy
vibrationswhenusingthemower.
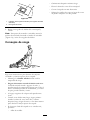
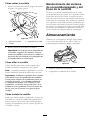
Storage
Storethemowerinacool,clean,anddryplaceaway
fromchildren.Coverthemowertokeepitcleanand
protected.
Figure25
1.Cleanthemowerhousing.
2.Checktheconditionoftheblade.
10

Troubleshooting
Problem
PossibleCauseCorrectiveAction
1.Theextensioncordisnotconnected
tothemower.
1.Connecttheextensioncordtothe
mowerandplugtheotherendof
theextensioncordintoanormal
householdoutlet.
2.Theextensioncordisdamaged.
2.Checktheextensioncord,andrepair
thecordifitisdamaged.
Motorwillnotstart
3.Thefuseorcircuitbreakerisblown.3.Checktheoutletfuseorthecircuit
breaker.
1.Themowerdischargechuteis
plugged.
1.Cleanthemowerdischargechute.
2.Theundersideofthemowerhousing
needstobecleaned.
2.Cleantheundersideofthemower
housing.
Motorstartshardorlosespower
3.Thecuttingheightissettoolow.
3.Setthemowercuttingheightina
higherpositionandstartthemotor
again.
1.Thebladeisnotbalanced.1.Balancetheblade.
2.Theblademountingboltisloose.2.Tightentheblademountingbolt.
3.Themowerdischargechuteis
plugged.
3.Cleanthemowerdischargechute.
4.Theundersideofthemowerhousing
needstobecleaned.
4.Cleantheundersideofthemower
deck.
Mowerormotorvibratesexcessively
5.Themotormountingboltsareloose.5.Tightenthemotormountingbolts.
1.Thebladeisdullandisnotbalanced.
1.Sharpenandbalancetheblade.
2.Youaremowingthesamepattern
everytimeyoumow.
2.Changethemowingpattern.
Unevencuttingpattern
3.Theundersideofthemowerhousing
needstobecleaned.
3.Cleantheundersideofthemower
deck.
1.Thecuttingheightissettoolow.1.Raisethecuttingheight.
2.Youaretryingtomowwetgrass.
2.Allowthegrasstodrybeforemowing.
Dischargechuteplugs
3.Theundersideofthemowerhousing
needstobecleaned.
3.Cleantheundersideofthemower
deck.
11

International Distributor List—Consumer Products
Distributor:
Country:
Phone Number:
Atlantis Su ve Sulama Sisstemleri Lt Turkey
90 216 344 86 74
Balama Prima Engineering Equip
Hong Kong 852 2155 2163
B-Ray Corporation
Korea 82 32 551 2076
Casco Sales Company
Puerto Rico
787 788 8383
Ceres S.A
Costa Rica
506 239 1138
CSSC Turf Equipment (pvt) Ltd
Sri Lanka
94 11 2746100
Cyril Johnston & Co Nothern Ireland
44 2890 813 121
Equiver Mexico
52 55 539 95444
Femco S.A.
Guatemala
502 442 3277
G.Y.K. Company ltd.
Japan
81 726 325 861
Geomechaniki of Athens
Greece 30 10 935 0054
Guandong Golden Star China
86 20 876 51338
Hako Gorund and Garden Sweden
46 35 10 0000
Hydroturf Int. Co Dubai United Arab Emirates
97 14 347 9479
Hydroturf Egypt LLC
Egypt
202 519 4308
Ibea S.p.A. Italy
39 0331 853611
Irriamc
Portugal
351 21 238 8260
Jean Heybroek b.v. Netherlands
31 30 639 4611
Lely (U.K. ) Limited
United Kingdom
44 1480 226 800
Maquiver S.A.
Colombia
57 1 236 4079
Maruyama Mfg. Co. Inc.
Japan
81 3 3252 2285
Metra Kft
Hungary
36 1 326 3880
Mounteld a.s. Czech Republic
420 255 704 220
Munditol S.A.
Argentina
54 11 4 821 9999
Oslinger Turf Equipment SA Ecuador
593 4 239 6970
Oy Hako Ground and Garden Ab Finland
358 987 00733
Parkland Products Ltd New Zealand
64 3 34 93760
Prochaska & Cie
Austria
43 1 278 5100
RT Cohen 2004 Ltd Israel
972 986 17979
Riversa Spain
34 9 52 83 7500
Roth Motorgerate GmBh & Co
Germany 49 7144 2050
Sc Svend Carlsen A/S Denmark
45 66 109 200
Solvert S.A.S
France
33 1 30 81 77 00
Spypros Stavrinides Limited
Cyprus 357 22 434131
Surge Systems India Limited India
91 1 292299901
T-Markt Logistics Ltd
Hungary
36 26 525 500
Toro Australia Australia
61 3 9580 7355
Toro Europe BVBA
Belgium
32 14 562 960
374-0102 Rev A

The Toro Warranty
Conditions and Products Covered
The Toro® Company and its afliate, Toro Warranty Company, pursuant to
an agreement between them, jointly promises to the original purchaser* to
repair any Toro Product used for normal residential purposes* if defective in
materials or workmanship. The following time periods apply from the date
of original purchase:
Products
Warranty Period
Walk Power Mowers
2-year limited warranty
Rear Engine Riders 2-year limited warranty
Lawn & Garden Tractors
2-year limited warranty
Electric Hand Held Products
2-year limited warranty
Snowthrowers
2-year limited warranty
Consumer Zero Turn
2-year limited warranty
* “Original purchaser” means use the person who originally purchased Toro
products.
* “Normal residential purposes” means use of the product on the same lot as
your home. Use at more than one location is considered commercial use, and
the commercial use warranty would apply.
Limited Warranty for Commercial Use
Toro Consumer Products and attachments used for commercial, institutional,
or rental use are warranted against defects in materials or workmanship for the
following time periods from the date of original purchase:
Products
Warranty Period
Walk Power Mowers
90 day warranty
Rear Engine Riders 90 day warranty
Lawn & Garden Tractors
90 day warranty
Electric Hand Held Products
90 day warranty
Snowthrowers
90 day warranty
Consumer Zero Turn
45 day warranty
Instructions for Obtaining Warranty Service
If you think that your Toro Product contains a defect in materials or
workmanship, follow this procedure:
1. Contact your seller to arrange service of the product. If for any reason
it is impossible for you to contact your seller, you may contact any Toro
Authorized Distributor to arrange service.
2. Bring the product and your proof of purchase (sales receipt) to your seller
or the Service Dealer.
If for any reason you are dissatised with the Service Dealer’s analysis or with the
assistance provided, contact the Toro importer or contact us at:
Customer Care Department, Consumer Division
Toro Warranty Company
8111 Lyndale Avenue South
Bloomington, MN 55420-1196
Manager: Technical Product Support: 001-952-887-8248
See attached Distributor List
Owner Responsibilities
You must maintain your Toro Product by following the maintenance procedures
described in the operator’s manual. Such routine maintenance, whether
performed by a dealer or by you, is at your expense.
Items and Conditions Not Covered
This express warranty does not cover:
• Cost of regular maintenance service or parts, such as lters, fuel, lubricants,
tune-up parts, blade sharpening, brake and clutch adjustments.
• Any product or part which has been altered or misused or required
replacement or repair due to normal wear, accidents, or lack of proper
maintenance.
• Repairs necessary due to improper fuel, contaminants in the fuel system, or
failure to properly prepare the fuel system prior to any period of non-use
over three months.
• Engine and transmission. These are covered by the appropriate
manufacturer’s guarantees with separate terms and conditions.
All repairs covered by this warranty must be performed by an Authorized Toro
Service Dealer using Toro approved replacement parts.
General Conditions
The purchaser is covered by the national laws of each country. The rights to
which the purchaser is entitled with the support of these laws are not restricted
by this warranty.
374-0101 Rev A

FormNo.3358-357RevB
Eurocycler™34cmund41cmElektrorasenmäher
Modellnr.21080—Seriennr.270A00001undhöher
Modellnr.21081—Seriennr.270B00001undhöher
Modellnr.21082—Seriennr.270C00001undhöher
Modellnr.21090—Seriennr.270D00001undhöher
Modellnr.21091—Seriennr.270E00001undhöher
Modellnr.21092—Seriennr.270F00001undhöher
Bedienungsanleitung
Inhalt
Einführung..................................................................1
Sicherheit.....................................................................1
SichereBetriebspraxis...........................................2
Schalldruck...........................................................3
Schallleistung........................................................3
Vibration,Hand/Arm..........................................3
Entsorgenvonelektrischenbzw.
elektronischenGeräten(WEEE)......................3
Sicherheits-undBedienungsschilder.....................3
Einrichtung..................................................................4
1.AufklappendesGriffs.......................................4
2.ZusammenbauendesGrasfangkorbs.................5
Produktübersicht..........................................................5
TechnischeDaten.................................................6
Betrieb.........................................................................6
BefestigendesVerlängerungskabels......................6
PlanendesMähmusters........................................7
AnlassendesMotors............................................7
AbstellendesMotors............................................7
EinstellenderSchnitthöhe....................................8
SammelndesSchnittguts......................................8
TippszumRasenmähen.......................................9
Wartung.....................................................................10
DoppeltisolierteGeräte.....................................10
ReinigendesRasenmähergehäuses......................10
WartendesMessers............................................10
WartenderEin-/Ausschaltanlageundder
Messerbremsanlage........................................11
Einlagerung................................................................11
Fehlersucheund-behebung........................................12
Einführung
DieserRasenmäheristnurfürdenPrivatgebrauchin
einemGarteneinesPrivateigentumskonzipiert.Das
GerätsolltenichtkommerziellfüröffentlichteAnlagen
verwendetwerden.
VielenDank,dassSiesichfüreinenElektrorasenmäher
vonTorofürdenPrivatgebrauchentschiedenhaben.
LesenSiedieseAnleitungsorgfältigdurch,ummit
demrichtigenEinsatzundWartungdesRasenmähers
vertrautzuwerden.DieInformationenindieser
AnleitungverhindernKörperverletzungenund
Produktbeschädigungen.Torokonstruiertundfertigt
zwarsichereProdukte,Siesindjedochfürdenrichtigen
undsicherenEinsatzdesGerätsverantwortlich.
DieVorschriftenfürdieVerwendungderRasenmäher
sindregionsabhängig.WendenSiesichandieörtlichen
Gemeinden,umdieVorschriften(besondersfürdie
MähzeiteninderRegion)zuerfragen.
Sicherheit
LesenSievordemAnlassendesMotorsdenInhalt
dervorliegendenAnleitungsorgfältigdurch,damit
SiegutdarüberBescheidwissen.
DiesisteinWarnzeichen.EsmachtSieauf
möglicheVerletzungsgefahrenaufmerksam.
BefolgenSiezumVermeidenvonVerletzungenund
TodesfällenimmersämtlicheSicherheitshinweise.
DerunsachgemäßeEinsatzunddiefalsche
WartungdiesesRasenmäherskönnenzu
Verletzungenführen.BefolgenSiediefolgenden
Sicherheitsanweisungen,umdasRisikosogering
wiemöglichzuhalten.
HaltenSieimmerdieSicherheitsanweisungen
ein,wennSiediesenelektrischenRasenmäher
verwenden,umdieGefahreinesBrandes,
elektrischenSchlagsundKörperverletzungen
zuverringern.
©2007—TheToro®Company
8111LyndaleAvenueSouth
Bloomington,MN55420
RegistrierenSieIhrProduktunterwww.Toro.com.
Originaldokuments(DE)
Druck:Ungarn
AlleRechtevorbehalten

DiefolgendenSicherheitsinformationenwurdenvom
europäischenStandardEN836:1997undCEI/IEC
60335-77:2001angepasst.
SichereBetriebspraxis
AllgemeineInformationen
•LesenSiedieseAnweisungengründlichdurch.
MachenSiesichmitdenBedienelementenunddem
korrektenEinsatzdesGerätsvertraut.
•LassenSiedenRasenmähernievonKindernoder
Personenbedienen,diemitdiesenAnweisungen
nichtvertrautsind.DasAlterdesFahrerskann
durchlokaleVorschrifteneingeschränktsein.
•MähenSienie,wennsichPersonen,insbesondere
KinderoderHaustiere,inderNäheaufhalten.
•BedenkenSieimmer,dassderBedienerdie
VerantwortungfürUnfälleoderGefahrengegenüber
anderenundihremEigentumträgt.
Vorbereitung
•TragenSiebeimMähenimmerfesteSchuheund
langeHosen.FahrenSiedieMaschineniebarfuss
odermitSandalen.
•UntersuchenSiedenArbeitsbereichderMaschine
gründlichundentfernenSiealleGegenstände,die
vonderMaschineaufgeworfenwerdenkönnten.
•ÜberprüfenSievordemEinsatzimmer,obdie
Schnittmesser,-schraubenunddasMähwerk
abgenutztoderbeschädigtsind.TauschenSie
abgenutzteoderdefekteMesserund-schrauben
alskompletteSätzeaus,umdieWuchtderMesser
beizubehalten.
•DiefürdasGerätverwendeteStromversorgung
sollteeineFehlerstrom-Schutzvorrichtungmiteinem
Auslösestromvonhöchstens30mAsein.
•VerwendenSienurVerlängerungskabelderGröße
1,00mm
2
,dienichtlängerals30msindundfürden
Außeneinsatzgedachtsind.
Handhabung
•MähenSienurbeiTageslichtoderguterkünstlicher
Beleuchtung.
•VermeidenSie,woesgeht,denEinsatzinnassem
Gras.
•AchtenSieanHängenimmeraufeinegute
Bodenhaftung.
•GehenSie,aberlaufenSienie.
•MähenSiebeiSichelmähernmitRädernimmerquer
zumHangundnieauf-oderabwärts.
•GehenSiebeimRichtungswechselanHängen
äußerstvorsichtigvor.
•VersuchenSienicht,steileHängezumähen.
•GehenSiemitgrößterVorsichtvor,wennSie
rückwärtsgehenoderdenRasenmäherinIhre
Richtungziehen.
•SchaltenSiedenMäherab,wennSievoneinem
Mähbereichzueinemanderenwechseln.DasMesser
sollteimmerstillstehen,wennSiesichmitdem
MäherausserhalbvonRasenächenbewegen.
•BenutzenSieniemalsdenRasenmähermit
beschädigtenSchutzeinrichtungenoderSchutzgittern
oderohneangebauteSchutzeinrichtungen,z.B.
Prallblecheund/oderGrasfangeinrichtungen.
•LassenSiedenMotorvorsichtiggemäßder
Anweisungenan,haltenSieIhreFüßevomMesser
fern.
•BeimStartenoderAnlassendesMotorsdarfder
Rasenmähernichtgekipptwerden,esseidenn,der
RasenmähermussbeidemVorgangangehoben
werden.IndiesemFallkippenSieihnnursoweit,
wieesunbedingterforderlichist,undhebenSienur
dievomBenutzerabgewandteSeitehoch.
•HaltenSieHändeundFüßevonsichdrehenden
Teilenfern.BleibenSieimmervonder
Auswurföffnungfern.
•HebenodertragenSiedenRasenmäherniebei
laufendemMotor.
•ZiehenSieindenfolgendenSituationenden
NetzsteckerausderFassungheraus:
–WennSiedenRasenmäherverlassen.
–BevorSieBlockierungenlösenoder
VerstopfungenimAuswurfkanalbeseitigen.
–VordemPrüfen,ReinigenoderArbeitenam
Rasenmäher.
–NachdemKontaktmiteinemFremdkörper.
UntersuchenSiedenRasenmäheraufSchäden
undführendienotwendigenReparaturendurch,
bevorSieihnerneutstartenundinBetrieb
nehmen.
–BeimAuftretenvonungewöhnlichenVibrationen
amRasenmäher(sofortüberprüfen).
WartungundLagerung
•HaltenSiealleMutternundSchraubenfest
angezogen,damitdasGerätineinemsicheren
Betriebszustandbleibt.
•PrüfenSiedenGrasfangkorbregelmäßigauf
VerschleißundAbnutzung.
2

•TauschenSieabgenutzteundbeschädigteTeileaus
Sicherheitsgründenaus.
•StellenSiesicher,dassSiedasrichtigeErsatzmesser
verwenden.
•KaufenSienurToroOriginalersatzteileund
-zubehör.
Schalldruck
DieseMaschineerzeugteinenmaximalen
Schalldruckpegel,deramOhrdesBenutzersaufder
GrundlagevonMessungenanbaugleichenMaschinen
nachRichtlinieEN1120183dBAbeträgt.
Schallleistung
DieseMaschineentwickeltnachMessungenan
baugleichenMaschinenlautEN11094einen
Schallleistungspegelvon96dBA.
Vibration,Hand/Arm
DieseMaschinehataufderGrundlagevonMessungen
anbaugleichenMaschinengemäßEN836ander
Handbzw.demArmdesBedienerseinmaximales
Vibrationsniveauvon4,8m/s
2
.
Entsorgenvonelektrischenbzw.elektronischenGeräten
(WEEE)
•DieEU-Richtlinie2002/96/EGklassiziertdiesesProduktalseinelektrischesoderelektronischesWerkzeug.
•EntsorgenSiediesesGerätnichtimallgemeinenHausmüll.
•EntsorgenSiediesesGerätaneinemSammel-oderRecycling-Zentrumgemäßderörtlichenoder
gesetzlichenVorschriften.
•DerVerbraucherspieltbeiderReduzierungvonMülleinegroßeRolle.RecyclenSiedieseselektrische
bzw.elektronischeGerät.
•Recyclenverhindert,dassgefährlicheMaterialienindenHaushaltsmüllgelangen.
•DasSymboleinesdurchgestrichenenMülleimerserinnertdenBedienerdaran,diesesProduktnichtinden
allgemeinenMüllzuwerfen.
Sicherheits-und
Bedienungsschilder
Wichtig:Sicherheits-undBedienungsschilder
sindinderNähepotenziellerGefahrenbereiche
angebracht.ErsetzenSiebeschädigteoder
verloreneSchilder.
110-1168
1.Aus
2.Ein
3.ZumEinkuppelndesMähwerksmüssenSiebeigedrückter
TastedenSchaltbügelzurückziehen.
110-8417
1.Warnung:LesenSiedieBedienungsanleitung.
2.GefahrdurchiegendeTeile:AchtenSiedarauf,dass
UnbeteiligtedenSicherheitsabstandzumGeräteinhalten.
3.Achtung:FassenSienichtdassichdrehendeMesser
an.ZiehenSiedasStromkabelabundlesenSie
dieAnweisungen,bevorSieKundendienst-oder
Wartungsarbeitenausführen.
4.GefahreineselektrischenSchlages:SetzenSiedie
MaschinenichtimRegenodernassenBedingungenein.
5.GefahreineselektrischenSchlags,Durchtrennendes
Elektrokabels:SchiebenSiedieMaschinenichtüberdas
Stromkabel.
3

Einrichtung
Hinweis:SchließenSiedenRasenmähererstaneine
Steckdosean,wennerkomplettmontiertist.
1.AufklappendesGriffs
Verfahren
Bild1
Bild2
1.RichtenSiedieMarkierungenaus
Bild3
Bild4
Bild5
Bild6
1.MarkierungenfürdieGriffpositionen
Hinweis:SiekönnendenoberenGriffaufdieStellung
1bis3einstellen.RichtenSiedieMarkierungmit
einerder3MarkierungenanderInnenseitederoberen
Griffarretierungaus(Bild6).
4

2.Zusammenbauendes
Grasfangkorbs
1
OberseitedesGrasfangkorbs
2
Grasfangkorbseite
Verfahren
Wichtig:FührenSiedieSchritteinder
angegebenenReihenfolgeaus.
1.SchiebenSiedieSeiteindieRiegeloben(Bild7).
Bild7
2.SchiebenSiedieandereSeiteindieRiegeloben
undverriegelnSiedieRückseitederbeidenSeiten
(Bild8).
Bild8
3.FangenSiehintenanundrichtenSiedierestlichen
SeitenriegelausunddrückenSiesiezusammen
(Bild9).
Bild9
Bild10
Produktübersicht
Bild11
1.Hebelfür
Recycling/Auffangen
8.Taste
2.TastefürdasEinstellen
derSchnitthöhe
9.Stecker
3.Hecktür
10.Griffriegel(4)
4.Füllstandanzeigedes
Grasfangkorbs
11.Verlängerungskabel(falls
zutreffend)
5.Schaltbügel12.Grasfangkorb
6.Kabelzungentlastung
13.Schnitthöhe
7.Griff
5

TechnischeDaten
Modell210802108121082210902109121092
Gewicht
16kg17kg16kg19kg20kg19kg
Länge
137cm137cm137cm145cm145cm145cm
Breite39cm39cm39cm45cm45cm45cm
Nominelle
Schnittbreite
34cm34cm34cm41cm41cm41cm
Nomineller
Schnitthöhen-
bereich
20bis75mm20bis75mm20bis75mm20bis75mm20bis75mm20bis75mm
Fassungsver-
mögendes
Grasfangkorbs
32L32L32L40L40L40L
Nominelle
Motordrehzahl
3000U/min3000U/min3000U/min3000U/min3000U/min3000U/min
Voltund
Frequenz
230V/50Hz230V/50Hz230V/50Hz230V/50Hz230V/50Hz230V/50Hz
Strom
1,2kW1,2kW1,2kW1,2kW1,2kW1,2kW
Betrieb
Befestigendes
Verlängerungskabels
Hinweis:DiesesVerfahrengiltfürRasenmäher,für
dieeinVerlängerungskabelbenötigtwird.
VerwendenSienurVerländerungskabel,dieimFreien
eigesetztwerdendürfen.
WennSiebeimEinsatzdesRasenmähersmit
WasserinBerührungkommen,kanndies
zueinemelektrischenSchlagführen,derzu
VerletzungenodersogartödlichenVerletzungen
führenkann.
•FassenSiedenSteckeroderdenRasenmäher
nichtmitnassenHändenan,oderwennSie
imWasserstehen.
•VerwendenSienurVerlängerungskabeldie
fürdenEinsatzimFreiengeeignetund
zugelassensind.
1.MachenSieimVerlängerungskabeleineSchleifeund
befestigenSiesieinderKabelarretierung(Bild12).
Bild12
2.SteckenSiedasVerlängerungskabelindieBuchse
amRasenmäher(Bild13).
Bild13
Hinweis:ZiehenSiedasVerlängerungskabel
nichtdurchZiehenamKabelab.FassenSieden
6

SteckerundnichtdasKabelan,wennSiedasKabel
entfernenmöchten.
DasElektrokabelkannbeschädigtwerdenund
einenSchlagoderBrandverursachen.
PrüfenSiedasElektrokabelgründlich,bevor
SiedenRasenmähereinsetzen.SetzenSie
denRasenmähernichtein,wenndasKabel
beschädigtist.LassenSiedasKabelsofort
voneinemofziellenVertragshändlervonToro
auswechselnoderreparieren.
PlanendesMähmusters
WennSiesichandasvorgeschlageneMähmuster
halten,verringernSiedasRisiko,mitdemRasenmäher
überdasKabelzufahren.AußerdemwirddasKabel
nichtunnötigabgenutzt.AchtenSiedarauf,dasssich
dasKabelnichtumBäume,Sträucheroderandere
Hindernissewickelt.
FangenSiedasMäheninderNähederSteckdosean.
MähenSiehinundherundmähenSiemitzunehmender
DistanzzurSteckdose(Bild14).
Bild14
AnlassendesMotors
1.SchließenSiedasVerlängerungskabelam
Rasenmäher(fallszutreffend)an.
2.SteckenSiedasandereEndedesKabelsineine
normaleSteckdose.
3.DrückenSiedieTastelinksamGriffundhaltenSie
siegedrückt(Bild15).
Bild15
4.ZiehenSiedenSchaltbügelbeigedrückterTastezum
Griff(Bild16).
Bild16
5.HaltenSiedenSchaltbügelzumGriffundlassenSie
dieTastelos(Bild17).
Bild17
AbstellendesMotors
1.LassenSiedenSchaltbügellos(Bild18).
7
La page est en cours de chargement...
La page est en cours de chargement...
La page est en cours de chargement...
La page est en cours de chargement...
La page est en cours de chargement...
La page est en cours de chargement...
La page est en cours de chargement...
La page est en cours de chargement...
La page est en cours de chargement...
La page est en cours de chargement...
La page est en cours de chargement...
La page est en cours de chargement...
La page est en cours de chargement...
La page est en cours de chargement...
La page est en cours de chargement...
La page est en cours de chargement...
La page est en cours de chargement...
La page est en cours de chargement...
La page est en cours de chargement...
La page est en cours de chargement...
La page est en cours de chargement...
La page est en cours de chargement...
La page est en cours de chargement...
La page est en cours de chargement...
La page est en cours de chargement...
La page est en cours de chargement...
La page est en cours de chargement...
La page est en cours de chargement...
La page est en cours de chargement...
La page est en cours de chargement...
La page est en cours de chargement...
La page est en cours de chargement...
La page est en cours de chargement...
La page est en cours de chargement...
La page est en cours de chargement...
La page est en cours de chargement...
La page est en cours de chargement...
La page est en cours de chargement...
La page est en cours de chargement...
La page est en cours de chargement...
La page est en cours de chargement...
La page est en cours de chargement...
La page est en cours de chargement...
La page est en cours de chargement...
La page est en cours de chargement...
La page est en cours de chargement...
La page est en cours de chargement...
La page est en cours de chargement...
La page est en cours de chargement...
La page est en cours de chargement...
La page est en cours de chargement...
La page est en cours de chargement...
La page est en cours de chargement...
La page est en cours de chargement...
La page est en cours de chargement...
La page est en cours de chargement...
La page est en cours de chargement...
La page est en cours de chargement...
La page est en cours de chargement...
La page est en cours de chargement...
La page est en cours de chargement...
La page est en cours de chargement...
La page est en cours de chargement...
La page est en cours de chargement...
La page est en cours de chargement...
La page est en cours de chargement...
La page est en cours de chargement...
La page est en cours de chargement...
La page est en cours de chargement...
La page est en cours de chargement...
La page est en cours de chargement...
La page est en cours de chargement...
La page est en cours de chargement...
La page est en cours de chargement...
La page est en cours de chargement...
La page est en cours de chargement...
La page est en cours de chargement...
La page est en cours de chargement...
La page est en cours de chargement...
La page est en cours de chargement...
La page est en cours de chargement...
La page est en cours de chargement...
La page est en cours de chargement...
La page est en cours de chargement...
La page est en cours de chargement...
La page est en cours de chargement...
La page est en cours de chargement...
La page est en cours de chargement...
La page est en cours de chargement...
La page est en cours de chargement...
La page est en cours de chargement...
La page est en cours de chargement...
La page est en cours de chargement...
La page est en cours de chargement...
La page est en cours de chargement...
La page est en cours de chargement...
La page est en cours de chargement...
La page est en cours de chargement...
La page est en cours de chargement...
La page est en cours de chargement...
La page est en cours de chargement...
La page est en cours de chargement...
La page est en cours de chargement...
La page est en cours de chargement...
La page est en cours de chargement...
La page est en cours de chargement...
La page est en cours de chargement...
La page est en cours de chargement...
La page est en cours de chargement...
La page est en cours de chargement...
La page est en cours de chargement...
La page est en cours de chargement...
La page est en cours de chargement...
La page est en cours de chargement...
La page est en cours de chargement...
La page est en cours de chargement...
-
 1
1
-
 2
2
-
 3
3
-
 4
4
-
 5
5
-
 6
6
-
 7
7
-
 8
8
-
 9
9
-
 10
10
-
 11
11
-
 12
12
-
 13
13
-
 14
14
-
 15
15
-
 16
16
-
 17
17
-
 18
18
-
 19
19
-
 20
20
-
 21
21
-
 22
22
-
 23
23
-
 24
24
-
 25
25
-
 26
26
-
 27
27
-
 28
28
-
 29
29
-
 30
30
-
 31
31
-
 32
32
-
 33
33
-
 34
34
-
 35
35
-
 36
36
-
 37
37
-
 38
38
-
 39
39
-
 40
40
-
 41
41
-
 42
42
-
 43
43
-
 44
44
-
 45
45
-
 46
46
-
 47
47
-
 48
48
-
 49
49
-
 50
50
-
 51
51
-
 52
52
-
 53
53
-
 54
54
-
 55
55
-
 56
56
-
 57
57
-
 58
58
-
 59
59
-
 60
60
-
 61
61
-
 62
62
-
 63
63
-
 64
64
-
 65
65
-
 66
66
-
 67
67
-
 68
68
-
 69
69
-
 70
70
-
 71
71
-
 72
72
-
 73
73
-
 74
74
-
 75
75
-
 76
76
-
 77
77
-
 78
78
-
 79
79
-
 80
80
-
 81
81
-
 82
82
-
 83
83
-
 84
84
-
 85
85
-
 86
86
-
 87
87
-
 88
88
-
 89
89
-
 90
90
-
 91
91
-
 92
92
-
 93
93
-
 94
94
-
 95
95
-
 96
96
-
 97
97
-
 98
98
-
 99
99
-
 100
100
-
 101
101
-
 102
102
-
 103
103
-
 104
104
-
 105
105
-
 106
106
-
 107
107
-
 108
108
-
 109
109
-
 110
110
-
 111
111
-
 112
112
-
 113
113
-
 114
114
-
 115
115
-
 116
116
-
 117
117
-
 118
118
-
 119
119
-
 120
120
-
 121
121
-
 122
122
-
 123
123
-
 124
124
-
 125
125
-
 126
126
-
 127
127
-
 128
128
-
 129
129
-
 130
130
-
 131
131
-
 132
132
-
 133
133
-
 134
134
-
 135
135
-
 136
136


Toro Eurocycler 34cm Electric Lawn Mower Manuel utilisateur
- Catégorie
- Scarificateurs de pelouse
- Taper
- Manuel utilisateur
- Ce manuel convient également à
dans d''autres langues
- italiano: Toro Eurocycler 34cm Electric Lawn Mower Manuale utente
- español: Toro Eurocycler 34cm Electric Lawn Mower Manual de usuario
- Deutsch: Toro Eurocycler 34cm Electric Lawn Mower Benutzerhandbuch
- Nederlands: Toro Eurocycler 34cm Electric Lawn Mower Handleiding
- dansk: Toro Eurocycler 34cm Electric Lawn Mower Brugermanual
- eesti: Toro Eurocycler 34cm Electric Lawn Mower Kasutusjuhend
- svenska: Toro Eurocycler 34cm Electric Lawn Mower Användarmanual
Documents connexes
-
Toro 21092 Manuel utilisateur
-
Toro Eurocycler 34cm Electric Lawn Mower Manuel utilisateur
-
Toro Carefree Electric WPM, 24 VDC Manuel utilisateur
-
-
-
Toro Carefree Electric WPM, 120 VAC Manuel utilisateur
-
-
Toro 55cm Recycler Lawn Mower Manuel utilisateur
-
-