Powerfist 9093899 Le manuel du propriétaire
- Catégorie
- Outils électroportatifs
- Taper
- Le manuel du propriétaire

V1.0 9093899
Please read and understand all instructions before use. Retain this manual for
future reference.

This page is intentionally left blank.

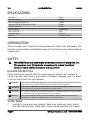
SPECIFICATIONS
Air Inlet 1/4 in.
Pressure Range 90 PSI
Air Consumption @ 90 PSI 5 CFM
Average CFM @ 15 Second Run Time 5 CFM
CFM @ Full Load 5 CFM
Speed Rating 18,000 RPM
Min. Hose Size 1/4 in.
Overall Length 4-5/16 in.
Material Aluminum Body
INTRODUCTION
The air chamfer tool is ideal for creating deburring, radius cuts and bevels. The
tool has an adjustable cutting depth range of 0 to 0.9 mm and a redirectable air
exhaust port.
SAFETY
WARNING! Read and understand all instructions before using this tool.
The operator must follow basic precautions to reduce the risk of
personal injury and/or damage to the equipment.
HAZARD DEFINITIONS
Please familiarize yourself with the hazard notices found in this manual. A
notice is an alert that there is a possibility of property damage, injury or death
if certain instructions are not followed.
DANGER! This notice indicates an immediate and specic hazard that will result in severe
personal injury or death if the proper precautions are not taken.
WARNING! This notice indicates a specic hazard or unsafe practice that could result in a
serious injury if the proper precautions are not taken.
CAUTION! This notice indicates a potentially hazardous situation that may result in minor
or moderate injury if proper practices are not taken.
NOTICE! This notice indicates that a specic hazard or unsafe practice will result in
equipment or property damage, but not personal injury.
WORK AREA
1. Operate in a safe work environment. Keep your work area clean, well-lit
and free of distractions. Place lights so you are not working in a shadow.
V1.0 AIR CHAMFER TOOL 9093899
Page 3 www.princessauto.com / 1-800-665-8685

2. Keep anyone not wearing the appropriate safety equipment away from
the work area.
3. Store unused tools properly in a dry, safe and secure location to prevent
rust, damage or misuse.
4. Do not install or use in the presence of ammable gases, dust or liquids.
PERSONAL SAFETY
WARNING! Wear personal protective equipment approved by the
Canadian Standards Association (CSA) or American National Standards
Institute (ANSI).
PERSONAL PROTECTIVE EQUIPMENT
1. Always wear impact safety goggles that provide front and side protection
for the eyes. Eye protection equipment should comply with CSA Z94.3-07
or ANSI Z87.1 standards based on the type of work performed.
2. Wear the appropriate type of full-face shield in addition to safety googles,
as the work can create chips, abrasive or particulate matter.
3. Wear protective clothing and gloves designed for the work environment,
materials and tools.
a. Do not wear gloves when operating a tool that can snag the material
and pull the hand into the tool.
4. The tool may contain high pressure. Use safety glasses and gloves for
protection during operation. Keep hands clear of the exposed rubber
portions of the hose.
5. This tool can cause hearing damage. Wear ear protection gear to eliminate
or reduce the noise. If possible add a muing device to the air tool’s
exhaust.
6. Wear the appropriate rated dust mask or respirator. Wear a NIOSH
approved respirator when working on materials that produce hazardous
fumes, dust or particulate matter.
PERSONAL PRECAUTIONS
Control the tool, personal movement and the work environment to avoid
personal injury or damage to tool.
1. Do not operate any tool when tired or under the inuence of drugs,
alcohol or medications.
9093899 AIR CHAMFER TOOL V1.0
www.princessauto.com / 1-800-665-8685 Page 4

2. Avoid wearing clothes or jewelry that can become entangled with the
moving parts of a tool. Keep long hair covered or bound.
3. Do not overreach when operating a tool. Proper footing and balance
enables better control in unexpected situations.
4. Keep your ngers away from the trigger/switch while carrying the tool,
attaching an air hose or an accessory. Lock the trigger/switch safety if
available.
5. Avoid unintentional starts. Be sure that the regulator/throttle switch is in
the neutral or OFF position when not in use and before connecting it to
any air source.
6. Never point the air stream or tool at any point of your body, other people
or animals. Debris and dust ejected at high speed can cause an injury.
7. Serious injury or death may occur from inhaling compressed air. The air
stream may contain carbon monoxide, toxic vapors or solid particles.
Never inhale compressed air directly from the pump or air tool.
SPECIFIC SAFETY
WARNING! DO NOT let comfort or familiarity with product (gained from
repeated use) replace strict adherence to the tool safety rules. If you use
this tool unsafely or incorrectly, you can suer serious personal injury.
1. Use the correct tool for the job. This tool was designed for a specic
function. Do not modify or alter this tool or use it for an unintended
purpose.
POWER TOOL PRECAUTIONS
1. Do not use any power tool with a malfunctioning power switch or control.
A power tool that fails to respond to the controls is dangerous and can
cause an injury. A qualied technician must repair and verify the power
tool is operating correctly, before it can be used.
2. Shut the power o and disconnect the air chamfer tool from the power
supply (if possible) before making any adjustments, changing accessories,
cleaning, servicing or when storing. Such preventive safety measures
reduce the risk of starting the tool accidentally.
3. Never force the tool. Excessive pressure could damage to the tool, your
workpiece or cause serious personal injury. If the air chamfer tool runs
V1.0 AIR CHAMFER TOOL 9093899
Page 5 www.princessauto.com / 1-800-665-8685

smoothly under no load, but does not run smoothly under load, then
excessive pressure is being used.
4. Check if air chamfer tool's moving parts are misaligned or binding before
each use. Correct the issue before using the air chamfer tool to avoid an
injury or damage to the tool.
5. Always be aware of the position of your hands relative to the air chamfer
tool. Avoid awkward hand positions where a sudden slip could cause a
hand to move into the chamfer blades. Never reach behind or beneath the
air chamfer tool.
6. Only use accessories that are specically designed for use with the air
chamfer tool. Ensure the chamfer blades are tightly installed.
7. Only use a chamfer blade that exceeds the Speed rating (see
Specications).
8. Before using the air chamfer tool on a workpiece, test the air chamfer tool
by running it at the highest speed rating for at least 30 seconds in a safe
position. Stop immediately if there is any abnormal vibration or wobbling.
Check the tool to determine the cause.
9. Never touch the chamfer blades or workpiece during or immediately after
use. They may be hot and could inict a burn injury.
10. The material and the motor housing can get very hot during operation.
Stop work until the tool cools down to a safe temperature.
11. Do not cover the air vents. Proper cooling of the motor is necessary to
ensure normal life of the tool.
12. Never use an air chamfer tool with a chamfer blade that is cracked or
worn. Change the chamfer blades before using it.
13. Do not place the air chamfer tool down until the chamfer blades has
stopped moving. The air chamfer tool may catch the surface of work
material and wrench itself free, causing injury to the user or others in the
work area.
14. Avoid unintentional starts. Be sure that the regulator/throttle switch is in
the neutral or OFF position when not in use and before connecting it to
any air source.
15. Make sure any adjustment mechanisms are secure before using the tool
9093899 AIR CHAMFER TOOL V1.0
www.princessauto.com / 1-800-665-8685 Page 6

16. Never point towards yourself. It could inict an injury.
17. Hold the air chamfer tool by the insulated gripping surfaces when
performing an operation where the air chamfer tool may contact hidden
electrical wiring. Air chamfer tool's exposed metal surfaces may convey a
shock to the operator from a ‘live’ wire.
KICKBACK PRECAUTIONS
Kickback is a sudden reaction when a chamfer blade is pinched or caught on
the material. If kickback occurs:
•The chamfer blades may contact a body part, causing a serious injury
• The air chamfer tool may wrench the user’s arm causing muscle or joint
injuries
• The tool may strike bystanders.
• Kickback can also damage the tool or workpiece.
Kickback can be avoided by taking proper precautions:
1. Maintain a rm grip on the tool and position your body and arms to allow
you to resist a kickback. Kickback will propel the tool in the direction
opposite the chamfer blade's teeth or direction of rotation. The tool may
pull out of your grasp.
a. Use clamps or a vice to hold down smaller workpieces.
2. Use special care when working on corners, sharp edges or exible
material. The workpiece has a tendency to snag the chamfer blades.
3. Only use a chamfer blade designed for the tool.
4. Maintain control of a long workpiece or large panel by placing supports
under the material on either side of the air chamfer tool.
5. Always make sure the work surface is free from debris or other foreign
objects. Striking debris can cause the air chamfer tool to jump and
damage the chamfer blades.
6. Maintain the chamfer blade's cutting edge. A dull edge is more likely to
slip from the workpiece.
V1.0 AIR CHAMFER TOOL 9093899
Page 7 www.princessauto.com / 1-800-665-8685

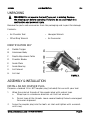
UNPACKING
WARNING! Do not operate the tool if any part is missing. Replace
the missing part before operating. Failure to do so could result in a
malfunction and personal injury.
Remove the parts and accessories from the packaging and inspect for damage.
Contents:
• Air Chamfer Tool
•Oset Ring Wrench
• Hexagon Wrench
• Air Connector
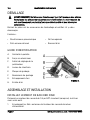
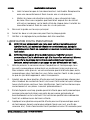
IDENTIFICATION KEY
A. Paddle Trigger
B. Aluminum Body
C. Depth Adjustment Collar
D. Chamfer Blades
E. Guide Plate
F. Guide Bearing
G. Air Exhaust
H. Air Inlet
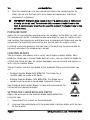
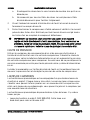
ASSEMBLY & INSTALLATION
INSTALL AN AIR COUPLER PLUG
Prepare a standard 1/4 in. NPT coupler plug (included) for use with your tool.
1. Wrap the external threads of the coupler plug with sealant tape.
a. Wrap tape in a clockwise direction so it will not unravel.
b. Do not tape all the threads. Leave several leading threads unwrapped
for easier alignment.
2. Screw the coupler plug into the tool's air inlet and tighten with a wrench
until snug.
FIGURE 1.
9093899 AIR CHAMFER TOOL V1.0
www.princessauto.com / 1-800-665-8685 Page 8

3. Run the compressor at a low volume and check the connection for air
leaks. Do not use the tool until all air leaks are repaired or the faulty
component is replaced.
IMPORTANT! Vibration may cause failure if a quick coupler is connected
directly to the air tool. To overcome this, connect a leader hose to the
tool. A quick coupler may then be used to connect the leader hose to the
air line hose.
PRESSURE DROP
Apply the air consumption and pressure rate numbers to the tool’s air inlet, not
the compressor’s outlet. Calculate the pressure drop for your air supply set-up
and increase the compressor outlet pressure to compensate. Make sure you do
not exceed the maximum pressure for any part of your air supply system.
Installing a pressure gauge at the tool inlet is the best way to measure the air
pressure and adjust the compressor’s output.
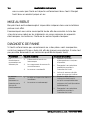
CHAMFER BLADES
The air chamfer tool comes with a set of two C-Angle chamfer blades. Each
blade has three sides. As each blade dulls or chips, you can rotate the blade to
a fresh side. Once all sides are dull or damaged, you can discard and replace it
with a fresh chamfer blade.
The air chamfer tool has two blade styles available. There are two blades per
set.
•C-Angle Chamfer Blade (SKU 9094210). This blade has a
straight edge to create a 45º bevel.
•R-Angle Chamfer Blades (SKU 9094228). This blade has a
curved inset to create a round edge instead of a bevel.
See Changing the Chamfer Blades in Care and maintenance for
instructions on replacing blades.
SETTING THE CHAMFER BLADE DEPTH
Adjust the accuracy of the chamfer blade depth before rst
using the tool.
1. Loosen both set screws on the guide plate.
2. Unscrew the guide plate until the guide plate's bottom aligns with the top
of the bearing.
FIGURE 1.
FIGURE 2.
V1.0 AIR CHAMFER TOOL 9093899
Page 9 www.princessauto.com / 1-800-665-8685

3. Tighten both set screws on the guide plate.
4. Loosen the set screw on the depth adjustment collar.
5. Rotate the collar until the zero line is centered on the inset mark on the
tool's body.
6. Tighten the collar set screw.
SETTING UP THE AIR CHAMFER TOOL
ADJUSTING THE CHAMFER BLADE DEPTH
1. Loosen both set screws on the guide plate.
2. Change the guide’s depth by twisting the depth adjustment to align the
number with the indent on the tool's body.
a. The depth is marked between 0 to 0.9 mm in 0.1 mm increments.
b. Increasing the number will expose more of each cutting blade's
surface.
c. Changing the depth will also change the bevel’s width.
3. Tighten the set screws.
AIR CHAMFER OPERATION
CAUTION! Do not change air chamfer tool's speed while in contact with
the workpiece. This can cause a loss of control and result in an injury
and damage to the tool or workpiece.
The guide bearing maintains the chamfer blade’s horizontal distance
from the workpiece. The bearing may sit below a thin workpiece,
resulting in an inconsistent bevel. Add a matching template below the
workpiece to guide the bearing during cutting.
1. Check that the horizontal and vertical surfaces are clean and smooth
before cutting. An uneven surface can cause the tool to unexpectedly tilt
or move horizontally and could result in gouges or an uneven bevel.
2. Determine if you need to clamp or secure the workpiece.
3. Twist the exhaust collar to redirect the exhaust air away from yourself
and the workpiece.
4. Open the air regulator to the desired airow.
9093899 AIR CHAMFER TOOL V1.0
www.princessauto.com / 1-800-665-8685 Page 10

5. Hold the tool's guide plate at against the workpiece. Make sure the
chamfer blades are not touching the workpiece.
6. Press down on the paddle trigger to start the blades spinning.
7. Move the chamfer blades into the workpiece. The guide bearing will press
against the workpiece to maintain an even depth.
8. Move the tool along the edge of the hole or outer edge at an even speed
until the cut is complete.
• The arrow on the tool body indicates the direction of blade rotation.
Move the air chamfer tool in the same direction while cutting.
9. Release the trigger to stop the tool.
10. Lift the air chamfer tool away from the workpiece when done.
11. When nished with the tool, turn o the air compressor, disconnect the
air hose and discharge any residual air remaining in the tool.
CARE & MAINTENANCE
1. Maintain the tool with care. A tool in good condition is ecient, easier to
control and will have fewer problems.
2. Inspect the tool components periodically. Repair or replace damaged or
worn components. Only use identical replacement parts when servicing.
3. Only use accessories intended for use with this tool. Follow instructions
for changing accessories.
4. Keep the tool handles or gripping surfaces clean and dry.
5. Maintain the tool’s labels and name plates. These carry important
information. If unreadable or missing, contact Princess Auto Ltd. for
replacements.
6. Clear the vents of any dirt, dust and debris on a regular basis to prevent
the tool from overheating.
WARNING! Only qualied service personnel should repair the tool. An
improperly repaired tool may present a hazard to the user and/or others.
CHANGING THE CHAMFER BLADES
The chamfer blades will eventually chip or become dull. Rotate or replace the
blades when this occurs.
V1.0 AIR CHAMFER TOOL 9093899
Page 11 www.princessauto.com / 1-800-665-8685

1. Loosen both set screws on the guide plate.
2. Unscrew the guide plate from the main body and set aside.
3. Remove the set screw holding the rst chamfer blade.
4. Pull the blade out, then:
a. Rotate it to a new edge. Place it back on the shank and secure with a
set screw. Repeat with the other two blades as needed.
b. Discard a blade once the third edge is unusable. Replace with a new
blade and secure with a set screw.
c. Set the chamfer blades aside, if changing from one blade type to
another. Keep track of which edge was exposed when removed by
running a marker on the used edge of each blade as a reminder.
Install the new blades and secure with set screws.
5. Screw the guide back onto the main body.
6. Tighten both set screws to secure the guide plate.
7. Check if the depth setting needs to be recalibrated.
AIR TOOL LUBRICATION
NOTICE! Only use air tool oil to lubricate the tool. Other lubricants are
not suitable and will damage the tool or cause a malfunction during use.
NOTICE! Never use a penetrating oil to lubricate an air tool. Penetrating
oil acts as a solvent that will dissolve the tool’s grease packing and may
damage the o-rings, causing the tool to seize or malfunction.
1. All air tools have an internal coating of grease to prevent corrosion during
shipping and storage. Remove this grease by adding a generous amount
of air tool oil in the air inlet and then run the tool under no load until the
exhaust is clear.
2. Manually add a drop or two of air tool oil into the tool’s coupler plug
before each use and after every hour of continuous use. The tool will not
work properly without lubrication and parts will wear prematurely.
3. Avoid adding too much air tool oil as this can cause premature power loss
and eventual tool failure. A qualied technician will need to take the tool
apart and clean out the excess oil.
4. Apply a generous amount of air tool oil to the tool before storing it
for an extended period of time (overnight, weekend, etc.). Run the tool
9093899 AIR CHAMFER TOOL V1.0
www.princessauto.com / 1-800-665-8685 Page 12

for approximately 30 seconds to ensure the oil is evenly distributed
throughout the tool. Store it in a clean and dry location.
DISPOSAL
Recycle a tool damaged beyond repair at the appropriate facility.
Contact your local municipality for a list of disposal facilities or by-laws for
electronic devices, batteries, oil or other toxic liquids.
TROUBLESHOOTING
Visit a Princess Auto Ltd. location for a solution if the tool does not function
properly or parts are missing. If unable to do so, have a qualied technician
service the tool.
Problem(s) Possible Cause(s) Suggested Solution(s)
The air chamfer
tool will not
start.
1. Supplied power is interrupted.
2. Motor components are
defective.
3. Motor has overheated.
1. Check that power supply is still
available.
2. Have a qualied technician
service the tool.
3. Allow motor to cool before
attempting to use.
Motor starts
slow and
doesn't reach
operation speed.
1. Air ow or air pressure is too
low.
2. Motor is damaged.
1. Adjust air ow or air pressure
to match tool requirements
(see Specications).
2. Have a qualied technician
service the tool.
Tool is making
unusual sounds. 1. Air chamfer tool's parts may be
rubbing or binding.
2. Worn tool components
1. Check for obstructions or
misaligned tool components.
Lubricate, repair or replace
the components based on the
particular problem.
2. Check and replace worn parts.
Performance
decreases over
time.
• The chamfer blades are dull or
damaged.
• Keep the chamfer blades sharp.
Replace as needed
V1.0 AIR CHAMFER TOOL 9093899
Page 13 www.princessauto.com / 1-800-665-8685

Problem(s) Possible Cause(s) Suggested Solution(s)
Overheating 1. Forcing machine to work too
fast.
2. The chamfer blades are dull or
damaged
3. Blocked motor housing vents.
1. Allow machine to work at its
own rate.
2. Keep the chamfer blades sharp.
Replace as needed
3. Blow dust out of motor using
compressed air.
9093899 AIR CHAMFER TOOL V1.0
www.princessauto.com / 1-800-665-8685 Page 14

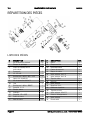
PARTS BREAKDOWN
PARTS LIST
# DESCRIPTION QTY
1 Set Screw, M4x4 3
2 Guide Plate 1
3 Depth Adjustment Collar 1
4 Cover 1
5 Screw, M3sx8 1
6 Ball bearing 619 / 3 ZZ 1
8 Chamfer Blades 2
9 Set screw, M2x5 2
10 Shank 1
11 Ball bearing 608ZZ 1
12 Dowel pin, 2x3 1
13 Front Plate 1
14 Cylinder 1
15 Pin, 1.5 x 29.5 1
16 Rotor collar 1
17 Rotor Blade 4
18 Rotor 1
# DESCRIPTION QTY
19 Rear Plate 1
20 Bearing 625 1
21 Motor housing 1
22 Valve bushing 1
23 O-ring, 3 x 1.5 1
24 O-ring, 4 x 1.8 1
25 Valve Stem 1
26 Spring 1
27 O-ring 1
28 Valve screw 1
29 Paddle trigger 1
30 Spring pin 1
32 O-ring, 23 x 1.5 1
33 Exhaust Sleeve 1
34 O-ring 1
35 Air Inlet 1
V1.0 AIR CHAMFER TOOL 9093899
Page 15 www.princessauto.com / 1-800-665-8685

This page is intentionally left blank.

V1,0 9093899
Vous devez lire et comprendre toutes les instructions avant d'utiliser l'appareil.
Conservez ce manuel afin de pouvoir le consulter plus tard.

Cette page a été laissée blanche intentionnellement.

SPÉCIFICATIONS
Entrée d’air 1/4 po
Plage de pression 90 lb/po carré
Consommation d’air à 90 lb/po carré 5 pi cubes/min
Débit moyen à un temps de fonctionnement de 15 secondes 5 pi cubes/min
Débit à pleine charge 5 pi cubes/min
Vitesse nominale 18 000 tr/min
Taille min. de tuyau 1/4 po
Longueur hors tout 4 5/16 po
Matériau Corps en aluminium
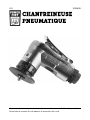
INTRODUCTION
La chanfreineuse pneumatique est idéale pour l’ébavurage et pour créer des
coupes à rayon et des biseaux. L’outil dispose d’une profondeur de coupe
réglable de 0 à 0,9 mm et d’un orice d’échappement d’air redirigeable.
SÉCURITÉ
AVERTISSEMENT! Veuillez lire et comprendre toutes les instructions
avant d’utiliser cet outil. L’opérateur doit respecter les précautions
élémentaires pour réduire le risque de blessure corporelle ou de
dommage à l’équipement.
DÉFINITIONS DE DANGER
Veuillez vous familiariser avec les avis de danger qui sont présentés dans ce
manuel. Un avis est une alerte indiquant qu’il existe un risque de dommage
matériel, de blessure ou de mort si on ne respecte pas certaines instructions.
DANGER! Cet avis indique un risque immédiat et particulier qui entraînera des
blessures corporelles graves ou même la mort si on omet de prendre les
précautions nécessaires.
AVERTISSEMENT! Cet avis indique un risque particulier ou une pratique non sécuritaire
qui pourrait entraîner des blessures graves si on omet de prendre les
précautions nécessaires.
ATTENTION! Cet avis indique une situation possiblement dangereuse qui peut
entraîner des blessures mineures ou modérées si on ne procède pas
de la façon recommandée.
V1.0 CHANFREINEUSE PNEUMATIQUE 9093899
Page 3 www.princessauto.com / 1-800-665-8685

AVIS! Cet avis indique un risque particulier ou une pratique non sécuritaire qui
entraînera des dommages au niveau de l’équipement ou des biens, mais
non des blessures corporelles.
AIRE DE TRAVAIL
1. Travaillez dans un environnement de travail sécuritaire. Gardez votre aire
de travail propre, bien éclairée et exempte de toute distraction. Placez les
lampes de façon à ne pas travailler dans l’ombre.
2. Assurez-vous que les personnes qui ne portent pas l’équipement de
sécurité approprié ne se trouvent pas à proximité de l’aire de travail.
3. Rangez les outils inutilisés correctement dans un lieu sécurisé et sec pour
empêcher la rouille, les dommages ou un mauvais usage.
4. Évitez d’installer ou d’utiliser des outils électriques en présence de gaz, de
poussière ou de liquides inammables.
SÉCURITÉ PERSONNELLE
AVERTISSEMENT! Portez de l’équipement de protection individuelle
homologué par l’Association canadienne de normalisation (CSA) ou
l’American National Standards Institute (ANSI).
ÉQUIPEMENT DE PROTECTION INDIVIDUELLE
1. Portez toujours des lunettes antiprojections qui orent une protection
frontale et latérale pour les yeux. L’équipement de protection des yeux
devrait être conforme à la norme CSA Z94.3-07 ou ANSI Z87.1 en fonction
du type de travail eectué.
2. Portez un écran facial panoramique de type approprié avec les lunettes
de sécurité puisque cette tâche peut créer des copeaux, des matières
abrasives ou des particules.
3. Portez des vêtements et des gants de protection conçus pour
l’environnement de travail, les matériaux et les outils.
a. Ne portez pas de gants lorsque vous utilisez un outil dans lequel le
tissu pourrait demeurer coincé, entraînant ainsi la main dans l’outil.
4. L’outil peut être à haute pression. Portez des lunettes de sécurité et des
gants pour vous protéger durant le fonctionnement. Gardez les mains à
l’écart des parties de caoutchouc exposées du tuyau.
5. Cet outil peut causer des dommages à l’ouïe. Portez une protection
d’oreille an d’éliminer ou de réduire le bruit. Si c’est possible, ajoutez
9093899 CHANFREINEUSE PNEUMATIQUE V1.0
www.princessauto.com / 1-800-665-8685 Page 4
La page est en cours de chargement...
La page est en cours de chargement...
La page est en cours de chargement...
La page est en cours de chargement...
La page est en cours de chargement...
La page est en cours de chargement...
La page est en cours de chargement...
La page est en cours de chargement...
La page est en cours de chargement...
La page est en cours de chargement...
La page est en cours de chargement...
La page est en cours de chargement...
La page est en cours de chargement...
La page est en cours de chargement...
La page est en cours de chargement...
La page est en cours de chargement...
-
 1
1
-
 2
2
-
 3
3
-
 4
4
-
 5
5
-
 6
6
-
 7
7
-
 8
8
-
 9
9
-
 10
10
-
 11
11
-
 12
12
-
 13
13
-
 14
14
-
 15
15
-
 16
16
-
 17
17
-
 18
18
-
 19
19
-
 20
20
-
 21
21
-
 22
22
-
 23
23
-
 24
24
-
 25
25
-
 26
26
-
 27
27
-
 28
28
-
 29
29
-
 30
30
-
 31
31
-
 32
32
-
 33
33
-
 34
34
-
 35
35
-
 36
36


Powerfist 9093899 Le manuel du propriétaire
- Catégorie
- Outils électroportatifs
- Taper
- Le manuel du propriétaire
dans d''autres langues
- English: Powerfist 9093899 Owner's manual
Documents connexes
Autres documents
-
Power Fist 9004391 Manuel utilisateur
-
-
Metabo KFM 15-10 F Mode d'emploi
-
Metabo KFM 9-3 RF Mode d'emploi
-
-
-
RIDGID R8481KSBN-R86065B Mode d'emploi
-
Milwaukee 2623-21 Manuel utilisateur
-
Milwaukee M18 2623-20 Manuel utilisateur
-