
www.jonsbo.com
D31 Computer Case

1
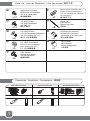
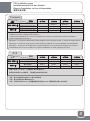
Parts List - Liste der Einzelteile - Liste des pieces - 配件內容
A
B
C
D
E
F
G
Connectors - Anschluss - Connecteurs - 連接器
Motherboard Standoff
Motherboard-Abstand
Entretoise de la carte mère
鎖主板備用銅柱
PSU Screws
Netzteil Schrauben
Vis d'alimentation
鎖電源螺絲
Spare panel mounting clip /
Ersatz-Panel-Montageclip /
Clip de montage de panneau
de rechange /
備用鉚釘卡扣
3.5" HDD Screws
3,5-Zoll-Festplattenschrauben
Vis pour disque dur 3,5"
鎖3.5" HDD硬碟螺絲
Motherboard Screws
Motherboard-Schrauben
Vis de la carte mère
鎖主機板螺絲
2.5" SSD Screws
2,5" SSD Schrauben
Vis SSD 2,5"
鎖2.5" SSD
Cable Tie
Kabelbinder
Attache de cable
束線帶
3.5" HDD Rubber Grommet/
3,5" HDD Gummitülle/
Passe-fil en caoutchouc
pour disque dur 3,5"/
3.5" HDD硬碟膠墊
HEX Socket
HEX-Buchse
Douille hexagonale
六角套筒
x10
x10
x5 x2
x5
x6
x2
H
I
x8
Power SW
Power SW
Power LED-
Power LED+
USB 3.0 Connection Type-C Connection
Power LED Connection
HD AUDIO Connection
Power Button Connection
Power LED
x1

2
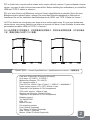
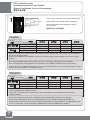
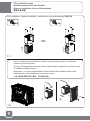
Chassis Specs - Chassis-Spezifikationen - Spécifications du chassis - 主機殼規格
D31 is divided into a version with a screen and a version without a screen. If you purchased a screen
version, you need to refer to the screen manual first. Before installing the motherboard, pre-install the
HDMI and TYPE-C cables in advance /
D31 ist in eine Version mit Bildschirm und eine Version ohne Bildschirm unterteilt. Wenn Sie eine
Bildschirmversion gekauft haben, müssen Sie zuerst das Bildschirmhandbuch zu Rate ziehen.
Installieren Sie vor der Installation des Motherboards die HDMI- und TYPE-C-Kabel im Voraus /
Le D31 se décline en une version avec écran et une version sans écran. Si vous avez acheté une
version écran, vous devez d'abord vous référer au manuel de l'écran. Avant d'installer la carte mère,
pré-installez les câbles HDMI et TYPE-C à l'avance /
D31分為帶屏幕和不帶屏幕版本,如果您購買的是屏幕版本,需要先參考屏幕說明書,在安裝主機板
之前,請提前預裝HDMI與TYPE-C線纜。
Case size: 205mm(W)*363mm(H)*452mm(D)
Drive bays: 2.5" SSD*2 , 3.5"HDD*1
Motherboard Support: ITX / M-ATX
PCl expansion slots: 4
Front I/O Port: USB 3.2 Gen 2 Type-C*1 / USB3.0*1 / Audio&Mic*1
Power supply support: ATX / SFX, 220mm L max.
*Depends on the position of PSU compartment
CPU cooler support: 168mm H max.
Graphics card support: 330mm~400mm
*Depends on the position of PSU compartment
Radiator support:
Top 240/280/360
Rear 120
Bottom 240/360
Fan mounting position:
Front 120mm*1(optional)
Top 120mm*3/140mm*2(optional)
Rear 120mm*1 (optional)
Bottom 120mm*3/140mm*2(optional)

3
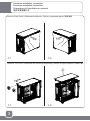
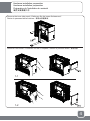
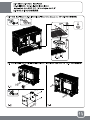
Hardware installation preparation
Hardware installation preparation
Préparation de l'installation du materiel
硬件安裝準備工作
Remove Side Panel / Seitenwand entfernen / Retirer le panneau lateral / 移除側板
1-1 1-2
1-1 1-2
Remove Top Cover / Entfernen Sie die obere Abdeckung / Retirer le capot supérieur / 移除上蓋

4
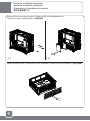
Hardware installation preparation
Hardware installation preparation
Préparation de l'installation du materiel
硬件安裝準備工作
Remove the inner side panel / Entfernen Sie die innere Seitenwand /
Retirer le panneau latéral intérieur / 移除內部側擋板
Remove Front Panel / Entfernen Sie die Frontplatte / Retirer le panneau avant / 移除前板
1-1
1-2

5
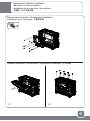
Hardware installation preparation
Hardware installation preparation
Préparation de l'installation du materiel
硬件安裝準備工作
Remove the dust filter / Entfernen Sie den Staubfilter / Retirer le filtre à poussière / 移除防塵網
Remove the power supply bracket / Entfernen Sie die Netzteilhalterung /
Retirez le support d'alimentation / 拆除電源架
1-1 1-2

6
Motherboard / Radiator Installation
Mainboard- / Kühlerinstallation
Installation de la carte mère / du radiateur
主機板 / 水冷安裝步驟
Motherboard Installation / Motherboard-Installation /
Installation de la carte mère / 主機板安裝
Radiator installation / Kühlereinbau / Installation de radiateur / 水冷安裝
x8
A
1-1 1-2

7
Power supply rack with 4-level height adjustment/
Netzteil-Rack mit 4-stufiger Höhenverstellung/
Rack d'alimentation avec réglage en hauteur
sur 4 niveaux/
電源架可進行4級高度調節
level-1
level-2
level-3
level-4
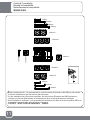
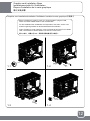
PSU installation steps
Installationsschritte für das Netzteil
Étapes d'installation du bloc d'alimentation
電源安裝步驟
level-1
400mm
level-3
342~360mm
342~360mm
level-1
level-3
335mm
342~360mm
level-1
level-3
335mm
335mm
level-1
level-3
335mm
When the length of the graphics card is less than or equal to 330mm, the power supply can be installed in
the level-4 hanging position.
When three 12CM fans are installed on the top, the power supply can be installed in the level-2 hanging
position.
Note: The calculated length of the graphics card is the total length including the PCI-E bracket.
Note: The length limit of the graphics card depends on the installation direction of the power supply.
Note: If 360 AIO is installed under the top cover, it is recommended to use a power supply length of 14CM
to obtain a longer graphics card installation space.
Power supply suitable at
Graphics card length limit
Power supply suitable at
Graphics card length limit
English
/
level-1
400mm
level-3
342~360mm
342~360mm
level-1
level-3
335mm
342~360mm
level-1
level-3
335mm
335mm
level-1
level-3
335mm
/
Netzteil geeignet für
Maximale Grafikkartenlänge
Netzteil geeignet für
Maximale Grafikkartenlänge
Wenn die Länge der Grafikkarte kleiner oder gleich 330 mm ist, kann das Netzteil in der
Level-4-Hängeposition installiert werden.
Wenn drei 12-CM-Lüfter oben installiert sind, kann das Netzteil in der Hängeposition der Ebene 2
installiert werden.
Hinweis: Die berechnete Länge der Grafikkarte ist die Gesamtlänge inklusive PCI-E-Bracket.
Hinweis: Die Längenbegrenzung der Grafikkarte hängt von der Einbaurichtung des Netzteils ab.
Hinweis: Wenn 360 AIO unter der oberen Abdeckung installiert ist, wird empfohlen, eine Netzteillänge von
14 cm zu verwenden, um einen längeren Installationsraum für die Grafikkarte zu erhalten.
Deutsch

8
PSU installation steps
Installationsschritte für das Netzteil
Étapes d'installation du bloc d'alimentation
電源安裝步驟
Niveau-1
400mm
Niveau-3
342~360mm
342~360mm
Niveau-1
Niveau-3
335mm
342~360mm
Niveau-1
Niveau-3
335mm
335mm
Niveau-1
Niveau-3
335mm
/
level-1
400mm
level-3
342~360mm
342~360mm
level-1
level-3
335mm
342~360mm
level-1
level-3
335mm
335mm
level-1
level-3
335mm
/
Français
Alimentation adaptée au
Limite de longueur de la carte
graphique
Alimentation adaptée au
Limite de longueur de la carte
graphique
Lorsque la longueur de la carte graphique est inférieure ou égale à 330 mm, l'alimentation peut être
installée en position suspendue de niveau 4.
Lorsque trois ventilateurs de 12 cm sont installés sur le dessus, l'alimentation peut être installée en
position suspendue de niveau 2.
Remarque : La longueur calculée de la carte graphique est la longueur totale, y compris le support PCI-E.
Remarque : La limite de longueur de la carte graphique dépend du sens d'installation de l'alimentation.
Remarque : Si 360 AIO est installé sous le capot supérieur, il est recommandé d'utiliser une longueur
d'alimentation de 14 cm pour obtenir un espace d'installation de carte graphique plus long.
中文
水冷 電源
電源適合等級
顯卡限長
電源適合等級
顯卡限長
當顯卡長度≤330mm時,可將電源安裝於第4級掛位。
當頂部安裝3個12CM風扇時,可將電源安裝於第2級掛位。
注意:顯卡計算長度為包含PCI-E擋片的總長度。
注意:顯卡長度取決於電源安裝方向。
注意:頂部如果安裝360AIO,則建議搭配電源長度為14CM,可獲得較長的顯卡安裝空間。

9
PSU installation steps
Installationsschritte für das Netzteil
Étapes d'installation du bloc d'alimentation
電源安裝步驟
PSU installation / Netzteil-Installation / Installation du bloc d'alimentation /電源安裝
OR
Note: The power plugs need to be inserted into the power supply first, and then
installed on the front panel.
Hinweis: Die Netzstecker müssen zuerst in das Netzteil eingesteckt und dann an der
Frontplatte installiert werden.
Remarque : Les fiches d'alimentation doivent d'abord être insérées dans le bloc
d'alimentation, puis installées sur le panneau avant.
注意: 電源插頭需先插入電源,再安裝到前板。
x4
E
x4
E
①②
1-1
1-2


11
Cooling & Compatibility
Kühlung & Kompatibilität
Refroidissement et compatibilité
散熱兼容性說明
*Before installing the fan, it is recommended to route the cables at the back of the MB tray and connect
it with the motherboard, and then secure with the screws.
*Vor der Installation des Lüfters wird empfohlen, die Kabel an der Rückseite des MB-Einschubs zu
verlegen und mit dem Motherboard zu verbinden und dann mit den Schrauben zu befestigen.
*Avant d'installer le ventilateur, il est recommandé d'acheminer les câbles à l'arrière du plateau MB et de
le connecter à la carte mère, puis de le fixer avec les vis.
*安裝風扇前,建議先走背線並與主機板連接後,再鎖螺絲。
360mm
120mm*3
280mm
140mm*2
240mm
120mm
360mm
240mm
120mm
120mm*1
120mm*1
140mm*2
120mm*3
120mm

12
Graphics card Installation Steps
Installationsschritte für Grafikkarten
Étapes d'installation de la carte graphique
顯卡安裝步驟
Graphics card installation
/
Installation Grafikkarte
/
Installer la carte graphique
/安裝顯卡
Before installing the graphics card, it is recommended to plug the USB,
switch and other related cables to the motherboard /
Vor der Installation der Grafikkarte wird empfohlen, das USB-, Switch- und
andere zugehörige Kabel an das Motherboard anzuschließen /
Avant d'installer la carte graphique, il est recommandé de brancher les câbles
USB, commutateur et autres câbles connexes à la carte mère /
顯卡安裝前,建議先把USB,開關等相關線纜插到主機板上
1-1 1-2
1-3 1-4

13
1-1 1-2
1-3 1-4
Finish Installation
Beenden Sie die Installation
Terminer l'installation
結束安裝


www.jonsbo.com
-
 1
1
-
 2
2
-
 3
3
-
 4
4
-
 5
5
-
 6
6
-
 7
7
-
 8
8
-
 9
9
-
 10
10
-
 11
11
-
 12
12
-
 13
13
-
 14
14
-
 15
15
-
 16
16


dans d''autres langues
- English: JONSBO D31 User guide
- Deutsch: JONSBO D31 Benutzerhandbuch
Autres documents
-
Lian Li Lancool 205 Manuel utilisateur
-
Thermaltake Urban T81 Manuel utilisateur
-
-
Corsair AIR740 Carbide Series High Airflow Mid-tower Case Manuel utilisateur
-
NZXT H7 Flow RGB Gaming PC Cases Manuel utilisateur
-
Corsair Graphite 760T Guide d'installation
-
Thermaltake Core X1 Manuel utilisateur
-
-
Corsair Graphite Series™ 780T Guide d'installation