La page est en cours de chargement...

For Research Use Only. Not for use in diagnostic procedures.
Neon™ Transfection System
USER GUIDE
For transfecting mammalian cells, including primary and stem
cells, with high transfection eciency
Catalog Numbers MPK5000, MPK1025, MPK1096, MPK10025, MPK10096
Document Part Number 251055
Publication Number MAN0001557
Revision C.0

Life Technologies Corporation | 5781 Van Allen Way | Carlsbad, California 92008 USA
For descriptions of symbols on product labels or product documents, go to thermofisher.com/symbols-definition.
The information in this guide is subject to change without notice.
DISCLAIMER: TO THE EXTENT ALLOWED BY LAW, THERMO FISHER SCIENTIFIC INC. AND/OR ITS AFFILIATE(S) WILL NOT BE
LIABLE FOR SPECIAL, INCIDENTAL, INDIRECT, PUNITIVE, MULTIPLE, OR CONSEQUENTIAL DAMAGES IN CONNECTION WITH OR
ARISING FROM THIS DOCUMENT, INCLUDING YOUR USE OF IT.
Revision history: Pub. No. MAN0001557
Revision Date Description
C.0 7 Sep 2021 Minor correction to electroporation protocol
B.0 1 March 2021 Update for RoHS2 compliance and SKU list
A.0 11 July 2014 New document
Important Licensing Information: These products may be covered by one or more Limited Use Label Licenses. By use of these
products, you accept the terms and conditions of all applicable Limited Use Label Licenses.
TRADEMARKS: All trademarks are the property of Thermo Fisher Scientific and its subsidiaries unless otherwise specified.
©2021 Thermo Fisher Scientific Inc. All rights reserved.

Contents
■CHAPTER 1 Product information .................................................. 6
Product description ............................................................. 6
Features ................................................................... 6
Upon receiving the device ........................................................ 7
Unpacking instructions ...................................................... 7
Product contents ................................................................ 7
Neon™ transfection system contents .......................................... 7
Neon™ kit contents .......................................................... 8
System components ............................................................. 9
Neon™ device .............................................................. 9
Neon™ pipette station ...................................................... 10
Neon™ Kits ................................................................ 10
System overview ............................................................... 11
Description of parts ............................................................ 12
Neon™ device ............................................................. 12
Neon™ pipette ............................................................. 12
Neon™ pipette station ...................................................... 13
Neon™ tube ............................................................... 13
Neon™ tips ................................................................ 14
■CHAPTER 2 Methods ............................................................. 15
Getting started ................................................................ 15
Install the Neon™ device with pipette station .................................. 15
Register the device ........................................................ 17
Electroporation protocol options ............................................. 17
Input values limit .......................................................... 17
Input window ............................................................. 18
Database window .......................................................... 19
Optimization window ....................................................... 21
Upgrade the firmware ...................................................... 22
General guidelines ............................................................. 23
Recommended kits ........................................................ 23
Recommended buers ..................................................... 23
DNA quality and amount .................................................... 24
Neon™ Transfection System User Guide 3

siRNA quality and amount .................................................. 24
Controls .................................................................. 24
Using the Neon™ Transfection System ............................................ 25
Materials needed .......................................................... 25
Set up the Neon™ pipette station ............................................ 26
Prepare adherent cells ...................................................... 27
Prepare suspension cells ................................................... 28
Electroporation protocol .................................................... 29
Optimization .............................................................. 33
Cleaning and maintenance .................................................. 33
Optimization protocol for DNA and siRNA ......................................... 33
Materials needed .......................................................... 33
General guidelines ......................................................... 34
24-well optimization protocol for adherent and suspension cell lines—day one .... 34
18-well optimization protocol for primary suspension blood cells—day one ....... 36
Optimization protocol—day two ............................................. 38
Optional: optimization protocol—day three .................................... 40
■APPENDIX A Troubleshooting .................................................... 42
Troubleshooting ................................................................ 42
Neon™ device error messages ................................................... 46
■APPENDIX B Maintenance ....................................................... 47
Repackaging the instrument ..................................................... 47
Repackaging and storage instructions ........................................ 47
Replace the Pipette Gripper ..................................................... 48
■APPENDIX C Specifications ...................................................... 51
Product specifications .......................................................... 51
■APPENDIX D Related products .................................................. 52
Accessory products ............................................................ 52
Additional products ........................................................ 52
Cell culture media ......................................................... 53
siRNA .................................................................... 53
■APPENDIX E Safety ............................................................... 54
Safety information .............................................................. 54
Informational symbols .......................................................... 54
Informations de sécurité ........................................................ 55
Informational symbols .......................................................... 56
Contents
4Neon™ Transfection System User Guide

Chemical safety ................................................................ 57
Biological hazard safety ......................................................... 58
■APPENDIX F Documentation and support ...................................... 59
Customer and technical support ................................................. 59
Limited product warranty ........................................................ 59
Contents
Neon™ Transfection System User Guide 5

Product information
Product description
The Neon™ Transfection System is a novel, benchtop electroporation device that employs an
electroporation technology by using the pipette tip as an electroporation chamber to eciently transfect
mammalian cells including primary and immortalized hematopoietic cells, stem cells, and primary cells.
The Neon™ Transfection System eciently delivers nucleic acids, proteins, and siRNA into all
mammalian cell types including primary and stem cells with a high cell survival rate. The transfection is
performed using as few as 1 × 10⁴ or as many as 5 × 10⁶ cells per reaction using a sample volume of
10 µL or 100 µL in a variety of cell culture formats (60 mm, 6-well, 48-well, and 24-well).
The Neon™ Transfection System uses a single transfection kit (Neon™ Kit) that is compatible with
various mammalian cell types including primary and stem cells thereby avoiding the need to determine
an optimal buer for each cell type.
The Neon™ Transfection System oers open and transparent protocols that are optimized for ease of
use and simplicity. The Neon™ device is preprogrammed with one 24-well optimization protocol to
optimize conditions for your nucleic acid/siRNA and cell type, or you can program and store up to
50 cell-specific protocols in the Neon™ device database. Optimized protocols for many commonly used
cell types are also available at https://www.thermofisher.com/us/en/home/life-science/cell-culture/
transfection/neon-transfection-system/neon-transfection-system-cell-line-data.html to maximize
transfection eciencies for your cell types.
See “Description of parts” on page 12 for details on various parts of the system.
Features
Important features of the Neon™ Transfection System are listed below:
•User-friendly Neon™ device benchtop design that easily fits in your tissue culture hood for easy,
ecient transfection of a wide variety of mammalian cells including primary and stem cells
•Ability to transfect 1 × 10⁴–5 × 10⁶ cells per reaction in a sample volume of 10 µL or 100 µL in a
variety of cell culture formats (60 mm, 6-well, 48-well, and 24-well)
•Utilizes a single buer system for all cell types except primary suspension blood cells
•Simple touch screen interface for easy programming of electroporation parameters
•Available with one pre-programmed 24-well optimization protocol and the option to customize up
to 50 cell specific protocols
•Built-in safety features in the device to enhance user safety
1
6Neon™ Transfection System User Guide

Upon receiving the device
Examine the unit carefully for any damage incurred during transit. Any damage claims must be filed
with the carrier. The warranty does not cover in-transit damage. To register the device, activate your
warranty, and be notified of important updates, go to thermofisher.com.
Unpacking instructions
Consult the following instructions to unpack the Neon™ Transfection System. The weight of the Neon™
device is 13.2 pounds (6 kg).
1. Cut the plastic straps and remove the outer box. Save the outer box and other packaging material
(in case you need to transport or ship the unit).
2. Remove the plastic bag containing the manual, the Neon™ Pipette box containing the pipette, and
then remove the plastic bag containing the power cords from the box.
3. Remove the Neon™ device and the Neon™ pipette station from the box and place them on a flat,
level surface.
4. Set up the Neon™ Transfection System as described on page 15.
Product contents
Neon™ transfection system contents
The contents of the Neon™ Transfection Systems are listed in the following table. The Neon™
Transfection System is shipped at room temperature.
See page 12 for specifications and description of the Neon™ Transfection System, and page 15 to set
up the device.
Product Quantity
Neon™ Transfection Device 1
Specific Power Cord
(for US/Canada/Taiwan/Japan, Europe, and UK)
4
Neon™ Pipette 1
Neon™ Pipette Station 1
User Guide 1
USB Memory Device 1
Chapter 1 Product information
Upon receiving the device 1
Neon™ Transfection System User Guide 7

Neon™ kit contents
The Neon™ Kits are used with the Neon™ Transfection Systems for ecient transfection of mammalian
cells and are available as standalone products (see “Accessory products” on page 52). The kits
consist of two components which are not sold individually (a Tips/Tubes Kit, and a Buer Kit), and are
available in two formats (for electroporation of 10 µL samples, and 100 µL samples).
Neon™ Kit components are listed in the following table, and are shipped at room temperature.
After receiving the kit, store buers at 4℃ and tips/tubes at room temperature.
Catalog numbers that appear as links open the web pages for those products.
Item
Neon™ Kit, 10 µL Neon™ Kit, 100 µL
Cat. No.
MPK1025
(50 reactions)
Cat. No.
MPK1096
(192 reactions)
Cat. No.
MPK10025
(50 reactions)
Cat. No.
MPK10096
(192 reactions)
Tips/Tubes Kit MPK1025K MPK1096K MPK10025K MPK10096K
Neon™ Tips 25 tips (10 µL) 96 tips (10 µL) 25 tips (100 µL) 96 tips (100 µL)
Neon™ Tubes 5 20 5 20
Buer Kit MPK1025B MPK1096B MPK10025B MPK10096B
Resuspension Buer R
(Proprietary) 1 mL 3 × 1 mL 10 mL 30 mL
Resuspension Buer T
(Proprietary) 1 mL 3 × 1 mL 10 mL 30 mL
Electrolytic Buer E
(Proprietary) 75 mL 2 × 150 mL — —
Electrolytic Buer E2
(Proprietary) — — 75 mL 2 × 150 mL
Chapter 1 Product information
Product contents
1
8Neon™ Transfection System User Guide

System components
Neon™ device
The Neon™ device is a simple, user friendly benchtop electroporation device. It is used with the Neon™
Pipette Station and Neon™ Kits to eciently transfect mammalian cells including primary and stem
cells. See “Description of parts” on page 12 for details.
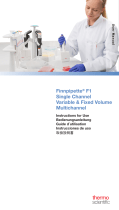
Front view
1
1Touchscreen
Rear view
2
1
3 4 5
6
1USB port panel for USB memory device (unscrew the
panel to access the port)
2High voltage port (connect to the high voltage
connector of the Neon™ Pipette Station)
3Sensor port (connect to the sensor connector of the
Neon™ Pipette Station)
4Power switch
5AC inlet (connect to the power cord, and plug into the
power outlet on the wall)
6Fan
Chapter 1 Product information
System components 1
Neon™ Transfection System User Guide 9

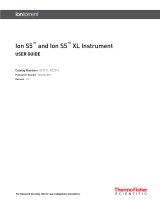
User interface
2
1
1Digital Display shows the protocol in use and various
protocol parameters
2Touchscreen buttons to operate the device
Neon™ pipette station
The Neon™ Pipette Station is a unique component of the system that holds the Neon™ Pipette during
electroporation, and protects the user from any electrical shock exposures. A high voltage and sensor
connector which connects the pipette station to the Neon™ device. See “Description of parts” on
page 12 for details.
3
2
1
1Connector cable
2Sensor connector
3High voltage connector
Neon™ Kits
The Neon™ Kits (not supplied with the device) contain the Neon™ Tips, Neon™ Tubes, and buers for
electroporation. The Neon™ Kits are available in two formats for electroporation of 10 µL or 100 µL
samples (See page 52 for ordering information). See page 12 for details on Neon™ Tips and Tubes.
Chapter 1 Product information
System components
1
10 Neon™ Transfection System User Guide

System overview
Unlike standard cuvette based electroporation, the Neon™ Transfection System uses a unique
electroporation reaction chamber, the Neon™ Tip that delivers a high electric field to the biological
sample. The Neon™ Tip maximizes the gap size between the two electrodes while minimizing the
surface area of each electrode. As a result, the sample experiences a more uniform electric field,
minimal pH change, less ion formation, and negligible heat generation.
This next generation electroporation technology overcomes many of the limitations associated with
standard cuvette based electroporation thereby increasing transfection eciency and cell viability, and
providing an ergonomic workflow.
The transfection occurs in the uniquely designed Neon™ Tip using simple 3-step procedure.
1. Load a mixture of harvested cells and molecules to be delivered (e.g., DNA, RNA, siRNA) into the
Neon™ Tip.
2. Plug the Neon™ Pipette with Neon™ Tip into position in the Neon™ Pipette Station with Neon™
Tube; select your protocol on the device, and press Start.
3. Unplug the Neon™ Pipette and transfer your transfected cells into a tissue culture vessel containing
the appropriate medium.
Chapter 1 Product information
System overview 1
Neon™ Transfection System User Guide 11

Description of parts
Neon™ device
The Neon™ Device employs the pipette tip as an electroporation chamber to eciently transfect
mammalian cells including primary and immortalized hematopoietic cells, stem cells, and primary cells.
The device is preprogrammed with a 24-well optimization protocol and supports a database to store up
to 50 user-specified protocols.
See page 9 for a front and rear view of the device.
Neon™ pipette
The Neon™ Pipette utilizes a positive displacement pipette mechanism for pipetting mixtures containing
cells and nucleic acid or siRNA. The Neon™ Pipette is a fixed volume pipette and permanently calibrated
at the manufacturing stage and does not require any further calibration.
The Neon™ Pipette is designed for use with Neon™ Tips only. Do not use any other tips with the
Neon™ Pipette.
Chapter 1 Product information
Description of parts
1
12 Neon™ Transfection System User Guide

Neon™ pipette station
The Neon™ Pipette Station holds a Neon™ Pipette during electroporation procedures. The Neon™
Pipette Station is equipped with many safety sensors and protection mechanisms that protect the
user from any exposures to an electrical shock. The Neon™ Pipette Station is connected to the Neon™
device using the high voltage and sensor connector (see page 15 for details).
The Neon™ Pipette Station also holds the Neon™ Tube which has an electrode near the bottom that
transfers the electric field from the electrode inside the Neon™ Tip.
1
2
3
1Connector cable
2Area to insert the Neon™ Tube
3Neon™ Pipette Station
Neon™ tube
The Neon™ Tube holds the Electrolytic Buer during electroporation and is inserted into the Neon™
Pipette Station. The Neon™ Pipette with the Neon™ Tip is then inserted into the Neon™ Tube which has
an electrode near the bottom that transfers the electric field from the electrode inside the Neon™ Tip.
The Neon™ Tubes are supplied with Neon™ Kits as well as available separately (see page 52).
To avoid contamination, we strongly recommend using the tubes for a maximum of 10 times only.
We recommend changing tube and buer when switching to a dierent plasmid DNA/siRNA or cell
type.
Tube Specifications:
Material: Polystyrene
Capacity: 2.5–4 mL
1
2
1Electrode
2Buer
Chapter 1 Product information
Description of parts 1
Neon™ Transfection System User Guide 13

Neon™ tips
The Neon™ Tips are disposable tips composed of a tip and piston used with the Neon™ Pipette. The
Neon™ Tips contain a gold-plated electrode to create a disposable electric chamber for the delivery of a
high electric field to biological samples. The Neon™ Tips are supplied with Neon™ Kits in two formats to
support operating volumes of 10 µL and 100 µL, respectively (see page 52 for ordering information).
To ensure repeatability and eliminate variation of the transfection conditions within or between
experiments, we recommend that you do not use the Neon™ Tip for more than 2 times. Oxide
formation at the piston surface area can be generated if the tips are used more than 2 times, which
decreases electrode function of the piston.
Tip specifications:
Material: Polypropylene
Capacity: 10 µL or 100 µL
1
2
3
4
1Mounting stem
2Piston
3Gold electrode
4Tip
Chapter 1 Product information
Description of parts
1
14 Neon™ Transfection System User Guide

Methods
Getting started
Install the Neon™ device with pipette station
1. Unpack the Neon™ device as instructed in “Unpacking instructions” on page 7.
2. Four power cords are shipped with the device to ensure that the cord you use is compatible
with your local socket format.
3. Place the Neon™ device on a level laboratory bench. Keep the area around the unit clear to ensure
proper ventilation of the unit.
Note: The Neon™ device has a small footprint and can be easily set up in the tissue culture hood
for convenience.
4. For your safety: Position the device properly such that the power switch and AC inlet located on
the rear of the unit (see page 9) are easily accessible. Be sure to position the device such that it is
easy to disconnect the unit.
Note: Since Neon™ device is air-cooled, its surface may become hot during operation. When
installing the device, leave a space of more than 10 cm from the back of the device.
5. Place the Neon™ Pipette Station near the Neon™ device.
2
Neon™ Transfection System User Guide 15

6. Connect the high voltage and sensor connector on the Neon™ Pipette Station to high voltage port
and sensor port on the rear side of Neon™ device, respectively.
Be sure to align the ridge indicated by a white arrow on the sensor connector on the Neon™ Pipette
Station with a groove indicated by a white dot on the sensor port of the Neon™ device (see figure
for details).
IMPORTANT! To connect or disconnect the sensor connector to the Neon™ device, always
handle the sensor connector using the cord plug and not the cord cable.
7. Ensure the AC power switch is in the O position ( see page 9).
Chapter 2 Methods
Getting started
2
16 Neon™ Transfection System User Guide

8. Attach the power cord to the AC inlet on the rear of the Neon™ device and then to the electrical
outlet. Use only properly grounded AC outlets and power cords.
9. To turn on the power, press the main power switch on the rear of the unit to ON position. The
digital display shows start up screen (see page 17).
10. The Neon™ device is operated by the touch screen on the front of the device. You can easily input
electroporation parameters by lightly touching the touch screen with a fingertip or a touch screen
pen. See 17 for details.
You are ready to use the Neon™ Transfection System. See page 25 for details.
Register the device
Visit thermofisher.com to register the device and activate your warranty or extended warranty, and
ensure that you receive product updates, special oers, and faster service.
Electroporation protocol options
There are three options to select an electroporation protocol for your cell type:
•If you already have the electroporation parameters for your cell type, input the parameters in the
Input Window (see page 17).
•If you wish to add cell-specific electroporation parameters to the database on the device for future
use, input the parameters in the Database Window (see page 19). You can also view our library
of protocols for commonly used cell types from thermofisher.com and in put the parameters in the
Database Window (see below) for various cell types.
•If you do not have any specific electroporation parameters for your cell type and wish to perform
optimization, use the Optimization Window (see page 21).
Input values limit
The Neon™ device is designed to only input certain values and limits for each value are listed below. If
your input value exceeds the maximum value, an error is displayed.
Input Voltage range: 500–2,500 V
Input Pulse Width range: 1–100 ms
Input Pulse Number range: 1–10
Chapter 2 Methods
Getting started 2
Neon™ Transfection System User Guide 17

Input window
To create a cell specific protocol, if you already have the electroporation parameters for your cell type:
1. Press the power switch (located at the rear of the unit, see page 9) to turn ON the Neon™ device.
The unit checks to ensure that the Neon™ Pipette Station is connected to the device and then the
start up screen is displayed.
2. Press Voltage to activate the number key pad to input voltage value. Press the desired voltage
value and press Done to save the value.
Note: If any input value is out of the limit, an error message is displayed and the lowest value of
limit is automatically set.
3. Press Width to activate the number key pad to input width value. Press the desired width value
and press Done to save the value.
4. Press Pulses to activate the number key pad to input pulse value. Press the desired pulse value
and press Done to save the value.
5. If you wish to save these electroporation parameters, press Save on the main screen to save the
protocol in the database.
Chapter 2 Methods
Getting started
2
18 Neon™ Transfection System User Guide

6. Press the desired protocol number button to edit the protocol. The selected protocol is highlighted.
7. Once the Edit screen is displayed, enter the User name by pressing the key pad buttons. The
cursor automatically moves to the next field Protocol and is highlighted red.
Continue to enter the information for Voltage, Width, and Pulse.
8. Press Enter to save the information in the database.
9. Proceed to preparing cells (see pages 27–28) and DNA, and setting up the Neon™ Pipette
Station for electroporation (see page 25).
Database window
Enter cell-specific protocols into the database. The database can store up to 50 cell-specific protocols.
1. Press the power switch (located at the rear of the unit, see page 9) to turn ON the Neon™ device.
The unit checks to ensure that the Neon™ Pipette Station is connected to the device and then the
start up screen is displayed.
2. Press Database button to start the database window. To scroll through the protocols in the
database, use the right/left scroll buttons near the Database button.
Chapter 2 Methods
Getting started 2
Neon™ Transfection System User Guide 19

The Database window shows:
•Number button: Indicates protocol number
•User and Protocol: Displays the user and protocol name
•Parameters (Voltage, Width, Pulse): Displays the electroporation parameter for each protocol
•Function buttons (Load, Edit, and Delete): Used to load, edit, or delete a protocol. The
function buttons are activated only after a protocol is selected.
•Page scroll: To scroll to or
3. Press the desired protocol number button to edit the protocol. The selected protocol is highlighted.
4. Once the Edit screen is displayed, enter the User name by pressing the key pad buttons. The
cursor automatically moves to the next field Protocol and is highlighted red.
Continue to enter the information for Voltage, Width, and Pulse.
If you wish to password protect the protocol, enter the Password (up to 7 characters) and Repeat
Password information using the key pad.
Chapter 2 Methods
Getting started
2
20 Neon™ Transfection System User Guide
/