
Manuel de montage
Ecran de projection motorisé
Référence : 042-3XXX

1
Informations de sécurité et d‘utilisation
Veuillez lire attentivement ces consignes de sécurité
• Veuillez lire et comprendre les instructions avant d’installer et d’utiliser l’écran de
projection.
• Veuillez surveiller attentivement l’écran pendant l’utilisation ou lorsqu’il est
à proximité d’enfants. Ne laissez pas l’écran sans surveillance pendant son
utilisation.
• La personne qui procède à l’installation doit vérifier que les structures de fixation
du support soient assez résistantes pour sécuriser l’écran afin que des vibrations
ou des coups sur la surface ne fassent pas tomber ou bouger l’écran.
• Ne manipulez pas l’écran si le câble est endommagé ou si l’écran est tombé où a
été endommagé. Attendez qu’il ait été observé et réparé par une personne
qualifiée.
• Ne posez ou n’attachez rien à la structure en métal ou à la surface de l’écran.
• Positionnez le câble d’alimentation de sorte à ce que personne ne trébuche
dessus ou ne le tire et ne le placez pas à proximité de surfaces chaudes.
• Ne branchez pas le câble avec des mains mouillées, il y aurait un risque
d’électrocution.
• Ne coupez ou ne retirez la troisième broche du câble d’alimentation sous aucune
circonstance. Pour votre propre sécurité, cet écran doit être bien alimenté.
• Veillez à toujours débrancher l’écran du courant avant de le nettoyer, de le
réparer et lorsqu’il est éteint. Ne retirez jamais le câble en tirant dessus sans
prendre la fiche.
• Afin de réduire le risque d’électrocution, s’il nécessite une réparation, ne
démontez pas l’écran tant qu’il n’a pas été observé par un technicien qualifié. Un
démontage incorrect peut causer une électrocution quand vous l’utiliserez.
Consignes de sécurité pour le câble et la fiche :
• La longueur du câble d’alimentation utilisé avec cet écran est ainsi afin de réduire
les risques que quelqu’un ne trébuche dessus ou ne s’emmêle dedans.
• Nous vous déconseillons fortement d’utiliser une rallonge.
• Si une rallonge est nécessaire, il faut qu’elle soit homologuée, que ce soit un câble
polarisé avec une fiche polarisée et que la prise courant soit adaptée. La
puissance électrique de la rallonge doit être égale ou supérieure à celle de l’écran.
• Veillez à toujours débrancher l’écran du courant avant de le nettoyer, de le
réparer et lorsqu’il est éteint. Ne retirez jamais le câble en tirant dessus sans
prendre la fiche.
• Veuillez toujours brancher l’écran à une prise de terre. La prise courant doit
être située à côté de l’écran et doit être facilement accessible.

2
Informations techniques
Installation
Tension : 100V – 120V, 60Hz
ou 220V – 240V, 50Hz
Consommation : 130W (Max)
0,4W (en mode veille)
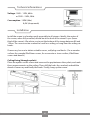
Installez l’écran dans un endroit facilement accessible à tous les spectateurs. Idéale-
ment, le centre de l’écran, une fois complètement déroulé, devrait être à la hauteur
des yeux des spectateurs (Tiers inférieur de la toile). Nous vous conseillons de mettre
le bas de l'image entre 80 et 120cm. L’écran peut être vissé à un mur comme sur un
plafond, ou alors accroché au plafond via des crochets.
Si besoin, veillez à vous procurer des vis, des chevilles et des crochets adéquats.
(Pour une surface en bois, par exemple des vis Ø4x50mm, pour une surface en béton
ou en pierre, des vis et des chevilles Ø 6x50mm)
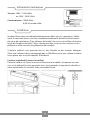
Fixation au plafond (à travers les œillets)
Placez les œillets sur l’écran et mesurez l’écart entre les œillets, et reportez ces mes-
ures sur le plafond. Ensuite, percez les trous ainsi marqués, et rajouter les chevilles si
nécessaire et enfi n les crochets. Enfin, accrochez l’écran.

Installation
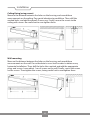
Fixation au plafond (à l’aide de vis)
Mesurer l’écart entre les trous sur le carter, et reportez ces mesures sur le plafond.
Prêtez une attention particulière au parallélisme. Ensuite, percez les trous ainsi mar-
qués, et rajouter les chevilles si nécessaire. Enfi n, fi xez l’écran au plafond à l’aide de vis.
Veillez à ne pas les serrer trop fort.
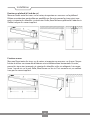
Fixation au mur
Mesurez l’écart entre les trous sur le carter, et reportez ces mesures sur le mur. Ne pas
hésiter à utiliser un niveau afin d’obtenir une installation bien horizontale. Ensuite,
percez les trous ainsi marqués, et rajouter les chevilles et les vis adéquats. Laissez en-
viron 1 cm de vis sur le mur. Enfin, fi xez l’écran sur les vis. Puis serrez les vis, en veillant
à ne pas les serrer trop fort.
3

Utilisation
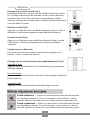
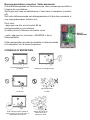
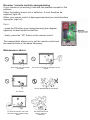
Pilotage avec le boitier mural (Fig.1)
Branchez la fiche dans une prise murale (Veillez à la tension correc-
te). Le câble ne devrait pas être étendu sur des surfaces blanches
ou tendu. Dans le cas d’une utilisation d’une rallonge, veillez à
observer la bonne tension électrique. Le boitier doit être fixé avec la
sortie de câble sur le bas.
Dérouler la toile (Fig.2)
Appuyez sur le bouton avec une fl èche indiquant le bas. La toile se
déroule et s’arrêtera automatique au point de butée inférieur.
Enrouler la toile (Fig.3)
Appuyez sur le bouton avec une flèche indiquant le haut. La toile
s’enroulera et s’arrêtera automatiquement au point de butée
supérieur.
Stopper la course de la toile
Pour arrêter la course de la toile à tout moment, appuyer sur le
bouton « stop » au milieu des flèches.
Pilotage à partir de la télécommande (radio fréquence) (Fig.4)
Dérouler la toile
Appuyez sur la touche du bas et la toile se déroule jusqu’au point
de butée inférieur.
Enrouler la toile
Appuyez sur la touche du haut et la toile s’enroule jusqu’au point de
butée supérieur.
Stopper la toile
Appuyez sur la touche du milieu et la toile stoppe sa course.
4
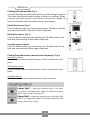
Limite inférieure — Ajustez le niveau d'arrêt de la barre de leste lorsqu'elle
est complètement déployée. Tournez l'interrupteur « limite inférieure » dans le
sens des aiguilles d'une montre pour que la barre de leste se rapproche du sol.
Limite supérieure — Ajustez le niveau d'arrêt de la barre de leste lorsqu'elle
est complètement rétractée. Tourner l'interrupteur « limite supérieure » dans le
sens des aiguilles d'une montre pour que la barre de leste se rapproche du carter.

Ne pas toucher la toile avec
les mains
Ne pas utiliser de produits
chimiques ou détergents pour
Reprogrammation récepteur / télécommande
Si votre télécommande ne fonctionne pas, deux causes peuvent être à
l'origine de ce problème :
Soit la pile est usée ou défectueuse. Il faut donc la remplacer (lumière
off).
Soit votre télécommande est déprogrammée et il faut donc procéder à
une reprogrammation (lumière on).
Pour cela :
-appuyez une fois sur le bouton S4 de
reprogrammation (voir schéma
ci-contre) situé à l'intérieur du boitier mural.
-enfin, appuyez sur le bouton « MONTÉE » de la
télécommande.
Cette manipulation permet de remettre la télécommande
et le récepteur sur la même fréquence.
CONSEILS D’ENTRETIEN
Ne pas écrire ou dessiner
sur la toile
Ne pas démonter
le carte
r
Utiliser de l’eau et un
chiffon doux pour
nettoyer le carter
Pour nettoyer la toile, utiliser un
chiffon doux avec de l’eau claire ou
légèrement savonneuse

Installation manual
Motorized projection screen
Reference : 042-3XXX

1
Safety and usage information
Please read these safety instructions carefully
•Please read and understand the instructions before installing and using the
projection screen.
•Please carefully monitor the display during use or when it is near children. Do not
leave the display unattended while in use.
•The person carrying out the installation should verify that the support fixing
structures are strong enough to secure the screen so that vibrations or knocks on
the surface do not cause the screen to fall or move.
•Do not handle the screen if the cable is damaged or if the screen has been
dropped or damaged. Wait until it has been observed and repaired by a qualified
person.
•Do not place or attach anything to the metal frame or screen surface.
•Position the power cable so that no one can trip over it or pull it, and do not place
it near hot surfaces.
•Do not connect the cable with wet hands, there is a risk of electric shock.
•Do not cut or remove the third prong from the power cable under any
circumstances. For your own safety, this display must be properly powered.
•Always unplug the display from power before cleaning, repairing and when it is
turned off. Never remove the cable by pulling on it without taking the plug.
•To reduce the risk of electric shock, if it requires service, do not disassemble the
display until it has been observed by a qualified technician. Improper
disassembly can cause electric shock when in use.
Safety instructions for cable and plug:
•The length of the power cable used with this display is designed to reduce the
risk of someone tripping over or entangled in it.
•We strongly advise against using an extension cord.
•If an extension cord is required, it must be Listed, a polarized cable with a
polarized plug, and a suitable outlet. The electrical power of the extension cord
must be equal to or greater than that of the screen.
•Always unplug the display from power before cleaning, repairing and when it is
turned off. Never remove the cable by pulling on it without taking the plug.
•Always connect the display to a grounded outlet. The socket must be located
next to the screen and must be easily accessible.

2
Technical informations
Installation
Voltage : 100V – 120V, 60Hz
or 220V – 240V, 50Hz
Consumption : 130W (Max)
0,4W (sleep mode)
Install the screen in a location easily accessible to all viewers. Ideally, the center of
the screen, when fully unrolled, should be at the level of the viewers' eyes (lower
third of the canvas). We advise you to put the bottom of the image between 80 and
120cm. The screen can be screwed to a wall or a ceiling, or hung from the ceiling via
hooks.
If necessary, be sure to obtain suitable screws, wall plugs and hooks. (For a wooden
surface, for example Ø4x50mm screws, for a concrete or stone surface, Ø 6x50mm
screws and dowels)
Ceiling fixing (through eyelets)
Place the eyelets on the screen and measure the gap between the eyelets, and mark
those measurements on the ceiling. Then, drill the holes thus marked, and add the
dowels if necessary and finally the hooks. Finally, hang up the screen.

Installation
Ceiling fixing (using screws)
Measure the distance between the holes on the housing, and record these
measurements on the ceiling. Pay special attention to parallelism. Then, drill the
marked holes, and add the dowels if necessary. Finally, secure the screen to the
ceiling with screws. Be careful not to over tighten them.
Wall mounting
Measure the distance between the holes on the housing, and record these
measurements on the wall. Do not hesitate to use a level in order to obtain a very
horizontal installation. Then, drill the holes thus marked, and add the appropriate
plugs and screws. Leave about 1 cm of screws on the wall. Finally, secure the screen
on the screws. Then tighten the screws, being careful not to overtighten them.
3

Utilization
Piloting with the wall box (Fig.1)
Connect the plug to a wall socket (make sure the voltage is correct).
The cable should not be laid on white surfaces or stretched. When
using an extension cord, be sure to observe the correct voltage. The
box must be fixed with the cable outlet on the bottom.
Unroll the canvas (Fig.2)
Press the button with an arrow pointing down. The fabric unwinds
and will automatically stop at the lower stop point.
Roll up the canvas (Fig.3)
Press the button with an arrow pointing up. The fabric will roll up
and stop automatically at the upper stop point.
Stop the canvas' course
Press the button with an arrow pointing up. The fabric will roll up
and stop automatically at the upper stop point.
Control from the remote control (radio frequency) (Fig.4)
Unroll the canvas
Press the lower button and the canvas unrolls to the lower stop
point.
Roll up the canvas
Press the lower button and the canvas unrolls to the lower stop
point.
Stop the canvas
Press the middle button and the canvas stops its course.
4
Lower limit — Adjust the stopping level of slat when
fully extend. Turn”lower limit” switch in clockwise direction
let the slat go closer to the ground.
Upper limit — Adjust the stopping level of slat when fully
retract. Turn”upper limit” switch in clockwise direction let the
slat go closer to the casing.

Receiver / remote control reprogramming
If your remote is not working, there are two possible causes for this
problem:
Either the battery is worn out or defective. It must therefore be
replaced (light off).
Either your remote control is deprogrammed and you must therefore
reprogram (light on).
For it :
- press the S4 button once reprogramming (see diagram
opposite) located inside the wall box.
- finally, press the "UP" button on the remote control.
This manipulation allows you to put the remote control and
the receiver back on the same frequency.
Don't touch the canvas with
you hands
Do not use chemicals or detergent for the
canvas
Do not write or draw on
the canvas
Do not disassemble the crankcase
Use water and a soft
cloth to clean the
crankcase
To clean the canvas, use a soft
cloth with clear or slightly soapy
water
Maintenance advice
-
 1
1
-
 2
2
-
 3
3
-
 4
4
-
 5
5
-
 6
6
-
 7
7
-
 8
8
-
 9
9
-
 10
10
-
 11
11
-
 12
12


dans d''autres langues
- English: Kimex 042-3415 Installation guide

