Black & Decker BSV2020 Le manuel du propriétaire
- Catégorie
- Aspirateurs
- Taper
- Le manuel du propriétaire

Please read before returning this product for any reason.
Àlire avant de retourner ce produit pour quelque raison que ce soit.
Lea el manual antes de devolver este producto por cualquier motivo.
INSTRUCTION MANUAL
MODE D’EMPLOI
MANUAL DE INSTRUCCIONES
final page size: 8.5 x 5.5 in
20V MAX* 3 IN 1 CORDLESS VACUUM
ASPIRATEUR SANS FIL 3 EN 1 20VMAX*
ASPIRADORA INALÁMBRICA 3 EN 1 20V MÁX*
BSV2020
BSV2020A
BSV2020P

ENGLISH
English (original instructions) 1
Français (traduction de la notice d’instructions originale) 12
Español (traducido de las instrucciones originales) 24
To register your new product, visit
www.BlackandDecker.com/NewOwner
Consulter le site Web www.BlackandDecker.com/NewOwner
pour enregistrer votre nouveau produit.
Visite www.BlackandDecker.com/NewOwner para registrar su
nuevo producto.
Thank you for choosing BLACK+DECKER!
If you have a question or experience a problem with your BLACK+DECKER
purchase, go to: http://www.blackanddecker.com/instantanswers
If you can’t find the answer or do not have access to the Internet,
call 1-800-544-6986 from 8 a.m. to 5 p.m. EST Mon. – Fri. to speak
with an agent. Please have the CATALOG NUMBER available when you call.

ENGLISH
1
6
7
11
1
4
2
3
17
16
9
10
5
12
8
8
English (original instructions)
DEFINITIONS: SAFETY ALERT SYMBOLS AND WORDS
This instruction manual uses the following safety alert symbols and words to alert you to hazardous situations and your risk
of personal injury or propertydamage.
DANGER: Indicates an imminently hazardous situation which, if not avoided, will result in death
or seriousinjury.
WARNING: Indicates a potentially hazardous situation which, if not avoided, could result in
death or seriousinjury.
CAUTION: Indicates a potentially hazardous situation which, if not avoided, may result in minor
or moderateinjury.
(Used without word) Indicates a safety relatedmessage.
NOTICE: Indicates a practice not related to personal injury which, if not avoided, may result in
propertydamage.
Fig. A
1
ON/OFF button
2
Variable power switch
3
Main handle
4
Floor brush ON/OFF button
5
Vacuum inlet
6
Charge port
7
Extension tube
8
Accessory release latch
9
Filter agitator wheel
10
Lift away dust canister
11
Floor brush
12
LED worklight
13
Small crevice tool
14
6 brush tool
15
Pet hair tool
16
Battery pack
17
Battery release button
18
Charger
19
Cup Charger
20
Charging station
21
Retaining tabs
14
15
13
18
19
20
21

ENGLISH
2
IMPORTANT SAFETY
INSTRUCTIONS
When using an electrical appliances, basic precautions should
always be followed, including the following:
READ ALL
INSTRUCTIONS BEFORE
USING THISAPPLIANCE.
WARNING: Read all safety warnings
and all instructions. Failure to follow the warnings
and instructions listed below may result in electric
shock, fire and/or seriousinjury.
WARNING: Some household dust
contains chemicals known to the State of California to
cause cancer, birth defects or other reproductive harm
such as asbestos and lead in lead basedpaint.
WARNING: Do not attempt to modify or
repair theappliance.
WARNING: Do not charge the battery
at ambient temperatures below 39°F (4°C) or above
104°F (40°C). Follow all charging instructions and do
not charge the appliance outside of the temperature
range specified in the instructions. Charging
improperly or at temperatures outside of the specified
range may damage the battery and increase risk
offire.
WARNING: To reduce the risk of fire,
electrical shock or injury:
• Shock Hazard. To protect against risk of electrical shock,
do not put charging base in water or otherliquid.
• Do not allow to be used as a toy. Close attention is
necessary when used by or nearchildren.
• Use only as described in this manual. Use only
manufacturer’s recommendedattachments.
• Do not use with damaged cord or plug. If appliance is
not working as it should, has been dropped, damaged,
left outdoors, or dropped into water, return it to a
servicecenter.
• Do not pull or carry by cord, use cord as a handle, close a
door on cord, or pull cord around sharp edges or corners.
Do not run appliance over cord. Keep cord away from
heatedsurfaces.
• Do not unplug by pulling on cord. To unplug, grasp the
plug, not thecord.
• Do not handle charger, including charger plug, and
charger terminals with wethands.
• Do not put any object into openings. Do not use with any
opening blocked; keep free of dust, lint, hair, and anything
that may reduce airflow.
• Keep hair, loose clothing, fingers, and all parts of body
away from openings and movingparts.
• Use extra care when cleaning onstairs.
• Do not use to pick up flammable or combustible liquids,
such as gasoline, or use in areas where they may
bepresent.
• Do not pick up anything that is burning or smoking, such
as cigarettes, matches, or hotashes.
• Do not use without dust bag and/or filters inplace.
• Do not charge the unitoutdoors.
• Use only the charger supplied by the manufacturer
torecharge.
• Do not incinerate the appliance even if it is severely
damaged. The batteries can explode in afire.
• This appliance is intended for household use only and not
for commercial or industrialuse.
• Do not allow the cord to hang over the edge of a table or
counter or touch hot surfaces. The unit should be placed
or mounted away from sinks and hotsurfaces.
• Plug the charger directly into an electricaloutlet.
• Use the charger only in a standard electrical outlet
(120V/60Hz).
• Unplug the charger from outlet before any routine
cleaning ormaintenance.
• Do not look into the air vents when the unit is switched
on, as sometimes there is a possibility of small debris being
discharged from the air vents, especially after cleaning
/ replacement of the filters as debris inside the unit can
bedisturbed.
• Leaks from battery cells can occur under extreme
conditions. If the liquid, which is a 20-35% solution of
potassium hydroxide, gets on the skin (1) wash quickly
with soap and water or (2) neutralize with a mild acid
such as lemon juice or vinegar. If the liquid gets into
the eyes, flush them immediately with clean water for a
minimum of 10 minutes. Seek medicalattention.
ADDITIONAL SAFETY WARNINGS
a ) Prevent unintentional starting. Ensure the
switch is in the off-position before picking up or
carrying the appliance. Carrying the appliance with
your finger on the switch or energizing appliance that
have the switch on invitesaccidents.
b ) Disconnect the battery pack from the appliance
before making any adjustments, changing
accessories, or storing appliance. Such preventive
safety measures reduce the risk of starting the
appliance accidentally.
WARNING! Read all safety warnings
and all instructions. Failure to follow the warnings
and instructions may result in electric shock, fire and/
or seriousinjury.
WARNING: To reduce the risk of injury,
read the instructionmanual.

ENGLISH
3
c ) Recharge only with the charger specified by the
manufacturer.
A charger that is suitable for one type
of battery pack may create a risk of fire when used
with another batterypack.
d ) Use appliance only with specifically designed
battery packs. Use of any other battery packs may
create a risk of injury and fire.
e ) When battery pack is not in use, keep it away
from other metal objects, like paper clips, coins,
keys, nails, screws or other small metal objects,
that can make a connection from one terminal to
another. Shorting the battery terminals together may
cause burns or a fire.
f ) Under abusive conditions, liquid may be ejected
from the battery; avoid contact. If contact
accidentally occurs, flush with water. If liquid
contacts eyes, additionally seek medical help.
Liquid ejected from the battery may cause irritation
or burns.
g ) Do not use a battery pack or appliance that
is damaged or modified.
Damaged or modified
batteries may exhibit unpredictable behavior resulting
in fire, explosion or risk ofinjury.
h ) Do not expose a battery pack or appliance
to fire or excessive temperature. Exposure to
fire or temperature above 266°F (130°C) may
causeexplosion.
i ) Follow all charging instructions and do not
charge the battery pack or appliance outside
of the temperature range specified in the
instructions. Charging improperly or at
temperatures outside of the specified range may
damage the battery and increase the risk of fire.
j ) Have servicing performed by a qualified repair
person using only identical replacement parts.
This will ensure that the safety of the product
ismaintained.
k ) Do not modify or attempt to repair the
appliance or the battery pack except as indicated
in the instructions for use and care.
SAVE THESE
INSTRUCTIONS
Important Safety Instructions for
All Battery Packs
WARNING: Read all safety warnings
and all instructions for the battery pack, charger
and power tool. Failure to follow the warnings
and instructions may result in electric shock, fire
and/or seriousinjury.
• Do not charge or use the battery pack in explosive
atmospheres, such as in the presence of flammable
liquids, gases or dust. Inserting or removing the battery
pack from the charger may ignite the dust orfumes.
• NEVER force the battery pack into the charger. DO
NOT modify the battery pack in any way to fit into
a non-compatible charger as battery pack may
rupture causing serious personal injury. Consult
the chart at the end of this manual for compatibility of
batteries andchargers.
• Charge the battery packs only in designated
BLACK+DECKERchargers.
• DO NOT splash or immerse in water or otherliquids.
• Do not store or use the tool and battery pack in
locations where the temperature may reach or
exceed 104°F (40°C) (such as outside sheds or metal
buildings in summer). For best life store battery packs in
a cool, drylocation.
NOTE: Do not store the battery packs in a tool with
the trigger switch locked on. Never tape the trigger
switch in the ONposition.
• Do not incinerate the battery pack even if it is severely
damaged or is completely worn out. The battery pack
can explode in a fire. Toxic fumes and materials are created
when lithium ion battery packs areburned.
• If battery contents come into contact with the skin,
immediately wash area with mild soap and water. If
battery liquid gets into the eye, rinse water over the open
eye for 15 minutes or until irritation ceases. If medical
attention is needed, the battery electrolyte is composed of
a mixture of liquid organic carbonates and lithiumsalts.
• Contents of opened battery cells may cause
respiratory irritation. Provide fresh air. If symptoms
persist, seek medicalattention.
WARNING: Burn hazard. Battery liquid
may be flammable if exposed to spark orflame.
WARNING: Fire hazard. Never attempt
to open the battery pack for any reason. If the battery
pack case is cracked or damaged, do not insert into
the charger. Do not crush, drop or damage the battery
pack. Do not use a battery pack or charger that has
received a sharp blow, been dropped, run over or
damaged in any way (e.g., pierced with a nail, hit
with a hammer, stepped on). Damaged battery packs
should be returned to the service center forrecycling.
Transportation
WARNING:
Fire hazard. Do not store
or carry the battery pack so that metal objects can
contact exposed battery terminals. For example,
do not place the battery pack in aprons, pockets, tool
boxes, product kit boxes, drawers, etc., with loose
nails, screws, keys, etc. Transporting batteries
can possibly cause fires if the battery terminals
inadvertently come in contact with conductive
materials such as keys, coins, hand tools and the
like. The US Department of Transportation Hazardous
Material Regulations (HMR) actually prohibit
transporting batteries in commerce or on airplanes in
carry-on baggage UNLESS they are properly protected
from short circuits. So when transporting individual
battery packs, make sure that the battery terminals are
protected and well insulated from materials that could
contact them and cause a shortcircuit.

ENGLISH
4
The RBRC® Seal
The RBRC® (Rechargeable Battery
Recycling Corporation) Seal on the
nickel cadmium, nickel metal hydride or
lithium-ion batteries (or battery packs)
indicates that the costs to recycle these batteries (or battery
packs) at the end of their useful life have already been
paid by BLACK+DECKER. In some areas, it is illegal to place
spent nickel cadmium, nickel metal hydride or lithium-ion
batteries in the trash or municipal solid waste stream and
the Call2Recycle® program provides an environmentally
consciousalternative.
Call 2 Recycle, Inc., in cooperation with BLACK+DECKER
and other battery users, has established the program in
the United States and Canada to facilitate the collection
of spent nickel cadmium, nickel metal hydride or lithium-
ion batteries. Help protect our environment and conserve
natural resources by returning the spent nickel cadmium,
nickel metal hydride or lithium-ion batteries to an authorized
BLACK+DECKER service center or to your local retailer for
recycling. You may also contact your local recycling center
for information on where to drop off the spent battery.
RBRC® is a registered trademark of Call 2 Recycle,Inc.
Important Safety Instructions for All
Battery Chargers
WARNING: Read all safety warnings
and all instructions for the battery pack, charger
and power tool. Failure to follow the warnings
and instructions may result in electric shock, fire
and/or seriousinjury.
• DO NOT attempt to charge the battery pack with
any chargers other than the ones in this manual.
The charger and battery pack are specifically designed to
worktogether.
• These chargers are not intended for any uses other
than charging BLACK+DECKER rechargeable
batteries. Any other uses may result in risk of fire, electric
shock orelectrocution.
• Do not expose the charger to rain orsnow.
• Pull by the plug rather than the cord when
disconnecting the charger. This will reduce the risk of
damage to the electric plug andcord.
• Make sure that the cord is located so that it will not
be stepped on, tripped over or otherwise subjected
to damage orstress.
• Do not use an extension cord unless it is absolutely
necessary. Use of improper extension cord could result in
risk of fire, electric shock orelectrocution.
• When operating a charger outdoors, always provide
a dry location and use an extension cord suitable
for outdoor use. Use of a cord suitable for outdoor use
reduces the risk of electricshock.
• An extension cord must have adequate wire size
(AWG or American Wire Gauge) for safety. The smaller
the gauge number of the wire, the greater the capacity
of the cable, that is, 16 gauge has more capacity than 18
gauge. An undersized cord will cause a drop in line voltage
resulting in loss of power and overheating. When using
more than one extension to make up the total length,
be sure each individual extension contains at least the
minimum wire size. The following table shows the correct
size to use depending on cord length and nameplate
ampere rating. If in doubt, use the next heavier gauge. The
lower the gauge number, the heavier thecord.
Minimum Gauge for Cord Sets
Volts
Total Length of Cord in Feet
(meters)
120 V 25 (7.6) 50 (15.2) 100 (30.5) 150 (45.7)
Ampere Rating
American Wire Gauge
More
Than
Not
More
Than
0 6 18 16 16 14
6 10 18 16 14 12
10 12 16 16 14 12
12 16 14 12 Not Recommended
• Do not place any object on top of the charger or
place the charger on a soft surface that might block
the ventilation slots and result in excessive internal
heat. Place the charger in a position away from any heat
source. The charger is ventilated through slots in the top
and the bottom of thehousing.
• Do not operate the charger with a damaged cord
orplug.
• Do not operate the charger if it has received a sharp
blow, been dropped or otherwise damaged in any
way. Take it to an authorized servicecenter.
• Do not disassemble the charger; take it to an
authorized service center when service or repair
is required. Incorrect reassembly may result in a risk of
electric shock, electrocution orfire.
• Disconnect the charger from the outlet before attempting
any cleaning. This will reduce the risk of electric shock.
Removing the battery pack will not reduce thisrisk.
• NEVER attempt to connect 2 chargerstogether.
• The charger is designed to operate on standard
120V household electrical power. Do not attempt to
use it on any other voltage. This does not apply to the
vehicularcharger.
WARNING: Shock hazard. Do not allow
any liquid to get inside the charger. Electric shock
mayresult.
WARNING: Burn hazard. Do not
submerge the battery pack in any liquid or allow any
liquid to enter the battery pack. Never attempt to open
the battery pack for any reason. If the plastic housing
of the battery pack breaks or cracks, return to a service
center forrecycling.
CAUTION: Burn hazard. To reduce the risk
of injury, charge only BLACK+DECKER rechargeable
battery packs. Other types of batteries may
overheat and burst resulting in personal injury and
propertydamage.

ENGLISH
5
NOTICE: Under certain conditions, with the
charger plugged into the power supply, the charger
can be shorted by foreign material. Foreign materials
of a conductive nature, such as, but not limited to,
grinding dust, metal chips, steel wool, aluminum
foil or any buildup of metallic particles should be
kept away from the charger cavities. Always unplug
the charger from the power supply when there is no
battery pack in the cavity. Unplug the charger before
attempting toclean.
Charging a Battery
BLACK+DECKER chargers are designed to charge
BLACK+DECKER batterypacks.
NOTE: To ensure maximum performance and life of lithium
ion battery packs:
• Charge the battery pack fully before firstuse.
• Recharge discharged batteries as soon as possible
after everyuse.
• Do not discharge batteriesfully.
The supplied charger offers three possible ways to charge
your battery.
- Cup charging
- Wall mounted cup charging
- Unit wall mounted charging
Standard cup charging (Fig. B)
1. Plug the charger into an appropriate outlet before
inserting the batterypack
16
.
2. Insert the battery pack into the cup charger
19
.
3. The green LED will flash indicating that the battery is
beingcharged.
4. The completion of charge is indicated by the green LED
remaining on continuously. The pack is fully charged
and may be used at this time or left on thecharger.
Wall mounted battery charging (Fig. B)
1. Mark the location of the charging station screw holes on
the wall (within reach of an electrical outlet for charging
the vacuum while it is on the charging station
20
.
2. Secure the charging station
20
to the wall using
appropriate screws and plugs for the type of wall, and
weight of the appliance.
3. Install the cup charger into the charging station (Fig. B).
Ensure it is locked into place before proceeding.
NOTE: To remove the cup charger from the charging
base pull out on the retaining tabs
21
and lift the cup
charger
19
out.
4. Plug the charger into an appropriate outlet before
inserting the batterypack.
5. Slide the battery pack
16
onto the charging station.
Fig. B
20
19
21
16
Wall mounted vacuum storage and
battery charging
(Fig. C)
The product can be attached to a wall to provide a
convenient storage and charging point for the appliance.
When mounting to a wall, make sure the mounting method
is suitable for the wall type and is appropriate to the weight
of the appliance.
1. Mark the location of the charging station screw holes
on the wall (at a height that allows the unit to hang
without hitting the floor and within reach of an
electrical outlet for charging the vacuum while it is on
the charging station
20
.
2. Fix the charging station
20
to the wall using
appropriate screws and plugs for the type of wall, and
weight of the appliance.
3. Install the cup charger
19
into the charging station (Fig
C.). Ensure it is locked into place before p roceeding.
NOTE: To remove the cup charger from the charging
base pull out on the retaining tabs
21
and lift the cup
charger out.
4. Plug the charger into an appropriate outlet.
5. With the battery
16
installed on the vacuum slide the
charge port
6
,located on the vacuum base, onto the
slots
33
of the charging station.
6. The white LED on the vaccum will flash indicating that
the battery is beingcharged.
7. The white LEDs will illuminate in segments, displaying
the state of chargein the battery
8. The completion of charge is indicated by the white LEDs
will turn off. The pack is fully charged and may be used
at this time or left on thecharger.
Fig. C
6
20
21
19
16
33

ENGLISH
6
Leaving the battery in the charger
The charger and battery pack can be left connected
indefinitely.
Charger Cleaning Instructions
WARNING: Shock hazard. Disconnect
the charger from the AC outlet before cleaning. Dirt
and grease may be removed from the exterior of the
charger using a cloth or soft non-metallic brush. Do
not use water or any cleaningsolutions.
Important Charging Notes
1. Longest life and best performance can be obtained if
the battery pack is charged when the air temperature is
between 65°F and 75°F (18° – 24°C). DO NOT charge
the battery pack in an air temperature below +40°F
(+4.5°C), or above +104°F (+40°C). This is important
and will prevent serious damage to the batterypack.
2. The charger and battery pack may become warm to the
touch while charging. This is a normal condition, and
does not indicate a problem. To facilitate the cooling of
the battery pack after use, avoid placing the charger or
battery pack in a warm environment such as in a metal
shed or an uninsulatedtrailer.
3. If the battery pack does not charge properly:
a. Check operation of receptacle by plugging in a lamp
or other appliance;
b. Check to see if receptacle is connected to a light switch
which turns power off when you turn out the lights;
c. Move the charger and battery pack to a location
where the surrounding air temperature is
approximately 65°F – 75°F (18° – 24°C);
d. If charging problems persist, take the tool, battery
pack and charger to your local servicecenter.
4. The battery pack should be recharged when it fails to
produce sufficient power on jobs which were easily
done previously. DO NOT CONTINUE to use under these
conditions. Follow the charging procedure. You may also
charge a partially used pack whenever you desire with
no adverse effect on the batterypack.
5. Foreign materials of a conductive nature such as, but
not limited to, grinding dust, metal chips, steel wool,
aluminum foil, or any buildup of metallic particles
should be kept away from charger cavities. Always
unplug the charger from the power supply when there
is no battery pack in the cavity. Unplug the charger
before attempting toclean.
6. Do not freeze or immerse the charger in water or any
otherliquid.
Storage Recommendations
1. The best storage place is one that is cool and dry, away
from direct sunlight and excess heat orcold.
2. For long storage, it is recommended to store a fully
charged battery pack in a cool dry place out of the
charger for optimalresults.
NOTE: Battery packs should not be stored completely
depleted of charge. The battery pack will need to be
recharged beforeuse.
SAVE THESE INSTRUCTIONS FOR
FUTURE USE
SYMBOLS
The label on your tool may include the following symbols. The
symbols and their definitions are as follows:
V ..............................volts
A .................................. amperes
Hz ................................hertz
W .................................watts
min .............................minutes
or AC ................ alternating current
or DC .......... direct current
n
o ............................... no load speed
..............................Class I Construction
(grounded)
...............................earthing terminal
.............................safety alert symbol
.............................. Class II Construction
(double insulated)
.../min or rpm. revolutions or reciprocation
per minute
Wh ..............................Watt Hours
Assembly
WARNING: Do not attempt to modify or
repair theappliance.
Intended use
Your BLACK+DECKER 20V Max* cordless 3 in 1 stick vacuum
cleaner has been designed for dry vacuuming purposes. This
appliance is intended for household useonly.
Assembly (Fig. D)
1. Align the top of the extension tube
7
with the vacuum
inlet
5
as shown in Fig.D.
2. Push the extension tube
7
onto the vacuum inlet
5
so
it locks into position.
3. Align the bottom of the extension tube
7
with the floor
brush
11
as shown in Fig.D.
4. Push the bottom of the extension tube
7
onto the floor
brush
11
so it locks into position.
5. To remove an accessory, press the accessory release
latch
8
located on the vacuum inlet or the bottom
of the extension tube and gently pull the connected
accessory off.

ENGLISH
7
WARNING: When not in use position the
unit with the rear of the vacuum facing a wall so that
any inadvertent fall of the unit would contact a wall
and not people orpets.
Fig. D
5
7
11
8
8
Operation
WARNING: To reduce the risk of
serious personal injury, turn unit off and
disconnect it from power source remove the
battery pack before making any adjustments or
removing/installing attachments or accessories.
An accidental start-up can causeinjury.
Installing and Removing the Battery
Pack (Fig. A)
NOTE: For best results, make sure your battery pack is
fullycharged.
To install the battery pack
16
into the tool handle, align the
battery pack with the rails inside the tool’s handle and slide
it into the handle until the battery pack is firmly seated in
the tool and ensure that it does notdisengage.
To remove the battery pack from the tool, press the release
button
17
and firmly pull the battery pack out of the tool
handle. Insert it into the charger as described in the charger
section of thismanual.
Use
This vacuum cleaner can be used in one of four ways.
• With the extension tube 7 and the floor brush 11 . (Fig. E)
• With the floor brush 11 . (Fig. F)
• With the extension tube 7 and an
accesssory tool 13 , 14 , 15 . (Fig. G)
• With an accesssory tool 13 , 14 , 15 . (Fig. H)
Fig. E Fig. F
Fig. G
Fig. H
Switching ON and OFF (Fig. A, I)
• To switch ON, press the ON/OFF button
1
.
• For increased power, slide the variable power switch
2
forward.
NOTE: The state of charge indicator LEDs will illuminate
while the vacuum is ON.
• To switch OFF, press the ON/OFF button 1 a second time.
• Return the product to the charger immediately after use
so that it will be ready and fully charged for the next
use. Ensure that the product is fully engaged with the
chargerplug.
Switching the floor brush OFF and ON (Fig. I)
• To switch the floor brush OFF, press the Floor brush ON/
OFF button
4
.
• To switch the floor brush ON, press the floor brush ON/
OFF button
4
a second time.
NOTE: The LED worklights
12
will illuminate whenever
the floor brush is switched ON.

ENGLISH
8
Fig. I
1
2
4
State of charge indicator
This appliance includes a state of charge indicator which
consists of three white LED lights that indicate the level
of charge remaining in the battery. This feature is only
activated when the vacuum is poweredon or during a
charge cycle.
The state of charge indicator is an indication of approximate
levels of charge remaining in the battery pack according to
the followingindicators:
The LED battery indicator displays the remaining charge
and warns you when the battery is low. The final LED will
flash continuously when there is only 1 minute of runtime
remaining. All LEDs will flash when the unit isdischarged.
NOTE: The state of charge indicator is only an indication
of the charge left on the battery. It does not indicate tool
functionality and is subject to variation based on product
components, temperature and end-userapplication.
Using an Accessory tool (Fig. J)
Your vacuum may come with some of the following tools.
- Small crevicetool.
- 6 Brushtool.
- Pet hair tool.
• The accessory too
l 13 , 14 , 15
can be fitted either
directly to the extension tube
7
or to the vacuum
inlet
5
as shown in Fig. J.
• Align the top of the accessory too
l 13 , 14 , 15
with the vacuum inlet
5
or extension tube
7
and push
into place so it locks into position as shown in Fig.J.
Fig. J
5
13
7
Cleaning and emptying the vacuum
WARNING: Projectile/Respiratory Hazard:
Never use the vac without itsfilter.
NOTE: The filter is re-usable, do not confuse it with a
disposable dust bag, and do not throw it away when the
product is emptied. We recommend that you replace the
filter every 6–9 months depending on frequency ofuse.
There are two methods of cleaning the canister, a quick
empty method and a thorough clean method.
To empty the dust canister (Fig. K, L)
• Lift and remove the lift away dust canister
10
from the
chassis
23
as shown in FigureK.
• Place the dust canister over a trash bin and press the
dust canister lid release button
24
to empty the dust
canister as shown in FigureL.
• Close the dust canister lid
25
, until it
clicks firmly
intoposition.
• Install the lift away dust canister
10
back onto the
chassis
23
.
Fig. K
10
23
25
Fig. L
24
10
25
Removing pre-filter (Fig. K, L, M)
• Lift and remove the lift away dust canister
10
from the
chassis
23
as shown in FigureK.
• Place the dust canister over a trash bin and press the
dust canister lid release button
24
to empty the dust
canister as shown in FigureL.
• Use your index finger and thumb to pinch the pre-filter
26
,
pull the pre-filter
26
from the dust canister
10
as
shown in Fig. M.
NOTE: The filter housing fits snuggly in the dust canister
and may be difficult to remove at first.
• Empty the dust canister into a trash bin.
NOTE: It is recommended that you agitate the filter
when the pre-filter
26
is removed. See Filter Agitator
section for instructions.
• Install the pre-filter
26
into the dust canister
10
ensuring the dust canister tab
27
aligns with the pre-
filter slot
28
as shown in Fig.M.

ENGLISH
9
• Install the dust canister onto the vacuum, until it clicks
firmly intoposition.
Fig. M
26
27
10
28
Filter Agitator (Fig. K, L, N)
• Lift and remove the lift away dust canister
10
from the
chassis
23
as shown in FigureK.
• Place the dust canister over a trash bin and press the
dust canister lid release button
24
to empty the dust
canister as shown in FigureL.
• Use your index finger and thumb to pinch the pre-filter
26
, pull the pre-filter
26
from the dust canister
10
as
shown in Fig. M.
NOTE: The filter housing fits snuggly in the dust canister
and may be difficult to remove at first.
• Rotate the filter agitator wheel
9
five to ten revolutions
over a trash bin to remove excessive dust from the filter.
• Empty the dust canister into a trash bin.
• Install the pre-filter
26
into the dust canister
10
ensuring the dust canister tab
27
aligns with the pre-
filter slot
28
as shown in Fig.M.
• Install the dust canister onto the vacuum, until it clicks
firmly intoposition.
IMPORTANT: Maximum dust collection will only be
obtained with clean filters and an empty dust canister.
If dust begins to fall back out of the product after it is
switched off, this indicates that the dust canister is full and
requiresemptying.
Fig. N
9
23
Removing filter (Fig. K, L, O)
• Lift and remove the lift away dust canister
10
from the
chassis
23
as shown in FigureK.
• Place the dust canister over a trash bin and press the
dust canister lid release button
24
to empty the dust
canister as shown in FigureL.
• Grasp the agitator wheel housing
29 and pull up
to remove.
• Remove the filter
30
, from the agitator wheel
housing
29
as shown in Fig. O.
• Shake off or lightly brush any loose dust from the filter.
• Install the the filter
30
, into the
agitator wheel housing
29
.
• Install the agitator wheel housing
29
onto the dust
canister, until it clicks firmly intoposition.
Fig. O
10
29
30
Cleaning the filters
• Once the filter and pre-filter are removed from the dust
canister shake off or lightly brush any loose dust from
the pre-filter
26
and filter
30
.
• Rinse out the dust canister
10
with warm soapywater.
• Wash the filters with warm soapy water.
• Ensure the filters are completely dry before refitting.
• Follow instructions in the Removing pre-filter and
Removing filter sections for assembly instructions.
• IMPORTANT: Maximum dust collection will only be
obtained with clean filters and an empty dust canister.
If dust begins to fall back out of the product after it is
switched off, this indicates that the dust canister is full
and requiresemptying.
• Wash the filters regularly using warm, soapy water and
ensure that it is completely dry before using again. The
cleaner the filter is, the better the product will perform.
• It is very important that the filters are completely dry
and correctly in position beforeuse.

ENGLISH
10
Removing and cleaning the rotary brushes (Fig. P)
CAUTION: To reduce the risk of injury from
moving parts, disconnect lift away canister before
cleaning orservicing.
• To remove the rotary brush
31
from the floor brush
11
Depress the release button
32
as shown in Figure P.
• The rotary brush
31
can now be removed.
• Clean rotary brush, and reinstall. Ensure it is secured in
its lockedposition before operating.
Fig. P
31
32
11
Replacing the filters
The filters should be replaced every 6 to 9 months and
whenever worn or damaged. Replacement filters are
available from your BLACK+DECKERdealer.
Visit www.blackanddecker.com to locatedealers.
• Remove the old filters as describedin Cleaning theFilters.
• Fit the new filters as describedin Cleaning the Filters.
(cat. no: BSVF1, BSVFA for allergy vacs)
Maintenance
Use only mild soap and damp cloth to clean the vac. Never
let any liquid get inside the vac; never immerse any part of
the vac into aliquid.
WARNING: Make sure the vacuum is
completely dry before usingit.
IMPORTANT: To assure product SAFETY and RELIABILITY,
repairs, maintenance and adjustment (other than those
listed in this manual) should be performed by authorized
service centers or other qualified service organizations,
always using identical replacementparts.
Troubleshooting
If the product does not work, check the following:
• The charger was correctly plugged in for recharge. (It
feels slightly warm to the touch.)
• The charger cord is not damaged and is correctly attached.
• The charger is plugged into a working electricaloutlet.
If vacuum performance is poor, check the following:
• Clean the filters. (See Cleaning and Emptying the
vacuum section.)
• Empty the dust canister. (See Cleaning and Emptying
the vacuum section.)
• Clean the rotary brushes. (See Removing and Cleaning
the rotary brushes section.)
• The LED flashes continuously, plug in the charger and
perform a recharge cycle
For assistance with your product, visit our website
www.blackanddecker.com for the location of the service
center nearest you or call the BLACK+DECKER help line at
1–800–544–6986.
Accessories
Recommended accessories for use with your appliance are
available from your local dealer or authorized service center.
If you need assistance regarding accessories, please call:
18005446986.
WARNING: The use of any accessory
not recommended for use with this appliance could
behazardous.
Repairs
The charger and battery pack are notserviceable.
WARNING: To assure product SAFETY and
RELIABILITY, repairs, maintenance and adjustment
(including brush inspection and replacement, when
applicable) should be performed by a BLACK+DECKER
factory service center or a BLACK+DECKER authorized
service center. Always use identical replacementparts.
Service Information
All
BLACK+DECKER
Service Centers are staffed with trained
personnel to provide customers with efficient and reliable
power tool service. Whether you need technical advice,
repair, or genuine factory replacement parts, contact the
BLACK+DECKER
location nearest you. To find your local
service location, call: 1-800-544-6986 or visit
www.blackanddecker.com

ENGLISH
11
TWOYEAR LIMITED WARRANTY
Black & Decker (U.S.) Inc. warranties this product to be free from
defects in material or workmanship for a period of two (2) years
following the date of purchase, provided that the product is used
in a home environment. This limited warranty does not cover
failures due to abuse, accidental damage or when repairs have
been made or attempted by anyone other than BLACK+DECKER
and its Authorized Service Centers. A defective product meeting
the warranty conditions set forth herein will be replaced or
repaired at no charge in either of two ways: The first, which will
result in exchanges only, is to return the product to the retailer
from whom it was purchased (provided that the store is a
participating retailer).Returns should be made within the time
period of the retailer’s policy for exchanges. Proof of purchase
may be required. Please check with the retailer for its specific
return policy regarding time limits for returns or exchanges.
The second option is to take or send the product (prepaid) to a
BLACK+DECKER owned or authorized Service Center for repair
or replacement at BLACK+DECKER’s option. Proof of purchase
may be required. BLACK+DECKER owned and authorized service
centers are listed online at www.blackanddecker.com. This
warranty does not apply to accessories. This warranty gives you
specific legal rights and you may have other rights which vary
from state to state. Should you have any questions, contact the
manager of your nearest BLACK+DECKER Service Center. This
product is not intended for commercial use, and accordingly,
such commercial use of this product will void this warranty. All
other guarantees, express or implied, are herebydisclaimed.
LATIN AMERICA:
This warranty does not apply to products
sold in Latin America. For products sold in Latin America,
check country specific warranty information contained in
the packaging, call the local company or see the website for
suchinformation.
Imported by Black & Decker (U.S.) Inc.,
701 E. Joppa Rd.
Towson, MD 21286
BlackandDecker.com
1-800-544-6986
TROUBLE SHOOTING
Problem Possible Cause Possible Solution
• Unit will not start. • Battery pack not charged. • Check battery pack charging
requirements.
• Battery pack will not charge • Charger not plugged in. • Plug charger into a working outlet. Refer
to Important Charging Notes for
more details.
• Surrounding air temperature
too hot or too cold
• Move charger and battery pack to a
39 degrees F (4 °C) or below
104 degrees F (+40 °C)
For assistance with your product, visit our website www.blackanddecker.com for the location of the service center nearest
you or call the BLACK+DECKER help line at 1-800-544-6986.

FRANÇAIS
12
Définitions: symboles et termes d'alarmes sécurité
Ces guides d'utilisation utilisent les symboles et termes d'alarmes sécurité suivants pour vous prévenir de situations
dangereuses et de risques de dommages corporels oumatériels.
DANGER : indique une situation dangereuse imminente qui, si elle n’est pas évitée, entraînera la mort ou
des blessuresgraves.
AVERTISSEMENT : indique une situation potentiellement dangereuse qui, si elle n’est pas évitée,
pourrait entraîner la mort ou des blessuresgraves.
ATTENTION : indique une situation potentiellement dangereuse qui, si elle n’est pas évitée, pourrait
entraîner des blessures légères oumodérées.
(Si utilisé sans aucun terme) Indique un message propre à lasécurité.
AVIS : indique une pratique ne posant aucun risque de dommages corporels mais qui par contre, si rien n’est
fait pour l’éviter, pourrait poser des risques de dommages matériels.
Français (traduction de la notice d’instructions originale)
6
7
11
1
4
2
3
17
16
9
10
5
12
8
8
Fig. A
1
Bouton Marche/Arrêt
2
Interrupteur à puissance variable
3
Poignée principale
4
Bouton Marche/Arrêt de la brosse pour
planchers
5
Entrée de l’aspirateur
6
Port de charge
7
Tube de rallonge
8
Verrou de déblocage de l’accessoire
9
Roue de l’agitateur du filtre
10
Bac à poussière amovible
11
Brosse pour planchers
12
Lampe de travail DEL
13
Petit suceur plat
14
Outil de brossage 6 po
15
Outil pour poils d’animaux
16
Bloc-piles
17
Bouton de libération du bloc-piles
18
Chargeur
19
Compartiment du chargeur
20
Poste de recharge
21
Languettes de retenue
14
15
13
18
19
20
21

FRANÇAIS
13
AVERTISSEMENT! lire tous
les avertissements de sécurité et toutes les
directives. Le non-respect des avertissements et des
directives pourrait se solder par un choc électrique, un
incendie et/ou une blessuregrave.
AVERTISSEMENT : afin de réduire le risque de
blessures, lire le mode d’emploi del’outil.
CONSIGNES
IMPORTANTES DE
SÉCURITÉ
Lorsque vous utilisez un appareil électrique, des précautions
élémentaires devraient toujours être prises, incluant les suivantes:
LISEZ TOUTES LES
INSTRUCTIONS AVANT
D’UTILISER CET
APPAREIL.
AVERTISSEMENT : Lisez tous
les avertissements de sécurité et toutes les
instructions. Ne pas suivre les avertissements et
les instructions ci-dessous peut entraîner un choc
électrique, un incendie et/ou des blessures graves.
AVERTISSEMENT : Certaines
poussières domestiques comme l’amiante ou le
plomb dans la peinture à base de plomb contiennent
des produits chimiques reconnus dans l’État de la
Californie pour causer le cancer et des anomalies
congénitales ou autres effets nuisibles sur
la reproduction.
AVERTISSEMENT : Ne pas tenter
de modifier ou de réparer l’appareil.
AVERTISSEMENT : Ne pas
recharger le bloc-piles à des températures sous 4°C
(39 °F) ou au-dessus de 40°C (104°F). Suivez les
instructions de recharge et ne pas recharger l’appareil
hors de la plage de températures indiquée dans
les instructions. Recharger de façon inappropriée
ou hors de la plage de températures indiquée peut
endommager le bloc-piles et augmenter le risque
d’incendie.
AVERTISSEMENT : Afin de
réduire le risque d’incendie, de choc électrique ou
de blessure:
• Danger de choc électrique. Afin de vous protéger contre
le risque de choc électrique, ne pas mettre le poste de
recharge dans l’eau ou autre liquide.
• Ne pas le laisser être utilisé comme jouet. Une attention
particulière est nécessaire lorsque l’appareil est utilisé par
des enfants ou près des enfants.
• Utilisez seulement comme décrit dans le présent manuel.
Utiliser seulement les accessoires recommandés du fabricant.
• Ne pas utiliser avec un cordon ou une fiche endommagée.
Si l’outil ne fonctionne pas comme il le devrait, a été
échappé, endommagé, laissé à l’extérieur ou échappé
dans l’eau, retournez-le dans un centre de services.
• Ne pas tirer ou transporter par le cordon, utiliser celui-ci
comme une poignée, le passer sous une porte ou autour
d’arêtes ou coins acérés. Ne pas passer la machine sur le
cordon. Gardez le cordon hors de portée de surfaces chaudes.
• Ne pas débrancher en tirant sur le cordon. Pour
débrancher, saisissez la fiche, pas le cordon.
• Ne pas toucher au chargeur ou sa fiche et ses contacts si
vos mains sont mouillées.
• Ne pas mettre tout objet dans les ouvertures. Ne pas
utiliser si une ouverture est bloquée; tenez à l’écart de la
poussière, de la charpie ainsi que des cheveux et de tout ce
qui peut réduire la circulation de l’air.
• Gardez vos cheveux, vêtements amples, doigts et toutes les
parties de votre corps loin des ouvertures et des pièces en
mouvement de l’outil.
• Redoublez de prudence durant le nettoyage d’escaliers.
• Ne pas utiliser pour ramasser des liquides combustibles
ou inflammables, comme l’essence ou utiliser dans des
endroits où ils sont présents.
• Ne pas ramasser tout ce qui brûle ou fume comme des
cigarettes, des allumettes ou des cendres chaudes.
• Ne pas utiliser sans le sac à poussière et/ou les filtres en place.
• Ne pas charger l’appareil à l’extérieur.
• Utilisez seulement le chargeur fourni par le fabricant pour
recharger.
• Ne pas incinérer l’appareil même s’il est sévèrement
endommagé. Les piles peuvent exploser et causer un incendie.
• Cet appareil n’est prévu que pour usage domestique et non
pour utilisation commerciale ou industrielle.
• Ne pas laisser le cordon pendre du bord d’une table ou
comptoir ou entrer en contact avec une surface chaude.
L’appareil ne devrait pas être placé ou monté près d’un
évier ou d’une source de chaleur.
• Branchez le chargeur directement dans une prise de courant.
• Branchez le chargeur seulement dans une prise de courant
domestique standard (120V - 60Hz).
• Débranchez le chargeur de sa prise avant tout entretien ou
nettoyage de routine.
• Ne pas regarder dans les évents lorsque l’appareil est
en marche parce qu’il arrive parfois que de petits débris
puissent être éjectés des évents, particulièrement après le
nettoyage/remplacement des filtres puisque les débris à
l’intérieur de l’appareil peuvent être dérangés.
• Sous conditions extrêmes, une fuite des cellules du bloc-
piles peut se produire. Si le liquide (qui est une solution
de 20 à 35% d’hydroxyde de potassium) se retrouve sur
l’épiderme, (1) lavez rapidement à l’eau et au savon et (2)
neutralisez avec un produit légèrement acide comme du
jus de citron ou du vinaigre. Si du liquide entre dans les
yeux, rincez immédiatement avec de l’eau propre pour une
durée minimum de 10minutes. Consultez un médecin.

FRANÇAIS
14
AVERTISSEMENTS DE SÉCURITÉ
SUPPLÉMENTAIRES
a ) Empêchez le démarrage non intentionnel.
Assurez-vous que l’interrupteur est en position
Arrêt avant de ramasser et de transporter
l'appareil. Transporter l’appareil avec votre doigt
sur l’interrupteur ou mettre sous tension un appareil
dont l’interrupteur est en position Marche favorise les
accidents.
b ) Débranchez le bloc-piles de l’appareil avant
d’effectuer tout ajustement, changer les
accessoires ou ranger l’appareil. Ces mesures de
sécurité préventives réduisent le risque de démarrage
accidentel de l’appareil.
c ) Rechargez seulement avec le chargeur indiqué
par le fabricant.
Un chargeur est approprié pour un
type de bloc-piles et peut créer un risque d’incendie s’il
est utilisé avec un bloc-piles d’un autre type.
d ) Utilisez l’appareil seulement avec des blocs-piles
spécialement conçus. Utiliser d’autres blocs-piles
peut créer un risque de blessure ou d’incendie.
e ) Lorsque vous n’utilisez pas le bloc-piles, gardez-
le hors de portée d’autres objets métalliques,
comme les trombones, les pièces de monnaie,
les clés, les clous, les vis et autres petits objets
métalliques qui peuvent connecter une borne à
une autre. Faire un court-circuit entre les bornes des
piles peut entraîner des brûlures ou un incendie.
f ) En conditions abusives, du liquide peut être
éjecté de la pile; évitez le contact. Si un contact se
produit accidentellement, rincez avec de l’eau. Si du
liquide entre en contact avec les yeux, consultez
aussi un médecin. Le liquide éjecté de la pile peut
entraîner une irritation ou des brûlures.
g ) Ne pas utiliser un bloc-piles ou un appareil
qui est endommagé ou qui a été modifié.
Les
piles endommagées ou modifiées peuvent avoir un
comportement imprévisible entraînant un incendie,
une explosion ou un risque de blessure.
h ) Ne pas exposer le bloc-piles ou l’appareil au feu
ou à une température excessive. L’exposition au feu
ou à une température au-dessus de 130°C (266°F)
pourrait entraîner une explosion.
i ) Suivez les instructions de recharge et ne pas
charger le bloc-piles ou l’appareil en hors de
la plage de températures indiquée dans les
instructions. Charger de façon inappropriée ou
hors de températures de la plage indiquée peut
endommager la pile et augmenter le risque d’incendie.
j ) Faites réparer par un réparateur qualifié utilisant
seulement des pièces de rechange identiques.
Ceci assurera le maintien de la sécurité du produit.
k ) Ne pas modifier ou tenter de réparer l’appareil
ou le bloc-piles sauf si c’est indiqué dans le mode
d’emploi et d’entretien.
CONSERVEZ CES
INSTRUCTIONS
Consignes de sécurité importantes pour
les blocs-piles
AVERTISSEMENT : Lisez
tous les avertissements de sécurité et toutes
les instructions du bloc-piles, du chargeur
et de l’outil électrique. Ne pas suivre les
avertissements et les instructions peut entraîner
un choc électrique, un incendie et/ou des
blessures graves.
• Ne pas charger ou utiliser le bloc-piles en
atmosphères explosibles comme la présence de
liquides inflammables, de gaz ou de poussière.
Insérer ou retirer la pile du bloc-piles peut enflammer la
poussière ou les vapeurs.
• Ne JAMAIS forcer le bloc-piles dans le chargeur.
NE PAS modifier le bloc-piles de quelque façon que
ce soit dans un chargeur non compatible puisque
le bloc-piles peut se briser causant une blessure
corporelle. Consultez le tableau à la fin de ce guide pour
la compatibilité des blocs-piles et des chargeurs.
• Chargez les blocs-piles seulement dans les chargeurs
conçus par BLACK+DECKER.
• NE PAS éclabousser ou immerger dans l’eau ou tout autre
liquide.
• Ne pas entreposer ou utiliser l’outil et le bloc-piles
dans des endroits où la température peut atteindre
ou excéder 40°C (104°F) (comme les remises
extérieures ou les édifices en métal durant l’été. Pour
une meilleure durée de vie, entreposer le bloc-piles dans un
endroit frais et sec.
REMARQUE: Ne pas ranger les blocs-piles dans un
outil avec la gâchette verrouillée. Ne jamais coller la
gâchette avec du ruban adhésif en position Marche.
• Ne pas brûler le bloc-piles même s’il est gravement
endommagé ou est entièrement usé. Le bloc-piles
peut exploser au cours d’un incendie. Des vapeurs et des
matières toxiques sont produites lorsque les blocs-piles au
lithium-ion sont brûlés.
• Si le liquide des piles entre en contact avec la
peau, lavez immédiatement avec de l’eau et du
savon doux. Si le liquide vient en contact avec les yeux,
rincez à l’eau courante durant 15minutes ou jusqu’à ce
que l’irritation cesse, en gardant les yeux ouverts. Pour
information de consultation médicale, l’électrolyte des
piles est composé d’un mélange organique liquide et de
sels de lithium.
• Le contenu des piles peut causer une irritation
respiratoire. Faites circuler de l’air frais. Si les symptômes
persistent, consultez un médecin.

FRANÇAIS
15
nickel-cadmium, hydrure métallique de nickel ou lithium-
ion. Aidez à protéger notre environnement et à conserver
les ressources naturelles en retournant les piles au nickel-
cadmium, hydrure métallique de nickel ou lithium-ion dans
un centre de services BLACK+DECKER autorisé ou chez
votre détaillant local pour qu’elles soient recyclées. Vous
pouvez aussi contacter votre centre de recyclage local pour
des informations sur les endroits où déposer la pile usagée.
RBRC® est une marque de commerce déposée de Call 2
Recycle,Inc.
Consignes de sécurité importantes
pour tous les chargeurs de piles
AVERTISSEMENT : Lisez
tous les avertissements de sécurité et toutes
les instructions du bloc-piles, du chargeur
et de l’outil électrique. Ne pas suivre les
avertissements et les instructions peut entraîner
un choc électrique, un incendie et/ou des
blessures graves.
• NE PAS tenter de recharger le bloc-piles avec un
chargeur autre que ceux indiqués dans le présent
manuel. Le bloc-piles et le chargeur sont spécifiquement
conçus pour fonctionner ensemble.
• Ces chargeurs ne sont pas conçus pour toute
utilisation autre que le chargement des piles
rechargeables BLACK+ DECKER. Tout autre usage
pourrait entraîner un danger d’incendie, un choc électrique
ou une électrocution.
• Ne pas exposer le chargeur à la pluie ou la neige.
• Tirez la fiche au lieu du cordon lorsque vous
débranchez le chargeur. Cela réduira le risque
d’endommager la fiche et le cordon électriques.
• Assurez-vous de ne pas placer le cordon là où
il pourrait faire trébucher les passants ou être
endommagé de quelque façon que ce soit.
• Ne pas utiliser une rallonge à moins que ce ne soit
absolument nécessaire. L’utilisation d’une rallonge
inadéquate pourrait entraîner un risque d’incendie un
choc électrique ou une électrocution.
• Lors de l’utilisation d’un chargeur à l’extérieur, gardez-
le toujours au sec et utilisez une rallonge appropriée
pour l’extérieur. L’utilisation d’une rallonge appropriée
pour l’extérieur réduit le risque de choc électrique.
• Une rallonge doit avoir un calibre de fil (AWG ou
calibrage américain normalisé des fils) approprié
pour la sécurité. Plus le numéro de calibre du fil est
petit, plus la capacité du câble est grande, c’est-à-dire
que le calibre 16 a plus de capacité que le calibre 18. Un
cordon de taille inférieure entraînera une chute de tension
de secteur ce qui causera une perte de puissance et une
surchauffe. Lorsque vous utilisez plus d’une rallonge pour
obtenir la longueur totale, assurez-vous que chaque
rallonge individuelle a au moins le calibre de fil minimum.
Le tableau suivant affiche la bonne taille à utiliser selon
longueur de cordon et l’intensité nominale de la plaque
signalétique. En cas de doute, utilisez le calibre le plus
AVERTISSEMENT : Danger de
brûlure. Le liquide des piles peut être inflammable s’il
est exposé aux étincelles ou aux flammes.
AVERTISSEMENT :
Danger
d’incendie. Ne jamais tenter d’ouvrir le bloc-piles pour
quelque raison que ce soit. Si le boîtier du bloc-piles est
fendu ou endommagé, ne pas l’insérer dans le chargeur.
Ne pas écraser, échapper ou endommager le bloc-piles.
Ne pas se servir d’un bloc-piles ou d’un chargeur qui a
subi un impact, a été échappé, écrasé ou endommagé
d’une façon ou d’une autre (par ex. perforé par un
clou, frappé par un marteau, sur lequel on a marché).
Les blocs-piles endommagés devraient être amenés/
expédiés au centre de service pour recyclage.
Transport
AVERTISSEMENT : Danger
d’incendie. Ne pas entreposer ou transporter
le bloc-piles de manière à ce que des objets
métalliques puissent entrer en contact avec les
bornes des piles exposées. Par exemple, ne pas
placer le bloc-piles dans des tabliers, des poches, des
coffres à outils,les boîtes d’ensembles de produits, les
tiroirs, etc. avec des clous, des vis, des clés, etc. non
fixés. Transporter des piles peut possiblement
causer un incendie si les bornes des piles entrent
par inadvertance en contact avec des matériaux
conducteurs comme les clés, les pièces de
monnaie, les outils à main et d’autres matériaux
semblables. La réglementation HMR (Hazardous
Material Regulations) du DOT (Department of
Transportation) des É.-U. interdit en fait le transport
de piles dans les véhicules commerciaux ou dans
les bagages de cabine à bord les avions À MOINS
qu’ils soient adéquatement protégés contre les
courts-circuits. Alors, lorsque vous transportez des
blocs-piles individuels, assurez-vous que leurs bornes
sont protégées et bien isolées de tout matériel avec
lequel elles pourraient entrer en contact et causer un
court-circuit.
Le sceau RBRC®
Le sceau RBRC® (Rechargeable Battery
Recycling Corporation) sur les piles (ou
blocs-piles) au nickel-cadmium, hydrure
métallique de nickel ou lithium-ion indique que les coûts
de recyclage de ces piles (ou blocs-piles) à la fin de leur
durée de vie utile ont déjà été payés par BLACK+DECKER.
Dans certaines régions, il est illégal de mettre les piles au
nickel-cadmium, hydrure métallique de nickel ou lithium-
ion à la poubelle ou dans le flux des déchets solides des
municipalités le programme Call2Recycle® offre une
solution de rechange écologique.
Call 2 Recycle, Inc., en collaboration avec BLACK+DECKER
et d’autres utilisateurs de piles, a établi le programme aux
États-Unis et au Canada pour faciliter la collecte des piles au

FRANÇAIS
16
lourd suivant. Plus le numéro de calibre est bas, plus le
cordon est lourd.
Calibre minimum pour les cordons d'alimentation
Volts
Longueur totale du cordon
d'alimentation en mètre (pieds)
120 V 7,6 (25) 15,2 (50) 30,5 (100) 45,7 (150)
240 V 15,2 (50) 30,5 (100) 61,0 (200) 91,4 (300)
Ampères
AWG
Plus que Pas plus
que
0 6 18 16 16 14
6 10 18 16 14 12
10 12 16 16 14 12
12 16 14 12 Non recommandé
• Ne pas placer tout objet sur le dessus du chargeur ou
placer le chargeur sur une surface molle qui pourrait
bloquer les fentes de ventilation et entraîner une
chaleur interne excessive. Placez le chargeur loin de
toute source de chaleur. Le chargeur est ventilé grâce aux
fentes du dessus et du bas du boîtier.
• Ne pas utiliser le chargeur avec un cordon
endommagé.
• Ne pas utiliser le chargeur s’il a reçu un choc violent,
s’il a été échappé ou est autrement endommagé de
quelque façon que ce soit. Apportez-le dans un centre
de services autorisé.
• Ne pas démonter le chargeur; apportez-le dans
un centre de services autorisé lorsqu’un entretien
ou une réparation est nécessaire. Un mauvais
réassemblage peut entraîner un danger de choc électrique,
une électrocution ou un incendie.
• Débranchez le chargeur de la prise avant d’essayer de
nettoyer. Ceci éliminera la possibilité de choc électrique.
Le retrait du bloc-piles ne réduira pas cette possibilité.
• NE JAMAIS tenter de brancher 2 chargeurs ensemble.
Le chargeur est conçu pour fonctionner sur une
alimentation électrique domestique 120 V. Ne pas
essayer de l’utiliser sur toute autre tension. Cela ne
s’applique par au chargeur véhiculaire.
AVERTISSEMENT : Danger de
choc électrique. Ne pas laisser pénétrer tout liquide à
l’intérieur du chargeur. Cela peut entraîner un choc
électrique.
AVERTISSEMENT : Danger
de brûlure. Ne pas immerger le bloc-piles dans tout
liquide ou laisser tout liquide entrer dans le bloc-piles.
Ne jamais tenter d’ouvrir le bloc-piles pour quelque
raison que ce soit. Si le boîtier en plastique du bloc-
piles se brise ou se fissure, retournez-le dans un centre
de services pour le recycler.
ATTENTION : Danger de brûlure. Afin
de réduire le risque de blessure, chargez seulement des
blocs-piles rechargeables BLACK+DECKER. D’autres
types de piles peuvent surchauffer et éclater entraînant
une blessure corporelle et des dommages.
AVIS : Dans certaines conditions, avec le
chargeur branché à l’alimentation, le chargeur peut
être court-circuité par une matière étrangère. Les
matières étrangères conductrices telles, mais sans
s’y limiter, les poussières de meulage, les copeaux
métalliques, la laine d’acier, le papier d’aluminium
ou toute accumulation de particules métalliques
devraient être éloignées des ouvertures du chargeur.
Débranchez toujours le chargeur de l’alimentation
lorsqu’il n’y a aucun bloc-piles à l’intérieur. Débranchez
le chargeur avant de nettoyer.
Charger un bloc-piles
Les chargeurs BLACK+DECKER sont conçus pour charger les
blocs-piles BLACK+DECKER.
REMARQUE: Afin d’assurer la performance et la vie
maximale des blocs-piles ion lithium:
• Chargez complètement le bloc-pile avant la
première utilisation.
• Rechargez les piles déchargées dès que possible
après chaque utilisation.
• Ne pas décharger complètement les piles.
Le chargeur fourni offre trois manières possible de charger
votre pile.
- Charger dans le compartiment
- Charger dans le compartiment fixé au mur
- Charger de l’unité fixée au mur
Charger dans le compartiment (Fig. B)
1. Branchez le chargeur dans une prise appropriée avant
d’insérer le bloc-piles
16
.
2. Insérez le bloc-piles dans le compartiment du chargeur
19
.
3. Le voyant DEL vert clignotera indiquant que la pile est
en cours de chargement.
4. La fin du chargement est indiquée par le voyant DEL
vert qui demeure allumé de façon continue. Le bloc est
complètement chargé et peut être utilisé à ce moment
ou laissé sur le chargeur.
Charger les piles fixées au mur (Fig. B)
1. Indiquez l’emplacement des trous des vis du poste de
recharge sur le mur (à proximité d’une prise électrique
pour charger l’aspirateur pendant qu’il est sur le poste
de recharge
20
.
2. Fixez le poste de recharge
20
au mur à l’aide de vis et
de chevilles appropriées pour le type de mur et le poids
de l’appareil.
3. Installez le compartiment du chargeur dans le poste de
recharge (Fig. B). Assurez-vous qu’il est verrouillé place
avant de procéder.
REMARQUE: Pour retirer le compartiment du chargeur
de la base de chargement, tirez les languettes de retenue
21
et soulevez le compartiment du chargeur
19
.
4. Branchez le chargeur dans une prise appropriée avant
d’insérer le bloc-piles.
5. Glissez le bloc-piles
16
dans la poignée de l’outil.

FRANÇAIS
17
Fig. B
20
19
21
16
Entreposage de l’aspirateur fixé au mur
et recharge des piles (Fig. C)
Le produit peut être fixé à un mur pour un entreposage
pratique et un point de chargement pour l’appareil. Lorsque
vous fixez au mur, assurez-vous que la méthode de fixation
convient au type de mur et qu’elle est appropriée pour le
poids de l’appareil.
1. Indiquez l’emplacement des trous des vis du poste de
recharge sur le mur (à une hauteur qui permet à l’unité
d’être suspendue sans toucher au plancher et à proximité
d’une prise électrique pour charger l’aspirateur pendant
qu’il est sur le poste de recharge
20
.
2. Fixez le poste de recharge
20
au mur à l’aide de vis et
de chevilles appropriées pour le type de mur et le poids
de l’appareil.
3. Installez le compartiment du chargeur dans le poste de
recharge (Fig. C). Assurez-vous qu’il est verrouillé place
avant de procéder.
REMARQUE: Pour retirer le compartiment du chargeur
de la base de chargement, tirez les languettes de
retenue
21
et soulevez le compartiment du chargeur.
4. Branchez le chargeur dans une prise appropriée.
5. Une fois le bloc-piles
16
installé sur l’aspirateur, glissez
le port du chargeur
6
, situé à la base de l’aspirateur, sur
les fentes
33
du poste de recharge.
6. Le voyant DEL blanc clignotera indiquant que la pile est
en cours de chargement.
7. Les voyants DEL blancs s’allumeront par étape, affichant
l’état de chargement du bloc-piles.
8. La fin du chargement est indiquée par les voyants
DEL blancs qui s’éteignent. Le bloc est complètement
chargé et peut être utilisé à ce moment ou laissé sur le
chargeur.
Fig. C
6
20
21
19
16
33
Laisser la pile dans le chargeur
Le chargeur et le bloc-piles peuvent être laissés connectés
pour une durée indéterminée.
Instructions de nettoyage du chargeur
AVERTISSEMENT : Danger de
choc électrique. Débranchez le chargeur de la prise CA
avant de nettoyer. La saleté et la graisse peuvent être
retirées des surfaces extérieures du chargeur à l’aide
d’un linge ou d’une brosse souple non métallique. Ne
pas utiliser d’eau ou de solution nettoyante.
Remarques importantes sur le
chargement
1. Une vie plus longue et une meilleure performance
peuvent être obtenues si le bloc-piles est chargé lorsque
la température de l’air est située entre 18°C et 24°C
(65°F et 75°F). NE PAS charger le bloc-piles dans une
température de l’air sous +4,5°C (+40°F) ou au-dessus
de +40°C (+104°F). C’est important et cela préviendra
les dommages graves au bloc-piles.
2. Le chargeur et le bloc-piles peuvent devenir chauds
au toucher durant le chargement. C’est un état normal
et cela n’indique pas un problème. Pour faciliter
le refroidissement du bloc-piles après l’utilisation,
évitez de placer le chargeur ou le bloc-piles dans un
environnement chaud comme une remise en métal ou
une remorque non isolée.
3. Si le bloc-piles ne charge par de adéquatement :
a. Vérifiez le fonctionnement de la prise en branchant
une lampe ou un autre appareil;
b. Vérifiez si la prise d’alimentation est connectée à
un interrupteur d’éclairage qui s’éteint lorsque vous
éteignez les lumières;
c. Déplacez le chargeur et le bloc-piles dans un endroit
où la température de l’air ambiant est d’environ
18° à 24°C (65° à 75°F);
d. Si les problèmes de chargement persistent, apportez
l’outil, le bloc-piles et le chargeur dans votre centre
de services local.
4. Le bloc-piles doit être chargé lorsqu’il ne produit pas
assez de puissance sur les tâches qui étaient facilement
effectuées auparavant. NE PAS CONTINUER à utiliser
dans ces conditions. Suivez la procédure de chargement.
Vous pouvez aussi charger un bloc partiellement utilisé
au moment désiré sans effet indésirable sur le bloc-piles.
5. Les matières étrangères conductrices telles (sans y
être limitées) les poussières de meulage, les copeaux
métalliques, la laine d’acier, les feuillards d’aluminium ou
toute accumulation de particules conductrices devraient
être éloignées des ouvertures du chargeur. Débranchez
toujours le chargeur de l’alimentation lorsqu’il n’y a
aucun bloc-piles à l’intérieur. Débranchez le chargeur
avant de nettoyer.
6. Ne pas congeler ou immerger le chargeur dans l’eau ou
tout autre liquide.

FRANÇAIS
18
Recommandations d’entreposage
1. Le meilleur endroit pour l’entreposage est celui qui est
frais et sec loin de la lumière directe du soleil et de la
chaleur ou du froid excessif.
2. Pour un entreposage prolongé, il est recommandé
d’entreposer un bloc-piles entièrement chargé dans un
endroit sec et frais hors du chargeur pour des résultats
optimaux.
REMARQUE: Les blocs-piles ne doivent pas être
entreposés complètement déchargés. Le bloc-piles doit être
rechargé avant l’utilisation.
CONSERVEZ CES INSTRUCTIONS POUR
UTILISATION ULTÉRIEURE
SYMBOLES
L’étiquette sur votre outil peut comporter les symboles suivants.
Les symboles et les définitions sont les suivants:
V..................................volts
A .................................ampères
Hz ...............................hertz
W ................................watts
min ............................minutes
ou AC ...............courant alternatif
ou DC ..........courant continu
n
o ...............................sous vide
.............................Construction de classe I
............................... borne de mise à la minute
(mis à la terre)
............................
Construction de classe II
...........................symbole d´avertissement
../min ........................tours à la minute
Wh .............................. Watt Heures
ASSEMBLAGE
AVERTISSEMENT : Ne pas tenter
de modifier ou de réparer l’appareil.
Utilisation prévue
Votre aspirateur vertical sans fil 3 en 1 20V Max*
BLACK+DECKER a été conçu pour le nettoyage à sec. Cet
appareil est conçu pour un usage domestique seulement.
Assemblage (Fig. D)
1. Alignez le haut du tube de rallonge
7
avec l’entrée de
l’aspirateur
5
comme illustré dans la Fig.D.
2. Poussez le tube de rallonge
7
dans l’entrée de
l’aspirateur
5
pour qu’il se verrouille en place.
3. Alignez le bas du tube de rallonge
7
avec la brosse
pour plancher
11
comme illustré dans la Fig.C.
4. Poussez le bas du tube de rallonge
7
dans la brosse
pour planchers
11
pour qu’il se verrouille en place.
5. Pour retirer un accessoire, appuyez sur le verrou de
déblocage
8
de l’accessoire sur l’entrée de l’aspirateur
ou le bas du tube de rallonge et retirez doucement
l’accessoire connecté.
AVERTISSEMENT : Lorsqu’elle
n’est pas utilisée, placez l’unité avec l’arrière de
l’aspirateur face à un mur de sorte qu’elle ne tombe
pas sur un enfant ou un animal domestique.
Fig. D
5
7
11
8
8
FONCTIONNEMENT
AVERTISSEMENT : Afin
de réduire le risque de blessure corporelle,
éteignez l’appareil et débranchez-le de la
source d’alimentation avant d’effectuer tout
ajustement ou de retirer/installer des pièces
ou des accessoires. Un démarrage accidentel peut
causer des blessures.
Installer et retirer le bloc-piles (Fig. A)
REMARQUE: Pour une meilleure performance, assurez-
vous que le bloc-piles est rechargé à 100%.
Pour installer le bloc-piles
16
dans l’outil, alignez le bloc-
piles avec les glissières à l’intérieur de la poignée de l’outil
et glissez-le dans la poignée jusqu’à ce que le bloc-piles soit
bien placé dans l’outil et assurez-vous qu’il est enclenché.
Pour retirer le bloc-piles de l’outil, appuyez sur le bouton
de libération
17
et tirez-le fermement hors de la poignée
de l’outil. Insérez-le dans le chargeur tel que décrit dans la
section du chargeur du présent manuel.
UTILISATION
L’aspirateur peut être utilisé de quatre façons.
• Avec le tube de rallonge
7
et la brosse pour planchers
11
. (Fig. E)
• Avec la brosse pour planchers
11
. (Fig. F)
La page charge ...
La page charge ...
La page charge ...
La page charge ...
La page charge ...
La page charge ...
La page charge ...
La page charge ...
La page charge ...
La page charge ...
La page charge ...
La page charge ...
La page charge ...
La page charge ...
La page charge ...
La page charge ...
La page charge ...
La page charge ...
La page charge ...
La page charge ...
-
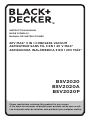 1
1
-
 2
2
-
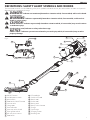 3
3
-
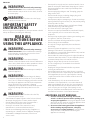 4
4
-
 5
5
-
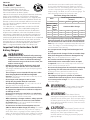 6
6
-
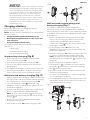 7
7
-
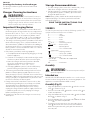 8
8
-
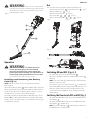 9
9
-
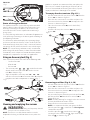 10
10
-
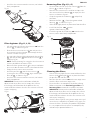 11
11
-
 12
12
-
 13
13
-
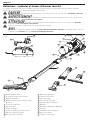 14
14
-
 15
15
-
 16
16
-
 17
17
-
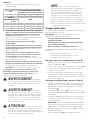 18
18
-
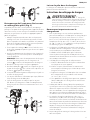 19
19
-
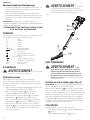 20
20
-
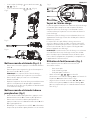 21
21
-
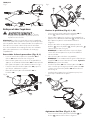 22
22
-
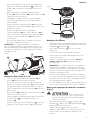 23
23
-
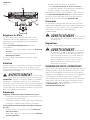 24
24
-
 25
25
-
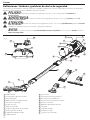 26
26
-
 27
27
-
 28
28
-
 29
29
-
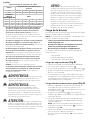 30
30
-
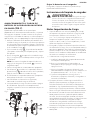 31
31
-
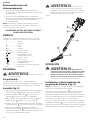 32
32
-
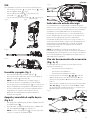 33
33
-
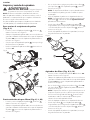 34
34
-
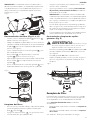 35
35
-
 36
36
-
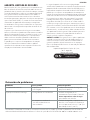 37
37
-
 38
38
-
 39
39
-
 40
40


Black & Decker BSV2020 Le manuel du propriétaire
- Catégorie
- Aspirateurs
- Taper
- Le manuel du propriétaire
dans d''autres langues
Documents connexes
-
Black & Decker HFEK520J Manuel utilisateur
-
-
-
-
-
-
-
-
-
