Sony DPP-EX5 Le manuel du propriétaire
- Catégorie
- Cadres photo numériques
- Taper
- Le manuel du propriétaire

DPP-EX5
3-207-119-16 (2)
2002 Sony Corporation
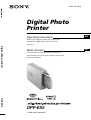
Digital Photo
Printer
GB
FR
Operating Instructions
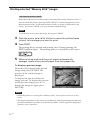
Before operating this printer, please read this
manual thoroughly and retain it for future
reference.
Mode d’emploi
Avant d’utiliser cette imprimante, veuillez lire
attentivement ce manuel et le conserver pour toute
référence ultérieure.
Digital Photo Printer
DPP-EX5

2
GB
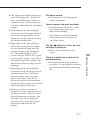
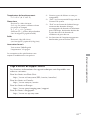
WARNING
To prevent fire or shock hazard, do
not expose the unit to rain or
moisture.
To avoid electrical shock, do not open
the cabinet. Refer servicing to
qualified personnel only.
CAUTION
Pictures and/or Sound distortion may occur if
this product is positioned in close proximity to
equipment emitting electromagnetic radiation.
CAUTION
Sony shall assume no responsibility for any
accidental or consequential damages or loss
of the recording contents which may be
caused by use or malfunction of the printer or
“Memory Stick”.
Owner’s Record
The model and serial numbers are located
on the bottom. Record the serial number
in the space provided below. Refer to this
number whenever you call upon your
Sony dealer regarding this product.
Model No. DPP-EX5
Serial No.
For the customers in the U.S.A.
WARNING
This equipment has been tested and found to
comply with the limits for a Class B digital
device, pursuant to Part 15 of the FCC Rules.
These limits are designed to provide reasonable
protection against harmful interference in a
residential installation. This equipment generates,
uses, and can radiate radio frequency energy and,
if not installed and used in accordance with the
instructions, may cause harmful interference to
radio communications. However, there is no
guarantee that interference will not occur in a
particular installation. If this equipment does
cause harmful interference to radio or television
reception, which can be determined by turning
the equipment off and on, the user is encouraged
to try to correct the interference by one or more of
the following measures:
–Reorient or relocate the receiving antenna.
–Increase the separation between the
equipment and receiver.
– Connect the equipment into an outlet on a
circuit different from that to which the
receiver is connected.
– Consult the dealer or an experienced radio/
TV technician for help.
You are cautioned that any changes or
modifications not expressly approved in this
manual could void your authority to operate this
equipment.
The shielded interface cable recommended in this
manual must be used with this equipment in order
to comply with the limits for a digital device
pursuant to Subpart B of Part 15 of Fcc Rules.
If you have any questions about this product, you
may contact:
Sony’s Customer Information Services Center
(CISC) at 1-866-328-SONY (7669)
or Sony Web site at www.sony.com
WARNING
This unit has no power switch.
When installing the unit, incorporate a
readily accessible disconnect device in the
fixed wiring, or connect the power cord to
socket-outlet which must be provided near
the unit and easily accessible. If a fault should
occur during operation of the unit, operate
the disconnect device to switch the power
supply off, or disconnect the power cord.

3
GB
•Microsoft, MS, MS-DOS and Windows
®
are registered trademarks of Microsoft
Corporation in the United States and
other countries.
•IBM and PC/AT are registered
trademarks of International Business
Machines Corporation.
•MMX and Pentium are registered
trademarks of Intel Corporation.
•Apple, Macintosh, Power Macintosh,
and Mac OS are registered trademarks of
Apple Computer, Inc.
• “Memory Stick“, “ ”, “Memory Stick
PRO” and “MagicGate Memory Stick“
are trademarks of Sony Corporation.
•“MagicGate” is the trademark of Sony
Corporation.
•This printer uses Exif Print (Exif 2.2)
technology.
•All other companies and product names
mentioned herein may be the
trademarks or registered trademarks of
their respective companies. Furthermore,
“™” and “
®
” are not mentioned in each
case in this manual.
GB
Declaration of Conformity
Trade Name: SONY
Model No.: DPP-EX5
Responsible Party:
Sony Electronics Inc.
Address: 680 Kinderkamarck Road,
Oradell NJ 07649 U.S.A.
Telephone No.: 201-930-6972
This device complies with part 15 of the
FCC Rules. Operation is subject to the
following two conditions:
(1) this device may not cause harmful
interference, and (2) this device must
accept any interference received, including
interference that may cause undesired
operation.
Duplication, edition, or printing of a CD,
TV programs, copyrighted materials such
as pictures or publications, or any other
materials except for your own recording or
creation is limited to private or domestic
use only. Unless you hold copyright or
have permission of copyright holders for
the materials to be duplicated, use of those
materials beyond this limit may infringe
the provisions of the copyright law and be
subject to the copyright holder’s claim for
damages.
When using photo images with this
printer, pay special attention not to
infringe the provisions of the copyright
law. Any unauthorized use or
modification of others’ portrait may also
infringe their rights.
For some demonstrations, performances,
or exhibits, photography may be
forbidden.
Backup recommendations
To avoid potential risk of data loss caused
by accidental operation or malfunction of
the printer, we recommend that you save a
backup copy of your data.
Information
IN NO EVENT SHALL SELLER BE LIABLE
FOR ANY DIRECT, INCIDENTAL OR
CONSEQUENTIAL DAMAGES OF ANY
NATURE, OR LOSSES OR EXPENSES
RESULTING FROM ANY DEFECTIVE
PRODUCT OR THE USE OF ANY
PRODUCT.

4
GB
Notice for users
Program © 2002 Sony Corporation
Documentation ©2002 Sony Corporation
A
ll rights reserved. This manual or the software
described herein, in whole or in part, may not
be reproduced, translated or reduced to any
machine readable form without prior written
approval from Sony Corporation.
IN NO EVENT SHALL SONY CORPORATION
BE LIABLE FOR ANY INCIDENTAL,
CONSEQUENTIAL OR SPECIAL DAMAGES,
WHETHER BASED ON TORT, CONTACT, OR
OTHERWISE, ARISING OUT OF OR IN
CONNECTION WITH THIS MANUAL, THE
SOFTWARE OR OTHER INFORMATION
CONTAINED HEREIN OR THE USE THEREOF.
By breaking the seal of the envelope of the CD-
ROM package, you accept all the terms and
conditions of this agreement. If you do not
accept these terms and conditions, please
return this disk envelope unopened, along with
the rest of the package, immediately to the
dealer where you obtained it.
Sony Corporation reserves the right to make
any modification to this manual or the
information contained herein at any time
without notice.
The software described herein may also be
governed by the terms of a separate user license
agreement.
User Registration
To receive customer services, complete and
return the registration card included in your
package.
Any design data such as sample pictures
provided in this software cannot be modified or
duplicated except for the purpose of personal
use. Any unauthorized duplication of this
software is prohibited under copyright law.
Please note that unauthorized duplication or
modification of others’ portraits or copyrighted
work could infringe the rights reserved by right
holders.
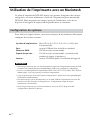
Table of contents
Getting started
Features .................................................. 6
Unpacking the printer ............................. 8
Identifying the parts ............................... 9
Setting up
1 Connecting the printer.................... 12
Connecting to a television ....................... 12
Connecting the AC power cord ................ 13
Inserting a “Memory Stick” ..................... 14
Connecting to a computer (optional) ....... 15
2 Preparing the printing pack ............ 16
3 Loading the print cartridge ............. 17
4 Inserting the print paper ................. 19
Basic printing operations
Printing selected
“Memory Stick” images ................. 21
Printing all the images or DPOF preset
images at one time ......................... 25

5
GB
Advanced printing operations
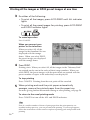
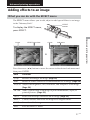
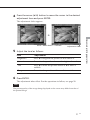
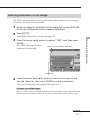
Adding effects to an image .................. 27
What you can do with the EFFECT menu .. 27
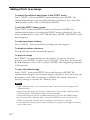
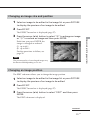
Changing an image size and position ...... 29
Changing an image position .................... 29
Adjusting the pictures ............................. 30
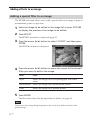
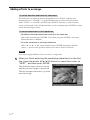
Adding a special filter to an image .......... 32
Entering characters on an image .............. 33
Making various prints
(CREATIVE PRINT)........................... 36
What you can do with the CREATIVE PRINT
menu ...................................................... 36
Making a card ......................................... 38
Making a calendar .................................. 42
Making a sticker...................................... 44
Making split images ................................ 45
Setting the printer (MENU) ................... 47
What you can do with the MENU ............ 47
Changing the printer preferences
(SETUP) ................................................... 48
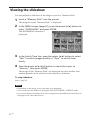
Viewing the slideshow.......................... 52
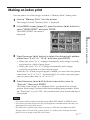
Making an index print .......................... 53
Deleting images .................................... 54
Deleting selected image(s) ....................... 54
Formatting a “Memory Stick” .................. 55
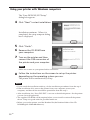
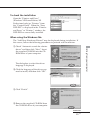
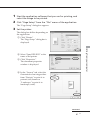
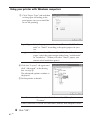
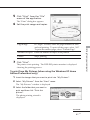
Printing from your computer
Using your printer with Windows
computers ....................................... 56
System requirements ............................... 56
Installing the printer driver ...................... 57
Printing from a application software ........ 60
Using your printer with Macintosh
computers ....................................... 66
System requirements ............................... 66
Installing the printer driver ...................... 67
Printing from a application software ........ 70
Additional information
Precautions ........................................... 73
About the “Memory Stick” ................... 75
What is “Memory Stick”? ........................ 75
Types of “Memory Stick”......................... 75
Types of “Memory Stick” that the printer can
use ......................................................... 75
Notes on use ........................................... 76
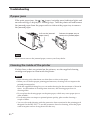
Troubleshooting ................................... 78
If paper jams ........................................... 80
Cleaning the inside of the printer ............. 80
Specifications ....................................... 82
Glossary ................................................ 84
Index .................................................... 85

6
GB
Getting started
Features
With the Digital Photo Printer DPP-EX5, you can print images of a “Memory
Stick” or a computer.
Photo-realistic printing
With its dye sublimation printing system, the printer can make photo-
realistic prints meeting a number of different requirements.
Super Coat 2 feature
The Super Coat 2 enables high durability and moisture or fingerprint
resistance, keeping your prints in good picture quality for an extended
period of time.
Auto Fine Print 2 feature (page 49)
The Auto Fine Print 2 analyses the picture information of an image and
corrects it as vivid, clear, and natural picture.
Exif 2.2* (Exif Print) support (page 49)
The printer supports Exif 2.2. When the Auto Fine Print 2 is effective, the
printer automatically adjusts an image saved by a digital still camera
compatible with the Exif Print standard and then print it with optimal
picture quality (for JPEG files only).
Selection of print sizes and border/borderless print (page 49)
You can select from a large, dynamic Post Card (4 x 6 inch) size/3.5 x 5 inch
size print or an economical Small (3.5 x 4 inch) size print. For the Post Card
(4 x 6 inch) size and 3.5 x 5 inch size prints, you can also select a borderless or
border print.
Selection of print finish (page 49)
You can select the print finish from either glossy or texture.
Paper tray allowing bulk printing of 25/30 sheets (page 19)
With the supplied paper tray, you can print up to 25 sheets for Post Card (4 x
6 inch) size and 30 sheets for 3.5 x 5 inch size and Small (3.5 x 4 inch) size
print paper at one time.
* Exif (Exchangeable image file format for digital still cameras) Print is a global
standard for digital photo printing. A digital still camera supporting Exif Print
stores the data relevant to the conditions of shooting as each shot is taken. The
printer utilises the Exif Print data stored in each image file to ensure the printed
result matches the original shot as closely as possible.

7
GB
Getting started
A wide variety of image processing and adjustments without
using a computer (page 27)
A variety of image processing functions allow you to magnify/reduce, rotate,
or move the image. You can also enter and overlay characters on an image or
add a special effect to the picture to produce sepia, monochrome, or paint
pictures. Adjustments of brightness, hue, and other elements of picture
quality are possible.
A wider variety of prints of “Memory Stick” images without using
a computer
x You can view the digital still camera images stored in a “Memory Stick”
on your television screen and print them without using your computer.
x All the contained images or all the DPOF (Digital Print Order Format)
preset images can be printed at one time (page 25).
x You can make various types prints such as a standard image print, a date
print, or an index print of the images stored in a “Memory Stick”. You
can also enjoy a slideshow of the images stored in a “Memory Stick”
(page 52).
x The CREATIVE PRINT menu allows you to make even more types of
prints such as an original card, calendar, split images, a sticker with
framed images (page 36).
For the “Memory Stick”, see page 75.
Printing from your computer with a convenient USB connection
(page 56)
By connecting the printer and your computer with the USB cable supplied
and installing the supplied DPP-EX5 printer driver software on your
computer, you can print images from your computer.

8
GB
Unpacking the printer
Make sure that the following accessories are supplied with your printer.
• AC power cord (1)
• Video connection cable (1)
• Paper tray (1)
• CD-ROM (1)
–Sony DPP-EX5/EX7 Printer
Driver Software
for Windows® 98/98SE/Me/
2000 Professional/XP Home
Edition/XP Professional
for MAC OS 8.6/9.0/9.1/9.2/
X (v10.1/v10.2)
–Operating Instructions
• Cleaning kit (a set of cleaning paper
and cartridge) (1)
• Operating Instructions (1)
• Warranty (1)
• Owner registration card (1)
• Sony End User Software License
Agreement (1)
Notes
•The AC power cord illustrated is for 120V only. The plug shape and specifications
change depending on the region you use the printer.
•Never insert the CD-ROM supplied with the printer into a CD player or other audio
player, which may cause serious damage to your ears, speaker system, or
earphones, or malfunctions to the audio device.

9
GB
Getting started
For details, see the pages indicated in
the parentheses.
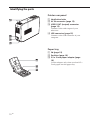
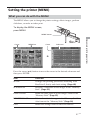
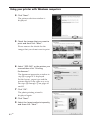
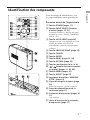
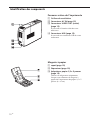
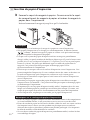
Printer front panel
1 POWER button (pages 17)
2 INPUT SELECT button/Input
indicators (pages 15, 21)
Switches the input. The indicator for the
current input signal lights (“MEMORY
STICK”/PC).
3 AUTO PRINT button (page 26)
Each time you press the button, ALL and
DPOF printing modes switch. The
relevant indicator lights.
4 CREATIVE PRINT button (page 36)
5 CANCEL button
6 ENTER button
7 PRINT button (pages 22, 24)
8 PICTURE button (page 22)
9 Arrow (B/b/V/v) button
0
/
(paper or cartridge error
indicator ) (pages 17, 20, 80)
qa MENU button (pages 47)
qs EFFECT button (page 27)
qd “MEMORY STICK” insertion slot
(page 14)
qf Paper tray compartment lid (page
20)
Insert the supplied paper tray here.
qg Cartridge compartment lid (page
17)
qh Print cartridge (pages 16, 17)
(Not supplied)
qj Print cartridge eject lever (page
17)
Identifying the parts
Continued

10
GB
Identifying the parts
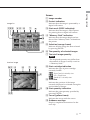
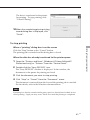
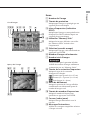
Paper tray
1 lid (page 19)
2 Partition (page 19)
3 3.5 x 5 inch paper adaptor (page
19)
Use the adaptor only when you feed 3.5 x
5 inch paper into the paper tray.
Printer rear panel
1 Ventilation holes
2 AC IN connector (page 13)
3 VIDEO OUT (output) connector
(page 12)
Connects to the video input of your
television.
4 USB connector (page 15)
Connects to the USB connector of your
computer.

11
GB
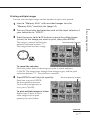
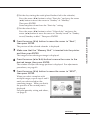
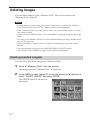
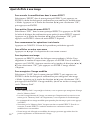
Getting started
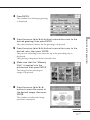
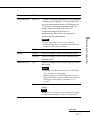
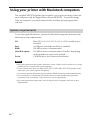
Preview image
Screen
1 Image number
2 Protect indication
Indicates that the image is protected by a
digital still camera.
3 Print mark (DPOF indication)
Indicates that the image is DPOF preset
for printing from a digital still camera.
4 “Memory Stick” indication
Indicates that the images displayed are
those of the “Memory Stick” inserted into
the printer.
5 Selection (orange frame)
Indicates that the image has been selected
by pressing ENTER.
6 The quantity of selected images
7 The total image quantity
Note
The displayed quantity may differ from
the number of images actually saved on
a “Memory Stick”.
8 Print cartridge indication
Indicates the type of print cartridge
currently loaded:
: Post Card (4 x 6 inch) size
: 3.5 x 5 inch size
: Small (3.5 x 4 inch) size
9 Scroll bar
Indicates the position of the image
currently displayed or selected among the
total number of images.
0 Print quantity indication
Indicates the print quantity specified by
pressing ENTER.
qa Cursor (yellow frame)
Indicates the image with the cursor.
qs Guidance message
Displays simplified instructions for the
next step.
1
2
345
67
qa
q;
9
8
qs
9
7
3
2
1q;
4
8
qs
6
Image list

12
GB
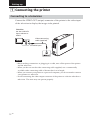
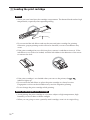
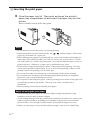
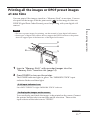
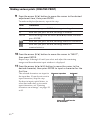
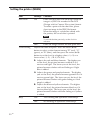
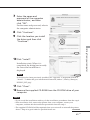
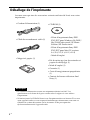
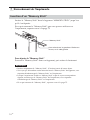
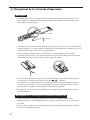
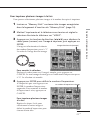
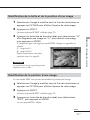
1 Connecting the printer
Setting up
To VIDEO input
Connecting to a television
Connect the VIDEO OUT (output) connector of the printer to the video input
of the television to display the images to be printed.
Television
Set the VIDEO/TV
input selector to
VIDEO.
Video connecting
cable (supplied)
Notes
•Before making connections or plugging in a cable, turn off the power of the printer
and the television.
•When you do not use the video connecting cable supplied, use a commercially
available video connecting cable of shorter than 3 m in length.
•When you connect your printer to a personal computer, you do not need to connect
your printer to a television.
•Avoid connecting the video output connector of the printer to a device other than a
television. The units may not operate properly.

13
GB
Setting up
Continued
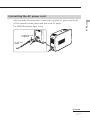
Connecting the AC power cord
After you make the connections, connect the supplied AC power cord to the
AC IN connector of the printer and then to an AC outlet.
The POWER indicator lights in red.
To the wall
outlet
AC power cord
(supplied)

14
GB
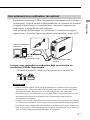
1 Connecting the printer
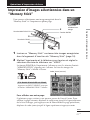
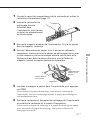
Inserting a “Memory Stick”
Insert the “Memory Stick” into the “MEMORY STICK” insertion slot until it
clicks into place.
For the “Memory Stick” that you can use with the printer, see page 75.
“Memory Stick”
With the notch facing left and the arrow facing
forward on the left
To eject the “Memory Stick”
Push the “Memory Stick” further into the insertion slot and then remove it
slowly.
Notes
•Insert the “Memory Stick” only. Do not insert any other objects.
•Do not attempt to force a “Memory Stick” into or out of the slot. If you do, the
“Memory Stick” or the printer may be damaged.
•When the printer is accessing the “Memory Stick” or the MEMORY STICK indicator
flashes, do not remove the “Memory Stick” from the printer. If you do, the “Memory
Stick” or the printer may be damaged.
•For the “Memory Stick”, see page 75.

15
GB
Setting up
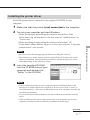
Connecting to a computer (optional)
Connect the USB connectors of the printer and your computer (Windows PC
or Macintosh) with a commercially available USB cable. By installing the
supplied driver software on your computer, you can print an image from your
computer. For details on how to install and operate the software, see
“Printing from your computer” (pages 56–72).
When you connect a computer that is already powered on to the
USB connector of the printer
The PC input indicator lights and the printer enters the PC mode.
Notes
•Use a commercially available A-B TYPE USB cable of shorter than 3m in length.
The type of a USB cable you should use may change depending on the computer. For
details, see the instructions manual of your computer.
•Do not remove or connect the USB cable into or from the printer during the data
communication or printing. The printer may not work properly.
•When you connect your printer to a television, no pictures are displayed on the
television in the PC mode. This is not due to trouble with the printer.
•Refer to the instruction manual of your computer for further information.
•You cannot use the printer and the printer driver on a network or with a
commercially available printer buffer.
Windows/Macintosh
computer
To USB connector
To USB connector (B-TYPE)

16
GB
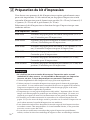
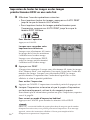
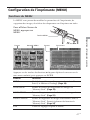
2 Preparing the printing pack
You need an optional printing pack designed for the printer. The pack contains
a set of print paper and a print cartridge for either Post Card (4 x 6 inch) size,
3.5 x 5 size, or Small (3.5 x 4 inch) size prints.
Select the printing pack according to the type of printing you intend to do:
Printing pack Contents
SVM-25LS 25 sheets of Post Card (4 x 6 inch) size photo paper/Print
cartridge for 25 prints
SVM-25LW 25 sheets of Post Card (4 x 6 inch) size sticker/Print
cartridge for 25 prints
SVM-30MS 30 sheets of 3.5 x 5 inch size photo paper/Print cartridge for
30 prints
SVM-30SS 30 sheets of Small (3.5 x 4 inch) size photo paper/Print
cartridge for 30 prints
SVM-30SW 30 sheets of Small (3.5 x 4 inch) size stickers/Print cartridge
for 30 prints
SVM-30SW09 30 sheets of Small (3.5 x 4 inch) size 9-split stickers/Print
cartridge for 30 prints
Notes
• Do not rewind the ink ribbon and use the rewound print cartridge for printing.
Otherwise, proper printing result will not be obtained, or even a breakdown
may occur.
•Use the printing pack for this printer only.
•Always use the print cartridge designed for the size of the print paper you use. If
you mix cartridges and paper of different types or sizes, printing may not be possible,
or a paper jam or other trouble may occur.
•Do not print on the used print paper. Printing an image twice on the same paper will
not make the printed image thicker. This may even cause a malfunction or
breakdown.
•Do not touch the ink ribbon of the print cartridge or the printing surface of the print
paper. If there are fingerprints or dust on the printing surface or the ink ribbon, the
printing quality may deteriorate.
•For high quality prints, avoid placing the printing pack in locations that are subject to
high temperature, high humidity, excessive dust, or direct sunlight.
•When storing a partially-used pack of the print cartridge and print paper, store it in
its original bag or in a similar container.

17
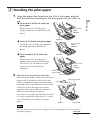
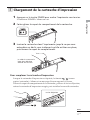
GB
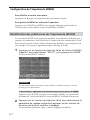
Setting up
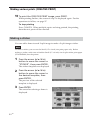
1
Press the POWER button to turn on the printer.
The POWER indicator lights in green.
2
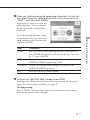
Slide open the cartridge compartment lid.
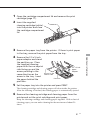
3 Insert the print cartridge into the printer firmly until it clicks
into place and close the cartridge compartment lid.
The side with the Sony logo
facing up
To replace the print cartridge
When the print cartridge runs out, the
/
(paper/cartridge error)
indicator lights and an error message appears on the screen.
Open the cartridge compartment lid, push the eject lever, remove the used
print cartridge, and then insert a new cartridge.
/
indicator
3 Loading the print cartridge
Continued
Eject lever

18
GB
3 Loading the print cartridge
Notes
•Never put your hand into the cartridge compartment. The thermal head reaches high
temperatures, especially after repeated printing.
•Do not rewind the ink ribbon and use the rewound print cartridge for printing.
Otherwise, proper printing result will not be obtained, or even a breakdown may
occur.
•If the print cartridge does not click into place, remove it and then re-insert it. If the
ink ribbon is too slack to be loaded, wind the ink ribbon in the direction of the arrow
to remove the slack.
•If the print cartridge is not loaded when you turn on the printer, the
/
indicator lights up.
•Do not touch the ink ribbon or place the print cartridge in a dusty location.
Fingerprints or dust on the ink ribbon may result in imperfect printing.
•Do not change the print cartridge while printing.
Notes on storing the print cartridge
•Avoid placing the print cartridge in a location subject to high temperatures, high
humidity, excessive dust or direct sunlight
•When you are going to store a partially-used cartridge, store it in its original bag.

19
GB
Setting up
Partition
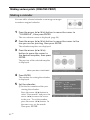
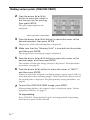
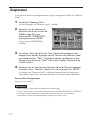
4 Inserting the print paper
1 Open the paper tray lid and set the 3.5 x 5 inch paper adaptor
and the partition according to the print paper size you want to
use.
x To use Post Card (4 x 6 inch) size
print paper
Remove the 3.5 x 5 inch paper
adaptor and leave the partition laid
down.
x To use 3.5 x 5 inch size print paper
Leave the 3.5 x 5 inch paper adaptor
installed and the partition laid
down.
x To use Small (3.5 x 4 inch) size
paper
Remove the 3.5 x 5 inch paper
adaptor and stand the partition up.
The Small (3.5 x 4 inch) size print
paper is to be set behind the
partition.
2 Set the print paper into the tray.
Riffle the print paper. Then insert the print
paper with its printing surface (the side
with no imprint) facing up and the arrow
pointing in the same direction as the arrow
in the tray. Insert the protective sheet
together with paper, and then remove it
after you have placed the paper.
You can set up to 25 sheets for Post Card (4
x 6 inch) size and 30 sheets for 3.5 x 5 inch
size and Small (3.5 x 4 inch) size print
paper.
Note
Do not touch the printing surface. Fingerprints on the printing surface may result in
imperfect printing.
3.5 x 5 inch
paper
adaptor
Arrow
Front side
Printing surface
Continued
3.5 x 5 inch
paper
adaptor
Partition
Small size
print paper
Partition
3.5 x 5 inch
paper
adaptor

20
GB
4 Inserting the print paper
3 Close the paper tray lid. Then push and open the printer’s
paper tray compartment lid and insert the paper tray into the
printer.
Insert it firmly until it clicks into place.
Notes
•Do not remove or insert the paper tray during printing.
•If print paper does not feed automatically, the
/
indicator lights. Pull out the
paper tray and check for a paper jam.
•When adding print paper to a partially full tray, make sure that the total number of
sheets does not exceed 25 for the Post Card (4 x 6 inch) size or 30 for the 3.5 x 5 inch
size and Small (3.5 x 4 inch) size print paper. Do not place different types or sizes of
paper in the tray. Otherwise, a paper jam or malfunction may occur.
•Do not write or type on the printing surface of the paper before printing. You may
not be able to proceed with printing. If you want to write greetings or draw on the
printed surface after printing, use an oil ink pen.
•Do not attach stickers or anything else on the printing surface before printing.
•Do not remove the backing from sticker print paper before printing is completed.
Otherwise, jams or printer damage may occur.
•Do not print on the used print paper. Printing an image twice on the same paper will
not make the printed image thicker. This may even cause a malfunction or
breakdown.
•Before printing, do not fold or bend the print paper.
Notes on storing the print paper
•Avoid placing the print paper in a location subject to high temperatures, high
humidity, excessive dust or direct sunlight.
•Avoid storing the paper with the printed faces touching each other or in contact with
rubber or plastic products including vinyl chloride or plasticizer for an extended
period of time; color changes or deterioration of the printed image may occur.
•When you are going to store partially-used print paper, store it in its original bag.
La page est en cours de chargement...
La page est en cours de chargement...
La page est en cours de chargement...
La page est en cours de chargement...
La page est en cours de chargement...
La page est en cours de chargement...
La page est en cours de chargement...
La page est en cours de chargement...
La page est en cours de chargement...
La page est en cours de chargement...
La page est en cours de chargement...
La page est en cours de chargement...
La page est en cours de chargement...
La page est en cours de chargement...
La page est en cours de chargement...
La page est en cours de chargement...
La page est en cours de chargement...
La page est en cours de chargement...
La page est en cours de chargement...
La page est en cours de chargement...
La page est en cours de chargement...
La page est en cours de chargement...
La page est en cours de chargement...
La page est en cours de chargement...
La page est en cours de chargement...
La page est en cours de chargement...
La page est en cours de chargement...
La page est en cours de chargement...
La page est en cours de chargement...
La page est en cours de chargement...
La page est en cours de chargement...
La page est en cours de chargement...
La page est en cours de chargement...
La page est en cours de chargement...
La page est en cours de chargement...
La page est en cours de chargement...
La page est en cours de chargement...
La page est en cours de chargement...
La page est en cours de chargement...
La page est en cours de chargement...
La page est en cours de chargement...
La page est en cours de chargement...
La page est en cours de chargement...
La page est en cours de chargement...
La page est en cours de chargement...
La page est en cours de chargement...
La page est en cours de chargement...
La page est en cours de chargement...
La page est en cours de chargement...
La page est en cours de chargement...
La page est en cours de chargement...
La page est en cours de chargement...
La page est en cours de chargement...
La page est en cours de chargement...
La page est en cours de chargement...
La page est en cours de chargement...
La page est en cours de chargement...
La page est en cours de chargement...
La page est en cours de chargement...
La page est en cours de chargement...
La page est en cours de chargement...
La page est en cours de chargement...
La page est en cours de chargement...
La page est en cours de chargement...
La page est en cours de chargement...
La page est en cours de chargement...
La page est en cours de chargement...
La page est en cours de chargement...
La page est en cours de chargement...
La page est en cours de chargement...
La page est en cours de chargement...
La page est en cours de chargement...
La page est en cours de chargement...
La page est en cours de chargement...
La page est en cours de chargement...
La page est en cours de chargement...
La page est en cours de chargement...
La page est en cours de chargement...
La page est en cours de chargement...
La page est en cours de chargement...
La page est en cours de chargement...
La page est en cours de chargement...
La page est en cours de chargement...
La page est en cours de chargement...
La page est en cours de chargement...
La page est en cours de chargement...
La page est en cours de chargement...
La page est en cours de chargement...
La page est en cours de chargement...
La page est en cours de chargement...
La page est en cours de chargement...
La page est en cours de chargement...
La page est en cours de chargement...
La page est en cours de chargement...
La page est en cours de chargement...
La page est en cours de chargement...
La page est en cours de chargement...
La page est en cours de chargement...
La page est en cours de chargement...
La page est en cours de chargement...
La page est en cours de chargement...
La page est en cours de chargement...
La page est en cours de chargement...
La page est en cours de chargement...
La page est en cours de chargement...
La page est en cours de chargement...
La page est en cours de chargement...
La page est en cours de chargement...
La page est en cours de chargement...
La page est en cours de chargement...
La page est en cours de chargement...
La page est en cours de chargement...
La page est en cours de chargement...
La page est en cours de chargement...
La page est en cours de chargement...
La page est en cours de chargement...
La page est en cours de chargement...
La page est en cours de chargement...
La page est en cours de chargement...
La page est en cours de chargement...
La page est en cours de chargement...
La page est en cours de chargement...
La page est en cours de chargement...
La page est en cours de chargement...
La page est en cours de chargement...
La page est en cours de chargement...
La page est en cours de chargement...
La page est en cours de chargement...
La page est en cours de chargement...
La page est en cours de chargement...
La page est en cours de chargement...
La page est en cours de chargement...
La page est en cours de chargement...
La page est en cours de chargement...
La page est en cours de chargement...
La page est en cours de chargement...
La page est en cours de chargement...
La page est en cours de chargement...
La page est en cours de chargement...
La page est en cours de chargement...
La page est en cours de chargement...
La page est en cours de chargement...
La page est en cours de chargement...
La page est en cours de chargement...
La page est en cours de chargement...
La page est en cours de chargement...
La page est en cours de chargement...
La page est en cours de chargement...
La page est en cours de chargement...
La page est en cours de chargement...
La page est en cours de chargement...
La page est en cours de chargement...
-
 1
1
-
 2
2
-
 3
3
-
 4
4
-
 5
5
-
 6
6
-
 7
7
-
 8
8
-
 9
9
-
 10
10
-
 11
11
-
 12
12
-
 13
13
-
 14
14
-
 15
15
-
 16
16
-
 17
17
-
 18
18
-
 19
19
-
 20
20
-
 21
21
-
 22
22
-
 23
23
-
 24
24
-
 25
25
-
 26
26
-
 27
27
-
 28
28
-
 29
29
-
 30
30
-
 31
31
-
 32
32
-
 33
33
-
 34
34
-
 35
35
-
 36
36
-
 37
37
-
 38
38
-
 39
39
-
 40
40
-
 41
41
-
 42
42
-
 43
43
-
 44
44
-
 45
45
-
 46
46
-
 47
47
-
 48
48
-
 49
49
-
 50
50
-
 51
51
-
 52
52
-
 53
53
-
 54
54
-
 55
55
-
 56
56
-
 57
57
-
 58
58
-
 59
59
-
 60
60
-
 61
61
-
 62
62
-
 63
63
-
 64
64
-
 65
65
-
 66
66
-
 67
67
-
 68
68
-
 69
69
-
 70
70
-
 71
71
-
 72
72
-
 73
73
-
 74
74
-
 75
75
-
 76
76
-
 77
77
-
 78
78
-
 79
79
-
 80
80
-
 81
81
-
 82
82
-
 83
83
-
 84
84
-
 85
85
-
 86
86
-
 87
87
-
 88
88
-
 89
89
-
 90
90
-
 91
91
-
 92
92
-
 93
93
-
 94
94
-
 95
95
-
 96
96
-
 97
97
-
 98
98
-
 99
99
-
 100
100
-
 101
101
-
 102
102
-
 103
103
-
 104
104
-
 105
105
-
 106
106
-
 107
107
-
 108
108
-
 109
109
-
 110
110
-
 111
111
-
 112
112
-
 113
113
-
 114
114
-
 115
115
-
 116
116
-
 117
117
-
 118
118
-
 119
119
-
 120
120
-
 121
121
-
 122
122
-
 123
123
-
 124
124
-
 125
125
-
 126
126
-
 127
127
-
 128
128
-
 129
129
-
 130
130
-
 131
131
-
 132
132
-
 133
133
-
 134
134
-
 135
135
-
 136
136
-
 137
137
-
 138
138
-
 139
139
-
 140
140
-
 141
141
-
 142
142
-
 143
143
-
 144
144
-
 145
145
-
 146
146
-
 147
147
-
 148
148
-
 149
149
-
 150
150
-
 151
151
-
 152
152
-
 153
153
-
 154
154
-
 155
155
-
 156
156
-
 157
157
-
 158
158
-
 159
159
-
 160
160
-
 161
161
-
 162
162
-
 163
163
-
 164
164
-
 165
165
-
 166
166
-
 167
167
-
 168
168
-
 169
169
-
 170
170
-
 171
171
-
 172
172


Sony DPP-EX5 Le manuel du propriétaire
- Catégorie
- Cadres photo numériques
- Taper
- Le manuel du propriétaire
dans d''autres langues
- English: Sony DPP-EX5 Owner's manual
Documents connexes
-
Sony DPF-D70 Guide d'installation
-
Sony DPP-EX7 Mode d'emploi
-
Sony DPP-SV55 Mode d'emploi
-
-
-
-
Sony DPP-FP60 Mode d'emploi
-
Sony DPP-SV77 Manuel utilisateur
-
-
Autres documents
-
Lexmark 310 series Manuel utilisateur
-
Olympus P-10 Manuel utilisateur
-
-
-
-
 Prinics BP-100 Bolle Photo Le manuel du propriétaire
-
 ARTECHPRO LNTB1 Mode d'emploi
-
Pyramid 2500/2650Pro Mode d'emploi
-
HID Global PLT-05151 FARGO DTCii Plus Power Trusted Identities Mode d'emploi

