Liebherr CBS1360 Mode d'emploi
- Catégorie
- Réfrigérateurs-congélateurs
- Taper
- Mode d'emploi

CBS 1360
7085 551-00
Use and
Care Manual
For NoFrost Combined
Refrigerator-Freezers with IceMaker
Manuel
d'utilisation et
d'entretien
Pour les combinés
réfrigérateur-congélateur
NoFrost avec IceMaker
Page 20
Instrucciones
de manejo y de
mantenimiento
Para combinados
frigorífico-congelador
NoFrost con IceMaker
Página 38

2
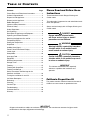
Contents Page
Please Read and Follow these Instructions.................. 2
California Proposition 65 ............................................... 2
Disposal of Old Appliance ............................................. 3
Disposal of this Appliance ............................................. 3
R600a Refrigerant ......................................................... 3
Important Safety Information ......................................... 4
Electrical Safety ............................................................. 5
Safety Regulations ......................................................... 5
Saving energy ................................................................ 6
Description of Appliance and Equipment ...................... 6
Operating and Control Elements ................................... 7
Switching the Appliance On and Off ............................. 8
Temperature Display ...................................................... 8
Setting the Temperature ................................................ 8
SuperCool ...................................................................... 9
Audible Alarm Signal ..................................................... 9
Power Failure/FrostControl Display............................... 9
Interior Light ................................................................... 9
Setup Mode ...................................................................10
Arranging Food .............................................................12
Equipment .....................................................................13
BioFresh Compartment ................................................14
Storage Times .............................................................14
Freezing ........................................................................15
Freezing with SuperFrost ..............................................15
Freezing and Storage ...................................................15
Safety Instructions and Warnings for the
Automatic Ice Maker
......................................................16
Turning the Ice Maker On and Off ...............................16
Ice Maker Description ..................................................16
Defrosting ......................................................................16
Cleaning ........................................................................17
Vacation Tips ................................................................17
Troubleshooting ............................................................18
Customer Service .........................................................18
Warranty ........................................................................ 19
IMPORTANT
All types and models are subject to continuous improvement. The manufacturer reserves the right to make
modifications to the shape, equipment and technology.
T
able
of
C
onTenTs
Please Read and Follow these
Instructions
These instructions contain Danger, Warning and
Caution notes.
This information is important for safe and efficient instal-
lation and operation.
Always read and comply with all Danger, Warning and
Caution notes!
DANGER!
Danger indicates a hazard which
will cause serious injury or death if
precautions are not followed.
WARNING!
Warning indicates a potentially hazardous
situation which, if not avoided, could
result in death or serious injury.
CAUTION!
Caution indicates a potentially hazardous
situation which, if not avoided, may result
in minor or moderate injury.
IMPORTANT
This indicates information that is especially
relevant to a problem-free installation and
operation.
California Proposition 65
This product contains chemicals known to the state of
California to cause cancer or reproductive harm.

3
s
afeTy
Disposal of Old Appliance
DANGER!
Risk of child entrapment.
Child entrapment and suffocation are not problems of
the past.
Junked or abandoned refrigerators are still dangerous –
even if they will sit for “just a few days.”
If you are getting rid of your old refrigerator, please
follow these instructions to help prevent accidents.
Before you discard old appliances:
• Takeoffthedoors.
• Leavetheshelvesinplacesothat
children may not easily climb inside.
• Cutoffthepowercablefromthe
discarded appliance. Discard separately
from the appliance.
• Besuretofollowyourlocalrequirements
for disposal of appliances.
Contact the trash collection agency in
your area for additional information.
Disposal of this Appliance
This appliance contains flammable gases
within the refrigeration circuit and insulation
foam.
Contact the municipality or disposal company
in your area for information on approved
recycling or disposal.
R600a Refrigerant
WARNING!
The refrigerant R600a contained within
the appliance is environmentally friendly,
butflammable.Leakingrefrigerantcan
ignite.
To prevent possible ignition, follow the
warnings below:
•
Keep ventilation openings, in
the appliance enclosure or in
the built-in structure, clear of
obstruction.
• Donotusemechanicaldevices
or other means to accelerate the
defrosting process,
other than
those recommended by the
manufacturer.
• Donotdamagetherefrigerantcircuit.
• Componentpartsandpowercords
shall be replaced with like components
performed by factory authorized service
personnel only.
• Donotuseelectricalappliancesinside
the food storage compartments of the
appliance, unless they are of the type
recommended by the manufacturer.

4
s
afeTy
• Intheeventofapoweroutage,minimizeopen-
ing the appliance door(s). Do not attempt to
re-freeze any previously frozen food that has
thawed.
• Toprotecttheappliancefrompossibledam-
age, allow the appliance to stand 1/2 to 1 hour
in place before turning the electricity on. This
allows the refrigerant and system lubrication to
reach equilibrium.
Important Safety Information
• Topreventinjurytoyouordamagetotheunit,
the appliance should be unpacked and set up by
two people.
• Iftheapplianceisdamagedondelivery,contact
the supplier immediately before connecting to
the power source.
• Toguaranteesafeoperation,ensurethatthe
appliance is set up and connected as described
in these operating instructions.
• Disconnecttheappliancefromthepowersource
if a fault occurs. Pull out the plug, turn off or
remove the fuse.
• Whendisconnectingtheappliance,usetheplug.
Do not pull on the cable.
• Anyrepairsandworkontheapplianceshould
only be carried out by the customer service
department. Unauthorized work may be dan-
gerous to the user. Changing the power source
cable should only be done by the customer ser-
vice department.
• Donoteaticecream,particularlyicecream
treats, or ice cubes, immediately from the
freezer compartment. There is a risk of “burning”
because of the very cold temperatures.
• Donotconsumefoodwhichhasbeenstoredfor
too long; it could cause food poisoning.
• Donotstoreexplosivesorspraysusingcom-
bustible propellants such as butane, propane,
pentane, etc. in the appliance. Electrical compo-
nents might cause leaking gas to ignite. You may
identify such sprays by the printed contents or a
flame symbol.
• Topreventpossibleinjuryduetoanelectrical
shock, be sure to disconnect the power cord or
turn off the circuit breaker before cleaning the
appliance.
• Toavoidinjuryordamagetotheappliance,do
not use steam cleaning equipment to clean the
appliance.
• Donotoperatetheapplianceinthepresenceof
explosivefumes.

5
s
afeTy
f
eaTures
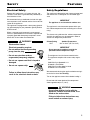
Electrical Safety
Connect this appliance to a 15 amp or 20 amp, 110-
120 VAC, circuit which is grounded and protected by a
circuit breaker or fuse.
We recommend using a dedicated circuit for this appli-
ance to prevent circuit overload and the chance of inter-
ruption to the appliance.
This appliance is equipped with a three-prong (ground-
ing) polarized plug for your protection against possible
shock hazards.
Where a two-prong wall receptacle is encountered,
contact a qualified electrician and have it replaced with
a properly grounded three-prong receptacle in accor-
dance with all local codes and ordinances.
WARNING!
Electrocution hazard.
Electricalgroundingrequired.
•
Do not remove the round grounding
prong from the plug.
•
Do not use extension cords or
ungrounded (two-prong) adapters.
• Donotuseapowercordthatisfrayedor
damaged.
•
Do not use a power strip.
Failure to follow these instructions may
result in fire, electrical shock or death.
Safety Regulations
The appliance is designed to cool, freeze and store food
and to make ice. It is designed as a household appli-
ance.
IMPORTANT
The appliance is not intended for outdoor use.
The appliance is manufactured to operate within spe-
cific ambient temperature limits according to its climate
rating.
The climate rating indicates the ambient temperature
at which the appliance may be operated in order to
achieve full refrigeration performance.
Climate Rating Ambient Temperature
SN-T 50°F to 109°F (10°C to 43°C)
IMPORTANT
Do not operate the appliance outside the
specified ambient temperature range.
- The refrigerant circuit has been tested for leaks.
- The appliance complies with current safety regula-
tions
CAN/CSA C22.2 No.60335-1-11
UL 60335-1 Fifth Edition
CAN/CSA C22.2 No. 60335-2-24-06
UL 60335-2-24 First Edition
We recommend cleaning the appliance before turning it
on for the first time. See Cleaning.
Turn on the appliance several hours before loading it.
Do not load with frozen food until the temperature
showsapproximately0°F(-18°C).
WARNING!
Do not allow children to play with the
appliance. Children must not climb, sit or
stand on the racks or door.
Failure to follow these instructions may
result in death or serious injury.

6
f
eaTures
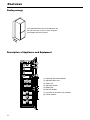
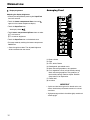
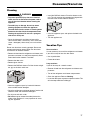
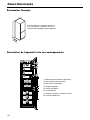
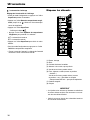
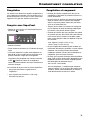
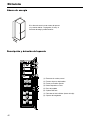
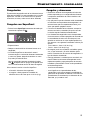
(1) Operating and control elements
(2) Adjustable door racks
(3) Gallon rack
(4) Adjustable shelves
(5) Model plate
(6) BioFresh drawers
(7) Ice maker (in the interior of the drawer)
(8) Freezer drawers
Description of Appliance and Equipment
If the gap between the rear of the appliance and
the wall is less than 2 inch (51 mm), the power
consumption level may increase.
Saving energy

7
f
eaTures
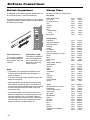
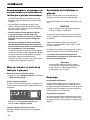
Freezer operating icons
Temperature Up control (to increase
the freezer temperature)
Temperature Down control (to
reduce the freezer temperature)
Freezer On/Off
SuperFrost
Alarm mute (refrigerator and freezer)
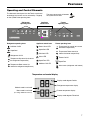
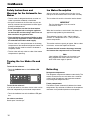
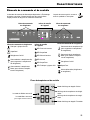
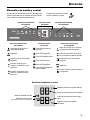
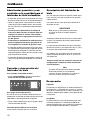
Operating and Control Elements
The electronic control panel has the Touch capacitance
technology. Any function can be activated by a fingertip
on the symbol of the operating icons.
Refrigerator operating icons
IceMaker On/Off
SuperCool
Refrigerator On/Off
Temperature Up control (to increase
the refrigerator temperature)
Temperature Down control (to
reduce the refrigerator temperature)
Refrigerator
operating icons
Appliance
control icons
Freezer
operating icons
Temperature and control display
Display mode degrees Celsius
Display mode degrees Fahrenheit
Refrigerator temperature display
Freezer temperature display
Sabbath mode is activated
Menu mode is activated
(for setting additional functions)
Appliance control icons
Power failure LED
SuperCool LED
Child lock LED
Alarm LED
SuperFrost LED
IceMaker ON LED
Theexactcontactpointisbetween
the symbol and its label.

8
f
eaTures
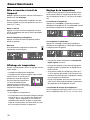
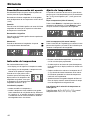
Switching the Appliance On and
Off
Clean the appliance before turning it on for the first
time. See Cleaning.
Do not place frozen food in the freezer until the tem-
perature shows at least 0°F (-18°C).
Switching the appliance on
Touch the Refrigerator On/Off icon or the Freezer On/
Off icon so the temperature displays light up.
Switching the refrigerator compartment off
TouchtheRefrigeratorOn/Officonforapproximately
3 seconds.
Note
If the freezer compartment is switched off, the entire
appliance will be switched off.
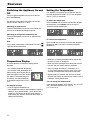
Setting the Temperature
The appliance is pre-set for normal operation. We rec-
ommend temperatures of 38°F (3°C) in the refrigerator
and 0°F (-18°C) in the freezer.
To reduce the temperature
Touch the Down icon on the left to reduce the refrigera-
tor temperature and the Down icon on the right to
reduce the freezer temperature.
Temperature Display
In normal operation, the following settings will be
displayed:
• theaveragerefrigeratortemperature
• thewarmestfrozenfoodtemperature.
When starting up for the first time or
when the appliance is warm, dashes
will appear in the freezer tempera-
ture display, until the temperature
in the freezer compartment is 32°F
(0°C).
The display will flash:
• ifyouchangethetemperatureor
• ifthetemperaturerisesbyseveraldegrees,indicating
cold loss, e.g. if you place fresh, “warm” food in the
freezer or if you remove or repack frozen food, the
temperature may rise for a short time due to warm air
flowing into the freezer.
To increase the temperature:
Touch the Up icon on the left to increase the refrigerator
temperature and on the right to increase the freezer
temperature.
• While you are entering the temperature, the set tem-
perature will flash on the display.
• When you touch the temperature setting icons for the
first time, the most recent setting is displayed.
• You can change the settings in increments of 1°F
(1°C) by briefly touching the icons again. If the icons
are held, the temperature setting will change faster.
• Approximatelyfivesecondsaftertheiconhasbeen
released, the display will automatically show the actual
freezing or cooling temperature.
You can change the temperatures:
In the refrigerator between 36°F and 45°F (2°C and 7°C)
and in the freezer between -15°F and 7°F
(-27°C and -14°C).

9
o
peraTion
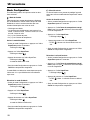
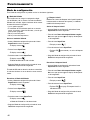
Audible Alarm Signal
The audible alarm signal
is switched off by touch-
ing the alarm icon.
Audible door alarm
This sounds when the door has been left open for longer
than about 180 seconds. The sound switch-off function is
active as long as the door is left open. The alarm auto-
matically switches back to standby when the door is shut.
Audible/visual temperature alarm
It always sounds if the freezer temperature is not low
enough. The temperature display and the alarm LED
flash at the same time.
This can be caused by:
- warm, fresh food being placed in the freezer,
- too much warm air from the outside entering when re-
arranging or removing frozen food,
- a fault in the appliance.
The temperature display will continue to flash until the
cause of the alarm has been rectified. It will then stop
flashing and light up continually. The audible warning
signal is now automatically reset.
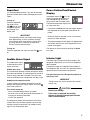
Power Failure/FrostControl
Display
If the power failure LED is lit, this
means the freezer temperature has
risen too high during the last few
hours or days due to a power failure.
The freezer temperature display flash-
es at the same time.
• IfyoutouchtheAlarm icon now, the highest tempera-
ture registered during the power failure will be dis-
played.
• Checkthequalityofthefoodincaseithasbecome
too warm or even defrosted.
• Thehighesttemperaturewillappearforapproximately
one minute. After that, the actual temperature in the
freezer will reappear.
The display can be turned off by touching the Alarm
icon again.
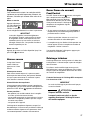
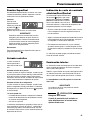
SuperCool
It is recommended particularly if you wish to cool large
quantities of food, drinks, freshly baked goods or meals
rapidly.
Turning on
Touch the SuperCool
icon briefly so the
LED
turns on. The
refrigerator tempera-
ture will drop to its
lowest value.
IMPORTANT
The SuperCool function uses slightly more energy.
After approximately six hours, however, the refrig-
erator switches back automatically to normal ener-
gy-saving operation. If required, the SuperCool
function can be turned off sooner.
Turning off
Touch the SuperCool icon again until the LED
turns
off.
Interior Light
The interior light is located at the left and right in the
refrigerator compartment. It turns on if the refrigerator
door is opened.
Furthermore a lightbar is integrated in the bottom of
the refrigerator door. This turns on if the freezer door is
opened to illuminate the freezer compartment.
ThelightintensityoftheLEDlightcorrespondsto
laser class 1/1M.
IMPORTANT
The light cover may only be removed by customer
service staff.
CAUTION!
Risk of eye damage.
If the cover is removed, do not look
directly at the light through optical lenses
from a close distance.

10
o
peraTion
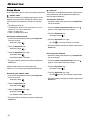
= Sabbath mode
This feature considers the religious requirements on the
Sabbath or holidays. When the Sabbath mode is active,
some functions of the electronic controls are switched
off.
• Thelightingremainsoff.
• Thecoolingfanremainsinitsactualstate:Ifitison,it
remains on, if it is off, it remains off.
• Thereisnodooralarm.
• Thereisnotemperaturealarm.
Activating the Sabbath mode
• ActivatethesetupmodebytouchingtheSuperFrost
icon for 5 seconds.
- the display shows
• TouchtheSuperFrost icon
- the display shows
• TouchtheSuperFrost icon again
- the display shows
- the Sabbath mode is activated.
• Exitsetupmodebytouchingthefreezercompartment
On/Off icon.
Sabbath mode switches off automatically after
120 hours if it is not manually switched off beforehand.
Deactivating the Sabbath mode
• ActivatethesetupmodebytouchingtheSuperFrost
icon for 5 seconds.
- the display shows
• TouchtheSuperFrost icon
- the display shows
• TouchtheSuperFrost icon again
- the display shows
the Sabbath mode is deactivated.
• Exitsetupmodebytouchingthefreezercompartment
On/Off icon.
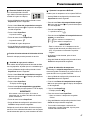
Setup Mode
In the setup mode, you can activate the following functions:
= Child lock
The child lock is designed to protect the appliance from
being switched off and the temperature setting from
being changed accidentally.
Activating the child lock
• ActivatethesetupmodebytouchingtheSuperFrost
icon for 5 seconds.
• Touchthefreezer compartment Down icon until
appears in the freezer temperature display.
• TouchtheSuperFrost icon
- the display shows
• TouchtheSuperFrost icon again
- the LED
is lit and the child lock is activated.
• Exitsetupmodebytouchingthefreezercompartment
On/Off icon.
Deactivating the child lock
• ActivatethesetupmodebytouchingtheSuperFrost
icon for 5 seconds.
• Touchthefreezer compartment Down icon until
appears in the freezer temperature display.
• TouchtheSuperFrost icon
- the display shows
• TouchtheSuperFrost icon again
- the LED
goes out. The child lock is deactivated.
• Exitsetupmodebytouchingthefreezercompartment
On/Off icon.

11
o
peraTion
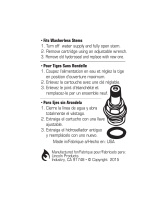
= WaterquantityforIcecubetray
If the produced ice cubes of the ice maker are too
small, the inflowing water quantity can be adjusted.
• ActivatethesetupmodebytouchingtheSuperFrost
icon for 5 seconds.
• Touch the freezer compartment Down icon until
appears in the freezer temperature display.
• TouchtheSuperFrost icon
- the display shows
• Touchfreezer compartment Up icon
once only so E 4 appears in the display.
IMPORTANT
Do not increase for more than one step. If the
adjusted value is too high, the ice cube tray of the
ice maker could overflow.
• TouchtheSuperFrost icon again.
• Exitsetupmodebytouchingthefreezercompartment
On/Off icon.
Checktheicecubesizewithinthenextdays.Ifthe
ice cubes are still smaller as desired, follow the steps
above again.
= Ice maker function test
Activation by service personnel only.
= Drop symbol reset
After the Water filter
(optional
accessory)
has been changed the
drop symbol on the display must
be reset.
• ActivatethesetupmodebytouchingtheSuperFrost
icon for 5 seconds.
• Touchthefreezer compartment Down icon until
appears in the freezer temperature display.
• TouchtheSuperFrost icon
- the display shows
• TouchtheSuperFrost icon again
- the display shows
• Thedropsymboldisappears.
• Exitsetupmodebytouchingthefreezercompartment
On/Off icon.
= Temperature display mode
You can choose the unit of temperature for the display
in degrees Fahrenheit or degrees Celsius.
The factory setting is degrees Fahrenheit.
• ActivatethesetupmodebytouchingtheSuperFrost
icon for 5 seconds.
• Touchthefreezer compartment Down icon until
appears in the freezer temperature display.
• TouchtheSuperFrost icon
- the display shows
• TouchtheSuperFrost icon again
- the temperature reading is now displayed in degree
Celsius.
• Exitsetupmodebytouchingthefreezercompartment
On/Off icon.
• To change the temperature display back to degrees
Fahrenheit, follow the steps above.
= Biofresh temperature adjustment
You can adjust the temperature in the BioFresh drawers.
• ActivatethesetupmodebytouchingtheSuperFrost
icon for 5 seconds.
• Touchthefreezer compartment Down icon until
appears in the freezer temperature display.
• TouchtheSuperFrost icon
- the display shows
• Touchfreezer compartment Up/Down icons to
select
6 - 9 to increase the temperature,
4 - 1 to reduce the temperature.
IMPORTANT
At values b4 - b1 the temperature in the drawers
can drop below 32°F (0°C). Stored goods could
freeze.
• TouchtheSuperFrost icon at the desired value.
• Exitsetupmodebytouchingthefreezercompartment
On/Off icon.

12
o
peraTion
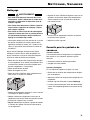
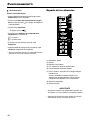
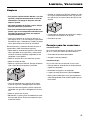
Arranging Food
(1) Butter, cheese
(2) Eggs
(3) Cans, drinks, Bottles
(4) Baked goods, pre-cooked meals
(5) Meat and sausage products, dairy products
(6) Fruit, vegetables, salad (at high humidity setting)
Meat and sausage products, dairy products (at
low humidity setting). Refer to chapter “Biofresh
Compartment”forexplanation.
(7) Frozen food
(8) Ice cubes
IMPORTANT
• Liquids and food which give off or absorb odors and
flavors should always be stored covered or in closed
containers.
• High-percentage alcohols should be tightly sealed and
stored upright.
= Display brightness
Adjusting the display brightness
• ActivatethesetupmodebytouchingtheSuperFrost
icon for 5 seconds.
• Touchthefreezer compartment Down icon until
appears in the freezer temperature display.
• TouchtheSuperFrost icon
- the display shows
• Touchfreezer compartment Up/Down icons to select
0 = minimum to
5 =maximumbrightness
• TouchtheSuperFrost icon at the desired value.
• Exitsetupmodebytouchingthefreezercompartment
On/Off icon.
• Close the appliance door. The adjusted brightness
will be activated after one minute.

13
r
efrigeraTor
C
omparTmenT
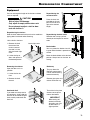
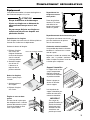
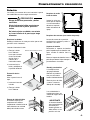
Repositioning the shelves
Hold the shelf underneath with your hand to avoid from
tipping down backwards when removing.
Lift the shelf at the front.
1. Remove the shelf
forward until the
circular cutout of
the shelf is in line
with the interior light
cover.
2. Lift the shelf up or
down and replace in
the desired position.
Repositioning the
sectioned shelf
Place the shelf rails
provided on the sup-
ports on the left and
right at the desired
height.
Sectioned shelf
If you need to make space for
tall containers, simply slide the
front half of the sectioned glass
shelf carefully underneath the
back half.
Repositioning the door racks
Slide the door rack up, pull out
toward you and replace in reverse
order.
Bottle holder
You can protect the bottles from fall-
ing over when the door is opened and
closed.
Move the bottle holder to the desired
position. Always hold at the front for
moving.
Removing the shelves
Open the door as far as
possible.
1. Lift the shelf at the
front.
2. Remove the shelf
forward.
Interior light cover
Equipment
You can rearrange the height of the shelves and door
racks as required.
CAUTION!
Risk of injury and damage.
Only adjust an empty shelf or door rack.
Do not attempt to adjust a shelf or door
rack with food on it.
Bottle tray
The tray above the
BioFresh compartment
can be used for storing
bottles horizontally.
Remove glass plate and
reinsert under the tray.
The cavities in the plate
ensures secure place-
ment of the bottles.
IMPORTANT
When storing tall
bottles horizontally,
the gallon rack must
be relocated to a
higher position.

14
b
io
f
resh
C
omparTmenT
BioFresh Compartment
The BioFresh compartment maintains food freshness up
to 3 times longer than in standard refrigerators.
The constant temperature just above 32°F (0°C) and the
adjustable humidity provides the ideal storage conditions
for different types of food.
Storage Times
for food in the BioFresh compartment
Dry setting
butter, cheese (soft) up to 30 days
milk (fresh) up to 7 days
sausage, cold cuts up to 7 days
fish up to 4 days
shellfish up to 3 days
poultry up to 5 days
pork
large portions up to 7 days
cut up up to 5 days
beef, game up to 7 days
Notes
• Thehumidityinthecompartmentdependsonthe
moisture content of the food and the frequency a
drawer is opened.
• Thefreshertheproductandthehigheritsquality,the
longer the storage life.
• Unwrappedfoodshouldbestoredseparately.Wrap
food if there is not enough space in the drawers. To
avoid bacterial spoilage, different types of meat should
not come into contact with each other. Keep meat
packed separately.
• Thefollowingproductsshouldnotbestoredinthe
BioFresh compartment: hard cheese, potatoes, cold-
sensitive vegetables such as cucumber, eggplant,
avocados, semi-ripe tomatoes, zucchini, and all cold-
sensitive tropical fruits such as pineapple, bananas,
grapefruit, melons, mangoes, papaya, etc.
Humid setting
artichokes up to 21 days
asparagus, broccoli up to 14 days
Brussels sprouts up to 30 days
cabbage up to 180 days
carrots up to 150 days
cauliflower up to 21 days
celery, chicory up to 30 days
Chinese cabbage, curly kale up to 14 days
fennel up to 21 days
garlic up to 180 days
green onions up to 7 days
herbs up to 30 days
iceberg salad, endives,
lamb’s lettuce up to 21 days
kohlrabi up to 14 days
leeks up to 60 days
lettuce up to 10 days
mushrooms up to 7 days
peas up to 10 days
radicchio up to 21 days
radishes up to 14 days
savoy cabbage up to 60 days
spinach up to 7 days
apples up to 180 days
apricots, bilberries, cherries up to 14 days
blackberries up to 8 days
black and red currants up to 21 days
dates (fresh) up to 60 days
figs (fresh) up to 7 days
gooseberries up to 21 days
grapes up to 90 days
kiwi fruits up to 120 days
peaches up to 30 days
pears up to 120 days
plums up to 21 days
quinces up to 90 days
raspberries, strawberries up to 5 days
rhubarb up to 21 days
Slide control to left
This setting is suitable for
dry or wrapped food like
dairy products, meat, fish,
cold cuts.
Slide control to right
This setting is suitable for
storing unwrapped food
with a high moisture con-
tent such as salad, veg-
etables and fruit.

15
f
reezer
C
omparTmenT
Freezing and Storage
• Packfrozenfoodinstandardfreezerbagsorreusable
plastic, metal or aluminum containers.
• Donotallowfreshfoodwhichistobefrozentocome
into contact with food already frozen. Always keep
packages dry in order to avoid them sticking together.
• Alwayswritethedateandcontentsonthepackage
anddonotexceedthestatedstoragetimeforthe
food. This prevents spoiling.
• Packfoodwhichyouarefreezingyourselfinquantities
right for your household. To ensure the food freezes
right through quickly, the following quantities should
notbeexceededperpackage:
- fruit, vegetables: up to 2-1/4 lbs (1 kg);
- meat: up to 5-1/2 lbs (2.5 kg).
• Donotfreezebottlesandcanswhichcontaincarbon-
ated drinks as they might burst. Drinks can be cooled
down quickly, but take the bottles out of the freezer
compartment after an hour at the most.
• Onlytakeoutasmuchfoodasneededforthawing.
Cook food which has been thawed as quickly as pos-
sible. Frozen food can be thawed in the following ways:
- in a microwave oven
- in the refrigerator: the safer way to thaw food because
there is less chance of bacteria growth. Use this
method for high density food such as roasts or poul-
try.
Freezing
Fresh food should be frozen completely and as rapidly
as possible. This is provided by the SuperFrost feature
and ensures that the nutritional value, appearance and
flavor of the food remains intact.
Freezing with SuperFrost
• TouchtheSuperFrost icon briefly so the LED
turns on.
• Wait24hours.
• Thenplacethefreshfoodinsidethefreezer.
• TheSuperFrostfunctionturnsoffautomatically.
Depending on the quantity of food placed in the freez-
er,thiswillnormallybebetween30andmaximum
65 hours.
The freezing process is now complete; the SuperFrost
LED
will turn off, and the freezer will change back
to normal energy-saving operation.
You should not turn on the SuperFrost function:
• when placing frozen food in the freezer;
• when freezing up to approximately 4-1/2 lbs (2 kg)
fresh food daily.

16
i
Ce
m
aker
Defrosting
Refrigerator compartment
The refrigerator compartment defrosts automatically. The
water that forms on the rear wall drains into a reservoir
at the back of the appliance and evaporates automati-
cally through the compressor heat.
Freezer compartment
The NoFrost system automatically defrosts the freezer
compartment. Any moisture will collect on the evaporator
and freeze. It will periodically defrost and evaporate.
Safety Instructions and
Warnings for the Automatic Ice
Maker
• Theicemakerisdesignedexclusivelytomakeice
cubes in quantities needed by a household.
• Allrepairsandworkontheicemakermayonlybe
done by customer service personnel or other appro-
priately trained personnel.
• Do not consume or use the first three batches
of ice. This applies both to using the appliance
for the first time and also using it after it has not
been used for a long period of time.
• The manufacturer cannot accept liability for dam-
agecausedbyequipmentorwaterlinesbetween
the solenoid valve and the water supply.
• Theicemakerisinthetopleftdrawerinthefreezer
compartment of the combined refrigerator-freezer. The
ice maker can only make ice cubes if the drawer is
completely closed.
• Theicemakerwillonlymakeicecubesifthefreezer
compartment is operating.
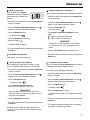
Ice Maker Description
After you start the ice maker for the first time, it may
take up to 24 hours before the first ice cubes are ready.
The ice cubes fall out of the ice maker into the drawer.
IMPORTANT
The first three batches of ice must not be
consumed or used.
When the ice reaches a certain level in the drawer, the
appliance stops producing ice automatically.
The production capacity is 100 - 120 ice cubes in
24 hours at a temperature of 0°F (-18°C) inside the
freezer compartment.
Tohavethemaximumcapacityofapprox.150icecubes
in 24 hours, activate the SuperFrost function.
Be aware that this increases the energy consump-
tion because the compressor will run constantly.
Note
If the IceMaker LED flashes, the ice maker is not
being supplied with water. Check if the shut off
valve of the water supply is opened.
Turning the Ice Maker On and
Off
To turn the ice maker on
• TouchtheIceMaker icon so the IceMakerLED
comes on.
To turn the ice maker off
If you do not need any ice cubes, the ice maker can be
turned off independently of the freezer compartment.
• TouchtheIceMakericonsotheIceMakerLEDgoes
out.
Ice maker at vacations
See chapter “Vacation tips”

17
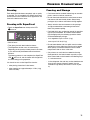
Cleaning
WARNING!
• To prevent possible injury due to an electrical
shock, be sure to disconnect the power cord or
turn off the circuit breaker before cleaning the
appliance.
• To avoid injury or damage, do not use steam
cleaningequipmenttocleantheappliance.
•
To avoid short-circuits, ensure no cleaning water
penetrates into the electrical components when
cleaning the appliance. Do not use a sponge or
cloth that is overly wet.
• Cleanthesidepanelsanddoorsurfaceswitha
clean and soft cloth. If necessary, use a moist cloth
(water + detergent). Alternatively, use a micro-fibre
cloth.
Do not use abrasive or scouring sponges. Do not use
concentrated cleaning agents. Never use abrasive or
acid cleaners or chemical solvents.
• Removeallfoodfromtherefrigeratorandfreezercom-
partments and store in a cool place temporarily. Store
frozen food in other freezers if available.
• Removethedoorracks.
• Removeglassshelves.
• RemovetheBioFreshdrawers.Pullthedrawerstraight
out, grip at the back and lift out.
• Cleantheequipmentpartsbyhandwithlukewarm
water and dishwasher detergent.
• Cleantherefrigeratorandfreezerdrawers’interiorwith
lukewarm water and dishwasher detergent.
• Dryallpartswellwithacloth.
• Do not damage or remove the model plate on the
inside of the appliance. It is very important for servic-
ing your appliance.
Vacation Tips
Short vacations
It is not necessary to turn off the refrigerator and freezer
if you will be away for less than four weeks.
• Useallperishables.
• Freezeotheritems.
Longvacations
If you will be away for a month or more:
• Removeallfoodfromtherefrigeratorandfreezercom-
partments.
• Turnofftherefrigeratorandfreezercompartments.
• Cleantheappliance.RefertoCleaning.
• Leavethedooropentopreventunpleasantodors.This
will also keep mold from building up.
C
leaning
/V
aCaTion
• InstalltheBioFreshdrawers.Placethedraweronthe
rails.Therailsmustbefullyextendedandalignedwith
the front of the drawer. Slide the drawer in.
• Installallequipmentpartsandreplacethefoodinthe
appliance.
• Turntheapplianceon.

18
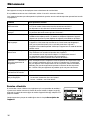
T
roubleshooTing
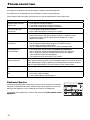
Problem Possible Cause and Remedy
Appliance does not work,
display is off
- Is the appliance turned on properly?
- Is the power cord properly inserted in the outlet?
- Is the circuit breaker or fuse in operating condition?
The interior light does
not come on
- Is the refrigerator compartment turned on?
- Has the door been open for more than 15 minutes?
Loud running noise - Is the appliance standing firmly on the floor, or does the compressor
cause nearby items of furniture or objects to vibrate? If necessary, move
the appliance slightly, align by adjusting the adjustable feet, or adjust
bottles and containers.
Motor seems to
run too long
- Is the ambient temperature too hot? See Safety Regulations.
- Has the appliance been opened too often or left open too long?
- A large amount of food has been added.
- Unit is in SuperCool mode. Verify unit is in normal operation mode.
The temperature is
not cold enough
- Is the temperature setting correct? See Setting the Temperature.
- Hasanexcessiveamountoffreshfoodbeenplacedintheappliance?
- Does a separately installed thermometer show the correct reading?
- Is the ventilation system working properly?
- Is the appliance set up too close to a heat source?
Freezer temperature display
shows two dashes - -
The freezer temperature display will only show temperatures that are below freezing.
When initially starting the freezer it will not be below freezing. It will take three to five
hours (depending on ambient conditions) for freezing temperatures to be achieved
and thus displayed numerically. This may also occur after a power failure.
Ice maker cannot be turned
on
- Is the appliance connected to the electrical outlet?
Ice maker is not making any
ice
- Is the ice maker turned on?
- Is the water supply line open?
- Is the IceMaker drawer closed properly?
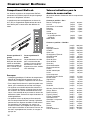
Customer Service
If none of the above possible causes apply, and you can not rectify the fault yourself,
contact the Liebherr Service Center. Indicate the type (1) of appliance, service num-
ber (2) and the appliance / serial number (3) as shown on the model plate.
The position of the model plate is shown in the section entitled Description of the
Appliance.
Your appliance is designed and manufactured for a long life and reliable operation.
If a problem occurs during operation, check whether it is due to an operating error.
Please note that even during the warranty period, you may be responsible for certain repair costs.

19
LIEBHERR WARRANTY PLAN
FULLTWOYEARWARRANTY
For two years from the date of original purchase, your Liebherr warranty covers all parts and labor to repair or replace
any part of the product which proves to be defective in materials or workmanship.
FULLFIVEYEARWARRANTY
For five years from the date of original purchase, your Liebherr warranty covers all parts and labor to repair or replace
any components that prove to be defective in materials or workmanship in the sealed system. The “Sealed System”
means only the compressor, condenser, evaporator, drier and all connecting tubing.
LIMITED6THTHROUGH12THYEARWARRANTY
From the 6th through 12th year from the date of original purchase, your Liebherr warranty covers all parts that prove
to be defective in materials or workmanship in the Sealed System (parts only).
TERMSAPPLICABLETOEACHWARRANTY
All service provided by Liebherr under the warranty must be performed by authorized Liebherr service representa-
tives, unless otherwise specified by Liebherr. Service will be provided in the home during normal business hours. This
warranty applies only to products installed for normal residential use. Details regarding a non-residential warranty are
available on request.
The warranty applies only to products installed in Canada and any one of the fifty states of the United States or the
District of Columbia.This warranty does not cover any parts or labor to correct any defect caused by negligence, acci-
dent or improper use, maintenance, installation, service or repair, including but not limited to improper removal and
reinstallation of the condensing unit.
THEWARRANTIESDESCRIBEDABOVEAREMADEEXPRESSLYINLIEUOFANYOTHERWARRANTIES,
EXPRESSEDORIMPLIED,INCLUDINGANYIMPLIEDWARRANTYOFMERCHANTABILITYORFITNESSFOR
APARTICULARPURPOSE,ANDOFANYOTHEROBLIGATIONORLIABILITYONTHEPARTOFLIEBHERR.
INNOEVENTSHALLLIEBHERRBELIABLEFORSPECIAL,INCIDENTALORCONSEQUENTIALDAMAGES
ARISING FROM THE BREACH OF THESE WARRANTIES OR ANY OTHER WARRANTIES, WHETHER
EXPRESS,IMPLIEDORSTATUTORY.
SomeStatesdonotallowtheexclusionorlimitationofincidentalorconsequentialdamagessotheabovelimitationor
exclusionmaynotapplytoyou.Thiswarrantygivesyouspecificlegalrightsandyoumayalsohaveotherrightswhich
vary from State to State.
To receive parts and/or service and the name of the Liebherr authorized service representative nearest you, contact
your Liebherr dealer or distributor or contact the Liebherr designated national service provider:
in the US: Service-appliances.us@liebherr.com, or call 1-866-LIEBHER or 1-866-543-2437
in Canada: www.euro-parts.ca, or call 1-888-LIEBHER, 1-888-543-2437.
W
arranTy

20
Table des matières Page
Veuillez lire et suivre ces instructions .........................20
California Proposition 65 .............................................20
Mise au rebut de votre appareil usagé ........................21
Évacuation de cet appareil ..........................................21
Réfrigérant R600a .......................................................21
Importante information sur la sécurité .........................22
La sécurité et l’électricité .............................................23
Contraintes de sécurité ................................................ 23
Économiser l’énergie ...................................................24
Description de l’appareil et de ses aménagements ....24
Éléments de commande et de contrôle ......................25
Mise en marche et arrêt de l’appareil ..........................26
Affichage de température ............................................26
Réglage de la température ..........................................26
SuperCool ....................................................................27
Alarme sonore..............................................................27
Écran Panne de courant/FrostControl ........................27
Éclairage intérieur ........................................................27
Mode Configuration .....................................................28
Disposer les aliments ..................................................30
Équipement ..................................................................31
Compartiment BioFresh ...............................................32
Valeurs indicatives pour la durée de conservation .....32
Congélation ..................................................................33
Congeler avec SuperFrost ........................................... 33
Congélation et rangement ...........................................33
Recommandations et consignes de sécurité
relatives à l’utilisation de la fabrique à glaçons
automatique .................................................................34
Mise en marche et arrêt de la fabrique à glaçons ......34
Description de la fabrique à glaçons ...........................34
Dégivrage .....................................................................34
Nettoyage .....................................................................35
Conseils pour les périodes de vacances ....................35
Dépannage ..................................................................36
Service clientèle ........................................................... 36
Garantie .......................................................................37
IMPORTANT
Tous les types et modèles sont sujets à des améliorations permanentes. Le fabricant se réserve le droit d’ap-
porter toute modification dans le design, l’équipement et la technologie.
T
able
des
maTières
Veuillez lire et suivre ces
instructions
Ce manuel d’instructions contient des indications
de danger, des avertisse ments et des précautions à
prendre.
Ces informations sont importantes afin de garantir une
installation et un fonctionnement sûrs et efficaces.
Toujours lire les indications de dangers, les avertisse-
ments et les précautions à prendre et agir en consé-
quence!
DANGER!
Indiqueundangerquiprovoquerapoten-
tiellement des blessures graves, voire
la mort, si des précautions ne sont pas
prises.
AVERTISSEMENT!
Unavertissementindiqueunesituation
potentiellementdangereusequi,sielle
n’est pas évitée, pourrait entraîner la mort
ou de graves blessures.
ATTENTION!
Attentionindiqueunesituationpotentiel-
lementdangereusequi,siellen’estpas
évitée, pourrait entraîner des blessures
modérées ou mineures.
IMPORTANT
Ceci souligne l’information spécialement
pertinente à une installation et un fonctionnement
sans problème.
California Proposition 65
Ce produit contient des produits chimiques reconnus par
l'état de la Californie comme causant le cancer ou des
troubles reproductifs.
La page charge ...
La page charge ...
La page charge ...
La page charge ...
La page charge ...
La page charge ...
La page charge ...
La page charge ...
La page charge ...
La page charge ...
La page charge ...
La page charge ...
La page charge ...
La page charge ...
La page charge ...
La page charge ...
La page charge ...
La page charge ...
La page charge ...
La page charge ...
La page charge ...
La page charge ...
La page charge ...
La page charge ...
La page charge ...
La page charge ...
La page charge ...
La page charge ...
La page charge ...
La page charge ...
La page charge ...
La page charge ...
La page charge ...
La page charge ...
La page charge ...
La page charge ...
-
 1
1
-
 2
2
-
 3
3
-
 4
4
-
 5
5
-
 6
6
-
 7
7
-
 8
8
-
 9
9
-
 10
10
-
 11
11
-
 12
12
-
 13
13
-
 14
14
-
 15
15
-
 16
16
-
 17
17
-
 18
18
-
 19
19
-
 20
20
-
 21
21
-
 22
22
-
 23
23
-
 24
24
-
 25
25
-
 26
26
-
 27
27
-
 28
28
-
 29
29
-
 30
30
-
 31
31
-
 32
32
-
 33
33
-
 34
34
-
 35
35
-
 36
36
-
 37
37
-
 38
38
-
 39
39
-
 40
40
-
 41
41
-
 42
42
-
 43
43
-
 44
44
-
 45
45
-
 46
46
-
 47
47
-
 48
48
-
 49
49
-
 50
50
-
 51
51
-
 52
52
-
 53
53
-
 54
54
-
 55
55
-
 56
56


Liebherr CBS1360 Mode d'emploi
- Catégorie
- Réfrigérateurs-congélateurs
- Taper
- Mode d'emploi
dans d''autres langues
- English: Liebherr CBS1360 User guide
- español: Liebherr CBS1360 Guía del usuario
Documents connexes
-
Liebherr CS1400RIM Mode d'emploi
-
-
-
Liebherr HC1540 Mode d'emploi
-
-
-
-
-
-