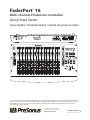
PRESONUS FaderPort 16 Guide de démarrage rapide
- Taper
- Guide de démarrage rapide

FaderPort
™
16
Multi-channel Production Controller
Quick Start Guide
Guía rápida / Kurzanleitung / Guide de prise en main
Part# 70-52000054-A
18011 Grand Bay Ct. • Baton Rouge,
Louisiana 70809 USA• 1-225-216-7887
www.presonus.com
®
© 2017 PreSonus Audio Electronics, Inc. All Rights Reserved. FaderPort, PreSonus, and Universal Control are trademarks or registered trademarks of PreSonus Audio Electronics, Inc.
Studio One is a registered trademark of PreSonus Software Ltd. Mac and Mac OS are registered trademarks of Apple, Inc., in the U.S. and other countries. Windows is a registered
trademark of Microsoft, Inc., in the U.S. and other countries. Other product names and technologies mentioned herein may be trademarks of their respective companies.
All specifications subject to change without notice.

Before operating your FaderPort controller, you must register
online for software downloads, the Owner’s Manual, and
instructional videos.
Please Note: A firmware update is required for your FaderPort 16.
Download and install Universal Control from your My PreSonus
account and follow the onscreen instructions.
1. Go online to my.presonus.com and create — or log
into — your My.PreSonus user account.
2. Click to register.
3. Enter your FaderPort 16 serial number.
4. Download your Windows or Mac software and
Owner’s Manual.
5. Install your Windows or Mac drivers and software.
6. Connect your FaderPort 16 to your computer. Please
refer to the diagrams in this Quick Start Guide and
additional instructions in your Owner’s Manual.
7. Connect the included power supply to an AC outlet
and to the FaderPort 16 controller.
8. Watch the FaderPort 16 Instruction video and consult
your Owner’s Manual for further instructions.
Bevor Sie Ihren FaderPort Controller verwenden können, müssen
Sie sich online registrieren, um auf die Software-Downloads, die
Bedienungsanleitung und Video-Tutorials zugreifen zu können.
Wichtiger Hinweis: Die Firmware Ihres FaderPort 16 muss aktualisiert
werden. Laden Sie Universal Control aus Ihrem My.PreSonus-Konto
herunter, starten Sie die Installation und folgen Sie den Anweisungen
auf dem Bildschirm.
1. Öffnen Sie die Webseite my.presonus.com und
erstellen Sie ein neues Konto – oder loggen Sie sich in
Ihren My.PreSonus-Konto ein.
2. Klicken Sie, um sich zu registrieren.
3. Geben Sie die Seriennummer Ihres FaderPort ein.
4. Laden Sie die Software für Windows oder Mac sowie
die Bedienungsanleitung herunter.
5. Installieren Sie die Treiber und Anwendungen für Ihr
Betriebssystem.
6. Schließen Sie Ihren FaderPort Controller an Ihren
Computer an. Beachten Sie dazu bitte die Abbildung
in dieser Kurzanleitung sowie die zusätzlichen
Anweisungen in Ihrer Bedienungsanleitung.
7. Schließen Sie das mitgelieferte Netzteil an einer
Steckdose und dem FaderPort Controller an.
8. Sehen Sie sich das FaderPort Einführungs-Video
an und lesen Sie für weitere Informationen die
Bedienungsanleitung.
Deberás registrarte en línea antes de operar tu controlador
FaderPort para obtener descargas de software, el manual del
propietario y videos didácticos.
Por favor, toma nota: Se requiere de una actualización de firmware
para tu FaderPort 16. Descarga e instala Universal Control desde tu
cuenta My PreSonus y sigue las instrucciones en pantalla.
1. Visita my.presonus.com y regístrate — o entra usando
tu perfil de usuario My.PreSonus.
2. Haz click para registrarte.
3. Ingresa el número de serie de tu FaderPort.
4. Baja tu software para Windows o Mac y el manual
para el usuario.
5. Instala tu software y los drivers para Windows o Mac.
6. Conecta tu FaderPort a tu computadora. Por favor
consulta los diagramas en esta guía rápida e
instrucciones adicionales en tu manual de usuario.
7. Conecta la fuente de poder externa incluida a
un enchufe de corriente alterna y al controlador
FaderPort.
8. Observa el video didáctico del FaderPort y consulta
tu manual del propietario para obtener más
instrucciones.
Avant de faire fonctionner votre contrôleur FaderPort, vous
devez vous enregistrer en ligne pour les téléchargements de
logiciels, le mode d’emploi, et des vidéos de formation.
À noter : une mise à jour du firmware est nécessaire pour votre
FaderPort 16. Téléchargez Universal Control depuis votre compte My
PreSonus, installez-le et suivez les instructions à l’écran.
1. Allez sur my.presonus.com et créez – ou connectez-
vous à – votre compte utilisateur My.PreSonus.
2. Cliquez sur Register (enregistrer un produit).
3. Saisissez le numéro de série de votre FaderPort.
4. Téléchargez vos logiciels pour Windows ou Mac et le
mode d’emploi.
5. Installez vos pilotes et logiciels pour Windows ou
Mac.
6. Connectez votre FaderPort à votre ordinateur.
Veuillez vous référer aux schémas de ce Guide de
prise en main et aux instructions supplémentaires de
votre mode d’emploi.
7. Connectez l’adaptateur secteur fourni à une prise de
courant et au contrôleur FaderPort.
8. Regardez la vidéo d’instructions pour FaderPort et
consultez votre mode d’emploi pour des instructions
supplémentaires.

1 Introduction
In addition to this Quick Start Guide, this FaderPort package contains the following:
4 FaderPort 16 production controller
4 6’ (1.8m) USB cable
4 External Power Supply
4 Studio One Key Commands Guide
Power User Tip: Studio One Artist and a more in-depth Owner’s Manual are available for download from your My
PreSonus user account. Visit http://my.presonus.com and register your FaderPort to receive downloads and licenses.
4 PreSonus Health Safety and Compliance Guide
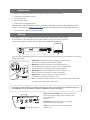
2 Hookup
The FaderPort 16 is a class-compliant device in both macOS® and Windows®. Simply connect
your FaderPort to a free USB port on your computer. While no driver installation is necessary,
you must install Universal Control and run a firmware update for full functionality.
If you are not using Studio One, press the first two Select buttons while powering on your FaderPort 16 to change
the Operation Mode.
4 Studio One. Studio One operation should be used with Studio
One and other DAWs that provide native support.
4 MCU (Logic). Select this mode to use your FaderPort 16 as a
Mackie Control Universal device in Logic, Live, or any other DAW
that does not have a customized mode or native support.
4 MCU (Cubase). Select this mode to use your FaderPort 16 as a
Mackie Control Universal device in Cubase or Nuendo.
4 MCU (Sonar). Select this mode to use your FaderPort 16
as a Mackie Control Universal device in Sonar.
4 HUI. Select HUI to use your FaderPort 16 as a HUI emulation device in Pro Tools.
Press the Select button below Exit to finish.
Note: When using the FaderPort 16 in MCU or HUI mode, you will need to configure it as two different devices in
your DAW. Please review the FaderPort 16 Owner‘s Manual for complete instructions.
Power and Power Switch. This is the connection for
your external power supply. Use the button to turn
your FaderPort 16
on or off.
Footswitch. Connect a momentary or latching
footswitch to control start/stop.
USB. This is the USB device connection for your
FaderPort 16

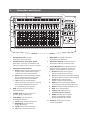
3 Connections and Controls
1
2
3
4
5 6 7
8
9
10
1. Pan/Param Encoder. Controls
panning for selected channel.
2. Channel Controls (Solo, Mute, Select).
When Arm is active, the Select buttons will
turn red and will arm the tracks for recording.
3. Studio One Custom Controls.
9 Bypass. Bypasses plug-in on the selected
channel. Use the Shift button to bypass
all plug-ins on the selected channel.
9 Macro. Faders control the Channel Editor
for the selected channel. Use the Shift
button to open the Channel Editor.
9 Link. Pan/Param encoder follows
whatever function your mouse is hovering
over. Use the Shift button to lock the
current function to this encoder.
4. Shift. Accesses alternate functions
where applicable.
5. Scribble Strips. Displays important
channel / plug-in information.
6. Fader Modes. Sets the function
of the motorized faders:
9 Track. Faders control channel level.
9 Edit Plug-ins. Faders control
plug-in parameters.
9 Sends. Faders control send level.
9 Pan. Faders control channel pan.
7. Mixer Views. Show/hide track types
displayed on your FaderPort.
8. Automation Controls. Switches between
automation modes for selected channel.
9. Session Navigator. These buttons alter the
functions of the push-button encoder and
the Next and Prev buttons on either side:
9 Channel. Encoder and navigation
buttons control channel scrolling.
9 Zoom. Encoder controls horizontal zooming.
Navigation buttons control vertical zooming.
9 Scroll. Encoder and navigation
buttons control timeline scrolling.
9 Bank. Encoder and navigation buttons
scroll through channels in banks of sixteen.
9 Master. Encoder controls the Master level.
9 Click. Turns on metronome.
9 Section. DAW dependent. See
FaderPort 16 Owner’s Manual.
9 Marker. Encoder and navigation
buttons scroll through markers.
Press Encoder to drop a marker.
10. Transport. Controls the transport
section of your DAW.
-
 1
1
-
 2
2
-
 3
3
-
 4
4


PRESONUS FaderPort 16 Guide de démarrage rapide
- Taper
- Guide de démarrage rapide
dans d''autres langues
Documents connexes
-
PRESONUS FADERPORT Guide de démarrage rapide
-
-
-
-
-
-
PRESONUS Eris E3.5 Mode d'emploi
-
PRESONUS FaderPort 8 Le manuel du propriétaire
-
-