
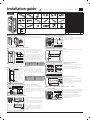
01
Uncrating the refrigerator
Ƹ͝ϑʀθʪиϩ˵ʪɵͱ̷ϩϑ
đՑуՌՋՌՋʪɇ
• Remove the brackets from the pallet by
unscrewing the bolts (ve per bracket).
02
Attaching the anti-tip bracket
Cabinet
Height
đՏуՎՐՑʪɇ
Wooden Wall
Concrete wall
đՏуՎՐՑʪɇ
ՑуՎՋ Ցʪɇ
ՍٓطՐՋظ
ƊΧɇʀʪθطиͱͱʒظ
ΧΧ̷̈ɇ͝ʀʪ ΧΧ̷̈ɇ͝ʀʪ
• Bracket height is measured from the oor
and depends on the cabinet height.
• Attach the anti-tip brackets. Ensure the
screws hold the bracket tightly.
• The anti-tip brackets must extend at least
2” (50 mm) over the appliance to secure the
appliance. If this minimum length cannot
be observed for structural conditions
it is possible to do this by fastening a
spacer(wood) behind the anti-tip angle.
* Bracket height = Cabinet height – 4 3/32” (104 mm)
Cabinet height A
Case 1 83 1/2” (2121 mm) 79 1/2” (2019 mm)
Case 2 84” (2134 mm) 79 7/8” (2030 mm)
03
Cabinet special requirements
10”
(254)
D
A
C
E
F
B
Electric supply
location
6”
(154)
ø1/4”(6.5)
1”
(25.4)
Water supply
location
A : Cabinet Width
B : Cabinet Depth
C : Cabinet Height
D : Electrical supply width location
E : Electrical supply height location
F : Water supply outlet location
*B : Includes the standard door panel
thickness with 1/4”
* Installation insidea cabinet of
this width allows the refrigerator
trim to be attached directly to the
surrounding cabinets.
• Connect refrigerator power cord plug to a
properly earthed receptacle. Set the Master
Power Switch to the “I” (ON) position.
• Check to make sure power to refrigerator
is on by opening refrigerator door to see if
interior lights are on.
42”
A 42” (1067mm) D 22” (559mm)
B 25” (635mm) E 80” (2032mm)
C 84” (2134mm) F 12” (305mm)
04
Moving the refrigerator into its enclosure
ĮЭʪθ̷ɇцƟцΧʪ
Aɇɵ̈
Aɇɵ̈͝ʪϩϑ̈ʒʪʀ˵ɇϑϑ̈ϑ
ƟͱΧӬʪи
ƟͱΧӬʪи
θɇ͔ʪ̷ʪϑϑƟцΧʪ
Aɇɵ̈͝ʪϩϑ̈ʒʪʀ˵ɇϑϑ̈ϑ
Aɇɵ̈
â̈˝
طťͱϑ̈ϩ̈ͱ̈͝͝˝ɇ̈ʒظ
ĮЭʪθ̷ɇц
θɇ͔ʪ̷ʪϑϑ
ťɇ͝ʪ̷
θʪɇʒц
ťɇ͝ʪ̷
θʪɇʒц
ťɇ͝ʪ̷
θʪɇʒц
ťɇ͝ʪ̷
θʪɇʒц
Ռժٗٗ
طՏՋ͔͔ظ
Ռժٗٗ
طՏՋ͔͔ظ
• According to the type of cabinet, a jig
(positioning aid) can be used to align the
refrigerator’s custom door panel with cabinet
by marking vertical line on the cabinet.
• Position the cabinet side chassis to align with
your vertical line.
05
Leveling the refrigerator
θͱ͝ϩ
ʒ̟Їϑϩɇɵ̷ʪϑ˵ɇ˙ϩ
طՎ؏ՓٓՌՋ͔͔ظ
đɇу
ՍՋ͔͔
âɇʀ̧ϩцΧʪط˵ʪ̈˝˵ϩɇʒ̟Їϑϩ͔ʪ͝ϩظ
ŵʪɇθ
• Attach the refrigerator’s top cover and trim
top cover to the hook at the top front of the
chassis.
• Using your drill and the bit shown below,
engage each of the refrigerator’s adjuster
shafts in turn, and level the refrigerator.
( CW ↑, CCW ↓)
Adjust the gap between the furniture and
upper chassis cover to 1/8 in. (3mm ).
• The front and rear leveling legs have a
maximum height adjustment of 3/4 in.
(20mm).
Installation guide
06
Securing the refrigerator
̈уʪʒ̷ͱʀɇϩ̈ͱ͝
ƟͱΧǤ̈ʪи
ťɇ͝ʪ̷θʪɇʒц Aɇɵ̈
Aɇɵ̈͝ʪϩϑ̈ʒʪʀ˵ɇϑϑ̈ϑ
طƟ²ظđՏуՌՏՌՍʪɇ
• Remove freezer box.
• Secure the refrigerator to its enclosure with
(TH) M4 x 14 screws (6 screws per side, as
shown in the graphic).
07
Attaching the Cabinet Trim
A˵ɇϑϑ̈ϑϑΧɇʀʪθ
Aɇɵ̈͝ʪϩϑ̈ʒʪϩθ͔̈
• Attach the trim between the refrigerator and
the cabinet.
08
Attaching the Custom-Door-Panel Brackets
ƸťťՐʪɇ؏øĮǮՐʪɇ
θ̈ʒ˝ʪUͱͱθøͱи
ط²ظđՏуՌՏՌՋʪɇ
ƸťťՏʪɇ؏øĮǮՐʪɇ
ط²ظđՏуՌՏՔʪɇ
θ̈ʒ˝ʪUͱͱθƸΧ
θʪʪіʪθUͱͱθƸΧ
θʪʪіʪθUͱͱθøͱи
Custom Panel: STS
• Drive screws each to the top and bottom
brackets as shown in the graphic.
(The other holes on each side of the bracket
are for a different application.)
Ƹť
øĮǮ
Panel
Template
REFFRE
ط²ظđՏуՌՏՌՋʪɇ
ƸťťՐʪɇ؏øĮǮՐʪɇ
Custom Panel: Wood, Other
• The template informs you the position of the
bracket and holes.
• Mark hole positions on every corner of the
panel according to the template and drive
the screws into the holes.
09
Aligning the panel (Order : Top → Side →
Front/Back)
UͱЇɵ̷ʪϩ˵θʪɇʒʪʒ
ɵͱ̷ϩ
Ɗ̈ʒʪϑʀθʪи
ĘͱՍϑʀθʪи
ĘͱՌϑʀθʪи
đՑуՌՍՌՌʪɇ
kɇʀ˵ՌՌϑʀθʪиϑΧʪθUͱͱθ
ťɇ͝ʪ̷Χͱϑ̈ϩ̈ͱ͝ɇʒ̟Їϑϩʪθ
đՌՎ
• There are two panel-adjustment mechanisms
at the top and two at the bottom of the door.
• A side screw to shift the panel side to side;
Screw 1 to shift the panel backward
Screw 2 to shift the panel forward
• To attach the Panel to the Door, screw nuts
snugly onto the double-threaded bolts.
(2 nuts per door)
DA68-03686A-00
CAUTION
Please read the installation insturctions carefully before you install the product.
No NAME Q'TY
1 PANEL BRACKET L-UP, R-LOW 4
2 PANEL BRACKET R-UP, L-LOW 4
3 ANTI-TIP BRACKET 2
4 NUT-HEXAGON FLANGE 8
5 BOLT-HEX 44
6 SCREW-TAPPING 40
7 SCREW-TAPPING 12
8 SCREW-TAPPING 6
9 TOP TABLE 1
10 LOWER DOOR CAP REF LEFT 1
11 LOWER DOOR CAP REF RIGHT 1
12 UPPER DOOR CAP FRE LEFT 1
13 UPPER DOOR CAP FRE RIGHT 1
14 TRIM TOP COVER 1
15 GAP GUIDE 1
16 HOLDER LOCK 6
17 BRACKET TEMPLATE-REF 1
18 BRACKET TEMPLATE-FRE 1
19 INSTALLATION GUIDE 1
M13 M6 x 12 (FH) M4 X 14
(TH) M4 X 16 M4 x 35
T-Type

Guide d’installation
FR
01
Déballage du réfrigérateur
Uʪϑϑʪθθʪі̷ʪϑ
ɵͱЇ̷ͱ͝ϑ
đՑуՌՋՌՋΧ̈ʽʀʪϑ
• Retirez les deux xations de la palette en
dévissant les boulons (cinq par support).
02
Fixation du support antibasculement
Hauteur
de l'armoire
đՏуՎՐՑΧ̈ʽʀʪϑ
Mur en bois
Mur en béton
đՏуՎՐՑΧ̈ʽʀʪϑ
ՑуՎՋ ՑΧ̈ʽʀʪϑ
ՍٓطՐՋظ
Aɇ̷ʪʒʪϑΧɇʀʪ͔ʪ͝ϩطɵͱ̈ϑظ
ΧΧɇθʪ̷̈ ΧΧɇθʪ̷̈
• La hauteur du support est mesurée à partir
du sol et dépend de la hauteur de l’armoire.
• Fixez les supports antibasculement. Assurez-
vous que les vis serrent fermement le
support.
• Les supports antibasculement doivent
s’allonger au moins de 2” (50 mm) sur
l’appareil pour le sécuriser. Si cette longueur
minimale ne peut pas être respectée pour
des raisons liées à la structure, l’alternative
consiste à xer une cale d’espacement (en
bois) derrière l’angle antibasculement.
*
Hauteur du support = Hauteur de l’armoire - 4 3/32” (104 mm)
Hauteur de l’armoire A
Cas 1 83 1/2” (2121 mm) 79 1/2” (2019 mm)
Cas 2 84” (2134 mm) 79 7/8” (2030 mm)
03
Conditions spéciques à l’armoire
10”
(254)
D
A
C
E
F
B
Emplacement de
l'alimentation électrique
6”
(154)
ø1/4”(6.5)
1”
(25.4)
Emplacement
de l'arrivée d'eau
A : Largeur de l’armoire
B : Profondeur de l’armoire
C : Hauteur de l’armoire
D : Emplacement de la largeur de
l’alimentation électrique
E : Emplacement de la hauteur de
l’alimentation électrique
F : Emplacement de la prise
d’alimentation en eau
*B : inclut une épaisseur de panneau
de porte standard avec 3/4”.
* Une installation à l’intérieur d’une
armoire de cette largeur permet à
l’habillage du réfrigérateur d’être
directement xé aux armoires
autour du produit.
• Branchez le cordon d’alimentation du
réfrigérateur à une prise correctement
mise à la terre. Réglez le Commutateur
d’alimentation principal sur la position «I»
(ACTIVATION).
• Vériez que le réfrigérateur est alimenté
en ouvrant la porte an de vérier que les
lumières intérieures sont allumées.
42”
A 42” (1067mm) D 22” (559mm)
B 25” (635mm) E 80” (2032mm)
C 84” (2134mm) F 12” (305mm)
04
Placer le réfrigérateur dans son caisson
ƟцΧʪʒʪϑЇΧʪθΧͱϑ̈ϩ̈ͱ͝
θ͔ͱ̈θʪθ͔ͱ̈θʪ
A˵ɑϑϑ̈ϑ̷ɇϩʭθɇ̷ʒʪ̷ɇθ͔ͱ̈θʪ
ǤЇʪʒЇ˵ɇЇϩ
ǤЇʪʒЇ˵ɇЇϩ
ƟцΧʪϑɇ͝ϑʀɇʒθʪ
A˵ɑϑϑ̈ϑ̷ɇϩʭθɇ̷ʒʪ̷ɇθ͔ͱ̈θʪ
ÜϑΧͱϑ̈ϩ̈˙ʒʪϑʪθθɇ˝ʪ
طɇ̈ʒʪɇЇΧͱϑ̈ϩ̈ͱ͝͝ʪ͔ʪ͝ϩظ
ƊЇΧʪθΧͱϑ̈ϩ̈ͱ͝
AθʪЇу
Ռժٗٗ
طՏՋ͔͔ظ
Ռժٗٗ
طՏՋ͔͔ظ
Aͱ͔Χɇϩ̈ɵ̷̈̈ϩʭ
Χɇ͝͝ʪɇЇ
Aͱ͔Χɇϩ̈ɵ̷̈̈ϩʭ
Χɇ͝͝ʪɇЇ
Aͱ͔Χɇϩ̈ɵ̷̈̈ϩʭ
Χɇ͝͝ʪɇЇ
Aͱ͔Χɇϩ̈ɵ̷̈̈ϩʭ
Χɇ͝͝ʪɇЇ
• Selon le type d’armoire, un dispositif de
serrage (aide au positionnement) peut être
utilisé pour aligner le panneau personnalisé
de la porte du réfrigérateur avec l’armoire en
traçant une ligne verticale sur l’armoire.
• Positionnez l’armoire côté châssis pour
l’aligner avec la ligne verticale.
05
Mise à niveau du réfrigérateur
Эɇ͝ϩ
θɵθʪɇ̟Їϑϩɇɵ̷ʪ
طՎ؏ՓٓՌՋ͔͔ظ
ՍՋ͔͔
͔ɇӱ
ƟцΧʪʒʪЭʭθ̈͝طɇ̟Їϑϩʪ͔ʪ͝ϩʒʪ̷ɇ˵ɇЇϩʪЇθظ
θθ̈ʽθʪ
• Fixez le cache supérieur du réfrigérateur
et de l’habillage sur le crochet de la partie
supérieure avant du châssis.
• En utilisant votre perceuse et le foret indiqué
ci-dessous, engagez chacun des arbres
d’ajustement du réfrigérateur en rotation et
mettez à niveau le réfrigérateur. (SH ↑, SAH
↓) Ajustez l’écart entre le meuble et le cache
du châssis supérieur à 1/8 pouce (3 mm).
• Les pieds de mise à niveau avant et arrière
ont un ajustement de hauteur maximale de
3/4 pouces (20 mm)..
06
Fixation du réfrigérateur
k͔Χ̷ɇʀʪ͔ʪ͝ϩѣуʪ
ǤЇʪʒЇ˵ɇЇϩ
طƟ²ظđՏуՌՏՌՍΧ̈ʽʀʪϑ
Aͱ͔Χɇϩ̈ɵ̷̈̈ϩʭ
Χɇ͝͝ʪɇЇ
θ͔ͱ̈θʪ
A˵ɑϑϑ̈ϑ̷ɇϩʭθɇ̷ʒʪ̷ɇθ͔ͱ̈θʪ
• Retirez le compartiment du congélateur
• Fixez le réfrigérateur dans son caisson avec
des vis (TH) M4 x 14 (6 vis par côté, comme
indiqué sur le schéma).
07
Fixation de l’habillage du meuble
Aɇ̷ʪʒʪϑΧɇʀʪ͔ʪ͝ϩ
ʒЇʀ˵ɑϑϑ̈ϑ
²ɇɵ̷̷̈ɇ˝ʪ
ʀͻϩʭ͔ʪЇɵ̷ʪ
• Fixez l’habillage entre le refrigerateur et le
meuble.
08
Fixation des supports du panneau personnalisé de
la porte
ťɇθϩ̈ʪ̈͝˙ʭθ̈ʪЇθʪʒʪ̷ɇ
ΧͱθϩʪʒЇθʭ˙θ̈˝ʭθɇϩʪЇθ
ťɇθϩ̈ʪ̈͝˙ʭθ̈ʪЇθʪʒʪ̷ɇ
ΧͱθϩʪʒЇʀͱ͝˝ʭ̷ɇϩʪЇθ
ťɇθϩ̈ʪϑЇΧʭθ̈ʪЇθʪʒʪ̷ɇ
ΧͱθϩʪʒЇθʭ˙θ̈˝ʭθɇϩʪЇθ
ƸťťՐʪɇ؏øĮǮՐʪɇ
ط²ظđՏуՌՏՌՋʪɇ
ƸťťՏʪɇ؏øĮǮՐʪɇ
ط²ظđՏуՌՏՔʪɇ
ťɇθϩ̈ʪϑЇΧʭθ̈ʪЇθʪʒʪ̷ɇ
ΧͱθϩʪʒЇʀͱ͝˝ʭ̷ɇϩʪЇθ
Panneau personnalisé: STS
• Enfoncez les vis sur la partie supérieure et
inférieure des supports, comme indiqué sur
le schéma. (Les autres trous de chaque côté
du support ont une autre utilité).
²ƸƟ
9Ɗ
Panneau
Modèle
ŵmŵÃAĮĘmø
ƊƸťՐΧ̈ʽʀʪϑ؏ÃĘՐΧ̈ʽʀʪϑ
ط²ظđՏуՌՏՌՋΧ̈ʽʀʪϑ
Panneau personnalisé : bois, autre
• Le modèle vous indique la position du
support et des trous.
• Marquez les positions des trous sur le
panneau selon le modèle et insérez les vis
dans les trous.
09
Alignement du panneau (ordre: Haut → Côté →
Avant/Arrière)
9ͱЇ̷ͱ͝ɞʒͱЇɵ̷ʪ
Χɇϑ
Ǥ̈ϑ̷ɇϩʭθɇ̷ʪ
Ǥ̈ϑՍ
Ǥ̈ϑՌ
đՑуՌՍՌՌΧ̈ʽʀʪϑ
A˵ɇαЇʪՌՌӬϑΧɇθΧͱθϩʪ
đʭʀɇ̈͝ϑ͔ʪϑʒɇ̟Їϑϩʪ͔ʪ͝ϩ
ʒЇΧɇ͝͝ʪɇЇ
đՌՎ
• Il y a deux mécanismes d’ajustement de
panneau au-dessus et deux en dessous de la
porte.
• Ajustez le panneau de sorte qu’il soit aligné
avec le meuble autour.
• Une vis latérale pour déplacer le panneau
d’un côté à l’autre ; la vis 1 pour déplacer le
panneau vers l’avant/l’arrière ; la vis 2 pour
xer le panneau en place.
• Pour xer le panneau sur la porte, vissez
les écrous sur les boulons à double pas. (2
écrous par porte)
ATTENTION
Veuillez lire attentivement les instructions d'installation avant d'installer l'appareil.
-
 1
1
-
 2
2

