
2K Wire-Free Camera
Quick Start Guide
U424AA Series
lorex.com
En

How to get started with your
2K Wire-Free Camera
Thank you for your purchase!

Disclaimers
• A regulated UL / CSA approved power supply is required for use with this camera (included).
Use of a non-regulated, non-conforming power supply can damage this product and voids the
warranty.
• Not intended for submersion in water. Installation in a sheltered location recommended.
• Audio recording without consent is illegal in certain jurisdictions. Lorex Corporation assumes
no liability for use of its products that does not conform with local laws.
• This camera includes an Auto Mechanical IR Cut Filter. When the camera changes between
Day/Night
viewing modes, an audible clicking noise may be heard from the camera. This clicking is
normal and
indicates that the camera lter is working.
• Some channels on the 5GHz Wi-Fi band are restricted in Canada. This means certain Wi-Fi
networks may not be available to connect to during setup.
Safety Precautions
• Read this guide carefully and keep it for future reference.
• Follow all instructions for safe use and handling of the product.
• Operate the camera within the specied temperature, humidity and voltage and use manufac-
turer approved accessories.
• Do not disassemble the camera.
• Do not point the camera directly at the sun or a source of intense light.
• Periodic cleaning may be required. Use a damp cloth only. Do not use any harsh, chemi-
cal-based cleaners.

Contents
Package Contents
Section
Overview
Before You Start
Setup
1
2
3
4
5
6
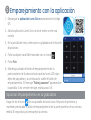
Pairing to the App
App Live View
Mounting
7

Package Contents
2K Wire-Free
Security Camera
(x1)
Re-chargeable
Battery Pack
(x1)
Charging
Adapter & Cable
(x1)
Camera
Antenna
(x1)
Mounting
Bracket
(x1)
Anchors (x4)
Screws (x4)
Security Screws (x2)
Allen Key (x1)
Drill Bit (x1)
Screwdriver (x1)
1

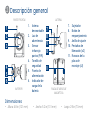
Overview
7. Fastener
8. Pairing
button
9. Adjustment
ring
10. Battery
release
tabs (x2)
11. Mounting
plate slots
(x2)
1. Detachable
antenna
2. Warning light
3. PIR sensor
4. Locking
screw
5. Power port
6. Battery
charging
indicator
SIDEFRONT
BOTTOM BACK MOUNTING PLATE
7
8
2
1
39
4
5
11
10
6
Dimensions
• Height: 4.8” (121mm)
2
• Width: 5.2” (131mm) • Length: 2.9” (73mm)

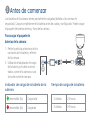
The camera battery comes partially charged (due to safety regulations). Please, fully
charge the battery before use and setup. You can charge the battery pack inside or
outside of the camera.
Before You Start
To charge the camera battery
pack:
1. Remove the protective lm on the
battery contacts and camera lens.
2. Using the provided battery
charging adapter and cable,
connect the camera to a nearby
outlet.
Camera Battery Charging Indicator Battery Charging Time
(solid) Fully charged
(solid) Charging
2-cell 2-4 hours
3-cell 3-5 hours
3

Setup
1. Turn the adjustment ring counter-
clockwise to loosen and angle the camera.
2. Screw in the antenna.
3. Insert the battery pack into the bottom of
the camera.
Note: You will hear a ‘beep’ when the
power pack is properly inserted. If you do
not hear this alert, remove the power pack
by pushing in on the battery release tabs
then re-insert.
Adjustment ring
4

Pairing to the App
Click the icon in an empty channel screen. After you press and hold the pairing
button on the back of your camera, you will have 30 seconds to pair the camera.
Optional: Pairing on the Recorder
1. Download the Lorex Cirrus app by scanning the QR code.
2. Open the Lorex Cirrus app and sign in or create an account.
3. From the Home screen, select your recorder from the list
of devices.
4. Tap any free channel marked with a icon.
5. Tap Pair.
6. Press and hold the pairing button on the back of the camera
until the red LED lights stop flashing, then release the
pairing button. A ‘Pairing success!’ message will appear on
screen. If you do not see this message, repeat steps 3-6.
5

App Live View
Settings
Device casting
Favorite group
Name display
Device name
Search / playback
video
6

Mounting
1. Set the mounting bracket to the desired mounting position.
2. Mark holes through the mounting bracket.
3. Using the included drill bit, drill holes where marked.
4. Using the included screwdriver, secure the bracket with the provided mounting screws.
Optional: If you are mounting the camera into drywall, use the provided drywall
anchors.
Camera Fastener
Security screw
Mounting
bracket
Mounting surface
Screws
Anchors (Optional)
7

5. Orient the camera fastener upwards, then align the
camera’s mounting plate slots to the tabs in the
mounting bracket. Push in and slide down to secure
in place.
6. Insert the security screw through the fastener on the
top of the camera and mounting bracket, then tighten
with the screwdriver.
7. Tighten the pre-installed locking screw using the
screwdriver.
Note: To remove the battery pack in the future, loosen
the locking screw.
8. Adjust the camera to the desired position. Tighten the
adjustment ring clockwise.
Pre-installed locking screw

This device complies with part 15 of the FCC Rules. Operation is subject to the
following two conditions: (1) This device may not cause harmful interference, and
(2) This device must accept any interference received, including interference that
may cause undesired operation.
Copyright © 2021 Lorex Corporation
As our products are subject to continuous improvement, Lorex reserves the right to modify
product design, specications and prices, without notice and without incurring any obligation.
E&OE. All rights reserved.
Need help?
Visit help.lorex.com for up-to-date information and resources:
• Download product guides
• Watch how-to-videos
• Find related troubleshooting tips & FAQs
U424AA-Series_QSG_TRILINGUAL_R1
Register your product
Please see our full Terms of Service and Limited Hardware Warranty Policy at
lorex.com/warranty.

Caméra 2K sans fils
Guide de démarrage rapide
SérieU424AA
lorex.com
Fr

Voici comment démarrer votre
2K caméra sans fil
Merci pour votre achat!

Clauses de non-responsabilité
• Un bloc d’alimentation stabilisé et certiéUL/CSA est nécessaire pour l’utilisation de cette caméra
(fourni). L’utilisation d’un bloc d’alimentation non réglementé et non conforme peut endommager ce
produit et annuler la garantie.
• Ne pas immerger dans l’eau. Installation recommandée dans un emplacement abrité.
• L’enregistrement audio sans consentement est illégal sur certains territoires. LorexCorporation
décline toute responsabilité concernant l’usage de produits non conformes aux lois locales.
• Cet appareil comprend un ltre IR mécanique autonome. Lorsque la caméra passe du mode diurne
au mode nocturne, un bruit de clic provenant de la caméra peut être entendu. Ce clic est normal et
indique que le ltre de la caméra fonctionne.
• Certains canaux de la bande Wi-Fi de 5GHz sont interdits au Canada. Cela signie que certains
réseaux Wi-Fi peuvent ne pas être disponibles pour la connexion pendant l’installation.
Mesures de sécurité
• Lisez attentivement ce guide et gardez-le pour consultation ultérieure.
• Veuillez suivre les directives pour assurer une utilisation et une manipulation sécuritaires du produit.
• Faites fonctionner la caméra dans les limites de température, d’humidité et de tension spéciées et
utilisez les accessoires approuvés par le fabricant.
• Ne démontez pas la caméra.
• Ne pointez pas votre caméra vers le soleil ou une source intense de lumière.
• Un nettoyage périodique peut s’avérer nécessaire. Utilisez uniquement un linge humide. N’utilisez pas
de nettoyants à base de produits chimiques abrasifs.

Contenu
Contenu de l’emballage
Section
Aperçu
Avant de commencer
Conguration
1
2
3
4
5
6
Jumelage à l’application
Visionnement de l’application en direct
Montage
7

Contenu de l’emballage
Caméra de sécurité
2K sans l
(x1)
Bloc-piles
rechargeable
(x1)
Adaptateur de
charge et câble
(x1)
Antenne
de caméra
(x1)
Support de
montage
(x1)
Ancrages (x4)
Vis (x4)
Vis de sécurité (x2)
Clé Allen (x1)
Mèche de forage (x1)
Tournevis (x1)
1

Aperçu
7. Fixation
8. Bouton de
jumelage
9. Bague de
réglage
10. Languettes
d’ouverture
du bloc-pile
(x2)
11. Fentes de
la plaque
de montage
(x2)
1. Antenne
démontable
2. Voyant
d’avertissement
3. Capteur passif à
infrarouge
4. Vis de blocage
5. Port
d’alimentation
6. Indicateur de
charge de la pile
CÔTÉAVANT
PARTIE
INFÉRIEURE
PLAQUE DE MONTAGE
ARRIÈRE
7
1
8
2
39
4
5
11
10
6
Dimensions
• Hauteur: 121mm (4,8po)
2
• Largeur: 131mm (5,2po) • Longueur: 73mm (2,9po)

Les piles de la caméra sont livrées partiellement chargées (en raison des règles de
sécurité). Prenez soin de charger complètement les piles avant l’utilisation et l’installation.
Vous pouvez charger le bloc-piles à l’intérieur ou à l’extérieur de la caméra.
Avant de commencer
Pour charger le bloc-piles de la
caméra :
1. Retirez le lm protecteur des
contacts des piles et de la lentille
de la caméra.
2. En utilisant l’adaptateur de bloc-
pile et le câble fournis, branchez
le caméra à la prise de courant la
plus proche.
Indicateur de charge de la pile de la caméra Temps de recharge des piles
(permanent) Complètement chargé
(permanent) Chargement
Deux cellules 2-4 heures
Trois cellules 3-5 heures
3
La page est en cours de chargement...
La page est en cours de chargement...
La page est en cours de chargement...
La page est en cours de chargement...
La page est en cours de chargement...
La page est en cours de chargement...
La page est en cours de chargement...
La page est en cours de chargement...
La page est en cours de chargement...
La page est en cours de chargement...
La page est en cours de chargement...
La page est en cours de chargement...
La page est en cours de chargement...
La page est en cours de chargement...
La page est en cours de chargement...
La page est en cours de chargement...
La page est en cours de chargement...
La page est en cours de chargement...
La page est en cours de chargement...
-
 1
1
-
 2
2
-
 3
3
-
 4
4
-
 5
5
-
 6
6
-
 7
7
-
 8
8
-
 9
9
-
 10
10
-
 11
11
-
 12
12
-
 13
13
-
 14
14
-
 15
15
-
 16
16
-
 17
17
-
 18
18
-
 19
19
-
 20
20
-
 21
21
-
 22
22
-
 23
23
-
 24
24
-
 25
25
-
 26
26
-
 27
27
-
 28
28
-
 29
29
-
 30
30
-
 31
31
-
 32
32
-
 33
33
-
 34
34
-
 35
35
-
 36
36
-
 37
37
-
 38
38
-
 39
39


dans d''autres langues
- English: Lorex U424AA Series User guide
- español: Lorex U424AA Series Guía del usuario
Documents connexes
-
Lorex L8559 Series 4K NVR and Battery-Operated Camera System Mode d'emploi
-
Lorex H32A3TU Mode d'emploi
-
-
-
Lorex N4K2-84WB-DSC Mode d'emploi
-
Lorex N4K2-84WB-DSC Manuel utilisateur
-
Lorex F461AQ Series Manuel utilisateur
-
Lorex E881AP Guide de démarrage rapide
-
-