Honeywell HUL900BC Le manuel du propriétaire
- Catégorie
- Humidificateurs
- Taper
- Le manuel du propriétaire

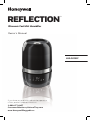
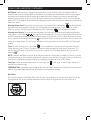
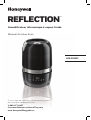
REFLECTION™
If you have any questions about the operation
of this product, please contact us:
1-800-477-0457
www.HoneywellPluggedIn.ca
HUL900BC
Ultrasonic Cool Mist Humidifier
Owner’s Manual

2
IMPORTANT SAFETY INSTRUCTIONS
READ AND SAVE THESE SAFETY INSTRUCTIONS BEFORE
USING THIS HUMIDIFIER
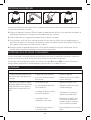
When using electrical appliances, basic precautions should always be followed to reduce the risk
of fire, electric shock, and injury to persons, including the following:
1. The humidifier should ALWAYS be placed on
a firm, flat, waterproof surface at least three
feet (1.2m) away from bedside, 12 inches
(30cm) from the wall. KEEP OUT OF REACH
OF CHILDREN AND PETS.
2. Be sure the humidifier is in a stable position
and the power cord is away from heated
surfaces and out of the way to prevent the
humidifier from being overturned.
3. DO NOT leave the humidifier unattended
in a closed room. Doing so may result in
personal injury or property damage. If room
becomes saturated, open the door and turn
the humidifier off or down.
4. Before using the humidifier, extend the
cord and inspect for any signs of damage.
DO NOT use the unit if the cord has been
damaged. DO NOT operate with power cord
coiled or with twist tie in place.
5. The humidifier has a polarized plug (one
blade is wider than the other) as a safety
feature. This plug will fit into a polarized
outlet only one way. If the plug does not fit
fully into the outlet, reverse the plug. If it still
does not fit, contact a qualified electrician.
DO NOT attempt to defeat this safety
feature.
6. CAUTION: To avoid fire or electric shock
hazard, plug the humidifier directly into a
120V AC electrical outlet. To avoid risk of
fire, electric shock, or personal injury, NEVER
use an extension cord or power strip.
7. The humidifier should ALWAYS be
unplugged and emptied when not in
operation or while being cleaned. Turn off
and unplug humidifier before moving. DO
NOT move or tilt humidifier while it is in
operation. Plug and unplug unit with dry
hands. NEVER pull by cord.
8. DO NOT operate the humidifier without
water. Turn off and unplug unit when tank is
empty.
9. Humidifier requires regular cleaning. Refer to
and follow cleaning instructions.
10. DO NOT operate outdoors; this humidifier is
intended for indoor residential use only.
11. DO NOT place in direct sunlight, high
temperature areas or near computers or
sensitive electronic equipment.
12. DO NOT cover or insert objects into any
openings on the unit. DO NOT block intake
or output vents.
13. DO NOT touch the nebulizer while the unit is
plugged in, as burns could result.
14. DO NOT attempt to repair or adjust any
electrical or mechanical functions on this
humidifier. Doing so will void your warranty.
15. DO NOT add any essential oils or liquid
inhalants (e.g. Vicks VapoSteam®) into the
Base Water Reservoir or Water Tank. Doing
so could damage the humidifier and void the
warranty.
16. For Residential Use Only.
SAVE THESE INSTRUCTIONS

3
HPA600 series
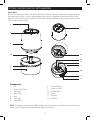
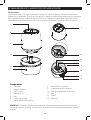
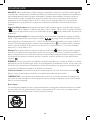
GETTING TO KNOW YOUR COOL MIST HUMIDIFIER
How it Works
Water is released from the Water Tank into the Reservoir. A Nebulizer vibrates at ultrasonic frequency, breaking
the water into a fine mist. The mist is quietly propelled by a fan up a vertical Mist Chamber to the Mist Outlet
where the cool, visible mist enters the room. This humidifier will shut off when the water level is low or when the
Tank is removed from the Base.
Components
1. Lid
2. Built-in Tank Handle
3. Mist Outlet
4. Water Tank
5. Base
6. Tank Light
7. Power Recess
8. Essential Oil Tray
9. Essential Oil Pad
10. Air Filter Door
11. Gasket
12. Reservoir
13. Nebulizer
1
3
4
7
5
NOTE: The lights on the control panel will illuminate when you touch the panel. After you finish interacting
with the panel, the lights will automatically dim within a few seconds.
12
2
13
6
5
10
8
9
11

4
GETTING TO KNOW YOUR COOL MIST HUMIDIFIER (CONTINUED)
Unpack the Humidifier
Keep this Owner’s Manual for reference
• Remove packaging materials. Remove twist tie from power cord and extend
power cord to full length.
• Place on a firm, level, water resistant surface a minimum of 12” (30cm) from
any walls. Mist should be directed away from any walls, bedding and furniture.
Hard Water and White Dust
• High mineral content in your water, also known as hard water, may cause a white mineral residue to
accumulate on surfaces in the room near the humidifier. This mineral residue is commonly referred to as white
dust. The higher the mineral content (hardness) of your water, the greater the potential that an ultrasonic
humidifier may produce white dust.
• White dust is not a result of a defect or flaw in the humidifier. It is a result of the amount of minerals suspended
in the water you are using.
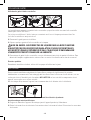
FILLING/REFILLING
HUL900BC holds 1.4 gallons (5.3L) of water (tank and reservoir combined).
The Tank can be filled in two ways:
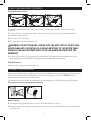
Option 1: To Fill Tank at the Humidifier
1. Ensure Tank is securely seated on Base. Open Tank lid and fill using a water pitcher.
2. Close the Tank lid.
1 2

5
Option 2: To Fill Tank at the Sink
1. Turn the the humidifier off before removing the Water Tank. Open Tank lid to reveal the handle and carry to
sink.
2. Fill Tank with cool water.
3. Carry Water Tank back to humidifier.
Note: The Tank should be carried using two hands; one hand on the Handle located on top of the Tank and other
hand supporting the bottom of the Tank. Kaz USA, Inc. will not accept responsibility for property damage caused
by water spillage.
4. Replace the full Tank on the Base.
CAUTION: DO NOT FILL WITH WARM OR HOT WATER. DO NOT ADD ESSENTIAL OILS,
MEDICATIONS, OR LIQUID INHALANTS, SUCH AS VICKS VAPOSTEAM, TO THE TANK. DOING
SO COULD CAUSE DAMAGE TO THE HUMIDIFIER AND VOID THE WARRANTY. USE CARE WHEN
HANDLING WATER TANK TO AVOID UNNECESSARY IMPACT.
Banging or dropping the Water Tank could result in damage to the Tank that may cause leaking.
USING YOUR HUMIDIFIER
NOTE: Position humidifier to direct mist output away from walls, furniture and bedding.
Power:
1. Plug the humidifier into a polarized 120V outlet.
2. Press the power recess to turn the humidifier on. The power icon will illuminate when the device is on. If the
Power Icon turns an amber colour, this indicates that the Reservoir water level is low or the Tank is not set in
place. Check the water level and fill if necessary, and ensure the Tank is properly seated.
NOTE: If you refill the Tank at the humidifier while the Power Icon is amber, power OFF the humidifier and then
power it back ON to activate the water flow into the Reservoir.
CAUTION: TO AVOID ELECTRIC SHOCK, DO NOT PLUG HUMIDIFIER INTO AN OUTLET
WITH WET HANDS.
21 3 4
FILLING/REFILLING (CONTINUED)
$
21

6
USING YOUR HUMIDIFIER (CONTINUED)
AUTO Mode: Your humidifier is equipped with both Auto and manual settings. When first powered ON, the
humidifier will start in Auto Mode. While in Auto Mode, the humidifier will automatically set the humidity output
level based on the ambient relative humidity in the room. When the humidity level is low, the humidifier will
add more moisture to the air at a faster rate. The target humidity level in Auto Mode is 60%. Once the humidity
reaches 60% in Auto Mode, the humidifier will stop producing mist while continuing to monitor the humidity level
around the device.
Humidity Output Level: To manually select an out put level, touch the Mist Control Icon. Continue to touch
the icon to change the output level setting. The selection will cycle through Auto -> Low -> Medium -> High ->
Auto. The setting is indicated by the lit dot above the Mist Control Icon. (See Control Panel section)
Humidity Level Setting: To set your preferred humidity level manually, select the Low, Medium or High output
setting, then use the Arrows to set your desired humidity level. You can set the humidity level from 30%
to 69%. For personal comfort, the recommended humidity level is between 40-60%. When the desired humidity
level is reached, the Humidity Reached Icon
h
and Numeric Display are illuminated in blue. If the humidity level
in your space drops below 30%, the Display will show Lo. If the humidity level rises above 69%, the Display will
show HI.
Timer: To set the timer, press the Timer Icon. Use the Arrows to increase or decrease the timer setting by
1 hour intervals, up to 12 hours. The timer is ON when the indicator above the Timer Icon is illuminated. To
turn the timer OFF, touch and hold the Timer Icon for 2 seconds, or use the Down Arrow to decrease the time
setting to .
NOTE: Humidifier will continue to cycle on and off to maintain the set humidity level while the Timer is set. At the
end of the timed cycle, the humidifier will power off, regardless of the humidity setting. Any time the humidifier is
manually turned off (with the power button or by unplugging) the timer will reset to OFF setting.
Tank Light: To turn on the tank light, touch the Tank Light Icon. Touch again to dim the light, and touch a
third time to turn off the light.
CONDENSATION: If you notice condensation on the walls, windows or around the humidifier, the humidity level is
too high. Open doors to the room or turn off humidifier until humidity level drops.
Mist Outlet
This humidifier features a directional Mist Outlet. Use this feature to direct the mist where you want it most. The
Outlet will rotate 90º in each direction from front to reduce white dust ingestion in the rear air input vent.
h

7
USING YOUR HUMIDIFIER (CONTINUED)
Using The Essential Oil Tray:
This humidifier features an Essentil Oil Tray that can be used with your favourite essential oil for added
enjoyment.
This is not a diffuser – the oil does not come in contact with water and is passively evaporated into the air.
Essential oils are not included.
1. Press and release tray to open.
2. Add a few drops of essential oil to the Pad.
WARNING: DO NOT POUR ANY LIQUIDS INTO THE MIST OUTLET. DO NOT ADD
LIQUID INHALANTS, ESSENTIAL OILS OR ANY ADDITIVES TO THE WATER TANK.
DOING SO CAN HAVE ADVERSE EFFECTS ON THE HUMIDIFIER AND VOID THE
WARRANTY.
3. To clean the Essential Oil Tray, gently wipe residue from the Tray. Replacement essential oil pads can be
ordered through Consumer Relations; see back of this manual for contact information.
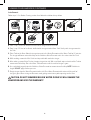
Daily Maintenance
For best results, use fresh clean water every day.
CLEANING YOUR HUMIDIFIER
To keep your humidifier running efficiently, clean it regularly. Weekly cleaning is recommended. All maintenance
should be done in the kitchen or bathroom on a water-resistant surface near a faucet. DO NOT wash any
components of this humidifier in the dishwasher.
To properly clean your humidifier, we recommend the separate processes of Scale Removal and Disinfecting.
These two processes must be performed separately.
Before Cleaning
1. Turn off and unplug humidifier. Never clean the humidifier when it is running.
2. Remove Water Tank and empty completely any water from the Tank and Base. Remove any accessories from
the Water Tank.
$
12
1 2 3

8
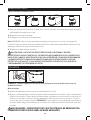
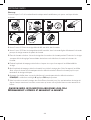
CLEANING YOUR HUMIDIFIER (CONTINUED)
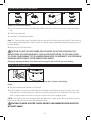
Scale Removal
Follow steps 1-2 in Before Cleaning section, then follow the additional steps below.
1. Pour 2 cups (.5 litre) of undiluted, distilled white vinegar into the Resevoir.
2. Pour 1 cup (.25 litre) of undiluted, distilled white vinegar into the Water Tank. Gently swish vinegar around in
the Tank.
3. Place Tank on the Base. Allow the vinegar to remain in the Water Reservoir and the Water Tank for 20 minutes.
The vinegar will loosen mineral buildup on the Nebulizer, Water Reservoir and in the underside of the Tank.
4. While soaking, remove the Mist Outlet and wipe with cloth soaked in vinegar.
5. After soaking, remove Water Tank and empty vinegar into sink. With a soft cloth, wipe underside of the Tank to
remove mineral buildup. Rinse the Water Tank with water until the smell of vinegar is gone.
6. Use a soft cloth to gently wipe the Nebulizer, Water Reservoir to remove mineral buildup. NOTE: Nebulizer is
fragile. DO NOT apply extreme pressure.
7. Empty vinegar from the Water Reservoir into the sink. Rinse Water Reservoir with water until the smell of
vinegar is gone. When rinsing out Reservoir, avoid getting water into any other openings on the Base.
CAUTION: DO NOT SUBMERGE BASE IN WATER. DOING SO WILL DAMAGE THE
HUMIDIFIER AND VOID THE WARRANTY.
V
2C
V
1C
1234
567

9
CLEANING YOUR HUMIDIFIER (CONTINUED)
Disinfecting
Before starting the disinfecting process, follow Steps 1-2 in the Before Cleaning section.
NOTE: Bleach may stain clothes. It is recommended that you wear rubber gloves during the disinfection process
to protect your hands.
1. Mix 1 tsp of bleach with 1 gallon (3.8 litre) of water. Fill the Water Reservoir with part of the solution, about 2
cups (.5 litre). Pour the rest of the solution in the Water Tank.
2. Close Tank lid and gently swish solution around in Tank to coat the inside of the Water Tank.
3. Place Tank on Base. Allow the bleach solution to remain in Tank and Water Reservoir for 20 minutes.
4. Remove Water Tank and empty solution into sink. Rinse the Water Tank with water until the smell of bleach is
gone.
5. Carefully empty solution from the Base into the sink. Rinse Water Reservoir with water until the smell of bleach
is gone. When rinsing out Reservoir, avoid getting water into any other openings on the Base.
CAUTION: DO NOT SUBMERGE BASE IN WATER. DOING SO WILL DAMAGE THE
HUMIDIFIER AND VOID THE WARRANTY.
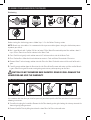
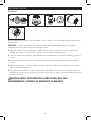
AIR FILTER CLEANING
It is recommended that when you disinfect your unit, you also inspect the Air Filter and clean if needed using the
following instructions:
1. Turn off and unplug the humidifier. Remove the Air Filter door by pushing the locking tab sideways towards the
door and gently pulling outward.
2. Remove black Air Filter by lifting it out from the door. Rinse Air Filter under cold water.
(3,8 l)
B
1 tsp
W
1 Gal.
1234
5
1234

10
AIR FILTER CLEANING (CONTINUED)
3. Blot Air Filter dry with a paper towel. Ensure Air Filter is completely dry before reinstalling. If it is damp, it will
affect the humidity sensor. When returning Air Filter to door, ensure filter is full seated.
4. Reattach Air Filter door by placing the alignment-tabs first, and then snapping the locking tab in place as the
door closes.
END OF SEASON CARE AND STORAGE
Follow the cleaning instructions when the humidifier will not be used for at least one week, or at the end of the
season. At the end of the season, remove any accessories from the humidifier.
Dry the humidifier completely before storing. DO NOT store with water inside the Water Tank. Pack unit in original
carton and store in a cool, dry location.
TROUBLESHOOTING
PROBLEM POSSIBLE CAUSE SOLUTION
Power Light remains OFF after
pressing the Power button
• Unit not plugged in
• No power at outlet
• Plug unit in
• Check home circuits, fuses; test
outlet
Power is ON and light is white but
little or no mist is produced
• No water in Tank
• Mineral deposits on Nebulizer
• Mist level setting may be too
low
• Auto shut-off feature has been
engaged
• Unit is not level
• Fill Water Tank
• Clean Nebulizer (Refer to
Cleaning Your Humidifier
section)
• Select a higher output level
setting
• Reset the humidifier by turning
it off or unplug the humidifier
for a few seconds, then turn
back on
• Place on a level surface
Water overflows from Water
Reservoir
• Tank may be damaged
• Tank is not sitting properly on
Base
• Check the Tank for any cracks
or damage, and replace if
necessary
• Ensure Tank is seated properly
and securely on Base

11
TROUBLESHOOTING (CONTINUED)
PROBLEM POSSIBLE CAUSE SOLUTION
Condensation forms around
humidifier or on windows and walls
• Mist Control is set too high
for room size or pre-existing
humidity level
• Humidifier may be too close to
wall or window
• Decrease Mist Control to a lower
setting, or open door to room
• Move humidifier away from wall
or point Mist Outlet away from
wall or window
Humidity displayed is unusually
high
• Air Filter is wet or damp • Remove filter and pat dry with a
towel or cloth
NOTE: Failure to keep this unit clean from mineral deposits normally contained in any water supply will affect the
efficiency of operation of this unit. Customer failure to follow these instructions may void the warranty.
ACCESSORIES
Protec® Antimicrobial Cleaning Ball or Fish (Not Included)
The Protec Antimicrobial features an antimicrobial, Aquastat®, which helps keep your
humidifier cleaner, longer. Simply drop in the tank for fresh, cleaner mist! Benefits of
using this product includes:
• Kills up to 99% of odour causing bacteria
• Continues cleaning for up to 30 days
• Contains no harmful chemicals
Protec ® PC-1C-BX, PC1FC
Accessories available at retailers and at www.HoneywellPluggedIn.ca.
CONSUMER RELATIONS
We are here to help. Call us toll-free at: 1-800-477-0457
E-mail:[email protected]
Or visit our website at: www.HoneywellPluggedIn.ca
Please be sure to specify Model number HUL900BC
NOTE: IF YOU EXPERIENCE A PROBLEM, PLEASE CONTACT CONSUMER RELATIONS FIRST OR SEE
YOUR WARRANTY. DO NOT RETURN THE HUMIDIFIER TO THE ORIGINAL PLACE OF PUR CHASE. DO NOT
ATTEMPT TO OPEN THE BASE OR TAMPER WITH THE POWER KNOB YOURSELF; DOING SO MAY VOID
YOUR WARRANTY AND CAUSE PERSONAL INJURY OR DAMAGE TO THE PRODUCT.

12
SPECIFICATIONS
Electrical rating: 120V, 60Hz., 25W
Capacity: 1.4 Gallons (5.3 Litres)
2 YEAR LIMITED WARRANTY
You should first read all instructions before attempting to use this product.
This 2 year limited warranty applies to repair or replacement of product found to be defective in material or
workmanship. This warranty does not apply to damage resulting from commercial, abusive, unreasonable
use or supplemental damage. Defects that are the result of normal wear and tear will not be considered
manufacturing defects under this warranty. KAZ IS NOT LIABLE FOR INCIDENTAL OR CONSEQUENTIAL
DAMAGES OF ANY NATURE, ANY IMPLIED WARRANTY OF MERCHANTABILITY OR FITNESS FOR A
PARTICULAR PURPOSE ON THIS PRODUCT IS LIMITED IN DURATION TO THE DURATION OF THIS
WARRANTY. Some jurisdictions do not allow the exclusion or limitation of incidental or consequential
damages or limitations on how long an implied warranty lasts, so the above limitations or exclusions may not
apply to you. This warranty gives you specific legal rights, and you also may have other rights which vary from
jurisdiction to jurisdiction. This warranty applies only to the original purchaser of this product from the original
date of purchase.
A. At its option, Kaz will repair or replace this product if it is found to be defective in material or workmanship.
B. This warranty does not cover damage resulting from any unauthorized attempts to repair or from any use
not in accordance with the instruction manual.
C. This warranty does not cover the filters, pre-filters, UV bulbs or other accessories (if included) except for
material or workmanship defects.


REFLECTIONMC
Si vous avez des questions sur le fonctionnement
de ce produit, appelez-nous au:
1-800-477-0457
www.HoneywellPluggedIn.ca
HUL900BC
Humidificateur ultrasonique à vapeur froide
Manuel d’instructions

15
CONSIGNES DE SÉCURITÉ IMPORTANTES
LISEZ CES MESURES DE SÉCURITÉ AVANT DE COMMENCER
À UTILISER CET HUMIDIFICATEUR ET ASSUREZ-VOUS DE LES
CONSERVER.
Lorsque vous utilisez des appareils électriques, vous devez toujours prendre certaines
précautions élémentaires pour réduire les risques d’incendie, de choc électrique et de blessure,
notamment les suivantes:
1. L’humidificateur doit TOUJOURS être posé
sur une surface ferme, plane et étanche, à
au moins trois pieds (1,2 m) du lit et à 12
pouces (30 cm) du mur. L’APPAREIL DOIT
ÊTRE HORS DE PORTÉE DES ENFANTS ET
DES ANIMAUX DE COMPAGNIE.
2. Assurez-vous que l’appareil est en position
stable et que le cordon d’alimentation est
éloigné des surfaces chauffantes et hors
d’atteinte afin d’empêcher de renverser
l’appareil
3. Ne laissez PAS l’humidificateur sans
surveillance dans une pièce fermée, car
cela pourrait entraîner des blessures graves
ou des dommages matériels. Si la pièce
devient saturée, ouvrez la porte et éteignez
l’humidificateur ou choisissez le réglage plus
bas.
4. Avant d’utiliser l’appareil, déroulez le cordon
et examinez-le avec soin pour déceler tout
signe de dégradation. Ne vous servez PAS
de l’appareil si le cordon est abîmé. Ne faites
PAS fonctionner l’appareil si le cordon est
enroulé ou si l’attache est en place.
5. Cet appareil est muni d’une fiche polarisée
(une branche est plus large que l’autre) qui
ne s’insère dans les prises polarisées que
dans un sens. Si la fiche ne pénètre pas
totalement dans la prise, retournez la fiche.
Si elle ne rentre toujours pas complètement
dans la prise, ayez recours aux services
d’un électricien agréé. N’essayez PAS de
contourner cette mesure de sécurité.
6. MISE EN GARDE: Pour éviter les risques
d’incendie ou de choc électrique, branchez
l’humidificateur directement dans une
prise électrique de 120V CA. Pour éviter les
risques d’incendie, de choc électrique ou de
blessure, n’utilisez JAMAIS de rallonge ou de
barre d’alimentation.
7. L’humidificateur doit TOUJOURS être
débranché et vidé entre les utilisations et
pour le nettoyer. Éteignez et débranchez
l’appareil avant de le déplacer. Ne le déplacez
PAS et ne l’inclinez pas pendant qu’il
fonctionne. Assurez-vous d’avoir les mains
sèches pour le brancher et le débrancher. Ne
tirez JAMAIS sur le cordon.
8. Ne faites PAS fonctionner cet appareil sans
eau. Éteignez-le et débranchez-le lorsque le
réservoir est vide.
9. L’humidificateur doit être nettoyé
régulièrement. Suivez les instructions
d’entretien.
10. Ne faites PAS fonctionner l’appareil à
l’extérieur; cet humidificateur n’est conçu
que pour un usage résidentiel à l’intérieur.
11. Ne placez PAS l’appareil au soleil, dans un
lieu très chaud ou à proximité d’ordinateurs
ou d’équipement électronique sensible.
12. Ne couvrez AUCUN orifice de l’appareil et
n’insérez RIEN dans les orifices. Ne bloquez
PAS les fentes d’entrée ou de sortie d’air.
13. Ne touchez PAS le nébuliseur si l’appareil est
branché, vous pourriez vous brûler.
14. N’essayez PAS de réparer ou d’ajuster les
fonctions électriques ou mécaniques de
cet humidificateur. Cela pourrait entraîner
l’annulation de votre garantie.
15. Ne mettez PAS des huiles essentielles ou des
liquides pour inhalation (par ex. VapoSteamMD
de Vicks) dans la base, la cuvette ou le
réservoir d’eau de l’appareil. Vous pourriez
endommager l’appareil et cela pourrait
entraîner l’annulation de la garantie.
16. Cet appareil doit servir à une utilisation
résidentielle seulement.
CONSERVEZ CES INSTRUCTIONS.

16
HPA600 series
SE FAMILIARISER AVEC L’HUMIDIFICATEUR À VAPEUR FROIDE
Fonctionnement
L’eau contenue dans le réservoir s’écoule dans la cuvette. Le nébuliseur vibre à une fréquence ultrasonique,
fragmentant les gouttelettes d’eau en une fine vapeur. La vapeur est silencieusement poussée par un ventilateur
dans la chambre à vapeur verticale et dirigée vers la buse qui dégage une vapeur froide visible dans la pièce.
L’humidificateur s’éteint lorsque le niveau d’eau est bas ou que le réservoir est retiré de la base de l’appareil.
Composantes:
1. Couvercle
2. Poignée encastrée
3. Buse à vapeur
4. Réservoir d’eau
5. Base
6. Lumière du réservoir
7. Bouton Marche/arrêt encastré
8. Godet à huiles essentielles
9. Tampon pour huiles essentielles
10. Porte du compartiment du filtre à air
11. Joint
12. Cuvette
13. Nébuliseur
1
3
4
7
5
REMARQUE: Les lumières du panneau de commande s’allument lorsque vous touchez le panneau. Une
fois que vous avez fini d’interagir avec le panneau, les lumières se tamisent automatiquement en quelques
secondes.
12
2
13
6
5
10
8
9
11

17
2
13
6
5
10
8
9
11
SE FAMILIARISER AVEC L’HUMIDIFICATEUR À VAPEUR FROIDE (SUITE)
Sortez l’appareil de la boîte
Conservez ce manuel d’instructions comme référence.
• Retirez l’emballage. Enlevez l’attache du cordon d’alimentation et étirez le
cordon à sa pleine longueur.
• Placez l’appareil sur une surface ferme, plane et étanche à au moins 12 po
(30 cm) des murs. La vapeur ne doit pas être dirigée vers un mur, le lit ou les
meubles.
Eau dure et poussière blanche
• La haute teneur en minéraux de l’eau, communément appelée « eau dure », peut provoquer le dépôt d’une «
poussière blanche » sur les diverses surfaces de la pièce qui se trouvent à proximité de l’humidificateur. Plus
l’eau de la région contient de minéraux, plus il y a de chances que l’humidificateur ultrasonique produise de la
poussière blanche.
• La « poussière blanche » n’est pas causée par un défaut de fonctionnement de l’appareil, mais par les
minéraux qui sont en suspension dans l’eau utilisée.
REMPLISSAGE
L’humidificateur HUL900BC contient 1,4 gallon (5,3 litres) d’eau (réservoir et cuvette combinés).
Le réservoir peut être rempli de deux façons :
Option 1 : Remplir le réservoir sur place, sans le déplacer
1. Assurez-vous que le réservoir est bien positionné sur la base de l’appareil. Ouvrez le couvercle du réservoir et
remplissez le réservoir d’eau en utilisant un pichet.
2. Fermez le couvercle du réservoir.
12

18
Option 2: Remplir le réservoir à l’évier
1. Éteignez l’appareil avant d’enlever le réservoir d’eau. Ouvrez le couvercle du réservoir pour dégager la poignée
et transportez le réservoir jusqu’à l’évier.
2. Remplissez le réservoir d’eau froide.
3. Transportez le réservoir jusqu’à l’humidificateur.
Note: REMARQUE : Utilisez vos deux mains pour transporter le réservoir d’eau : une main sur la poignée du
réservoir et l’autre qui soutient le fond du réservoir. Kaz USA, Inc. décline toute responsabilité relativement à des
dommages matériels causés par un déversement d’eau.
4. Remettez le réservoir en place sur la base.
MISE EN GARDE : N’UTILISEZ PAS D’EAU TIÈDE OU D’EAU CHAUDE DANS L’APPAREIL.
N’AJOUTEZ PAS D’HUILES ESSENTIELLES, DES PRODUITS MÉDICAMENTEUX OU DES LIQUIDES POUR
INHALATION, COMME LE VAPOSTEAM DE VICKS, DANS LE RÉSERVOIR. CELA RISQUE D’ENDOMMAGER
L’HUMIDIFICATEUR ET D’ANNULER LA GARANTIE. MANIPULEZ LE RÉSERVOIR AVEC SOIN POUR
ÉVITER TOUT CHOC INUTILE. SI VOUS FRAPPEZ OU ÉCHAPPEZ LE RÉSERVOIR, VOUS RISQUEZ DE
L’ENDOMMAGER ET DE PROVOQUER DES FUITES.
UTILISATION
REMARQUE : Orientez l’appareil de sorte que la sortie de vapeur ne soit pas dirigée vers les murs, les
meubles ou la literie.
Mise en marche:
1. Branchez l’humidificateur dans une prise de courant polarisée de 120V.
2. Appuyez sur le bouton Marche/arrêt encastré pour mettre l’humidificateur en marche. L’icône s’allume lorsque
l’appareil est en marche.Si l’icône devient de couleur ambre, cela indique que le niveau d’eau de la cuvette est
bas ou que le réservoir n’est pas mis en place correctement. Vérifiez le niveau d’eau et ajoutez-en, s’il y a lieu;
assurez-vous que le réservoir est bien fixé. REMARQUE: Si vous remplissez le réservoir pendant que l’icône est
de couleur ambre, éteignez l’humidificateur, puis remettez-le en marche pour activer l’écoulement d’eau dans
la cuvette.
MISE EN GARDE : POUR ÉVITER TOUT CHOC ÉLECTRIQUE, NE BRANCHEZ PAS
L’HUMIDIFICATEUR SI VOUS AVEZ LES MAINS MOUILLÉES.
REMPLISSAGE (SUITE)
$
21
21 3 4

19
UTILISATION (SUITE)
Mode AUTO: Votre humidificateur est doté de réglages automatiques et manuels. Quand vous mettez l’appareil
en marche après l’avoir branché, l’humidificateur démarre en mode Auto. En mode automatique, l’humidificateur
règle automatiquement le débit de vapeur en fonction de l’humidité relative ambiante de la pièce. Lorsque le
taux d’humidité est faible, l’humidificateur ajoute de l’humidité dans l’air à un rythme plus rapide. En mode
automatique, le taux d’humidité cible est de 60 %. Lorsque le taux d’humidité atteint 60 % en mode Auto,
l’humidificateur cesse de produire de la vapeur tout en continuant à contrôler le taux d’humidité autour de
l’appareil.
Réglage du débit de vapeur: Pour régler manuellement le débit de vapeur, appuyez sur l’icône Débit de vapeur.
et faites défiler les options. Les options sont Auto -> Faible -> Moyen -> Élevé -> Auto. Le réglage sélectionné
est indiqué par le voyant allumé au-dessus de l’icône Débit de vapeur (voir la section relative au panneau de
commande).
Réglage du taux d’humidité: Pour régler manuellement le taux d’humidité, sélectionnez le réglage du débit de
vapeur – Faible, Moyen ou Élevé, puis utilisez les flèches pour régler le taux d’humidité souhaité. Vous
pouvez régler le taux d’humidité entre 30 % et 69 %. Un taux d’humidité confortable se situe entre 40 et 60 %.
Lorsque le taux d’humidité souhaité est atteint, l’icône Humidité atteinte
h
et les chiffres affichés s’allument
en bleu. Si le taux d’humidité de la pièce baisse en deçà de 30 %, l’écran affiche « LO ». Si le taux d’humidité
dépasse 69 %, l’écran affiche « HI ».
Minuterie: Pour régler la minuterie, appuyez sur l’icône de la minuterie. Utilisez les flèches pour augmenter
ou diminuer le réglage de la minuterie par intervalles d’une heure, jusqu’à 12 heures. La minuterie est activée
lorsque le voyant au-dessus de l’icône de la minuterie est allumé. Pour désactiver la minuterie, appuyez sur l’icône
de la minuterie et maintenez-la enfoncée pendant 2 secondes, ou utilisez la flèche vers le bas pour réduire le
réglage à .
REMARQUE: Tant que la minuterie est en fonction, l’humidificateur continue à se mettre en marche et à s’arrêter
pour maintenir le taux d’humidité réglé. À la fin du cycle programmé, l’humidificateur s’éteint, quel que soit le taux
d’humidité réglé. Chaque fois que l’humidificateur est éteint manuellement (en appuyant sur le bouton de mise
en marche ou en débranchant l’appareil), la minuterie est désactivée.
Lumière du réservoir: Pour allumer la lumière du réservoir, appuyez sur l’icône de la lumière du réservoir.
Appuyez à nouveau pour diminuer l’intensité, et une troisième fois pour éteindre la lumière.
CONDENSATION: Si vous constatez de la condensation sur les murs, les fenêtres ou autour de l’appareil, c’est
que le taux d’humidité est trop élevé. Ouvrez la porte de la pièce ou éteignez l’appareil jusqu’à ce que l’humidité
baisse à un niveau acceptable.
Buse à vapeur
Cet humidificateur comporte une buse à vapeur directionnelle qui vous permet d’orienter la vapeur vers l’endroit
que vous voulez cibler. En position frontale, la buse à vapeur pivote de 90° dans les deux sens pour réduire la
pénétration de poussière blanche dans l’évent d’entrée d’air à l’arrière.
h

20
UTILISATION (SUITE)
Utilisation du godet à huiles essentielles:
Cet humidificateur comporte un godet à huiles essentielles qui peut être utilisé avec votre huile essentielle
favorite pour un bien-être accru.
Ceci n’est pas un diffuseur. L’huile n’entre pas en contact avec l’eau et s’évapore passivement dans l’air.
Les huiles essentielles ne sont pas incluses.
1. Pour ouvrir le godet, poussez et relâchez.
2. Déposez quelques gouttes d’huile essentielle sur le tampon.
MISE EN GARDE : NE VERSEZ PAS DE LIQUIDE DANS LA BUSE À VAPEUR.
N’AJOUTEZ PAS DE LIQUIDE POUR INHALATION, D’HUILES ESSENTIELLES,
NI D’ADDITIFS DANS LE RÉSERVOIR D’EAU. CELA RISQUE D’ENDOMMAGER
L’HUMIDIFICATEUR ET D’ANNULER LA GARANTIE.
3. Pour nettoyer le godet à huiles essentielles, essuyez délicatement tout résidu de produit à l’intérieur. Pour
obtenir des tampons supplémentaires, adressez-vous au service à la clientèle; voir au dos de ce manuel.
Entretien quotidien
Pour obtenir de meilleurs résultats, utilisez de l’eau propre et fraîche tous les jours
NETTOYAGE
Pour que votre humidificateur fonctionne de façon efficace, nettoyez-le régulièrement. Un entretien
hebdomadaire est recommandé. Tout nettoyage doit être effectué dans la cuisine ou la salle de bains, sur une
surface qui résiste à l’humidité, près d’un robinet. NE LAVEZ PAS au lave-vaisselle les composantes de cet
appareil; aucune pièce ne va au lave-vaisselle.
Afin de nettoyer adéquatement l’appareil, nous recommandons de le détartrer et de le désinfecter.
Les processus de détartrage et de désinfection doivent être effectués séparément.
Avant de nettoyer votre humidificateur :
1. Éteignez et débranchez l’appareil. Ne nettoyez jamais l’appareil pendant qu’il fonctionne.
2. Retirez le réservoir d’eau et videz toute l’eau contenue dans le réservoir et la base. Enlevez tous les accessoires
du réservoir.
1 2 3
$
12
La page est en cours de chargement...
La page est en cours de chargement...
La page est en cours de chargement...
La page est en cours de chargement...
La page est en cours de chargement...
La page est en cours de chargement...
La page est en cours de chargement...
La page est en cours de chargement...
La page est en cours de chargement...
-
 1
1
-
 2
2
-
 3
3
-
 4
4
-
 5
5
-
 6
6
-
 7
7
-
 8
8
-
 9
9
-
 10
10
-
 11
11
-
 12
12
-
 13
13
-
 14
14
-
 15
15
-
 16
16
-
 17
17
-
 18
18
-
 19
19
-
 20
20
-
 21
21
-
 22
22
-
 23
23
-
 24
24
-
 25
25
-
 26
26
-
 27
27
-
 28
28
-
 29
29


Honeywell HUL900BC Le manuel du propriétaire
- Catégorie
- Humidificateurs
- Taper
- Le manuel du propriétaire
dans d''autres langues
- English: Honeywell HUL900BC Owner's manual
Documents connexes
Autres documents
-
Vicks VUL600 Le manuel du propriétaire
-
-
-
-
-
-