YoLink X3 Outdoor Alarm Controller Mode d'emploi
- Taper
- Mode d'emploi

Your X3 Alarm Controller connects to
the internet via one of our hubs (original
YoLink Hub or the SpeakerHub), and it
does not connect directly to your WiFi or
local network. In order for remote access
to the device from the app, and for
full-functionality, a hub is required. This
guide assumes the YoLink app has been
installed on your phone, and a YoLink
Hub or SpeakerHub is installed and
online.
If installing the X3 Alarm Controller and
Siren Horn outdoors, please refer to the
environmental range information in the
specifications found on the X3 Alarm
Controller product support page. While
this product can be installed outdoors, to
ensure years of trouble-free operation, it
should be protected from rain and direct
sunlight by an enclosure or overhead
cover.
Quick Start Guide
YS7105-UC & Siren Horn
X3 Outdoor Alarm
Controller
Revision Feb. 24, 2023
Welcome!
A
Thank you for purchasing YoLink
products! We appreciate you trusting
YoLink for your smart home & automa-
tion needs. Your 100% satisfaction is our
goal. If you experience any problems
with your installation, with our products
or if you have any questions that this
manual does not answer, please contact
us right away. See the Contact Us
section for more info.
Thank you!
Eric Vanzo
Customer Experience Manager
The following icons are used in this guide to
convey specific types of information:
Very important information
(can save you time!)
Pour des instructions en
français, scannez les codes
QR dans la section suivante.
Para obtener instrucciones en
español, escanee los códigos
QR en la siguiente sección.
Fr
Es
Before You Begin
B
Installation & User
Guide
Product Support
Support produit
Soporte de producto
You can also find all current guides and
additional resources, such as videos and
troubleshooting instructions, on the X3
Alarm Controller Product Support Page
by scanning the QR code below or by
visiting:
https://shop.yosmart.com/pages/x3-
alarm-controller-product-support
Please note: this is a quick start guide,
intended to get you started on the
installation of your X3 Alarm Controller.
Download the full Installation & User
Guide by scanning this QR code:
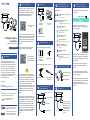
Get to Know Your X3
Alarm Controller
E
Get to Know Your X3
Alarm Controller, Cont.
E
Status LED
Mounting Holes (2)
SET Button
12VDC Output
LED Behaviors
Blinking Red Once, Then Green
Once
Device Start-Up
Blinking Red And Green
Alternately
Restoring to Factory Defaults
Blinking Red Once
Valve Closing
Quick Blinking Red Twice
Valve is Closed
Blinking Green Once
Valve Opening
Quick Blinking Green
Control-D2D Pairing in Progress
Quick Blinking Red
Control-D2D Unpairing in
Progress
Slow Blinking Green
Updating
Fast Blinking Red Once Every
30 Seconds
Low Battery, Replace Battery
Soon
Wall Anchors
Drill with Drill Bits Medium Phillips
Screwdriver
Required Items
The following items will be required:
The following items may be required:
D
In the Kit
C
1 x ER34615
Battery
Pre-Installed
X3 Alarm
Controller
Siren Horn
ES-626
Quick Start Guide
Mounting Holes (3)
Tilt Adjustment
Mounting Base
Get to Know Your Siren
F
To power up the
alarm controller for
the first time, press
SET button briefly,
unless the LED
flashes red then
green.
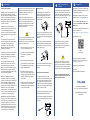
Power Up
G
Add Your X3 Alarm
Controller to the App
H
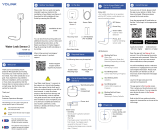
1. Tap Add Device (if shown) or tap the
scanner icon:
Scanner icon
2. Approve access to your phone’s
camera, if requested. A viewfinder will be
shown on the app.
3. Hold the phone over the QR code so
that the code appears in the viewfinder.
If successful, the Add Device screen will
be displayed.
You can change the device name and
assign it to a room later. Tap Bind
device.
If successful, the message “You have
successfully added this product!” will be
displayed. Tap Done.
4. Confirm the Outdoor Alarm Controller
is noted as being online before proceed-
ing to the next section. If not,
double-check the steps in the Power Up
section.

1. Connect the cable of the controller to
the cable of the siren. Ensure the arrow
of the cable connector aligns with the
arrow of the other cable connector. Twist
the collar of the connector tight.
2. Test the siren by pressing the SET
button on the controller. The siren
should activate. Press the SET button
again to silence the siren.
Final Connections &
Testing
JContact Us
K
We are here for you, if you ever need any
assistance installing, setting up or using
a YoLink app or product!
Need help? For fastest service, please
email us 24/7 at [email protected]
Or call us at 831-292-4831 (US phone
support hours: Monday - Friday, 9AM to
5PM Pacific)
You can also find additional support and
ways to contact us at:
www.yosmart.com/support-and-service
Or scan the QR code:
Finally, if you have any feedback or
suggestions for us, please email us at
Thank you for trusting YoLink!
Eric Vanzo
Customer Experience Manager
Support
Home Page
15375 Barranca Parkway
Ste. J-107 | Irvine, California 92618
© 2023 YOSMART, INC IRVINE,
CALIFORNIA
Preparing for Installation
Determine where you will install your X3
Alarm Controller and Siren. Typically,
they will be mounted together, no farther
apart from each other than the cables
allow. (Extension cables are available,
allowing for locating the siren remotely
from the controller).
Determine how you will mount the
controller and siren, and have appropri-
ate mounting hardware (screws,
anchors, etc.) and a means of installing
them in the wall or mounting surface on
hand.
It is important to securely mount the
Outdoor Alarm Controller and the Siren
to the wall or mounting surface, to
ensure they do not later fall down.
Physical damage to the device is not
covered by the warranty.
Consider if the controller or siren will be
subjected to tampering or vandalism.
Mounting them higher on the wall may
deter tampering.
Also, consider minimum mounting
heights. As the siren is very loud, you
should avoid locating it near head
height or at locations where people may
be present when it activates. Hearing
can be damaged by high decibel sounds,
such as the siren produces.
While the controller and siren are
designed for outdoor use, as with any
electronic or similar device, protecting it
from direct intense sunlight and from
rain or snow with overhead cover, can
extend its life and protect it from issues
like fading colors or dry and brittle
cables or plastic. Just under the eaves of
a roof or under an overhanging structure
is an ideal location for this product.
Pro tip: like the professional installers
may do, you can consider installing your
siren in the attic, if applicable. A location
in the attic may allow for sound to be
carried both inside the home as well as
outside (depending on siren proximity to
eaves or gable vents and the construc-
tion characteristics of your home).
You may consider testing the siren at the
proposed location before permanently
installing it, checking that the sound
carries as far as desired.
Additional X3 Alarm Controller and
Sirens can be added to your system, and
may be required for larger homes or
buildings, and larger yards or locations
with sound obstructions and/or high
ambient sound levels.
Installation
I
Protect your ears and those of others
that may be close to the siren during
testing. Consider warning your neighbors
you will be testing your siren, to avoid a
surprise visit from the police department!
Refer to the full installation and user
guide to complete the setup of your X3
Alarm Controller and Siren.
2. If you are using wall anchors, install
them per the manufacturer instructions
(this may require a drill and appropriate
drill bit).
3. Secure the siren base to the wall or
mounting surface, with three screws.
Check that it is securely-mounted, by
gently tugging on it.
4. You can adjust the desired up/down
tilt of the siren at this time or during
testing.
Install the Siren
1. Holding the siren at the desired
location, transfer the location of the
three mounting holes to the wall or
mounting surface, using a marker or
similar means.
Install the X3 Alarm Controller
1. At the desired location for the
controller, confirm the cables of the two
devices will reach each other. Holding
the controller at the desired location,
mark the location of the mounting holes
to the wall or mounting surface, using a
marker or similar means.
2. If you are using wall anchors, install
per the manufacturer instructions.
3. Secure the X3 Alarm Controller to the
wall or mounting surface with a screw,
as shown.
If you are using the X3 Alarm Controller
with a 12V DC device other than the
included siren, such as a strobe or relay,
please note the following:
The device must be 12V DC, not AC,
not less or more than 12 volts.
The device current draw and inrush
current must be under 400
milliamps.
Correct polarity must be observed.
Do not attempt to power the device
for extended periods, as this will
quickly drain the battery.
Consider using the controller to
power a low-current 12VDC relay or
mechanically-latching relay, with the
load being powered by a separate
power source.
If splicing the cable to another cable
or device, use care to not damage
the antenna wire, which is attached
to the controller cable!
-
 1
1
-
 2
2


YoLink X3 Outdoor Alarm Controller Mode d'emploi
- Taper
- Mode d'emploi
dans d''autres langues
Documents connexes
-
YoLink YS1B01-UN Mode d'emploi
-
 YoLink YS1B01-UN Uno WiFi Camera Mode d'emploi
-
-
YoLink YS4909-UC Mode d'emploi
-
 YoLink YS7905S-UC Mode d'emploi
-
YoLink YS5003-UC Mode d'emploi
-
YoLink YS5001-UC Mode d'emploi
-
YoLink YS7805-UC Mode d'emploi
-
 YoLink YS7904-UC Mode d'emploi
-
YoLink YS7804-EC Mode d'emploi


Autres documents
-
Ksenia Imago User And Installer Manual
-
Aeotec ZW164-C Manuel utilisateur
-
 bmb-home HOME PROTECTOR+ Mode d'emploi
-
 Evolu7 GSM Manual Book
-
Honeywell CFS8DLLRS500 Manuel utilisateur
-
Directed Power Sports Installer And Owner Manual
-
 Abbra Fully Supervised Wireless Alarm Control System Guide d'installation
-
Marmitek MS9480 Le manuel du propriétaire
-
 Imperii Electronics imperii Alarm System GSM Soko Manuel utilisateur


