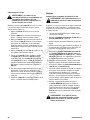
Simplicity OPERATOR'S MANUAL FOR BEAL TRACTOR MODEL EBL175460 (7800498) Manuel utilisateur
- Catégorie
- Tondeuses à gazon
- Taper
- Manuel utilisateur
Ce manuel convient également à

Yvan Béal - 21, av. de l’Agriculture - B.P. 16
Z.I. du Brézet - 63014 Clermont-Ferrand Cedex 2
Tél : 04 73 91 93 51 - Télécopie : 04 73 90 23 11
www.yvanbeal.fr - E-mail : [email protected]
R.C.S. Clermont-Fd B 304 973 886 S.A.S. au capital de 612 000 €
NOTICE D’EMPLOI
Tondeuse autoportée
NPMS17.5/117H
01-000434-081017
OPERATOR'S MANUAL
NOTICE D'EMPLOI
Riding mower
Tondeuse autoportée
Part No. 7103097
Revision ‘A’, 12/11/2008
Not for
Reproduction

Thank you for purchasing this quality-built mower. When operated and maintained according to the instructions in this manual,
your mower will provide many years of dependable service.
This manual contains safety information to make you aware of the hazards and risks associated with mowers and how to avoid
them. Because the manufacturer does not necessarily know all the applications this mower could be used for, it is important
that you read and understand these instructions. Keep this manual near the mower for convenient reference.
This mower requires final assembly before use. Refer to the Assembly section of this manual for instructions on fi nal assembly
procedures. Follow the instructions completely.
Nous vous remercions d’avoir acheté cette tondeuse de qualité. Si vous utilisez et entretenez cette tondeuse conformément aux
directives du manuel, elle vous procurera de nombreuses années de service fi able.
Ce manuel contient des informations relatives à la sécurité afi n que vous connaissiez les dangers et risques qui sont liés aux
tondeuses et la façon de les éviter. Le fabricant ne connaissant pas nécessairement toutes les utilisations envisagées pour votre
tondeuse, il est important de lire et de comprendre les présentes directives. Conservez ce manuel à proximité de la tondeuse
afi n de pouvoir le consulter facilement.
Un assemblage de fi nition est nécessaire avant d’utiliser la tondeuse. Veuillez vous reporter à la rubrique Assemblage du
présent manuel afi n d’obtenir les directives pour l’assemblage de fi nition. Veuillez suivre attentivement les directives.
Mower / Tondeuse
Model Number / Numéro de modèle _________________________________________
Serial Number / Numéro de série _________________________________________
Engine / Moteur
Model Number / Numéro de modèle _________________________________________
Serial Number / Numéro de série _________________________________________
Date Purchased / Date d’achat
Manual Content Copyright © 2008 Briggs & Stratton Corporation.
All rights reserved. No part of this material may be reproduced or
transmitted in any form by any means without the express written
permission of Briggs & Stratton Power Products Group, LLC.
Droits d’auteur sur le contenu du manuel © 2008 Briggs & Stratton
Corporation. Tous droits réservés. Aucune partie de ce document
ne peut être reproduite ou transmise sous une forme ou un moyen
quelconque sans l’autorisation écrite préalable de Briggs & Stratton
Power Products Group, LLC.
EBL175460 (7800498) Béal CE Riding Mower, 46"
Not for
Reproduction

3
A
B
C
D
E
G
H
F
1
A B
2
A
B
43
B
D
E
A
C
D
A
B
E
C
H
G
F
5
A
B
6
H
E
A
B
D
C
G
F
A
7
Not for
Reproduction

4 www.yvanbeal.fr
C
D
F
E
A
G
B
8
C
7
1
0
1
935
A
B
11
A
13
D
7101936
A B
C
10
A
12
9
A
B
Not for
Reproduction

5
B
A
C
E
D
A
F
G
E
C
D
A
B
B
E
C
D
A
14 15
B
16
17 18
B
A
B
C
D
E
A
19 20
Not for
Reproduction

6 www.yvanbeal.fr
A
D
C
B
A
A
B
D
G
F
C
H
A
E
A
B
D
C
G
F
21 22
23
24 25
Guards removed for clarity
Protections non représentés pour des raisons de clarté
Guards removed for clarity
Protections non représentés pour des raisons de clarté
Not for
Reproduction

7
C
B
A
A
I
J
M
L
N
O
P
T
U
S
Q
R
A
H
A
A
H
B
B
B
G
D
E
F
C
B
A
A
C
B
E
D
F
F
K
W
V
26 27
28
Guards removed for clarity
Protections non représentés pour des raisons de clarté
Not for
Reproduction

8 www.yvanbeal.fr
B
C
D
A
A
B
C
A
B
A
B
C
A
B
A
B
A
B
C
D
29 30
11
22
3 3,4,5,6
31
32 33
35
34
A
B
C
D
36
Not for
Reproduction

9
37
A
M
L
K
B
F
C
D
G
H
I
E
J
H
D
C
G
E
A
A
B
E
F
G
B
J
K
K
38
I
Not for
Reproduction

10 www.yvanbeal.fr
A
B
C
D
E
F
A
A
H
I
G
B
D
C
E
F
J
C
A
B
39 40
41 42
Not for
Reproduction

English Français
11
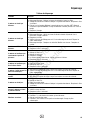
Table of Contents
Operator Safety . . . . . . . . . . . . . . . . . . . . . . . . . . . . . . . . . . 12
Important Operator Safety Instructions . . . . . . . . . . . . . . . . . . . . . . . . . . . . 12
International Pictorials . . . . . . . . . . . . . . . . . . . . . . . . . . . . . . . . . . . . . . . . . 15
Assembly . . . . . . . . . . . . . . . . . . . . . . . . . . . . . . . . . . . . . . 16
Parts Bag - Contents . . . . . . . . . . . . . . . . . . . . . . . . . . . . . . . . . . . . . . . . . . . 16
Installing the Seat . . . . . . . . . . . . . . . . . . . . . . . . . . . . . . . . . . . . . . . . . . . . . 16
Assembling the Steering Wheel . . . . . . . . . . . . . . . . . . . . . . . . . . . . . . . . . . 16
Maintenance Free Battery . . . . . . . . . . . . . . . . . . . . . . . . . . . . . . . . . . . . . . . 16
IMPORTANT! Before You Start Mowing . . . . . . . . . . . . . . . . . . . . . . . . . . . . 17
Features and Controls . . . . . . . . . . . . . . . . . . . . . . . . . . . . . 19
Operation . . . . . . . . . . . . . . . . . . . . . . . . . . . . . . . . . . . . . . 20
Attachments . . . . . . . . . . . . . . . . . . . . . . . . . . . . . . . . . . . . . . . . . . . . . . . . . 20
Electrical Safety System . . . . . . . . . . . . . . . . . . . . . . . . . . . . . . . . . . . . . . . . 20
Using Controls . . . . . . . . . . . . . . . . . . . . . . . . . . . . . . . . . . . . . . . . . . . . . . . 20
Driving and Stopping the Unit . . . . . . . . . . . . . . . . . . . . . . . . . . . . . . . . . . . . 21
Mowing . . . . . . . . . . . . . . . . . . . . . . . . . . . . . . . . . . . . . . . . . . . . . . . . . . . . . 22
Engine Operation . . . . . . . . . . . . . . . . . . . . . . . . . . . . . . . . . . . . . . . . . . . . . . 23
Tips . . . . . . . . . . . . . . . . . . . . . . . . . . . . . . . . . . . . . . . . . . . . . . . . . . . . . . . . 25
Maintenance . . . . . . . . . . . . . . . . . . . . . . . . . . . . . . . . . . . 26
Maintenance Schedule . . . . . . . . . . . . . . . . . . . . . . . . . . . . . . . . . . . . . . . . . 26
General Recommendations . . . . . . . . . . . . . . . . . . . . . . . . . . . . . . . . . . . . . . 27
Inspection . . . . . . . . . . . . . . . . . . . . . . . . . . . . . . . . . . . . . . . . . . . . . . . . . . . 27
Adjustments . . . . . . . . . . . . . . . . . . . . . . . . . . . . . . . . . . . . . . . . . . . . . . . . . 28
Maintenance Free Battery . . . . . . . . . . . . . . . . . . . . . . . . . . . . . . . . . . . . . . . 29
Lubrication . . . . . . . . . . . . . . . . . . . . . . . . . . . . . . . . . . . . . . . . . . . . . . . . . . 30
Mower Housing Maintenance . . . . . . . . . . . . . . . . . . . . . . . . . . . . . . . . . . . . 30
Storage . . . . . . . . . . . . . . . . . . . . . . . . . . . . . . . . . . . . . . . . . . . . . . . . . . . . . 34
Troubleshooting . . . . . . . . . . . . . . . . . . . . . . . . . . . . . . . . . 35
Specifications . . . . . . . . . . . . . . . . . . . . . . . . . . . . . . . . . . . 37
Not for
Reproduction

12 www.yvanbeal.fr
! !
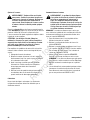
WARNING: This powerful cutting machine is capable of amputating hands and feet and can throw
objects that can cause injury and damage! Failure to comply with the following SAFETY instructions
could result in serious injury or death to the operator or other persons. The owner of the machine
must understand these instructions and must allow only persons who understand these instructions to
operate machine. Each person operating the machine must be of sound mind and body and must not
be under the influence of any substance, which might impair vision, dexterity or judgment. If you have
any questions pertaining to your machine which your dealer cannot answer to your satisfaction, call
Customer Service Department.
Protection for Children
Tragic accidents can occur if the operator is not alert to
the presence of children. Children are often attracted to the
machine and the mowing activity. Children who have been
given rides in the past may suddenly appear in the mowing
area for another ride and be run over or backed over by the
machine. Never assume that children will remain where you
last saw them.
1. KEEP children out of the mowing area and under the
watchful care of a responsible adult other than the operator.
2. DO NOT allow children in yard when machine is operated
(even with the blade OFF).
3. DO NOT allow children or others to ride on machine,
attachments or towed equipment (even with the blades
OFF). They may fall and be seriously injured.
4. DO NOT allow pre-teenage children to operate machine.
5. ALLOW only responsible adults and teenagers with
mature judgment under close adult supervision to operate
machine.
6. DO NOT operate blades in reverse. STOP BLADES. LOOK
and SEE behind and down for children, pets and hazards
before and while backing.
7. USE EXTRA CARE when approaching blind corners,
shrubs, trees, or other objects that may obscure vision.
Protection against Tipovers
Slopes are a major factor related to loss-of-control and tip-
over accidents, which can result in severe injury or death.
All slopes require extra CAUTION. If you cannot back up
the slope or if you feel uneasy on the slope, DO NOT mow
it. Use extra care with grass catchers or other attachments;
these affect the handling and the stability of the machine.
1. DO NOT operate machine on slopes exceeding
10 degrees (18% grade).
2. Turn blades OFF when traveling uphill. Use a slow speed
and avoid sudden or sharp turns.
Protection against Tipovers
(Continued from Previous Column)
3. DO NOT operate machine back and forth across face
of slopes. Operate up and down. Practice on slopes with
blades off.
4. AVOID starting, stopping or turning on slopes. If machine
stops going uphill or tires lose traction, turn blades OFF and
back slowly straight down the slope.
5. STAY ALERT for holes and other hidden hazards.
Tall grass can hide obstacles. Keep away from ditches,
washouts, culverts, fences and protruding objects.
6. KEEP A SAFE DISTANCE (at least 3 feet [1 m]) away
from edge of ditches and other drop offs. The machine
could turn over if an edge caves in.
7. Always begin forward motion slowly and with caution.
8. Use weights or a weighted load carrier in accordance
with instructions supplied with a grass catcher. DO NOT
operate machine on slopes exceeding 10 degrees (18%
grade) when equipped with grass catcher.
9. DO NOT put your foot on the ground to try to stabilize
the machine.
10. DO NOT operate machine on wet grass. Reduced
traction could cause sliding.
11. Choose a low enough speed setting so that you will not
have to stop or shift on a slope. Tires may lose traction on
slopes even though the brakes are functioning properly.
12. DO NOT operate machine under any condition where
traction, steering or stability is doubtful.
13. Always keep the machine in gear when going down
slopes. DO NOT shift to neutral (or actuate hydro roll
release) and coast downhill.
Important Operator Safety Instructions
Not for
Reproduction

13
Preparation
1. Read, understand, and follow instructions and
warnings in this manual and on the machine, engine and
attachments. Know the controls and the proper use of the
machine before starting.
2. Only mature, responsible persons shall operate the
machine and only after proper instruction.
3. Data indicates that operators age 60 and above, are
involved in a large percentage of mower-related injuries.
These operators should evaluate their ability to operate the
mower safely enough to protect themselves and others
from serious injury.
4. Handle fuel with extra care. Fuels are flammable and
vapors are explosive. Use only an approved fuel container.
DO NOT remove fuel cap or add fuel with engine running.
Add fuel outdoors only with engine stopped and cool. Clean
spilled fuel from machine. DO NOT smoke.
5. Practice operation of machine with BLADES OFF to learn
controls and develop skills.
6. Check the area to be mowed and remove all objects such
as toys, wire, rocks, limbs and other objects that could
cause injury if thrown by blade or interfere with mowing.
7. Keep people and pets out of mowing area. Immediately
STOP blades, STOP engine, and STOP machine if anyone
enters the area.
8. Check shields, deflectors, switches, blade controls and
other safety devices frequently for proper operation and
location.
9. Make sure all safety decals are clearly legible. Replace if
damaged.
10. Protect yourself when mowing and wear safety glasses,
a dust mask, long pants and substantial footwear.
11. Know how to STOP blades and engine quickly in
preparation for emergencies.
12. Use extra care when loading or unloading the machine
into a trailer or truck.
13. Check grass catcher components frequently for signs
of wear or deterioration and replace as needed to prevent
injury from thrown objects going through weak or worn
spots.
Safe Handling of Gasoline
To avoid personal injury or property damage, use extreme
care in handling gasoline. Gasoline is extremely flammable
and the vapors are explosive.
1. Extinguish all cigarettes, cigars, pipes and other sources
of ignition.
2. Use only an approved fuel container.
3. DO NOT remove fuel cap or add fuel with the engine
running. Allow the engine to cool before refueling.
4. DO NOT refuel the machine indoors.
5. DO NOT store the machine or fuel container inside where
there is an open flame, spark or pilot light such as on a
water heater or other appliances.
6. DO NOT fill fuel containers inside a vehicle or on a
truck or trailer bed with a plastic liner. Always place the
containers on the ground away from the vehicle before
filling.
7. Remove gas-powered equipment from the vehicle or
trailer and refuel it on the ground. If this is not possible,
then refuel equipment using a portable container, rather
than a gasoline dispenser nozzle.
8. DO NOT start gas powered equipment in enclosed
vehicles or trailers.
9. Keep the nozzle in contact with the rim of the fuel tank or
container opening at all times until fueling is complete. DO
NOT use a nozzle lock-open device.
10. If fuel is spilled on clothing, change clothing
immediately.
11. Never overfill a fuel tank. Replace fuel cap and tighten
securely.
Operation
1. Mount and dismount machine from left side. Keep clear
of discharge opening at all times.
2. Start engine from operator’s seat, if possible. Make sure
blades are OFF and parking brake is set.
3. DO NOT leave machine with engine running. STOP
engine, STOP blades, SET brake, and remove key before
leaving operators position of any reason.
4. DO NOT operate machine unless properly seated with
feet on feet rests or pedal(s).
! !
Important Operator Safety Instructions (Continued)
Not for
Reproduction

14 www.yvanbeal.fr
Operation
(Continued from Previous Page)
5. STOP BLADES and ENGINE and make sure blades have
stopped before removing grass catcher or unclogging
mower to prevent loss of fingers or hand.
6. Blades must be OFF except when cutting grass. Set
blades in highest position when mowing over rough
ground.
7. Keep hands and feet away from rotating blades
underneath deck. DO NOT place foot on ground while
BLADES are ON or machine is in motion.
8. DO NOT operate machine without entire grass catcher
or guards in place and working. DO NOT point discharge at
people, passing cars, windows or doors.
9. Slow down before turning.
10. Watch out for traffic when near or crossing roadways.
11. STOP engine immediately after striking an obstruction.
Inspect machine and repair damage before resuming
operation.
12. Operate machine only in daylight or with good artificial
light.
13. Exercise CAUTION when pulling loads. Limit loads to
those you can safely control and attach loads to hitch plate
as specified with MURRAY attachment instructions.
14. On slopes, the weight of the towed equipment may
cause loss of traction and loss of control. When towing,
travel slowly and allow extra distance to stop.
15. DO NOT operate engine in enclosed areas. Engine
exhaust gases contain carbon monoxide, a deadly poison.
16. DO NOT discharge material against a wall or
obstruction. Material may ricochet back towards the
operator.
17. Only use accessories approved by the manufacturer.
See manufacturer’s instructions for proper operation and
installation of accessories.
Towing
1. Tow only with a machine that has a hitch designed for
towing. DO NOT attach towed equipment except at the hitch
point.
2. Follow the manufacturer’s recommendation for weight
limits for towed equipment and towing on slopes.
3. DO NOT allow children or others on towed equipment.
4. On slopes, the weight of the towed equipment may cause
loss of traction and loss of control.
5. Travel slowly and allow extra distance to stop.
Maintenance
1. DO NOT store machine or fuel container inside where
fumes may reach an open flame, spark or pilot light such
as in a water heater, furnace, clothes dryer or other gas
appliance. Allow engine to cool before storing machine
in an enclosure. Store fuel container out of the reach of
children in a well ventilated, unoccupied building.
2. Keep engine free of grass, leaves or excess grease to
reduce fire hazard and engine overheating.
3. When draining fuel tank, drain fuel into an approved
container outdoors and away from open flame.
4. Check brakes frequently; adjust, repair or replace as
needed.
5. Keep all bolts, nuts and screws properly tight. Check that
all cotter pins are in proper position.
6. Always provide adequate ventilation when running
engine. Exhaust gases contain carbon monoxide, an
odorless and deadly poison.
7. Disconnect negative (black) cable from battery before
performing maintenance or service. Cranking engine could
cause injury.
8. DO NOT work under machine without safety blocks.
9. Service engine and make adjustments only when engine
is stopped. Remove spark plug wire(s) from spark plug(s)
and secure wire(s) away from spark plug(s).
10. DO NOT change engine governor speed settings or
overspeed engine.
11. Lubricate machine at intervals specified in manual to
prevent controls from binding.
12. Mower blades are sharp and can cut. Wrap the blades
or wear heavy leather gloves and use CAUTION when
handling them.
13. DO NOT test for spark by grounding spark plug next to
spark plug hole; spark plug could ignite gas exiting engine.
14. Have machine serviced by an authorized dealer at least
once a year and have the dealer install any new safety
devices.
15. Maintain or replace safety and instruction labels as
necessary.
16. Use only genuine replacement parts to assure that
original standards are maintained.
! !
Important Operator Safety Instructions (Continued)
Not for
Reproduction

15
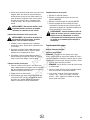
Safety
International Pictorials
IMPORTANT: Some of the following pictorials are located on your unit or on literature supplied with the product. Before you
operate the unit, learn and understand the purpose for each pictorial.
A - Warning.
B - Shield Eyes. Explosive Gases Can
Cause Blindness Or Injury.
C - No Sparks, Flames or Smoking.
D - Sulphuric Acid Can Cause Blindness
Or Severe Burns.
E - Flush Eyes Immediately With Water.
Get Medical Help Fast.
F - IMPORTANT: Read Owner’s Manual
Before Operating This Machine.
G - WARNING: Thrown Objects. Keep
Bystanders Away. Read User
Instructions Before Operating This
Machine.
H - WARNING: Do Not Use This
Machine On Slopes Greater Than 10
Degrees.
I - DANGER: Keep People, Especially
Children, Away From Unit.
J - DANGER: No Step.
K - DANGER: Keep Feet And Hands
Away From Rotating Blade.
L- DANGER: Keep Hands Away From
Rotating Blade.
M - DANGER: Disconnect Spark Plug
Wire Before Servicing Unit.
N - WARNING: Hot Surface.
O - WARNING: Use Caution When
Connecting Or Disconnecting
Accessories.
P - WARNING: Crushed Fingers.
A - Engine start
B - Lights
C - Engine off
D - Engine on
E - Brake
F - Parking brake
G - Clutch
H - Slow
I - Fast
J - Choke
K - Oil
L - Blade rotation control
M - Raise
N - Fuel
A
B
C
D
E
G
H
F
I
J
K
L
M
N
A
B
C
D
E
G
H
F
I
J
K
L
M
N
P
max 10°
max± 90N max± 150N
O
Not for
Reproduction

16 www.yvanbeal.fr
Read and follow the assembly and adjustment
instructions for your mower. All fasteners are in the
parts bag. Do not discard any parts or material
until the unit is assembled.
NOTE: In this instruction book, left and right describe the
location of a part with the operator on the seat.
WARNING: Before doing any assembly or
maintenance to the mower, remove the wire from
the spark plug.
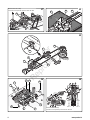
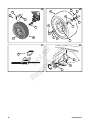
Parts Bag - Contents
The fasteners and other loose parts are shown in Figure 1.
The fasteners are shown full size. The quantity is shown in
brackets [ ].
[2] Carriage bolt (A)•
[2] Wing nut (B)•
[1] Bolt (C)•
[1] Washer (D)•
[2] Knob (E)•
[2] Washer (F)•
[1] Keys & ring (G)•
[1] Terminal cover (H)•
Installing the Seat
How to Install the Seat
1. Carefully remove the plastic bag from the seat. Use the
fasteners shown to install the seat (Figure 2). The wing
bolt (A) and washer (B) are shown at full size.
NOTE: Fasteners may be attached to seat for shipping
purposes, if so remove fasteners before proceeding.
2. Align the holes in the seat hinge (D) to the holes in the
seat (E) (Figure 3). Fasten the seat to the seat hinge
(D) with the wing bolt (A) and washer (B) as shown.
3. Check the operating position of the seat (E). If the seat
(E) needs to be adjusted, loosen the two wing bolts
(A). Slide the seat (E) forward or backward along the
seat adjusting holes (C) as shown. Tighten the wing
bolts (A).
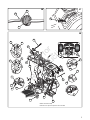
Assembling the Steering Wheel
How to Assemble the Steering Wheel
Tools Required: 3/8" Socket Wrench
Attach the steering wheel as follows:
1. Make sure the front wheels point forward.
2. Slide the bellows (F) over the steering post (G)
(Figure 5).
NOTE: Before attachment of the steering wheel,
make sure that the front wheels point forward and
are straight (H). For proper alignment of the steering
wheel, see Figure 5.
3. Slide the steering wheel (E) onto the steering post (G).
4. Use the screw (A) and washer (B) shown to secure
the steering wheel (Figure 4 and 5). In Figure 4, the
fasteners are shown at full size. Tighten the screw until
snug and then add 1/4 turn. DO NOT over tighten.
5. Attach the cover (C) to the steering wheel (E)
(Figure 5).
6. Some models have an optional decal (D) in the parts
bag. Attach the decal (D) to the center of the steering
wheel (E) as shown.
Maintenance Free Battery
IMPORTANT: Before you attach the battery cables to the
battery, check the battery date. The battery date tells if the
battery must be charged.
1. Check the top and the side of the battery (F) for the
location of the battery date (Figure 7).
2. If the battery (F) is put into service before the battery
date, the battery cables can be attached without
charging the battery (F). See “How to Install the Battery
Cables”.
3. If the battery (F) is put into service after the battery
date, the battery (F) must be charged. See “How to
Charge the Maintenance Free Battery”.
Assembly
Not for
Reproduction

17
How to Charge the Maintenance Free Battery
WARNING: When you charge the battery, do not
smoke. Keep the battery away from any sparks. The
fumes from the battery acid can cause an
explosion.
1. Remove the battery (F) and battery tray (G) (Figure 7).
2. Remove the protective cap from the battery
terminal (D).
3. Use a 12 volt battery charger to charge the battery (F).
Charge at a rate of 6 amperes for one hour. If you do
not have a battery charger, have an authorized service
center charge the battery.
4. Install the battery (F) and battery tray (G). Make sure
the positive (+) terminal (D) is on the left side.
How to Install the Battery Cables
WARNING: To prevent sparks, fasten the red cable
to the positive (+) terminal before you connect the
black cable.
Use the carriage bolt (A) and wing nut (B) shown to install
the battery cables (Figure 6). The fasteners are shown at full
size.
1. Remove the protective cap from the battery
terminal (D) (Figure 7).
2. Fasten the red cable (E) and terminal cover (H) (if
equipped) to the positive (+) terminal (D) with the
carriage bolt (A) and wing nut (B) as shown.
3. Fasten the black cable (C) to the negative (-) terminal
with the fasteners as shown.
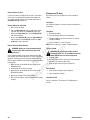
IMPORTANT! Before You Start Mowing
Check the engine oil.•
Fill the fuel tank with gasoline.•
Check the air pressure of the tires.•
Check the level of the mower housing.•
Make sure the battery cables are attached.•
Make sure the wire is attached to the spark plug.•
WARNING: Before doing any assembly or
maintenance to the mower, remove the wire from
the spark plug.
NOTE: In this instruction book, left and right describe the
location of a part with the operator on the seat.
How to Prepare the Engine
NOTE: The engine was shipped from the factory filled with
oil. Check the level of the oil. Add oil as needed.
NOTE: The operation of a new engine will sometimes result
in a slight amount of smoke. This smoke is caused by paint
or oil on or around the muffler. This is normal and only
expected during initial operation.
A separate engine manual is also included with the unit. See
this engine manual for the manufacturer’s instructions for
the type of gasoline and oil to use. Before you use the unit,
read the information on safety, operation, maintenance, and
storage.
WARNING: Follow the engine manufacturer’s
instructions for the type of gasoline and oil to use.
Always use a safety gasoline container. Do not
smoke when adding gasoline to the engine. When
inside an enclosure, do not fill with gasoline.
Before you add gasoline, stop the engine. Let the
engine cool for several minutes.
IMPORTANT: This unit is equipped with an internal
combustion engine and must not be used on or near any
unimproved forest-covered, brush-covered or grass-covered
land unless the engine’s exhaust system is equipped with a
spark arrester meeting applicable local or state laws (if any).
If a spark arrester is used, it must be maintained in effective
working order by the operator.
In the State of California the above is required by law
(Section 4442 of the California Public Resources Code).
Other states may have similar laws. Federal laws apply on
federal lands. See an Authorized Service Center for a spark
arrester for the muffler.
In some areas, local law requires the use of a resistor spark
plug to control the ignition signals. See an Authorized
Service Center for a resistor spark plug for the engine.
NOTE: Actual sustained horsepower will likely be lower due
to operating limitations and environmental factors.
Not for
Reproduction

18 www.yvanbeal.fr
Check the Tires
NOTE: The tires may be over inflated for shipment.
Check the air pressure in the tires. Tires with too much air
pressure will cause the unit to ride rough. Also, the wrong
air pressure will keep the mower housing from cutting level.
Recommended air pressure is 14 PSI (1 BAR).
Check the Level of the Mower Housing
Make sure the level of cut is still correct. After you mow a
short distance, look at the area that was cut. If the mower
housing does not cut level, see the instructions on “How to
Level the Mower Housing” in the Maintenance section of this
manual.
Not for
Reproduction

19
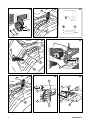
Features and Controls
Features and Controls
Features and controls are shown in Figure 8.
Throttle Control / Choke Control (A) — Throttle control
increases or decreases the speed of the engine. Choke
control engages the choke to start a cold engine. (Note: On
some models, the choke control is incorporated into the
throttle control lever. Other models have a separate choke
control knob located below the throttle control.)
Brake Pedal (B) — Use the brake pedal to quickly stop the
forward or reverse motion of the unit.
Lift Lever (C) — Use the lift lever to change the height of
cut.
Ignition Key Switch (D) — Use the ignition key switch to
start and stop the engine. (Note: The headlight switch is
incorporated into the ignition switch.)
Blade Rotation Control (E) — Use the blade rotation control
to start and stop the rotation of the blade.
Parking Brake Lever (F) — Use the parking brake lever to
engage the brake when you leave the unit.
Speed Control Pedal (G) — Use the speed control pedal to
change the speed and direction of the unit.
Automatic Drive Disconnect (H) (not shown, located behind
the unit) — Use the automatic drive disconnect to disengage
the transmission.
Not for
Reproduction

20 www.yvanbeal.fr
Operation
Attachments
This unit can use many different attachments.
For all pull-behind attachments or trailers, the maximum gross
weight is 250 pounds (113 kg). Gross weight is the weight of
the attachment or trailer and any load that might be on or in it.
Do not operate on a slope that is greater than 10 degrees
when using a pull-behind attachment or trailer. Never allow
someone to stand or ride on or in an attachment or trailer.
Electrical Safety System
Operator Presence System (Seat)
The seat has an Operator Presence System to shut off the
engine when the operator leaves the seat. This system is
not intended for regular use in stopping the engine or the
blade(s). Before leaving the seat, move the blade rotation
control to the DISENGAGE position, shift to neutral, set the
parking brake, and stop the engine.
How to Check the Safety Interlock Switches
To check the function of the safety interlock switches, follow
the steps below.
1. Check the blade rotation control switch. Sit in the seat.
Depress the clutch/brake pedal. Move the blade rotation
control to the ENGAGE position. Turn the ignition
switch to the START position. The engine should not
start. If the engine starts, the switch is defective and
must be replaced.
2. Check the clutch/brake switch. Sit in the seat. Move the
blade rotation control to the DISENGAGE position. DO
NOT depress the clutch/brake pedal. Turn the ignition
switch to the START position. The engine should not
start. If the engine starts, the switch is defective and
must be replaced.
3. Check the Operator Presence System switch. DO NOT
sit in the seat. Depress the clutch/brake pedal. Move
the blade rotation control to the DISENGAGE position.
Turn the ignition switch to the START position. The
engine should not start. If the engine starts, the switch
is defective and must be replaced.
Using Controls
How to Use the Throttle Control
Use the throttle control to increase or decrease the speed of
the engine.
CAUTION: Always operate the engine with the throttle
control in the FAST position. If the engine runs for several
minutes at slower than the FAST position, the engine and
transmission will overheat and can be damaged.
1. The FAST position is marked with a detent. For normal
operation and when using a grass bagger, move the
throttle control to the FAST position. For maximum
charging of the battery and for a cooler running engine
and transmission, operate the engine in the FAST
position.
2. For transport and to tow pull behind attachments,
control the ground speed with the speed control pedal.
3. The engine governor is set at the factory for maximum
performance. Do not adjust the governor to increase
the speed of the engine.
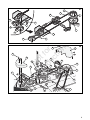
How to Use the Blade Rotation Control
The blade rotation control is next to the steering wheel
(Figure 9). Use the blade rotation control to engage the
blade(s) or to operate a snow thrower attachment.
1. Before you start the engine, make sure the blade
rotation control is in the DISENGAGE position (A).
2. Move the blade rotation control to the ENGAGE position
(B) to rotate the blade(s).
NOTE: If the engine stops when you engage the
blade(s), the seat switch is not activated. Make sure
you sit in the middle of the seat. Also, make sure the
wire is connected to the seat switch.
3. Move the blade rotation control to the DISENGAGE
position (A) to stop the blade(s). Before you leave the
operator’s position, make sure the blade(s) has stopped
rotating.
4. Before you ride the unit across a sidewalk or a road,
move the blade rotation control to the DISENGAGE
position (A).
WARNING: Always keep your hands and feet away
from the blade, deflector opening, and the mower
housing when the engine runs.
Not for
Reproduction
La page est en cours de chargement...
La page est en cours de chargement...
La page est en cours de chargement...
La page est en cours de chargement...
La page est en cours de chargement...
La page est en cours de chargement...
La page est en cours de chargement...
La page est en cours de chargement...
La page est en cours de chargement...
La page est en cours de chargement...
La page est en cours de chargement...
La page est en cours de chargement...
La page est en cours de chargement...
La page est en cours de chargement...
La page est en cours de chargement...
La page est en cours de chargement...
La page est en cours de chargement...
La page est en cours de chargement...
La page est en cours de chargement...
La page est en cours de chargement...
La page est en cours de chargement...
La page est en cours de chargement...
La page est en cours de chargement...
La page est en cours de chargement...
La page est en cours de chargement...
La page est en cours de chargement...
La page est en cours de chargement...
La page est en cours de chargement...
La page est en cours de chargement...
La page est en cours de chargement...
La page est en cours de chargement...
La page est en cours de chargement...
La page est en cours de chargement...
La page est en cours de chargement...
La page est en cours de chargement...
La page est en cours de chargement...
La page est en cours de chargement...
La page est en cours de chargement...
La page est en cours de chargement...
La page est en cours de chargement...
La page est en cours de chargement...
La page est en cours de chargement...
La page est en cours de chargement...
La page est en cours de chargement...
La page est en cours de chargement...
La page est en cours de chargement...
La page est en cours de chargement...
La page est en cours de chargement...
-
 1
1
-
 2
2
-
 3
3
-
 4
4
-
 5
5
-
 6
6
-
 7
7
-
 8
8
-
 9
9
-
 10
10
-
 11
11
-
 12
12
-
 13
13
-
 14
14
-
 15
15
-
 16
16
-
 17
17
-
 18
18
-
 19
19
-
 20
20
-
 21
21
-
 22
22
-
 23
23
-
 24
24
-
 25
25
-
 26
26
-
 27
27
-
 28
28
-
 29
29
-
 30
30
-
 31
31
-
 32
32
-
 33
33
-
 34
34
-
 35
35
-
 36
36
-
 37
37
-
 38
38
-
 39
39
-
 40
40
-
 41
41
-
 42
42
-
 43
43
-
 44
44
-
 45
45
-
 46
46
-
 47
47
-
 48
48
-
 49
49
-
 50
50
-
 51
51
-
 52
52
-
 53
53
-
 54
54
-
 55
55
-
 56
56
-
 57
57
-
 58
58
-
 59
59
-
 60
60
-
 61
61
-
 62
62
-
 63
63
-
 64
64
-
 65
65
-
 66
66
-
 67
67
-
 68
68


Simplicity OPERATOR'S MANUAL FOR BEAL TRACTOR MODEL EBL175460 (7800498) Manuel utilisateur
- Catégorie
- Tondeuses à gazon
- Taper
- Manuel utilisateur
- Ce manuel convient également à
dans d''autres langues
Documents connexes
-
Simplicity 880421X51N Manuel utilisateur
-
-
-
-
Victa VICTA CE RIDING MOWERS (EVT125380F, EVT155420HF) Manuel utilisateur
-
-
-
-
Murray 7800888 Manuel utilisateur
-