
3. Press the NOTE [√] or [®] switch to select the note name (C–B) that you
wish to tune.
Each time you press the switch, the note name will change in semitone steps.
If you press and hold the switch, the note name will change continuously.
This setting will be remembered even if you change modes.
4. Play a single note on your instrument, and tune so that the V
U style
meter
moves to the 0 position (center) and the pitch guide LEDs are both lit.
The meter will operate when the difference between the specified note and
the input pitch is in the range of -500 cents – +500 cents.
■ Auto meter mode
In this mode you can tune any note you input.
1. Make the settings described in steps 1–4 of “Preparations for tuning.”
2. Set the [MODE] dial to AUTO-SLOW, AUTO-MEDIUM, or AUTO-FAST.
AUTO-SLOW: The VU style meter will respond slowly to the input sound.
AUTO-FAST: The VU style meter will respond rapidly to the input sound.
AUTO-MEDIUM: The response will be between that of AUTO-SLOW and AUTO-
FAST.
3. Play a single note on your instrument.
The LCD display will indicate the closest note name and the octave for the
pitch that you played.
Tune your instrument approximately so that the correct note name is
displayed.
4. Tune your instrument so that the
VU style
meter moves to the 0 position
(center) and the pitch guide LEDs are both lit.
The meter will indicate the difference between the specified note and the
input pitch in the range of -50 cents – +50 cents.
If you use the internal mic of the OT–12 to tune, place your instrument as close
as possible to the internal mic so that extraneous sounds are not picked up by
the mic.
In some cases, such as when the sound contains numerous overtones, the OT–12
may have difficulty detecting the pitch. If this occurs, change the volume or
octave, and try again.
■ Sound mode
In this mode you can tune to a reference pitch sounded by the OT–12.
1. Make the settings described in steps 1–4 of “Preparations for tuning.”
2. Set the [MODE] dial to SOUND- or SOUND- .
The setting produces a low-volume reference tone. The setting
produces a loud reference tone.
3. Press the NOTE [√] or [®] switch to select the note that you wish to tune.
Each time you press the switch, the reference pitch will change in semitone
steps over a five octave range of C2–C7.
This setting is remembered even if you change modes.
4. Tune your instrument to the reference pitch that is output by the OT–12.
■ Sound Back mode
This mode outputs the reference pitch that is closest to the note you input via
the INPUT jack, and displays the difference between your note and the
reference pitch in the meter.
1. Make the settings described in steps 1–4 of “Preparations for tuning.”
2. Set the [MODE] dial to SOUND BACK - or SOUND BACK- .
The setting produces a low-volume reference tone. The setting
produces a loud reference tone.
3. Play a single note on your instrument.
The reference pitch closest to the note that you played will be sounded, and
the note name will be displayed in the LCD. The meter will indicate the
difference between the specified note and the input pitch in the range of -50
cents – +50 cents. Tune your instrument approximately so that the correct
reference pitch is sounded.
4.
Tune your instrument according to the reference pitch and the VU style meter .
Replacing the batteries/Memory function
When the batteries run down, accurate tuning will no longer be possible. When
directed by the low battery indicator in the LCD, replace the batteries as soon as
possible.
The batteries are also used to maintain the contents of memory when the power
is off in order to preserve the reference pitch, TRANS/TEMPERAMENT setting,
and the note name selected in Manual Meter mode or Sound mode (Memory
function).
The various settings of the Memory function will be reset when you remove the
batteries or when the batteries run down. (If the AC adapter is plugged in and
connected to the OT–12, these settings will not be reset.)
You should leave the batteries installed even when using the OT–12 with its AC
adapter.
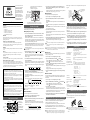
2. Insert two AA batteries.
Be careful to observe the
correct polarity (+, -).
1. Press lightly and
slide in the direction
of the arrow to open
the lid of the battery
case.
3. Close the lid of the battery case.
Adjustment
screw
Adjusting the zero point of the
VU style
meter
If the OT–12 is jarred while being transported etc., or due to normal aging after
extended use, the
VU style
meter may drift away from the 0 position (center).
Please re-adjust the VU style meter to the 0 position so that tuning will be
accurate.
1. While holding down the NOTE [√] switch, turn the power switch ON and
verify that the
VU style
meter points to the 0 position.
2. If it does not point to 0, open the battery case lid as shown in the diagram
for “Replacing the batteries/Memory function,” and use a small Phillips
screwdriver (jeweler's screwdriver) to rotate the adjustment screw until the
V
U style
meter points to 0.
3. After completing the adjustment (or if the V
U style
meter already points to
0), press any switch to return to normal operation, and close the lid.
Specifications
Scale :
12 equal tempered, Pythagorean, Mean tone E
/D
,
Werckmeister III, Kirnberger III, Kellner, Vallotti, Young
Transposition range : C, C
, D, E
, E, F, F
, G, G
A, B
, B
Detection range : A0 (27.50 Hz)–C8 (4186 Hz)
Reference tone :
C2 (65.41 Hz)–C7 (2093 Hz) five octaves, two volume levels
Tuning modes :
Manual, Auto (SLOW, MEDIUM, FAST), Sound, Sound Back
Calibration range : A4=349–499 Hz (1 Hz steps)
Detection accuracy : +/-1 cent
Sound accuracy : C2 (65.4 Hz)–B5 (987.8 Hz) +/-0.72 cents or better
: C6 (1047 Hz)–C7 (2093 Hz) +/-1.45 cents or better
Pitch guide range :
for AUTO (SLOW, MEDIUM, FAST), SOUND BACK modes
-50 cents – -3 cents :
-3 cents – +3 cents :
,
+3 cents – +50 cents :
for MANUAL mode
-500 cents – -3 cents :
-3 cents – +3 cents :
,
+3 cents – +500 cents :
Connectors : INPUT (1/4” mono), OUTPUT (1/4” mono), DC IN (9V
)
Power supply : AA batteries x 2 (3 V), or AC adapter
Battery life : approximately 100 hours (alkaline batteries, Meter
mode, continuous input at A4)
Dimensions (W x H x D) : 5-1/2” x 2-3/8” x 1-9/16” (140.5 x 60.0 x 39.5 mm)
Weight : 6.8 oz [194 g] (with batteries)
Included items : Alkaline AA (LR6) batteries x 2 to verify operation
Options (sold separately) : AC adapter (9V
)
* Appearance and specifications are subject to change without notice.
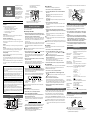
Using the tilt slit
The back of the OT–12 has a slit that can be used to tilt the tuner to a convenient
angle.
Insert a coin or similar object into the slit as shown below.
The V
U style
meter may drift from the 0 position (center) when the OT–12 is
tilted. If this occurs, perform the procedure described in “Adjusting the zero
point of the V
U style
meter” while the unit is tilted, so that the V
U style
meter
points to 0.
Thank you for purchasing the
Korg OT–12 Orchestral Tuner
.
Before you use the OT–12,
please read this owner’s
manual carefully and use the
unit as directed. After you have
read the manual, keep it for
future reference.
Precautions
Location
Using the unit in the following locations can result in a malfunction.
•In direct sunlight
• Locations of extreme temperature or humidity
• Excessively dusty or dirty locations
•Locations of excessive vibration
• Close to magnetic fields
Power supply
Please connect the designated AC adapter to an AC outlet of the correct voltage. Do not
connect it to an AC outlet of voltage other than that for which your unit is intended.
Interference with other electrical devices
Radios and televisions placed nearby may experience reception interference. Operate this unit
at a suitable distance from radios and televisions.
Handling
To avoid breakage, do not apply excessive force to the switches or controls.
Care
If the exterior becomes dirty, wipe it with a clean, dry cloth. Do not use liquid cleaners such as
benzene or thinner, or cleaning compounds or flammable polishes.
Keep this manual
After reading this manual, please keep it for later reference.
Keeping foreign matter out of your equipment
Never set any container with liquid in it near this equipment. If liquid gets into the equipment,
it could cause a breakdown, fire, or electrical shock.
Be careful not to let metal objects get into the equipment. If something does slip into the
equipment, unplug the AC adapter from the wall outlet. Then contact your nearest Korg dealer
or the store where the equipment was purchased.
THE FCC REGULATION WARNING (for U.S.A.)
This equipment has been tested and found to comply with the limits for a Class B digital
device, pursuant to Part 15 of the FCC Rules. These limits are designed to provide
reasonable protection against harmful interference in a residential installation. This
equipment generates, uses, and can radiate radio frequency energy and, if not installed and
used in accordance with the instructions, may cause harmful interference to radio
communications. However, there is no guarantee that interference will not occur in a
particular installation. If this equipment does cause harmful interference to radio or
television reception, which can be determined by turning the equipment off and on, the user
is encouraged to try to correct the interference by one or more of the following measures:
• Reorient or relocate the receiving antenna.
• Increase the separation between the equipment and receiver.
•Connect the equipment into an outlet on a circuit different from that to which the receiver
is connected.
• Consult the dealer or an experienced radio/TV technician for help.
Unauthorized changes or modification to this system can void the user’s authority to
operate this equipment.
CE mark for European Harmonized Standards
CE mark which is attached to our company’s products of AC mains operated apparatus
until December 31, 1996 means it conforms to EMC Directive (89/336/EEC) and CE mark
Directive (93/68/EEC).
And, CE mark which is attached after January 1, 1997 means it conforms to EMC Directive
(89/336/EEC), CE mark Directive (93/68/EEC) and Low Voltage Directive (73/23/EEC).
Also, CE mark which is attached to our company’s products of Battery operated apparatus
means it conforms to EMC Directive (89/336/EEC) and CE mark Directive (93/68/EEC).
IMPORTANT NOTICE TO CONSUMERS
This product has been manufactured according to strict specifications and voltage
requirements that are applicable in the country in which it is intended that this product
should be used. If you have purchased this product via the internet, through mail order,
and/or via a telephone sale, you must verify that this product is intended to be used in the
country in which you reside.
WARNING: Use of this product in any country other than that for which it is intended
could be dangerous and could invalidate the manufacturer’s or distributor’s warranty.
Please also retain your receipt as proof of purchase otherwise your product may be
disqualified from the manufacturer's or distributor’s warranty.
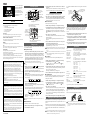
Front and side panels
[MODE] dial
LCD display
Meter
NOTE[√]/[®] switches
CALIB[√]/[®] switches
Pitch guide
LED
[TRANS/TEMPERAMENT]
switch
INPUT jack (input)
Internal mic
OUTPUT jack (output)
DC IN connector
(connect AC adapter)
Power switch ( /ON/OFF)
Tuning is complete when the VU style meter points to 0
(center) and both pitch guides are lit.
Reference pitch
(calibration)
Key, Temperament name
Note name, Octave
Reference pitch
volume (two steps)
Remaining battery
amount (four steps)
AUTO : Auto Meter mode (SLOW, MEDIUM, FAST)
MANUAL : Manual Meter mode
SOUND : Sound, Sound Back mode
Tuning procedure
The OT–12 provides four modes: Manual Meter, Auto Meter (
SLOW/MEDIUM/
FAST
), Sound, and Sound Back.
■ Preparations for tuning
1. If you are using an instrument with a pickup or contact mic, connect the
INPUT jack of the OT–12 to the cable (plug) from your instrument or mic.
If the OUTPUT jack of the OT–12 is connected to an amp, the sound that is
input to the INPUT jack will be output without change. Since this may cause
noise during your performance, set the power switch of the OT–12 to OFF.
If you are using the internal mic of the OT–12, tune without connecting a
plug to the INPUT jack and OUTPUT jack. If a plug is connected to the
INPUT jack or OUTPUT jack, the internal mic cannot be used.
The INPUT and OUTPUT jacks are for mono use only. Stereo plugs cannot be
used.
2. Turn the power switch to ON or . (At the position, the power will be
on and the display will be illuminated.)
When the power is on, the last-selected reference pitch (default: A=440 Hz)
and the mode last selected by the [MODE] dial will be active.
3. If you wish to change the reference pitch (calibration), press the CALIB
[√] or [®] switch.
Each time you press the switch, the reference pitch will change, and will be
shown in the display. If you press and hold the switch, the setting will
change continuously.
4. If you are tuning a transposing instrument or tuning to a classical scale,
press the [TRANS/TEMPERAMENT] switch.
Each time you press the switch, the setting (key, temperament) will change,
and will be shown in the display.
If you select a key, the characters “TRANS” will blink in the LCD display.
If you select a temperament, the setting will blink in the LCD display.
(Not display for C)
PG: Pythagorean ME
: Mean Tone E
MD
: Mean Tone D
WM: Werckmeister III KB: Kirnberger III KN: Kellner
V
T: Vallotti YG: Young
When a classical temperament is selected, the reference pitch will be A (=+/-0
cents).
■ Manual meter mode
In this mode you can tune to a note name that you specify.
1. Make the settings described in steps 1–4 of “Preparations for tuning.”
2. Set the [MODE] dial to MANUAL.
2
© 2000 KORG INC.

4. Jouez une note sur votre instrument et accordez l’instrument de sorte à
amener l’aiguille de l’indicateur en position “0” (centre) et à éclairer les
deux témoins d’accord.
L’indicateur ne fonctionne que lorsque la différence entre la note spécifiée et
la hauteur jouée n’excède pas la plage –500~+500 cents.
■ Mode Auto Meter
Ce mode permet d’accorder n’importe quelle note.
1. Voyez les étapes 1~4 sous “Préparatifs pour l’accordage”.
2. Réglez la commande [MODE] sur AUTO-SLOW, AUTO-MEDIUM ou
AUTO-FAST.
AUTO-SLOW:
L’indicateur réagit lentement à d’éventuelles différences de
hauteur.
AUTO-FAST:
L’indicateur réagit rapidement à d’éventuelles différences de
hauteur.
AUTO-MEDIUM:
La vitesse de réaction de l’indicateur est à mi-chemin entre
AUTO-SLOW et AUTO-FAST.
3. Jouez une note sur votre instrument.
L’affichage LCD affiche le nom de la note reconnue ainsi que l’octave dans
laquelle elle est jouée.
Dans un premier temps, accordez votre instrument de façon à afficher le nom
de la note voulue.
4. Gardez ensuite l’indicateur à l’oeil et affinez l’accord de l’instrument. Dès
que les deux témoins d’accord s’allument, l’accord est bon.
L’indicateur affiche des décalages de hauteur sur une plage de –50~+50
cents.
Si vous utilisez le microphone interne de l’OT–12, maintenez l’instrument le
plus près possible de l’OT–12 pour éviter toute interférence de signaux
indésirables.
Dans certains cas, notamment lorsque le son contient de nombreuses harmoni-
ques, il peut arriver que l’OT–12 ne détecte pas correctement la hauteur. Jouez
alors la note moins fort ou dans une autre octave.
■ Mode Sound
Ce mode vous permet d’accorder votre instrument par rapport à une note de
référence produite par l’OT–12.
1. Voyez les étapes 1~4 sous “Préparatifs pour l’accordage”.
2. Réglez la commande [MODE] sur SOUND- ou SOUND- .
Le réglage produit une note de référence de faible volume.
Le réglage produit une note de référence de volume plus élevé.
3. Actionnez la touche NOTE [√] ou [®] pour sélectionner le nom de la note
que vous souhaitez accorder.
Chaque pression sélectionne le demi-ton précédent/suivant sur une plage de
5 octaves (C2~C7).
Ce réglage est mémorisé même lorsque vous changez de mode.
4. Accordez votre instrument par rapport à la note de référence produite par
l’OT–12.
■ Mode Sound Back
Ce mode produit la note de référence dont la hauteur se rapproche le plus de
celle reçue via le connecteur INPUT. L’indicateur affiche la différence entre ces
deux hauteurs.
1. Voyez les étapes 1~4 sous “Préparatifs pour l’accordage”.
2.
Réglez la commande [MODE] sur SOUND BACK- ou SOUND BACK- .
Le réglage produit une note de référence de faible volume.
Le réglage produit une note de référence de volume plus élevé.
3. Jouez une note sur votre instrument.
L’appareil produit la note qui se rapproche le plus de la vôtre. Le nom de la
note est affiché. L’indicateur montre la différence de hauteur entre votre note
et celle qu’il estime être la bonne sur une plage de –50~+50 cents. Accordez
l’instrument de sorte à obtenir environ la bonne hauteur.
4. Gardez ensuite l’indicateur à l’oeil et affinez l’accord de l’instrument en
fonction de la sonorité de référence.
Remplacement des piles / Fonction de mémorisation
Lorsque les piles sont pratiquement épuisées, il devient de plus en plus difficile
d’obtenir un accord fiable de l’instrument. Vérifiez donc régulièrement
l’affichage de l’état de piles et changez-les à temps.
Les piles permettent en outre de conserver, après la mise hors tension de l’OT–
12, les réglages effectués en dernier lieu, à savoir la hauteur de référence,
TRANS/TEMPERAMENT ainsi que la note choisie en mode Sound ou en mode
Meter (Manual) (fonction de mémorisation).
Lors du changement des piles ou lorsqu’elles sont complètement épuisées, les
réglages mémorisés sont effacés. (Si toutefois, l’OT–12 reste sur secteur grâce à
l’adaptateur, vous ne perdez pas ces réglages lors du changement des piles).
Même lorsque vous utilisez l’OT–12 avec un adaptateur, laissez les piles dans
l’appareil.
2. Insérez deux piles AA.
Respectez la polarité
indiquée (+, –).
1. Pour ouvrir le
compartiment à
piles, appuyez
doucement et faites
glisser le couvercle
dans la direction
indiquée par la
flèche.
3. Remettez le couvercle.
Vis de
réglage
Ajustement du point zéro de l’indicateur
Si l’OT–12 a été fort secoué durant un transport, par exemple, ou s’il n’a plus été
utilisé depuis longtemps, l’aiguille de l’indicateur peut ne plus revenir en
position zéro (au centre). C’est un phénomène normal que vous pouvez corriger
comme suit:
1. Maintenez la touche NOTE [√] enfoncée tout en plaçant l’interrupteur en
position ON. Voyez si l’indicateur se trouve en position “0” (centre).
2. S’il n’indique pas la position “0”, ajustez-le avec la vis de réglage située
dans le compartiment à piles. Servez-vous d’un petit tournevis cruciforme
(d’orfèvre, par exemple) pour ramener l’aiguille en position “0”. Voyez
l’illustration de la section “Remplacement des piles / Fonction de mémori-
sation”.
3. Après le réglage (ou si l’indicateur se trouve à la position “0”), appuyez sur
n’importe quelle touche et refermez le couvercle du compartiment à piles.
Caractéristiques
Gamme : 12 notes, tempérament égal, Pythagoricienne, Ton
moyen Mib/Ré#, Werckmeister III, Kirnberger III,
Kellner, Vallotti, Young
Plage de transposition : C, C
, D, E
, E, F, F
, G, G
A, B
, B
Plage de détection : A0 (27,50Hz) à C8 (4.186Hz)
Notes de référence : C2 (65,41Hz) à C7 (2093Hz), cinq octaves, deux niveau
de volume
Modes d’accord : Manual, Auto (SLOW, MEDIUM, FAST), Sound, Sound
Back
Plage de calibrage : A4= 349 à 499Hz (par paliers de 1Hz)
Précision de détection : ±1 cent
Précision de la sonorité : C2 (65,4 Hz) à B5 (987,8 Hz) ±0,72 cents ou mieux
C6 (1047Hz) à C7 (2093Hz) ±1,45 cents ou mieux
Plage des témoins d’accord : AUTO (SLOW, MEDIUM, FAST), SOUND BACK
-50 cents à -3 cents :
-3 cents à +3 cents :
,
+3 cents à +50 cents :
for MANUAL mode
-500 cents à -3 cents :
-3 cents à +3 cents :
,
+3 cents à +500 cents :
Connecteurs : INPUT (1/4” mono), OUTPUT (1/4” mono), DC IN (9 V
)
Alimentation: Piles AA x 2 (3 V) ou adaptateur
Durée de vie des piles : ± 100 heures (piles alcalines, mode Meter, avec entrée
continue de la note La4)
Dimensions (LxHxP) : 140,5 x 60,0 x 39,5 mm
Poids : 194 g piles comprises
Accessoires : Piles AA (LR6) x 2 pour contrôle
Option (vendu séparément) : Adaptateur (9V
)
* Les caractéristiques et l’aspect extérieur sont susceptibles d’être modifiés sans avis
préalable.
Utilisation de la fente d’inclinaison
La fente située au dos de l’OT–12 permet de l’incliner pour en faciliter l’utilisa-
tion.
Pour incliner l’appareil, insérez une pièce de monnaie ou autre objet dans la
fente, comme indiqué ci-dessous.
L’aiguille de l’indicateur peut quitter la position centrale (“0”) lorsque l’OT–12
est incliné. Dans ce cas, suivez les instructions données dans la section
“Ajustement du point zéro de l’indicateur” en effectuant le réglage avec l’OT–12
incliné.
Nous vous remercions d’avoir
opté pour l’accordeur OT–12
Orchestral Tuner de Korg.
Avant d’utiliser cet appareil,
nous vous demandons de lire
attentivement ce manuel et de
respecter les instructions
fournies. Veuillez également
conserver le manuel dans un
endroit sûr afin de pouvoir le
consulter ultérieurement.
MODE D’EMPLOI
Précautions
Emplacement
L’utilisation de cet instrument dans les endroits suivants peut en entraîner le mauvais
fonctionnement.
•En plein soleil
• Endroits très chauds ou très humides
• Endroits sales ou fort poussiéreux
• Endroits soumis à de fortes vibrations
•A proximité de champs magnétiques
Alimentation
Branchez l’adaptateur secteur fourni à une prise secteur de tension appropriée. Evitez de
brancher l’adaptateur à une prise de courant dont la tension ne correspond pas à celle pour
laquelle l’appareil est conçu.
Interférences avec d’autres appareils électriques
Les postes de radio et de télévision situés à proximité peuvent par conséquent souffrir
d’interférences à la réception. Veuillez dès lors faire fonctionner cet appareil à une distance
raisonnable de postes de radio et de télévision.
Maniement
Pour éviter de les endommager, manipulez les commandes et les boutons de cet instrument
avec soin.
Entretien
Lorsque l’instrument se salit, nettoyez-le avec un chiffon propre et sec. Ne vous servez pas
d’agents de nettoyage liquides tels que du benzène ou du diluant, voire des produits
inflammables.
Conservez ce manuel
Après avoir lu ce manuel, veuillez le conserver soigneusement pour toute référence ultérieure.
Evitez toute intrusion d’objets ou de liquide
Ne placez jamais de récipient contenant du liquide près de l’instrument. Si le liquide se
renverse ou coule, il risque de provoquer des dommages, un court-circuit ou une électrocution.
Veillez à ne pas laisser tomber des objets métalliques dans le boîtier (trombones, par ex.). Si cela
se produit, débranchez l’alimentation de la prise de courant et contactez votre revendeur korg
le plus proche ou la surface où vous avez acheté l’instrument.
Marque CE pour les normes européennes harmonisées
La marque CE apposée sur tous les produits de notre firme fonctionnant sur secteur
jusqu'au 31 décembre 1996 signifie que ces appareils répondent à la Directive EMC (89/336/
CEE) et à la Directive concernant la marque CE (93/68/CEE).
La marque CE apposée après le 1 janvier 1997 signifie que ces appareils sont conformes à la
Directive EMC (89/336/CEE), à la Directive concernant la marque CE (93/68/CEE) ainsi
qu'à la Directive Basse Tension (73/23/CEE).
La marque CE apposée sur tous les produits de notre firme fonctionnant sur piles signifie
que ces appareils répondent à la Directive EMC (89/336/CEE) et à la Directive concernant la
marque CE (93/68/CEE).
REMARQUE IMPORTANTE POUR LES CLIENTS
Ce produit a été fabriqué suivant des spécifications sévères et des besoins en tension
applicables dans le pays où ce produit doit être utilisé. Si vous avez acheté ce produit via
l’internet, par vente par correspondance ou/et vente par téléphone, vous devez vérifier que
ce produit est bien utilisable dans le pays où vous résidez.
ATTENTION: L’utilisation de ce produit dans un pays autre que celui pour lequel il a été
conçu peut être dangereuse et annulera la garantie du fabricant ou du distributeur.
Conservez bien votre récépissé qui est la preuve de votre achat, faute de quoi votre produit
ne risque de ne plus être couvert par la garantie du fabricant ou du distributeur.
Panneaux avant et latéral
Commande [MODE]
Affichage LCD
Indicateur
Touches NOTE
[√]/[®]
To u ches CALIB
[√]/[®]
To uche
[TRANSMIT/TEMPERAMENT]
Connecteur INPUT (entrée)
Microphone
interne
Connecteur OUTPUT (sortie)
Connecteur DC IN
(branchez-y l’adaptateur)
Interrupteur
( /ON/OFF)
Témoins d’accord
(diodes)
Tonalité, gamme
Note, octave
AUTO: Mode Meter automatique (SLOW, MEDIUM, FAST)
MANUAL: Mode Meter manuel
SOUND: Mode Sound, Sound Back
Lorsque l’indicateur de type VU-mètre affiche la position “0” (centre) et
lorsque les deux témoins d’accord s’allument, la note est bien accordée.
Hauteur de
référence (calibrage)
Affichage de tension
des piles (4 niveaux)
Volume de la hauteur
de référence (2 ni-
veaux)
Procédure d’accordage
L’OT–12 offre quatre modes d’accordage: Manual Meter, Auto Meter (SLOW,
MEDIUM, FAST), Sound et Sound Back.
■ Préparatifs pour l’accordage
1. Si vous servez d’un instrument avec élément ou micro de contact, reliez le
connecteur INPUT de l’OT–12 à la sortie de l’instrument ou du micro-
phone avec un câble adéquat.
Si vous branchez le connecteur OUTPUT de l’OT–12 à un amplificateur, le
signal d’entrée (INPUT) est reproduit sans le moindre changement. Comme
cela peut être source de bruit durant le jeu, il vaut mieux mettre l’OT–12 hors
tension (commutateur POWER en position OFF).
Si vous servez du microphone interne de l’OT–12, vous n’avez pas besoin
de brancher les connecteurs INPUT ou OUTPUT. N’oubliez pas que dès que
vous insérez une fiche dans le connecteur INPUT ou OUTPUT, le micro-
phone interne est désactivé.
Les connecteurs INPUT et OUTPUT sont mono. Il est impossible d’y brancher
des fiches stéréo.
2. Réglez l’interrupteur en position ON ou . (En position , l’appareil est
sous tension et l’affichage est éclairé).
Après la mise sous tension, la dernière hauteur de référence (défaut: A4=
440Hz) et le mode sélectionné en dernier lieu avec la commande [MODE]
entrent en vigueur.
3. Si vous souhaitez modifier la fréquence de référence, appuyez sur la
touche CALIB [√] ou [®].
Chaque fois que vous actionnez une de ces touches, la fréquence de référence
précédente/ suivante est sélectionnée et apparaît à l’affichage. Lorsque vous
maintenez une de ces touches enfoncée, la fréquence de référence change en
continu.
4. Pour transposer ou accorder un instrument selon une gamme classique,
actionnez la touche [TRANS/TEMPERAMENT].
Une nouvelle pression sur cette touche modifie la tonalité et la gamme. Le
réglage apparaît à l’affichage.
Si vous sélectionnez simplement une autre tonalité, le message “TRANS”
clignote à l’écran.
Si vous optez pour une autre gamme, le réglage clignote à l’affichage.
(n’est pas affiché
pour Do)
PG:
Pythagoricienne
ME
:
Ton moyen Mi
MD
:
Ton moyen Ré
WM:
Werckmeister
III KB:
Kirnberger
III KN:
Kellner
VT:
Vallotti
YG:
Young
Si vous optez pour une gamme classique, La (A) sert de hauteur de référence
(=±0 Cent).
■ Mode Manual Meter
Ce mode vous permet d’accorder la note sélectionnée.
1. Voyez les étapes 1~4 sous “Préparatifs pour l’accordage”.
2. Réglez la commande [MODE] sur MANUAL.
3. Appuyez sur la touche NOTE [√] ou [®] pour sélectionner le nom de la
note que vous souhaitez accorder (C~B).
Une nouvelle pression sur une de ces touches modifie la note par paliers
d’un demi-ton. Si vous maintenez une de ces touches enfoncée, le change-
ment de note est continu.
Ce réglage est mémorisé même lorsque vous changez de mode.

Vielen Dank, dass Sie sich für
das Stimmgerät OT–12
Orchestral Tuner von Korg
entschieden haben. Bitte lesen
Sie sich diese Bedienungsanlei-
tung vor Gebrauch des OT–12
vollständig dur ch, um bei der
Bedienung alles richtig zu
machen. Bewahren Sie die
Bedienungsanleitung an einem
sicheren Ort auf.
Tonart, Stimmung
Notenname, Oktave
AUTO: Auto-Metermodus (SLOW, MEDIUM, FAST)
MANUAL: Manual-Metermodus
SOUND: Sound, Sound Back-Modus
Wenn das VU-ähnliche Meter die „0“-Position (Mitte) anzeigt und beide
Stimmungsanzeigen leuchten, ist die Note richtig gestimmt.
Referenz-Tonhöhe
(Kalibrierung)
Baterriespannungs-
anzeige (vier Stufen)
Lautstärke der Refe-
renznote (zwei Stu-
fen)
Arbeitsweise für das Stimmen
Das OT–12 bietet vier Stimm-Modi: Manual, Meter, Auto Meter (SLOW, MEDIUM,
FAST), Sound und Sound Back.
■ Vorbereitungen zum Stimmen
1. Wenn Sie ein Instrument mit Spulenelement oder Kontaktmikrofon verwen-
den, müssen Sie die INPUT-Buchse des OT–12 über ein geeignetes Kabel mit
dem Ausgang des Instrumentes oder Mikrofons verbinden.
Wenn Sie die OUTPUT-Buchse des OT–12 mit einem Verstärker verbinden, wird
das an der INPUT anliegende Signal unverändert ausgegeben. Da beim Spielen
Rauschen auftreten kann, sollten Sie den POWER-Schalter des OT–12 in die
OFF-Position stellen.
Wenn Sie das interne Mikrofon des OT–12 verwenden, brauchen Sie nichts an die
INPUT- oder OUTPUT-Buchse anzuschließen. Bedenken Sie, dass bei Anschlie-
ßen einer Klinke an die INPUT- oder OUTPUT-Buchse das interne Mikrofon
deaktiviert wird.
Die Buchsen INPUT und OUTPUT Buchse sind mono. Es können keine Stereo-
Klinken angeschlossen werden.
2. Stellen Sie den Netzschalter auf ON oder . (In der Position ist das Gerät
eingeschaltet und das Display leuchtet.)
Nach dem Einschalten wird die zuletzt gewählte Referenzfrequenz (Vorgabe: A4=
440Hz) gewählt. Außerdem wird wieder der mit dem [MODE]-Rad eingestellte
Modus aufgerufen.
3. Wenn Sie die Referenzfrequenz ändern möchten, müssen Sie die CALIB [√]
oder [®] Taste drücken.
Beim Drücken einer dieser Tasten wird jeweils die vorangehende/nächste
Referenzfrequenz gewählt. Diese wird im Display angezeigt. Wenn Sie eine dieser
Tasten gedrückt halten, ändert sich die Referenzfrequenz kontinuierlich.
4.
Wenn Sie ein Instrument gemäß einer klassischen Skala transponieren oder
stimmen möchten, müssen Sie den [TRANS/TEMPERAMENT]-Schalter drücken.
Bei wiederholtem Drücken dieser Taste ändern sich die Tonart und das Tempera-
ment. Die Einstellung wird im Display angezeigt.
Wenn Sie nur eine andere Tonart wählen, blinkt die Meldung „TRANS“ im Display.
Wenn Sie ein anderes Temperament wählen, blinkt die Einstellung im Display.
(wird für C nicht
angezeigt)
PG: Pythagoreisch MEb: Mittelton Eb MD#: Mittelton D#
WM: Werckmeister III KB: Kirnberger III KN: Kellner
VT: Vallotti YG: Young
Wenn Sie ein klassisches Temperament wählen, wird A als Ausgangspunkt
(=±0 Cent) verwendet.
■ Manual-Metermodus
In diesem Modus können Sie die jeweils gewählte Note stimmen.
1. Siehe die Schritte 1~4 unter „Vorbereitungen zum Stimmen“.
2. Stellen Sie die [MODE]-Wählscheibe auf MANUAL.
3. Drücken Sie den NOTE [√] oder [®] Schalter, um den Namen der Note zu
wählen, die Sie stimmen möchten (C~B).
Bei wiederholtem Drücken einer dieser Tasten ändert sich die Note in Halbton-
schritten. Wenn Sie eine Taste gedrückt halten, ändert sich der Notenname
kontinuierlich.
Diese Einstellung wird auch nach dem Wechsel in einen anderen Modus behalten.
4. Spielen Sie eine Einzelnote auf Ihrem Instrument und stimmen Sie das
Instrument so, dass die VU-Meternadel sich in der Position „0“ (Mitte)
befindet, während beide Stimmungsanzeigen leuchten.
Das Meter funktioniert nur, wenn sich die Stimmung der Note im Bereich -
500~+500 Cent um die gewählte Note befindet.
Bedienungsanleitung
Vorsichtsmaßnahmen
Aufstellungsort
Vermeiden Sie das Aufstellen des Geräts an Orten, an denen
• es direkter Sonneneinstrahlung ausgesetzt ist;
• hohe Feuchtigkeit oder Extremtemperaturen auftreten können;
• Staub oder Schmutz in großen Mengen vorhanden sind;
• das Gerät Erschütterungen ausgesetzt sein kann.
• in der Nähe eines Magnetfeldes.
Stromversorgung
Schließen Sie das beiliegende Netzteil nur an eine geeignete Steckdose an. Verbinden Sie es
niemals mit einer Steckdose einer anderen Spannung.
Störeinflüsse auf andere Elektrogeräte
Dieser kann bei in der Nähe aufgestellten Rund-funkempfängern oder Fernsehgeräten
Empfangsstörungen hervorrufen. Betreiben Sie solche Geräte nur in einem geeigneten Abstand
von diesem Erzeugnis.
Bedienung
Vermeiden Sie bei der Bedienung von Schaltern und Reglern unangemessenen Kraftaufwand.
Reinigung
Bei auftretender Verschmutzung können Sie das Gehäuse mit einem trockenen, sauberen Tuch
abwischen. Verwenden Sie keinerlei Flüssigreiniger wie beispielsweise Reinigungsbenzin,
Ve rdünnungs- oder Spülmittel. Verwenden Sie niemals brennbare Reiniger.
Bedienungsanleitung
Bewahren Sie diese Bedienungsanleitung gut auf, falls Sie sie später noch einmal benötigen.
Flüssigkeiten und Fremdkörper
Stellen Sie niemals Behältnisse mit Flüssigkeiten in der Nähe des Geräts auf. Wenn Flüssigkeit
in das Gerät gelangt, können Beschädigung des Geräts, Feuer oder ein elek-trischer Schlag die
Folge sein.
Beachten Sie, daß keinerlei Fremdkörper in das Gerät gelangen. Sollte ein Fremdkörper in das
Gerät gelangt sein, so trennen Sie es sofort vom Netz. Wenden Sie sich dann an Ihren KORG-
Fachhändler.
Das CE-Zeichen für die Europäische Gemeinschaft
Vor dem 31.12.1996 vergebene CE-Zeichen auf unseren netzgespeisten Geräten zeigen an,
daß diese Geräte gemäß der EMC-Richtlinie (89/336/EWG) und der CE-Richtlinie (93/68/
EWG) der EU arbeiten.
Nach dem 01.01.1997 vergebene CE-Zeichen auf unseren netzgespeisten Geräten zeigen an,
daß diese Geräte gemäß der EMC-Richtlinie (89/336/EWG), der CE-Richtlinie (93/68/
EWG) und der Niederspannungsstromrichtlinie (73/23/EWG) der EU arbeiten.
Die CE-Zeichen auf unseren batteriegespeisten Geräten zeigen an, daß diese Geräte gemäß
der EMC-Richtlinie (89/336/EWG) und der CE-Richtlinie (93/68/EWG) der EU arbeiten.
WICHTIGER HINWEIS FÜR KUNDEN
Dieses Produkt wurde unter strenger Beachtung von Spezifikationen und Spannungsan-
forderungen hergestellt, die im Bestimmungsland gelten. Wenn Sie dieses Produkt über das
Internet, per Postversand und/oder mit telefonischer Bestellung gekauft haben, müssen Sie
bestätigen, dass dieses Produkt für Ihr Wohngebiet ausgelegt ist.
WARNUNG: Verwendung dieses Produkts in einem anderen Land als dem, für das es
bestimmt ist, verwendet wird, kann gefährlich sein und die Garantie des Herstellers oder
Importeurs hinfällig lassen werden. Bitte bewahren Sie diese Quittung als Kaufbeleg auf, da
andernfalls das Produkt von der Garantie des Herstellers oder Importeurs ausgeschlossen
werden kann.
Front und Seite
[MODE]-Wählscheibe
LC-Display
Meter
NOTE
[√]/[®]
Schalter
CALIB
[√]/[®]
Schalter
INPUT-Buchse (Eingang)
Internes
Mikrofon
OUTPUT-Buchse (Ausgang)
Netzschalter ( /ON/OFF)
Stimmungs-
anzeige (LED)
DC IN-Buchse
(schließen Sie hier das
Netzteil an)
[TRANS/TEMPERAMENT]-
Schalter
■ Auto-Metermodus
In diesem Modus kann jede beliebige Note gestimmt werden.
1. Siehe die Schritte 1~4 unter „Vorbereitungen zum Stimmen“.
2. Stellen Sie die [MODE]-Wählscheibe auf AUTO-SLOW, AUTO-MEDIUM oder
AUTO- FAST.
AUTO-SLOW: Das VU-Meter spricht langsam auf eventuelle Tonhöhen-
schwankungen an.
AUTO-FAST: Das VU-Meter spricht schnell auf eventuelle Tonhöhen-
schwankungen an.
AUTO-MEDIUM: Die Ansprache auf Schwankungen liegt zwischen AUTO-SLOW
und AUTO-FAST.
3. Spielen Sie eine Einzelnote auf dem Instrument.
Das LC-Display zeigt den Namen der erkannten Note sowie die Oktave, in der sie
gespielt wird, an.
Stimmen Sie Ihr Instrument so weit, dass schon einmal der richtige Notenname
angezeigt wird.
4. Behalten Sie nun das VU-Meter im Auge, während Sie Ihr Instrument
feinstimmen. Sobald beide Stimmungsanzeigen leuchten, ist die Note richtig
gestimmt.
Das Meter zeigt etwaige Abweichungen von der richtigen Stimmung im Bereich -
50~+50 Cent an.
Wenn Sie das interne Mikrofon des OT–12 verwenden, müssen Sie Ihr
Instrument so nahe wie möglich an das OT–12 halten, damit keine Störsignale
aufgegriffen werden.
In bestimmten Fällen, z.B. wenn der Klang viele Obertöne enthält, kann es sein,
dass das OT–12 die Tonhöhe nicht richtig auswertet. Spielen Sie die Note dann
leiser oder in einer anderen Oktave.
■ Sound-Modus
In diesem Modus können Sie Ihr Instr ument zu einer vom OT–12 ausgegebenen
Referenznote stimmen.
1. Siehe die Schritte 1~4 unter „Vorbereitungen zum Stimmen“.
2. Stellen Sie die [MODE]-Wählscheibe auf SOUND-
oder SOUND- .
Die
Einstellung bedeutet, dass die Lautstärke der Referenznote gering ist. Bei
ist die Lautstärke des Referenztons höher.
3. Drücken Sie die NOTE [√] oder [®] Taste, um den Namen der Note zu
wählen, die Sie stimmen möchten.
Bei wiederholtem Drücken wählen Sie den jeweils vorangehenden/nächsten
Halbton in einem Bereich von fünf Oktaven (C2~C7).
Diese Einstellung wird auch bei Aufrufen eines anderen Modus’ behalten.
4.
Stimmen Sie Ihr Instrument zur vom OT–12 ausgegebenen Referenznote.
■ Sound Back-Modus
In diesem Modus wir d die Referenznote ausgegeben, die der über die INPUT-Buchse
empfangenen Tonhöhe am nächsten kommt. Der Unterschied zwischen diesen
beiden wir d mit Hilfe des Meters angezeigt.
1. Siehe die Schritte 1~4 unter „Vorbereitungen zum Stimmen“.
2. Stellen Sie die [MODE]-Wählscheibe auf SOUND BACK
oder SOUND
BACK
.
Die
Einstellung bedeutet, dass die Lautstärke der Referenznote gering ist. Bei
ist die Lautstärke des Referenztons höher.
3. Spielen Sie eine Einzelnote auf Ihrem Instrument.
Das Gerät gibt nun den Ton aus, der Ihrer Note am nächsten kommt. Der
Notenname erscheint im LCD. Das Meter zeigt den Unterschied zwischen Ihrer
Note und der mutmaßlich richtigen Note im Bereich -50~+50 Cent an. Stimmen Sie
Ihr Instrument so weit, bis die Sie ungefähr die richtige Tonhöhe erreicht haben.
4. Behalten Sie nun das Meter im Auge, während Sie Ihr Instrument zum
Referenzton stimmen.
Auswechseln der Batterien und Speicherfunktion
Wenn die Batterien nahezu erschöpft sind, wird es immer schwieriger, das Instrument
zuverlässig zu stimmen. Überpr üfen Sie also in regelmäßigen Zeitabständen die
Batterie- Spannungsanzeige, und wechseln Sie die Batterien rechtzeitig aus.
Die Batterien dienen außerdem zum Puffern der zuletzt gewählten Einstellungen
(Kammertonfr equenz, TRANS/TEMPERAMENT , der im Manual-Meter - oder Sound-
Modus gewählte Notenname). Diese werden bei Ausschalten des OT–12 gespeichert.
Beim Entnehmen der Batterien bzw. wenn sie ganz erschöpft sind, werden die
gespeicherten Einstellungen gelöscht. (Wenn Sie jedoch ein Netzteil an das
OT–12 anschließen, bleiben die Einstellungen beim Auswechseln der Batterien
erhalten.)
Auch bei Verwendung des OT–12 mit einem Netzteil sollten Sie die Batterien nicht
entfernen.
2. Legen Sie zwei AA-
Mignonzellen in das
Fach. Achten Sie auf
die richtige Polarität
(+, -).
1. Drücken Sie vor-
sichtig auf diese
Stelle und schie-
ben Sie den
Deckel in die an-
gezeigte Rich-
tung, um das
Batteriefach zu
öffnen.
3. Bringen Sie den Deckel wieder an.
Einstell-
schraube
Nachjustieren des Meternullpunktes
Wenn das OT–12 während des Transportes usw. stark geschüttelt wir d oder bereits
längere Zeit verwendet wor den ist, kehrt die Meternadel u.U. nicht mehr zur
Nullposition (Mitte) zur ück. Das ist eine normale Abnutzungserscheinung, die
folgendermaßen korrigiert wer den kann:
1. Halten Sie die NOTE [√]-Taste gedrückt, während Sie den Netzschalter auf
ON stellen. Schauen Sie nach, ob sich das Meter in der „0“-Position (Mitte)
befindet.
2. Wenn das Meter nicht die „0“-Position anzeigt, können Sie die Einstellung
korrigieren, indem Sie die Justierschraube im Batteriefach mit einem kleinen
Kreuzkopfschraubenzieher (+, z.B. einem Juwelierschraubenzieher) so
einstellen, dass sich die Nadel wieder in der „0“-Position befindet. Siehe die
Abbildung unter „Auswechseln der Batterien und Speicherfunktion“.
3. Drücken Sie nach dem Justieren (bzw. wenn sich das Meter bereits in der
„0“-Position befindet) eine beliebige Taste und bringen Sie den Deckel des
Batteriefachs wieder an.
Technische Daten
Skala :12 Noten, gleichschwebende Stimmung, Pythagoreisch,
Mittelton Es/Dis, W erckmeister III, Kirnber ger III, Kellner,
Vallotti, Young
Transpositionsbereich :C, C#, D, E
, E, F, F#, G, G#, A, B
, B
Erkannter Bereich : A0 (27,50Hz)~C8 (4.186Hz)
Referenznoten :C2 (65,41Hz)~C7 (2093Hz), fünf Oktaven, zwei
Lautstärkestufen
Stimm-Modi : Manual, Auto (SLOW, MEDIUM, FAST), Sound, Sound
Back
Kalibrier ungsbereich :A4= 349~499Hz (in 1Hz-Schritten)
Erkennungsgenauigkeit : ±1 Cent
Referenzton-Genauigkeit :C2 (65,4 Hz)~B5 (987,8 Hz) ±0,72 Cent oder besser
C6 (1047Hz)~C7 (2093Hz) ±1,45 Cent oder besser
Stimmungs-Anzeigebereich : AUT O (SLOW, MEDIUM, FAST), SOUND BACK
-50 Cent~-3 Cent :
-3 Cent~+3 Cent : ,
+3 Cent~+50 Cent :
MANUAL-Modus
-500 Cent~-3 Cent :
-3 Cent~+3 Cent : ,
+3 Cent~+500 Cent :
Anschlussbuchsen :INPUT (1/4" mono), OUTPUT (1/4" mono), DC IN (9 V
)
Stromversorgung :AA-Batterien x 2 (3 V) oder Netzteil
Batterie-Lebensdauer :Etwa 100 Stunden (Alkalibatterien, Meter-Modus, bei
kontinuierlicher Eingabe der Note A4)
Abmessungen (BxHxT) :140,5 x 60,0 x 39,5 mm
Gewicht:194 g inklusive Batterien
Lieferumfang : AA-Batterien (LR6) x 2 für Kontr ollzwecke
Sonderzubehör :Netzteil (9V
)
* Änderungen der technischen Daten ohne vorherige Ankündigung jederzeit vorbehalten.
Anwinkeln des Stimmgerätes
Dank der Ritze auf der Rückseite des OT–12 können Sie das Stimmgerät anwinkeln
und somit komfortabler arbeiten.
Schieben Sie eine Münze wie in der Abbildung gezeigt in die Ritze.
Das VU-Meter wählt u.U. nicht die Nullposition (Mitte), wenn das OT–12
angewinkelt wird. Das kann aber mit den Anweisungen unter „Nachjustieren des
Meternullpunktes“ behoben werden. Wichtig ist dabei, dass das Meter im
angewinkelten Zustand den Nullpunkt anzeigt.
-
 1
1
-
 2
2
-
 3
3


dans d''autres langues
- English: Korg OT-12 Owner's manual
- Deutsch: Korg OT-12 Bedienungsanleitung
Documents connexes
-
Korg OT-120 Le manuel du propriétaire
-
-
-
-
-
-
-
Korg Pitchblack+ Manuel utilisateur
-
-
