NOTE: THIS INSTRUCTION
BOOKLET CONTAINS IMPORTANT
SAFETY INFORMATION.
PLEASE READ AND KEEP FOR
FUTURE REFERENCE.
English pg 1-48
Français pg 49-54
Español pg 55-60
Lot # 390961 04/28/16
Purchased: __________________
Be sure to give us a ring before
making any returns. 1-800-523-3987
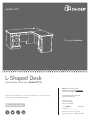
L-Shaped Desk
Avenue Eight Collection | Model 417714
Need help? Visit Sauder.com to view video assembly tips or chat with a live rep.
Prefer the phone? Call 1-800-523-3987.
Share your journey!
sauder.com
The original desktop.

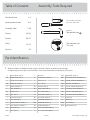
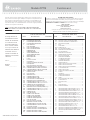
Table of Contents Assembly Tools Required
2-4
5-6
7-48
49-54
55-60
61-62
63
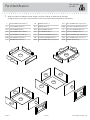
Part Identifi cation
Hardware Identifi cation
Assembly Steps
Français
Español
Safety
Warranty
Hammer
Not actual size
No. 2 Phillips Screwdriver
Tip Shown Actual Size
Skip the power trip.
This time.
417714 www.sauder.com/servicesPage 2
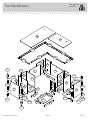
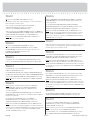
Part Identifi cation
å While not all parts are labeled, some of the parts will have a label or an inked letter on the edge
to help distinguish similar parts from each other. Use this part identifi cation to help identify similar parts.
A OUTER RIGHT END (1)
B2 INNER RIGHT END (1)
C OUTER LEFT END (1)
D2 INNER LEFT END (1)
E RIGHT UPRIGHT (1)
F LEFT UPRIGHT (1)
G2 RIGHT TOP (1)
H2 LEFT TOP (1)
I RIGHT BOTTOM (1)
J LEFT BOTTOM (1)
K RIGHT MODESTY PANEL (1)
L LEFT MODESTY PANEL (1)
N RIGHT BACK (1)
O LEFT BACK (1)
P DOOR (1)
Q ADJUSTABLE SHELF (1)
R RIGHT LEG (1)
T LEFT LEG (1)
QQ FRONT PANEL (1)
RR RIGHT SIDE SKIRT (1)
SS LEFT SIDE SKIRT (1)
TT RIGHT BACK SKIRT (2)
UU LEFT BACK SKIRT (2)
VV KEYBOARD UPRIGHT (1)
WW KEYBOARD FRONT (1)
XX KEYBOARD BACK (1)
YY RIGHT KEYBOARD SIDE (1)
ZZ LEFT KEYBOARD SIDE (1)
AAA KEYBOARD SHELF (1)
BBB TOP RIGHT FRONT MOLDING (1)
CCC TOP LEFT FRONT MOLDING (1)
DDD REAR TOP MOLDING (1)
EEE TOP LEFT REAR MOLDING (1)
FFF TOP RIGHT SIDE MOLDING (1)
GGG TOP LEFT SIDE MOLDING (1)
HHH TOP RIGHT REAR MOLDING (1)
JJJ PLINTH (8)
LLL SPACER (2)
MMM HALF DISK (8)
M35 END MOLDING (4)

Part Identifi cation
Now you know
our ABCs.
417714www.sauder.com/services
Page 3
A
B2
C
D2
E
F
G2
H2
I
J
K
L
N
O
P
Q
R
QQ
RR
TT
UU
VV
WW
XX
YY
ZZ
AAA
BBB
CCC
DDD
EEE
FFF
GGG
HHH
LLL
T
M35
M35
M35
TT
UU
JJJ
JJJ
MMM
JJJ
JJJ
JJJ
JJJ
MMM
MMM
M35
MMM
MMM
LLL
SS

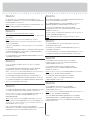
Part Identifi cation
å While not all parts are labeled, some of the parts will have a label or an inked letter on the edge
to help distinguish similar parts from each other. Use this part identifi cation to help identify similar parts.
S FILE DRAWER BOX FRONT (1)
U FILE DRAWER FRONT (1)
D78 FILE DRAWER BACK (1)
D211 FILE DRAWER RIGHT SIDE (1)
D32 FILE DRAWER LEFT SIDE (1)
D708 FILE DRAWER BOTTOM (1)
Z DRAWER BOX FRONT (1)
BB DRAWER FRONT (1)
D77 DRAWER BACK (1)
D36 RIGHT DRAWER SIDE (1)
D37 LEFT DRAWER SIDE (1)
GG TOP RIGHT DRAWER FRONT (1)
D76 TOP RIGHT DRAWER BACK (1)
D46
RIGHT DRAWER SIDE (Top Right) (1)
D47 LEFT DRAWER SIDE (Top Right) (1)
D958 TOP RIGHT DRAWER BOTTOM (1)
LL TOP LEFT DRAWER FRONT (1)
D74
TOP LEFT DRAWER BACK (1)
D34 RIGHT DRAWER SIDE (Top Left) (1)
D35 LEFT DRAWER SIDE (Top Left) (1)
D716 DRAWER BOTTOM (2)
Now you know
our ABCs.
417714 www.sauder.com/servicesPage 4
S
U
Z
BB
GG
LL
D958
D716
D716
D708
D77
D36
D37
D32
D78
D211
D47
D76
D46
D35
D34
D74

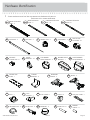
Hardware Identifi cation
å Screws are shown actual size. You may receive extra hardware with your unit.
417714www.sauder.com/services
Page 5
PPP
NARROW EXTENSION
RAIL - 8
QQQ
NARROW EXTENSION
SLIDE - 8
NNN
WIDE EXTENSION
RAIL - 2
OOO
WIDE EXTENSION
SLIDE - 2
LOCK - 1
1J
LOCK COVER - 1
10J
LOCK
BRACKET - 1
5J
(EXTENSION SETS SHOWN SEPARATED)
KNOB - 6
42K
FILE GLIDE - 2
6B
FILE ROD - 2
8B
TWIST-LOCK®
FASTENER - 37
7F
HIDDEN CAM - 2
1F
CAM DOWEL - 2
2F
HINGE - 2
14H
KEYBOARD
HINGE - 2
12H
MOLDING
CONNECTOR - 5
17F
CONNECTOR
PLATE - 1
14G
CORNER
BRACKET - 4
31G
ANGLE
BRACKET - 37
5G
CORD CLIP - 3
9P
LARGE DRAWER
FRONT BRACKET - 2
10G
GROMMET - 3
10P
GROMMET CAP - 3
1P
FELT DISC CARD - 1
1M
METAL PIN - 8
1R
RUBBER
SLEEVE - 4
2R
DRAWER FRONT
BRACKET - 1
9G
TOP DRAWER
FRONT BRACKET - 2
6G

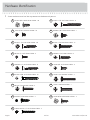
Hardware Identifi cation
å Screws are shown actual size. You may receive extra hardware with your unit.
417714 www.sauder.com/servicesPage 6
GOLD 5/16" FLAT HEAD SCREW - 34
3S
BROWN 7/16" LARGE HEAD SCREW - 1
6S
SILVER 3/4" PAN HEAD SCREW - 2
52S
BLACK 7/8" MACHINE SCREW - 3
37S
BLACK 1-7/8" FLAT HEAD SCREW - 12
2S
BROWN 1-1/2" FLAT HEAD SCREW - 6
14S
BLACK 1-1/4" FLAT HEAD SCREW - 26
7S
SMALL BLACK 1-1/4" FLAT HEAD SCREW - 2
74S
SILVER 1-1/4" MACHINE SCREW - 2
35S
BLACK 1-1/8" PAN HEAD SCREW - 12
9S
BROWN 1" FLAT HEAD SCREW - 8
12S
GOLD 1" MACHINE SCREW - 1
50S
SILVER 5/8" FLAT HEAD SCREW - 4
23S
BLACK 9/16" LARGE HEAD SCREW - 118
1S
SILVER 9/16" LARGE HEAD SCREW - 2
54S
BLACK 1/2" FLAT HEAD SCREW - 4
11S
30S
BLACK 1-9/16" FLAT HEAD SCREW - 16

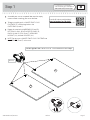
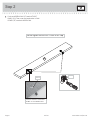
Step 1
Look for this icon. It means a
video assembly tip is available at
www.sauder.com/services/tips
å
Assemble your unit on a carpeted fl oor or on the empty
carton to avoid scratching your unit or the fl oor.
å
To begin assembly, push a SAUDER TWIST-LOCK®
FASTENER (7F) into the large holes in the
OUTER ENDS (A and C).
å
Repeat this step for the INNER ENDS (B2 and D2),
BOTTOMS (I and J), RIGHT MODESTY PANEL (K),
BACKS (N and O), LEGS (R and T), KEYBOARD
UPRIGHT (VV), and both SPACERS (LLL).
å
NOTE: Do not insert a SAUDER TWIST-LOCK® FASTENER into
the UPRIGHTS (E and F) at this time.
417714www.sauder.com/services
Page 7
7F
A
C
(29 used)
Do not tighten the TWIST-LOCK® FASTENERS in this step.
Scan this QR code or go to this address:
http://qr.sauder.com/?ID=1497
to watch a video on how to assemble your unit.

Step 2
å
Push two HIDDEN CAMS (1F) into the FRONT
PANEL (QQ). Then, insert the metal end of a CAM
DOWEL (2F) into each HIDDEN CAM.
417714 www.sauder.com/servicesPage 8
QQ
Arrow
Insert the metal end of the CAM
DOWEL into the HIDDEN CAM.
Arrow
Do not tighten the HIDDEN CAMS in this step.
2F
1F

å
Tap fi ve MOLDING CONNECTORS (17F) into the notches in
the MOLDINGS (BBB, CCC, DDD, EEE, FFF, GGG, and HHH).
Step 3
417714www.sauder.com/services
Page 9
HHH
EEE
CCC
GGG
DDD
BBB
FFF
17F
17F
17F
Use your hammer to tap the MOLDING CONNECTORS (17F) into the notches in the MOLDINGS.
Flat end
Flat end
Flat end

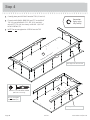
Step 4
å
Carefully place your MOLDINGS onto the TOPS (G2 and H2).
å
Fasten the MOLDINGS (BBB, DDD, and FFF) to the RIGHT
TOP (G2) and MOLDINGS (CCC, EEE, GGG, and HHH)
to the LEFT TOP (H2). Use twenty-six BLACK 1-1/4" FLAT
HEAD SCREWS (7S).
å
NOTE: Do not overtighten the SCREWS into the TOP.
417714 www.sauder.com/servicesPage 10
HHH
EEE
CCC
GGG
H2
G2
DDD
BBB
FFF
Surface with holes
Surface with holes
The large hole must be here.
The large hole must be here.
BLACK 1-1/4" FLAT HEAD SCREW
(26 used in this step)
7S
Remember:
Righty tighty.
Lefty loosey.
Do not overtighten
the SCREWS (7S).

å
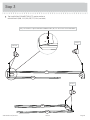
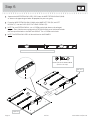
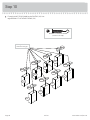
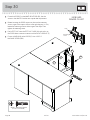
NOTE: Before beginning this step, separate the NARROW EXTENSION SETS (PPP and QQQ) from the WIDE EXTENSION
SETS (NNN and OOO). Do not confuse these SETS once they are separated.
å
Separate the NARROW EXTENSION SLIDES (QQQ) from the NARROW EXTENSION RAILS (PPP) as shown in the upper
diagram below. Be prepared, the parts are greasy.
å
Fasten the NARROW EXTENSION RAILS (PPP) to the INNER ENDS (B2 and D2) and UPRIGHTS (E and F). Use twelve
GOLD 5/16" FLAT HEAD SCREWS (3S).
å
NOTE: For each EXTENSION RAIL, turn a SCREW into the hole shown in the enlarged diagram. Then, slide the inner
cartridge of the EXTENSION RAIL in to fi nd the other hole that lines up with the hole in the END and UPRIGHT. Turn a
SCREW into this hole.
å
NOTE: The EXTENSION SLIDES will be used later for the DRAWERS.
Step 5
417714www.sauder.com/services
Page 11
Push the release lever in and pull the SLIDE from the RAIL.
PPPQQQ
PPP
PPP
PPP
PPP
PPP
PPP
B2
D2
E
F
Surface with
TWIST-LOCK®
FASTENER
holes
These RAILS use the last
holes from the open end.
Narrow
Extension
Rails
When this NARROW
EXTENSION RAIL (PPP) is
fastened to the UPRIGHT (F),
it will hang over the edge.
Surface with
TWIST-LOCK®
FASTENERS
Surface with
TWIST-LOCK®
FASTENER
holes
Surface with
TWIST-LOCK®
FASTENERS
Open end
Open end
Open end
Open end
Narrow Extension Rails
GOLD 5/16" FLAT HEAD SCREW
(12 used in this step)
3S

Step 6
å
Separate the WIDE EXTENSION SLIDES (OOO) from the WIDE EXTENSION RAILS (NNN)
as shown in the upper diagram below. Be prepared, the parts are greasy.
å
Fasten the WIDE EXTENSION RAILS (NNN) to the INNER LEFT END (D2) and LEFT
UPRIGHT (F). Use four GOLD 5/16" FLAT HEAD SCREWS (3S).
å
NOTE: For each EXTENSION RAIL, turn a SCREW into the hole shown in the enlarged
diagram. Then, slide the inner cartridge of the EXTENSION RAIL out to fi nd the other holes
that line up with the holes in the END and UPRIGHT. Turn a SCREW into this hole.
å
NOTE: The EXTENSION SLIDES will be used later for the DRAWERS.
417714 www.sauder.com/servicesPage 12
Push the black lever in and pull the SLIDE from the RAIL.
NNNOOO
D2
F
NNN
NNN
Open end
Open end
Wide
Extension
Rails
GOLD 5/16" FLAT HEAD SCREW
(4 used in this step)
3S

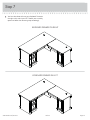
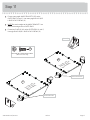
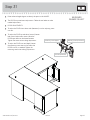
å
You have the choice of having your Keyboard Drawer on
the right or left side of your unit. Choose your assembly
option and follow the remaining steps accordingly.
Step 7
417714www.sauder.com/services
Page 13
KEYBOARD DRAWER ON RIGHT
KEYBOARD DRAWER ON LEFT

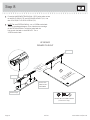
Step 8
å
Fasten the NARROW EXTENSION RAILS (PPP) to the other surface
of the RIGHT UPRIGHT (E) and KEYBOARD UPRIGHT (VV). Use
four GOLD 5/16" FLAT HEAD SCREWS (3S).
å
NOTE: For each EXTENSION RAIL, turn a SCREW into the hole
shown in the enlarged diagram. Then, slide the inner cartridge
of the EXTENSION RAIL in to fi nd the other hole that
lines up with the holes in the UPRIGHTS. Turn a
SCREW into this hole.
KEYBOARD
DRAWER ON RIGHT
E
VV
Surface without
TWIST-LOCK
®
FASTENER holes
PPP
PPP
Narrow
Extension
Rails
Open end
Surface with
TWIST-LOCK®
FASTENERS
Open end
Finished edge
GOLD 5/16" FLAT HEAD SCREW
(4 used in this step)
3S
417714 www.sauder.com/servicesPage 14

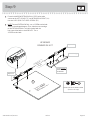
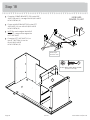
Step
å
Fasten the NARROW EXTENSION RAILS (PPP) to the other
surface of the LEFT UPRIGHT (F) and KEYBOARD UPRIGHT (VV).
Use four GOLD 5/16" FLAT HEAD SCREWS (3S).
å
NOTE: For each EXTENSION RAIL, turn a SCREW into the hole
shown in the enlarged diagram. Then, slide the inner cartridge
of the EXTENSION RAIL in to fi nd the other hole that
lines up with the holes in the UPRIGHTS. Turn a
SCREW into this hole.
KEYBOARD
DRAWER ON LEFT
VV
Surface without
TWIST-LOCK
®
FASTENER holes
PPP
PPP
F
GOLD 5/16" FLAT HEAD SCREW
(4 used in this step)
3S
Narrow
Extension
Rails
Open end
Finished edge
Open end
Step 9
417714www.sauder.com/services
Page 15
Surface without
TWIST-LOCK®
FASTENERS

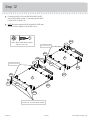
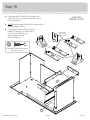
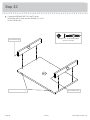
Step
å
Fasten the HALF DISKS (MMM) to the PLINTHS (JJJ). Use
eight BROWN 1" FLAT HEAD SCREWS (12S).
Step 10
The larger hole
should be facing up.
JJJ
JJJ
JJJ
JJJ
JJJ
JJJ
JJJ
JJJ
MMM
MMM
MMM
MMM
MMM
MMM
MMM
MMM
BROWN 1" FLAT HEAD SCREW
(8 used in this step)
12S
417714 www.sauder.com/servicesPage 16

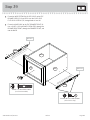
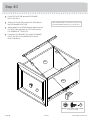
Step Step 11
å
Fasten twenty-eight ANGLE BRACKETS (5G) to the
OUTER ENDS (A and C). Use twenty-eight BLACK 9/16"
LARGE HEAD SCREWS (1S).
å
NOTE: Be sure the edges of the ANGLE BRACKETS are
even with the edges of the OUTER ENDS.
å
Fasten four PLINTHS (JJJ) to the OUTER ENDS (A and C).
Use eight BLACK 9/16" LARGE HEAD SCREWS (1S).
5G
A
C
5G
Surface with
TWIST-LOCK
®
FASTENERS
Surface with
TWIST-LOCK
®
FASTENERS
JJJ
JJJ
JJJ
JJJ
(28 used)
Use bottom holes
Use bottom holes
BLACK 9/16" LARGE HEAD SCREW
(36 used in this step)
1S
417714www.sauder.com/services
Page 17

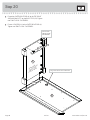
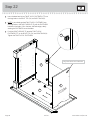
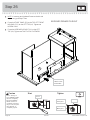
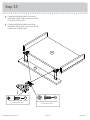
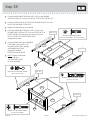
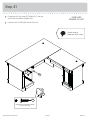
Step
å
Fasten the PLINTHS (JJJ) and END MOLDINGS (M35)
to the OUTER ENDS (A and C). Use twenty BLACK 9/16"
LARGE HEAD SCREWS (1S).
å
NOTE: Be sure to center the END MOLDINGS (M35) over
the HALF DISKS (MMM) on the PLINTHS (JJJ).
Step 12
A
C
JJJ
JJJ
JJJ
JJJ
M35
M35
M35
M35
MMM
MMM
MMM
MMM
MMM
MMM
MMM
MMM
BLACK 9/16" LARGE HEAD SCREW
(20 used in this step)
1S
Use bottom holes
Use bottom holes
The END MOLDINGS (M35) should be
centered over the HALF DISKS (MMM).
417714 www.sauder.com/servicesPage 18

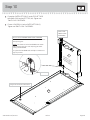
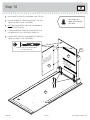
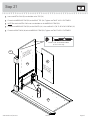
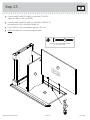
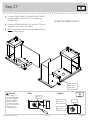
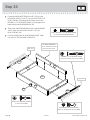
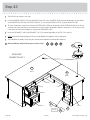
Step Step 13
å
Fasten the OUTER LEFT END (C) to the TOP LEFT SIDE
MOLDING (GGG) on the LEFT TOP (H2). Tighten two
TWIST-LOCK® FASTENERS.
å
Fasten a SPACER (LLL) to the OUTER LEFT END (C).
Tighten two TWIST-LOCK® FASTENERS.
H2
C
Surface with
TWIST-LOCK
®
FASTENERS
GGG
LLL
Dowel end
Large hole should be located here.
Surface with
TWIST-LOCK®
FASTENERS
417714www.sauder.com/services
Page 19
How to use the SAUDER TWIST-LOCK
®
FASTENER
1. Insert the dowel end of the FASTENER into the hole of
the adjoining part.
NOTE: The dowel end of the FASTENER must remain
fully inserted in the hole of the adjoining part while
locking the FASTENER.
2. Tighten the FASTENER with a Phillips screwdriver as
tight as possible.

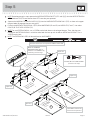
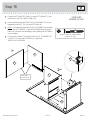
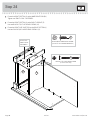
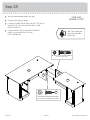
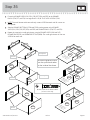
Step Step 14
417714 www.sauder.com/servicesPage 20
å
Insert two METAL PINS (1R) into the holes in the TOP (H2).
å
Fasten the INNER LEFT END (D2) to the LEFT TOP (H2).
Tighten two TWIST-LOCK® FASTENERS.
å
NOTE: Be sure the METAL PINS insert into the holes in
the INNER LEFT END (D2).
å
Fasten the INNER LEFT END (D2) to the SPACER (LLL).
Use two BLACK 1-7/8" FLAT HEAD SCREWS (2S).
å
Fasten the LEFT BACK (O) to the INNER LEFT END (D2).
Tighten two TWIST-LOCK® FASTENERS.
LLL
D2
O
H2
Surface with
TWIST-LOCK
®
FASTENERS
Surface with
TWIST-LOCK
®
FASTENERS
Now might be a
good time to refresh
your drink.
1R
BLACK 1-7/8" FLAT HEAD SCREW
(2 used in this step)
2S
La page est en cours de chargement...
La page est en cours de chargement...
La page est en cours de chargement...
La page est en cours de chargement...
La page est en cours de chargement...
La page est en cours de chargement...
La page est en cours de chargement...
La page est en cours de chargement...
La page est en cours de chargement...
La page est en cours de chargement...
La page est en cours de chargement...
La page est en cours de chargement...
La page est en cours de chargement...
La page est en cours de chargement...
La page est en cours de chargement...
La page est en cours de chargement...
La page est en cours de chargement...
La page est en cours de chargement...
La page est en cours de chargement...
La page est en cours de chargement...
La page est en cours de chargement...
La page est en cours de chargement...
La page est en cours de chargement...
La page est en cours de chargement...
La page est en cours de chargement...
La page est en cours de chargement...
La page est en cours de chargement...
La page est en cours de chargement...
La page est en cours de chargement...
La page est en cours de chargement...
La page est en cours de chargement...
La page est en cours de chargement...
La page est en cours de chargement...
La page est en cours de chargement...
La page est en cours de chargement...
La page est en cours de chargement...
La page est en cours de chargement...
La page est en cours de chargement...
La page est en cours de chargement...
La page est en cours de chargement...
La page est en cours de chargement...
La page est en cours de chargement...
La page est en cours de chargement...
La page est en cours de chargement...
-
 1
1
-
 2
2
-
 3
3
-
 4
4
-
 5
5
-
 6
6
-
 7
7
-
 8
8
-
 9
9
-
 10
10
-
 11
11
-
 12
12
-
 13
13
-
 14
14
-
 15
15
-
 16
16
-
 17
17
-
 18
18
-
 19
19
-
 20
20
-
 21
21
-
 22
22
-
 23
23
-
 24
24
-
 25
25
-
 26
26
-
 27
27
-
 28
28
-
 29
29
-
 30
30
-
 31
31
-
 32
32
-
 33
33
-
 34
34
-
 35
35
-
 36
36
-
 37
37
-
 38
38
-
 39
39
-
 40
40
-
 41
41
-
 42
42
-
 43
43
-
 44
44
-
 45
45
-
 46
46
-
 47
47
-
 48
48
-
 49
49
-
 50
50
-
 51
51
-
 52
52
-
 53
53
-
 54
54
-
 55
55
-
 56
56
-
 57
57
-
 58
58
-
 59
59
-
 60
60
-
 61
61
-
 62
62
-
 63
63
-
 64
64


dans d''autres langues
- English: Sauder 417714 User manual
- español: Sauder 417714 Manual de usuario
Documents connexes
-
Sauder HomePlus Collection 411967 Mode d'emploi
-
-
-
-
-
-
-
-
-