
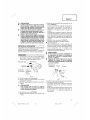
HITACHI
Designedforoperatingin USA&Canadaonly.
WhenthisproductisusedinareasotherthantheUSA&Canada,
wecannotguaranteetheproductqualityandperformance.
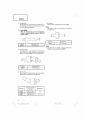
Model
Modele
Modelo
WH 18DSDL
WR 18DSDL
CordlessImpact Driver
Marteau a choc sans fil
Atornillador de impacto a bateria
CordlessImpact Wrench
Clea chocsansfil
Llavede impacto a bateria
WH18DSDL WR18DSDL
SAFETYINSTRUCTIONSAND INSTRUCTIONMANUAL
,4',, WARNING
IMPROPER OR UNSAFE use of this power tool can result in death or serious bodily
injury!
This manual contains important information about product safety. Please read and
understand this manual BEFORE operating the power tool. Please keep this manual
available for other users and owners before they use the power tool. This manual should
be stored in safe place.
INSTRUCTIONSDESECURITEETMODE D'EMPL01
/_ AVERTISSEMENT
Une utilisation INCORRECTE OU DANGEREUSE de cet outil motoris6 peut entrafner la
mort ou de s@ieuses blessures corporelles!
Ce mode d'emploi contient d'importantes informations apropos de la s6curit6 de ce
produit. Priere de lire et de comprendre ce mode d'emploi AVANT d'utiliser I'outil
motoris& Garder ce mode d'emploi a la disponibilite des autres utilisateurs et proprietaires
avant qu'ils utilisent I'outil motoris& Ce mode d'emploi doit _tre conserve dans un
endroit sQr.
INSTRUCCIONESDESEGURIDADYMANUALDEINSTRUCCIONES
/_, ADVERTENCIA
iLa utilizaci6n INAPROPIADA O PELIGROSA de esta herramienta electrica puede
resultar en lesiones de gravedad o la muerte!
Este manual contiene informaci6n importante sobre la seguridad del producto. Lea y
comprenda este manual ANTES de utilizar la herramienta electrica. Guarde este manual
para que puedan leerlo otras personas antes de utilizar la herramienta electrica. Este
manual debe ser guardado en un lugar seguro.
Hitachi Koki
01Eng WH18DSDL US.p65 1 10/2/12, 3:18 PM

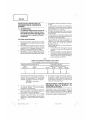
English I CONTENTS
Page Page
IMPORTANT SAFETY INSTRUCTIONS ............. 3 NAME OF PARTS ................................................ 9
MEANINGS OF SIGNAL WORDS ...................... 3 SPECIFICATIONS .............................................. 10
SAFETY .................................................................... 3
GENERAL POWER TOOL SAFETY
WARNINGS .................................................. 3
SPECIFIC SAFETY RULES AND SYMBOLS ....... 5
IMPORTANT SAFETY INSTRUCTIONS FOR USE OF
THE CORDLESS IMPACT DRIVER/WRENCH ........ 6
IMPORTANT SAFETY INSTRUCTIONS
FOR BATTERY CHARGER ........................... 6
IMPORTANT SAFETY INSTRUCTIONS
FOR USE OF THE BATTERY AND
BATTERY CHARGER .................................... 7
CAUTION ON LITHIUM-ION BATTERY ............. 7
FUNCTIONAL DESCRIPTION .................................. 9
ASSEMBLY AND OPERATION ............................. 11
APPLICATIONS ................................................. 11
REMOVAL AND INSTALLATION METHOD
OF BATTERY ........................................... 11
CHARGING METHOD ....................................... 11
BEFORE USE ..................................................... 13
OPERATION ....................................................... 13
OPERATIONAL CAUTIONS .............................. 15
MAINTENANCE AND INSPECTION ..................... 17
ACCESSORIES ....................................................... 19
STANDARD ACCESSORIES ............................... 19
OPTIONAL ACCESSORIES ................................ 19
PARTS LIST ............................................................ 65
FranqaisI TABLE DES MATIERES
Page Page
CONSIGNES DE St_CURITE IMPORTANTES .......... 23 NOM DES PARTIES ............................................ 30
SIGNIFICATION DES MOTS D'AVERTISSEMENT .... 23 SPECIFICATIONS ................................................ 31
SECURITE ................................................................ 23
AVERTISSEMENTS DE St_CURITE Gt_NERAUX
CONCERNANT LES OUTILS ELECTRIQUES... 23
REGLESDE SECURITESPECIFIQUESET SYMBOLES..., 25
CONSlGNES DE SI_CURITI_ IMPORTANTES
POUR L'UTILISATION DU MARTEAU/CL¢ A
CHOCS SANS FIL ......................................... 26
CONSIGNES DE SI_CURITI_ IMPORTANTES
POUR LE CHARGEUR DE BATTERIE .......... 26
CONSIGNES DE SI_CURITI_ IMPORTANTES
POUR L'UTILISATION DE LA BATTERIE
ET DU CHARGEUR DE BATTERIE .............. 27
PRI_CAUTIONS RELATIVES A LA BATTERIE
AU LITHIUM ION ......................................... 28
DESCRIPTION FONCTIONNELLE ........................... 30
ASSEMBLAGE ET FONCTIONNEMENT ................ 32
UTILISATIONS .................................................... 32
METHODE DE RETRAIT ET D'INSTALLATION
DE LA BATTERIE .......................................... 32
MC:THODE DE RECHARGE ................................. 32
AVANT L'UTILISATION ...................................... 34
UTILISATION ....................................................... 34
PRO:CAUTIONS D'UTILISATION ........................ 37
ENTRETIEN ET INSPECTION .................................. 38
ACCESSOIRES ......................................................... 40
ACCESSOIRES STANDARD ............................... 40
ACCESSOIRES EN OPTION ................................ 40
LISTE DES PIECES ................................................. 65
Espar_ol I INDICE
Pagina Pagina
INSTRUCCIONESIMPORTANTESSOBRESEGURIDAD.. 44 NOMENCLATURA ............................................... 51
SIGNIFICADODE LASPALABRAS DESENALIZACION ,,.44 ESPECIFICACIONES ............................................ 52
SEGURIDAD ............................................................. 44
ADVERTENCIAS DE SEGURIDAD GENERAL DE
LA HERRAMIENTA EL¢CTRICA .................. 44
NORMAS Y SIMBOLOS ESPECIFICOS DE
SEGURIDAD ................................................. 46
INSTRUCCIONES IMPORTANTES DE
SEGURIDAD PARA USAR EL TALADRO/
LLAVE DE IMPACTO DE BATERIA .............. 47
INSTRUCCIONES IMPORTANTES DE SEGURIDAD
PARA EL CARGADOR DE BATERIAS ............ 48
INSTRUCCIONES IMPORTANTES DE SEGURIDAD PARA
LA BATERiA Y EL CARGADOR DEBATERiAS ......48
ADVERTENCIA DE LA BATERiA DE LITIO...................... 49
DESCRIPCION FUNClONAL .................................... 51
MONTAJE Y OPERACION ...................................... 53
APLICACIONES .............. , ............................ ,........ 53
MCTODO DE EXTRACCION E INSTALACION
DE LA BATERIA ............................................ 53
MC:TODO DE CARGA ...... _................................... 53
ANTES DE LA UTILIZACION .............................. 55
OPERACION ........................................................ 55
PRECAUCIONES OPERACIONALES .................. 58
MANTENIMIENTO E INSPECCION ........................ 59
ACCESORIOS ........................................................... 61
ACCESORIOS ESTANDAR ................................. 61
ACCESORIOS OPCIONALES .............................. 61
LISTA DE PIEZAS .................................................. 65
01Eng WH18DSDL US.p65 2 10/2/12, 2:38 PM

English
IMPORTANT SAFETY INSTRUCTIONS
Readand understandall ofthe safetyprecautions,warnings andoperatinginstructionsin the InstructionManual
beforeoperatingor maintainingthis powertool.
Mostaccidentsthat resultfrom powertool operation andmaintenancearecausedbythefailureto observebasic
safetyrulesor precautions.An accidentcanoften be avoided byrecognizinga potentially hazardoussituation
beforeit occurs,and by observingappropriatesafetyprocedures.
Basicsafetyprecautionsareoutlined inthe "SAFETY"sectionofthisInstructionManualand inthe sectionswhich
containthe operationand maintenanceinstructions.
Hazardsthat must beavoidedto preventbodily injury or machinedamageareidentified byWARNINGSonthe
powertool and inthis Instruction Manual.
NEVERusethispower tool in amannerthat hasnot beenspecificallyrecommendedbyHITACHI.
MEANINGS OF SIGNAL WORDS
WARNINGindicatesa potentially hazardoussituationswhich, if ignored,could resultindeathor seriousinjury.
CAUTIONindicatesapotentially hazardoussituationswhich, if not avoided, may result in minor or moderate
injury,or maycausemachinedamage.
NOTEemphasizesessentialinformation.
m_
I
I
GENERAL POWER TOOL SAFETY WARNINGS
/k
1)
2)
WARNING:
Readallsafetywarnings andallinstructions.
Failuretofollow the warnings and instructionsmay resultin electric shock,fire and/orseriousinjury.
Saveallwarnings andinstructionsfor futurereference.
Theterm "power tool" inthe warningsreferstoyour mains-operated(corded)powertoolor battery-operated
(cordless)powertool.
Work areasafety
a} Keepworkareacleanandwell lit.
Clutteredor darkareasinviteaccidents.
b) Do not operate power tools in explosive
atmospheres,suchas in the presenceof
flammable liquids,gasesordust.
Powertools createsparkswhich may ignite
the dust or fumes.
c} Keepchildrenand bystandersaway while
operatingapowertool.
Distractionscancauseyou to losecontrol.
Electricalsafety
a} Powertoolplugsmustmatchtheoutlet.
Nevermodifytheplugin anyway.
Donot useanyadapterplugswith earthed
(grounded)powertools.
Unmodifiedplugs and matchingoutlets will
reduceriskofelectric shock.
b) Avoidbodycontactwithearthedorgrounded
surfacessuchaspipes,radiators,rangesand
refrigerators.
Thereis an increasedrisk of electric shockif
your body isearthedor grounded.
3)
c} Do notexposepowertoolsto rain or wet
conditions.
Waterenteringapowertool will increasethe
riskof electricshock.
d) Donotabusethecord.Neverusethecordfor
carrying,pullingorunpluggingthepowertool.
Keepcordawayfrom heat,oil,sharpedges
ormovingparts.
Damagedorentangledcordsincreasethe risk
of electricshock.
e} Whenoperatinga powertooloutdoors,use
an extensioncordsuitablefor outdooruse.
Useof acordsuitablefor outdoorusereduces
the risk of electricshock.
f} Ifoperatinga powertoolinadamplocation
isunavoidable,usea residualcurrentdevice
(RCD)protectedsupply.
UseofanRCDreducestheriskofelectricshock.
Personalsafety
a} Stayalert,watchwhatyouaredoinganduse
commonsensewhenoperatingapowertool.
Donot useapowertoolwhileyou aretired
or underthe influenceof drugs,alcoholor
medication.
3
01Eng WH18DSDL US.p65 3 10/2/12, 2:38 PM

tirol
I
I
English
4)
A moment of inattention while operating
power tools may result in serious personal
injury.
b) Usepersonalprotectiveequipment.Always
wear eyeprotection.
Protectiveequipmentsuchasdustmask,non-
skid safety shoes, hard hat, or hearing
protection usedfor appropriate conditions
will reducepersonalinjuries.
c} Preventunintentionalstarting.Ensurethe
switchisintheoff-positionbeforeconnecting
topowersourceand/orbatterypack,picking
uporcarryingthetool.
Carryingpowertoolswith yourfinger on the
switch or energising powertools that have
the switch on invites accidents.
d) Removeanyadjustingkeyorwrenchbefore
turningthe powertoolon.
A wrenchor akeyleft attachedto a rotating
partofthe powertool mayresultin personal
injury.
e} Donotoverreach.Keepproperfootingand
balanceat alltimes.
This enablesbetter control ofthe powertool
in unexpectedsituations.
f} Dressproperly.Donot wear looseclothing
or jewellery.Keepyour hair, clothingand
glovesawayfrommovingparts.
Looseclothes,jewellery or long hair can be
caught inmoving parts.
g) Ifdevicesareprovidedfortheconnectionof
dust extraction and collection facilities,
ensurethese are connectedand properly
used.
Useofdustcollectioncanreducedust-related
hazards.
Powertooluseandcare
a) Donot forcethepowertool.Usethe correct
powertoolforyourapplication.
Thecorrectpowertool will do the job better
andsaferatthe rateforwhich it wasdesigned.
b) Donotusethepowertooliftheswitchdoes
notturnitonandoff.
Anypowertoolthatcannotbecontrolledwith
the switchisdangerousandmust berepaired.
c} Disconnectthe plugfromthe powersource
and/orthebatterypackfromthe powertool
beforemakinganyadjustments,changing
accessories,orstoringpowertools.
Suchpreventivesafetymeasuresreducethe
riskofstarting the powertool accidentally.
d) Storeidle powertoolsout of the reachof
childrenanddonot allowpersonsunfamiliar
with thepowertoolortheseinstructionsto
operatethepowertool.
Powertools aredangerous in the handsof
untrainedusers.
e) Maintain power tools. Check for
misalignmentor bindingof moving parts,
breakageof partsand any othercondition
thatmayaffectthepowertool'soperation.
If damaged,have the powertool repaired
beforeuse.
Many accidents are caused by poorly
maintained powertools.
f} Keepcuttingtoolssharpandclean.
Properlymaintainedcuttingtoolswith sharp
cutting edgesareless likelyto bind and are
easierto control.
g) Usethe powertool,accessoriesandtoolbits
etc. in accordancewith theseinstructions,
takingintoaccounttheworkingconditions
andtheworkto beperformed.
Useofthepowertool for operationsdifferent
from those intended could result in a
hazardoussituation.
5} Batterytooluseandcare
a) Rechargeonlywiththe chargerspecifiedby
themanufacturer.
A charger that is suitable for one type of
battery pack may create a risk of fire when
usedwith another batterypack.
b) Use power tools only with specifically
designatedbatterypacks.
Useof any otherbatterypacksmaycreatea
riskof injury andfire.
c} Whenbatterypackisnotinuse,keepitaway
from other metal objectslike paperclips,
coins,keys, nails,screws,or other small
metal objects,that canmake aconnection
fromoneterminalto another.
Shortingthe batteryterminals together may
causeburnsor afire.
d) Under abusiveconditions,liquidmay be
ejectedfrom the battery;avoidcontact.If
contactaccidentallyoccurs,flushwithwater.
If liquid contactseyes, additionallyseek
medicalhelp.Liquid ejectedfrom thebattery
may causeirritation or burns.
6} Service
a) Haveyourpowertoolservicedbya qualified
repair person using only identical
replacementparts.
This will ensurethat the safetyof the power
tool ismaintained.
-WARNING-
To reduce the risk of injury, user must read
instructionmanual,
01Eng WH18DSDL US.p65 4 10/2/12, 2:38 PM

WARNING:
Some dust created by power sanding, sawing,
grinding, drilling, and other constructionactivities
containschemicalsknowntothe StateofCalifornia
to causecancer,birth defectsor otherreproductive
harm.Someexamplesofthesechemicalsare:
• Leadfrom lead-basedpaints,
• Crystallinesilicafrom bricksandcementandother
masonryproducts,and
• Arsenic and chromium from chemically-treated
lumber.
Your risk from theseexposuresvaries,depending
on how often you do this type of work. Toreduce
your exposureto thesechemicals:work in a well
ventilated area, and work with approved safety
equipment, such as those dust masks that are
speciallydesignedtofilter out microscopicparticles.
SPECIFIC SAFETY RULES AND SYMBOLS
1. Holdpowertoolsby insulatedgrippingsurfaces,
whenperforminganoperationwherethefastener
maycontacthiddenwiring.
Fastenerscontacting a "live" wire may make
exposedmetalpartsof the powertool "live" and
couldgive theoperator anelectric shock.
2. ALWAYSwearearprotectorswhenusingthetool
for extendedperiods.
Q Prolongedexposure to high intensity
noisecan causehearing loss.
3. NEVERplace handsor other body parts nearthe
drillbitorchuckduring operation.Holdthe impact
driver/wrenchby itshandleonly.
4. Because the cordless impact driver/wrench
operatesbybatterypower,beawareofthefactthat
it canbeginto operateatany time.
5. WhenworkingatelevatedIocations,clearthe area
of all other people and be aware of conditions
belowyou.
6. NEVERtouch moving parts.
NEVERplace your hands,fingers or other body
partsnearthe tool's moving parts.
7. NEVERoperatewithout all guardsin place.
NEVERoperate this tool without all guards or
safetyfeatures in place and in proper working
order. If maintenance or servicing requires the
removalof a guard or safetyfeature, be sureto
replacetheguardor safetyfeaturebeforeresuming
operationof the tool.
English
8. Use righttool.
Don'tforce smalltool or attachmentto do thejob
of aheavy-dutytool.
Don't use tool for purpose not intended -for
example- don't usecircular sawfor cutting tree
limbs or logs.
9. NEVERuse a power tool for applications other
thanthose specified.
NEVERuseapowertool forapplicationsotherthan
thosespecifiedin the InstructionManual.
10. Handletool correctly.
Operate the tool according to the instructions
provided herein.Do not drop or throw the tool.
NEVERallow thetool to beoperatedbychildren,
individuals unfamiliar with its operation or
unauthorizedpersonnel.
11. Keepall screws,bolts andcoverstightly in place.
Keepallscrews,bolts,andplatestightly mounted.
Checktheir condition periodically.
12. Do not use power tools if the plastichousing or
handleis cracked.
Cracksin thetool's housingor handlecan leadto
electricshock.Suchtools shouldnotbe useduntil
repaired.
13. Bladesandaccessoriesmust besecurelymounted
to the tool.
Prevent potential injuries to yourself or others.
Blades,cutting implementsandaccessorieswhich
havebeenmounted to the tool should besecure
andtight.
14. NEVERusea tool which isdefectiveor operating
abnormally.
If the tool appears to be operating unusually,
making strange noises, or otherwise appears
defective,stop using it immediately andarrange
for repairsbyaHitachiauthorized servicecenter.
15. Carefullyhandlepower tools.
Should apowertool bedroppedor struckagainst
hard materialsinadvertently,it maybedeformed,
cracked,or damaged.
16. Do notwipe plastic partswith solvent.
Solventssuchasgasoline,thinnerbenzine,carbon
tetrachloride,and alcohol may damageandcrack
plasticparts.Donotwipethemwith suchsolvents.
Wipe plastic parts with a soft cloth lightly
dampenedwith soapywateranddrythoroughly.
17. ALWAYS wear eye protection that meets the
requirement of the latest revision of
ANSIStandardZ87.1.
18.
Definitionsfor symbols usedonthis tool
V...............volts
-. ..............directcurrent
no ............no load speed
---/rain......revolutionsor reciprocationperminute
iml-i
I
I
01Eng WH18DSDL US.p65 5 10/2/12, 2:38 PM

r-I--I
/
I
English
IMPORTANT SAFETY INSTRUCTIONS FOR USE
OFTHE CORDLESSIMPACT DRIVER/WRENCH
/_ WARNING:
Deathor seriousbodilyinjurycouldresultfrom
improperor unsafeuseof the cordlessimpact
driver/wrench,Toavoidtheserisks,follow these
basicsafetyinstructions:
IMPORTANT SAFETY INSTRUCTIONS FOR
BATTERY CHARGER
/_ WARNING:
Deathor seriousbodilyinjurycouldresultfrom
improperor unsafeuseof batterychargers,To
avoid these risks, follow these basic safety
instructions:
1. Neverusethisimpactdriver/wrenchhandlefor any
applicationother thanthoseinthis manual.
2. Never place handsor other body parts near the 1.
drill bitor chuckduring operation.
Holdthe impactdriver/wrench byits handleonly.
3. When working in high places,alwaysmakesure 2.
thatther isno one below beforestarting to work.
4. Always wear eye and ear protection when you
work. 3.
5. Always installthe driverbitsecurely.Aloosebit is
dangerousbecauseit can comeloose while you
areworking. (WH18DSDL)
6. Always usethe driver bit that matchesthe screw 4.
size.(WH18DSDL) 5.
7. Always havethe screwyou are screwingin and
this impact driver in astraight line.Workingwith
this impact driver at an angle to the screw can 6.
damage the screw head and will not give the
prescribedtightening torque. (WH18DSDL) 7.
8. Confirm whether the socket has any crack in it.
(WR18DSDL)
9. Attach the hex. socketsecurelyonto the anvil. If 8.
the hex.socketisinsufficientlysecured,itmaydrop
out and cause an accident. For hex. socket
attachmentrefer to "OPERATION".(WR18DSDL)
10. Confirmthetightening torquebyatorquewrench
before use in order to ascertain the correct
tightening torque to beused.(WR18DSDL)
11. Ifa universaljoint is used,be surenotto operate
the unit in a no-load condition. Operating inthis
condition is dangerous.Whenthe socketsection
spins around it may cause injury to hands or
bodies, or the resulting intense vibration may
causethe userto dropthe tool. (WR18DSDL)
12. Becareful that foreign mattersdo not blockthe
holeslocatedon bothsidesof the handle.Alsodo
not closethe holeswith atape.The holesactan
important role.(WR18DSDL)
Table1
READALL INSTRUCTIONS
This manual contains important safety and
operating instructionsfor batterycharger Model
UC18YRSL.
Beforeusingbattery charger,readall instructions
and cautionary markingson (1) batterycharger,
(2)battery,and (3)productusing battery.
To reduce risk of injury, charge HITACHI
rechargeablebatterytype BSL18series.Othertype
of batteriesmayburstcausingpersonalinjury and
damage.
Do not exposebatterychargerto rain or snow.
Use of an attachment not recommendedor sold
bythe batterychargermanufacturermay resultin
ariskof fire,electricshock,or injury to persons.
Toreduceriskof damageto electricplugandcord,
pull by plugwhen disconnectingbatterycharger.
Make sure cord is located so that it will not be
steppedon, tripped over,or otherwise subjected
to damageor stress.
An extension cord should not be used unless
absolutely necessary.Useof improperextension
cordcouldresultinariskoffire andelectricshock.
If extensioncordmustbe usedmakesure:
a. That bladesof extension cord arethe same
number,size,andshapeasthoseof plug on
batterycharger:
b. Thatextension cordisproperly wired and in
good electricalcondition; and
c. Thatwiresizeislargeenoughfor ACampere
rating of battery charger as specified in
Table1.
RECOMMENDEDMINIMUMAWGSIZEFOR
EXTENSIONCORDSFORBATTERYCHARGERS
AC InputRatingAmperes* AWG Sizeof Cord
Equalto or but less Lengthof Cord,Feet(Meter)
greaterthan than 25(7.5) 50(15) 100(30) 150(45)
0 2 18 18 18 16
2 3 18 18 16 14
3 4 18 18 16 14
01Eng WH18DSDL US.p65 6 10/2/12, 2:38 PM

Ifthe input ratingof abatterychargerisgiven in
watts ratherthan in amperes,the corresponding
ampereratingisto bedetermined bydividing the
wattage rating bythevoltage rating-for example:
1,250watts = 10amperes
125volts
9. Donotoperatebatterychargerwith damagedcord
or plug-replacethem immediately.
10. Donot operatebattery chargerif it hasreceiveda
sharpblow,beendropped,or otherwisedamaged
in anyway;take itto a qualifiedserviceman.
11. Do not disassemble batterycharger;take it to a
qualified serviceman when service or repair is
required.Incorrectreassemblymayresultina risk
ofelectric shockor fire.
12. To reduce riskof electric shock,unplug charger
from receptacle before attempting any
maintenanceor cleaning. Removing the battery
will not reducethis risk.
IMPORTANT SAFETY INSTRUCTIONS FOR
USE OF THE BATTERY AND BATTERY
CHARGER
You must charge the battery before you can use the
power tool. Before using the model
UC18YRSL battery charger, be sure to read all
instructions and cautionary statements on it, the battery
and in this manual.
/k CAUTION:
USEONLYHITACHIBATTERYTYPEBSL18
SERIES.OTHERTYPESOFBATTERIESMAY
BURSTANDCAUSEINJURY!
Followtheseinstructionsto avoidthe riskof injury:
Ak WARNING:
Improperuseofthebatteryorbatterychargercan
leadtoseriousinjury.Toavoidtheseinjuries:
1. NEVERdisassemblethe battery.
2. NEVERincinerate the battery, even if it is
damagedor is completely worn out.The battery
canexplode inafire.
3. NEVERshort-circuitthe battery.
4. NEVERinsert any objects into the battery
charger'sair vents.Electric shockor damageto
the batterycharger may result.
5. NEVERcharge outdoors.Keepthe battery away
from directsunlight and useonly where there is
low humidity andgood ventilation.
6. NEVERcharge when the temperature is below
32°F(0°C)or above104°F(40°C).
Chargingthe battery attemperatures outsidethe
rangeof 32°F- 104°F(0°C- 40°C)may prevent
properchargingand reducebattery life.
English
7. NEVERconnecttwo batterychargerstogether.
8. NEVERinsertforeign objectsintothe holefor the
batteryor the batterycharger.
9. NEVERuseaboostertransformerwhencharging.
10. NEVERusean enginegenerator or DCpowerto
charge.
11. NEVERstore the battery or battery charger in
placeswherethetemperaturemayreachor exceed
104°F(40°C).
12. ALWAYSoperate charger on standard household
electricalpower (120volts).Using thecharger on
any othervoltage may overheatand damagethe
charger.
13. ALWAYSwaitatleast15minutesbetweencharges
to avoid overheatingthe charger.
14. ALWAYSdisconnectthe power cord from its
receptaclewhen thecharger isnot in use.
CAUTION ON LITHIUM-ION BATTERY
To extendthe lifetime, the lithium-ion battery equips
with the protectionfunction to stop theoutput.
Inthe casesof 1to 3describedbelow,when usingthis
product, evenif you arepulling the switch,the motor
may stop. This is not the trouble but the result of
protection function.
1. Whenthe batterypower remaining runsout,the
motor stops.
In suchcase,chargeit upimmediately.
2. If the tool is overloaded,the motor may stop. In
this case,releasethe switchof tool andeliminate
causesof overloading. After that, you canuse it
again.
3. Ifthe batteryis overheatedunderoverloadwork,
the battery power maystop.
In this case,stop using the battery and let the
batterycool.After that,you can useit again.
Furthermore, pleaseheedthe following warning and
caution.
Ak WARNING
Inorderto preventanybatteryleakage,heatgeneration,
smoke emission, explosion and ignition beforehand,
pleasebe sureto heedthe following precautions.
1. Makesurethat swarf anddust do not collect on
the battery.
© Duringwork makesurethat swarfand dustdo not
fall onthe battery.
© Makesurethat any swarfanddust falling on the
power tool during work do not collect on the
battery.
0 Do not store an unused battery in a location
exposedto swarf and dust.
0 Before storing a battery, remove any swarf and
dust that may adhere to it and do not store it
togetherwith metalparts(screws,nails,etc.).
iml-i
/
I
01Eng WH18DSDL US.p65 7 10/2/12, 2:38 PM

r-I--I
I
I
English
2. Donot piercebatterywith asharpobjectsuchasa
nail, strike with a hammer, step on, throw or
subjectthe batteryto severephysicalshock.
3. Do not use an apparently damagedor deformed
battery.
4. Do not usethe battery in reversepolarity.
5. Do not connectdirectlyto anelectricaloutlets or
carcigarettelighter sockets.
6. Do not usethe batteryfor a purpose otherthan
thosespecified.
7. Ifthe batterychargingfailsto completeevenwhen
a specified recharging time has elapsed,
immediatelystop furtherrecharging.
8. Do not put or subject the battery to high
temperatures or high pressure such as into a
microwaveoven,dryer,orhighpressurecontainer.
9. Keepawayfrom fire immediately when leakage
orfoul odor aredetected.
10. Do not use in a location where strong static
electricitygenerates.
11. If there is battery leakage, foul odor, heat
generated,discoloredor deformed,or in anyway
appears abnormal during use, recharging or
storage, immediately remove it from the
equipmentor batterycharger,andstopuse.
,4k CAUTION
1. If liquid leakingfrom the battery gets into your
eyes, do not rub your eyesand wash them well
with fresh clean water such as tap water and
contactadoctorimmediately.
If left untreated, the liquid may cause eye-
problems.
2. If liquid leaksonto yourskinor clothes,washwell
with cleanwatersuchas tapwater immediately.
There is a possibility that this can causeskin
irritation.
3. If you find rust,foul odor, overheating,discolor,
deformation,and/orotherirregularitieswhenusing
the batteryfor the firsttime, do not useandreturn
it to your supplier or vendor.
/k WARNING
If an electrically conductive foreign object enters the
terminalsofthe lithium ion battery,ashort-circuitmay
occur resulting in the riskof fire. Pleaseobservethe
following matterswhen storing the battery.
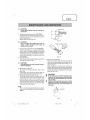
O Donot placeelectricallyconductivecuttings,nails,
steelwire, copperwire or otherwire inthe storage
case.
O Eitherinstallthe battery inthe powertool orstore
by securelypressing into the battery coveruntil
the ventilation holes are concealedto prevent
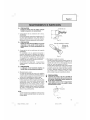
short-circuits(SeeFig.1).
SAVETHESEINSTRUCTIONS
AND
MAKETHEMAVAILABLETOOTHERUSERS
AND
OWNERSOFTHISTOOL!
01Eng WH18DSDL US.p65 8 10/2/12, 2:38 PM

iml-i
/
English I
NOTE:
The information contained in this Instruction Manual is designedto assist you in the safe operation and
maintenanceof the powertool.
NEVERoperate,or attemptany maintenanceonthe tool unlessyou havefirst readand understoodall safety
instructionscontainedin this manual.
Someillustrations in this Instruction Manualmay showdetailsor attachmentsthat differ from thoseon your
own powertool.
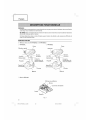
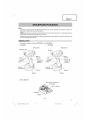
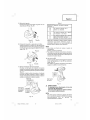
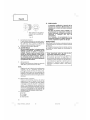
NAME OFPARTS
1. CordlessImpactDriver (WH18DSDL)/Wrench(WR18DSDL)
0 WH18DSDL 0 WR18DSDL
Housing
Guide sleeve Anvil
Housing
Push button
Light Light
Switch trigger Rotation Switch trigger
change lever
Handle Handle
Switch _<_
Switchpanel Hook panel _
Battery
Push button
Rotation
change lever
Hook
Battery
© Battery(BSL1830)
Ventilation holes
Terminals
Battery cover
Latc
Battery
Fig.1
01Eng WH18DSDL US.p65 9 10/4/12, 8:28 AM

rl--I
I
I
English
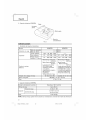
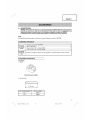
2. BatteryCharger(UC18YRSL)
Pilot lamp
Cord
rail
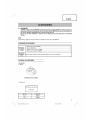
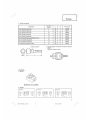
SPECIFICATIONS
1. CordlessImpactDriver/Wrench
Fig.2
Nameplate
Model
No-loadspeed
Capacity
Tighteningtorque
(Maximum)
Powermode
Savemode
Smallscrew
Ordinarybolt
Hightension bolt
WH18DSDL
0- 2,600/min
0- 2,000/min
5/32"- 3/8"(M4- M10)
1/4"- 9/16"(M6- M14)
1/4"- 15/32"(M6- M12)
Powermode1,510in-lbs.
{170N.m}
Savemode840in-lbs.
{95N.m}
Tightening is9/16"(M14)high
tension bolt, when fully charged
at68°F(20°C)temp.
Tighteningtime: 3sec.
WR18DSDL
3/8"- 23/32"(M10- M18)
5/16"- 9/16"(M8- M14)
Powermode 188ft.lbs.
{255N.m}
Savemode 103ft.lbs.
{140N.m}
Tighteningis 5/8"(M16)F10T,
when fully chargedat 68°F
(20°C)temp.
Tighteningtime:5sec.
Bitshanksize 1/4"(6.35mm) Hex. 1/2"(12.7mm) square
Rechargeablebattery BSL1830:Li-ion18V (3.0Ah)
Weight 3.7Ibs.(1.7kg)
2. BatteryCharger(UC18YRSL)
Inputpower source Single phase:AC 120V60 Hz
Chargingtime Approx.45 min.
Chargingvoltage DC14.4V- 18V
Charger DC14.4V:DC3.5A
Chargingcurrent DC18V:DC3.5A
Weight 1.3Ibs.(0.6kg)
NOTE:Thechargingtime mayvary accordingto temperature and powersourcevoltage.
lO
01Eng WH18DSDL US.p65 10 11/19/12, 1:19 PM

English
m_
I
I
APPLICATIONS
<WH18DSDL>
Driving and removing of machine screws, wood
screws,tapping screws,etc.
<WR18DSDL>
Tighteningand loosening of all typesof bolts and
nuts,usedfor securingstructural items
REMOVAL AND INSTALLATION METHOD
OF BATTERY
1. Battery removal
Hold the handle tightly and push the battery latch to
remove the battery (see Fig. 3).
/_ CAUTION
Nevershort-circuitthebattery.
2. Batteryinstallation
Insertthe batterywhile observingits polarities(see
Fig.3).
Pull out
l_ Handle
Insert ))-_-'-q'N_
,'" _ Latch
"" Push
Battery
Fig.3
CHARGING METHOD
NOTE:
Beforeplugging into the receptacle,makesurethe
following points.
O The power source voltage is stated on the
nameplate.
© The cord is not damaged.
/k
WARNING:
Donotchargeatvoltagehigherthanindicatedon
the nameplate.
Ifchargedatvoltagehigherthanindicatedonthe
nameplate,thechargerwill burnout.
1. Connectthe charger's power cordto a receptacle.
When the power cord is connected,the charger's
pilot lamp will blink in red.(At 1-secondintervals)
Do not use the electrical cord if
damaged. Have it repaired
immediately.
2. Insertthe batteryintothe charger.
Firmly insertthe battery into the charger until the
lineisvisible, asshown in Fig.4,5.
Battery
Pilot ,amp ___
Charger
Fig.4
Line
Fig.5
3. Charging
Whenthe batteryisconnectedtothebatterycharger,
chargingwill commenceandthepilot lampwill light
in red.(SeeTable2)
NOTE:
Ifthe pilot lampflikersin red,pull outthe plugfrom
the receptacleand checkif the battery is properly
mounted.
Whenthe batteryisfully charged,thepilot lampwill
blinkin redslowly.(At 1-secondintervals)(SeeTable
2)
11
O1Eng WH18DSDL US.p65 11 10/2/12, 2:38 PM

rm
I
I
English
(1)Pilot lampindication
Theindicationsofthe pilot lampwill beasshown in
Table2,accordingtothe conditionof thechargeror
the rechargeablebattery.
Table2
Before
charging
The While
pilot charging
lamp
lights or Charging
blinks in complete
red.
Charging
impossible
The
pilot lamp Overheat
lights in standby
green.
Blinks
Lights
Blinks
Flickers
Lights
Indications of the pilot lamp
Lights for 0.5 seconds. Does not light for 0.5
seconds. (off for 0.5 seconds)
Lights continuously
Lights for 0.5 seconds. Does not light for 0.5
seconds. (off for 0.5 seconds)
Lights for 0.1 seconds. Does not light for 0.1
seconds. (off for 0.1 seconds)
mmmmmmmmmmmmm
Lights continuously
Malfunction in the
battery or the charger
Battery overheated.
Unable to charge
(Charging will commence
when battery cools).
(2)Regarding the temperature of the rechargeable
battery.
Thetemperaturesfor rechargeablebatteriesareas
shownintheTable3,and batteriesthat havebecome
hot should be cooled for a while before being
recharged.
Table3 Rechargingrangesof batteries
Rechargeable
batteries
BSL1830
Temperaturesatwhichthe
batterycanberecharged
32OF-122OF
(OoC- 50oc)
(3)Regardingrechargingtime
Table4 Chargingtime (At 68°F(20°C))
Charger
UC18YRSL
Battery _--_._
BSL1830 Approx. 45min.
NOTE:
The charging time may vary according to
temperatureandpowersourcevoltage.
4. Disconnectbatterychargerfrom the receptacle.
/k CAUTION
Donotpulltheplugoutofthereceptaclebypulling
onthecord.
Makesuretograsptheplugwhenremovingfrom
receptacleto avoiddamagingcord.
5. Remove the battery from the battery charger.
Supporting the battery charger with hand, pull out
the battery from the battery charger.
I Howtomakethebatteriesperformlonger I
(1) Recharge the batteries before they become
completely exhausted.
When you feelthat the power of the tool becomes
weaker,stop usingthetool and rechargeits battery.
If you continue to use the tool and exhaust the
electric current, the battery may be damaged and
its lifewill becomeshorter.
(2)Avoid rechargingat high temperatures.
A rechargeablebatterywill behot immediatelyafter
use.Ifsucha batteryisrechargedimmediatelyafter
use,its internalchemicalsubstancewilldeteriorate,
andthe battery life will be shortened. Leavethe
batteryandrechargeit afterit hascooledfor awhile.
/k CAUTION
• When the batterychargerhas beencontinuosly
used,the batterychargerwill be heated,thus
constitutingthe causeofthe failures.Oncethe
charginghasbeencompleted,give15minutesrest
untilthe nextcharging.
• If the batteryisrechragedwhenitiswarmdueto
batteryuseorexposuretosunlight,thepilotlamp
maylightingreen.
Thebatterywill notberecharged.Insucha case,
let thebatterycoolbeforecharging.
12
01Eng WH18DSDL US.p65 12 10/2/12, 2:38 PM

Whenthepilotlampflickersrapidlyin red(at0.2-
secondintervals),checkfor and take out any
foreignobjectsinthecharger'sbatteryinstallation
hole.Iftherearenoforeign objects,it isprobable
thatthebattery orchargerismalfunctioning.Take
itto yourauthorizedServiceCenter.
BEFORE USE
Checktheworkareatomakesurethat it isclearofdebris
andclutter.
Clearthe area of unnecessarypersonnel.Ensurethat
lighting andventilation isadequate.
OPERATION
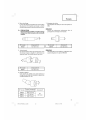
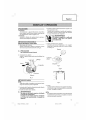
1. Installingthe bit (WH18DSDL)
Always follow the following procedure to install
driver bit. (Fig.6)
Guide sleeve Movement
Driver bit Hexagonal hole "_(
in the anvil "_"_,_J,,/
Fig.6
(1)Pullthe guidesleeveforward.
(2)Insertthe bit into the hexagonalholein the anvil.
(3)Releasethe guidesleeveandit returnsto itsorigianl
position.
Ak CAUTION
Ifthe guidesleevedoesnotreturnto its original
position,thenthebit isnotinstalledproperly.
2. Removingthe bit (WH18DSDL)
Pleasedo the opposite point on the method of
installing bit.
3. Selecting the socket matched to the bolt
(WR18DSDL)
Besureto useasocketwhichis matchedtothe bolt
to betightened. Usingan improper socketwill not
only result in insufficient tightening but also in
damageto the socketor nut.
Aworn or deformedhex.or square-holedsocketwill
not give anadequatetightnessfor fitting to the nut
or anvil,consequentlyresultingin lossoftightening
torque.
Payattention to wear of socket hole,and replace
beforefurther wearhasdeveloped.
4. Installinga socket(WR18DSDL)
Selectthe socketto be used.
• Plungertype (Fig.7)
Align the plunger locatedin the squarepart of the
anvilwiththe holein thehex.socket.Thenpushthe
English
plunger, and mount the hex. socket on the anvil.
Check that the plunger is fully engaged in the hole.
When removing the socket, reverse the sequence.
Ak CAUTION
• Pleaseusethedesignatedattachmentswhich are
listed in the operationsmanual and Hitachi's
catalog. Accidentsor injuriescouldresultfrom
notdoingso.
• Makesuretofirmlyinstallthe socketintheanvil.
Ifthe socketisnotfirmly installedit mightcome
outandcauseinjuries.
Hexagonal socket Groove Anvil
5,
6.
Fig. 7
Confirm that the battery is mounted correctly.
Check the rotational direction
The bit rotates clockwise (viewed from the rear side)
by pushing the R-side of the push button.
The L-side of the push button is pushed to turn the
bit counterclockwise. (See Fig. 8).
(The ,o and _ marks are engraved on the body.)
Push Push
Trigger switch Push button
Fig.8
/k
CAUTION
The pushbuttoncannotbe switchedwhile the
impact driver is turning. To switch the push
button,stopthe impactdriver,thensetthe push
button.
7. Switchoperation
© When the trigger switch is depressed, the tool
rotates.Whenthe trigger isreleased,thetool stops.
© The rotational speedcan be controlled by varying
the amount thatthe trigger switch is pulled.Speed
13
m_
I
I
01Eng WH18DSDL US.p65 13 10/2/12, 2:38 PM

rm
I
I
English
is lowwhen thetriggerswitch is pulledslightly and
increasesasthe trigger switch is pulled more.
© Whenreleasingthe trigger of the switch,the brake
will be appliedfor immediate stopping.
NOTE:
Abuzzingnoiseisproducedwhenthemotorisabout
to rotate;this isonly anoise,not a machinefailure.
If the nut is only loosely fitted to the bolt, the bolt
may turn with the nut, therefore mistaking proper
tightening. In this case, stop impact on the nut and
hold the bolt head with a wrench before restarting
impact, or manually tighten the bolt and nut to
prevent them slipping.
11.Using the hook
The hook is used to hang up the power tool to your
waist belt while working.
Changerotation speed
Asshown in Fig.9,whenthe rotationchangelever ,4k
is slid to the lower side,the powermode (P)is set. •
And when slid to upper side,the savemode (S)is
set.
Pleaseuse the save mode (S)when you want to •
lower Maximum tighteningtorque.
I I _i_ Rotation
Save mode ( change lever
Power mode
Fig.9
CAUTION
In the work of the save mode (S), avoid the
continuous screw-tightening as temperature of
electronic components of the converter switch
increases.
Tighteningandlooseningscrews
Installthe bitthat matchesthe screw,line upthe bit
inthe groovesoftheheadofthe screw,thentighten
it.
Pushthe impactdriver/wrenchjust enoughto keep
the bit fitting the headof the screw.
/k
/k CAUTION
Applyingthe impact driver/wrench fortoo long
tightensthescrewtoo muchandcanbreakit.
Tighteningascrewwiththeimpactdriver/wrench
atanangletothatscrewcandamagethe headof
the screw and the proper force will not be
transmittedto thescrew.
Tightenwith this impactdriver/wrenchlinedup
straightwith thescrew.
10.
Tighteningandloosening bolts
Ahex.socketmatchingthe boltor nut mustfirst be
selected.Then mount the socketon the anvil, and
grip the nut to be tightened with the hex. socket.
Holding the wrench in linewith the bolt, pressthe
powerswitch to impactthe nutfor severalseconds.
14
(1)
CAUTION
Whenusingthe hook,hang upthe power tool
firmlynotto dropaccidentally.
Ifthepowertoolisdropped,itmayleadtoanaccident.
Whencarryingthepowertoolwithhookedtoyour
waist belt,do notfit anybit to the tip of power
tool.If the sharpbit suchasdrillisfitted to the
powertoolwhencarryingitwith hookedto your
waistbelt,youwillbe injured.
Installsecurelythehook.Unlessthehookissecurely
installed,itmaycauseaninjurywhileusing.
Removingthe hook.
Removethe screws fixing the hook with Philips
screwdriver. (Fig.10)
Hook Screw
Fig.10
(2) Replacingthe hookandtightening the screws.
Installsecurelythe hookin thegrooveofpowertool
and tighten the screws to fix the hook firmly.
(Fig.11)
Groove
Hook
Screw
Fig.11
01Eng WH18DSDL US.p65 14 10/2/12, 3:21 PM

12.About RemainingBatteryIndicator
When pressing the remaining battery indicator
switch,the remaining batteryindicatorlamplights
andthe battery remaining power can bechecked.
(Fig.12) When releasing your finger from the
remaining battery indicator switch, the remaining
battery indicator lamp goes off. Thetable 5 shows
the stateof remaining battery indicator lamp and
the battery remaining power.
Switch panel
Remaining
battery Remaining
indicator battery
switch indicator
lamp
State of lamp
Fig.12
Table 5
Battery Remaining Power
The battery remaining power
is enough.
The battery remaining power
is a half.
The battery remaining power
s nearly empty.
:{e-chargethe battery soonest
_ossible.
Asthe remainingbatteryindicatorshowssomewhat
differently dependingon ambienttemperatureand
batterycharacteristics,readit asa reference.
NOTE:
O Do not give a strong shockto the switch panelor
breakit.It may leadto atrouble.
O To save the battery power consumption, the
remaining battery indicator lamp lights while
pressingthe remaining batteryindicator switch.
13.
Howto usethe LEDlight
Everytime you pressthe light switch on the switch
panel,the LEDlight lightsor goesoff. (Fig.13)
Topreventthe batterypowerconsumption,turn off
the LEDlightfrequently.
m_
I
English I
Light switch
Fig.13
/k CAUTION
Do not exposedirectlyyour eye to the light by
lookingintothe light.
If youreye iscontinuouslyexposedto the light,
youreyewillbe hurt.
NOTE:
To preventthe batterypowerconsumptioncaused
byforgetting toturn off the LEDlight,the lightgoes
off automaticallyinabout 15minutes.
OPERATIONAL CAUTIONS
1. Restingthe unit after continuouswork
After usefor continuous bolt-tightening work, rest
the unit for 15 minutes or so when replacingthe
battery. Thetemperatureofthe motor,switch,etc.,
will riseifthework isstartedagainimmediatelyafter
batteryreplacement,eventuallyresultinginburnout.
Ak CAUTION
Donot touchthe metalparts,asit getsvery hot
duringcontinuouswork.
2. Cautionson useof the speedcontrol switch
This switch has a built-in, electronic circuit which
steplesslyvariesthe rotationspeed.Consequently,
when the switchtrigger is pulledonly slightly (low
speed rotation) and the motor is stopped while
continuously driving in screws,the componentsof
the electronic circuit parts may overheat and be
damaged.
3. Usea tighteningtime suitablefor the screw
Theappropriatetorquefor a screwdiffersaccording
tothe materialandsizeofthescrew,andthematerial
beingscrewedetc.,so pleaseuseatightening time
suitable for the screw. In particular, if a long
tighteningtime isusedinthecaseofscrewssmaller
than 5/16"(8 mm), there is a dangerof the screw
breaking,sopleaseconfirm thetightening time and
the tightening torque beforehand.
15
01Eng WH18DSDL US.p65 15 10/2/12, 2:38 PM

rm
I
I
English
4. Work at a tighteningtorque suitable for the bolt
underimpact
The optimum tightening torque for nuts or bolts
differswith materialand sizeof the nutsor bolts.
An excessivelylargetightening torque for a small
bolt may stretchor breakthe bolt. The tightening
torqueincreasesin proportiontotheoperationtime.
Usethe correctoperatingtime for the bolt.
5. Confirmthe tightening torque
Thefollowing factors contribute to a reduction of
the tightening torque. So confirm the actual
tighteningtorqueneededbyscrewingupsomebolts
beforethe job with ahandtorque wrench. Factors
affectingthe tightening torque areas follows.
(1)Voltage
When the discharge margin is reached, voltage
decreasesandtightening torque is lowered.
(2)Operatingtime
Thetighteningtorqueincreaseswhentheoperating
time increases.Butthe tightening torque does not
increaseabove a certain value even if the tool is
drivenfor a longtime.
(3)Diameterof bolt
Thetightening torque differs with the diameter of
the bolt. Generally a largerdiameter bolt requires
largertighteningtorque.
(4)Tightening conditions
Thetighteningtorquediffersaccordingtothe torque
ratio,class,andlengthof boltsevenwhenboltswith
the same size threads are used. The tightening
torquealsodiffersaccordingto the conditionof the
surfaceof workpiecethrough whichthe bolts areto
betightened. Whenthe bolt andnut turn together,
torque isgreatly reduced.
(5)Usingoptional parts(WR18DSDL)
Thetightening torque is reduceda little when an
extensionbar,universaljoint ora longsocketisused.
(6)Clearanceofthe socket(WR18DSDL)
Aworn or deformedhex. orasquare-holedsocket
will not give an adequatetightness to the fitting
betweenthe nut or anvil,consequentlyresulting in
lossof tightening torque.
Usinganimproper socketwhich doesnot matchto
the bolt will result in an insufficient tightening
torque.
(7)Tighteningtorquevaries,dependingon thebattery's
chargelevel.
16
01Eng WH18DSDL US.p65 16 10/2/12, 2:38 PM

English
m_
I
I
Ak CAUTION:
Pullout batterybeforedoingany inspectionor
maintenance.
/k
Checkingthecondition ofthe bit. (WH18DSDL)
The bits should be checkedregularly. If worn or
brokenbitscanslipor decreasetheefficiencyofthe
motor andburn it out.
Replaceworn bits with newones.
CAUTION:
Ifyou usea driverbit ofwhich point isworn or
broken, it will be dangerous since it slips.So
replaceit with anewone.
2. Checkingthe condition ofthe socket(WR18DSDL)
Aworn or deformedhex. orasquare-holedsocket
will not give an adequatetightness to the fitting
betweenthe nut or anvil,consequentlyresulting in
lossof tighteningtorque. Payattentionto wearof a
socket holes periodically, and replace with a new
oneif needed.
3. Checkthe Screws
Loosescrewsaredangerous.Regularlyinspectthem
andmakesurethey aretight.
Ak CAUTION:
Usingthis powertool with loosened screws is
extremelydangerous.
Maintenanceof the motor
The motor unit winding is the very "heart" of the
powertool.
Exercisedue careto ensure the winding doesnot
becomedamagedand/orwet with oil or water.
Inspectingthe carbonbrushes(Fig.14)
The motor employs carbon brushes which are
consumable parts. Since and excessively worn
carbon brush can result in motor trouble, replace
the carbon brush with newones when it becomes
worntoor nearthe"wear limit". Inaddition,always
keepcarbonbrushescleanandensurethattheyslide
freelywithin the brush holders.
NOTE:
When replacingthe carbonbrushwith a newone,
be sureto usethe HitachiCarbon BrushCodeNo.
999054.
Wear limit
I.... iO.l_,l(3mm)I
, = 0.45" I
(11.5mm)
Fig.14
Nail of carbon brush
--_ \ Protrusion
\ , of carbon
brush
Fig.15
Replacingcarbon brushes
Take out the carbon brush byfirst removing the
brush cap and then hooking the protrusion of the
carbon brushwith aflat headscrewdriver, etc.,as
shown in Fig.16.
When installing the carbon brush, choose the
directionso thatthe nailofthecarbonbrushagrees
with thecontactportionoutsidethebrushtube.Then
pushit inwith afinger asillustratedin Fig.17.Lastly,
installthe brushcap.
Ak CAUTION
• Beabsolutelysureto insertthe nailofthe carbon
brushintothecontactportionoutsidethe brush
tube. (Youcaninsertwhicheveroneof the two
nailsprovided.)
• Cautionmustbeexercisedsinceanyerrorinthis
operationcanresultin the deformednailofthe
carbonbrushandmaycausemotortroubleat an
earlystage.
@
Fig.16
17
01Eng WH18DSDL US.p65 17 10/2/12, 2:38 PM

rm
I
I
English
Contact portion
outside brush tube
Fig.17
7. Checkfor Dust
Dust may be removed with a soft cloth or a cloth
dampenedwith soapywater.
Do not usebleach,chlorine, gasolineor thinner,for
they may damagethe plastics.
8. Disposalof the exhaustedbattery
/k WARNING:
Do not disposeof the exhaustedbattery. The
battery must explodeif it is incinerated.The
productthat you have purchasedcontains a
rechargeablebattery.Thebatteryisrecyclable.At
the endofit's usefullife,undervariousstateand
locallaws, it may be illegalto disposeof this
batteryintothe municipalwaste stream.Check
with yourlocalsolidwasteofficialsfor detailsin
yourareaforrecyclingoptionsorproperdisposal.
9. Storage
Storingin aplacebelow 104°F(40°C)andout of the
reachof children.
NOTE:
Makesure that the battery is fully charged when
stored for a long period (3 months or more). The
batterywith smallercapacitymaynot beable to be
chargedwhen used,if storedfor a long period.
10.Serviceand repairs
All quality power tools will eventually require
servicingor replacementof parts becauseof wear
from normal use. To assure that only authorized
replacement parts will be used, all service and
repairs must be performed by a HITACHI
AUTHORIZEDSERVICECENTER,ONLY.
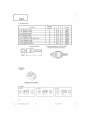
11.Serviceparts list
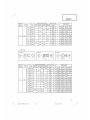
A: ItemNo.
B: CodeNo.
C: No.Used
D: Remarks
ik CAUTION:
Repair,modificationand inspectionof Hitachi
Power Toolsmust becarriedout by an Hitachi
AuthorizedServiceCenter.
ThisPartsListwillbehelpfulifpresentedwiththe
tooltotheHitachiAuthorizedServiceCenterwhen
requestingrepairor othermaintenance.In the
operationand maintenanceofpowertools,the
safety regulationsand standardsprescribedin
eachcountrymustbe observed.
MODIFICATIONS:
HitachiPowerToolsareconstantlybeingimprovedand
modified to incorporate the latest technological
advancements.
Accordingly, some parts (i.e. code numbers and/or
design) may bechangedwithout prior notice.
Importantnoticeonthebatteriesforthe Hitachi
cordlesspowertools
Pleasealwaysuseoneof ourdesignatedgenuine
batteries. We cannot guarantee the safety and
performance of our cordless power tool when
usedwith batteriesother thanthese designated
by us, or when the battery is disassembledand
modified (suchasdisassemblyandreplacement
of cellsor other internal parts).
18
01Eng WH18DSDL US.p65 18 10/2/12, 2:38 PM

English
m_
I
I
A_ WARNING
ALWAYSuseOnlyauthorizedHITACHIreplacementpartsandaccessories.NEVERusereplacementpartsor
accessorieswhicharenot intendedforusewiththistool.ContactHITACHIifyou arenot surewhetherit is
safeto usea particularreplacementpartor accessorywith yourtool.
The useof anyotherattachmentor accessorycan be dangerousand couldcauseinjuryor mechanical
damage.
NOTE:
Accessoriesaresubjectto changewithout anyobligation onthe part ofthe HITACHI.
STANDARD ACCESSORIES
_1_BatteryCharger(UC18YRSL).......................................................................................................1
WH18DSDL _2_Battery BSL1830).........................................................................................................................2
WR18DSDL _3_Batterycover(CodeNo.329897).................................................................................................1
(2LSRK) @ PlasticCase(CodeNo.323230)...................................................................................................1
WH18DSDL
WR18DSDL Battery,battery charger,plasticcaseandbatterycoverarenot contained.
(NN)
OPTIONAL ACCESSORIES
<WH18DSDL>
1. Battery
BSL1830(CodeNo. 330067)
Phillipsbit
Bit No.
No. 2
No. 3
Code No.
992671
992672
19
01Eng WH18DSDL US.p65 19 10/2/12, 2:38 PM

Fm
I
I
English
3. Hexagonalsocket
Part Name
Engraved
characters L B Code No.
7 65 7 992689
8 65 8 996177
10 65 10 985329
12 65 12 996178
13 65 13 996179
14 65 14 996180
16 65 16 996181
17 65 17 996182
21 166 21 996197
4 mm Hexagonal socket
5 mm Hexagonal socket
6 mm Hexagonal socket
5/16" Hexagonal socket
8 mm Hexagonal socket
10 mm Hexagonal socket (small type)
10 mm Hexagonal socket
10 mm Hexagonal socket
1/2" Hexagonal long socket
Engravedcharacters
4. Drillchuckadapterset:CodeNo. 321823
Usethe drill availableon the market.
<WR18DSDL>
1. Battery
BSL1830(CodeNo. 330067)
2. Sockets
Form B
Form C Form D
20
01Eng WH18DSDL US.p65 20 10/2/12, 2:38 PM
La page est en cours de chargement...
La page est en cours de chargement...
La page est en cours de chargement...
La page est en cours de chargement...
La page est en cours de chargement...
La page est en cours de chargement...
La page est en cours de chargement...
La page est en cours de chargement...
La page est en cours de chargement...
La page est en cours de chargement...
La page est en cours de chargement...
La page est en cours de chargement...
La page est en cours de chargement...
La page est en cours de chargement...
La page est en cours de chargement...
La page est en cours de chargement...
La page est en cours de chargement...
La page est en cours de chargement...
La page est en cours de chargement...
La page est en cours de chargement...
La page est en cours de chargement...
La page est en cours de chargement...
La page est en cours de chargement...
La page est en cours de chargement...
La page est en cours de chargement...
La page est en cours de chargement...
La page est en cours de chargement...
La page est en cours de chargement...
La page est en cours de chargement...
La page est en cours de chargement...
La page est en cours de chargement...
La page est en cours de chargement...
La page est en cours de chargement...
La page est en cours de chargement...
La page est en cours de chargement...
La page est en cours de chargement...
La page est en cours de chargement...
La page est en cours de chargement...
La page est en cours de chargement...
La page est en cours de chargement...
La page est en cours de chargement...
La page est en cours de chargement...
La page est en cours de chargement...
La page est en cours de chargement...
La page est en cours de chargement...
La page est en cours de chargement...
La page est en cours de chargement...
La page est en cours de chargement...
-
 1
1
-
 2
2
-
 3
3
-
 4
4
-
 5
5
-
 6
6
-
 7
7
-
 8
8
-
 9
9
-
 10
10
-
 11
11
-
 12
12
-
 13
13
-
 14
14
-
 15
15
-
 16
16
-
 17
17
-
 18
18
-
 19
19
-
 20
20
-
 21
21
-
 22
22
-
 23
23
-
 24
24
-
 25
25
-
 26
26
-
 27
27
-
 28
28
-
 29
29
-
 30
30
-
 31
31
-
 32
32
-
 33
33
-
 34
34
-
 35
35
-
 36
36
-
 37
37
-
 38
38
-
 39
39
-
 40
40
-
 41
41
-
 42
42
-
 43
43
-
 44
44
-
 45
45
-
 46
46
-
 47
47
-
 48
48
-
 49
49
-
 50
50
-
 51
51
-
 52
52
-
 53
53
-
 54
54
-
 55
55
-
 56
56
-
 57
57
-
 58
58
-
 59
59
-
 60
60
-
 61
61
-
 62
62
-
 63
63
-
 64
64
-
 65
65
-
 66
66
-
 67
67
-
 68
68


Hitachi WH 18DSDL Safety Instructions And Instruction Manual
- Taper
- Safety Instructions And Instruction Manual
- Ce manuel convient également à
dans d''autres langues
- English: Hitachi WH 18DSDL
- español: Hitachi WH 18DSDL
Documents connexes
-
Hitachi WH14DBL Manuel utilisateur
-
-
Hitachi DN 18DSL Manuel utilisateur
-
Hitachi DS18DSAL Le manuel du propriétaire
-
-
-
-
Hitachi WH 18DBDL Manuel utilisateur
