
www.groupeseb.com
EN
FR
EL
AR
FA
1505087478 28/02/12

2
1
3a
3b
4
5
6
9
10a
10b
10c
10d
11
12
13
19
14
15
16
17
7
8
18
N
R
L
R
A
ACTIFRY2EN1_1505087478_Mise en page 1 28/02/12 12:54 PageC

ACTIFRY2EN1_1505087478_Mise en page 1 28/02/12 12:54 PageD

ACTIFRY2EN1_1505087478_Mise en page 1 28/02/12 12:54 PageE

EN
FR
EL
AR
FA
5
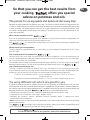
So that you can get the best results from
your cooking, offers you special
advice on potatoes and oils.
The potato: for an enjoyable and balanced diet every day!
Potatoes are a great food for everybody at every age. They are an excellent source of energy and are rich
in vitamins. Depending on the varieties, the climatic conditions and cultivation, the potato can vary greatly
in terms of: shape, size, quality of taste. Each one has its own characteristics. In respect of earliness, yield,
size, colour, storage quality and directions for cooking. The cooking results may vary depending on the
origin and seasonality.
What variety should be used for ?
As a rule we recommend you use special "chip" potatoes. For high moisture content new potatoes, we
recommend that you cook your fries for a few extra minutes.
With it's also possible to cook frozen fries. Because they are already pre-cooked, there
is no need to add any oil.
Where should you store potatoes?
The best places to store potatoes are in a dark cellar, or a cool cupboard (between 6 and 8°C), away
from any light.
How should potatoes be prepared for ?
For best results, you must make sure that the fries do not stick together. For this we recommend you
wash the peeled potatoes thoroughly before cutting them and then once again when they have been
cut up, until the water has turned clear.
This will allow you to remove the maximum amount of starch. Carefully dry the fries using a dry and highly
absorbent clean tea towel. The fries must be perfectly dry before they are put in the .
How should the potatoes be cut?
The chip's crispiness and fluffiness depends on its size. The more thinly cut your fries are, the crispier
they will be and vice-versa, the thicker they are the fluffier they will be on the inside. Depending on your
preference, you can vary the size of your fries and change the cooking time accordingly:
Thickness: Thin American style: 8 x 8 mm / Standard: 10 x 10 mm / Thick: 13 x 13 mm
Length up to 9 cm.
The maximum recommended chip thickness is 13 x 13 mm and a length of up to 9 cm.
Try using different oils which are good for you
If you fancy treating yourself to a different taste, then one spoonful of oil added once is all you need.
All the fatty acids which are essential for life can be found in vegetable oils. They all contain in different proportions,
the nutrients which are essential for a balanced diet. It's important to vary the oils you use in order to provide your
body with everything it needs! With , you can use a very large variety of oils:
• Standard oils: sunflower, olive, corn, rapeseed*, grapeseed, groundnut (peanut), soya*.
• Flavoured oils: oils infused with herbs, garlic, peppers, lemon…
• Speciality oils: hazelnut*, seasme*, safflower*, almond*, avocado*, argan* (* cooking time varies
according to the manufacturer).
*Note: Some of these oils may not be readily available in your supermarket. Please substitute according
to your preferred taste.
The technology with its low quantity of fats, allows you to retain the good fatty acids
which are essential for providing you with the energy you need.
With , you can treat yourself and your friends too!
To find out more or if you've any questions, please visit www.tefal.com
ACTIFRY2EN1_1505087478_Mise en page 1 28/02/12 12:54 Page5

6
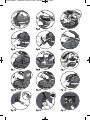
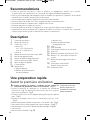
Description
1. Transparent lid
2. Lid latches
3. 2in1 spoon (2in1)
a. oil side
min= 14 ml (4 people)
max= 20 ml (6 people)
b. salt side
4. 2in1 cooking tray with “MAX” level
5. Detachable mixing paddle
6. Paddle unlocking button
7. “MAX” liquid contents level
8. Tray support pads
9. Detachable bowl
10. 2in1 handle
a. tray handle
b. button for disconnecting the two
handles
c. bowl handle
d. button for unlocking the bowl handle
11. Body
12. Detachable filter
13. Lid opening control
14. LCD screen
15. Button for activating the 2in1 function
16. + and – button for adjusting cooking time
17. Button for starting and stopping cooking
18. On/off switch and plug-in socket
19. Detachable power cord
The inside of the ActiFry
pan has a highly resistant
ceramic coating.
Some helpful advice
• When using the appliance for the first time you may notice a harmless smell. This smell, which will not
affect the appliance in any way, will quickly disappear.
• So as not to damage your appliance make sure you stick to the quantities of ingredients and liquid
given in the instruction booklet and recipe book.
• Never overload the tray and do not exceed the recommended quantities.
• Never leave your 2in1 spoon in the appliance whilst it is on.
• Never place the tray in the appliance without the bowl.
• Never put the paddle in without the bowl.
• Never exceed the height indicated by the maximum level marker on the paddle and the maximum
mark on the tray.
• Place the tray in the appliance when the reminder beep sounds and not at the the beginning of
cooking (except if the cooking time in the pan and the tray are the same).
• Never leave the appliance unattended whilst in operation.
For fast cooking
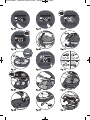
Before using for the first time
• Don’t forget to remove the protective sleeves located on the
lid before using the appliance – fig.29.
• Open the lid by pressing on the lid opening control buttons – fig.1
and push the two grey latches outwards to remove the lid – fig.2.
• Remove the 2 in 1 spoon, and then remove its polystyrene packing
which you can throw away – fig.3.
• Lift up the bowl’s handle horizontally until you hear a “CLICK“ sound
– fig.4.
• Remove the tray handle by pushing on the button 10b – fig.5.
• You can use this handle for taking out the tray – fig.6-7.
• Remove the paddle by pushing the unlocking button – fig.8a.
• Take the bowl out.
• Remove the detachable filter – fig.28.
ACTIFRY2EN1_1505087478_Mise en page 1 28/02/12 12:54 Page6

EN
FR
EL
AR
FA
7
• All these detachable parts are dishwasher friendly – fig.9 or can be
cleaned with a non-abrasive sponge and some washing-up liquid.
• Dry thoroughly before putting back.
• Adjust the position of the paddle until you hear a “CLICK” sound
–
fig.8b
Prepare the food
• Open the lid – fig.1.
• Remove the 2in1 spoon
– fig.3 and the tray – fig.7.
• Lift the handle up – fig.4 and remove the bowl from the appliance.
• Place your food on the tray making sure you always keep to the
quantities recommended in the cooking tables and/or the recipe book
(please see: “Cooking table”). Never exceed the "MAX“ level marker
– fig.10.
• Depending on the food, add the recommended amount of fat in the
spoon and pour the contents evenly in to the bowl
– fig.11.
• Put the bowl back into the appliance and close the lid.
• Push the handle back
– fig.12.
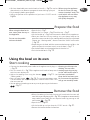
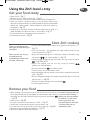
Using the bowl on its own
Start cooking
• Connect the detachable power cable to the appliance and plug it in
– fig.13.
• Push the switch 0/| – fig.14,the appliance will make a beep sound
and the screen displays 00.
• Adjust the cooking time using the buttons
– fig.15 (see
“Cooking table“).
• Press the start button – fig.16. The minute countdown starts.
The countdown will only be displayed in seconds when there is less
than a minute left.
• You can adjust the cooking time at any time by pressing on the buttons
– fig.17.
Remove the food
• When the cooking is finished, the timer will sound and the screen will
start blinking and displaying 00 – fig.18:the appliance automatically
stops cooking your food. You can stop the buzzer by pressing on the
start button
– fig.19.
• Open the lid – fig.20.
• Lift the handle up until you hear the “CLICK” sound – fig.21.
• Remove the bowl and take the food out.
When using the bowl on its
own, never place the tray in
the appliance.
Do not use the paddle
without the bowl.
When using the appliance
for the first time you may
notice a harmless smell. This
smell, which will not affect
the appliance in any way,
will quickly disappear.
Opening the lid stops the
cooking. You can start
cooking again by pressing
on the start button after it
has been switched off.
Once the lid has been open
for 2 minutes the appliance
will go into stand-by mode.
ACTIFRY2EN1_1505087478_Mise en page 1 28/02/12 12:54 Page7

8
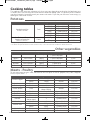
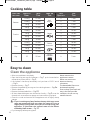
Cooking tables
The cooking times given are indicative only, they may vary depending on whether the food items are
in season, their size, how they each taste and the electrical voltage used. The quantity of oil indicated
may be increased in accordance with your tastes and needs. If you like your fries even more crispy, try
cooking for a few extra minutes.
Potatoes
TYPE QUANTITY OIL COOKING TIME
Standard sized fries
10 mm x 10 mm
Fresh
1500 g** 1 spoonful of oil 41-43 min
1250 g** 1 spoonful of oil 38-40 min
1000 g** ¾ spoonful of oil 35-37 min
750 g** ½ spoonful of oil 30-32 min
500 g**
1
⁄3 spoonful of oil 24-26 min
250 g**
1
⁄5 spoonful of oil 20-22 min
Mac Cain Traditional Frozen Fries
Straight cut frozen fries
10 mm x 10 mm***
Frozen
1200 g without 36-38 min
750 g without 24-26 min
TYPE QUANTITY OIL COOKING TIME
Chicken nuggets
Fresh 1200 g without 18-20 min
Frozen 1200 g without 18-20 min
Chicken drumsticks Fresh 9 without 25-30 min
Chicken legs Fresh 3 without 30-35 min
Chicken breasts Fresh
9 small chicken breasts
(about 1200 g)
without 22-25 min
Spring Rolls Fresh 12 small 1 spoonful of oil 10-12 min
Veal cutlets Fresh 9 1 spoonful of oil 22-25 min
Pork chops Fresh (2.5 cm thick) 6 1 spoonful of oil 18-20 min
Pork fillet
Fresh (cut into thin
slices or strips)
9 1 spoonful of oil 13-15 min
Saddle of rabbit Fresh 9 1 spoonful of oil 18-20 min
Minced meat
Fresh 900 g 1 spoonful of oil 13-15 min
Frozen 600 g 1 spoonful of oil 13-15 min
Meatballs Frozen 1200 g 1 spoonful of oil 18-20 min
Sausages Fresh 8 – 10 without 10-12 min
Meats - Poultry
To give extra taste to your meat, feel free to mix the spices in the oil (paprika, curry, basil, oregano,
cumin, thyme, laurel…).
Other vegetables
TYPE QUANTITY OIL COOKING TIME
Zucchini Fresh in slices 1200 g
1 spoon of oil
+ 150 ml cold water
30 min
Peppers Fresh in slices 1000 g
1 spoon of oil
+ 250 ml cold water
25 min
Mushrooms Fresh in quarters 1000 g 1 spoon of oil 20 min
To m a t o e s Fresh in quarters 1000 g 1 spoon of oil 20 min
Onions Fresh in round slices 750 g 1 spoon of oil 30 min
** Weight of unpeeled potatoes.
*** for American Style Thin Cut Frozen Fries (8 mm x 8 mm) cook for the same time as 10 mm x 10 mm frozen fries.
ACTIFRY2EN1_1505087478_Mise en page 1 28/02/12 12:54 Page8

EN
FR
EL
AR
FA
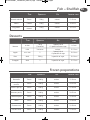
9
TYPE QUANTITY OIL COOKING TIME
Battered calamari Frozen 500 g without 12-14 min
Prawns Cooked 600 g without 8-10 min
King prawns
Frozen and
thawed
450 g without 9-11 min
T
YPE
Q
UANTITY
O
IL
C
OOKING
TIME
Bananas
in slices
700 g
(7 bananas)
1 spoonful of oil
+ 1 spoonful of brown sugar
4-6 min
in foil
3 bananas
without
15-17 min
Apples
cut in two
5
1 spoonful of oil
+ 2 spoonfulls of sugar
10-12 min
Pears
diced
1500 g
2 spoonfuls of sugar
10-12 min
Pineapple
diced
2
2 spoonfuls of sugar
15-17 min
TYPE QUANTITY OIL COOKING TIME
Ratatouille Frozen 1000 g without 25-30 min
Pan-fried pasta
and fish
Frozen 1000 g without 20-22 min
Farmer's pan-fry Frozen 1000 g without 25-30 min
Mountain pan-fry Frozen 1000 g without 20-25 min
Carbonara pasta Frozen 1000 g without 18-20 min
Paella Frozen 1000 g without 18-20 min
Cantonese rice Frozen 1000 g without 18-20 min
Chili con Carne Frozen 1000 g without 15-20 min
Fish – Shellfish
Desserts
Frozen preparations
ACTIFRY2EN1_1505087478_Mise en page 1 28/02/12 12:54 Page9

EN
FR
EL
AR
FA
Using the 2in1: bowl + tray
Get your food ready
• Open the lid – fig.1.
• Remove the 2in1 spoon and the tray – fig.3.
• Lift the handle up - fig.4 and remove the bowl from the appliance
• Place your food in the bowl making sure you always keep to the
quantities recommended in the cooking tables and/or the recipe book
(please see “Cooking table”). Never exceed the "MAX“ level marker on
the paddle
– fig.10.
• Depending on the food, add the recommended amount of fat in a
spoon and pour the contents evenly in to the bowl – fig.11
• Put the bowl back in the appliance and close the lid.
• Fold away the handle
– fig.12.
Start 2in1 cooking
• Connect detachable power cable to the appliance and plug it in –
fig.13.
• Push the switch 0/| , the appliance will make a beep sound and the
screen displays 00
– fig.14.
• Adjust the total cooking time (=cooking the food in the bowl) using
the buttons (see “Cooking table“)
– fig.15.
• Select the type of food you want to cook in the tray using the button
– fig.23 and 24.
• Adjust the cooking time for the tray using the buttons
(please see “Cooking table”).
• Push the start button . The cooking starts.
• The minute by minute countdown starts.
• Place the food on the tray making sure you don’t exceed the maximum
level
– fig.22.
• When the appliance beeps and stops automatically, open the lid and
put the tray in
– fig.25.
• Close the lid again and press the start button .
• The countdown resumes.
Remove your food
• When cooking is finished, the timer will sound and the screen will start
blinking and displaying 00: the appliance automatically stops cooking
your food. You can stop the buzzer by pressing on the start button
– fig.19.
• Open the lid – fig.20.
• Lift up the handle until you hear the “CLICK” – fig.21.
• Disconnect the two handles by pressing the button 10b.
• Turn over the tray handle so that it can fit on to the tray
– fig.26.
• Remove the tray and take your food out – fig.27.
• Remove the bowl and take your food out.
2 in1
2 in1
2 in1
2 in1
11
Be careful, because the tray
is very hot after cooking.
Always use the tray handle
to remove it. If you want
even crispier fries, you
can cook them for a further
2 minutes after you’ve
removed the tray.
There is a pre-set time for
each type of food which you
can adjust.
When you are not using it,
the appliance will
automatically switch itself
off after 10 minutes.
ACTIFRY2EN1_1505087478_Mise en page 1 28/02/12 12:54 Page11

12
Easy to clean
Clean the appliance
• Allow it to cool down completely.
• Open the lid by pressing on the buttons – fig.1 push the two latches
outwards to remove the lid
– fig.2.
• Lift the bowl’s handle up horizontally until you hear a “CLICK“ sound
– fig.4.
• Remove the tray – fig.7.
• Remove the paddle by pressing on the unlocking button – fig.8a.
• Take the bowl out.
• Remove the detachable filter – fig.28.
• All these detachable parts are dishwasher friendly – fig.9 or can be
cleaned with a non-abrasive sponge and some washing-up liquid.
• Clean the inside and outside of the appliance with a slightly damp
sponge.
• If you’re cooking any fatty food on the tray which may cause
spray we recommend that you clean the spray off using a
slightly damp sponge each time you’ve finished using your
appliance. In particular the internal areas of the blower
marked by black arrows
– fig.30.
• Dry thoroughly before putting back.
Never immerse the
appliance in water.
Never use corrosive or
abrasive cleaning
substances.
The detachable filter must
be cleaned regularly.
So as to keep your bowl and
tray in the best possible
condition, do not use any
metallic utensils.
FOOD FOR
THE BOWL
QUANTITY
BOWL
TOTAL
TIME
FOOD ON
TRAY
TRAY
QUANTITY
TRAY
TIME
Potatoes
1250 g 45 min
Beef
Burgers
4 7 min
1000 g 35 min 4 7 min
750 g 30 min 3 6 min
250 g 25 min 1 5 min
Zucchini
1000 g 30 min
Salmon
4 10 min
750 g 25 min 3 10 min
500 g 20 min 2 8 min
250 g 18 min 1 7 min
Fries
1250 g 50 min
Chicken
drumsticks
5 18 min
1000 g 45 min 4 16 min
750 g 40 min 3 16 min
250 g 33 min 1 15 min
Figs
10 20 min
Crunchy
chocolate
4 5 min
Cooking table
ACTIFRY2EN1_1505087478_Mise en page 1 28/02/12 12:54 Page12

EN
FR
EL
AR
FA
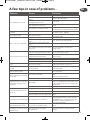
A few tips in case of problems…
The appliance won't work.
The appliance isn't correctly plugged in. Check that the appliance is correctly plugged in.
Yo u h av en 't ye t p re s s ed t h e O N / OF F
button.
Press the ON / OFF button.
Yo u' ve p re ss ed t h e O N / O FF b u tt o n b u t
the appliance won't work.
Close the lid.
The appliance won't heat up.
Bring your appliance to an Approved Service
Centre.
The paddle is not turning correctly.
Check that it is correctly in place otherwise take
your appliance to an Approved Service Centre.
The paddle is not turning
correctly.
The paddle isn't locked.
Adjust the position of the paddle until you hear
the “CLICK” sound
- fig.8b.
The tray won't turn. The tray isn't locked.
Adjust the position of the tray until you hear
the “CLICK” sound.
The food is not cooked evenly.
Yo u h av en 't u se d t he p a dd l e. Put it in position.
The food is not chopped up the same
way.
Chop all the food to the same size.
The fries are not chopped the same
way.
Chop all the fries to the same size.
The paddle is in the right position but it
won't turn.
Bring the appliance to an Approved
Service Centre.
The fries are not crispy enough.
Yo u a re n ot u s in g s pe c ia l c h ip p o ta to es Choose special chip potatoes.
The potatoes haven't been
sufficiently washed and dried.
Wash, drain and dry the potatoes thoroughly
before cooking.
The fries are too thick. Chop them more thinly.
There's not enough oil.
Increase the quantity of oil (see “Cooking table”).
The filter (12) is blocked. Clean the filter.
The food won’t turn with the
tray.
The food is too thick. Reduce the thickness of your food.
The food in the bowl isn’t
cooked.
The tray was put on the bowl when the
cooking started.
Only put the tray in during the second half of
the cooking phase.
The fries become cracked whilst
they are being cooked.
Yo u' re n o t u s i ng t h e r i g ht q u an t i ty .
Reduce the quantity of potatoes and change
the cooking time.
The food remains on the edge
of the dish.
The bowl is overloaded.
Stick to the quantities indicated in the cooking
table.
Reduce the quantity of food.
Maximum level exceeded. Reduce the quantities.
Liquids from the cooking have
seeped into the body of the
appliance.
Bowl faulty.
Check that there aren't any leaks by filling the
bowl up to the MAX level of the paddle. If you
do find a leak, take your bowl to an Approved
Service Centre.
The maximum level has been exceeded.
Don't go over the maximum level.
The LCD screen doesn't work
anymore.
The appliance isn't plugged in. Plug the appliance in.
The appliance hasn't been turned on. Press the ON / OFF button.
The appliance has been used incorrectly
and as a result has gone into safety mode.
Ta k e t h e a p p l i a n c e t o an A p p r o v e d S e r v i c e
Centre.
The LCD screen is indicating Err. The appliance has a malfunction.
Unplug the appliance, wait 10 seconds,
plug the appliance back. In again, and press
the ON/OFF button. If the LCD screen is still
indicating Err, take the appliance to an
Approved Service Centre.
The appliance is making an
abnormal amount of noise.
Yo u s us pe ct t h at t h e a p p li a n ce ' s
motors are not working properly.
Ta k e t h e a p p l i a n c e t o an A p p r o v e d S e r v i c e
Centre.
During combined cooking, the
machine won’t stop for you to
put the tray in.
The tray cooking has not been
programmed.
Use the 2in1 function during combined
cooking.
PROBLEMS CAUSES SOLUTIONS
13
ACTIFRY2EN1_1505087478_Mise en page 1 28/02/12 12:54 Page13

18
Description
Une préparation rapide
Avant la première utilisation
• Avant d'utiliser le produit, n'oubliez pas de retirer les
manchons de protection situés sur le couvercle - fig.29.
• Ouvrez le couvercle en appuyant sur le bouton de commande
d'ouverture - fig.1 et poussez les deux verrous gris vers l’extérieur
pour retirer le couvercle - fig.2.
• Enlevez la cuillère 2en1 et son calage en polystyrène que vous pouvez
jeter - fig.3.
• Remontez la poignée de la cuve à l’horizontale jusqu’au “CLIC”
- fig.4.
• Retirez la poignée de plateau en poussant sur le bouton 10b - fig.5.
• Vous pouvez utilisez cette poignée pour sortir le plateau - fig.6-7.
• Retirez la pale en poussant le bouton de déverrouillage - fig.8a.
• Sortir la cuve.
• Retirez le filtre amovible - fig.28.
1. Couvercle transparent
2. Verrous du couvercle
3. Cuillère 2en1 (2in1)
a. face huile
min= 1,4 cl (4 personnes)
max= 2 cl( 6 personnes)
b. face sel
4. Plateau de cuisson 2en1 avec niveau “MAX”
5. Pale de brassage amovible
6. Bouton de déverrouillage de la pale
7. Niveau contenance “MAX” liquide
8. Patins d'appui du plateau
9. Cuve amovible
10. Poignée 2en1
a. poignée plateau
b. bouton de désolidarisation
des deux poignées
c. poignée cuve
d. bouton de déverrouillage
de la poignée cuve
11. Corps
12. Filtre amovible
13. Commande d’ouverture du couvercle
14. Ecran LCD
15. Bouton d’activation de la fonction 2en1
16. Bouton + et – pour régler le temps de
cuisson
17. Bouton de démarrage et arrêt de la
cuisson
18. Interrupteur marche/arrêt
et point de branchement
19. Cordon amovible
L’intérieur de la cuve
ActiFry dispose d’un
revêtement céramique
haute résistance.
Recommandations
• Durant la première utilisation, il peut se produire un dégagement d’odeur sans nocivité.
Ce phénomène sans conséquence sur l’utilisation de l’appareil disparaîtra rapidement.
• Pour ne pas endommager votre appareil, veillez à respecter les quantités d’ingrédients et de liquide
indiquées dans le mode d’emploi et le livre de recettes.
• Ne surchargez pas le plateau, respectez les quantités recommandées.
• Ne laissez jamais la cuillère 2en1 dans l’appareil pendant le fonctionnement.
• Ne jamais positionner le plateau dans l'appareil sans la cuve.
• Ne jamais positionner la pale sans la cuve.
• Ne jamais dépasser la hauteur indiquée par le niveau max de la pale et maxi du plateau.
• Ne positionnez jamais le plateau dans l'appareil au début de cuisson en utilisation 2en1, attendez
l'avertissement sonore qui vous indique à quel moment le positionner.
ACTIFRY2EN1_1505087478_Mise en page 1 28/02/12 12:54 Page18

20
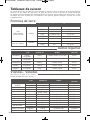
Tableaux de cuisson
Les temps de cuisson sont donnés à titre indicatif, ils peuvent varier en fonction de la saisonnalité des
aliments, de leur taille, des quantités, du goût de chacun et de la tension du réseau électrique.
La quantité d’huile indiquée peut être augmentée en fonction de vos goûts et de vos besoins. Si vous
souhaitez des frites encore plus croustillantes, vous pouvez ajouter quelques minutes de cuisson
supplémentaires.
Pommes de terre
TYPE QUANTITÉ AJOUT TEMPS DE CUISSON
Frites
taille standard
10 mm x 10 mm
Fraîches
1500 g 1 cuillère d'huile 41-43 min
1250 g 1 cuillère d'huile 38-40 min
1000 g ¾ cuillère d'huile 35-37 min
750 g ½ cuillère d'huile 30-32 min
500 g
1
⁄3 cuillère d'huile 24-26 min
250 g
1
⁄5 cuillère d'huile 20-22 min
Frites
Mac Cain Tradition
Surgelées
1200 g sans 36-38 min
750 g sans 24-26 min
TYPE QUANTITÉ AJOUT
TEMPS DE
CUISSON
Nuggets
de poulet
Frais 1200 g sans 18-20 min
Surgelés 1200 g sans 18-20 min
Pilons de poulet Frais 9 sans 25-30 min
Cuisses de poulet Fraîches 3 sans 30-35 min
Blancs de poulet Frais
9 blancs
(environ 1200 g)
sans 22-25 min
Nems Frais 12 petits 1 cuillère d'huile 10-12 min
Paupiettes de veau Fraîches 9 1 cuillère d'huile 22-25 min
Côtes de porc Fraîches 6 1 cuillère d'huile 18-20 min
Filet de porc Frais 9 1 cuillère d'huile 13-15 min
Râbles de lapin Frais 9 1 cuillère d'huile 18-20 min
Viande hachée
Fraîche 900 g 1 cuillère d'huile 13-15 min
Surgelée 600 g 1 cuillère d'huile 13-15 min
Boulettes de viande Surgelées 1200 g 1 cuillère d'huile 18-20 min
Saucisses Fraîches 8 – 10 (piquées) sans 10-12 min
Viandes - Volailles
Pour donner du goût à vos viandes, n’hésitez pas mélanger des épices dans l’huile (paprika, curry,
herbes de Provence, thym, laurier…).
Autres légumes
TYPE QUANTITÉ AJOUT
TEMPS DE
CUISSON
Courgettes
Fraîches
en lamelles
1200 g 1 cuillère d’huile + 15 cl d’eau 30 min
Poivrons
Frais
en lamelles
1000 g 1 cuillère d’huile + 25 cl d’eau 25 min
Champignons
Frais
en quartiers
1000 g 1 cuillère d'huile 20 min
To m a t e s
Fraîches
en quartiers
1000 g 1 cuillère d'huile 20 min
Oignons
Frais
en rondelles
750 g 1 cuillère d'huile 30 min
ACTIFRY2EN1_1505087478_Mise en page 1 28/02/12 12:54 Page20

EN
FR
EL
AR
FA
21
TYPE QUANTITÉ AJOUT
TEMPS DE
CUISSON
Beignets de calamars Surgelés 500 g sans 12-14 min
Crevettes Cuites 600 g sans 8-10 min
Gambas Surgelées 450 g sans 9-11 min
T
YPE
Q
UANTITÉ
A
JOUT
T
EMPS DE
CUISSON
Bananes
en rondelles
700 g
(7 bananes)
1 cuillère d'huile
+ 1cuillère de sucre roux
4-6 min
en papillote
3 bananes
sans
15-17 min
Pommes
coupées en deux
5
1 cuillère d'huile
+ 2 cuillères de sucre
10-12 min
Poires
coupées en
morceaux
1500 g
2 cuillères de sucre
10-12 min
Ananas
coupé en
morceaux
2
2 cuillères de sucre
15-17 min
TYPE QUANTITÉ AJOUT
TEMPS DE
CUISSON
Ratatouille Surgelée 1000 g sans 25-30 min
Poêlée pâtes
et poisson
Surgelée 1000 g sans 20-22 min
Poêlée paysanne Surgelée 1000 g sans 25-30 min
Poêlée savoyarde Surgelée 1000 g sans 20-25 min
Pâtes à la carbonara Surgelées 1000 g sans 18-20 min
Paëlla Surgelée 1000 g sans 18-20 min
Riz Cantonnais Surgelé 1000 g sans 18-20 min
Chili con Carne Surgelé 1000 g sans 15-20 min
Poissons - Crustacés
Desserts
Préparations surgelées
ACTIFRY2EN1_1505087478_Mise en page 1 28/02/12 12:54 Page21

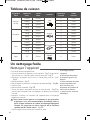
24
Un nettoyage facile
Nettoyez l’appareil
• Laissez-le refroidir complètement.
• Ouvrez le couvercle en appuyant sur les boutons
- fig.1 et poussez les
deux verrous vers l’extérieur pour retirer le couvercle
- fig.2.
• Remontez la poignée de la cuve à l’horizontale jusqu’au “CLIC”
- fig.4.
• Retirez le plateau - fig.7.
• Retirez la pale en poussant sur le bouton de déverrouillage - fig.8a.
• Sortez la cuve.
• Retirez le filtre amovible
- fig.28.
• Toutes ces pièces amovibles passent au lave-vaisselle - fig.9 ou
peuvent être nettoyées avec une éponge non-abrasive et du liquide
vaisselle.
• Nettoyez l'intérieur et l'extérieur de l'appareil avec une éponge
légèrement humide.
• Pour toute cuisson grasse sur le plateau et qui génère des
projections, nous vous recommandons de nettoyer celles-ci
après chaque utilisation à l'aide d'une éponge légèrement
humide. En particulier les zônes internes de la soufflerie
repérées par les flèches noires
- fig.30.
• Séchez soigneusement avant de remettre en place.
N’immergez jamais
l’appareil.
N’utilisez pas de produit
d’entretien agressifs ou
abrasifs.
Le filtre amovible doit être
nettoyé régulièrement.
Pour conserver plus
longtemps les qualités de
votre cuve et plateau,
n’utilisez aucun ustensile
métallique.
ALIMENTS
CUVE
QUANTITÉ
CUVE
TEMPS
TOTAL
ALIMENTS
PLATEAU
QUANTITÉ
PLATEAU
TEMPS
PLATEAU
Pommes
de terre
1250 g 45 min
Steak
Haché
4 7 min
1000 g 35 min 4 7 min
750 g 30 min 3 6 min
250 g 25 min 1 5 min
Courgettes
1000 g 30 min
Saumon
4 10 min
750 g 25 min 3 10 min
500 g 20 min 2 8 min
250 g 18 min 1 7 min
Frites
1250 g 50 min
Pilons de poulets
5 18 min
1000 g 45 min 4 16 min
750 g 40 min 3 16 min
250 g 33 min 1 15 min
Figues
10 20 min
Croustillants
chocolat
4 5 min
Tableau de cuisson
ACTIFRY2EN1_1505087478_Mise en page 1 28/02/12 12:54 Page24

EN
FR
EL
AR
FA
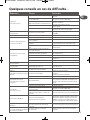
Quelques conseils en cas de difficulté…
L’appareil
ne fonctionne pas.
L’appareil n’est pas bien branché.
Vérifiez que l’appareil est correctement
branché.
Vous n’avez pas encore appuyé sur le
bouton ON / OFF.
Appuyez sur le bouton ON / OFF.
Vous avez appuyé sur le bouton ON /
OFF mais l’appareil ne fonctionne pas.
Fermez le couvercle.
L’appareil ne chauffe pas.
Apportez l’appareil à un Centre
Service Agréé.
La pale ne tourne pas.
Vérifiez qu’elle est bien en place sinon apportez
l’appareil à un Centre Service Agréé.
La pale ne tourne pas
correctement.
La pale n'est pas verrouillée.
Repositionnez la pale jusqu'au
“CLIC”
- fig.8b.
Le plateau ne tourne pas. Le plateau n'est pas verrouillé. Repositionnez le plateau jusqu'au
“CLIC”.
La cuisson des préparations
n'est pas homogène.
Vous n’avez pas utilisé la pale. Mettez-la en place.
Les aliments ne sont pas coupés de
façon régulière.
Coupez les aliments tous de la même taille.
Les frites ne sont pas coupées de façon
régulière.
Coupez toutes les frites de la même taille.
La pale est en place mais elle ne tourne
pas.
Apportez l’appareil à un Centre
Service Agréé.
Les frites ne sont pas assez
croustillantes.
Vous n'utilisez pas des pommes de
terre spéciales frites.
Choisissez des pommes de terre spéciales frites.
Les pommes de terre ne sont pas
suffisamment lavées et séchées.
Lavez, égouttez et séchez bien les pommes de
terre avant cuisson.
Les frites sont trop épaisses. Coupez-les plus fines.
Il n’y a pas assez d’huile.
Augmentez la quantité d’huile (voir “Tableau
de cuisson”).
Le filtre (12) est obstrué. Nettoyez le filtre.
Les aliments ne tournent pas
avec le plateau.
Les aliments sont trop épais. Réduisez l'épaisseur de vos aliments.
Les aliments dans la cuve ne
sont pas cuits.
Le plateau à été mis sur la cuve au
démarrage de la cuisson.
Mettez uniquement le plateau en deuxième
partie de cuisson.
Les frites sont cassées lors de la
cuisson.
La quantité n'est pas adaptée.
Réduisez la quantité de pommes de terre et
adaptez le temps de cuisson.
Les aliments restent sur le bord
du plat.
La cuve est trop chargée.
Respectez les quantités indiquées sur le tableau
de cuisson.
Réduisez la quantité d'aliments.
Niveau maxi dépassé. Réduisez les quantités.
Des liquides de cuisson
ont coulé dans le corps de
l'appareil.
Cuve défectueuse.
Vérifier l'absence de fuite en remplissant la
cuve jusqu'au niveau MAX de la pale. En cas
fuite apportez votre cuve à un Centre Service
Agréé.
Le niveau maxi a été dépassé. Respecter le niveau maxi.
L'écran LCD
ne fonctionne plus.
L'appareil n'est pas branché. Branchez l'appareil.
L’appareil n'a pas été mis en
fonctionnement.
Appuyez sur le bouton ON / OFF.
Suite à un dysfonctionnement dans
l'utilisation du produit, il s'est mis en
sécurité.
Apportez l’appareil à un Centre Service Agréé.
L’écran LCD indique Err.
C’est une anomalie dans le
fonctionnement de l’appareil.
Débranchez l’appareil, attendre 10 secondes,
rebranchez l’appareil, appuyez sur le bouton
ON/OFF. Si l’écran LCD indique toujours Err,
apportez l’appareil à un Centre Service Agréé.
L'appareil est anormalement
bruyant.
Vous soupçonnez une anomalie dans
le fonctionnement des moteurs de
l’appareil.
Apportez l’appareil à un Centre Service Agréé.
Lors d'une cuisson combinée,
il n'y pas d'arrêt de la machine
pour mettre le plateau.
La cuisson plateau n'a pas été
programmée.
Utilisez la fonction 2en1 lors d'une cuisson
combinée.
PROBLÈMES CAUSES SOLUTIONS
25
ACTIFRY2EN1_1505087478_Mise en page 1 28/02/12 12:54 Page25

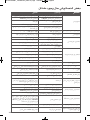
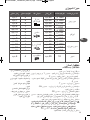
°Fi «MBUz` w •U‰ ˧uœ ±AUØq.
40
«LAUØq«LAUØq «_ßU» «Ku‰
«LMZ ô ¥FLq
«LMZ ¨Od ±uÅu‰ °UOU¸ «JNd°Uzw °AJq ÅO`.
¢QØb °QÊ «LMZ ±uÅu‰ °AJq §Ob °UOU¸ «JNd°Uzw
r ¢CGj ´Kv ±HUÕ «AGOq FFO/NO
«CGj ´Kv ±HUÕ «AGOq FFO/NO
«LMZ ô ¥ºªs
«´d÷ «LMZ ´Kv ±dØe îb±W ±ÔFLb
–¸«Ÿ «d¥p ô ¢d„ °AJq ÅO`.
¢QØb «NU ¢Qîc ±uÆFNU «BO`, Ëô «´d÷ «LMZ ´Kv
±dØe îb±W ±ÔFLb
–¸«Ÿ «d¥p ô ¢d„ °AJq ÅO`.
–¸«Ÿ «d¥p ¨Od ±IHKW
´bÒ‰ Ë{FOW –¸«Ÿ «d¥p «v Ê ¢ºLl Åu‹ «ùÆHU‰
"ØKOp" - «AJq b8
«BOMOW ô ¢b˸
«BOMOW ¨Od ±ÔIHKW
´bÒ‰ ±s Ë{l «BOMOW «v Ê ¢ºLl Åu‹ "ØKOp".
«DFUÂ ¨Od ±DNu °UºUËÍ
«DU©f ¨Od ±Id±AW °AJq ØU·
«X r ¢ºFLq –¸«Ÿ «d¥p
{FNU w ±uÆFNU «BO`
«DFUÂ ¨Od ±ÔIDl °MHf «Dd¥IW
ÆDÒl «DFU ÆDFUÎ ±ºUË¥W
¢ÔIDÒl §LOl ÆDl «DU©f «v ÆDl ±ºUË¥W
–¸«Ÿ «d¥p ±dØW w ±uÆFNU °AJq ÅO`
ËJMNU ô ¢b˸.
«´d÷ «LMZ ´Kv ±dØe îb±W ±ÔFLb
«X r ¢ºFLq °DU©f ±s «MuŸ «ªU’
«îd u´UÎ îUÅUÎ ±s «DU©f
«DU©f r ¢ÔGºq °LU Ot «JHU¥W Ër ¢ÔHn.
¢ÔGºq «DU©f, ¢ÔBHÒv Ë¢ÔHn §Ob«Î Æq «DNw
ÆDl «DU©f «LÔId±AW ßLOJW
¢ÔIDÒl «DU©f ÆDFUÎ ¸ÆOIW
«e¥X ¨Od ØU·
¢ÔCU· ØLOW ±s «e¥X («Ed "§bˉ «DNw")
«HKd (21) ±ºbËœ
EÒn «HKd
«DFU ô ¥b˸ w «BOMOW
«DFUÂ ßLOp §b«Î
îHn ßLUØW ÆDl «DFUÂ
«DFUÂ w «u´U¡ ¨Od ±DNu
ËÔ{FX «BOMOW u‚ «u´U¡ ´Mb °b«¥W «DNw
¢u{l «BOMOW
Ij £MU¡ «MBn «Uw ±s œË¸… «DNw
«DU©f «LÔId±AW ¢B` ±ÔAIIW £MU¡
«DNw
«X ô ¢ºFLq «JLOW «BOW
¢ÔªHn ØLOW «DU©f Ë ¥ÔGOÒd ËÆX «DNw
¥Iv «DFUÂ ´Kv •UW «Do
«u´U¡ ±Kw¡ °AJq “«zb
¥Ôd§v «IOÒb °UJLOU‹ «LcØu¸… w §bˉ «DNw
“¥Uœ… ´s ±ºuÈ «b «_ÆBv
îHn «JLOU‹
«¸¢HUŸ u‚ ±ºuÈ «b «_ÆBv
ô ¢FbÈ ±ºuÈ «b «_ÆBv
«ºu«zq ±s «DFU ¢ºd°X «
v œ«îq
§ºr «LMZ
«LMZ ¨Od ±uÅu‰ °UOU¸ «JNd°Uzw
«ËÅq «LMZ °UOU¸ «JNd°Uzw
r ¥r ¢AGOq «LMZ
«{Gj ´Kv ±HUÕ «AGOq FFO/NO
Ib ¢r «ßFLU‰ «LMZ °AJq ¨Od ÅO` Ë«MO]W
Ê «LMZ Æb ¢u‰ Ë¢u±U¢OJOUÎ «v Ë{FOW «_±UÊ
«´d÷ «LÔMZ ´Kv ±dØe îb±W ±FLb
®U®W «Fd÷ «dÆLOW r ¢Fb ¢FLq
¢u§b ±AJKW w «LMZ
«Bq «LMZ ´s «OU¸ «JNd°Uzw , «Ed 01 œÆUzo , «ËÅq
«LMZ £UOW °UOU¸ «JNd°Uzw, «{Gj ´Kv ±HUÕ «AGOq
FFO/NO. –« °IOX ®U®W «Fd÷ ¢Fd÷ ¸ßUW rrE,
«´d÷ «LÔMZ ´Kv ±dØe îb±W ±FLb
®U®W «Fd÷ ¢Fd÷ ¸ßUW rrE
«Ap °QÊ «LÔd„ ô ¥FLq °AJq ÅO`
«´d÷ «LMZ ´Kv ±dØe îb±W ±FLb
«LMZ ¥Bb¸ Åu«¢UÎ ¨Od ©OFOW
ÅOMOW «
DNw ¨Od ±Ôd±W
«ßFLq Ë™OHW 1ni2 £MU¡ «DNw «Lb±Z
£MU¡ «DNw «Lb±Z, ô ¢uÆn «LUØOMW
Jw ¢Cl ONU «BOMOW
«u´U¡ ¢Un
¢QØb ±s ´b ˧uœ Í ¢ºdÒ» Ë–p °FW «u´U¡ GU¥W
±ºuÈ «b «_ÆBv ±s –¸«Ÿ «d¥p. –« ˧b‹ ¢ºd» ,
¥Ôd§v ´d÷ «u´U¡ ´Kv ±dØe îb±W ±ÔFLb.
«DU©f «LÔId±AW ¨Od ±ÔIDFW °MHf «Dd¥IW
ÆLX °UCGj ´Kv ±HUÕ «AGOq FFO/NO,
ËJs «LMZ ô ¥FLq
«¨Ko «GDU¡
ACTIFRY2EN1_1505087478_Mise en page 1 28/02/12 12:55 Page40

41
EN
FR
EL
AR
FA
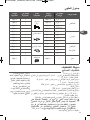
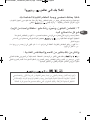
ßNKW «MEOn
¢MEOn «LMZ
> ¥Ôd„ «v Ê ¥dœ ¢LU±UÎ
> «` «GDU¡ °UCGj ´Kv «_“¸«¸ - «AJq 1 «œl «Leô§Os «v «ªU¸Ã
HBq «GDU¡ - «AJq 2.
> «¸l ±Ii «u´U¡ «IOUÎ «v Ê ¢ºLl Åu‹ "ØKOp" - «AJq 4.
> «Bq «BOMOW - «AJq 7.
> «eŸ –¸«Ÿ «d¥p °UCGj ´Kv “¸ «H` - «AJq a8.
> «îdà «u´U¡
> «eŸ «HKd «IU°q KHBq - «AJq 82
> §LOl cÁ «_§e«¡ «IU°KW KHBq , ÆU°KW ¥CUÎ KMEOn w §öÒ¥W «BuÊ
- «AJq 9, Ë ¥LJs ¢MEOHNU °u«ßDW «ßHMW ¨Od ±FbOW ±l «IKOq ±s
ßUzq ¢MEOn «BuÊ.
> ¥ÔMEn «ezOs «b«îKw Ë«ªU¸§w KLMZ °IDFW ÆLU‘ ¸©W ÆKOöÎ.
> –« ØMX °Bbœ ©Nw Í uŸ ±s «_©FLW «bMOW ´Kv
«BOMOW, Æb ¥Bb¸ ´MNU °Fi «ªU¸ Ë «d–«– «bMw,
MB` Ê ¥ÔMEÒn c« «d–«– °UßHMW ¸©W ÆKOöÎ w Øq ±d…
¢MNw ±s «ßFLU‰ «LMZ. Ë°Ub¥b ±s «LºU•U‹
«b«îKOW ±s «u´U¡ «LÔbœ… °U_ßNr «ºuœ«¡ - «AJq 03.
> ¢ÔHn ¢LU±UÎ Æq Ë{FNU £UOW.
ô ¢GLd «LÔMZ °ULU¡ ô
¢ºFLq ±u«œ ¢MEOn •UØW
Ë ØU®DW MEn «LMZ
¥V ¢MEOn «HKd «IU°q
KHBq œ«zLUÎ Ë°UEUÂ
Jw ¢Uk ´Kv «u´U¡
Ë«BOMOW w •UW §Ob… ,
¥Ôd§v ´b «ßFLU‰ œË«‹
«DNw «LFbOW ´KONU.
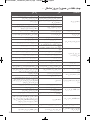
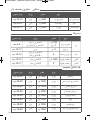
«uÆX
KBOMOW
«JLOW w
«BOMOW
©FUÂ
«BOMOW
«uÆX
«ù§LUw
«JLOW w
«u´U¡
©FUÂ «u´U¡
4
r °Id
°d¨d
«DU©f
4
3
1
4
ßLp ßKLuÊ
Øußv
3
2
1
5
ªU– «b§UÃ
«DU©f
«LÔId±AW
4
3
1
4
®uØuô¢t
Dd
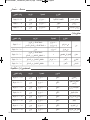
§bˉ «DNw
0521 §d«Â
0001 §d«Â
057 §d«Â
052 §d«Â
0001 §d«Â
057 §d«Â
005 §d«Â
052 §d«Â
0521 §d«Â
0001 §d«Â
057 §d«Â
052 §d«Â
01
54 ϮOIW
53 ϮOIW
03 ϮOIW
52 ϮOIW
03 ϮOIW
52 ϮOIW
02 ϮOIW
81 ϮOIW
05 ϮOIW
54 ϮOIW
04 ϮOIW
33 ϮOIW
02 ϮOIW
7 ϮOIW
7 ϮOIW
6 ϮOIW
5 ϮOIW
01 ϮOIW
01 ϮOIW
8 ϮOIW
7 ϮOIW
81 ϮOIW
61 ϮOIW
61 ϮOIW
51 ϮOIW
5 ϮOIW
ACTIFRY2EN1_1505087478_Mise en page 1 28/02/12 12:55 Page41

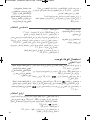
«ßFLU‰ 1ni2 : «u´U¡ + «BOMOW
§Fq ©FU±p §Ue«Î
> «` «GDU¡ - «AJq 1.
> «eŸ ±KFIW 1ni2 - «AJq 7-6-3.
> «¸l «LIi - «AJq 4 Ë«Bq «u´U¡ ´s «LMZ.
>
{l «DFUÂ w «u´U¡ ±l «d’ ´Kv «ù•HUÿ °UJLOU‹ «LuÅv °NU w
§bˉ «DNw Ë/Ë ØU» ËÅHU‹ «DNw (¥Ôd§v ±d«§FW "§bˉ «DNw"). ô
¢FbÈ ±ºuÈ ´ö±W «b «_ÆBv «EUd… ´Kv –¸«Ÿ «d¥p
- «AJq 01.
> •ºV u´OW «DFUÂ, ¢ÔCU· ØLOW «buÊ °ULKFIW Ë¢ÔºJV ±u¥U¢NU
°UºUËÍ w «u´U¡ - «AJq 11.
> «¸§l «u´U¡ £UOW «v ±JUt w «LMZ Ë«¨Ko «GDU¡.
> «œl «LIi - «AJq 21.
«°b «DNw w 1ni2
> «ËÅq «ºKp «JNd°Uzw «IU°q KHBq °ULMZ , £r ËÅKt °UOU¸ «JNd°Uzw
- «AJq 31.
> «œl «LHUÕ I/0 , ßOBb¸ ´s «LMZ ®U¸… Åu¢OW "°OV" Ë¥ÔFd÷ ´Kv
«AU®W «d±e 00 - «AJq 41.
> ´b‰ ËÆX «DNw «ù§LUw (= ©Nw «DFU w «u´U¡) °UßFLU‰ «_“¸«¸
(¥Ôd§v ±d«§FW : §bˉ «DNw") - «AJq 51.
> «îd uŸ «DFUÂ «cÍ ¢ÔFbÁ KDNw w «BOMOW °UßFLU‰ «e¸ -
«AJq 32 Ë 42.
> ´b‰ ËÆX «DNw KBOMOW °UßFLU‰ «_“¸«¸ (¥Ôd§v ±d«§FW "§bˉ «DNw").
> «œl “¸ «AGOq . ¢b ´LKOW «DNw.
> ¥b «Fb «FJºw œÆOIW °bÆOIW.
> {l «DFU ´Kv «BOMOW ±l «d’ °Fb ¢ªDw ±ºuÈ «b «_ÆBv - «AJq 22.
> ´Mb±U ¥ÔDKo «LMZ «ù®U¸… «Bu¢OW "°OV" Ë¥uÆn Ë¢u±U¢OJOUÎ, «` «GDU¡
Ë{l «BOMOW w «b«îq - «AJq 52.
> «¨Ko «GDU¡ ±d… £UOW Ë«{Gj ´Kv “¸ «AGOq .
> ¥ÔU°l «Fb «MU“w .
«¸l «DFUÂ
>
´Mb «NU¡ «DNw, ßu· ¥ÔDKo «LRÆX ®U¸… Åu¢OW Ë¢b ®U®W «Fd÷
°Uu±Oi Ë¥ÔFd÷ ´KONU «d±e 00 : ¥uÆn «LMZ ´s ©Nw «DFU ˢu±U¢OJOUÎ.
¥ÔLJMp ¢uÆOn «ù®U¸… «Bu¢OW °UCGj ´Kv ±HUÕ «AGOq -
«AJq 91.
• «` «GDU¡ - «AJq 02
• «¸l «LIi «v Ê ¢ºLl Åu‹ "ØKOp" - «AJq 12.
• «Bq «LICOs °UCGj ´Kv “¸ .b01
• «ÆKV ±Ii «BOMOW °OY ¥LJs Ê ¥ÔdØÒV ´Kv «BOMOW - «AJq 62.
> «Bq «BOMOW Ë«¸l ±MNU «DFU - «AJq 72.
> «Bq «u´U¡ Ë«¸l ±Mt «DFUÂ
2 in1
2 in1
2 in1
2 in1
42
]¥Ôd§v «ùUÁ, _Ê «BOMOW
ßUîMW §b«Î °Fb ´LKOW
«DNw. «ßFLq œ«zLUÎ
±Ii «BOMOW dFNU. –«
«¸œ‹ « ¢JuÊ «AOf
±Id±AW Ød , ¥LJMp ¢Lb¥b
d… «DNw œÆOIOs
{UOOs °Fb ¸l «BOMOW.
MUp {j ±Ôºo KuÆX
Jq uŸ ±s u«Ÿ «DFUÂ
«cÍ ¥LJMp ¢Fb¥Kt.
´Mb±U ô ¢JuÊ °U§W «v
«ßFLU‰ «LMZ, ßu·
¥uÆn «LMZ Ë¢u±U¢OJOUÎ
°Fb 01 œÆUzo.
ACTIFRY2EN1_1505087478_Mise en page 1 28/02/12 12:55 Page42
La page est en cours de chargement...
La page est en cours de chargement...
La page est en cours de chargement...
La page est en cours de chargement...
La page est en cours de chargement...
La page est en cours de chargement...
La page est en cours de chargement...
La page est en cours de chargement...
La page est en cours de chargement...
La page est en cours de chargement...
-
 1
1
-
 2
2
-
 3
3
-
 4
4
-
 5
5
-
 6
6
-
 7
7
-
 8
8
-
 9
9
-
 10
10
-
 11
11
-
 12
12
-
 13
13
-
 14
14
-
 15
15
-
 16
16
-
 17
17
-
 18
18
-
 19
19
-
 20
20
-
 21
21
-
 22
22
-
 23
23
-
 24
24
-
 25
25
-
 26
26
-
 27
27
-
 28
28
-
 29
29
-
 30
30


Tefal YV960015 Manuel utilisateur
- Taper
- Manuel utilisateur
dans d''autres langues
- English: Tefal YV960015 User manual
Documents connexes
-
Tefal YV970850 Manuel utilisateur
-
T-Fal AW950050 Manuel utilisateur
-
-
-
-
T-Fal FZ700251 Le manuel du propriétaire
-
T-Fal FZ700251 Manuel utilisateur
-
-
-