
TOILETTES
TOILETS
Manuel D’Instruction
Instruction Manual
JADE BATH 11111 RUE COLBERT, ANJOU, QC, H1J 2S1 TEL: 1.866.333.0555 - JADEBATH.COM - INFO@JADEBATH.COM

JADE BATH 11111 RUE COLBERT, ANJOU, QC, H1J 2S1 TEL: 1.866.333.0555 - JADEBATH.COM - INFO@JADEBATH.COM
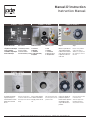
Box content
1. Mounting brackets
2. FLoor screws
3. Plastic anchors
4. Bowl Mounting screw
Necessary tools
1. Drill
2. Hammer
3. Screwdriver
4. Glue (for glass)
5. Triagular ruler
Step 3
Draw a cross guideline
at the point which is
305mm (12”) away from
the roughing in center to
the wall.
Step 4
Using the tracing sheet,
cut out the drain hole and
then align it onto the floor
flange.
Step 5
Drill 2 8mm holes using
the tracing sheet, for the
ground screws.
Step 6
Insert the plastic anchors
to the floor. Then
attach the Type Seven
Installation Brackets
using the floor screws.
Contenu de la boite.
1. Équerres en Plastique
2. Vis à plancher
3. Chevilles en plastique
4. Vis de montage
Outils necessaire
1. Perceuse
2. Marteau
3. Tournevis
4. colle (pour vitre)
5. Équerre
Étape 3
Mesurer à partir du mur
12po. Veuillez marquer
l’endroit en dessinant un
croix. Assurez-vous que
le guide est centré sur
cette croix.
Étape 4
A l’aide de la feuille de
traçage, découper la
sortie du drain et ensuite
alignez-là sur la bride
du sol.
Étape 5
Percer 2 trous de 8mm
à l’aide de la feuille de
traçage, pour les vis du
sol.
Étape 6
Insérez les chevilles en
plastique au plancher.
Ensuite fixez les équerres
d’installation de type
sept à l’aide des vis à
plancher.
Manuel D’Instruction
Instruction Manual
ÉTAPE 1 - STEP 1
ÉTAPE 4 - STEP 4
ÉTAPE 2 - STEP 2
ÉTAPE 5 - STEP 5 ÉTAPE 6 - STEP 6
ÉTAPE 3 - STEP 3

JADE BATH 11111 RUE COLBERT, ANJOU, QC, H1J 2S1 TEL: 1.866.333.0555 - JADEBATH.COM - INFO@JADEBATH.COM
Manuel D’Instruction
Instruction Manual
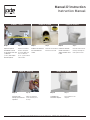
ÉTAPE 7 - STEP 7
ÉTAPE 10 - STEP 10
ÉTAPE 8 - STEP8
ÉTAPE 11 - STEP 11
ÉTAPE 9 - STEP 9
Step 7
Adjust the installation
brackets and tighten
the screws. Make sure
there is a 206 mm
(8 1/8 ‘’) space between
each brackets.
Step 8
Install the wax around the
drain hole of the bowl.
Step 9
Install the toilet bowl over
the flange and align the
toilet against the wall.
Étape 7
Ajustez les équerres
d’installation et serrez
les vis. Assurez-vous qu’il
y a 206 mm
( 8 1/8’’ ) entre chaque
bord des équerres.
Étape 8
Installer la cire autour du
trou d’évacuation de
cuvette.
Étape 9
Installez la cuvette de
toilette sur la bride et
alignez la toilette contre
le mur.
Step 10
Tighten the mounting
screws and then put on
the caps.
Step 11
The installation is now
complete.
Étape 10
Serrez les vis de
montage, puis mettez les
capuchons.
Étape 11
L’installation est
maintenant complète.

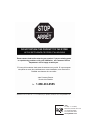
STOP
ARRET
DO NOT RETURN THIS PRODUCT TO THE STORE
NE PAS RETOURNER CE PRODUIT AU GASIN
a
a
1-866-333-0555
l
A
2
Jade
11 900, J.J. Joubert,
Montreal, Canada H1E 7J4
Tel: (514) 832 0555
Fax: (514) 832 0554
www.jadebath.com
-
 1
1
-
 2
2
-
 3
3
-
 4
4


Jade Bath TS-151 Mode d'emploi
- Taper
- Mode d'emploi
- Ce manuel convient également à
dans d''autres langues
Documents connexes
Autres documents
-
STRUCTUBE ANJOU Assembly Instructions
-
-
Canarm HVR Manuel utilisateur
-
 Kichler Lighting Jade 300030 Manuel utilisateur
-
-
-
 Boyel Living JMJBL-125-OPT Mode d'emploi
-
 PUR Water Purification Products Primair Series Manuel utilisateur
-
 Four winns Fling Le manuel du propriétaire
-
Human Touch Perfect Chair PC600 Le manuel du propriétaire


