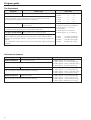
Miele 52833705USA Mode d'emploi
- Catégorie
- Sèche-linge électriques
- Taper
- Mode d'emploi
Ce manuel convient également à

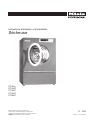
Operating and Installation Instructions
PT 8257
PT 8337
PT 8407
PT 8507
To prevent accidents and machine damage
read these instructions before installing or use.
M.-Nr. 07 713 522
en, fr - US, CA

2

IMPORTANT SAFETY INSTRUCTIONS . . . . . . . . . . . . . . . . . . . . . . . . . . . . . . . . . . . . . . . . . . . . . . . . . . . . . . . . . . 4
Description of the appliance . . . . . . . . . . . . . . . . . . . . . . . . . . . . . . . . . . . . . . . . . . . . . . . . . . . . . . . . . . . . . . . . . . 6
Operating panel .............................................................................7
Drying. . . . . . . . . . . . . . . . . . . . . . . . . . . . . . . . . . . . . . . . . . . . . . . . . . . . . . . . . . . . . . . . . . . . . . . . . . . . . . . . . . . . . 9
Before first use ..............................................................................9
Preparing the laundry .........................................................................9
1. Turn on the dryer .........................................................................10
2. Load the laundry..........................................................................10
3. Select a program .........................................................................11
4. Select [ "Blockplus" (if desired) ............................................................11
5. Adjust the program (if desired)...............................................................12
6. Select Delay Start (if desired) ................................................................13
7. Start a program...........................................................................14
8. End of program...........................................................................14
Extra features . . . . . . . . . . . . . . . . . . . . . . . . . . . . . . . . . . . . . . . . . . . . . . . . . . . . . . . . . . . . . . . . . . . . . . . . . . . . . 15
Add or remove laundry during a program ........................................................15
Skip or repeat program sequences .............................................................15
Program stop ..............................................................................16
Canceling a program ........................................................................16
K Information ...............................................................................16
Estates ...................................................................................18
Program guide. . . . . . . . . . . . . . . . . . . . . . . . . . . . . . . . . . . . . . . . . . . . . . . . . . . . . . . . . . . . . . . . . . . . . . . . . . . . . 21
Basic programs ............................................................................21
Comforters ................................................................................23
Cleaning Contractors ........................................................................23
Fire Department ............................................................................24
Professional cleaners ........................................................................24
Chip card use / Coin mechanism . . . . . . . . . . . . . . . . . . . . . . . . . . . . . . . . . . . . . . . . . . . . . . . . . . . . . . . . . . . . . 26
Drying using the coin mechanism C 4060 / C 4065 / C 4070 .........................................26
Cleaning and Care . . . . . . . . . . . . . . . . . . . . . . . . . . . . . . . . . . . . . . . . . . . . . . . . . . . . . . . . . . . . . . . . . . . . . . . . . 27
Cleaning the lint filter ........................................................................27
Dryer .....................................................................................27
Frequently asked questions . . . . . . . . . . . . . . . . . . . . . . . . . . . . . . . . . . . . . . . . . . . . . . . . . . . . . . . . . . . . . . . . .28
Fault messages.............................................................................28
After sales service . . . . . . . . . . . . . . . . . . . . . . . . . . . . . . . . . . . . . . . . . . . . . . . . . . . . . . . . . . . . . . . . . . . . . . . . . 30
IMPORTANT SAFETY INSTRUCTIONS . . . . . . . . . . . . . . . . . . . . . . . . . . . . . . . . . . . . . . . . . . . . . . . . . . . . . . . . . 32
Leveling the dryer ...........................................................................34
Installation on an elevated base ................................................................34
Coin mechanism ............................................................................35
Communication module XKM RS232 ............................................................35
Electrical connection ........................................................................36
Air intake / Venting ..........................................................................36
Hot water connection ........................................................................36
Steam connection ...........................................................................36
Technical Data. . . . . . . . . . . . . . . . . . . . . . . . . . . . . . . . . . . . . . . . . . . . . . . . . . . . . . . . . . . . . . . .
. . . . . . . . . . . . . 37
Guide to the data plate symbols . . . . . . . . . . . . . . . . . . . . . . . . . . . . . . . . . . . . . . . . . . . . . . . . . . . . . . . . . . . . . . 38
Help to protect the environment . . . . . . . . . . . . . . . . . . . . . . . . . . . . . . . . . . . . . . . . . . . . . . . . . . . . . . . . . . . . . . 39
Quick Guide. . . . . . . . . . . . . . . . . . . . . . . . . . . . . . . . . . . . . . . . . . . . . . . . . . . . . . . . . . . . . . . . . . . . . . . . . . . . . . . 41
Contents
3

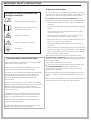
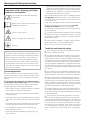
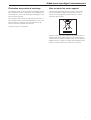
Explanation of safety instructions and
warnings on the dryer
Read the operating instructions.
Read all the instructions, e.g. the
installation instructions.
Caution, hot surfaces.
Caution, voltage up to 1000 V
Grounding
,READ AND SAVE THESE INSTRUCTIONS
Keep these operating instructions in a safe place and
pass them on to any future user.
Read all instructions before installation or use of the
dryer to prevent injury and machine damage.
This dryer is only intended for industrial or institutional
use and should not be used by anyone who is not
specially trained to operate it. This also applies to
industrial applications performed in residential
environments.
This machine conforms to current safety requirements.
However, inappropriate installation and use can lead to
personal injury and property damage. Read the
operating and installation instructions carefully before
using this machine.
Installation, repair and maintenance work should be
performed by a Miele authorized service technician.
Work by unqualified persons could be dangerous
Improper use of the appliance can lead to personal
injury and material damage.
All personnel working with this machine must be fully
trained in all aspects of its use and safety.
Proper use of the dryer
~
The dryer is only intended for drying fabrics that were
washed with water as a cleaning agent. Check fabric care
labels to verify that the articles can be machine dried.
~
To prevent fire, do not dry the following (with the
exception of the textiles permitted in the special programs):
–
Articles containing foam rubber, rubber or rubber-like
materials.
–
Articles that have been treated with flammable cleaning
agents.
–
Articles that have been contaminated with hair spray,
nail polish remover, etc.
–
Articles that may be greasy, oily or that may contain
other residues, e.g. kitchen or salon laundry.
–
Mops, floor cloths, etc. if they contain substances such
as wax or chemical cleaning agents.
–
Damaged padded or filled fabrics such as jackets or
cushions.
–
Articles that are not sufficiently clean and are soiled with
grease or oil. Wash very dirty articles (e.g. work clothing)
with a special detergent. For information in this regard,
consult a cleaning agent retailer.
With sensitive fabrics there may be a danger of them
spontaneously combusting if dried too long. Immediately
remove the laundry at the end of the drying program and
after a power failure.
Keep a fire extinguisher near the dryer.
~
The laundry must not be removed from the dryer until
the cooling down phase has been completed.
If hot laundry items are stacked or packed they could
spontaneously combust.
~
Empty all pockets so that no flammable items such as
lighters, matches, candles and cosmetics end up in the
dryer.
~
If the dryer is operated in a publicly accessible area, the
operator must ensure the safe use of the appliance.
IMPORTANT SAFETY INSTRUCTIONS
4

Safety
,
The dryer is only intended for drying fabrics that
were washed with water as a cleaning agent.
~
Operate the dryer only if an exhaust air duct is
connected and the room is adequately ventilated.
~
Persons who lack physical, sensory or mental abilities,
or experience with the appliance should not use it without
supervision or instruction by a responsible person.
~
Do not let children play in, on or near the dryer. Do not
let them play with the controls or operate the unit.
~
Always close the door after loading or unloading the
dryer, to prevent:
–
children from climbing into the dryer, or hiding small
items in the dryer.
–
small animals from climbing into the dryer.
~
Do not operate the appliance if the control panel, wires
or cables are damaged.
~
Do not damage, remove, or bypass any of the safety
features and controls of the dryer.
~
Do not operate the dryer when housing parts have been
removed and the moving or electrical parts are exposed
and accessible.
~
High temperatures occur at the window and frame of
the drum door. The laundry is extremely hot if it is removed
too soon. Burn hazard!
~
Do not touch the steam components (depending on
model). Scalding hazard!
~
Always make sure the drum is stationary before
reaching in to remove laundry. Never put your hand into a
drum that is still moving.
~
Take care not to pinch or cut your fingers on the hinges
of the drum door or lint flap. Use the handles.
~
The area necessary to open the drum door completely
must not be obstructed by doors or other structures.
~
Do not use the dryer without the built-in lint filter in
place. Fire hazard!
If the lint filter is damaged it must be replaced immediately.
~
Never use or store gasoline, petroleum-based
substances or other easily flammable substances near the
machine. Fire and explosion hazard!
~
A build-up of lint will block the airflow, heating and
ventilation, which will impair the efficiency of the dryer. Be
sure to clean the lint filter before or after each load.
~
Do not use a power washer to clean the dryer.
~
Remove the door to the drying compartment before the
appliance is removed for service or discarded.
~
Disinfection and cleaning agents often contain chlorine
compounds. If these agents dry on stainless steel it will
cause it to rust. To protect the dryer use only chlorine-free
disinfection and cleaning agents for laundering and
disinfecting, and for cleaning the stainless steel surfaces. If
in doubt about a cleaning agent, contact the manufacturer.
If an agent containing chlorine is spilled, wash it off with
water and dry with a soft cloth.
Electrical safety
~
Be certain this appliance is properly installed and
grounded by an authorized technician. For electrical safety
this machine must be grounded z. It is imperative that this
basic safety requirement be tested by a qualified
electrician. Consult a qualified electrician if in doubt.
~
Before installation or service, disconnect the power
supply to the work area.
~
Repairs to electrical and gas appliances should only be
carried out by a Miele Service Technician in accordance
with local and national safety regulations. Unauthorized
repairs could cause injury or machine damage.
~
Use only genuine Miele parts. Use of non-Miele parts
may impair performance and void any guarantees.
~
Do not repair or replace any part of the appliance or
attempt any servicing unless specifically recommended in
these operating instructions. Contact Miele’s Technical
Service Department for assistance.
~
Do not operate the dryer in a room where cleaning
machines operate with solvents containing CFC. Vapors
from combustion turn into hydrochloric acid which
damages laundry and dryer. When operated in a separate
room, there must be no air exchange possible. Make sure
the dryer is supplied with clean fresh air only.
~
The air intake opening is located on the back of the
dryer. Never block this opening. Therefore, do not cover
the dryer top with any blankets or sheets.
~
The dryer needs timely and professional maintenance to
prevent performance loss, malfunctions and the risk of fire.
SAVE THESE
INSTRUCTIONS
IMPORTANT SAFETY INSTRUCTIONS
5

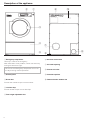
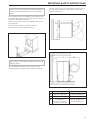
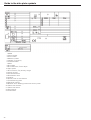
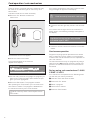
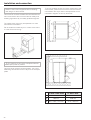
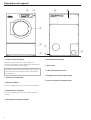
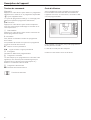
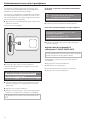
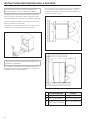
a Emergency Stop button
Use only in case of an emergency.
After elimination of the problem, unlock the switch by
turning the dial to the right.
Do not use the Emergency Stop button to turn off
the dryer during normal operation!
b Control panel
c Drum door
Pull the door handle to open the drum door.
d Lint filter flap
Pull the handle to open the lint filter flap.
e Four height adjustable feet
f Electrical connection
g Air intake opening
h Exhaust air collar
i Potential equalizer
j Communication module slot
Description of the appliance
6
f
g
h
j
i
ab
c
d
e

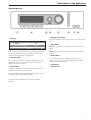
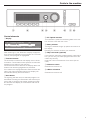
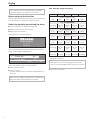
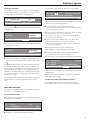
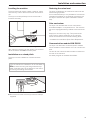
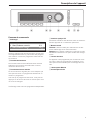
Operating panel
a Display*
1 White Cottons 0%
2 Cottons 0%
3 Cottons Hot Wash 0%
FC A
After turning on, the "Welcome" display will appear for
a short time followed by the program list. The most
recently used program is highlighted.
b Function keys
The keys have different functions depending on the
appliance status. The functions are shown in the
display above the buttons.
c Start button
The light ring flashes if a selected program can be
started or a selection can be made.
Once a program has started the Start button can be
pressed to show the original display.
* Contents in the display will vary with program
offering.
d Optical PC interface
For data transfer between the machine’s controls and
a PC.
e Jog shuttle
Turn the jog shuttle for display selections and input
fields.
Press the jog shuttle to confirm display selections or
changes.
f Card reader
If the machine has been programmed for card
operation, you can only use those programs stored
on the card to dry laundry.
g I On button
h 0 Off button
Description of the appliance
7

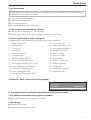
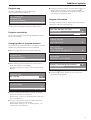
Control keys
f Stop / End
Press to stop a selected program or end an already
stopped program.
[ Block plus
The respective program block (e.g. pre-drying) will
be added to the program.
FC Functions
Press this key to temporarily select another language
and/or access the Supervisor level.
mDelay start
Press this key to select a start time in the display.
K Information
To show program information
ü Skip
Cycles of a program in progress can be skipped or
repeated.
A Back to the previous display
e/- Next or previous line
S Save
See the Programming Manual
$ Program locked
If a program has a "locked" status it cannot be
stopped or ended with the Off-button after one
minute.
% Program unlocked
\ Operating data
Data transfer
Operator card
No programs are saved on this card. To transfer the
data from the control to the card and vice versa see
the Programming Manual.
30 programs with 6 blocks each can be saved on the
card.
The back of the card can be labeled.
Insert the card, arrow first.
Description of the appliance
8

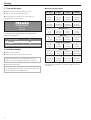
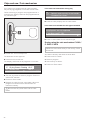
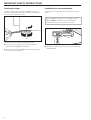
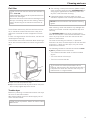
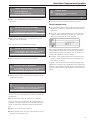
Before first use
^
Wipe the interior of the drum with a soft dry cloth
Preparing the laundry
,
Not all fabrics are suitable for drying in a
tumble dryer. Check the manufacturer’s
instructions on the fabric care label.
q = Dry at normal temperature
r = Dry at low temperature
s = Do not tumble dry
^
Sort the laundry by fabric type and color. This will
ensure even drying results and will prevent
damage to fabrics.
,
To prevent fire, do not dry the following
(with the exception of the textiles permitted in the
special programs):
Articles containing foam rubber, rubber or
rubber-like materials.
Articles that have been treated with flammable
cleaning agents.
Articles that have been contaminated with hair
spray, nail polish remover, etc.
Articles that may be greasy, oily or saturated with
other residues, e.g. kitchen or salon laundry.
Mops, floor cloths, etc. if they contain substances
such as wax or chemical cleaning agents.
Damaged padded or filled fabrics, like jackets or
cushions.
Articles that are not sufficiently clean and are
soiled with grease or oil. Wash very dirty articles
(e.g. work clothing) with a special detergent.
Important drying information:
–
Articles made from pure wool and wool mixtures
may become matted. Dry these with the Woolens
program only.
–
Pure linen may become rough with tumble drying.
Consult the manufacturer’s instructions before
drying.
–
Items with metal buckles, hooks, snaps, zippers,
etc. should be put into the dryer in a cloth bag
(e.g. pillow case) to protect the drum from
scratches and dents.
–
Articles with closed metal zippers may cause a
short at the sensor electrodes on the drum ribs, so
that the drying process ends too late or does not
end at all. These items should be dried with the
zippers open.
–
Loop knit materials tend to shrink. Over-drying
increases this effect. Do not use the highest dry
program for such fabrics.
–
Starched laundry can be tumble dried. Select a
program with a suitable residual moisture for
ironing by hand or machine.
Sort the laundry according to the level of dryness
required. It is not necessary to sort according to
size.
– Pillow cases and duvet covers should be buttoned
to prevent smaller items from getting caught inside
them.
– For cost efficiency, only dry full loads. Overloading
provides poor drying results and has an adverse
effect on fabrics.
–
If the washing machine's last rinse cycle is with
warm water, a shorter drying time will be required
due to the lower residual moisture and the residual
heat in the laundry.
Drying
9

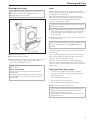
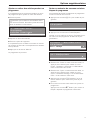
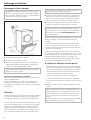
1. Turn on the dryer
^
Open the gas or steam valve (on site).
^
Turn on the power main (on site).
^
Press the l "On" button to turn the dryer on.
The Welcome screen shows.
M
PROFESSIONAL
PT 8xx7
Welcome
The program list is displayed. The program last
started is highlighted.
1 White Cottons 0%
2 Cottons 0%
3 Colors 0%
FC A
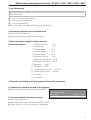
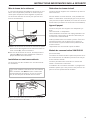
2. Load the laundry
^ Open the drum door.
^ Load the laundry loosely into the drum.
Check that there are no foreign objects in the
drum, e.g. wash dosage containers, coins, etc.
^ Close the drum door.
To prevent fabric damage, check that laundry will
not be caught in the closed door.
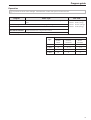
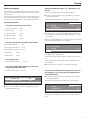
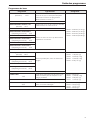
Maximum laundry weight
PT 8257 PT 8337 PT 8407 PT 8507
Drum volume
66 gal
(250 l)
86 gal
(325 l)
106 gal
(400 l)
132 gal
(500 l)
Cottons
22-29 lb
(10-13 kg)
29-35 lb
(13-16 kg)
35-44 lb
(16-20 kg)
44-55 lb
(20-25 kg)
Wrinkle-free
11 lb
(5 kg)
14.5 lb
(6.6 kg)
17.6 lb
(8 kg)
22 lb
(10 kg)
Woolens
9lb
(4 kg)
11.5 lb
(5.2 kg)
14 lb
(6.4 kg)
17.5 lb
(8 kg)
Delicates/Synthetics
4.5 lb
(2 kg)
6lb
(2.6 kg)
7lb
(3.2 kg)
9lb
(4 kg)
Hot/Cool air
22-29 lb
(10-13 kg)
29-35 lb
(13-16 kg)
35-44 lb
(16-20 kg)
44-55 lb
(20-25 kg)
Proofing, Outerwear
11-14.5 lb
(5-6.6 kg)
13-20 lb
(6-9 kg)
17.5-24 lb
(8-11 kg)
22-29 lb
(10-13 kg)
See "Adjust the program - Laundry weight" for more
information.
Drying
10

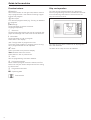
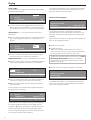
3. Select a program
The dryer uses an electronic sensor system which
monitors the residual moisture in the laundry and a
timer for extra safety.
Once the required level of dryness has been reached
the laundry is cooled and the drying program will
end.
1 White Cottons 0%
2 Cottons 0%
3 Colors 0%
FC A
^
Select a program by turning the jog shuttle (e.g.
Program 2 Hot Wash / Cottons dry).
See the "Program Guide" for more information on
the standard programs.
4. Select [ "Blockplus" (if desired)
(Not available for standard programs)
^
Confirm the selected program by pressing the jog
shuttle.
22 Hot Wash / Cottons dry 22.0 / 22.0 lb
15 % Drying 176 °F
Cool down e
[ m A
^
Press the [ "Blockplus" button to select a
program block, e.g. pre-drying if desired.
22 Hot Wash / Cottons dry 22.0 / 22.0 lb
24 % Pre-drying
0 % Drying e
[ m A
The field [ is highlighted.
The function can be deselected by pressing the
button again.
If you do not need to make any other changes to the
program:
^ Press the "START" button and the drying program
will begin.
Drying
11

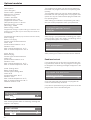
5. Adjust the program (if desired)
To change program settings before starting the
program:
^
Confirm the selected program by pressing the jog
shuttle.
2 Cottons 22.0 / 22.0 lb
0 % Drying 176°F
Cool down e
m A
The maximum laundry weight is shown on the right
side in the display.
Laundry weight
The laundry weight can be manually selected.
2 Cottons 22.0 22 lb
0 % Drying 176°F
Cool down e
m A
^ Turn the jog shuttle until "Laundry weight" is
highlighted and press to confirm the selection. Turn
the jog shuttle to the desired laundry weight and
press to confirm the selection.
Temperature
In 1 °F or °C steps from 86 °F / 30 °C to max. 203 °F /
95 °C.
^ Turn the jog shuttle to "Temperature" and press to
confirm the selection.
2 Cottons 22.0 lb
0 % Drying 176°F
Cool down e
m A
^
Turn the jog shuttle to the desired temperature and
press it to confirm the selection.
Residual moisture
In 1 % steps from -4 to 40 %.
^
Turn the jog shuttle to "Residual moisture" (0 %)
and press to confirm the selection.
2 Cottons 22.0 lb
0% Drying 176°F
Cool down
m A
^
Turn the jog shuttle to the desired percentage and
press it to confirm the selection.
^
Press the "Start" button to begin the program.
The program sequence is shown in the display after
the start of the program.
2 Cottons
0 % Drying >40 %{
Cool down Finish at 12:35
mKf
In the second display line, "Drying" in the display
above, the actual residual moisture is shown (>40%)
and if the heating { is active. The third line shows the
following program block.
The "Finish at 12:35" on the right side shows the end
time of the program.
The "Finish at" display has a self learn function.
Several program cycles are necessary for an exact
display.
Drying
12

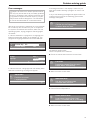
6. Select Delay Start (if desired)
Use the m "Delay start" button to start a program at a
later time.
Setting the delay start
^
Select a program.
^
Press m "Delay Start".
2 Cottons 22.0 lb
Start time: 2 :10 pm Start date: 2.13.2006
After setting the delay start press Start.
m A
The display shows the current time of day and date.
The hour entry field is highlighted.
^
Turn the jog shuttle to the "Hours" entry field. Press
the jog shuttle to select the hour. Turn the jog
shuttle to the desired hour and press it to confirm
the selection.
^
Turn the jog shuttle to the "Minutes" entry field.
Press the jog shuttle to select the minutes. Turn the
jog shuttle to the desired minutes and press it to
confirm the selection.
^ Turn the jog shuttle to the "Start date" entry field.
Press the jog shuttle to select the start date. Turn
the jog shuttle to the desired date and press it to
confirm the selection.
^ Press the "Start" button.
The program will start at the selected time.
2 Cottons 22.0 lb
0 % Drying
2:07pm -2.13.2006 Start: 2:10pm-2.13.2006
m A
The display shows the current time of day, date and
the start time.
^
If the door is opened before the delay start time
has elapsed, press the "Start" button again.
Canceling the Delay Start
^
Press the m "Delay Start" or A "Back" button to
cancel the delay start function.
Drying
13

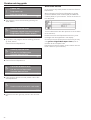
7. Start a program
^
Press the "Start" button to begin the program..
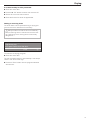
8. End of program
2 Cottons
Program end
Anti-crease Finish at 12:35
m FC Kf
The program end is shown in the display and the
buzzer sounds.
^
Open the drum door.
^
Remove the laundry.
If the laundry is not removed from the machine at the
end of the program an anti-crease cycle will
automatically start. The drum turns in intervals to
minimize creasing in the laundry.
,
The laundry must not be removed from the
dryer before the drying program has finished. The
cooling down phase must be completed.
If hot laundry items are stacked or packed they
could spontaneously combust.
^ Check the lint filter and clean if necessary.
Close lint filter flap, trip hazard.
2 Cottons
Program end
Caution: Lint filter is clogged
A
A reminder will appear in the display when the filter
needs to be cleaned.
^
Clean the lint filter immediately after the program
ends.
^
Close the drum door.
^
Press the 0 "Off" button to turn off the machine.
^
Turn off power at the power mains (on site).
^
Close the on site gas or steam valve.
Drying
14

Add or remove laundry during a program
The drum door can be opened during a program to
add or remove laundry.
^
Open the door.
,
Make sure the drum is stationary before
removing laundry. Never put your hand into a
drum that is still moving.
2 Cottons
Program stop
Door is open. Close the door.
FC f
^
Add or remove a laundry item.
^
Close the door.
The fan may come on as a safety measure if the
temperature in the drum is too high.
^
Press the "Start" button.
The program continues.
Skip or repeat program sequences
Sequences of a program in progress can be skipped
or repeated.
^
Press the f "End" button to stop the program.
2 Cottons
Program stop
Press Start.
ü f
^
Press the ü "Skip/Repeat" button.
The display shows the current program segment. See
"Program structure" in the Programming Manual.
Skip/Repeat -> 2 Cottons
Program stop
Area 1: Drying e
S A
Area 1: Drying
Block 1: Pre-drying
-
S A
^ Turn the jog shuttle to "Area" and press it to confirm
the selection.
Area: Select 1 Drying or 2 Cooling and confirm.
^ Turn the jog shuttle to "Block" and press it to
confirm the selection.
Block: Select Drying 1-10 or Cooling 1-10 and
confirm.
^
Press the S "Save" and "Start" button to skip the
program cycles.
^
To go back without skipping program cycles:
Press the A "Back" to go back to the program
stop.
Extra features
15

Program stop
^
Press the f "End" button to stop the program.
2 Cottons
Program stop
Press Start.
ü f
^
Press the "Start" button to continue the program.
Canceling a program
To cancel a program, press the f "End" button twice.
K Information
^
Press the K "Information" button during the program
to see program information.
Examples:
2 Cottons
Delay start: 10.7.2003
Start time: 9:47 e
m K f
Time after Start:0h23min
Time left:0h11min
Program end time: 10:21 pm e
Area 1: Drying
Block 1: Pre-drying
Actual exhaust air temp.: 138 °F e
Reference supply air temperature : 302 °F
Peak load: No
Anti-crease: 3s./87s./60min e
2 Cottons
Recirculation/vent flap: Recirculation -
Block end signal: Yes
A
^ Press the A "Back" button to get back to the
program sequence.
Extra features
16

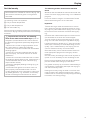
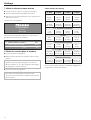
Language
The display language can be temporarily changed
with the flag symbol.
1 White Cottons 0%
2 Cottons 0%
3 Colors 20%
FC A
^
Press the FC function button.
Settings Back <-
Main menu Language
Programming level
FC A
^
Press the jog shuttle to select "Language".
Settings svenska
Language english (USA)
Back <-
FC A
^ Turn the jog shuttle to select the desired language
and press to confirm the selection.
When the selection is confirmed the display switches
to the selected language.
The language is set back to its original setting:
– if no activity was carried out for 5 minutes.
– 5 minutes after the program has ended.
–
when the door is opened.
Extra features
17

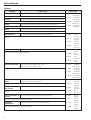
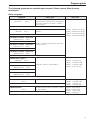
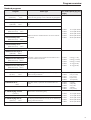
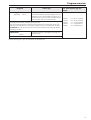
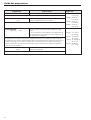
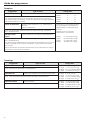
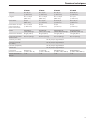
Estates
Program Fabric Type max. load
White Cottons White items made of cottons, linens PT 8257 22-29 lb
(10-13 kg)
PT 8337 29-35 lb
(13-16 kg)
PT 8407 35-44 lb
(16-20 kg)
PT 8507 44-55 lb
(20-25 kg)
165 °F
Cottons White or colored items made of cottons, linens or mixed fabrics
165 °F
Colors Colored items made of cottons, linens or mixed fabrics
165 °F
Darks Dark items made of cottons, linens or mixed fabrics
165 °F
Minimum iron Items made of synthetic fabrics, mixed fabrics PT 8257 11 lb
(5.0 kg)
PT 8337 14.5 lb
(6.6 kg)
PT 8407 17.5 lb
(8.0 kg)
PT 8507 22 lb
(10 kg)
140 °F
Delicates Items made of synthetic fabrics, mixed fabrics PT 8257 4.4 lb
(2 kg)
PT 8337 6 lb
(2.6 kg)
PT 8407 7 lb
(3.2 kg)
PT 8507 9 lb
(4 kg)
104 °F, Dry to 20% residual moisture
600+TC Sheets Hot Bed linens high thread count sheet
made of cottons, mixed fabrics
PT 8257 22-29 lb
(10-13 kg)
PT 8337 29-35 lb
(13-16 kg)
PT 8407 35-44 lb
(16-20 kg)
PT 8507 44-55 lb
(20-25 kg)
140 °F
600+TC Sheets
Warm
Bed linens high thread count sheet
made of cottons, mixed fabrics
PT 8257 11 lb
(5.0 kg)
PT 8337 14.5 lb
(6.6 kg)
PT 8407 17.5 lb
(8.0 kg)
PT 8507 22 lb
(10 kg)
140 °F
Silk and Rayon
Bed Linens
Bed linens made of silk, rayon, satin
140 °F
Down Comforters &
Pillows
Down comforters, duvet covers made of down PT 8257 22 lb
(10 kg)
PT 8337 29 lb
(13 kg)
PT 8407 35.5 lb
(16 kg)
PT 8507 44 lb
(20 kg)
165 °F, see load size in "Covers" section
Washable
Bedspreads
Blankets, covers made of synthetic fabrics
165 °F, see load size in "Covers" section
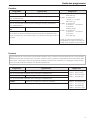
Extra features
18

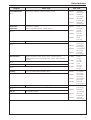
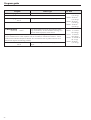
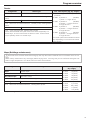
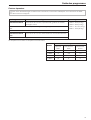
Program Fabric Type max. load
Linen Tablecloths
165 °F
Tablecloths, napkins made of cottons, linens PT 8257 22-29 lb
(10-13 kg)
PT 8337 29-35 lb
(13-16 kg)
PT 8407 35-44 lb
(16-20 kg)
PT 8507 44-55 lb
(20-25 kg)
Mixed Fiber
Tablecloths
Tablecloths, napkins
made of synthetic fabrics, mixed fabrics
PT 8257 11 lb
(5.0 kg)
PT 8337 14.5 lb
(6.6 kg)
PT 8407 17.5 lb
(8.0 kg)
PT 8507 22 lb
(10 kg)
140 °F
Outerwear Coats and jackets made of mixed fabrics PT 8257 11-14.5 lb
(5-6,6 kg)
PT 8337 14.5-20 lb
(6,6-9 kg)
PT 8407 17.5-24.5 lb
(8-11 kg)
PT 8507 22-29 lb
(10-13 kg)
140 °F
Silks handcare Blouses, dresses, pants, skirts, coats, evening gowns,
wedding gown, faux furs made of silk, rayon, satin, acetate,
viscose
PT 8257 8.8 lb
(4 kg)
PT 8337 11.5 lb
(5.2 lb)
PT 8407 14 lb
(6.5 kg)
PT 8507 17.5 lb
(8 kg)
140 °F
Woolens handcare Woolens and mixed woolens
165 °F
Proofing Drying of waterproofed outdoor items PT 8257 11-14.5 lb
(5-6,6 kg)
PT 8337 14.5-20 lb
(6,6-9 kg)
PT 8407 17.5-24.5 lb
(8-11 kg)
PT 8507 22-29 lb
(10-13 kg)
140 °F
Hot air Drying small loads or finish drying single items PT 8257 22-29 lb
(10-13 kg)
PT 8337 29-35 lb
(13-16 kg)
PT 8407 35-44 lb
(16-20 kg)
PT 8507 44-55 lb
(20-25 kg)
165 °F
Cool air Airing/Fluffing items
Extra features
19

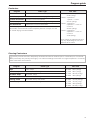
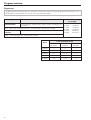
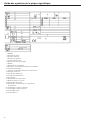
Program Fabric Type max. load
Smoothing
Cotton and linen fabrics
PT 8257 11 lb
(5.0 kg)
PT 8337 14.5 lb
(6.6 kg)
PT 8407 17.5 lb
(8.0 kg)
PT 8507 22 lb
(10 kg)
165 °F, Reduces wrinkles after the being washed. Remove items immediately after
program end and allow to air dry.
Denim
(Machine iron) 165 °F
Items made of denim
Shirts
(Machine iron) 165 °F
Shirts and blouses
Towelling
165 °F
Multi-layer fabrics and towels.
Towels, wash cloths, bath robes, etc.
PT 8257 22-29 lb
(10-13 kg)
PT 8337 29-35 lb
(13-16 kg)
PT 8407 35-44 lb
(16-20 kg)
PT 8507 44-55 lb
(20-25 kg)
Reactivate
140 °F
Outdoor clothing suitable for drying in a tumble dryer.
The fibers are straightened, improving water-repellency.
PT 8257 11-14.5 lb
(5-6,6 kg)
PT 8337 14.5-20 lb
(6,6-9 kg)
PT 8407 17.5-24.5 lb
(8-11 kg)
PT 8507 22-29 lb
(10-13 kg)
Automatic
140 °F
Mixed loads of fabrics for the Cottons and Wrinkle-free
programs.
PT 8257 11 lb
(5.0 kg)
PT 8337 14.5 lb
(6.6 kg)
PT 8407 17.5 lb
(8.0 kg)
PT 8507 22 lb
(10 kg)
Temperatures given refer to extracted air temperature.
Extra features
20
La page est en cours de chargement...
La page est en cours de chargement...
La page est en cours de chargement...
La page est en cours de chargement...
La page est en cours de chargement...
La page est en cours de chargement...
La page est en cours de chargement...
La page est en cours de chargement...
La page est en cours de chargement...
La page est en cours de chargement...
La page est en cours de chargement...
La page est en cours de chargement...
La page est en cours de chargement...
La page est en cours de chargement...
La page est en cours de chargement...
La page est en cours de chargement...
La page est en cours de chargement...
La page est en cours de chargement...
La page est en cours de chargement...
La page est en cours de chargement...
La page est en cours de chargement...
La page est en cours de chargement...
La page est en cours de chargement...
La page est en cours de chargement...
La page est en cours de chargement...
La page est en cours de chargement...
La page est en cours de chargement...
La page est en cours de chargement...
La page est en cours de chargement...
La page est en cours de chargement...
La page est en cours de chargement...
La page est en cours de chargement...
La page est en cours de chargement...
La page est en cours de chargement...
La page est en cours de chargement...
La page est en cours de chargement...
La page est en cours de chargement...
La page est en cours de chargement...
La page est en cours de chargement...
La page est en cours de chargement...
La page est en cours de chargement...
La page est en cours de chargement...
La page est en cours de chargement...
La page est en cours de chargement...
La page est en cours de chargement...
La page est en cours de chargement...
La page est en cours de chargement...
La page est en cours de chargement...
La page est en cours de chargement...
La page est en cours de chargement...
La page est en cours de chargement...
La page est en cours de chargement...
La page est en cours de chargement...
La page est en cours de chargement...
La page est en cours de chargement...
La page est en cours de chargement...
La page est en cours de chargement...
La page est en cours de chargement...
La page est en cours de chargement...
La page est en cours de chargement...
La page est en cours de chargement...
La page est en cours de chargement...
La page est en cours de chargement...
La page est en cours de chargement...
La page est en cours de chargement...
La page est en cours de chargement...
La page est en cours de chargement...
La page est en cours de chargement...
La page est en cours de chargement...
La page est en cours de chargement...
La page est en cours de chargement...
La page est en cours de chargement...
La page est en cours de chargement...
La page est en cours de chargement...
La page est en cours de chargement...
La page est en cours de chargement...
La page est en cours de chargement...
La page est en cours de chargement...
La page est en cours de chargement...
La page est en cours de chargement...
La page est en cours de chargement...
La page est en cours de chargement...
La page est en cours de chargement...
La page est en cours de chargement...
La page est en cours de chargement...
La page est en cours de chargement...
La page est en cours de chargement...
La page est en cours de chargement...
La page est en cours de chargement...
La page est en cours de chargement...
La page est en cours de chargement...
La page est en cours de chargement...
La page est en cours de chargement...
La page est en cours de chargement...
La page est en cours de chargement...
La page est en cours de chargement...
-
 1
1
-
 2
2
-
 3
3
-
 4
4
-
 5
5
-
 6
6
-
 7
7
-
 8
8
-
 9
9
-
 10
10
-
 11
11
-
 12
12
-
 13
13
-
 14
14
-
 15
15
-
 16
16
-
 17
17
-
 18
18
-
 19
19
-
 20
20
-
 21
21
-
 22
22
-
 23
23
-
 24
24
-
 25
25
-
 26
26
-
 27
27
-
 28
28
-
 29
29
-
 30
30
-
 31
31
-
 32
32
-
 33
33
-
 34
34
-
 35
35
-
 36
36
-
 37
37
-
 38
38
-
 39
39
-
 40
40
-
 41
41
-
 42
42
-
 43
43
-
 44
44
-
 45
45
-
 46
46
-
 47
47
-
 48
48
-
 49
49
-
 50
50
-
 51
51
-
 52
52
-
 53
53
-
 54
54
-
 55
55
-
 56
56
-
 57
57
-
 58
58
-
 59
59
-
 60
60
-
 61
61
-
 62
62
-
 63
63
-
 64
64
-
 65
65
-
 66
66
-
 67
67
-
 68
68
-
 69
69
-
 70
70
-
 71
71
-
 72
72
-
 73
73
-
 74
74
-
 75
75
-
 76
76
-
 77
77
-
 78
78
-
 79
79
-
 80
80
-
 81
81
-
 82
82
-
 83
83
-
 84
84
-
 85
85
-
 86
86
-
 87
87
-
 88
88
-
 89
89
-
 90
90
-
 91
91
-
 92
92
-
 93
93
-
 94
94
-
 95
95
-
 96
96
-
 97
97
-
 98
98
-
 99
99
-
 100
100
-
 101
101
-
 102
102
-
 103
103
-
 104
104
-
 105
105
-
 106
106
-
 107
107
-
 108
108
-
 109
109
-
 110
110
-
 111
111
-
 112
112
-
 113
113
-
 114
114
-
 115
115
-
 116
116


Miele 52833705USA Mode d'emploi
- Catégorie
- Sèche-linge électriques
- Taper
- Mode d'emploi
- Ce manuel convient également à
dans d''autres langues
Documents connexes
Autres documents
-
Blomberg TAF 7239 Manuel utilisateur
-
Beko DV 1160 Manuel utilisateur
-
Hotpoint WDD 8640 B EU Le manuel du propriétaire
-
Hitachi UJ 18DSL Manuel utilisateur
-
 Malber WD 1000 Mode d'emploi
-
AEG TM8C952BS Manuel utilisateur
-
-
-
-
