Toro Flex-Force Power System 24in 60V Hedge Trimmer Manuel utilisateur
- Catégorie
- Souffleuses à neige
- Taper
- Manuel utilisateur
Ce manuel convient également à

FormNo.3406-737RevA
SnowMaster®724ZXR
Snowthrower
36001
Soufeuseàneige
SnowMaster®724ZXR
36001
www.T oro.com.
*3406-737*A


FormNo.3406-735RevA
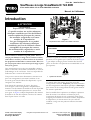
SnowMaster®724ZXRSnowthrower
ModelNo.36001—SerialNo.400010798andUp
Operator'sManual
Introduction
WARNING
CALIFORNIA
Proposition65Warning
Thisproductcontainsachemicalorchemicals
knowntotheStateofCaliforniatocausecancer,
birthdefects,orreproductiveharm.
Theengineexhaustfromthisproduct
containschemicalsknowntotheStateof
Californiatocausecancer,birthdefects,
orotherreproductiveharm.
Thismachineisintendedtobeusedbyresidential
homeowners.Itisdesignedforremovingsnowfrom
pavedsurfaces,suchasdrivewaysandsidewalks,and
othersurfacesfortrafconresidentialorcommercial
properties.Itisnotdesignedforremovingmaterials
otherthansnow,norisitdesignedforclearingoffgravel
surfaces.
Readthisinformationcarefullytolearnhowtooperateand
maintainyourmachineproperlyandtoavoidinjuryand
machinedamage.Youareresponsibleforoperatingthe
machineproperlyandsafely.
YoumaycontactTorodirectlyatwww .Toro.comformachine
andaccessoryinformation,helpndingadealer,ortoregister
yourmachine.
Wheneveryouneedservice,genuineToroparts,oradditional
information,contactanAuthorizedServiceDealerorToro
CustomerServiceandhavethemodelandserialnumbersof
yourmachineready.Figure1identiesthelocationofthe
modelandserialnumbersonthemachine.Writethenumbers
inthespaceprovided.
Figure1
1.Modelandserialnumberlocation
ModelNo.
SerialNo.
Thismanualidentiespotentialhazardsandhassafety
messagesidentiedbythesafety-alertsymbol(Figure2),
whichsignalsahazardthatmaycauseseriousinjuryordeath
ifyoudonotfollowtherecommendedprecautions.
Figure2
1.Safety-alertsymbol
Thismanualuses2wordstohighlightinformation.
Importantcallsattentiontospecialmechanicalinformation
andNoteemphasizesgeneralinformationworthyofspecial
attention.
Formodelswithstatedpower,thenetpoweroftheenginewas
laboratoryratedbytheenginemanufacturerinaccordance
withSAEJ1940.Asconguredtomeetsafety,emission,and
operatingrequirements,theactualenginehorsepoweronthis
classofsnowthrowerwillbesignicantlylower.
©2016—TheToro®Company
8111LyndaleAvenueSouth
Bloomington,MN55420
Registeratwww.T oro.com.
OriginalInstructions(EN)
PrintedintheUSA
AllRightsReserved
*3406-735*A

Important:Ifyouareusingthismachineabove1500m
(5,000ft)foracontinuousperiod,ensurethattheHigh
AltitudeKithasbeeninstalledsothattheenginemeets
CARB/EPAemissionregulations.TheHighAltitude
Kitincreasesengineperformancewhilepreventing
spark-plugfouling,hardstarting,andincreased
emissions.Onceyouhaveinstalledthekit,attach
thehigh-altitudelabelnexttotheserialdecalonthe
machine.ContactanyAuthorizedToroServiceDealer
toobtaintheproperHighAltitudeKitandhigh-altitude
labelforyourmachine.Tolocateadealerconvenientto
you,accessourwebsiteatwww.Toro.comorcontactour
ToroCustomerCareDepartmentatthenumber(s)listed
inyourEmissionControlWarrantyStatement.
Removethekitfromtheengineandrestoretheengine
toitsoriginalfactorycongurationwhenrunningthe
engineunder1500m(5,000ft).Donotoperateanengine
thathasbeenconvertedforhigh-altitudeuseatlower
altitudes;otherwise,youcouldoverheatanddamage
theengine.
Ifyouareunsurewhetherornotyourmachinehasbeen
convertedforhigh-altitudeuse,lookforthefollowing
label(Figure3).
Figure3
ThissparkignitionsystemcomplieswithCanadianICES-002.
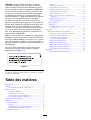
Contents
Introduction..................................................................1
Safety...........................................................................3
SafetyandInstructionalDecals.................................4
Setup............................................................................5
1UnfoldingtheHandle............................................5
2InstallingtheDischargeChute................................6
3CheckingtheEngine-OilLevel...............................6
4CheckingtheTirePressure.....................................6
ProductOverview..........................................................7
Operation.....................................................................7
BeforeOperation.......................................................7
Safety.....................................................................7
FillingtheFuelTank................................................7
CheckingtheEngine-OilLevel..................................8
DuringOperation......................................................8
Safety.....................................................................8
StartingtheEngine..................................................9
EngagingtheAuger.................................................9
DisengagingtheAuger.............................................9
Self-PropellingtheMachine......................................9
ShuttingOfftheEngine...........................................9
AdjustingtheDischargeChuteandChute
Deector...........................................................10
UncloggingtheDischargeChute..............................10
OperatingTips......................................................10
AfterOperation........................................................11
Safety....................................................................11
PreventingFreeze-upafterUse.................................11
Maintenance.................................................................11
RecommendedMaintenanceSchedule(s)......................11
MaintenanceSafety.................................................11
CheckingtheEngine-OilLevel.................................12
CheckingandAdjustingtheSkids.............................12
InspectingtheThrowingEdges................................13
ChangingtheEngineOil.........................................13
ReplacingtheSparkPlug.........................................14
AdjustingtheAugerCable.......................................14
AdjustingtheTransmissionCable.............................15
CheckingtheTirePressure......................................15
Storage........................................................................16
StoringtheSnowthrower.........................................16
2

Safety
ThismachinecomplieswithANSIB71.3specications
ineffectatthetimeofproduction.
•Readandunderstandthecontentsofthemanualbefore
youstarttheengine.Makesurethateveryoneusingthis
productknowshowtousetheproductandunderstands
thewarnings.
•Donotputyourhandsorfeetnearmovingcomponents
onthemachine.
•Donotoperatethemachinewithoutallguardsandother
safetyprotectivedevicesinplaceandworkingonthe
machine.
•Keepclearofanydischargeopening.Keepbystandersa
safedistanceawayfromthemachine.
•Keepchildrenoutoftheoperatingareaandunderthe
watchfulcareofaresponsibleadultotherthanthe
operator.Neverallowchildrentooperatethemachine.
•Shutthemachineoffbeforeservicing,fueling,or
unclogging.
Youcanndadditionalitemsofsafetyinformationintheir
respectivesectionsthroughoutthismanual.
3

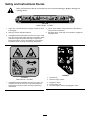
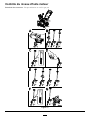
SafetyandInstructionalDecals
Safetyandinstructiondecalsarelocatednearareasofpotentialdanger.Replacedamagedor
missingdecals.
131-1785
OrderPartNo.131-5921
1.Augerdrive—squeezethelevertoengage;releasethelever
todisengage.
4.Thrownobjecthazard—keepbystandersasafedistance
awayfromthesnowthrower.
2.Warning—readtheOperator'sManual.5.Self-propeldrive—pushdownonthehandletoengagethe
self-propeldrive.
3.Cutting/dismembermenthazardofhandorfoot,auger—keep
awayfrommovingparts;keepallguardsandshieldsinplace;
shutofftheengineandwaitfortheaugertostopbefore
leavingthemachine;removetheignitionkeyandreadthe
instructionsbeforeservicingorperformingmaintenance.
131-5914
OrderPartNo.131-5916
1.Cutting/dismembermenthazardofhandorfoot,auger—do
notplaceyourhandinthechute;removetheignitionkey
andreadtheinstructionsbeforeservicingorperforming
maintenance.
x 3
1
2
3
4
5
120-9805
120-9805
1.Insertthekey.
2.Primetheengine3times.
3.Engagethechoke.
4.Pullthestartercord.
5.Oncetheengineisrunning,disengagethechoke.
4

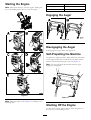
Setup
LooseParts
Usethechartbelowtoverifythatallpartshavebeenshipped.
ProcedureDescription
Qty.
Use
1
Nopartsrequired
–
Unfoldthehandle.
Bolt(1/4-20X1–1/2inches)
1
2
Washer-facedlocknut(1/4-20inch)
1
Installthedischargechute.
3
Nopartsrequired
–
Checktheengine-oillevel.
4
Nopartsrequired
–
Checkthetirepressure.
1
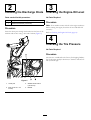
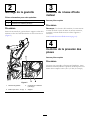
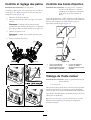
UnfoldingtheHandle
NoPartsRequired
Procedure
Important:Ensurethecablesarenotpinchedwhen
unfoldingthehandle.
Figure4
5

2
InstallingtheDischargeChute
Partsneededforthisprocedure:
1
Bolt(1/4-20X1–1/2inches)
1
Washer-facedlocknut(1/4-20inch)
Procedure
Insertthechutepostthroughthebracketintothebaseofthe
machineandsecureitusingaboltandalocknut(Figure5).
Figure5
1.Chutepost3.Washer-facedlocknut
(1/4-20inch)
2.Bolt(1/4-20X1–1/2
inches)
4.Bracket
3
CheckingtheEngine-OilLevel
NoPartsRequired
Procedure
Note:Yourmachinecomeswithoilintheenginecrankcase.
Beforestartingtheengine,checktheoillevelandaddoilif
necessary.
RefertoCheckingtheEngine-OilLevel(page12).
4
CheckingtheTirePressure
NoPartsRequired
Procedure
Thetiresareoverinatedatthefactoryforshipping.Reduce
thetirepressureequallyinbothtirestobetween103and137
kPa(15and20psi).
6

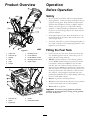
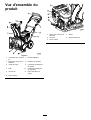
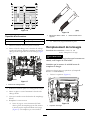
ProductOverview
Figure6
1.Augerlever7.Dischargechute
2.Fuel-tankcap
8.Chutedeector
3.Dipstick
9.Chute-deectorcontrol
4.Skid
10.Discharge-chutecontrol
5.Auger11.Upperhandle
6.Scraper
Figure7
1.Fuel-tankcap
4.Choke
2.Primer5.Recoil-starthandle
3.Ignitionkey
Operation
BeforeOperation
Safety
•Donotoperatethemachinewithoutwearingadequate
wintergarments.Avoidloosettingclothingthatcanget
caughtinmovingparts.Wearsubstantial,slip-resistant
footwearthatwillimprovefootingonslipperysurfaces.
•Alwayswearsafetyglassesoreyeprotectionduring
operationorwhileperforminganadjustmentorrepair
toprotecteyesfromforeignobjectsthatmaybethrown
fromthemachine.
•Thoroughlyinspecttheareawherethemachineistobe
usedandremovealldoormats,sleds,boards,wires,and
otherforeignobjects.
•Ifashield,safetydevice,ordecalisdamaged,illegible,or
lost,repairorreplaceitbeforebeginningoperation.Also,
tightenanyloosefasteners.
FillingtheFuelTank
•Forbestresults,useonlyclean,fresh(lessthan30days
old),unleadedgasolinewithanoctaneratingof87or
higher((R+M)/2ratingmethod).
•Ethanol:Gasolinewithupto10%ethanol(gasohol)
or15%MTBE(methyltertiarybutylether)byvolume
isacceptable.EthanolandMTBEarenotthesame.
Gasolinewith15%ethanol(E15)byvolumeisnot
approvedforuse.Neverusegasolinethatcontainsmore
than10%ethanolbyvolume,suchasE15(contains15%
ethanol),E20(contains20%ethanol),orE85(contains
85%ethanol).Usingunapprovedgasolinemaycause
performanceproblemsand/orenginedamagewhichmay
notbecoveredunderwarranty.
•Donotusegasolinecontainingmethanol.
•Donotstorefueleitherinthefueltankorfuelcontainers
overthewinterunlessyouuseafuelstabilizer.
•Donotaddoiltogasoline.
Important:Toreducestartingproblems,addfuel
stabilizertothefuelallseason,mixingitwithgasoline
lessthan30daysold.
7

Figure8
1.Donotllabovethebottomofthefuel-tankneck.
CheckingtheEngine-OilLevel
RefertoCheckingtheEngine-OilLevel(page12).
DuringOperation
Safety
•Rotatingaugerbladescaninjurengersorhands.
Staybehindthehandlesandawayfromthedischarge
openingwhileoperatingthemachine.Keepyourface,
hands,feet,andanyotherpartofyourbodyor
clothingawayfrommovingorrotatingparts.
•Neverdirectthedischargetowardpeopleorareaswhere
propertydamagecanoccur.
•Exercisecautiontoavoidslippingorfalling.Alwaysbe
sureofyourfooting,andkeeparmholdonthehandles.
Walk;neverrun.
•Exerciseextremecautionwhenoperatingonslopes.
•Neveroperatethemachinewithoutgoodvisibilityor
light.
•Donotoperatethemachinewhileill,tired,orunderthe
inuenceofalcoholordrugs.
•Lookbehindandusecarewhenbackingupwiththe
machine.
•Whennotactivelyclearingsnow,disengagepowertothe
rotorblades.
•Donotattempttoclearsnowfromagravelorcrushed
rocksurface.Thisproductisintendedforuseonlyon
pavedsurfaces.
•Donotusethemachineonaroof.
•Neverattempttomakeanyadjustmentswhiletheengine
isrunning(exceptwhenspecicallyrecommendedby
manufacturer).
•Stayalertforhiddenhazardsortrafc.
•Afterstrikingaforeignobject,stoptheengine,remove
theignitionkey,thoroughlyinspectthemachinefor
anydamage,andrepairthedamagebeforestartingand
operatingthemachine.
•Ifthemachineshouldstarttovibrateabnormally,stop
theengineandcheckimmediatelyforthecause.
•Donotruntheengineindoors,exceptwhenstarting
theengineandfortransportingthemachineinorout
ofthebuilding.Opentheoutsidedoors;exhaustfumes
aredangerous.
•Donotoverloadthemachinecapacitybyattemptingto
clearsnowattoofastarate.
•Nevertouchahotengineormufer.
8

StartingtheEngine
Note:Fullyinsertthekeytostarttheengine.Turningthe
keytothemiddlepositiondoesnotstarttheengine.
Figure9
Note:PrimetheengineinBofFigure9accordingtothe
followingtable:
Temperature
SuggestedNumberofPrimes
-23°C(-10°F)andabove
3
Below-23°C(-10°F)
6
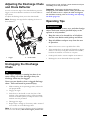
EngagingtheAuger
Figure10
DisengagingtheAuger
Todisengagetheauger,releasetheaugerlever.
Self-PropellingtheMachine
Tooperatetheself-propeldrive,simplywalkwithyourhands
ontheupperhandleandyourelbowsatyoursides,andthe
machineautomaticallykeepspacewithyou(Figure11).
Note:Youcanself-propelthemachinewiththeauger
engagedordisengaged.
Figure11
ShuttingOfftheEngine
Toshutofftheengine,removethekeyfromtheignitionor
movethekeytothemiddleposition.
9

AdjustingtheDischargeChute
andChuteDeector
Toraiseorlowertheangleofthechutedeector,pressthe
triggeronthechutedeectorandmovethechutedeector
upordown.
Toadjustthedischargechute,movethechutehandle.
Note:Disengagetheaugerbeforeadjustingthechuteor
chutedeector.
Figure12
1.Trigger
2.Chutehandle
UncloggingtheDischarge
Chute
WARNING
Iftheauger/impellerisrunningbutthereisno
snowcomingoutofthedischargechute,the
dischargechutemaybeclogged.
Neveruseyourhandstoclearacloggeddischarge
chute.Thiscouldresultinpersonalinjury.
1.Whileremainingintheoperatingposition,releasethe
self-propelhandle.
2.Engagetheauger.
3.Pushdownonthehandletoraisethefrontofthe
machineafewcentimeters(inches)offthepavement,
thenliftthehandlesquicklytobumpthefrontofthe
machineontothepavement.
4.Disengagetheauger.
5.Repeatsteps1through4,ifnecessary,untilastreamof
snowcomesoutofthedischargechute.
Note:Ifyoucannotunclogthedischargechutebybumping
thefrontofthemachine,shutofftheengine,waitforall
movingpartstostop,anduseasnow-cleanouttool(not
included);neveruseyourhand.
Important:Uncloggingthedischargechuteby
bumpingthefrontofthemachineonthepavementmay
causetheskidstomove.Adjusttheskidsandtighten
theskidboltssecurely;refertoCheckingandAdjusting
theSkids(page12).
OperatingTips
WARNING
Theaugercanthrowstones,toys,andotherforeign
objectsandcauseseriouspersonalinjurytothe
operatorortobystanders.
•Keeptheareatobeclearedfreeofallobjects
thattherotorbladescouldpickupandthrow.
•Keepallchildrenandpetsawayfromthearea
ofoperation.
•Removethesnowassoonaspossibleafteritfalls.
•Ifthemachinedoesnotpropelitselfforwardonslippery
surfacesorinheavysnow ,pushforwardonthehandle,
butallowthemachinetoworkatitsownpace.
•Overlapeachswathtoensurecompletesnowremoval.
•Dischargethesnowdownwindwheneverpossible.
10

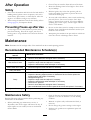
AfterOperation
Safety
•Neverstorethemachinewithfuelinthefueltankinsidea
buildingwhereignitionsourcesarepresent,suchashot
waterheaters,spaceheaters,orclothesdryers.Allowthe
enginetocoolbeforestoringinanyenclosure.
•Whenstoringthemachineformorethan30days,referto
Storage(page16)forimportantdetails.
PreventingFreeze-upafterUse
•Lettheenginerunforafewminutestopreventmoving
partsfromfreezing.Shutofftheengine,waitforall
movingpartstostop,andremoveiceandsnowfromthe
machine.
•Cleanoffanysnowandicefromthebaseofthechute.
•Rotatethedischargechuteleftandrighttofreeitfrom
anyicebuildup.
•WiththeignitionkeyintheOFFposition,pullthe
recoil-starthandleseveraltimestopreventtherecoil
starterfromfreezingup.
•Insnowyandcoldconditions,somecontrolsandmoving
partsmayfreeze.Donotuseexcessiveforcewhen
tryingtooperatefrozencontrols.Ifyouhavedifculty
operatinganycontrolorpart,starttheengineandletit
runforafewminutes.
•Donotusethechutecontroltoattempttomoveafrozen
dischargechute.Holddowntheblueknobanduseyour
handstorotatethechute.
•Transportingthemachineinanopentrailerorvehiclecan
causethecontrolsordischargechutetofreeze.
Maintenance
Note:Determinetheleftandrightsidesofthemachinefromthenormaloperatingposition.
RecommendedMaintenanceSchedule(s)
MaintenanceService
Interval
MaintenanceProcedure
Afterthersthour
•Checkforloosefastenersandtightenthemifnecessary.
Aftertherst2hours
•Changetheengineoil.
•Inspecttheaugercableandadjustitifnecessary.
•Inspectthetransmissioncableandadjustitifnecessary.
Beforeeachuseordaily
•Checktheengine-oillevelandaddoilifnecessary.
Every100hours
•Replacethesparkplug.
Yearly
•Checktheskidsandadjustthemifnecessary.
•InspectthethrowingedgesandhaveanAuthorizedServiceDealerreplacethe
throwingedgesandscraperifnecessary.
•Changetheengineoil.
•Inspecttheaugercableandadjustitifnecessary.
•Inspectthetransmissioncableandadjustitifnecessary.
•Checkthetirepressure.
•Checkforloosefastenersandtightenthemifnecessary.
•HaveanAuthorizedServiceDealerinspectthedrivebeltandreplaceitifnecessary.
Yearlyorbeforestorage
•Preparethemachineforstorage.
MaintenanceSafety
Readthefollowingsafetyprecautionsbeforeperformingany
maintenanceonthemachine:
•Beforeperforminganymaintenance,service,or
adjustment,shutofftheengineandremovethekey.If
majorrepairsareeverneeded,contactanAuthorized
ServiceDealer.
•Checkallfastenersatfrequentintervalsforproper
tightnesstobesurethemachineisinsafeworking
condition.
•Maintainorreplacesafetyandinstructionlabels,as
necessary.
•Donotchangethegovernorsettingsontheengine.
•PurchaseonlygenuineTororeplacementpartsand
accessories.
11

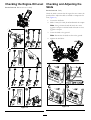
CheckingtheEngine-OilLevel
ServiceInterval:Beforeeachuseordaily
Figure13
CheckingandAdjustingthe
Skids
ServiceInterval:Yearly
Checktheskidstoensurethattheaugerdoesnotcontactthe
pavedsurface.Adjusttheskidsasneededtocompensatefor
wear(Figure14).
1.Loosentheskidbolts.
2.Slidea5mm(3/16inch)boardunderneaththescraper.
Note:Usingathinnerboardwillresultinamore
aggressivescraper.Athickerboardwillresultinaless
aggressivescraper.
3.Lowertheskidstotheground.
Note:Ensurethattheskidsareatontheground.
4.Tightentheskidbolts.
Figure14
12

InspectingtheThrowing
Edges
ServiceInterval:Yearly—Inspectthethrowingedgesand
haveanAuthorizedServiceDealer
replacethethrowingedgesandscraper
ifnecessary.
Beforeeachsession,inspectthethrowingedgesforwear.
Whenathrowingedgehasworndowntothewear-indicator
hole,haveanAuthorizedServiceDealerreplacethethrowing
edges(Figure15).
Figure15
1.Thewear-indicatorhole
isintact;youdonotneed
toreplacethethrowing
edges.
2.Thewear-indicatorhole
isexposed;replaceboth
throwingedges.
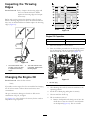
ChangingtheEngineOil
ServiceInterval:Aftertherst2hours
Yearly
Ifpossible,runtheengineforafewsecondsbeforechanging
theoilbecausewarmoilowsbetterandcarriesmore
contaminants.
Oiltype:automotivedetergentoilwithanAPIservice
classicationofSJ,SL,orhigher.
UseFigure16toselectthebestoilviscosityfortheoutdoor
temperaturerangeexpected:
Figure16
EngineOilCapacities
Model
Maxll
36001
0.5L(17oz)
1.Movethemachinetoalevelsurface.
2.Placeanoil-drainpanundertheoil-drainplug,remove
theoil-drainplug,andtipthemachinebackwardand
draintheusedoilintheoil-drainpan(Figure17).
Figure17
1.Oil-drainplug
3.Afterdrainingtheusedoil,returnthemachinetothe
operatingposition.
4.Installtheoil-drainplugandtightenitsecurely.
5.Cleanaroundtheoil-llcap.
6.Fillthecrankcasewithoil.
A.Removethedipstickandslowlypouroilintothe
oil-lltubetoraisetheoilleveltotheFullmark
onthedipstick(Figure19).Donotoverll.
13

Figure18
1.Lowoillevel—addoil
2.Correctoillevel
B.Installthedipsticksecurely.
ReplacingtheSparkPlug
ServiceInterval:Every100hours—Replacethesparkplug.
WARNING
Replacingthesparkplugwhiletheengineishot
canresultinburns.
Waituntiltheengineiscooltoreplacethespark
plug.
UseaTorosparkplugorequivalent(Champion®RN9YCor
NGKBPR6ES).
1.Removetheboot(Figure19).
Figure19
1.Spark-plugboot
2.Cleanaroundthebaseofthesparkplug.
3.Removeanddiscardtheoldsparkplug.
Note:Youwillneedaratchetwrenchextensionto
removethesparkplug.
4.Setthegapbetweentheelectrodesonanewsparkplug
at0.76mm(0.030inch)asshowninFigure20.
Figure20
1.0.76mm(0.030inch)
AdjustingtheAugerCable
ServiceInterval:Aftertherst2hours
Yearly
Ifthedrivebeltslipsorsquealsunderheavyload,adjustthe
augercable.
1.Loosenthenutonthelowercableclamp,butdonot
removeit(Figure21).
Figure21
1.Nut
3.Connector
2.Cable4.Spring
2.Pullthecableuptoremovesomeslack(Figure21).
Important:Donotremovealltheslackfrom
thecable.Removingalltheslackfromthecable
preventstheaugerfromstoppingproperly.
3.Holdthecableinplaceandtightenthenut(Figure21).
14

AdjustingtheTransmission
Cable
ServiceInterval:Aftertherst2hours
Yearly
Ifthewheelseasilystallout,orifthewheelsdrivewithout
engagingtheself-propelhandle,adjustthetransmissioncable.
1.Loosenthenutontheuppercableclamp,butdonot
removeit(Figure22).
Figure22
1.Nut
2.Cable
2.Pullthecabledowntoremovemostoftheslackinthe
cable(Figure22).
Important:Donotremovealltheslackfromthe
cable.Removingalltheslackfromthecablemay
causethewheelstoengagewithoutengagingthe
self-propelhandle.
3.Tightenthenut(Figure22).
CheckingtheTirePressure
ServiceInterval:Yearly
Checktheairpressureinthetiresandinatethemto103to
137kPa(15to20psi).
15

Storage
StoringtheSnowthrower
WARNING
•Gasolinefumesarehighlyammable,explosive,
anddangerousifinhaled.Ifyoustorethe
machineinanareawithanopename,the
gasolinefumesmayigniteandcausean
explosion.
•Donotstorethemachineinahouse(living
area),basement,oranyotherareawhereignition
sourcesmaybepresent,suchashotwaterand
spaceheaters,clothesdryers,furnaces,and
otherlikeappliances.
•Donottipthemachinebackwardwithfuelin
thefueltank;otherwise,fuelmayleakoutof
themachine.
1.Onthelastrefuelingoftheseason,addfuelstabilizer
tofreshfuelasdirectedbytheenginemanufacturer.
2.Runtheenginefor10minutestodistributethe
conditionedfuelthroughthefuelsystem.
3.Shutofftheengine,allowittocool,andsiphonthe
fueltankorruntheengineuntilitshutsoff.
4.Starttheengineandrunituntilitstops.
5.Chokeorprimetheengine,startitathirdtime,and
runtheengineuntilitdoesnotstart.
6.Drainthefuelinthecarburetorthroughthe
carburetor-drainboltintoanapprovedgasoline
container.
7.Disposeofunusedfuelproperly.Recycleitaccording
tolocalcodes,oruseitinyourautomobile.
8.Whiletheengineisstillwarm,changetheengineoil.
RefertoChangingtheEngineOil(page13).
9.Removethesparkplug.
10.Squirt2teaspoonsofoilintothespark-plughole.
11.Installthesparkplugbyhandandthentorqueitto27
to30N∙m(20to22ft-lb).
12.WiththeignitionkeyintheOFFposition,pullthe
recoil-starthandleslowlytodistributetheoilonthe
insideofthecylinder.
13.Cleanthemachine.
14.Touchupchippedsurfaceswithpaintavailablefroman
AuthorizedServiceDealer.Sandaffectedareasbefore
painting,andusearustpreventativetopreventthe
metalpartsfromrusting.
15.Tightenanyloosefasteners.Repairorreplaceany
damagedparts.
16.Coverthemachineandstoreitinaclean,dryplace
outofthereachofchildren.Allowtheenginetocool
beforestoringitinanyenclosure.
16

Notes:

*374-0320*
EmissionControlWarrantyStatement
FortheUnitedStates,California,andCanada
YourWarrantyRightsandObligations
TheCaliforniaAirResourcesBoard(CARB),theU.S.EnvironmentalProtectionAgency(EPA),andTheT oroCompany,arepleasedtoexplainthe
emissioncontrolsystemwarrantyonyour2017–2018smalloff-roadengine/equipment.InCaliforniaandtheUnitedStates,newsmalloff-road
engines/equipmentmustbedesigned,built,andcertiedtomeetstringentanti-smogstandards.TheToroCompanywarrantstheemissioncontrol
systemonyoursmalloff-roadengine/equipmentfortheperiodoftimelistedbelow,providedtherehasbeennoabuse,neglect,orimpropermaintenance
ofyoursmalloff-roadengine/equipment.
Youremissioncontrolsystemmayincludepartssuchasthecarburetor,fuel-injectionsystem,theignitionsystem,catalyticconverter,fueltanks,fuellines,
fuelcaps,valves,canisters,lters,vaporhoses,clamps,connectors,andotherassociatedemission-relatedcomponents.
Whereawarrantableconditionexists,TheToroCompanywillrepairyoursmalloff-roadengine/equipmentatnocosttoyouincludingdiagnosis,
partsandlabor.
Manufacturer’sWarrantyCoverage
ThisemissioncontrolsystemiswarrantedfortwoyearsorthedurationofTheT oroWarranty,whicheverislonger.Ifanyemission-relatedpartonyour
engine/equipmentisdefective,thepartwillberepairedorreplacedbyTheT oroCompany.
OwnerResponsibilities
Asthesmalloff-roadengineowner,youareresponsiblefortheperformanceoftherequiredmaintenancelistedinyourOperator'sManual.Werecommend
thatyouretainallreceiptscoveringmaintenanceonyoursmalloff-roadengine/equipment,butwecannotdenywarrantysolelyforthelackofreceipts.
Asthesmalloff-roadengine/equipmentowner,youshouldhoweverbeawarethatwemaydenyyouwarrantycoverageifyoursmalloff-road
engine/equipmentoraparthasfailedduetoabuse,neglect,impropermaintenanceorunapprovedmodications.
Youareresponsibleforpresentingyoursmalloff-roadengine/equipmenttoaT oroDistributionCenterorServiceCenterassoonasaproblemexists.The
warrantyrepairsshouldbecompletedinareasonableamountoftime,nottoexceedthirty(30)days.
Ifyouhaveanyquestionsregardingyourwarrantycoverage,contactusat:
CustomerCareDepartment,ConsumerDivision
ToroWarrantyCompany
8111LyndaleAvenueSouth
Bloomington,MN55420-1196
1-888-384-9939(U.S.andCanadiancustomers)
emailCustomerSupportat:www.toro.com
GeneralEmissionsWarrantyCoverage
TheToroCompanywarrantstotheultimatepurchaserandeachsubsequentpurchaserthatthesmalloff-roadengine/equipmentis:
•Designed,built,andcertiedtoconformwithallapplicableemissionsregulations;and
•Freefromdefectsinmaterialsandworkmanshipthatcouldcausethefailureofawarrantedpart;and
•Identicalinallmaterialrespectstothepartsasdescribedintheapplicationforcertication.
Thewarrantyperiodbeginsonthedatethesmalloff-roadengine/equipmentisdeliveredtoanultimatepurchaser.Thewarrantedperiodistwoyearsor
thedurationofTheT oroWarranty,whicheverislonger.
Subjecttocertainconditionsandexclusionsasstatedbelow,thewarrantyonevaporativeemissions-relatedpartsisasfollows:
1.Anywarrantedpartthatisnotscheduledforreplacementasrequiredmaintenanceinthewritteninstructionssupplied,iswarranted
forthewarrantyperiodstatedabove.Ifthepartfailsduringtheperiodofwarrantycoverage,thepartwillberepairedorreplacedby
TheToroCompany.Anysuchpartrepairedorreplacedunderwarrantywillbewarrantedfortheremainderofthewarrantyperiod.
2.Anywarrantedpartthatisscheduledonlyforregularinspectioninthewritteninstructionssuppliediswarrantedforthewarranty
periodstatedabove.Anysuchpartrepairedorreplacedunderthewarrantywillbewarrantedfortheremainderofthewarrantyperiod.
3.Anywarrantedpartthatisscheduledforreplacementasrequiredmaintenanceinthewritteninstructionssuppliedis
warrantedfortheperiodoftimebeforetherstscheduledreplacementdateforthatpart.Ifthepartfailsbeforetherst
scheduledreplacement,thepartwillberepairedorreplacedbyTheT oroCompany.Anysuchpartrepairedorreplaced
underwarrantywillbewarrantedfortheremainderoftheperiodpriortotherstscheduledreplacementpointforthepart.
4.Repairorreplacementofanywarrantedpartunderthewarrantyprovisionshereinmustbeperformedatan
AuthorizedServiceDealeratnochargetotheowner.
5.WarrantyservicesorrepairswillbeprovidedatallServiceDealersauthorizedtoservicethesubjectenginesorequipment.
6.Thesmalloff-roadengine/equipmentownerwillnotbechargedfordiagnosticlaborthatisdirectlyassociatedwithdiagnosis
ofadefective,emission-relatedwarrantedpart,providedthatsuchdiagnosticworkisperformedatanAuthorizedServiceDealer.
7.TheT oroCompanyisliablefordamagestootherengine/equipmentcomponentscausedbyafailureunderwarrantyofanywarrantedpart.
8.Throughoutthesmalloff-roadengine/equipmentwarrantyperiodstatedabove,TheT oroCompanywillmaintainasupply
ofwarrantedpartssufcienttomeettheexpecteddemandforsuchparts.
9.Manufacturerapprovedreplacementpartsmaybeusedintheperformanceofanywarrantymaintenanceorrepairsand
mustbeprovidedwithoutchargetotheowner.SuchusewillnotreducethewarrantyobligationsofTheT oroCompany.
10.Add-onormodiedpartsthatarenotapprovedbyTheToroCompanymaynotbeused.Theuseofanon-approvedadd-onormodiedpartsby
thepurchaserwillbegroundsfordisallowingawarrantyclaim.TheT oroCompanywillnotbeliabletowarrantfailuresofwarrantedpartscausedby
theuseofannon-approvedadd-onormodiedparts.
374-0320RevA
La page est en cours de chargement...
La page est en cours de chargement...
La page est en cours de chargement...
La page est en cours de chargement...
La page est en cours de chargement...
La page est en cours de chargement...
La page est en cours de chargement...
La page est en cours de chargement...
La page est en cours de chargement...
La page est en cours de chargement...
La page est en cours de chargement...
La page est en cours de chargement...
La page est en cours de chargement...
La page est en cours de chargement...
La page est en cours de chargement...
La page est en cours de chargement...
La page est en cours de chargement...
La page est en cours de chargement...
La page est en cours de chargement...
La page est en cours de chargement...
La page est en cours de chargement...
La page est en cours de chargement...
La page est en cours de chargement...
La page est en cours de chargement...
-
 1
1
-
 2
2
-
 3
3
-
 4
4
-
 5
5
-
 6
6
-
 7
7
-
 8
8
-
 9
9
-
 10
10
-
 11
11
-
 12
12
-
 13
13
-
 14
14
-
 15
15
-
 16
16
-
 17
17
-
 18
18
-
 19
19
-
 20
20
-
 21
21
-
 22
22
-
 23
23
-
 24
24
-
 25
25
-
 26
26
-
 27
27
-
 28
28
-
 29
29
-
 30
30
-
 31
31
-
 32
32
-
 33
33
-
 34
34
-
 35
35
-
 36
36
-
 37
37
-
 38
38
-
 39
39
-
 40
40
-
 41
41
-
 42
42
-
 43
43
-
 44
44


Toro Flex-Force Power System 24in 60V Hedge Trimmer Manuel utilisateur
- Catégorie
- Souffleuses à neige
- Taper
- Manuel utilisateur
- Ce manuel convient également à
dans d''autres langues
Documents connexes
-
Toro SnowMaster 724 ZXR Snowthrower Manuel utilisateur
-
-
Toro SnowMaster 724 QXE Snowthrower Manuel utilisateur
-
-
-
Toro SnowMax 724 ZXR Snowthrower Manuel utilisateur
-
Toro SnowMax 724 QXE Snowthrower Manuel utilisateur
-
Toro Power Max 724 OE Snowthrower Manuel utilisateur
-
Toro 622 Snowthrower Manuel utilisateur
-