
Quick StartGuide
RT-AC68U V3 DualBand
3x3Wireless-AC 1900Gigabit Router
®
NA8104_RT-AC68U_QSG_v2.indb 1 10/11/135:59:23PM

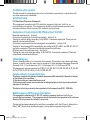
Tableofcontents
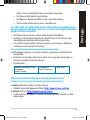
English.............................................................................................4
繁體中文........................................................................................19
Français..............................................34
Português..............................................................49
Español...................................................... 64
NOTE /<注意> /<REMARQUE> /<NOTA>/<NOTA>
•Formore details,referto the user manual includedin the
supportCD.
•更多資訊,請參考驅動程式與公用程式光碟中的使用手冊。
•Pour plus de détails,consultezle manuelde l'utilisateur
contenudans leCD de support.
•Paramais detalhes,consulte o manual do utilizador
incluídono CD de suporte.
•Paraobtener más detalles,consulte el manual delusuario
incluidoen elCD de soporte.
NA8104_RT-AC68U_QSG_v2.indb 2 10/11/135:59:23PM

4
English
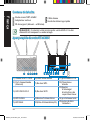
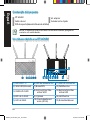
AC adapter
Quick StartGuide
Packagecontents
RT-AC68U
Network cable (RJ-45)
Support CD (User Manual)
1)
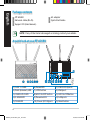
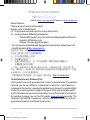
LAN 1~4 LED
6)
PowerLED
11)
USB3.0/2.0ports
2)
WAN (Internet) LED
7)
WPS button
12)
WANport
3)
USB3.0/2.0 LED
8)
Wi-Fi On/Off button
13)
LED On/Offbutton
4)
2.4GHzLED
9)
Powerswitch
14)
LANports
5)
5GHzLED
10)
Power (DC-IN)port
15)
Resetbutton
NOTE: If any of the itemsis damaged or missing,contact your retailer.
AquicklookatyourRT-AC68U
8U
12 3 4 5 6 147 8 9 10 11 1213
15
NA8104_RT-AC68U_QSG_v2.indb 3 10/11/135:59:23PM

5
English
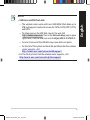
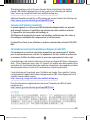
NOTES:
•USB ExternalHDD/Flash disk:
•The wireless router works with most USB HDDs/Flash disks up to
2TB and supports read-write access for FAT16, FAT32, EXT2, EXT3,
and NTFS.
•To safely remove the USB disk, launch the web GUI
(http://router.asus.com), then in the Network Map page's upper
right corner, click the USB icon and click Eject USB 3.0/ USB 2.0.
•Incorrect removalof the USB disk may cause data corruption.
•For the listof file system and hard disk partitionsthat the wireless
router supports, visit
http://event.asus.com/networks/disksupport
•For the listof printers that the wireless routersupports, visit
http://event.asus.com/networks/printersupport
NA8104_RT-AC68U_QSG_v2.indb 4 10/11/135:59:23PM

6
English
Installingyourrouter
IMPORTANT: Before installing the router, ensure that Internet connec-
tion isavailable
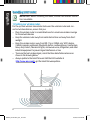
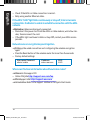
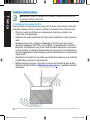
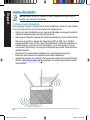
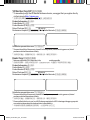
1.Positionyourwirelessrouter.
For the optimal wireless transmissionbetween the wireless router and con-
nected wirelessdevices,ensure thatyou:
•Placethe wireless router in acentralized areafora maximumwireless coverage
forthe networkdevices.
•Keep the wireless routerawayfrommetalobstructions and awayfromdirect
sunlight.
•Keep the wireless router away from 802.11g or 20MHz only Wi-Fi devices,
2.4GHzcomputer peripherals,Bluetooth devices,cordless phones, transformers,
heavy-dutymotors,fluorescent lights,microwaveovens,refrigerators,and other
industrial equipment to prevent signalinterference orloss.
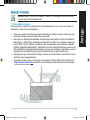
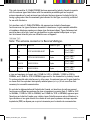
•Toensure the best wireless signal,orient the three detachable antennas as
shown in the drawingbelow.
•Always update to the latestfirmware.VisittheASUSwebsite at
http://www.asus.comto getthe latestfirmwareupdates.
45°
90°
45°
8U
NA8104_RT-AC68U_QSG_v2.indb 5 10/11/135:59:23PM

7
English
2.Prepare yourmodem.
a. Unplug the AC adapter fromthe power outlet and disconnect it fromyour
cable/ADSL modem.
b. Disconnect the network cable fromyour cable/ADSL modem.
c. Reboot your computer(recommended).
M o de m
OFF!
a
b
c
WARNING! Before disconnecting the wires/cables, ensure that your
cable/ADSL modem has been turned offforat least two minutes. If your
modem has a backup battery,removeit as well.
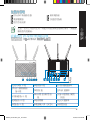
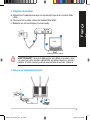
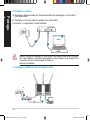
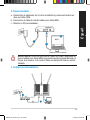
3.Set up yourwirelessenvironment.
RT-AC68 U
Computer
Wall Power Outlet
LAN
M o d e m
Power
WAN
a
b
cd
NA8104_RT-AC68U_QSG_v2.indb 6 10/11/135:59:23PM

8
English
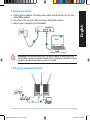
a. Insert your wirelessrouter’s AC adapter to the DC-IN port and plug it to a
power outlet.
b. Using another network cable, connect your modem to your wirelessrouter’s
WAN port.
c. Insert your modem’s AC adapterto the the DC-IN port and plug it to a power
outlet.
d. Using the bundled network cable, connect your computer to your wireless
router’s LAN port. Ensure that the WAN and LAN LEDs are blinking.
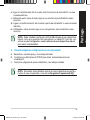
NOTE: You can also set up RT-AC68U using a mobile device such as
smartphone or tablet PC.To do this, go to Setup your router using a
mobile device fordetails.
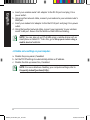
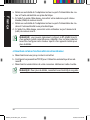
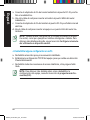
4. Disable some settings on yourcomputer.
a. Disable the proxy server,if enabled.
b. Set the TCP/IPsettings to automaticallyobtain an IP address.
c. Disable the dial-up connection, if enabled.
NOTE: For more details on disabling your computer settings,refer to
Frequently AskedQuestions(FAQs).
NA8104_RT-AC68U_QSG_v2.indb 7 10/11/135:59:23PM

9
English
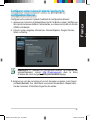
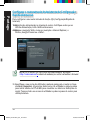
SettingupyourrouterusingtheQuickInternetSetup
Wizard
Tosetup your routerusing QIS ((Quick Internet Setup):
r1e.ssPthepower button at the back of your router.Ensure that the Power,
LAN and WAN LEDs are on.
2.Launch your web browser such as Internet Explorer, Firefox, Google Chrome,
or Safari.
NOTE: If QIS does not launch automatically, enter http://
router.asus.com in the address bar and refresh the browser again.
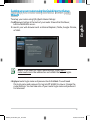
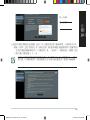
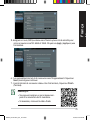
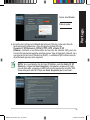
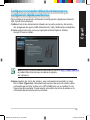
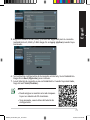
s3s.igAnyourrouterlogin name and password and click Next.You will need
this login name and password to log into RT-AC68Uto view or change the
router settings. You can take note of your router login name and password
for futureuse.
NA8104_RT-AC68U_QSG_v2.indb 8 10/11/135:59:23PM

10
English
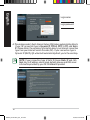
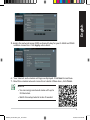
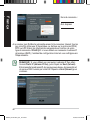
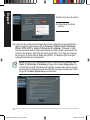
4. The wireless router’s Quick Internet Setup (QIS)feature automaticallydetects
if your ISP connection type is Dynamic IP, PPPoE, PPTP, L2TP, and Static
IP. Please obtain the necessary information about your Internet connection
type from your Internet Service Provider (ISP). If your connection type is
Dynamic IP (DHCP),QIS wizard will automatically direct you to the next step.
NOTE: If your connection type is Static IP,choose Static IP and click
Next. Key in IP address, subnet mask,default gateway and DNS server
informationprovided by your ISP.Click Next to proceed.
Setup of router(RT-AC68U)administrator password
Login name:
Loginpassword:
NA8104_RT-AC68U_QSG_v2.indb 9 10/11/135:59:23PM

11
English
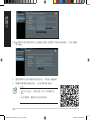
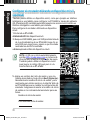
5. Assign the network name (SSID)and securitykey foryour 2.4GHz and 5GHz
wirelessconnection. Click Apply when done.
6. Your Internet and wireless settings are displayed.Click Next to continue.
7. Read the wirelessnetwork connection tutorial.When done, click Finish.
NOTES:
•You can assign a network name with up to
32 characters.
•Watch the setup tutorial video if needed.
NA8104_RT-AC68U_QSG_v2.indb 10 10/11/135:59:23PM

12
English
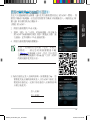
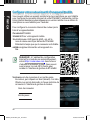
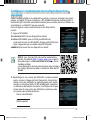
1ur.nTonRT-AC68U.
W2.i-EFnifaubnlectionof your mobile device.
e3a.rSchforthe SSID ASUS, which is the default SSID
of your RT-AC68U wirelessnetwork. Click this SSID to
connect and wait forthe status to displayWi-Fi con-
nected.
4.Launch your mobile device web browser.
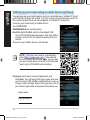
Settingupyourrouterusingamobiledevice(optional)
You can also use your mobile device such as a smartphone or a tablet PC to set
up RT-AC68U through QIS wizard. The QIS wizard will automatically switch to
the mobile version if you use a smartphone or a tablet PC to launch it.
Tosetup your routerusing a mobile device:
RT-AC68U
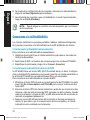
NOTE: If QIS does not launch automatically,
enter http://router.asus. com in the address
bar and refresh the browser again.You can also
use your mobile device to scan forthe QR code
here to go to RT-AC68U’sweb interface.
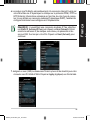
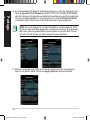
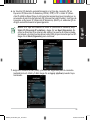
5ss.igAnyourrouterlogin name and password, and
click Next. You will need this login name and pass-
word to log into RT-AC68U’s web interface to view or
change router settings. Ensure that you take note of
your router login name and passwordforfuture use.
RT-AC68U
Login name:
Loginpassword:
NA8104_RT-AC68U_QSG_v2.indb 11 10/11/135:59:23PM

13
English
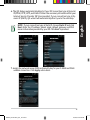
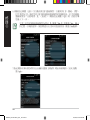
6. The QIS feature automaticallydetects ifyour ISP connection type is Dynamic
IP,PPPoE, PPTP,L2TP,and StaticIP.Enter the necessary informationthat your
Internet Service Provider (ISP) has provided. If your connection type is Dy-
namic IP (DHCP),QIS wizard will automaticallydirect you to the next step.
NOTE:If your connection type is Static IP, choose Static IP and click
Next. Enter the IP address, subnet mask, default gateway and DNS
serverinformationprovided by your ISP.Click Next to proceed.
RT-AC68U ASUS RT-AC68U
7. Assign the network name (SSID)and securitykey foryour 2.4GHz and 5GHz
wirelessconnection. Click Apply when done.
ASUSRT-AC68U
NA8104_RT-AC68U_QSG_v2.indb 12 10/11/135:59:23PM

14
English
8. Your Internet and wirelesssettings are displayed.Click Next to continue.
9. Read the wireless network connection tutorial.When done, click Finish.
NOTES: You can assign a network name with up to 32 characters.
Connecttothewirelessnetwork
There aretwo ways for your wirelessclients (notebook, tablet PC,smartphone
and so on) to connect to RT-AC68U’s wirelessnetwork.
Connectto thewirelessnetworkmanually
Toconnect to the wirelessnetwork manually:
1. Enable theWi-Fi function on your wirelessclient to scan foravailable wireless
networks.
2. Select the SSID or network name that you assigned to your RT-AC68U’s net-
work.
3. Enter the passwordand click Connect.
Connectto thewirelessnetworkthroughWPS
RT-AC68Uhas aWPS (Wi-Fi Protected Setup) button foryou to connect your
wirelessclient to RT-AC68U’s network without entering password.
Toconnect to the wirelessnetwork through WPS:
1. Press the WPS button at the back of RT-AC68U.Refer to the sectionA quick
look at your RT-AC68U for the location of the WPS button).
2. Press the WPS button of your wirelessclient within two minutes or follow the
WPS instructions that came with the wireless client. When connecting via
WPS,the Power LED on your routerblinks fast.
3. Waituntil your router’s Power LED turns into a solid light indicating a suc-
cessfully connection between your router and your wirelessclient.
NA8104_RT-AC68U_QSG_v2.indb 13 10/11/135:59:23PM

15
English
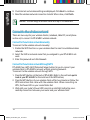
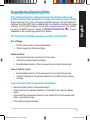
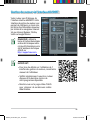
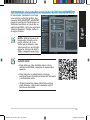
ManagingtherouterviatheASUSWRTwebGUI
Yourwireless router comes with the
intuitive ASUSWRT web graphical
userinterface. ASUSWRTallows you
to easily configure its various fea-
tures through a web browser such
as Internet Explorer, Firefox, Safari,
or GoogleChrome.
NOTE: Use the searchbar
on the bottom of the inter-
face to get more informa-
tion from ASUS technical
support site
http://support.asus.com.
IMPORTANT:
•For more detailson using your router'sWeb
GUI,refer to the usermanual.
•Alway check and upgrade firmware to the
latest version forbetterexperience.
•VisitASUS Networking video channel for
tutorial videos on featured functions.
NA8104_RT-AC68U_QSG_v2.indb 14 10/11/135:59:23PM

16
English
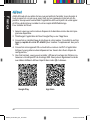
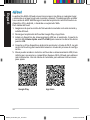
AiCloud
ASUS AiCloud app provides you with access to your data wherever and when-
ever you have an Internet connection. It also allows you to access your ASUS
WebStorage account via the AiCloud mobile app on your iOS or Android device,
or via a web browser.
ToinstallAiCloud:
1. Ensure that your router’s firmware version is the latest one and supports
AiCloud.
2. Download AiCloud app fromGoogle Play or App Store.
3. Installyour USB storagedevice to your router.Refer to section A quick look
at your RT-AC68U forthe location of the USB ports.
4. Connect your iOS or Android devices to the router through Wi-Fi.The Ai-
Cloud app will automaticallyguide you through the setup process.
5. You can now access,stream and share to all files in your USB storage. Search
ASUS AiCloud for more information. Watch tutorial videos for step-by-step
guide.
GooglePlay AppStore
NA8104_RT-AC68U_QSG_v2.indb 15 10/11/135:59:23PM

English
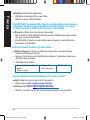
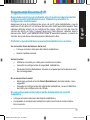
FrequentlyAskedQuestions(FAQs)
Afterfollowingthesteps,I stillcannotaccessthewirelessrouter’sweb
graphics userinterface (webGUI)to configurethewirelessroutersettings.
Ensure that your PC's proxy settings are disabled and your PC'S IP address is
obtained from the DHCP server automatically. for details on disabling the proxy
settings, visit the ASUS Support site at http://support.asus.com. For details
on using the DHCP server to obtain IP addresses automatically, refer to your
Windows® or Mac operating system's help feature.
Theclientcannotestablishawirelessconnection withtherouter.
Out ofRange:
•Put the routercloser to the wirelessclient.
•Tryto change the channel settings.
Authentication:
•Use wired connection to connect to the router.
•Check the wireless securitysettings.
•Press the Reset button at the rearpanel for more than five seconds.
Cannot find the router:
•Press the Reset button at the rearpanel for more than five seconds.
•Check the setting in the wireless adapter such as SSID and encryption
settings.
CannotaccesstheInternetviawireless LANadapter.
•Move the routercloser to the wirelessclient.
•Check whether the wireless adapter is connected to the correct wireless
router.
•Check whether the wirelesschannel in use conforms to the channels avail-
able in yourcountry/area.
•Check the encryptionsettings.
17
NA8104_RT-AC68U_QSG_v2.indb 16 10/11/135:59:23PM

18
English
•Check if the ADSL or Cable connection is correct.
•Retry using another Ethernet cable.
IftheADSL“LINK”lightblinkscontinuouslyorstaysoff,Internetaccessis
notpossible-theRouteris unableto establishaconnection withtheADSL
network.
•ethEantsaulrlyourcables are all properly connected .
•Disconnect the power cord fromthe ADSL or cable modem, wait a few min-
utes, thenreconnect the cord.
•If the ADSL light continues to blink or staysOFF,contact your ADSL service
provider.
Networknameorencryptionkeysareforgotten.
•rysTettingup the wired connection and configuring the wirelessencryption
again.
•Pressthe Reset button of the wirelessrouterformore than five seconds.
•Factory defaultsettings:
User name/ Password:
admin /admin IP address:
router.asus.com SSID:
ASUS
WherecanI findmoreinformation aboutthewirelessrouter?
•serUManualin the support CD
•Online FAQsite:http://support.asus.com/faq
•echTnical Support site:http://support.asus.com
•ustoCmerHotline:Refer to the Support Hotline in this Quick Start Guide
NA8104_RT-AC68U_QSG_v2.indb 17 10/11/135:59:23PM

19
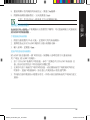
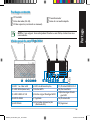
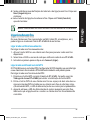
RJ45 網路線
快速使用指南
包裝內容物
RT-AC68U 無線路由器
電源變壓器
使用手冊光碟
注意:若以上列出的任何一項配件有毀損或是短缺的情形,請儘速
聯絡您的經銷商。
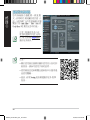
認識您的 RT-AC68U 無線路由器
1)
LAN 1~4 指 示 燈
6)
電源指示燈
11)
USB 3.0/2.0連接埠
2)
WAN(網際網路)
指示燈
7)
WPS 按 鈕
12)
WAN 連接埠
3)
USB 3.0/2.0指 示 燈
8)
Wi-Fi 開 啟 / 關 閉 按
鈕
13)
指示燈開啟 /關閉
按鈕
4)
2.4GHz 指 示 燈
9)
電源開關
14)
LAN 連接埠
5)
5GHz 指 示 燈
10)
電源輸入埠(DC-IN)
15)
重置按鈕
8U
12 3 4 5 6147 8 9 10 11 12 13
15
繁體中
文
NA8104_RT-AC68U_QSG_v2.indb 18 10/11/135:59:23PM

20
注意:
•USB 外接硬碟 /隨身碟:
• 此無線路由器相容大多數容量高達 2TB 的USB 硬碟 /隨身 碟
,並支援 FAT16、FAT32、EXT2、EXT3 與NTFS 的存取
。
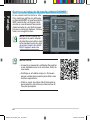
•欲安全移 除 US B磁碟,請登入網頁圖形使用者介面
(http://router.asus.com),接著在「網路地圖」頁面的右
上角點選USB 圖示並選擇 退出 USB 磁碟。
•錯誤移除 USB 碟將會導致資料遺失。
• 請造訪 http://event.asus.com/networks/disksupport 獲得此無線路 由器所
支援的檔案系統與硬碟磁區清單。
• 請造訪 http://event.asus.com/networks/printersupport獲得此無線 路由器所
支援的印表機清單。
繁體中
NA8104_RT-AC68U_QSG_v2.indb 19 10/11/135:59:23PM

21
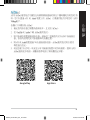
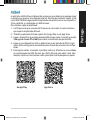
安裝您的路由器
重要!安裝路由器之前,請確認網際網路連線可用。
1. 放置您的路由器
為獲得無線路由器與所連線的網路裝置之間的最佳無線傳送訊號,請確認以
下幾點:
• 建議將路由器放置在中心區域,以覆蓋所有無線行動裝置。
•請勿將裝置放在靠近金屬物品與陽光直射的地方。
• 請遠離其它 802.11g或20MHz Wi-Fi 裝置、2.4GHz 電腦周邊裝置、 藍芽 裝置、
無線室內電話、傳送器、重型發動機、日光燈、微波爐、電冰箱與 其他
工業裝置,以防止訊號干擾或丟失。
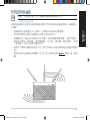
•請按照下圖所示擺放路由器上的三根可拆卸式天線以獲得最佳前後訊號覆
蓋。
• 請經常更新至最新版本韌體。您可以登入華碩官網 http://tw.asus.com 獲得 最 新韌
體。
45°
90°
45°
8U
繁體中
NA8104_RT-AC68U_QSG_v2.indb 20 10/11/135:59:23PM
La page charge ...
La page charge ...
La page charge ...
La page charge ...
La page charge ...
La page charge ...
La page charge ...
La page charge ...
La page charge ...
La page charge ...
La page charge ...
La page charge ...
La page charge ...
La page charge ...
La page charge ...
La page charge ...
La page charge ...
La page charge ...
La page charge ...
La page charge ...
La page charge ...
La page charge ...
La page charge ...
La page charge ...
La page charge ...
La page charge ...
La page charge ...
La page charge ...
La page charge ...
La page charge ...
La page charge ...
La page charge ...
La page charge ...
La page charge ...
La page charge ...
La page charge ...
La page charge ...
La page charge ...
La page charge ...
La page charge ...
La page charge ...
La page charge ...
La page charge ...
La page charge ...
La page charge ...
La page charge ...
La page charge ...
La page charge ...
La page charge ...
La page charge ...
La page charge ...
La page charge ...
La page charge ...
La page charge ...
La page charge ...
La page charge ...
La page charge ...
La page charge ...
La page charge ...
La page charge ...
La page charge ...
La page charge ...
La page charge ...
La page charge ...
La page charge ...
La page charge ...
La page charge ...
-
 1
1
-
 2
2
-
 3
3
-
 4
4
-
 5
5
-
 6
6
-
 7
7
-
 8
8
-
 9
9
-
 10
10
-
 11
11
-
 12
12
-
 13
13
-
 14
14
-
 15
15
-
 16
16
-
 17
17
-
 18
18
-
 19
19
-
 20
20
-
 21
21
-
 22
22
-
 23
23
-
 24
24
-
 25
25
-
 26
26
-
 27
27
-
 28
28
-
 29
29
-
 30
30
-
 31
31
-
 32
32
-
 33
33
-
 34
34
-
 35
35
-
 36
36
-
 37
37
-
 38
38
-
 39
39
-
 40
40
-
 41
41
-
 42
42
-
 43
43
-
 44
44
-
 45
45
-
 46
46
-
 47
47
-
 48
48
-
 49
49
-
 50
50
-
 51
51
-
 52
52
-
 53
53
-
 54
54
-
 55
55
-
 56
56
-
 57
57
-
 58
58
-
 59
59
-
 60
60
-
 61
61
-
 62
62
-
 63
63
-
 64
64
-
 65
65
-
 66
66
-
 67
67
-
 68
68
-
 69
69
-
 70
70
-
 71
71
-
 72
72
-
 73
73
-
 74
74
-
 75
75
-
 76
76
-
 77
77
-
 78
78
-
 79
79
-
 80
80
-
 81
81
-
 82
82
-
 83
83
-
 84
84
-
 85
85
-
 86
86
-
 87
87


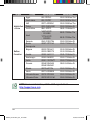
dans d''autres langues
- italiano: Asus RT-AC68U Guida utente
- English: Asus RT-AC68U User guide
- español: Asus RT-AC68U Guía del usuario
- português: Asus RT-AC68U Guia de usuario
- 日本語: Asus RT-AC68U ユーザーガイド
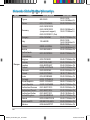
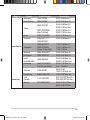
Documents connexes
-
Asus RTAC68U Guide de démarrage rapide
-
-
-
Asus RT-AX57 Manuel utilisateur
-
Asus RT-AC68W Manuel utilisateur
-
Asus RT-N66U Manuel utilisateur
-
Asus BRT-AC828 Guide de démarrage rapide
-
-
Asus RP-AC68U Guide de démarrage rapide
-