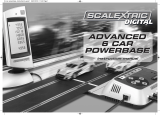
Hornby R636 Double Track Level Crossing Le manuel du propriétaire
- Taper
- Le manuel du propriétaire

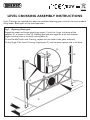
LEVEL CROSSING ASSEMBLY INSTRUCTIONS
Level Crossings are supplied with both the traditional opening gates and with the more modern
lifting boom. Both types are for hand operation.
Fig.1 Opening Gate type
Engage the upper and longer gate hinge spigot (1) with the ‘hinge’ at the top of the
gatepost (2) as shown in inset (3). Holding gate and post together, push their bottom
spigots into the holes in the level crossing base (4).
On the Double Track Level Crossing, repeat with the other three gates and posts.
On the Single Track Level Crossing, fit gate post (5) into the other square hole in the base.
12V
➀
➁
➂
➃
➄

Hornby Hobbies Limited, Westwood, Margate, Kent CT9 4JX, United Kingdom
4/306C 1106 Printed in China
Safety Note
This product is not suitable for children under three years. It contains small parts which can
present a choking hazard and some components have functional sharp points and edges.
Handle with care.
Please retain these details and the address for future reference.
Fig.2 Lifting Boom type
Clip white surrounds (1) to warning lamp units (2 and 3).
Fit lamp unit (2) to lifting boom housing (4). Engage lifting boom (5) to its housing as shown.
Assemble housing (4) and lamp unit (3) to square holes in level crossing base.
Repeat the procedure for the opposite side of the crossing. The rectangular panel
immediately below the lamps on part (3) is used in reality to light up ‘another train coming’,
but otherwise always appears black.
Warning
Fishplates have functional sharp points and edges. Please handle with care.
➀
➁
➂
➃
➄
➀

BAHNÜBERGANG – MONTAGEANLEITUNG
Bahnübergänge sind sowohl in der traditionellen britischen Bauart mit Schwenkgattern als auch in mod-
erneren Ausführung mit Hebeschranken verfügbar. Beide Typen sind für den Handbetrieb vorgesehen.
Abb. 1. Schwenkgatter-Typ
Den oberen (längeren) Drehzapfen (1) des Gatters in die Zapfenöffnung des Scharniers oben am
Gatterpfosten (2) einschieben, wie in der Detailansicht (3) gezeigt. Das Gatter und den Pfosten zusam-
men halten und die beiden unteren Zapfen in die Löcher der Grundplatte (4) drücken.
Beim doppelspurigen Bahnübergang mit den drei anderen Gattern und Pfosten auf gleiche Weise verfahren.
Beim einspurigen Bahnübergang den Gatterpfosten (5) in das andere viereckige Loch in der
Grundplatte drücken.
Abb. 2. Hebeschranken-Typ
Weiße Umrandungen (1) auf Blinkleuchte (2) und Blinklichtanlage (3) mit Klipps befestigen.
Blinkleuchte (2) am Schrankenhubgehäuse (4) befestigen. Schrankenbalken (5) wie in der Abbildung
gezeigt am Gehäuse anbringen.
Nun die Zapfen des Gehäuses mit Blinkleuchte (4) und der Blinkanlage (3) in die entsprechenden
viereckigen Löcher in der Grundplatte drücken.
Schrankeneinheit an der anderen Übergangsseite auf gleiche Weise montieren. Bei echten Bahnübergän-
gen leuchtet die an der separaten Warnampel (3) unter den Blinklichtern befindliche Tafel auf, wenn sich
ein weiterer Zug dem Übergang nähert, bleibt sonst jedoch schwarz.
WARNHINWEIS: Gleislaschen weisen funktionsbedingt scharfe Spitzen und Kanten auf.
Bitte mit Vorsicht handhaben!
Deutsch
Sicherheitshinweise
Dieses Produkt ist nicht für Kinder unter 3 Jahren geeignet. Enthaltene Kleinteile könnten zu Erstick-
ungsgefahr führen und einige Funktionsteile sind spitz und scharfkantig. Mit Vorsicht handhaben.
Diese Anleitung und Adresse zur zukünftigen Verwendung sorgfältig aufbewahren.
INSTRUCCIONES DE MONTAJE PARA PASO A NIVEL
Hay pasos a nivel con barrera tradicional y con la barrera moderna con contrapeso.
Ambos tipos son de accionamiento manual.
Fig 1. Barrera tradicional
Engancha el saliente superior largo del poste de la barrera (1) en la ‘bisagra’ de la parte superior de la
barra (2) según se muestra en el detalle (3). Juntando el poste y la barra, aprieta los salientes inferiores
en los orificios de la base del paso a nivel (4).
Para el Doble paso a nivel, repite la operación con las otras tres barreras y barras.
Para el Paso a nivel con barrera simple, encaja el poste de la barrera (5) en el otro orificio cuadrado de
la base.
Fig 2. Barrera con contrapeso
Cierra el exterior blanco (1) sobre los semáforos (2 y 3).
Engancha la unidad de semáforo (2) en el contrapeso (4). Coloca la barra (5) en el contrapeso según la
ilustración.
Introduce el contrapeso (4) y la unidad de semáforo (3) en los orificios cuadrados de la base del paso a nivel.
Repite el procedimiento para el otro lado del paso. El panel rectangular inmediatamente debajo del semáforo
(3) se utiliza en realidad para indicar “se acerca otro tren”, pero en caso contrario aparece siempre negro.
ADVERTENCIA: Las juntas tienen bordes y puntas afilados. Manéjalos con cuidado.
Notas de Seguridad
Este producto no es indicado para niños menores de 3 años. Contiene partes pequeñas que pueden
producir asfixia y algunos componentes tienen bordes o puntas funcionales afilados. Manéjalos con
cuidado. Conserva esta información y dirección para posibles consultas en el futuro.
Español
12V

Hornby Hobbies Limited, Westwood, Margate, Kent CT9 4JX, United Kingdom
4/306TR 1106 Printed in China
INSTRUCTIONS DE MONTAGE DES PASSAGES A NIVEAU
Les passages à niveau sont fournis avec des barrières traditionnelles et avec des barres levantes plus
modernes. Les deux sont actionnées à la main.
Français
Fig. 1 Barrières traditionnelles
Glissez l’ergot de charnière supérieur (le plus long des deux) (1) dans la « charnière » en haut du poteau
(2) comme indiqué dans l’encadré (3). En maintenant la barrière et le poteau solidaires, enfoncez leur
ergot inférieur dans le trou qui se trouve sur le socle du passage à niveau (4).
Pour le passage à niveau à double voie, faites la même chose pour les trois autres barrières et poteaux.
Pour le passage à niveau à une seule voie, enfoncez le poteau (5) dans l’autre trou carré du socle.
Fig. 2 Passages à niveau à barre levante
Clipsez les cadres blancs (1) sur les feux de signalisation (2 et 3).
Montez les feux (2) sur le logement de la barre levante (4). Enfoncez la barre levante (5) dans son
logement, comme indiqué.
Enfoncez le logement (4) et les feux (3) dans les trous carrés qui se trouvent sur le socle du passage à niveau.
Répétez cette procédure pour l’autre côté du passage à niveau. Le panneau rectangulaire qui se
trouve juste en dessous des feux sur la pièce (3) est utilisé en réalité pour afficher le message lumineux
« approche d’un second train », mais autrement il ne s’allume jamais.
AVERTISSEMENT : Les éclisses comportent des points et des bords coupants. Veuillez les
manipuler avec précaution.
Consignes de sécurité Ce produit ne convient pas aux enfants de moins de 3 ans. Il contient des
petites pièces qui peuvent présenter un risque d’étouffement et certains composants ont des bords ou
des pointes coupants. Manipulez avec précaution.
Veuillez conserver ces consignes ainsi que l’adresse pour pouvoir vous y référer ultérieurement.
Italiano
ISTRUZIONI PER IL MONTAGGIO DEL PASSAGGIO A LIVELLO
I passaggi a livello sono disponibili nella tradizionale versione con cancelli e nella versione più moderna
con sbarra. Entrambi sono azionati manualmente.
Fig 1. Tipo con apertura a cancello
Innestare il perno superiore e più lungo (1) della cerniera del cancello nella sede predisposta sul palo
(2) come mostrato nel riquadro (3). Tenendo cancello e palo insieme, spingere i perni inferiori nei fori
predisposti nella base del passaggio a livello (4).
Per passaggi a livello a doppio binario: ripetere la stessa procedura per gli altri tre cancelli e pali.
Per passaggi a livello a binario singolo: montare il palo (5) nell’altro foro quadrato della base.
Fig 2. Tipo con sbarra
Fissare la cornice bianca (1) sulle luci di segnalazione (2 e 3).
Montare le luci di segnalazione (2) sulla sede della sbarra (4). Innestare la sbarra (5) nell’apposita sede
come mostrato in figura.
Montare sede (4) e luci (3) nei fori quadrati presenti nella base del passaggio a livello.
Ripetere la procedura per il lato opposto del passaggio a livello. Il pannello rettangolare subito sotto le
luci del componente (3) viene realmente utilizzato per illuminare un altro treno in avvicinamento, ma
altrimenti appare nero.
AVVERTENZA Le piastre di giunzione presentano punte e bordi funzionali taglienti.
Maneggiare con cura.
Note relative alla sicurezza Questo prodotto non è adatto ai bambini di età inferiore ai 36 mesi.
Contengono componenti di piccole dimensioni che possono comportare rischi di soffocamento e alcuni
componenti presentano bordi funzionali taglienti o appuntiti. Maneggiare con prudenza.
Conservare queste istruzioni e l’indirizzo per successive consultazioni.
-
 1
1
-
 2
2
-
 3
3
-
 4
4