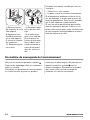
Zanussi ZFU27400XA Manuel utilisateur
- Catégorie
- Congélateurs
- Taper
- Manuel utilisateur

EN
User manual 2
FR
Notice d'utilisation 13
Freezer
Freezer
ZFU27400XA

Contents
Safety instructions _ _ _ _ _ _ _ _ _ _ _ _ _ _ 2
Product description _ _ _ _ _ _ _ _ _ _ _ _ _ 5
Control panel _ _ _ _ _ _ _ _ _ _ _ _ _ _ _ _ 5
Daily use _ _ _ _ _ _ _ _ _ _ _ _ _ _ _ _ _ _ _ 6
First use _ _ _ _ _ _ _ _ _ _ _ _ _ _ _ _ _ _ _ 7
Helpful hints and tips _ _ _ _ _ _ _ _ _ _ _ _ 7
Care and cleaning _ _ _ _ _ _ _ _ _ _ _ _ _ _ 8
Troubleshooting _ _ _ _ _ _ _ _ _ _ _ _ _ _ _ 9
Technical information _ _ _ _ _ _ _ _ _ _ _ 10
Installation _ _ _ _ _ _ _ _ _ _ _ _ _ _ _ _ _ 10
Environmental concerns _ _ _ _ _ _ _ _ _ _ 12
Subject to change without notice.
Safety instructions
In the interest of your safety and to ensure the
correct use, before installing and first using
the appliance, read this user manual carefully,
including its hints and warnings. To avoid un-
necessary mistakes and accidents, it is impor-
tant to ensure that all people using the appli-
ance are thoroughly familiar with its operation
and safety features. Save these instructions
and make sure that they remain with the appli-
ance if it is moved or sold, so that everyone
using it through its life will be properly in-
formed on appliance use and safety.
For the safety of life and property keep the
precautions of these user's instructions as the
manufacturer is not responsible for damages
caused by omission.
Children and vulnerable people safety
• This appliance is not intended for use by
persons (including children) with reduced
physical, sensory or mental capabilities, or
lack of experience and knowledge, unless
they have been given supervision or instruc-
tion concerning use of the appliance by a
person responsible for their safety.
Children should be supervised to ensure
that they do not play with the appliance.
• Keep all packaging well away from children.
There is risk of suffocation.
• If you are discarding the appliance pull the
plug out of the socket, cut the connection
cable (as close to the appliance as you can)
and remove the door to prevent playing chil-
dren to suffer electric shock or to close
themselves into it.
• If this appliance featuring magnetic door
seals is to replace an older appliance having
a spring lock (latch) on the door or lid, be
sure to make that spring lock unusable be-
fore you discard the old appliance. This will
prevent it from becoming a death trap for a
child.
General safety
Warning!
Keep ventilation openings, in the appliance en-
closure or in the built-in structure, clear of ob-
struction.
• The appliance is intended for keeping food-
stuff and/or beverages in a normal house-
hold and similar applications such as:
– staff kitchen areas in shops, offices and
other working environments;
– farm houses and by clients in hotels, mo-
tels and other residential type environ-
ments;
– bed and breakfast type environments;
– catering and similar non-retail applica-
tions.
• Do not use a mechanical device or any artifi-
cial means to speed up the thawing proc-
ess.
• Do not use other electrical appliances (such
as ice cream makers) inside of refrigerating
appliances, unless they are approved for
this purpose by the manufacturer.
• Do not damage the refrigerant circuit.
• The refrigerant isobutane (R600a) is con-
tained within the refrigerant circuit of the ap-
pliance, a natural gas with a high level of en-
2
www.zanussi.com

vironmental compatibility, which is neverthe-
less flammable.
During transportation and installation of the
appliance, be certain that none of the com-
ponents of the refrigerant circuit become
damaged.
If the refrigerant circuit should become
damaged:
– avoid open flames and sources of ignition
– thoroughly ventilate the room in which the
appliance is situated
• It is dangerous to alter the specifications or
modify this product in any way. Any damage
to the cord may cause a short-circuit, fire
and/or electric shock.
Warning! Any electrical component
(power cord, plug, compressor) must be
replaced by a certified service agent or quali-
fied service personnel to avoid hazard.
1. Power cord must not be lengthened.
2. Make sure that the power plug is not
squashed or damaged by the back of
the appliance. A squashed or damaged
power plug may overheat and cause a
fire.
3. Make sure that you can come to the
mains plug of the appliance.
4. Do not pull the mains cable.
5. If the power plug socket is loose, do not
insert the power plug. There is a risk of
electric shock or fire.
6. You must not operate the appliance
without the lamp cover (if foreseen) of
interior lighting.
• This appliance is heavy. Care should be tak-
en when moving it.
• Do not remove nor touch items from the
freezer compartment if your hands are
damp/wet, as this could cause skin abra-
sions or frost/freezer burns.
• Avoid prolonged exposure of the appliance
to direct sunlight.
• Bulb lamps (if foreseen) used in this appli-
ance are special purpose lamps selected for
household appliances use only. They are not
suitable for household room illumination.
Daily Use
• Do not put hot pot on the plastic parts in the
appliance.
• Do not store flammable gas and liquid in the
appliance, because they may explode.
• Do not place food products directly against
the air outlet on the rear wall. (If the appli-
ance is Frost Free)
• Frozen food must not be re-frozen once it
has been thawed out.
• Store pre-packed frozen food in accordance
with the frozen food manufacturer's instruc-
tions.
• Appliance's manufacturers storage recom-
mendations should be strictly adhered to.
Refer to relevant instructions.
• Do not place carbonated or fizzy drinks in
the freezer compartment as it creates pres-
sure on the container, which may cause it to
explode, resulting in damage to the appli-
ance.
• Ice lollies can cause frost burns if consumed
straight from the appliance.
Care and cleaning
• Before maintenance, switch off the appli-
ance and disconnect the mains plug from
the mains socket.
• Do not clean the appliance with metal ob-
jects.
• Do not use sharp objects to remove frost
from the appliance. Use a plastic scraper.
• Never use a hair drier or other heating appli-
ances to speed up defrosting. Excessive
heat may damage the plastic interior, and
humidity could enter the electric system
making it live.
Installation
Important! For electrical connection carefully
follow the instructions given in specific
paragraphs.
• Unpack the appliance and check if there are
damages on it. Do not connect the appli-
3
www.zanussi.com

ance if it is damaged. Report possible dam-
ages immediately to the place you bought it.
In that case retain packing.
• It is advisable to wait at least four hours be-
fore connecting the appliance to allow the
oil to flow back in the compressor.
• Adequate air circulation should be around
the appliance, lacking this leads to over-
heating. To achieve sufficient ventilation fol-
low the instructions relevant to installation.
• Wherever possible the back of the product
should be against a wall to avoid touching
or catching warm parts (compressor, con-
denser) to prevent possible burn.
• The appliance must not be located close to
radiators or cookers.
• Make sure that the mains plug is accessible
after the installation of the appliance.
• Connect to potable water supply only (If a
water connection is foreseen).
Service
• Any electrical work required to do the serv-
icing of the appliance should be carried out
by a qualified electrician or competent per-
son.
• This product must be serviced by an author-
ized Service Centre, and only genuine spare
parts must be used.
Environment Protection
This appliance does not contain gasses
which could damage the ozone layer, in
either its refrigerant circuit or insulation materi-
als. The appliance shall not be discarded to-
gether with the urban refuse and rubbish. The
insulation foam contains flammable gases: the
appliance shall be disposed according to the
applicable regulations to obtain from your local
authorities. Avoid damaging the cooling unit,
especially at the rear near the heat exchanger.
The materials used on this appliance marked
by the symbol
are recyclable.
4
www.zanussi.com

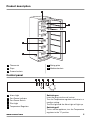
Product description
1
4
2
3
5
1
Thermostat
2
Flaps
3
Freezer baskets
4
Rating plate
5
Maxibox baskets
Control panel
1 2 3 4 5
1
Alarm Light
2
Fast Freeze Indicator
3
Fast Freeze Switch
4
Pilot Light
5
Temperature Regulator
Switching on
Insert the plug into the wall socket.
Turn the Temperature regulator clockwise to a
medium setting.
The Pilot light and the Alarm light will light up.
Switching off
To turn off the appliance, turn the Temperature
regulator to the "0" position.
5
www.zanussi.com

Temperature regulation
The temperature is automatically regulated.
To operate the appliance, proceed as follows:
• turn the Temperature regulator toward lower
settings to obtain the minimum coldness.
• turn the Temperature regulator toward high-
er settings to obtain the maximum coldness.
The intermediate position is usually the most
suitable.
However, the exact setting should be chosen
keeping in mind that the temperature inside
the appliance depends on:
• room temperature
• how often the door is opened
• the quantity of food stored
• the location of the appliance.
Fast Freeze function
To activate the Fast Freeze function, press the
Fast Freeze switch.
The Fast Freeze light will light up.
Excessive Temperature Alarm
In the event of an abnormal temperature rise
inside the freezer (e.g. power cut) alarm light
comes on.
When normal conditions are restored the
alarm light will switch off automatically.
Daily use
Storage of frozen food
When first starting-up or after a period out of
use, before putting the products in the com-
partment let the appliance run at least 2 hours.
The freezer drawers ensure that it is quick and
easy to find the food package you want. If
large quantities of food are to be stored, re-
move all drawers except for the bottom drawer
which needs to be in place to provide good air
circulation. On all shelves it is possible to
place food that protrude until 15 mm from the
door.
Important! In the event of accidental
defrosting, for example due to a power failure,
if the power has been off for longer that the
value shown in the technical characteristics
chart under "rising time", the defrosted food
must be consumed quickly or cooked
immediately and then re-frozen (after cooling).
Freezing fresh food
The freezer compartment is suitable for freez-
ing fresh food and storing frozen and deep-
frozen food for a long time.
To freeze fresh food activate the Fast Freezing
function at least 24 hours before placing the
food to be frozen in the freezer compartment.
Place the fresh food to be frozen in the top
compartment.
The maximum amount of food that can be fro-
zen in 24 hours is specified on the rating plate,
a label located on the inside of the fridge.
The freezing process lasts 24 hours: during
this period do not add other food to be frozen.
After 24 hours, when the freezing process is
completed, deactivate the Fast Freezing func-
tion (see "Fast Freezing function").
Thawing
Deep-frozen or frozen food, prior to being
used, can be thawed at room temperature.
Small pieces may even be cooked still frozen,
directly from the freezer: in this case, cooking
will take longer.
Removal of freezing baskets from the
freezer
The freezing baskets have a limit stop to pre-
vent their accidental removal or falling out. At
the time of its removal from the freezer, pull the
basket towards yourself and, upon reaching
the end point, remove the basket by tilting its
front upwards.
At the time of putting it back, slightly lift the
front of the basket to insert it into the freezer.
Once you are over the end points, push the
baskets back in their position.
6
www.zanussi.com

12
First use
Cleaning the interior
Before using the appliance for the first time,
wash the interior and all internal accessories
with lukewarm water and some neutral soap
so as to remove the typical smell of a brand-
new product, then dry thoroughly.
Important! Do not use detergents or abrasive
powders, as these will damage the finish.
Helpful hints and tips
Normal Operating Sounds
• You may hear a faint gurgling and a bub-
bling sound when the refrigerant is pumped
through the coils or tubing. This is correct.
• When the compressor is on, the refrigerant
is being pumped around and you will hear a
whirring sound and a pulsating noise from
the compressor. This is correct.
• The thermic dilatation might cause a sudden
cracking noise. It is natural, not dangerous
physical phenomenon. This is correct.
• When the compressor switches on or
switches off, you will hear a faint "click" of
the temperature regulator. This is correct.
Hints for energy saving
• Do not open the door frequently or leave it
open longer than absolutely necessary.
• If the ambient temperature is high and the
Temperature Regulator is set to low temper-
ature and the appliance is fully loaded, the
compressor may run continuously, causing
frost or ice on the evaporator. If this hap-
pens, set the Temperature Regulator toward
warmer settings to allow automatic defrost-
ing and so a saving in electricity consump-
tion.
Hints for freezing
To help you make the most of the freezing
process, here are some important hints:
• the maximum quantity of food which can be
frozen in 24 hrs. is shown on the rating
plate;
• the freezing process takes 24 hours. No fur-
ther food to be frozen should be added dur-
ing this period;
• only freeze top quality, fresh and thoroughly
cleaned, foodstuffs;
• prepare food in small portions to enable it to
be rapidly and completely frozen and to
make it possible subsequently to thaw only
the quantity required;
• wrap up the food in aluminium foil or poly-
thene and make sure that the packages are
airtight;
• do not allow fresh, unfrozen food to touch
food which is already frozen, thus avoiding a
rise in temperature of the latter;
• lean foods store better and longer than fatty
ones; salt reduces the storage life of food;
• water ices, if consumed immediately after
removal from the freezer compartment, can
possibly cause the skin to be freeze burnt;
7
www.zanussi.com

• it is advisable to show the freezing in date
on each individual pack to enable you to
keep tab of the storage time.
Hints for storage of frozen food
To obtain the best performance from this ap-
pliance, you should:
• make sure that the commercially frozen
foodstuffs were adequately stored by the re-
tailer;
• be sure that frozen foodstuffs are transfer-
red from the foodstore to the freezer in the
shortest possible time;
• not open the door frequently or leave it open
longer than absolutely necessary;
• once defrosted, food deteriorates rapidly
and cannot be refrozen;
• do not exceed the storage period indicated
by the food manufacturer.
Care and cleaning
Caution! Unplug the appliance before
carrying out any maintenance operation.
This appliance contains hydrocarbons in
its cooling unit; maintenance and re-
charging must therefore only be carried out by
authorized technicians.
Periodic cleaning
The equipment has to be cleaned regularly:
• clean the inside and accessories with luke-
warm water and some neutral soap.
• regularly check the door seals and wipe
clean to ensure they are clean and free from
debris.
• rinse and dry thoroughly.
Important! Do not pull, move or damage any
pipes and/or cables inside the cabinet.
Never use detergents, abrasive powders,
highly perfumed cleaning products or wax
polishes to clean the interior as this will
damage the surface and leave a strong odour.
Clean the condenser (black grill) and the com-
pressor at the back of the appliance with a
brush. This operation will improve the perform-
ance of the appliance and save electricity con-
sumption.
Important! Take care of not to damage the
cooling system.
Many proprietary kitchen surface cleaners
contain chemicals that can attack/damage the
plastics used in this appliance. For this reason
it is recommended that the outer casing of this
appliance is only cleaned with warm water
with a little washing-up liquid added.
After cleaning, reconnect the equipment to the
mains supply.
Defrosting the freezer
A certain amount of frost will always form on
the freezer shelves and around the top com-
partment.
Defrost the freezer when the frost layer rea-
ches a thickness of about 3-5 mm.
To remove the frost, follow the instructions be-
low:
• switch off the appliance and pull out the
plug from the wall socket
• remove any stored food, wrap it in several
layers of newspaper and put it in a cool
place
• remove the freezer drawers
• put insulating material around the drawers,
e.g. blankets or newspapers.
Defrosting can be accelerated by placing
bowls with hot water (not boiling) inside the
freezer.
• Leave the door open and insert the plastic
scraper in the appropriate seating at the
bottom centre, placing a basin underneath
to collect the defrost water
• carefully scrape off the ice when it starts to
thaw (use a wood or a plastic scraper)
• when all the ice has melted, dry the interior
thoroughly and keep the scraper for future
use.
• switch on the appliance and replace the fro-
zen foodstuff.
8
www.zanussi.com

Activate the Fast Freeze function for some
hours so that it can reach the sufficient storing
temperature as soon as possible.
Caution! Never use sharp metal tools to
scrape off frost from the evaporator as
you could damage it. Do not use a mechanical
device or any artificial means to speed up the
thawing process other than those
recommended by the manufacturer. A
temperature rise of the frozen food packs,
during defrosting, may shorten their safe
storage life.
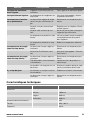
Troubleshooting
Warning! Before troubleshooting,
disconnect the mains plug from the mains
socket.
Only a qualified electrician or competent
person must do the troubleshooting that is not
in this manual.
Problem Possible cause Solution
The appliance does not
operate. The Pilot light
does not flash.
The appliance is switched off. Switch on the appliance.
The mains plug is not connected
to the mains socket correctly.
Connect the mains plug to the
mains socket correctly.
The appliance has no power.
There is no voltage in the mains
socket.
Connect a different electrical appli-
ance to the mains socket.
Contact a qualified electrician.
The Pilot light flashes. The appliance is not working prop-
erly.
Contact a qualified electrician.
The Alarm light flashes. The temperature in the freezer is
too high.
Refer to "Excessive Temperature
Alarm"
The compressor operates
continually.
The temperature is not set correct-
ly.
Set a higher temperature.
The door is not closed correctly. Refer to "Closing the door".
The door has been opened too fre-
quently.
Do not keep the door open longer
than necessary.
The product temperature is too
high.
Let the product temperature de-
crease to room temperature before
storage.
The room temperature is too high. Decrease the room temperature.
The temperature in the
freezer is too low.
The temperature regulator is not
set correctly.
Set a higher temperature.
The Fast Freeze function is switch-
ed on.
Refer to" Fast Freeze function".
The temperature in the
freezer is too high.
The temperature regulator is not
set correctly.
Set a lower temperature.
9
www.zanussi.com

Problem Possible cause Solution
Many products are stored at the
same time.
Store less products at the same
time.
Products are too near to each oth-
er.
Store products so that there is cold
air circulation.
There is too much frost. Food is not wrapped correctly. Wrap the food correctly.
The temperature regulator is not
set correctly.
Set a higher temperature.
Technical information
Dimension
Height 1850 mm
Width 595 mm
Depth 658 mm
Rising Time 20 h
Voltage 230 - 240 V
Frequency 50 Hz
The technical information are situated in the
rating plate on the internal left side of the ap-
pliance and in the energy label.
Installation
Caution! Read the "Safety Information"
carefully for your safety and correct
operation of the appliance before installing the
appliance.
Positioning
This appliance should be installed in a dry,
well ventilated indoor where the ambient tem-
perature corresponds to the climate class indi-
cated on the rating plate of the appliance:
Climate
class
Ambient temperature
SN +10°C to + 32°C
N +16°C to + 32°C
ST +16°C to + 38°C
T +16°C to + 43°C
Some functional problems might occur for
some types of models when operating outside
of that range. The correct operation can only
be guaranteed within the specified tempera-
ture range. If you have any doubts regarding
where to install the appliance, please turn to
the vendor, to our customer service or to the
nearest Service Centre
Location
The appliance should be installed well away
from sources of heat such as radiators, boilers,
direct sunlight etc. Ensure that air can circu-
late freely around the back of the cabinet. To
ensure best performance, if the appliance is
positioned below an overhanging wall unit, the
minimum distance between the top of the cab-
inet and the wall unit must be at least 100
mm . Ideally, however, the appliance should
not be positioned below overhanging wall
10
www.zanussi.com

units. Accurate levelling is ensured by one or
more adjustable feet at the base of the cabi-
net.
Warning! It must be possible to
disconnect the appliance from the mains
power supply; the plug must therefore be
easily accessible after installation.
A
B
100 mm
min
20 mm
Rear spacers
You can find the two spacers in the bag with
documentation.
Do these steps to install the spacers:
1. Release the screw.
2. Engage the spacer below the screw.
3. Turn the spacer to the right position.
4. Tighten again the screws.
2
4
3
1
Electrical connection
Before plugging in, ensure that the voltage
and frequency shown on the rating plate cor-
respond to your domestic power supply.
The appliance must be earthed. The power
supply cable plug is provided with a contact
for this purpose. If the domestic power supply
socket is not earthed, connect the appliance
to a separate earth in compliance with current
regulations, consulting a qualified electrician.
The manufacturer declines all responsibility if
the above safety precautions are not observed.
This appliance complies with the E.E.C. Direc-
tives.
Levelling
When placing the appliance ensure that it
stands level. This can be achieved by two ad-
justable feet at the bottom in front.
11
www.zanussi.com

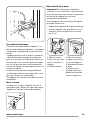
Door reversibility
Important! To carry out the following
operations, we suggest that this be made with
another person that will keep a firm hold on
the doors of the appliance during the
operations.
To change the opening direction of the door,
do these steps:
• Remove the plug from the power socket.
• Tilt back the appliance carefully so that the
compressor cannot touch the floor.
1. Remove the plinth.
2. Unscrew and re-
move the lower hing-
es.
3. Remove the door.
2
1
4. Unscrew the up-
per pin and screw it
on the opposite side.
5. Refit the door.
6. Make sure the
edge of the door is
parallel with the edge
of the top.
A
B
7. Unscrew the pin
(A) and screw it on
the opposite side.
8. Remove the cap
(B) and position it on
the opposite side.
9. Screw the lower
hinges.
10. Refit the plinth.
11. Stand the appli-
ance upright.
12. Fit the handle on
the opposite side
and put the plastic
caps (contained in
the instructions bag)
in the free holes.
Do a final check to make sure that:
• All screws are tightened.
• The door opens and closes correctly.
If the ambient temperature is cold (i.e. in Win-
ter), the gasket may not fit perfectly to the cab-
inet. In that case, wait for the natural fitting of
the gasket.
In case you do not want to carry out the above
mentioned operations, contact the nearest Af-
ter Sales Service Force. The After Sales Serv-
ice specialist will carry out the reversibility of
the doors at your cost.
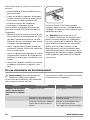
Environmental concerns
Recycle the materials with the symbol . Put
the packaging in applicable containers to
recycle it.
Help protect the environment and human
health and to recycle waste of electrical and
electronic appliances. Do not dispose
appliances marked with the symbol
with the
household waste. Return the product to your
local recycling facility or contact your
municipal office.
12
www.zanussi.com

Sommaire
Instructions de sécurité _ _ _ _ _ _ _ _ _ _ 13
Description de l'appareil _ _ _ _ _ _ _ _ _ _ 16
Bandeau de commande _ _ _ _ _ _ _ _ _ _ 16
Utilisation quotidienne _ _ _ _ _ _ _ _ _ _ _ 17
Première utilisation _ _ _ _ _ _ _ _ _ _ _ _ _ 18
Conseils utiles _ _ _ _ _ _ _ _ _ _ _ _ _ _ _ 18
Entretien et nettoyage _ _ _ _ _ _ _ _ _ _ _ 19
En cas d'anomalie de fonctionnement _ _ 20
Caracteristiques techniques _ _ _ _ _ _ _ _ 21
Installation _ _ _ _ _ _ _ _ _ _ _ _ _ _ _ _ _ 22
En matière de sauvegarde de l'environnement
_ _ _ _ _ _ _ _ _ _ _ _ _ _ _ _ _ _ _ _ _ _ _ 24
Sous réserve de modifications.
Instructions de sécurité
Pour votre sécurité et garantir une utilisation
correcte de l'appareil, lisez attentivement cette
notice, y compris les conseils et avertisse-
ments, avant d'installer et d'utiliser l'appareil
pour la première fois. Pour éviter toute erreur
ou accident, veillez à ce que toute personne
qui utilise l'appareil connaisse bien son fonc-
tionnement et ses fonctions de sécurité. Con-
servez cette notice avec l'appareil. Si l'appareil
doit être vendu ou cédé à une autre personne,
veillez à remettre cette notice au nouveau pro-
priétaire, afin qu'il puisse se familiariser avec
son fonctionnement et sa sécurité.
Pour la sécurité des personnes et des biens,
conservez et respectez les consignes de sé-
curité figurant dans cette notice. Le fabricant
décline toute responsabilité en cas de dom-
mages dus au non-respect de ces instruc-
tions.
Sécurité des enfants et des personnes
vulnérables
• Cet appareil n'est pas destiné à être utilisé
par des enfants ou des personnes dont les
capacités physiques, sensorielles ou menta-
les, ou le manque d'expérience et de con-
naissance les empêchent d'utiliser l'appareil
sans risque lorsqu'ils sont sans surveillance
ou en l'absence d'instruction d'une person-
ne responsable qui puisse leur assurer une
utilisation de l'appareil sans danger.
Empêchez les enfants de jouer avec l'appa-
reil.
• Ne laissez pas les différents emballages à
portée des enfants. Ils pourraient s'asphy-
xier.
• Si l'appareil doit être mis au rebut, sortez la
fiche de la prise électrique, coupez le cor-
don d'alimentation au ras de l'appareil et dé-
montez la porte pour éviter les risques
d'électrocution et que des enfants ne res-
tent enfermés à l'intérieur.
• Cet appareil est muni de fermetures magné-
tiques. S'il remplace un appareil équipé
d'une fermeture à ressort, nous vous con-
seillons de rendre celle-ci inutilisable avant
de vous en débarrasser. Ceci afin d'éviter
aux enfants de s'enfermer dans l'appareil et
de mettre ainsi leur vie en danger.
Consignes générales de sécurité
Avertissement
Veillez à ce que les orifices de ventilation, situ-
és dans l'enceinte de l'appareil ou la structure
intégrée, ne soient pas obstrués.
• Les appareils sont destinés uniquement à la
conservation des aliments et/ou des bois-
sons dans le cadre d’un usage domestique
normal, tel que celui décrit dans la présente
notice.
– dans des cuisines réservées aux em-
ployés dans des magasins, bureaux et au-
tres lieux de travail ;
– dans les fermes et par les clients dans
des hôtels, motels et autres lieux de sé-
jour ;
– dans des hébergements de type chambre
d'hôte ;
– pour la restauration et autres utilisations
non commerciales.
13
www.zanussi.com

• N'utilisez pas d'appareils électriques,
d'agents chimiques ou tout autre système
artificiel pour accélérer le processus de dé-
givrage.
• Ne faites pas fonctionner d'appareils électri-
ques (comme des sorbetières électri-
ques, ...) à l'intérieur des appareils de réfri-
gération à moins que cette utilisation n'ait
reçu l'agrément du fabricant.
• N'endommagez pas le circuit frigorifique.
• Le circuit frigorifique de l’appareil contient
de l’isobutane (R600a), un gaz naturel of-
frant un haut niveau de compatibilité avec
l’environnement mais qui est néanmoins in-
flammable.
Pendant le transport et l'installation de votre
appareil, assurez-vous qu'aucune partie du
circuit frigorifique n'est endommagée.
Si le circuit frigorifique est endommagé :
– évitez les flammes vives et toute autre
source d'allumage
– aérez soigneusement la pièce où se trou-
ve l'appareil
• Ne modifiez pas les spécifications de l'ap-
pareil. Si le câble d'alimentation est endom-
magé, il peut causer un court circuit, un in-
cendie et/ou une électrocution.
Avertissement Les éventuelles répara-
tions ou interventions sur votre appareil,
ainsi que le remplacement du câble d'alimen-
tation, ne doivent être effectuées que par un
professionnel qualifié.
1. Ne branchez pas le cordon d'alimenta-
tion à une rallonge.
2. Assurez-vous que la prise n'est pas
écrasée ou endommagée par l'arrière
de l'appareil. Une prise de courant
écrasée ou endommagée peut
s'échauffer et causer un incendie.
3. Vérifiez que la prise murale de l'appareil
est accessible.
4. Ne débranchez pas l'appareil en tirant
sur le câble.
5. Si la prise murale n'est pas bien fixée,
n'introduisez pas de prise dedans. Ris-
que d'électrocution ou d'incendie.
6. N'utilisez pas l'appareil sans le diffuseur
de l'ampoule (si présent) de l'éclairage
intérieur.
• Cet appareil est lourd. Faite attention lors
de son déplacement.
• Ne touchez pas avec les mains humides les
surfaces givrées et les produits congelés
(risque de brûlure et d'arrachement de la
peau).
• Évitez une exposition prolongée de l'appareil
aux rayons solaires.
• Les ampoules (si présentes) utilisées dans
cet appareil sont des ampoules spécifiques
uniquement destinées à être utilisées sur
des appareils ménagers. Elles ne sont pas
du tout adaptées à un éclairage quelconque
d'une habitation.
Utilisation quotidienne
• Ne posez pas d'éléments chauds sur les
parties en plastique de l'appareil.
• Ne stockez pas de gaz ou de liquides in-
flammables dans l'appareil (risque d'explo-
sion).
• Ne placez pas d'aliments directement contre
la sortie d'air sur la paroi arrière de l'appa-
reil. (Si l'appareil est sans givre.)
• Un produit décongelé ne doit jamais être re-
congelé.
• Conservez les aliments emballés conformé-
ment aux instructions de leur fabricant.
• Respectez scrupuleusement les conseils de
conservation donnés par le fabricant de
l'appareil. Consultez les instructions respec-
tives.
• Ne mettez pas de bouteilles ni de boîtes de
boissons gazeuses dans le compartiment
congélateur, car la pression se formant à
l'intérieur du contenant pourrait le faire écla-
ter et endommager ainsi l'appareil.
• Ne consommez pas certains produits tels
que les bâtonnets glacés dès leur sortie de
l'appareil, car ils peuvent provoquer des
brûlures.
Entretien et nettoyage
• Avant toute opération d'entretien, mettez
l'appareil à l'arrêt et débranchez-le.
14
www.zanussi.com

• N'utilisez pas d'objets métalliques pour net-
toyer l'appareil.
• N'utilisez pas d'objet tranchant pour gratter
la couche de givre. Utilisez une spatule en
plastique.
• N'utilisez pas d'appareils électriques ou
agents chimiques pour dégivrer l'appareil.
La chaleur excessive pourrait endommager
le revêtement plastique interne et l'humidité
pourrait s'introduire dans le système électri-
que.
Installation
Important Avant de procéder au
branchement électrique, respectez
scrupuleusement les instructions fournies
dans cette notice.
• Déballez l'appareil et vérifiez qu'il n'est pas
endommagé. Ne branchez pas l'appareil s'il
est endommagé. Signalez immédiatement
au revendeur de l'appareil les dommages
constatés. Dans ce cas, gardez l'emballage.
• Il est conseillé d'attendre au moins quatre
heures avant de brancher l'appareil pour
que le circuit frigorifique soit stabilisé.
• Veillez à ce que l'air circule librement autour
de l'appareil pour éviter qu'il ne surchauffe.
Pour assurer une ventilation suffisante, res-
pectez les instructions de la notice (chapitre
Installation).
• Placez l'appareil dos au mur pour éviter tout
contact avec le compresseur et le conden-
seur (risque de brûlure).
• Placez de préférence votre appareil loin
d'une source de chaleur (chauffage, cuisson
ou rayons solaires trop intenses).
• Assurez-vous que la prise murale reste ac-
cessible après l'installation de l'appareil.
• Branchez à l'alimentation en eau potable
uniquement. (Si un branchement sur le ré-
seau d'eau est prévu.)
Maintenance
• Les branchements électriques nécessaires
à l'entretien de l'appareil doivent être réali-
sés par un électricien qualifié ou une per-
sonne compétente.
• Cet appareil ne doit être entretenu et réparé
que par un Service après-vente autorisé, ex-
clusivement avec des pièces d'origine.
Protection de l'environnement
Le système frigorifique et l'isolation de vo-
tre appareil ne contiennent pas de C.F.C.
contribuant ainsi à préserver l'environnement.
L'appareil ne doit pas être mis au rebut avec
les ordures ménagères et les déchets urbains.
La mousse d'isolation contient des gaz inflam-
mables : l'appareil sera mis au rebut conformé-
ment aux règlements applicables disponibles
auprès des autorités locales. Veillez à ne pas
détériorer les circuits frigorifiques, notamment
au niveau du condenseur. Les matériaux utili-
sés dans cet appareil identifiés par le symbole
sont recyclables.
15
www.zanussi.com

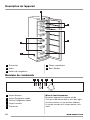
Description de l'appareil
1
4
2
3
5
1
Thermostat
2
Volets
3
Paniers de congélation
4
Plaque signalétique
5
Bacs Maxibox
Bandeau de commande
1 2 3 4 5
1
Voyant d'alarme
2
Voyant Congélation rapide
3
Touche Congélation rapide
4
Voyant lumineux
5
Thermostat
Mise en fonctionnement
Branchez l'appareil à une prise murale.
Tournez le thermostat dans le sens des aiguil-
les d'une montre sur une position médiane.
Le voyant lumineux et le voyant alarme s'allu-
ment.
16
www.zanussi.com

Mise à l'arrêt
Pour mettre l'appareil à l'arrêt, tournez le ther-
mostat sur la position "0".
Réglage de la température
La température est réglée automatiquement.
Pour faire fonctionner l'appareil, procédez
comme suit :
• Tournez le thermostat sur la position mini-
mum pour obtenir moins de froid.
• Tournez le thermostat sur la position maxi-
mum pour obtenir plus de froid.
Une position intermédiaire est généralement la
plus indiquée.
Toutefois, le réglage doit être choisi en tenant
compte du fait que la température à l'intérieur
de l'appareil dépend de plusieurs facteurs :
• la température ambiante
• la fréquence d'ouverture de la porte
• la quantité de denrées stockées
• l'emplacement de l'appareil.
Fonction Fast Freeze
Pour activer la fonction Fast Freeze, appuyez
sur la touche Fast Freeze.
Le voyant Fast Freeze s'allume.
Alarme de température
Lorsque la température à l'intérieur du com-
partiment congélateur remonte anormalement
(par exemple, en cas de coupure de courant),
le voyant alarme s'allume.
Une fois les conditions normales de fonction-
nement rétablies, le voyant alarme s'éteint au-
tomatiquement.
Utilisation quotidienne
Conservation d'aliments congelés
À la mise en service ou après un arrêt prolon-
gé, faites fonctionner l'appareil pendant 2 heu-
res environ, avant d’introduire les produits
dans le compartiment.
Les tiroirs de congélation vous permettent de
trouver facilement et rapidement les aliments
dont vous avez besoin. Si vous devez stocker
une grande quantité d'aliments, retirez tous les
tiroirs et le bac à glace sauf le tiroir inférieur
qui doit être en place afin de permettre une
circulation d'air optimale. Des denrées alimen-
taires peuvent être stockées sur chaque clay-
ette en respectant un espace de 15 mm max.
à partir de la porte.
Important En cas de décongélation
accidentelle, due par exemple à une coupure
de courant, si la coupure a duré plus de temps
qu'il n'est prévu au paragraphe « Autonomie de
fonctionnement », au chapitre Caractéristiques
techniques, consommez rapidement les
aliments décongelés ou cuisez-les
immédiatement avant de les recongeler (une
fois refroidis).
Congélation d'aliments frais
Le compartiment congélateur est idéal pour
congeler des denrées fraîches et conserver à
long terme des aliments surgelés ou congelés.
Pour congeler les denrées fraîches, activez la
fonction Congélation rapide au moins 24 heu-
res avant de placer les denrées à congeler
dans le compartiment congélateur.
Placez les denrées fraîches à congeler dans le
compartiment supérieur.
La quantité maximale de denrées que vous
pouvez congeler par 24 heures figure sur la
plaque signalétique, située à l'intérieur de l’ap-
pareil.
Le processus de congélation dure 24 heures :
vous ne devez ajouter aucune autre denrée à
congeler au cours de cette période.
Au bout de 24 heures, lorsque le processus
de congélation est terminé, désactivez la fonc-
tion Congélation rapide (reportez-vous au pa-
ragraphe « Congélation rapide »).
La décongélation
Les aliments surgelés ou congelés peuvent
être décongelés à température ambiante.
Les petites pièces peuvent même être cuites
sans décongélation préalable : dans ce cas, la
cuisson est plus longue.
17
www.zanussi.com

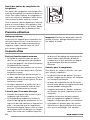
Retrait des paniers de congélation du
congélateur
Les paniers de congélation sont équipés d'un
arrêt afin d'empêcher leur retrait accidentel ou
chute. Pour retirer le panier du congélateur, ti-
rez-le vers vous et en atteignant l'arrêt, retirez-
le en inclinant la partie avant vers le haut.
Pour le remettre, relevez légèrement l'avant du
panier et insérez-le dans le congélateur. Une
fois que vous avez dépassé les butées d'arrêt,
poussez les paniers dans la bonne position.
12
Première utilisation
Nettoyage intérieur
Avant d'utiliser l'appareil pour la première fois,
nettoyez l'intérieur et tous les accessoires in-
ternes avec de l'eau tiède savonneuse pour
supprimer l'odeur caractéristique du "neuf"
puis séchez soigneusement.
Important N'utilisez pas de produits abrasifs,
poudre à récurer, éponge métallique pour ne
pas abîmer la finition.
Conseils utiles
Bruits de fonctionnement normaux
• Le liquide de refroidissement qui passe
dans le circuit d'évaporation peut produire
un bruit de gargouillis ou de bouillonnement.
Ce phénomène est normal.
• Le compresseur peut produire un ronronne-
ment aigu ou un bruit de pulsation. Ce phé-
nomène est normal.
• La dilatation thermique peut provoquer un
soudain, léger bruit de craquement. C'est un
phénomène normal et sans gravité. Ce phé-
nomène est normal.
• Un léger claquement se produit lors de la
mise en fonctionnement/à l'arrêt du com-
presseur. Ce phénomène est normal.
Conseils pour l'économie d'énergie
• N'ouvrez pas la porte trop souvent ou plus
longtemps que nécessaire.
• Si la température ambiante est élevée, le
dispositif de réglage de température est sur
la position de froid maximum et l'appareil est
plein : il est possible que le compresseur
fonctionne en régime continu, d'où un risque
de formation excessive de givre sur l'évapo-
rateur. Pour éviter ceci, modifiez la position
du dispositif de réglage de température de
façon à obtenir des périodes d'arrêt du
compresseur et ainsi permettre un dégivra-
ge automatique, d'où des économies
d'énergie.
Conseils pour la congélation
Pour obtenir les meilleurs résultats, voici quel-
ques conseils importants :
• la quantité maximale de denrées que vous
pouvez congeler par 24 heures est indiquée
sur la plaque signalétique.
• le temps de congélation est de 24 heures.
Aucune autre denrée à congeler ne doit être
ajoutée pendant cette période.
• congelez seulement les denrées alimentai-
res fraîches, de qualité supérieure (une fois
nettoyées).
• préparez la nourriture en petits paquets
pour une congélation rapide et uniforme,
adaptés à l'importance de la consommation.
• enveloppez les aliments dans des feuilles
d'aluminium ou de polyéthylène et assurez-
vous que les emballages sont étanches ;
18
www.zanussi.com

• ne laissez pas des aliments frais, non con-
gelés, toucher des aliments déjà congelés
pour éviter une remontée en température de
ces derniers.
• les aliments maigres se conservent mieux et
plus longtemps que les aliments gras ; le sel
réduit la durée de conservation des aliments
• la température très basse à laquelle se trou-
vent les bâtonnets glacés, s'ils sont con-
sommés dès leur sortie du compartiment
congélateur, peut provoquer des brûlures.
• L'identification des emballages est impor-
tante : indiquez la date de congélation du
produit, et respectez la durée de conserva-
tion indiquée par le fabricant.
Conseils pour la conservation des
produits surgelés et congelés du
commerce
Pour obtenir les meilleures performances pos-
sibles :
• assurez-vous que les denrées surgelées
achetées dans le commerce ont été correc-
tement entreposées par le revendeur ;
• prévoyez un temps réduit au minimum pour
le transport des denrées du magasin d'ali-
mentation à votre domicile ;
• évitez d'ouvrir trop souvent la porte du con-
gélateur et ne la laissez ouverte que le
temps nécessaire ;
• une fois décongelés, les aliments se dété-
riorent rapidement et ne peuvent pas être
recongelés ;
• ne dépassez pas la durée de conservation
indiquée par le fabricant.
Entretien et nettoyage
Attention débrancher l'appareil avant
toute opération d'entretien.
Cet appareil contient des hydrocarbures
dans son circuit réfrigérant : l'entretien et
la recharge ne doivent donc être effectués que
par du personnel autorisé.
Nettoyage périodique
Cet appareil doit être nettoyé régulièrement :
• Nettoyez l'intérieur et tous les accessoires
avec de l'eau tiède savonneuse.
• Vérifiez régulièrement les joints de porte et
nettoyez-les en les essuyant pour éviter tou-
te accumulation de déchets.
• Rincez et séchez soigneusement.
Important Ne pas tirer, déplacer ou
endommager les tuyaux et/ou câbles qui se
trouvent à l'intérieur de l'appareil.
Ne JAMAIS utiliser de produits abrasifs ou
caustiques ni d'éponges avec grattoir pour
nettoyer l'intérieur de façon à ne pas l'abîmer
et laisser de fortes odeurs.
Nettoyer le condenseur (grille noire) et le com-
presseur situés à l'arrière de l'appareil avec
une brosse ou un aspirateur. Cette opération
améliore les performances de l'appareil et per-
met des économies d'énergie.
Important Attention à ne pas endommager le
système de réfrigération.
De nombreux détergents pour la cuisine re-
commandés par les fabricants contiennent des
produits chimiques qui peuvent attaquer/en-
dommager les pièces en plastique utilisées
dans cet appareil. Il est par conséquent re-
commandé d'utiliser seulement de l'eau chau-
de additionnée d'un peu de savon liquide pour
nettoyer la carrosserie de l'appareil.
Après le nettoyage, rebranchez l'appareil.
Dégivrage du congélateur
Une certaine quantité de givre se forme tou-
jours sur les clayettes du congélateur et autour
du compartiment supérieur.
Dégivrez le congélateur lorsque l'épaisseur de
la couche de givre est comprise entre 3 et
5 mm.
19
www.zanussi.com

Pour enlever le givre, suivez les instructions ci-
dessous :
• mettez l'appareil à l'arrêt et débranchez la
prise de courant
• sortez les denrées congelées, enveloppez-
les dans plusieurs feuilles de papier journal
et conservez-les dans un endroit frais
• enlevez les paniers de congélation
• enveloppez-les de papier journal.
Pour accélérer le dégivrage, placez un réci-
pient d'eau chaude (non bouillante) dans le
congélateur.
• Maintenez la porte ouverte et utilisez la spa-
tule en plastique comme gouttière en l'insé-
rant dans l'emplacement prévu à cet effet.
Placez au-dessous un récipient dans lequel
s'écoulera l'eau de dégivrage
• retirez soigneusement la glace quand elle
commence à fondre (utilisez une spatule en
bois ou en plastique)
• une fois la glace fondue, épongez et séchez
soigneusement l'intérieur du congélateur et
conservez la spatule pour une prochaine uti-
lisation.
• rebranchez l'appareil, remettez-le en service
et replacez les aliments congelés à l'inté-
rieur.
Activez la fonction Fast Freeze pendant
quelques heures pour que la température de
stockage suffisante puisse être atteinte le plus
rapidement possible.
Attention N'utilisez en aucun cas
d'objets métalliques ou tranchants pour
gratter la couche de givre sur l'évaporateur,
car vous risqueriez de le détériorer. N'utilisez
aucun dispositif mécanique ou autre moyen
artificiel pour accélérer le processus de
dégivrage hormis ceux recommandés dans
cette notice d'utilisation. Une élévation de la
température des denrées congelées, pendant
la décongélation, peut réduire leur durée de
conservation.
En cas d'anomalie de fonctionnement
Avertissement Avant de résoudre les
problèmes, débranchez l'appareil.
La résolution des problèmes, non mentionnés
dans le présent manuel, doit être
exclusivement confiée à un électricien qualifié
ou une personne compétente.
Anomalie Cause possible Solution
L'appareil ne fonctionne
pas. Le voyant de fonc-
tionnement ne clignote
pas.
L'appareil est à l'arrêt. Mettez l'appareil en fonctionnement.
La fiche n'est pas correctement
branchée sur la prise de courant.
Branchez correctement la fiche sur
la prise de courant.
Le courant n'arrive pas à l'appareil.
La prise de courant n'est pas ali-
mentée.
Branchez un autre appareil électri-
que sur la prise de courant.
Faites appel à un électricien qualifié.
20
www.zanussi.com
La page est en cours de chargement...
La page est en cours de chargement...
La page est en cours de chargement...
La page est en cours de chargement...
La page est en cours de chargement...
La page est en cours de chargement...
La page est en cours de chargement...
La page est en cours de chargement...
-
 1
1
-
 2
2
-
 3
3
-
 4
4
-
 5
5
-
 6
6
-
 7
7
-
 8
8
-
 9
9
-
 10
10
-
 11
11
-
 12
12
-
 13
13
-
 14
14
-
 15
15
-
 16
16
-
 17
17
-
 18
18
-
 19
19
-
 20
20
-
 21
21
-
 22
22
-
 23
23
-
 24
24
-
 25
25
-
 26
26
-
 27
27
-
 28
28


Zanussi ZFU27400XA Manuel utilisateur
- Catégorie
- Congélateurs
- Taper
- Manuel utilisateur
dans d''autres langues
- English: Zanussi ZFU27400XA User manual
Documents connexes
-
Zanussi ZFU27400XA Manuel utilisateur
-
Zanussi ZFC103 Manuel utilisateur
-
-
-
Zanussi ZFC21400WA Manuel utilisateur
-
-
-
Zanussi ZFU25200XA Manuel utilisateur
-
-
